1
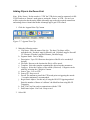
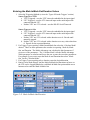
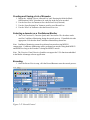
Argus 200/250
“Next-Generation” PCI MPEG-2 Encode
Ver. 3.X
Installation and User Guide
Argus 250 Encoder Model 2000-0190
Argus 200 Encoder Model 2000-0190-1
2
Table of Contents
Table of Contents................................................................................................................ 2
List of Figures ..................................................................................................................... 3
Chapter 1............................................................................................................................. 4
Getting Started.............................................................................................................. 4
Argus 200/250 Features .............................................................................................. 4
The CineView Pro XLe Decoder................................................................................ 4
Argus 200/250 Minimum System Requirements .................................................. 5
Service Pack Availability ......................................................................................... 5
Software Requirements........................................................................................... 5
Hardware and Driver Installation ........................................................................... 5
Preliminary Software Installation Procedures.................................................. 5
Installing Hardware Drivers (manual install) ...................................................... 6
Software Installation ................................................................................................ 8
Changing or Uninstalling Vela Software ............................................................. 10
Product Licensing................................................................................................... 11
Argus 200/250 Performance Issues ..................................................................... 11
Error Codes ............................................................................................................. 11
Customer Support .................................................................................................. 11
llustrations................................................................................................................. 12
Chapter 2........................................................................................................................... 14
Encoding Using the Media Advantage Software................................................... 15
Launching the Media Advantage Software............................................................... 15
Browsing to the Argus 200 Node.............................................................................. 15
Creating a New Template ......................................................................................... 15
Types of Encode Sources.......................................................................................... 19
Types of Encode Triggers......................................................................................... 19
Adding Clips to the Record List ............................................................................... 21
Entering the Mark-In/Mark-Out/Duration Values .................................................... 23
Creating and Saving a List of Encodes ..................................................................... 24
Selecting a decoder as a Confidence Monitor........................................................... 24
Encoding ................................................................................................................... 24
Appendix A....................................................................................................................... 26
Specifications.............................................................................................................. 26
Argus 200/250 Model 2000-0190 Encoder Board ............................................ 26
System Requirements ....................................................................................... 26
Supported Formats ............................................................................................ 26
Video Features ................................................................................................... 26
Audio Features ................................................................................................... 26
Physical................................................................................................................ 27
Power Requirements ......................................................................................... 27
External Connectors .......................................................................................... 27
Operating Environment ..................................................................................... 27
Appendix B ....................................................................................................................... 28
Vela Error Codes........................................................................................................ 28
3
Appendix C ....................................................................................................................... 29
Argus 200/250 Encode Parameters/Properties..................................................... 29
Appendix D....................................................................................................................... 30
Notes on Encoding MPEG4...................................................................................... 30
MPEG4 Compression in a MPEG2 Transport Stream ............................................. 30
MPEG4 Compression in the MP4 File Format......................................................... 30
Playback of Files Containing MPEG4 Compression................................................ 30
Appendix E ....................................................................................................................... 31
VTR RS-422 Cable Connections ............................................................................. 31
List of Figures
Figure 1-1. Installation Wizard Welcome Screen............................................................... 9
Figure 1-2. Vela System Software Setup Screen ................................................................ 9
Figure 1-3. Installation Wizard Complete Screen............................................................. 10
Figure 1-4. Application Maintenance Screen ................................................................... 11
Figure 1-5. Argus 200/250 Board Layout......................................................................... 12
Figure 1-6. Argus 200/250 Cable Assembly P/N 6000-0190 ........................................... 13
Figure 1-7. Argus 200/250 Input Cable Assembly Pinout Diagram................................. 14
Figure 2-1. MediaAdvantage Servers ............................................................................... 15
Figure 2-2. Select New Template ..................................................................................... 16
Figure 2-3. Select Template Based On ............................................................................. 17
Figure 2-4. Setting Template Input Properties.................................................................. 17
Figure 2-5. Setting Template Encode2 Properties ............................................................ 18
Figure 2-6. Setting Template Encode1 Properties ............................................................ 19
Figure 2-7. Append New Clip........................................................................................... 21
Figure 2-8. Add Record Clip Dialog................................................................................. 22
Figure 2-9. VTR Error ...................................................................................................... 22
Figure 2-10. VTR Controls ............................................................................................... 22
Figure 2-11. Mark-In/Mark-Out/Duration ........................................................................ 23
Figure 2-12. Record Control ............................................................................................. 24
Figure E-1. RS-232/422 Connections ............................................................................... 31
4
Chapter 1
Getting Started
Argus 200/250 Features
• VITC/LTC input
• Real-time encoding and multiplexing in MPEG-2 and
MPEG-4 Profile formats
• Runs under Linux & Windows XP Professional
• PAL and NTSC television formats
• Sony 9-pin machine control via MediaAdvantage
• Multi-board capability supported via SDK
• Composite video input and component serial
Digital video input (SMPTE 259M)
• YUV component input
• Closed caption support EIA-608B
• Embedded audio in the SDI steam
• Dolby® Digital bitstream pass-through audio
• Easy to use and intuitive end-user GUI includes the
Powerful RecordAdvantage module from Vela’s
MediaAdvantage Lite software
• 32-bit Linux or Windows COM Software Developer’s Kit
is available for custom applications are included
• DVB/ASI output
The CineView Pro XLe Decoder
A worthy companion to the Argus 200/250 encoder, the CineView Pro XLe decoder is Vela's secondgeneration professional PCI MPEG-2 decoder. Based on the latest decoding technology available, the
CineView Pro XLe supports advanced features such as SMPTE time code output, embedded audio
within the SDI output stream, four-channel audio decoding, and Dolby® Digital audio decoding and
compressed audio output.
The CineView Pro XLe supports PCI bus mastering, optional hardware VCXO for push model
streaming applications, and dual time base support for genlock and push model simultaneously. The
Pro XLe retains many of the features of the CineView Pro XL MPEG-2 decoder such as digital video
output (SMPTE 259M) as well as composite NTSC and PAL video. The Pro XLe supports MPEG-2
data rates up to 50Mbps. Stream parsing is performed on board.
For more information on the CineView Pro XLe decoder, consult the "CineView Pro XLe Decoder
Installation and User Manual" included on the system CD. A full-featured SDK is available from Vela
for those wishing to develop custom applications using the CineView Pro XLe decoder. Contact Vela
for details.
5
Argus 200/250 Minimum System Requirements
•
•
•
•
•
•
Microsoft® Windows® Windows XP Professional or Linux O/S
2.4 GHz IBM® PC-compatible Pentium or equivalent
512 MB RAM, plus RAM used by video server application
Fast (7200 RPM) IDE, serial ATA or fast/wide SCSI drive recommended
CD-ROM or DVD-ROM drive (for installation of system files)
200MB available hard disk space (for MediaAdvantage Lite installation, including
Microsoft .NET Framework and Microsoft MSDE) plus disk space for clips and
segments
Service Pack Availability
Vela no longer includes Windows operating system Service Packs with Vela system software, due to
file size constraints and the increasingly frequent need to update or patch the service packs.
To find out if your system is a candidate for a service pack or other system upgrade, and to download
the latest versions, please contact the Microsoft Web site at www.microsoft.com.
Software Requirements
• Argus 200/250 system software, version 3.2 or higher
• Argus 200/250 Encoder Software Developer's Kit (SDK), version 3.2.
• Compiler with COM support: Microsoft Visual Studio .NET is recommended.
Hardware and Driver Installation
Power off the PC, unplug it from the AC source, and remove the cover to
expose the chassis and motherboard. It is important that the Argus 200/250 encoder board be plugged
into a PCI bus master slot, making sure the edge connectors are fully engaged. Secure the board's
mounting bracket to the PC chassis. Connect the audio and video cables as needed, and power up the
PC as usual.
The audio/LTC cable assembly, part number 6000-0190, connects to the 26-pin D-sub connector on
the rear of the encoder. See illustrations at the end of this chapter for connector drawings and pinouts,
and an outline of the board itself.
Preliminary Software Installation Procedures
All of the software that you need to install the Argus 200/250 is located on the single CD-ROM. Just
follow these steps, remembering that a number of reboots may be required during the installation
process. Do not remove the CD-ROM disc from the drive until you've completed the last step.
1. Uninstall any Argus (and CineView) software currently on the system. Use the Windows Control
Panel > Add/Remove Programs application, following instructions in the user manual that
accompanied the already-installed software.
2. If using Windows XP all the Vela drivers will be installed automatically during the software install.
3. Install the Argus 200/250 board and power up your system, as instructed above.
4. If the "Add New Hardware Wizard" appears when you boot your system,
click Cancel.
5. If the "Digital Signature Not Found" screen appears, click Yes to continue with
installation.
6. If using Windows XP skip to “Software Installation” section. If using Windows 2000
perform the “Installing Hardware Drivers section.
6
Installing Hardware Drivers (manual install)
1.
If you have never installed the Argus 200/250 encoder on your system, you must install the
device drivers before attempting to run the encoder. The drivers are located on the installation
CD-ROM disc, in the following folder: Drivers\Argus200. (This installation will also fulfill
the need for CineView Pro XLe drivers, should you wish to use that product.)
2.
Insert the Argus 200/250 installation CD-ROM disc into the CD-ROM Drive.
3.
Exit the System Software Setup screen (See Installation Wizard Welcome Screen) if it
appears.
4.
On your desktop, right click on My Computer and a menu should appear.
Select Properties.
Click on the tab labeled Hardware.
Click on Device Manager.
5.
6.
7.
8.
9.
10.
Search for the "Multimedia Controller" device. This device can usually be found in one of the
following directories: Sound, Video and Game Controllers,
or Other Devices. Right-click on "Multimedia Controller."
Select Properties from the Menu.
Under the General tab, click on Reinstall Driver.
Prompt: "Upgrade Device Driver Wizard." Click Next.
11.
Prompt: "Install Hardware Device Drivers." Select the radio button "Search for my suitable
driver for my device," then click Next.
12.
Prompt: "Locate Driver Files." Check "Specify a Location," uncheck everything else and
click Next, or, if you are installing the software from the CD, select the CD Drive option (if
you choose this second option, you can skip step 15.)
13.
A message box will appear that will allow you to browse your computer until you find a
driver for the Multimedia Controller. Check Browse to select the device from the following
path on the CD: \Drivers Argus200.
Click OK.
If prompted, you will need to perform these additional steps:
14.
15.
a. Prompt: "Driver Files Search Result." Message displays "Windows found a driver that is a
closer match for this device than your current driver." Click Next.
b. When the "Digital Signature Not Found" screen appears, click Yes.
c. The "Files Needed" screen will ask for "xcode2.inf." Browse the CD-ROM until you find
that driver file, then click OK.
7
16.
Insert the Argus 200/250 installation CD-ROM disc into the CD-ROM Drive.
17.
Exit the System Software Setup screen (See Installation Wizard Welcome Screen) if it
appears.
18.
On your desktop, right click on My Computer and a menu should appear.
Select Properties.
Click on the tab labeled Hardware.
Click on Device Manager.
19.
20.
21.
22.
23.
24.
Search for the "Multimedia Controller" device. This device can usually be found in one of the
following directories: Sound, Video and Game Controllers,
or Other Devices. Right-click on "Multimedia Controller."
Select Properties from the Menu.
Under the General tab, click on Reinstall Driver.
Prompt: "Upgrade Device Driver Wizard." Click Next.
25.
Prompt: "Install Hardware Device Drivers." Select the radio button "Search for my suitable
driver for my device," then click Next.
26.
Prompt: "Locate Driver Files." Check "Specify a Location," uncheck everything else and
click Next, or, if you are installing the software from the CD, select the CD Drive option (if
you choose this second option, you can skip step 15.)
27.
A message box will appear that will allow you to browse your computer until you find a
driver for the Multimedia Controller. Check Browse to select the device from the following
path on the CD: \Drivers\Argus200.
Click OK.
If prompted, you will need to perform these additional steps:
28.
29.
a. Prompt: "Driver Files Search Result." Message displays "Windows found a driver that is a
closer match for this device than your current driver." Click Next.
b. When the "Digital Signature Not Found" screen appears, click Yes.
c. The "Files Needed" screen will ask for "xcode2.inf." Browse the CD-ROM until you find
that driver file, then click OK.
1.
When the driver installation is complete and the prompt "Completing the Upgrade Device
Driver Wizard" appears, click Finish. Close the screens and
return to Device Manager.
2.
The Software Setup screen should pop up after the reboot. If it does not, run setup.exe from
the CD-ROM or Start > Run.
8
Software Installation
Be sure to review the "readme" files on the system software CD-ROM for the very latest
information on installation and performance issues.
The current version of software has been qualified to run under Windows XP Pro (SP 2) or. Windows
NT, Windows 95 and Windows 98 are not supported. If you are upgrading a previous version of
software with this release, Version 3.2, you must first uninstall the existing version of Argus 200/250
software. To do so, select the "Add or Remove Programs" option on the Control Panel, select the
"Vela System Software Version 1.xxx
1. Now you're ready to install this latest version of 200/250 software. All of the
software that you need for the Argus 200/250 encoder is located on the Argus
200/250 installation CD-ROM. Just follow the steps that follow, remembering that a
number of reboots may be required during the installation process. Do not remove
the CD-ROM disc from the drive until you've completed the final step.
2. Insert the supplied system CD-ROM into the CD-ROM drive. The Vela Software
Setup screen should appear. If it does not, run setup.exe from the CD-ROM or Start >
Run. Select "Install Vela System Software."
3. Next, an Installation Wizard screen (See Installation Wizard Welcome Screen) will
appear. For the most part, all the screens are self-explanatory and guide you from one
install point to the next. Click Next.
4. (See Vela System Software Setup Screen) Select the type of installation you prefer
(Typical, Complete, or Custom). At this point the required Microsoft .Net
Framework v1.1 may automatically be installed if it is not detected. Click Next.
5. The "Select Features" screen appears next (See Installation Wizard Feature Select
Screen). Select the requested features for installation by selecting the disk drive icon
displayed before each option.
Select either the "will be installed on local hard drive option" or "entire feature will
be unavailable" option. You may also select any licensed features
desired. Some options may not be currently supported. Common files will be
installed when needed. Click Next.
6. Keep the suggested location (C:\Program Files\Vela Research ) as the installation
folder for each application. Click Next.
7. The progress of the installation will be graphically displayed. Throughout the
installation, you may be asked to accept product license agreements. Please review
the license agreements and accept them if you concur.
8. (See Installation Wizard Completion Screen) The Install Wizard notifies you that the
install is complete and that it is necessary to restart your system in order for the
installation to take effect. Click OK to reboot.
9
Figure 1-1. Installation Wizard Welcome Screen
Figure 1-2. Vela System Software Setup Screen
10
Figure 1-3. Installation Wizard Complete Screen
Changing or Uninstalling Vela Software
To modify or remove Vela system software, go to the Windows Control Panel and open the
"Add/Remove Programs" application. Look for an entry containing the phrase "Vela System
Software" and click on it, then click on the "Change" button. A versatile and helpful "Application
Maintenance" screen (See Application Maintenance Screen) will appear. From this application you
can choose to:
• Change which application features are installed. Basically, it displays the Select Features
screen, explained earlier, which configures individual
features and applications.
• Reinstall corrupt or missing files, Registry keys and shortcuts. Note that preferences
stored in the Registry may be set to default values.
• Completely uninstall and remove Vela system software. If this selection is made, an
uninstall screen will appear. Click Next on the window to uninstall all Vela system
software. Note that a checkbox allows you to keep the current application database(s)
you may have created for clips, playlists, etc. Note that if the checkbox is cleared, all
Vela-specific databases will be deleted.
11
Figure 1-4. Application Maintenance Screen
Product Licensing
After you have installed your Argus 200/250 encoder software, it may be necessary
to license the product and/or software purchased, including any options such as SDKs, machine
control, etc.
From the Start menu, select Start > Programs > Vela Research > Licensing.
Enter the strings in the shaded box of the licensing form shipped with your product into the dialog box
exactly as they are given, one at a time, by selecting the + key, entering the string and pressing OK. If
you have any difficulty entering a license during the install process, you can re-enter it anytime using
this process. The new key will supersede any previous key that you may have entered.
Contact Vela technical support if you lose or require additional license keys, or if you need additional
help. See the "Customer Support" contact methods below.
Argus 200/250 Performance Issues
Please refer to the "Readme.txt" file on the Vela system CD for the latest Argus 200/250 performance
issues errata, and bug fixes, if any.
Error Codes
Occasionally the Argus 200/250 encoder may encounter a problem and report an error. In most cases
when an error occurs, the system returns an error code (usually a
negative number) and a short error message.
You can obtain an up-to-date listing of these error codes by referring to the VelaApiReference.chm
Help-formatted file located on the Vela system software CD. Look in the Help file index there under
"Vela API Error Code Table."
Customer Support
In the event of problems with your encoder, you may be able to aid trouble-shooting efforts by
referencing error codes that may appear. See the above "Error Codes" section for more information. If
the problem cannot be resolved locally, please contact Vela Customer Support as follows:
•
•
•
•
•
Toll-free: (800) 243-7855
Phone: (727) 507-5301
Fax: (727) 507-5310
E-mail: [email protected]
World Wide Web -- http://www.vela.com
12
llustrations
Figure 1-5. Argus 200/250 Board Layout
13
Figure 1-6. Argus 200/250 Cable Assembly P/N 6000-0190
14
Figure 1-7. Argus 200/250 Input Cable Assembly Pinout Diagram
Chapter 2
15
Encoding Using the Media Advantage Software
Launching the Media Advantage Software
1. Double Click the ‘Media Advantage’ icon on the desktop or go to Start >
Programs > Vela Research > Media Advantage and launch the Media Advantage
application.
2. If you have a Media Advantage ‘Server’ license you be required to enter a user
name and password. The default username and password are:
User Name: admin
Password: vela
Once logged in the default ‘admin’ password can be changed by selecting
‘Account…’ from the ‘Tools’ menu in Media Advantage if desired.
Browsing to the Argus 200 Node
Currently both the Argus 200 and the Argus 250 are labeled as ‘Argus 200’ in the Media
Advantage application.
1. In the Media Advantage Servers window expand the ‘Record Advantage’ node.
2. Click on the ‘Argus 200’ icon. This will enable the Argus 200 for use.
Figure 2-1. MediaAdvantage Servers
Creating a New Template
The Media Advantage Software employs templates as a convenient way of retaining
encoding parameters from one encode session to the next. A ‘default’ template named
‘Analog_NTSC’ is created when the Media Advantage software is installed. The
‘Analog_NTSC’ template has the following basic encode settings:
Input Video: Composite
Input Audio: Analog (2 Channel)
16
Encoder1: MPEG2 Transport Stream, CBR 5 Mbps, Closed GOP IBBP 12, 608 ATSC
Closed Captioning. Output to File on Disk.
Encoder2: Disabled.
Note: The default template ‘Analog_NTSC’ is read only and cannot be modified. User
created templates can be created, deleted, and/or modified at any time.
To Create a New Template, perform the following steps:
1. In the ‘Argus 200’ Control window select the ‘Settings’ button located above the
‘Record Control’ label.
2. Select the ‘New’ button
Figure 2-2. Select New Template
3. Enter the new template name and select a template for the ‘Based on Template’.
Note the ‘Based on Template’ selection loads the settings for template selected. These
settings are then modified for the new template.
17
Figure 2-3. Select Template Based On
For demonstrative purposes we will create a template using the SDI inputs to produce an
8 Mbps MPEG2 file using Encoder1 and an MPEG4 ‘IPOD’ compatible file for
Encoder2.
4. Expand the ‘Input’ node and make the appropriate settings. For our
demonstration we will set the Live.Video.Port to SDI and the Live.Audio.Source
to SDI
Figure 2-4. Setting Template Input Properties
5. Collapse the ‘Input’ node and expand the ‘Encode2’ node and make the
appropriate settings. For demonstration we will set:
Outport: Disk
Preset.OutputStandard: ipod (SQ)
18
Figure 2-5. Setting Template Encode2 Properties
6. Collapse the ‘Encode2’ node and expand the ‘Encode1’ node and make the
appropriate settings. For demonstration we will set:
Video.Bitrate.Nominal: 8
19
Figure 2-6. Setting Template Encode1 Properties
7. Click ‘Save’ to save the new template.
8. Once saved, user created templates can be modified or deleted at any time.
9. Return to the encoder control window by selecting the ‘Record’ tab.
Types of Encode Sources
The Media Advantage software defines two types of ‘sources’ for the encoder.
1. VTR
a. A VTR source is a source which will be controlled by the Media
Advantage software using Sony BVW Protocol over RS-422 (RS-422
straight thru cable with RS-232 to RS-422 adapter is required. See
Appendix E)
b. The VTR source can be a ‘real’ VTR or any other device that can be
controlled via Sony BVW Protocol over RS-422
c. The user will be required to enter Mark-In and Mark-out points for each
clip to be encoded in this fashion
d. The Mark-In and Mark-Out can be triggered using either VITC, LTC, or
RS-422
2. Live
a. A Live source is any source not directly controlled by the Media
Advantage software or a ‘Free Running’ source.
b. If the ‘Live’ source contains VITC or LTC these parameters can be used
to produce frame accurate encodes
c. A VTR is a ‘Live’ source if you choose to control the manually.
Types of Encode Triggers
The Argus 200/250 is designed to support triggering an encode 5 ways. Before adding
clips to the Record List it is important to understand the encode triggering mechanisms
supported by the Argus 200/250 and determine which trigger mechanism best suits your
needs.
Manual Start/Manual Stop (Live source only)
1. In this scenario the encoder is started/triggered manually and stopped manually.
The encode will run ‘infinitely’ until stopped by the user.
Manual Start/Duration Stop (Live source only)
1. In this scenario the encoder is started/triggered manually and stopped at the
requested duration. The duration is accurate to -0/+2 frames depending on
GOP structure.
VITC Triggered Start and Stop (Live or VTR source)
20
1. In this scenario the encoder is started/triggered and stopped by VITC. The
‘Source’ can either be ‘Live’ or ‘VTR’
2. VITC Accuracy is +/- 0 frames for the Mark-In and -0/+2 frames for the
Mark-Out depending on GOP structure.
LTC Triggered Start and Stop (Live or VTR source)
1. In this scenario the encoder is started/triggered and stopped by LTC.
2. LTC Accuracy is +/- 0 frames for the Mark-In and -0/+2 frames for the
Mark-Out depending on GOP structure.
.
RS-422 Triggered Start and Stop (VTR source only)
1. In this scenario the VTR is controlled by the Media Advantage software and the
encoder is started/triggered and stopped by RS-422 Serial TimeCode.
2. RS-422 Mark-In accuracy is System/VTR dependent and is NOT
recommended for ‘frame accurate’ encoding if VITC or LTC is available.
The VTR Mark-In point can be ‘calibrated’ by setting the ‘Begin Frame Adjust’
value when adding a Record Clip as discussed in the ‘Adding Clips to the Record
List’ section. Once the Mark-In has been calibrated, the Mark-Out is -0/+2
frames.
21
Adding Clips to the Record List
Note: If the ‘Source’ for the encode is ‘VTR’ the VTR device must be connected via RS232/422 and set to ‘Remote’ mode prior to setting the ‘Source’ to VTR. If it isn’t you
will be required to shut down the Media Advantage app, make the required connections
and settings, then re-launch the Media Advantage app to gain VTR control.
1. Click the ‘Append New Clip’ button
Figure 2-7. Append New Clip
2. Make the following entries
a. Clip Name: Enter the name of the clip. The base Clip Name will be
appended with _Encoder1.mpg for Encode1 and _Encoder2.mpg for Encode2
(i.e. filename_Encoder1.mpg and filename_Encoder2.mpg)
b. Segment Name: Don’t Change
c. Description: Up to 256 Character description of the file to be encoded (if
desired).
d. File Path: Browse to the location the file(s) will be stored.
e. Template: Select the template containing the desired encode parameters.
f. Category: Select the Category of the encode (if desired). Categories can be
added by selecting the ‘Categories’ button.
g. Source Type: Live or VTR
h. Source ID: Keep set at 0
i. Preroll: The amount to preroll the VTR needs prior to triggering the encode.
5 seconds (minimum) is recommended.
j. Begin Frame Adjust: Set this only if using the RS-422 Triggering method.
Enter the number of frames to’ calibrate’ the Mark-In when using RS-422
Triggering.
k. Port: The Com Port used to communicate with the VTR
l. End Frame Adjust: Not Used. Keep set at 0.
3. Select OK
22
Figure 2-8. Add Record Clip Dialog
4. If using a VTR source and you see the ‘VTR is not initialized properly’ message but
the ‘Current’ Timecode shows a valid time code from the VTR you can disregard this
message.
Figure 2-9. VTR Error
Figure 2-10. VTR Controls
23
Entering the Mark-In/Mark-Out/Duration Values
1. Select the Triggering Method (review the ‘Types of Encode Triggers’ section)
Source Type set to VTR
a. VITC Triggered: uses the VITC timecode embedded in the input signal
b. LTC Triggered: uses the LTC timecode input on the multi-input cable
connector labeled LTC.
c. Neither VITC nor LTC selected: uses the RS-422 Serial Timecode.
Source Type set to Live
a. VITC Triggered: uses the VITC timecode embedded in the input signal
b. LTC Triggered: uses the LTC timecode input on the multi-input cable
connector labeled LTC.
c. Neither VITC nor LTC selected with a duration set to 0: Encode until
manually stopped.
d. Neither VITC nor LTC selected with a duration set to any value other than
0: Encode for the requested duration.
2. For Trigger Types requiring a Mark-In and Mark-Out select the ‘Calculate Mode’
desired. There are three parameters the encoder is expecting: Mark-In, MarkOut, and Duration. The Media Advantage can calculate the third parameter if
given two of the parameters. The ‘Calculate Mode’ tells the Media Advantage
which parameter to calculate and forces the user to enter the two other parameters.
For example if you want to enter the Mark-In and Duration then select ‘MarkOut’ for the ‘Calculate Mode’.
3. For Trigger Types requiring only a duration, enter the desired duration
4. Entries can be made directly into the Mark-In/Mark-Out/Duration text boxes or
the VTR can be Jogged/Shuttled to each Mark-In/Mark-Out point and the arrow
button used to enter the Mark-In/Mark-Out.
Figure 2-11. Mark-In/Mark-Out/Duration
24
Creating and Saving a List of Encodes
1. Repeat the ‘Adding Clips to a Record List’ and ‘Entering the Mark-In/MarkOut/Duration Values’ procedures for each clip in the list to be encoded.
2. Use the Save/Save As buttons to Save the Record List (if desired)
3. Use the ‘Open Existing List’ button to recall a saved Record List.
4. Use the ‘New List’ button to clear the Record List view.
Selecting a decoder as a Confidence Monitor
1. The Vela Cineview II, Cineview Quad, and CineviewPro XLe decoders can be
used for Confidence Monitoring during the encode process. If installed select the
appropriate Vela decoder from Confidence Monitor drop down box.
Note: Confidence Monitoring cannot be performed on encodes using MPEG4
compression. Confidence Monitoring can be performed on encodes doing both MPEG2
and MPEG4 as long as the Encoder1 is doing the MPEG2 encode.
Note: The Cineview II and Cineview Quad do not support the VGA function embedded
in the Media Advantage software application.
Encoding
1
Once the Record List is setup, click the Record Button to start the encode process.
Figure 2-12. Record Control
25
2. If ‘Encode All’ is selected all items in the Record List will be encoded. If
‘Encode Selected’ is selected only those items selected by the user will be
encoded.
3. Encode status/progress is provided by color cues, messages, and a progress bar.
26
Appendix A
Specifications
Argus 200/250 Model 2000-0190 Encoder Board
System Requirements
•
•
•
•
•
•
Microsoft® Windows® XP Professional or Linux O/S
2.4GHz IBM® PC-compatible Pentium 4 or equivalent
512 MB RAM, plus RAM used by video server application
Fast (7200 RPM) IDE, serial ATA or fast/wide SCSI drive recommended
CD-ROM or DVD-ROM drive (for installation of system files)
200MB available hard disk space (for MediaAdvantage Lite installation, including Microsoft
.NET Framework and Microsoft MSDE) plus disk space for clips and segments
Supported Formats
• MPEG-2, ML@MP, MPEG-4 Advance Simple Profile
• ISO/IEC 18818-1 (mpeg-2 Program and transport), ISO/IEC 14492-2 Level 5 (MPEG-4
asp)
• Video Bit Rate
MPEG-2 (Main Level) – 500kps to 15Mbps
MPEG-4 – 20kbps-15Mbps
Variable bit rate encoding
Video Features
•
•
•
•
•
•
•
•
•
•
VITC/LTC input
Real-time encoding and multiplexing in Mpeg-2 and Mpeg-4 formats
Runs under Linux & Windows 2000 and Windows XP
PAL and NTSC formats
Sony 9-pin machine control via MediaAdvantage
Composite video
Digital video input (SMPTE 259M)
YUV component video inputs
Closed caption support EIA-608B
Embedded audio in the SDI stream
Audio Features
• Dolby Digital bitstream pass-through audio
• DOLBY DIGITAL 2.0
• Easy to use and intuitive end-user GUI includes the powerful RecordAdvantage module
from Vela’s MediaAdvantage Lite Software
• 32-bit Linux or Windows COM Software Developer’s Kit is available for custom application
development
Sample applications are included.
• DVB/ASI output
• Analog Audio Input
27
Physical
• ½ slot PCI form factor board
Power Requirements
• +3.3VDC ±5% @ 1.2A (typ)
• +12VDC ±5% @ 0.2A (typ)
• -12VDC ±5% @ .05A (typ)
External Connectors
• DVI type connector for
AES/Analog Audio
YCbCr (component)
LTC
• BNC: Composite video input
• BNC: SDI video input
• BNC: DVB/ASI output
Operating Environment
• Operating Temperature: +10°C to +40°C (+50°F to +104°F) @ 80% RH
Note: All specifications subject to change without notice.
28
Appendix B
Vela Error Codes
Occasionally the Argus 200/250 encoder may encounter and report an error. In most cases when an
error occurs, the Argus Server returns an error code (usually a negative number) and a message with
each error event that it transmits to its clients. Below are listed the encoder error codes (absolute
value) and a brief description of the errors that they represent.
When displayed, many, if not most, of the codes will have a minus sign (-)
preceding them. These notations have been left out of this table for enhanced readability. Note that
these error codes are valid for both the Argus 200/250 encoder and the CineView Pro XLe decoder.
For the most current list of error codes see VelaApiReference.chm
29
Appendix C
Argus 200/250 Encode Parameters/Properties
Properties and parameters setup in the Templates are accompanied with text describing
the property. For more information on properties or a complete list of properties
supported by the Argus 200/250 refer to the Argus200Properties.pdf located in the..\Vela
Research\Documentation directory.
30
Appendix D
Notes on Encoding MPEG4
The Argus 200/250 supports encoding MPEG4 compression in Simple Profile and
Advanced Simple Profile formats wrapped in either the MPEG2 Transport Stream format
or the MP4 container.
MPEG4 Compression in a MPEG2 Transport Stream
To obtain a file or output containing MPEG4 compression in a MPEG2 Transport Stream
make the following Template settings.
1.
2.
3.
4.
Create a new Template and set the appropriate Input parameters.
Set the Video.Format to MPEG4
Uncheck the Preset.Enable checkbox.
You can now set all parameters (except Stream.Format) as desired. The
Stream.Format parameter must remain set at A/V TS.
5. Save the Template
6. Encodes using this template will use MPEG4 compression in a MPEG2 Transport
Stream.
MPEG4 Compression in the MP4 File Format
To obtain a file or output containing MPEG4 in the MP4 File Format make the following
Template settings.
1. Create a new Template and set the appropriate Input parameters.
2. Set the Preset.OutputStandard to ipod (SQ)
3. Uncheck the Preset.Enable checkbox
4. You can now set the all parameters (except Stream.Format) as desired. The
Stream.Format parameter must remain set at A/V PS.
5. Save the Template.
6. Encodes using this template will create MPEG4 compression in the MP4 file
format.
Note: All encoded files are given the .mpg extension. For playback of MP4 files in some
software decoders (e.g. Apple QuickTime) you must change the file extension from .mpg
to .mp4
Playback of Files Containing MPEG4 Compression
The Media Advantage application does not currently support playback of files using
MPEG4 compression. There are numerous free software based decoders available for
playing back MPEG4 based files including RealPlayer®, Apple QuickTime®, and
Elecard MPEG Player®.
31
Appendix E
VTR RS-422 Cable Connections
Figure E-1. RS-232/422 Connections