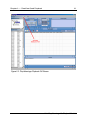
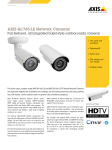
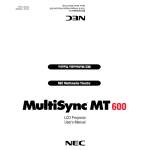
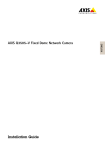
1
CineView ® Quad
4-Channel PCI MPEG-2 A/V Decoder
Model 2000-0175
Installation and User Guide
Version 2.3
Document Part Number 9050-0175
Copyright 2005 Vela Research LP. All rights reserved.
CineView is a registered trademark of Vela Research LP.
This manual is written and published by Vela Research LP (Vela). All rights
reserved. Vela reserves the right to make changes to this manual and to the
product(s) represented without notice. No portion of this manual may be
copied, reproduced, or transcribed without the express written authorization
of Vela.
All brand names, product names, or trademarks appearing in this manual
are registered to the respective companies or organizations that
own the names or trademarks.
Vela OEM Products Division
5733 Myerlake Circle
Clearwater, FL 33760
Phone: (727) 507-5300
Fax: (727) 507-5310
Vela is a member of the PCI
Special Interest Group,
Vendor ID No. 0x127D
World Wide Web – http://www.vela.com
Mailing/Shipping Address: 5733 Myerlake Circle, Clearwater, FL 33760-2804
All returns must be accompanied by an authorized
RMA number obtained from Vela.
Published in the United States of America June, 2005
Rev. CVQ-0506-006
Table of Contents
List of Figures and Tables . . . . . . . . . . . . . . . . . . . . . . . . . . . . . . . . . . . . . . .iii
Chapter 1
Getting Started. . . . . . . . . . . . . . . . . . . . . . . . . . . . . . . . . . . . . . . . . . . . . . . . . 1
Introduction . . . . . . . . . . . . . . . . . . . . . . . . . . . . . . . . . . . . . . . . . . . . . . . . . . . . . . 1
CineView Quad Features . . . . . . . . . . . . . . . . . . . . . . . . . . . . . . . . . . . . . . . . . . . 2
Hardware & Performance Features . . . . . . . . . . . . . . . . . . . . . . . . . . . . . . . . . . . . 2
Video & Audio Playback Features . . . . . . . . . . . . . . . . . . . . . . . . . . . . . . . . . . . . . 3
Software Development Features . . . . . . . . . . . . . . . . . . . . . . . . . . . . . . . . . . . . . . 3
Minimum System Requirements . . . . . . . . . . . . . . . . . . . . . . . . . . . . . . . . . . . . . . 3
EMI Certification Note . . . . . . . . . . . . . . . . . . . . . . . . . . . . . . . . . . . . . . . . . . . . . . 4
Service Pack Availability . . . . . . . . . . . . . . . . . . . . . . . . . . . . . . . . . . . . . . . . . . . . 4
Hardware Installation . . . . . . . . . . . . . . . . . . . . . . . . . . . . . . . . . . . . . . . . . . . . . . 5
CineView Quad Decoder Board Installation . . . . . . . . . . . . . . . . . . . . . . . . . . . . . 5
Jumper Settings. . . . . . . . . . . . . . . . . . . . . . . . . . . . . . . . . . . . . . . . . . . . . . . . . . . 6
Hardware Driver and Software Installation . . . . . . . . . . . . . . . . . . . . . . . . . . . . . . 6
Preliminary Software Installation Procedures . . . . . . . . . . . . . . . . . . . . . . . . . . . . 6
Installing Hardware Drivers . . . . . . . . . . . . . . . . . . . . . . . . . . . . . . . . . . . . . . . . . . 7
Driver Installation on a Windows 2000 (SP 4) or Windows XP System . . . . . 7
Driver Installation Difficulties . . . . . . . . . . . . . . . . . . . . . . . . . . . . . . . . . . . . . . 9
Vela System Software Installation . . . . . . . . . . . . . . . . . . . . . . . . . . . . . . . . . . . . 10
Changing or Uninstalling Vela Software . . . . . . . . . . . . . . . . . . . . . . . . . . . . . . . 14
Product Licensing . . . . . . . . . . . . . . . . . . . . . . . . . . . . . . . . . . . . . . . . . . . . . . . . 15
Customer Support . . . . . . . . . . . . . . . . . . . . . . . . . . . . . . . . . . . . . . . . . . . . . . . . 15
Illustrations . . . . . . . . . . . . . . . . . . . . . . . . . . . . . . . . . . . . . . . . . . . . . . . . . . . . . 16
Chapter 2
CineView Quad Playback . . . . . . . . . . . . . . . . . . . . . . . . . . . . . . . . . . . . . . . 19
Playback Applications . . . . . . . . . . . . . . . . . . . . . . . . . . . . . . . . . . . . . . . . . . . . . 19
CineViewClient Startup and Playback . . . . . . . . . . . . . . . . . . . . . . . . . . . . . . . . . 19
Setting CineViewClient Decoder Properties . . . . . . . . . . . . . . . . . . . . . . . . . . . . 20
Vela PlayAdvantage Lite Playback Module . . . . . . . . . . . . . . . . . . . . . . . . . . . . 20
Appendix A
Specifications . . . . . . . . . . . . . . . . . . . . . . . . . . . . . . . . . . . . . . . . . . . . . . . . 23
Index . . . . . . . . . . . . . . . . . . . . . . . . . . . . . . . . . . . . . . . . . . . . . . . . . . . . . . . . 25
Table of Contents
List of Figures and Tables
Chapter 1
Getting Started. . . . . . . . . . . . . . . . . . . . . . . . . . . . . . . . . . . . . . . . . . . . . . . . . 1
Figure 1-1. Initial Device Manager Screen . . . . . . . . . . . . . . . . . . . . . . . . . . . . . . 8
Figure 1-2. Device Manager Screen Following Driver & Software Install. . . . . . 10
Figure 1-3. Installation Wizard Welcome Screen . . . . . . . . . . . . . . . . . . . . . . . . 12
Figure 1-4. Installation Wizard Setup Screen. . . . . . . . . . . . . . . . . . . . . . . . . . . 12
Figure 1-5. Installation Wizard Feature Select Screen. . . . . . . . . . . . . . . . . . . . 13
Figure 1-6. Installation Wizard Completion Screen . . . . . . . . . . . . . . . . . . . . . . 13
Figure 1-7. Vela Application Maintenance Screen . . . . . . . . . . . . . . . . . . . . . . . 14
Figure 1-8. CineView Quad Decoder Board Layout . . . . . . . . . . . . . . . . . . . . . . 16
Figure 1-9. CineView Quad DB-44 Connector Pinout . . . . . . . . . . . . . . . . . . . . 17
Figure 1-10.CineView Quad Multi-Cable Assembly, p/n 6000-0175. . . . . . . . . . 18
Chapter 2
CineView Quad Playback . . . . . . . . . . . . . . . . . . . . . . . . . . . . . . . . . . . . . . . 19
Figure 2-1. CineViewClient Playback Application Main Screen . . . . . . . . . . . . . 19
Figure 2-2. PlayAdvantage Playback GUI Screen . . . . . . . . . . . . . . . . . . . . . . . 21
Appendix A
Specifications . . . . . . . . . . . . . . . . . . . . . . . . . . . . . . . . . . . . . . . . . . . . . . . . 23
Index . . . . . . . . . . . . . . . . . . . . . . . . . . . . . . . . . . . . . . . . . . . . . . . . . . . . . . . . 25
List of Figures and Tables
Chapter 1
Getting Started
Introduction
Welcome to Version 2.3 of the CineView® Quad decoder, Model 2000-0175
decoder. This is Vela’s next-generation half-size, PCI-based A/V decoder that
supports four independent channels of high-quality MPEG-1 and MPEG-2
decoded audio and video. Using highly integrated decoder technology, the
CineView Quad minimizes CPU utilization through efficient hardware and
software optimization.
Multi-board capability is possible with the Quad, allowing users to scale up to
four Quad decoders within a single PC, resulting in a total of 16 channels.
The CineView Quad supports playback data rates up to 15 Mbps.
A convenient A/V breakout cable plugs into the back of the Quad board for audio
and video output needs. Video output consists of composite, YUV/RGB and
S-video. PAL to NTSC television standards conversion allows video to be played
on studio picture monitors independent of video format. Audio support for the
Quad includes analog stereo, S/PDIF and Dolby® digital bitstream output.
The CineView Quad runs on Microsoft® Windows® and Linux and includes a new
easy-to-use GUI (Graphical User Interface) with the PlayAdvantage™ Lite playback module from Vela’s new multi- functional MediaAdvantage® Lite user software. Among its many features, PlayAdvantage allows for effortless playlist
preparation with drag-and-drop functionality and file import capabilities.
Also supplied with the CineView Quad decoder is a convenient sample playback
application, CineViewClient, from which MPEG files can be set up and viewed.
It allows you to control most of the available functions of the CineView Quad.
NOTE: Sample applications such as “CineViewClient” are included for development
purposes only and, as shipped, are not designed or certified as production applications.
CineView Quad software development tools include Software Developer’s Kits
(SDKs) for Linux (Red Hat) and Windows. Support for Microsoft DirectShow®
is also included. Comprehensive, up-to-date SDK information and documentation
can be found by examining the VelaApiReference.chm Help-formatted file
located in the Vela system software CD-ROM.
NOTE: “CineView,” “MediaAdvantage,” and “PlayAdvantage” are trademarks or registered
trademarks of Vela LP. “Dolby” is a registered trademark of Dolby Laboratories. All other
trademarks, brand names, or product names appearing in this publication are registered
to the respective companies or organizations that own the trademarks or brand names.
Introduction
2
CineView Quad Decoder Installation and User Guide
Note that much of this information and functionality also applies to Vela’s
CineView II decoder, Model 2000-0177, except that the CV-II is single-channel.
NOTE: Be sure to review the “readme” files on the system software CD-ROM for
the very latest information on installation and performance issues.
CineView Quad Features
Hardware & Performance Features
• Standard half-size PCI form factor
• Four channel MPEG decoder on a single board
• Multiboard support: up to 16 total playback channels within a single PC
• External video sync lock
• PCI Bus mastering for low CPU utilization
• 33/66 MHz, 32-bit PCI Bus support
• Uses only one PCI slot and one shared IRQ
• Low power consumption. Support for universal 3.3v and 5.0v PCI slots.
• Interlace to progressive conversion: scaling to 480p, 720p, and 1080i
• Analog and digital audio
• Trick modes: pause, fast forward, slow, rewind
• Video outputs include interlaced or progressive, NTSC or PAL composite
and S-video (Y/C), and YUV/RGB.
• Scan and frame-rate conversion of NTSC to PAL and PAL to NTSC
• ON-SCREEN DISPLAY (OSD)
– Full or part-screen graphic display with full control; overlays video
with text messages or graphics
– Alpha blending for smooth graphic and text mixing
– 256-color selectable palette out of 16.7 million colors
– Region highlight feature for creating interactive menus with highlights
• Runs under Windows 2000, XP, or Linux (Red Hat 7.2 and compatible)
• Support for Microsoft DirectShow® 6.0
• PlayAdvantage user application software module from MediaAdvantage Lite
CineView Quad Features
Chapter 1 — Getting Started
3
Video & Audio Playback Features
• Plays MPEG-1 and MPEG-2 streams
• Playback data rates up to 15 Mbps for NTSC, 12 Mbps for PAL
• MPEG audio layers 1 and 2
• Dolby (AC-3) bitstream out
• S/PDIF audio
• Sampling rates: 32 kHz, 44.1 kHz, 48 kHz and 96 kHz
• Supports data rates up to 384 Kbps
• Unbalanced analog stereo audio output
• Frequency response: 20 Hz to 22 kHz, ±0.5dB
• Software adjustable volume control
• BNC connector for external sync input
• A/V breakout cable mates with DB-44 and supports:
4 ea. composite video (1v p-p, 75-ohm)
4 ea. S-video (1v p-p, 75-ohm)
4 ea. pairs of analog stereo audio
4 ea. S/PDIF digital audio
Software Development Features
•
•
•
•
Microsoft Windows and Linux support (Red Hat 7.2)
Windows: Microsoft DirectShow and COM APIs are available
Linux: C / C++ shared libraries are available
Easy to use Software Development Kit (optional). Powerful API includes a
modifiable sample application. (Note that Vela SDK sample applications are
included for development purposes only and, as shipped, are not designed or
certified as production applications.) Includes full support for the CineView
Quad’s advanced decoder chip. Includes complete HTML documentation.
Minimum System Requirements
• Microsoft® Windows® 2000, 2000 Server, 2003 Server, XP or Linux
(Version 2.4 kernel).
• 800 Mhz IBM® PC-compatible Pentium® or equivalent; dual processors
recommended when transcoding.
Minimum System Requirements
4
CineView Quad Decoder Installation and User Guide
• 256 MB RAM, plus RAM used by video server application, if applicable.
• Fast (7200 RPM) IDE, serial ATA or fast/wide SCSI drive recommended.
• CD-ROM or DVD-ROM drive (for installation of system files).
• 200MB available hard disk space (for MediaAdvantage Lite installation,
including Microsoft .NET Framework and Microsoft MSDE) plus disk
space for clips and segments.
• Plug and Play BIOS support.
• PCI-compliant VGA controller with accessible linear frame buffer (support
for high bit 16 or high bit 24 required).
EMI Certification Note
Vela does not certify EMI requirements for cable lengths greater than one meter
(39”). This includes network cables, keyboard extension cables, etc.
Service Pack Availability
Vela no longer includes Windows operating system Service Packs with Vela
system software, due to file size constraints and the increasingly frequent need to
update or patch the service packs.
To find out if your system is a candidate for a service pack or other system
upgrade, and to download the latest versions, please contact the Microsoft Web
site at www.microsoft.com.
EMI Certification Note
Chapter 1 — Getting Started
5
Hardware Installation
WARNING!
Hazardous electrical voltages may be present in your computer
when its cover is removed for installation of this decoder. Follow
proper safety procedures during installation. Remove all power
from the computer before installing the decoder board.
STATIC DISCHARGE CAUTION
To avoid damage to the decoder from static discharge, keep the board in its
protective bag until ready to be installed. If possible, use an antistatic strap
when handling the decoder board. Avoid touching components and edge
connectors.
CineView Quad Decoder Board Installation
1. Power off the PC, unplug it from the AC source, and remove the cover or
cabinet to expose the chassis and motherboard.
2. Configure decoder board jumpers if needed. See “Jumper Settings,” page 6.
3. It is important that the CineView Quad decoder board be plugged into a PCI
bus master slot, making sure the edge connectors are fully engaged. Secure the
board’s mounting bracket to the PC chassis. Replace the PC’s cabinet or cover.
4. Connect an external sync source to the BNC connector on the rear of the
decoder, if desired.
5. Connect the audio and video multicable, part number 6000-0175, to the 44-pin
D-connector on the rear of the board. Then route the individual, channel-specific
A/V cables as desired. Pinout information and drawings for the 44-pin D-connector
can be found in Figure 1-9. A view of the cable can be found in Figure 1-10.
NOTE: The multicable output cables for each type of signal are factory numbered from
1– 4 so that proper output channel continuity can be maintained. Please note that,
depending on the operating system used and how the BIOS configures the decoder,
the system software may see the output channel order differently (for example, 1-3-24). Output channel numbering is different for Windows and for Linux, and can differ
even among various Windows versions. However, once installed, the output channel
sequence, as determined by the particular operating system, will remain in place under
that operating system.
Hardware Installation
6
CineView Quad Decoder Installation and User Guide
Jumper Settings
The following CineView Quad jumpers and header connectors can be configured
as indicated, depending on the video format and output type desired. Note that J2,
J4, J5, and J6 set the video output type for each of the four output channels.
See Figure 1-8, page 16, for location of these jumpers.
JP2: PAL enable. Install jumper for PAL source synclock.
JP3: Synclock termination enable. Install jumper for 75-ohm termination.
J2:
Selects YUV/RGB/S-video/composite or S-video/composite.
Pins 1, 2 for YUV, RGB, S-video, and composite
Pins 2, 3 for S-video and composite only
J4:
Selects YUV/RGB/S-video/composite or S-video/composite.
Pins 1, 2 for YUV, RGB, S-video, and composite
Pins 2, 3 for S-video and composite only
J5:
Selects YUV/RGB/S-video/composite or S-video/composite.
Pins 1, 2 for YUV, RGB, S-video, and composite
Pins 2, 3 for S-video and composite only
J6:
Selects YUV/RGB/S-video/composite or S-video/composite.
Pins 1, 2 for YUV, RGB, S-video, and composite
Pins 2, 3 for S-video and composite only
Hardware Driver and Software Installation
Preliminary Software Installation Procedures
NOTE: If you intend to run Windows 2000 as your operating system, it is recommended
that Service Pack 4 be installed for proper Vela system software operation. See Step 2
below if you need to install Service Pack 4.
All of the software that you need to install the CineView Quad decoder is located
on a single CD-ROM. Just follow these steps, remembering that a number of
reboots may be required during the installation process. Do not remove the
CD-ROM disc from the drive until you've completed the last step.
1. Uninstall any CineView Pro and Argus software currently on the system. Use
the Windows Control Panel > Add/Remove Programs application, following
instructions in the user manual that accompanied the already-installed software.
Hardware Driver and Software Installation
Chapter 1 — Getting Started
7
2. For Windows 2000, install Windows 2000 Service Pack 4, if it is not already
installed on your system. You can download this service pack and its installation
instructions from the Microsoft Web site on the Internet.
3. Following installation of SP 4, install the CineView Quad drivers and
application-level software (see below).
Installing Hardware Drivers
Driver Installation on a Windows 2000 (SP 4) or Windows XP System
If you have never before installed the CineView Quad decoder on your system, you
must install the device drivers. The drivers are located on the installation CD-ROM
disc, in the following folder: Drivers\Cineview II and Quad.
NOTE: As noted in the steps below, you will need to perform parts of this procedure
four times to install the four separate drivers required for the Quad decoder.
1. Be sure the CineView Quad decoder is installed per above instructions.
2. Power up the system. If the “Add New Hardware Wizard” appears when you
boot your system, click Cancel. (You may see this screen four times, once for
each of the four Quad drivers you install.)
3. Insert the Vela System Software CD-ROM disc into the CD drive.
4. Exit the Vela System Software Setup screen (Figure 1-3) if it appears.
5. On your desktop, right click on My Computer and a menu should appear.
Select Properties.
6. Click on the tab labeled Hardware.
7. Click on Device Manager. A screen will appear, similar to that in Figure 1-1.
Hardware Driver and Software Installation
8
CineView Quad Decoder Installation and User Guide
Figure 1-1. Initial Device Manager Screen
8. Search for the “Multimedia Controller.” This device can usually be found in
one of the following directories: Sound, Video and Game Controllers, or Other
Devices. Right-click on “Multimedia Controller.”
9. Select Properties from the Menu.
10. Under the General tab, click on Reinstall Driver.
11. Prompt: “Upgrade Device Driver Wizard.” Click Next.
12. Prompt: “Install Hardware Device Drivers.” Select the radio button “Search
for my suitable driver for my device,” then click Next.
13. Prompt: “Locate Driver Files.” Check “Specify a Location,” uncheck everything else and click Next, or, if you are installing the software from the CD, select
the CD Drive option (if you choose this second option, you can skip step 15.)
14. A message box will appear that prompts you to browse your computer until
you find a driver for the Multimedia Controller. Check Browse to select the
device from the following path on the CD: Drivers\Cineview II and Quad. The
driver file is named “Symphony.inf.” (Same for all four drivers.) Click OK.
15. If prompted, you will need to perform these additional steps:
a. Prompt: “Driver Files Search Result.” Message displays “Windows
Hardware Driver and Software Installation
Chapter 1 — Getting Started
9
found a driver that is a closer match for this device than your current
driver.” Click Next.
b. When the “Digital Signature Not Found” screen appears, click Yes.
16. When the driver installation is complete and the prompt “Completing the
Upgrade Device Driver Wizard” appears, click Finish. Close the screens and
return to Device Manager. Do not reboot the computer at this time.
17. Return to Step 7 to load the second CineView Quad driver, and do so again
for the third and fourth. Do not reboot until the final (fourth) driver is installed.
18. When the four CineView Quad drivers have been installed properly, and the
Device Manager screen appears, you may notice exclamation marks on the names
of the new drivers. Following Vela system software installation, which starts on
page 10, the exclamation marks will disappear and the resultant Device Manager
screen will look similar to that in Figure 1-2. Note that the Quad decoder drivers
will carry the name of “Sigma Designs Symphony MPEG Decoder.”
19. Reboot the computer.
20. The Vela System Software Setup screen should appear after the reboot.
If it does not, run setup.exe from the CD-ROM or Start > Run.
Driver Installation Difficulties
If you experience difficulty installing the drivers under Windows 2000 with
Service Pack 4 please try the following steps.
1. From Start > Run, run gpedit.msc. This will launch the Group Policy Editor.
2. Go to Local Computer Policy > Computer Configuration > Windows Settings
> Security Settings > Local Policies > Security Options.
3. Change the policy for “Unsigned driver installation behavior” to “Warn but
allow install.”
4. Close the Group Policy Editor, reboot the computer, and re-install the driver.
Hardware Driver and Software Installation
10
CineView Quad Decoder Installation and User Guide
Figure 1-2. Device Manager Screen Following Driver & Software Install
Vela System Software Installation
Be sure to review the “readme” files on the system software CD-ROM for the
very latest information on installation and performance issues.
The current version of software has been qualified to run under Windows 2000 (SP
4) or Windows XP. Windows NT, Windows 95 and Windows 98 are not supported.
Note that first-generation PCI decoders such as the CineView Pro, the Pro XL
and the Pro LE are not supported with the software included in this release.
Windows 2000 users should install Service Pack 4. See page 6 for SP 4 installation.
If you are upgrading a previous version of software with this release, Version 2.3,
you must first uninstall the existing version of CineView Quad software if you
haven’t already done so. To do so, select the “Add or Remove Programs” option on
the Control Panel, select the name “CineView Quad, then click “Change/Remove.”
After the previous version has been removed, you're ready to install this latest
version of Vela software. All the software you need for the CineView Quad
decoder is located on the installation CD. Just follow the steps that follow,
noting that several reboots may be required during the installation process.
Do not remove the CD from the drive until you've completed the final step.
Hardware Driver and Software Installation
Chapter 1 — Getting Started
11
1. Insert the supplied Vela system CD into the CD-ROM drive. A Vela System
Software Setup installation screen should appear. If it doesn’t, run setup.exe from
the CD. Select “Install Vela System Software.”
2. Next, an Installation Wizard welcome screen (Figure 1-3) will appear. For the
most part, all the screens are self-explanatory and guide you from one install
point to the next. Click Next.
3. (Figure 1-4) Select the type of installation you prefer (Typical, Complete,
or Custom). At this point the required Microsoft .Net Framework v1.1 will
automatically be installed if it is not detected. Click Next.
4. The “Select Features” screen appears next (Figure 1-5). Select the requested
features for installation, including the CineView Quad (the selection includes the
CineView II name), by selecting the disk drive icon displayed before each option.
Select either the “will be installed on local hard drive option” or “entire feature
will be unavailable option.” You may also choose to install the CineView SDK at
this time if you have purchased it. Note that some options may not be currently
supported. Common files will be installed when needed. Click Next.
5. Keep the suggested location (C:\Program Files\Vela Research) as the installation folder for each application. Click Next.
6. The progress of the installation will be graphically displayed. Throughout the
installation you may be asked to accept product license agreements. Please review
the license agreements and accept them.
7. (Figure 1-6) The Install Wizard notifies you that the install is complete and
that it is necessary to restart your system in order for the installation to take effect.
Click OK to reboot.
Hardware Driver and Software Installation
12
CineView Quad Decoder Installation and User Guide
Figure 1-3. Installation Wizard Welcome Screen
Figure 1-4. Installation Wizard Setup Screen
Hardware Driver and Software Installation
Chapter 1 — Getting Started
13
Figure 1-5. Installation Wizard Feature Select Screen
Figure 1-6. Installation Wizard Completion Screen
Hardware Driver and Software Installation
14
CineView Quad Decoder Installation and User Guide
Changing or Uninstalling Vela Software
To modify or remove Vela system software, go to the Windows Control Panel and
open the “Add/Remove Programs” application. Look for an entry containing the
phrase “Vela System Software” and click on it, then click on the “Change” button.
A versatile and helpful “Application Maintenance” window (Figure 1-7) will
appear. From this application you can choose to:
• Change which application features are installed. Basically, it displays the
Select Features screen, explained earlier, which configures individual
features and applications.
• Reinstall corrupt or missing files, Registry keys and shortcuts. Note that
preferences stored in the Registry may be set to default values.
• Completely uninstall and remove Vela system software. If this selection is
made, an uninstall screen will appear. Click Next on the window to uninstall
all Vela system software. Note that a checkbox allows you to keep the current application database(s) you may have created for clips, playlists, etc.
Note that if the checkbox is cleared, all Vela-specific databases will be
deleted.
Figure 1-7. Vela Application Maintenance Screen
Changing or Uninstalling Vela Software
Chapter 1 — Getting Started
15
Product Licensing
After you have installed your CineView Quad software, it may be necessary to
license the product and/or software purchased, including any options such as
machine control, SDKs, etc.
From the Start menu, select Start > Programs > Vela Research > Licensing.
Enter the strings in the shaded box of the licensing form shipped with your product into the dialog box exactly as they are given, one at a time, by selecting the +
key, entering the string and pressing OK. If you have any difficulty entering a
license during the install process, you can re-enter it anytime using this process.
The new key will supersede any previous key that you may have entered.
Contact Vela technical support if you lose or require additional license keys, or if
you need additional help. See the “Customer Support” contact methods below.
Customer Support
In the event of problems with your CineView Quad 4-channel decoder, please
contact the Vela Training and Support staff as follows:
•
•
•
•
•
Toll-free: (800) 243-7855
Phone: (727) 507-5301
Fax: (727) 507-5310
E-mail: [email protected]
World Wide Web — http://www.vela.com
Product Licensing
16
CineView Quad Decoder Installation and User Guide
Illustrations
Figure 1-8. CineView Quad Decoder Board Layout
Illustrations
Chapter 1 — Getting Started
17
Figure 1-9. CineView Quad DB-44 Connector Pinout
Illustrations
18
CineView Quad Decoder Installation and User Guide
Figure 1-10. CineView Quad Multi-Cable Assembly, p/n 6000-0175
Illustrations
Chapter 2
CineView Quad Playback
Playback Applications
Supplied with the CineView Quad decoder is a convenient sample playback
application, CineViewClient, from which MPEG files can be set up and viewed.
It allows you to control most of the available functions of the CineView Quad.
NOTE: Sample applications such as “CineViewClient” are included for development
purposes only and, as shipped, are not designed or certified as production applications.
Another included application is the PlayAdvantage™ Lite module from Vela’s
new multi-functional MediaAdvantage® Lite user software. For more information
on the module, refer to“Vela PlayAdvantage Lite Playback Module,” page 20.
CineViewClient Startup and Playback
To launch the CineViewClient playback application, go to Start > Programs >
Vela Research > CineView II and Quad > CineviewClient. A full-featured playback window will appear, similar to that shown in Figure 2-1.
Figure 2-1. CineViewClient Playback Application Main Screen
Playback Applications
20
CineView Quad Decoder Installation and User Guide
Decoder Selector – Selects the desired playback decoder from this list.
System Time Code – Not currently implemented.
Stream Time Code – Not currently implemented.
MPEG File Browser – Use the browser to locate a desired MPEG playback file.
It will be displayed in the accompanying text box.
Loop – Check this box if you want the selected file to play continuously.
Buttons: Play, Pause, Slow, Step, Fast Forward, Stop – Use as needed to
start and control playback of the selected MPEG file.
Get Current State – Gets the current state of the board and displays it in the box
next to the button (i.e. initialized, playing, fast forwarding, etc).
Reset – Sends a reset command to the API.
Event Log Window – Displays recent playback actions and events.
Setting CineViewClient Decoder Properties
By going to Start > Programs > Vela Research > > CineView II and Quad > Property Client, the user can set or adjust decoder properties as desired. This can be
done concurrently with the Playback window open.
Information on setting the properties can be found by examining the VelaApiReference.chm Help-formatted file located in the Vela system software CD-ROM.
Vela PlayAdvantage Lite Playback Module
The CineView Quad supports the easy-to-use PlayAdvantage Lite module from
Vela’s new multi-functional MediaAdvantage Lite user software. Among its many
features, PlayAdvantage allows for effortless playlist preparation with convenient
drag-and-drop functionality and file import capabilities.
Start up PlayAdvantage Lite by double-clicking the desktop icon. On the lefthand side of your screen, under the MediaAdvantage Systems section, expand the
PlayAdvantage™ option. Select the desired decoder by name. (If there is more
than one decoder of the same type installed, subsequent ones will have numbers,
e.g., (2), (3) appended to the name.
This will bring up the playback window shown in Figure 2-2. If you want to
enable VGA display, click the VGA Display button in the upper left corner
(shown here with arrow), then select the desired decoder.
Refer to PlayAdvantage on-line Help for details on playback functionality.
Vela PlayAdvantage Lite Playback Module
Chapter 2 — CineView Quad Playback
21
Figure 2-2. PlayAdvantage Playback GUI Screen
Vela PlayAdvantage Lite Playback Module
Appendix A
Specifications
CineView Quad Decoder, Model 2000-0175
Video
•
•
•
•
•
•
•
Decodes MPEG-1 and MPEG-2 streams
Playback data rates up to 15 Mbps for NTSC, 12 Mbps for PAL
Signal to Noise Ratio: 65dB
Frequency response: 0 to 4.1 MHz ±5dB
Sync tip: 40 IRE ±4
Luma non-linearity: 5%
Differential phase: ±1o
Audio
•
•
•
•
•
•
MPEG audio layers 1 and 2
Dolby® (AC-3) bitstream out
Sampling rates: 32 kHz, 44.1 kHz, 48 kHz and 96 kHz
Supports data rates up to 384 Kbps
Software adjustable volume control
S/PDIF
0.5v p-p, 75-ohm
Rise and fall time: > 0.4µi measured from 10% to 90%, <10ns jitter
• Analog
Unbalanced analog stereo audio output
Reference level: 0.5v p-p ±10% (unbalanced)
Frequency response: 20 Hz to 22 kHz, ±0.5dB
THD+n: @ 20 Hz to 22 kHz < 0.5%, <10ns jitter
Connectors
• Universal PCI edge connector
• BNC connector on rear of decoder for external sync input
• A/V breakout cable mates with DB-44 and supports:
4 ea. composite video (1v p-p, 75-ohm)
4 ea. S-video (1v p-p, 75-ohm)
4 ea. pairs of analog stereo audio
4 ea. S/PDIF digital audio
Specifications
24
CineView Quad Decoder Installation and User Guide
Power Requirements
• Support for 3.3 & 5.0 volt PCI slots
Dimensions
• Standard half-size PCI form factor
• 6.5" L x 4.0” H (16.5cm L x 10.2cm H), excluding rear connectors
Minimum System Requirements
• Microsoft® Windows® 2000, 2000 Server, 2003 Server, XP or Linux
(Version 2.4 kernel)
• 800 Mhz IBM® PC-compatible Pentium or equivalent (dual processors
recommended when transcoding)
• 256 MB RAM, plus RAM used by video server application
• Fast (7200 RPM) IDE, serial ATA or fast/wide SCSI drive recommended
• CD-ROM or DVD-ROM drive (for installation of system files)
• 200MB available hard disk space (for MediaAdvantage Lite installation, including Microsoft .NET Framework and Microsoft MSDE) plus disk space for clips
and segments
Software
• Includes drivers, easy-to-use Application Programming Interface (API)
and sample applications
• Complete HTML documentation
• SDKs: Windows DirectShow, Linux, Microsoft COM
• Compatible with currently-released CineView Linux and Windows SDKs
• Runs under Linux (Red Hat 7.2), Windows 2000, and Windows XP
• File and streaming playback from supported servers
• Supports “push” and “pull” modes
• Support for Microsoft DirectShow® 6.0
• Complete HTML documentation
All specifications subject to change without notice.
Specifications
Index
A
U
AES/EBU Jumper Settings . . . . . . . . . . 6
API Information . . . . . . . . . . . . . . . 1, 20
Uninstalling Software . . . . . . . . . . . . . 14
C
VGA Display . . . . . . . . . . . . . . . . . . . . 20
Video . . . . . . . . . . . . . . . . . . . . . . . . . . 5
Video Frame Buffer . . . . . . . . . . . . . . . 4
CD-ROM Installation Disc . . . . . . . . . . 11
CineView® Decoder . . . . . . . . . . . . . . 20
CineViewClient . . . . . . . . . . . . . . . . 1, 19
Customer Support . . . . . . . . . . . . . . . 15
V
D
Decoder Properties . . . . . . . . . . . . . . . 20
DirectShow® . . . . . . . . . . . . . . . . . . . . . 2
E
Electrical Voltage Warning . . . . . . . . . . 5
H
Hardware Installation . . . . . . . . . . . . . . 5
J
Jumper Settings . . . . . . . . . . . . . . . . . . 6
L
Licensing Keys . . . . . . . . . . . . . . . . . . 15
Linux . . . . . . . . . . . . . . . . . . . . . . . . . . 3
M
®
MediaAdvantage Lite . . . . . . . . . . . . . 1
Minimum System Requirements . . . . . . 3
P
PCI Bus . . . . . . . . . . . . . . . . . . . . . . 4, 5
PlayAdvantage™ . . . . . . . . . . . . . . . . 20
PlayAdvantage Lite . . . . . . . . . . 1, 19, 20
Plug and Play . . . . . . . . . . . . . . . . . . . . 4
S
Sample Playback Application . . . . . 1, 19
SDK Guide . . . . . . . . . . . . . . . . . . . . . 20
Specifications . . . . . . . . . . . . . . . . . . . 23
Index