1
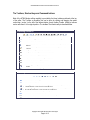
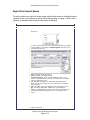
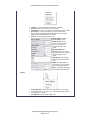
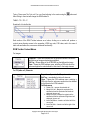
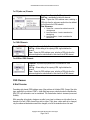
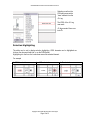
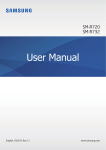
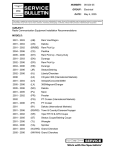
nBit HTML Editor ActiveX Control User Manual version 3.0 nBit HTML ActiveX Control Users Manual Introduction The purpose of this document is to provide a reference for developers and users of the nBit HTML Editor ActiveX control. It outlines the basics of what the control does, introduces some basic HTML concepts and describes how to use all the features the control provides. This document is not provided as a tutorial for people with absolutely no experience with WYSIWYG HTML Editors or Web Design to learn HTML. There are plenty of good web sites and books around to serve this purpose. If you have little or no experience with HTML coding concepts or webpage design then a good place to start would be sites like http://w3schools.org or www.htmldog.com/guides/htmlbeginner/. Copyright © 2004-2006 nBit Information Technologies Page 1 of 12 nBit HTML Editor ActiveX Control User Manual version 3.0 Table Of Contents Introduction Basics of HTML What does the nBit HTML Editor ActiveX do? The Toolbars, Shortcut keys and Command buttons Formatting toolbar #1 Formatting toolbar #2 The Form toolbar Accelerator Keys Right Click Context Menus The Document Object Model ( DOM ) Toolbar Overview DOM Toolbar Context Menus For TD (table cell ) Elements Cell Sub-menus For TR (table row ) Elements Row Sub-menus For TABLE Elements For All Other HTML Elements CSS Classes A Brief Overview Using Style Sheet Styles in the Editor Selection Highlighting Copyright © 2004-2006 nBit Information Technologies Page 2 of 12 1 3 3 4 4 4 5 5 6 8 8 9 9 9 10 10 10 10 10 10 11 12 nBit HTML Editor ActiveX Control User Manual version 3.0 Basics of HTML HTML – Hyper Text Markup Language. HTML is authoring language of the World Wide Web. HTML defines the structure and layout of a Web document by using a variety of markup tags and attributes These tags and attributes instruct programs like web browsers, such as Internet Explorer or Mozilla, how to layout and display a document retreived from a World Wide Web Server. The correct structure for an HTML document starts with <HTML><HEAD></HEAD> and then <BODY> and ends with </BODY></HTML>. All the information you'd like to display in a Web page fits in between the <BODY> and </BODY> tags. For example: <HTML> <HEAD> (what the document is about) </HEAD> <BODY> (what is displayed in the web browser) </BODY> </HTML> There are hundreds of other tags used to format and layout the information in a Web page. Tags are also used to specify images to display in web pages and hypertext links. These allow Web developers to direct users to other Web pages with only a click of the mouse on either an image or word(s). What does the nBit HTML Editor ActiveX do? The editor is WYSIWYG ( What You See Is What You Get ) HTML Editor. Its function is to allow the user of a windows application to edit and create HTML Markup in a visual design mode, similar to a word processor, minimizing the necessity for the user to have any HTML coding knowledge and, to provide an editable visual preview of the web-site content before publishing it to the web. The editors databound property, documentHTML, outputs the contents of the edited document between and excluding the <BODY> and </BODY> tags. This makes it possible for the editor to modify the contents of an entire web page or just sections of a page. In terms of Website Content Management Systems the resulting HTML code outputted from the editor could be stored in a database for retreival later by a server-side scripting language such as ASP, PHP, .NET, Cold Fusion etc and sent to the web browser that requested the document. Copyright © 2004-2006 nBit Information Technologies Page 3 of 12 nBit HTML Editor ActiveX Control User Manual version 3.0 The Toolbars, Shortcut keys and Command buttons Most of the HTML Markup editing capabilty is provided by the three toolbars positioned at the top of the editor. The Toolbars a moveable, this can be done by clicking and dragging the raised vertical bar ( anchor ) to the left of the leftmost button of each toolbar. Double clicking a toolbars anchor will return it to its original position. The toolbars Their functionality is described below. Formatting toolbar #1 Button Description Show Code - Toggles between HTML code and WYSIWYG Design view Print - Prints the current document Copy - Copies the current HTML selection onto the clipboard Cuts - Cuts the current HTML selection from the document and places it on the clipboard Paste - Paste the clipboard contents into the current cursor position in the document Justify Left - Left justifies the current selection Justify Center - Center justifies the current selection Justify Right - Right justifies the current selection Bold - Bolds the currently selected text Italic - Italicizes the currently selected text Underline - Underlines the currently selected text Stikeout- Stikes the currently selected text Ident - Indents the current selection Outdent - Outdents the current selection Text Settings - Modifys / Sets the text font, color, and size for the current selection Spell Check – Perfoms a spelling check on the current selection / document Formatting toolbar #2 Button Description Undo - undoes the last change Redo - redoes the last undo Insert / Edit Link - Inserts or Edits a hyperlink at the current cursor position Insert Image - allows the user insert an image to the current cursor position from a file upload via FTP or a file stored in a local directory Insert Library Image - allows the user insert an image to the current cursor position from a file upload via FTP or a file stored in a local directory Ordered List – Inserts an ordered ( numbered ) list Un-Ordered List – inserts a bulleted list Insert Table - inserts an HTML table at the current cursor point Horizontal Rule - Inserts a horizontal rule Copyright © 2004-2006 nBit Information Technologies Page 4 of 12 nBit HTML Editor ActiveX Control User Manual version 3.0 The Form toolbar Butto Description n Insert Form - Inserts / edits a FORM element on the document. The form tags always encase the entire document and only one form may be placed in each document Insert Text Field - Inserts a text field Insert Text Area - Inserts a multiline Text Area Insert File Field - Inserts a file upload field Insert Hidden Field - Inserts a file hidden field Insert Image Field - Inserts an Image field Insert Checkbox - Inserts a checkbox Insert Select Field - Inserts a drop down select field Insert button - Inserts a button Insert Submit Button - Inserts a submit button Insert Reset Button - Inserts a submit button Insert option Field - Inserts an option field Accelerator Keys Some additional functionality and short cuts are provided by the following accelerator key combinations, which closely resemble the key combinations used for similar actions in other windows based applications. Keys ctl-A ctl-P ctl-C ctl-X ctl-V ctl-B ctl-I ctl-U ctl-F Shift-Enter Enter Shift-Space Action Select All - Selects the entire document Print - Prints the current document Copy - Copies the current HTML selection onto the clipboard Cuts - Cuts the current HTML selection from the document and places it on the clipboard Paste - Paste the clipboard contents into the current cursor position in the document Bold - Bolds the current selection / word Italic - Italicizes the current selection / word Underline - Underlines the current selection / word Find – Opens the find dialog for text searching HTML Break - Inserts an HTML BR element Starts a new HTML block element or inserts a BR element Insert a hard-space ( ) character Copyright © 2004-2006 nBit Information Technologies Page 5 of 12 nBit HTML Editor ActiveX Control User Manual version 3.0 Right Click Context Menus The editor contains some right-click contect-menus that allow direct access to the selected objects properties. When a user performs a right-click after selecting either an image, a Table border, a hyperlink, or standard text the following context menus are displayed. Context Menus Context Menu Images Options Right Clicking on a previously selected Image displays the images context menu. Cut , Copy , and Paste have the same clipboard functionality as standard windows applications. Selecting the Image Properties menu item opens the image properieties form. Width - the width of the image in pixels Height - the height of the image in pixels Constrain Proportions - when selected changing the value of one dimension of the image will cause the other to recalcuate as to maintain the images original aspect ratio Reset - will return the image to its actual width and height in pixels Source - the URL of the image. This may be edited if you would like to change the image Border - the width of the border displayed around the image in pixels Align - The images alignment in relation to the surrounding text Alt Text - The text displayed in a browser that doesnt show images and the text displayed when hovering the mouse over an image in other browsers. Tables Selecting and then Right Clicking on a table border displays the following context menu Copyright © 2004-2006 nBit Information Technologies Page 6 of 12 nBit HTML Editor ActiveX Control User Manual version 3.0 Insert Row - Inserts a Table Row to the bottom of the table Delete Row - Deletes the bottom row from the table Insert Column - Inserts a new column to the right-hand side of the table Delete Column - Removes the right-most column from the table Note - To perform advanced row and cell operations use the DOM Toolbar menus for the individual rows and cells Properties - opens the table properties form Border Width - the tables' Border Width in pixels Border Colour - Border Colour, clicking the paint bucket icon opens the standard windows colour picker Background Colour Background Colour, clicking the paint bucket icon opens the standard windows colour picker Cell spacing - Cell Spacing between the tables individual cells Width - The table width as a pixel value or as a percentage of its parent HTML element. Links and Text Elements Style - A valid CSS style string describing the table properties. Right Clicking on a link or section of a text element displays Cut, Copy and Paste - behave the same way windows cut, copy and paste clipboard functions do. In the case of a hyperlink both the text and link are copied, cut or pasted. Insert / Edit Link - Opens the link editing form Copyright © 2004-2006 nBit Information Technologies Page 7 of 12 nBit HTML Editor ActiveX Control User Manual version 3.0 Type - The protocol the link uses URL - The destination of the link The Document Object Model ( DOM ) Toolbar Overview The Document Object Model ( DOM ) Toolbar provides an easy way to select HTML elements between the root of the document ( the <BODY> tag ) and the currently selected element. The DOM “branch” is essentially a listing of each parent HTML element from the selected element back to the <BODY> tag. This enables the user to modify the properties of any HTML element or it’s parent, or it’s grand-parent , or it’s great-grandparent etc etc in a branch of the HTML DOM. For Example by clicking on a link inside a table cell inside which is in a table row in a table will produce the following display on the DOM Toolbar TABLE – TR – TD – A Graphically, it can be represented like this Copyright © 2004-2006 nBit Information Technologies Page 8 of 12 nBit HTML Editor ActiveX Control User Manual version 3.0 Typing “Some more Text” into cell 3 on row 2 and aligning to the center using the then clicking in then text will change the DOM toolbar to button and TABLE – TR – TD – P Graphically, it looks like this Each section of the DOM Toolbar behaves as a button, clicking on an section will produce a context menu allowing access to the properties, HTML tag code, CSS class, and in the case of table cells and table rows, some more advanced functionality. DOM Toolbar Context Menus For Images Properties – Opens the standard IMG tag properties window. Identical to right-clicking an image and selecting properties. Edit Tag – Allows editing of the HTML IMG tag that defines the image Class – Opens the CSS subclass menu, selecting a CSS style from the sub-menu applies the rules defined for that class to the image element For TD (table cell ) Elements Properties – Opens the Cell Properties windows. Edit Tag – unavailable for table cell elements Class – Opens the CSS subclass menu, selecting a CSS style from the sub-menu applies the rules defined for that class to the HTML element Cell Sub-menus Delete Cell – removes the selected cell Merge Cell Left – Merges the contents of the selected cell and the contents of left-hand cell adjancent into one cell Merge Cell Right - Merges the contents of the selected cell and the contents of Right-hand cell adjancent into one cell Insert Cell Before – Inserts a cell to the left of the current cell Insert Cell After – Inserts a cell to the right of the current cell Copyright © 2004-2006 nBit Information Technologies Page 9 of 12 nBit HTML Editor ActiveX Control User Manual version 3.0 For TR (table row ) Elements Properties – Opens the Cell Properties window. Edit Tag – unavailable for table cell elements Class – Opens the CSS subclass menu, selecting a CSS style from the sub-menu applies the rules defined for that class to the HTML element Row Sub-menus Delete Row – removes the selected row and its child elements Insert Row Above – Inserts a row above the selected row Insert Row Below – Inserts a row below the selected row For TABLE Elements Properties – Opens the Table Properties window. Edit Tag – Allows editing of the opening HTML tag that defines the element Class – Opens the CSS subclass menu, selecting a CSS style from the sub-menu applies the rules defined for that class to the HTML element For All Other HTML Elements Properties – at present a properties form is unavailable for other elements. Edit Tag – Allows editing of the opening HTML tag that defines the element Class – Opens the CSS subclass menu, selecting a CSS style from the sub-menu applies the rules defined for that class to the HTML element CSS Classes A Brief Overview Cascading style sheets (CSS) address many of the problems of old-style HTML. Some of the older tags, especially the notorious <FONT>, clutter Web page source code and make for inflexible sites. With CSS, style information can be centralized. This centralization leads to increased power and flexibility. With cascading style sheets, designers are able to use tags to reference a style rather than redescribe it for each HTML element they wish to stylise. Then, when a style needs to be changed, only the referenced declarations need to be changed, not all of the instances where it is used. Copyright © 2004-2006 nBit Information Technologies Page 10 of 12 nBit HTML Editor ActiveX Control User Manual version 3.0 CSS information may be contained on each Web page, called from an external file, or both. For sites with many style declarations, the centralized method (external file) offers the most potential efficiency gains in terms of site management. Using Style Sheet Styles in the Editor The nBit HTML Editor supports Cascading Style Sheets, either as external files or as rules defined in the document itself. Selecting the “Class” menu item from the DOM Toolbar popup menu allows any of the CSS styles defined in a document to be applied to the element selected. For Example The selected <P>, or paragraph tag, can have any of the listed style sheet styles applied to it. Currently the HTML of the tag is <P align=center>Some more text</P> Clicking on the listHeader style in the CSS menu changes the CSS style of the <P> tag to listHeader. The HTML of the <P> tag now is <P align=center class=listHeader>Some more text</P> Copyright © 2004-2006 nBit Information Technologies Page 11 of 12 nBit HTML Editor ActiveX Control User Manual version 3.0 Selecting none from the CSS menu removes the “class” attribute from the <P> tag. The HTML of the <P> tag now reads <P align=center>Some nore text</P> Selection Highlighting The editor can be set to display selection highlighting. HTML elements can be highlighted are clicks on the document itself and / or on the DOM toolbar. Highlighting is in the form of a border draw around the selected element. For example A <SPAN> selected An <IMG> selected Copyright © 2004-2006 nBit Information Technologies Page 12 of 12 A <P> selected