1
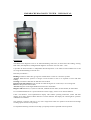
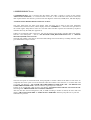
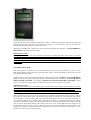
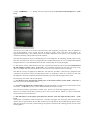
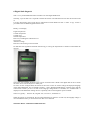
JDSPORSCHE DIAGNOSTIC TESTER – USER MANUAL
Introduction
The JDS Porsche diagnostic tester is an enhanced flashing code tester, for ECU fault code reading, clearing
fault codes, idle adaptation, and digital dash diagnosis on Porsche cars from 1987 – 1994
It provides the home mechanic or Independent Porsche Specialist a cost effective and invaluable tool to aid
servicing and fault finding on Porsche cars.
Functions provided are Reading stored ECU fault codes, giving a fast “health check” on the car’s electronic systems.
Actuator tests allow the operator to energise various actuators in the car as required to assist with fault
finding..
Clearing stored fault codes after the fault has been rectified
Knock counts of detonation can be carried out while driving the car on the road, or on a rolling road.
Reset the idle speed of some models.
Activates diagnosis of the digital dashboard used in later 928 models.
Diagnose and test 928 S4 , GT, SE.CS and GTS, 944S/S2 and 944 Turbo, all 964 models, all 968 models.
It is a small hand held unit. It is powered from the vehicle supply, so there are no internal batteries.
It has a 40 character, 2 line alpha-numeric display. This enables operating instructions, menus and fault
displays to be clearly shown without reference to written manuals. The display has a back light for operation
in difficult environments.
The operation is intuitive and easy to use, with a single enter button for operation of all functions through
scrolling options and on-screen prompts.
It is hoped the following instructions will help you quickly become acquainted with its operation.
CONNECTING THE TESTER.
Before connecting the tester to the car make sure that if your car is fitted with an immobiliser, this must
be disarmed before the ignition is switched on for any of the diagnostic or activating routines to
function correctly.
Also check that the air conditioning switch is “off”.
Do not depress the throttle until requested to do so.
If the car has automatic transmission, place the gear selector in “Park”.
Two types of connectors are available with the JDS Porsche tester -
12 way connector
For the 1988 Model year 928S4 and 944S, a lead with a twelve way rectangular plug is required (also for 1987
928 cars which have been upgraded by JDS Porsche for diagnostics). The 12 way diagnostic socket on the
1987/8 928 cars is situated on the mounting plate that holds the LH and EZK ECU’s, under the cover at the
side of the passenger’s foot well. For the 1988 944S, the 12 way socket is under the dashboard on the
passenger’s side, just above the DME ECU.
19 way connector
The 19 way socket on the 928 from MY 1989 to 1994 is located under the “hump” at the side of the passenger
seat. This cover is held with two thumbscrews. For other Porsche cars refer to the workshop manual.
The other end of the cable is terminated in a 19 way “mini-DIN” connector. Plug this into the top of the tester.
The flat on the plug should be uppermost, make sure that the plug is completely in its socket.
Start up
As soon as the cable is plugged into the vehicle and the tester, the tester is activated and the display is
illuminated. There is no “on/off” switch. As soon as the tester is powered up, it will commence the
initialisation, and proceed automatically to the vehicle type selection menu. The tester will scroll through the
options on a 2 second cycle. To select the car required, press the green “enter” button on the side of the tester.
The tester will acknowledge the vehicle type that has been selected
To terminate operation at any point, or to return to the top menu, unplug the tester lead. When it is
reconnected, the tester will automatically reset itself and restart its sequence.
Note; the number of vehicle types available varies according to the software version installed. Make
sure that the latest version is always installed.
DIAGNOSIS AND TESTING PROCEDURES
The following options are then shown in sequence in the display
1.
2.
3.
4.
5.
6.
Select LH/EZK/PSD ECU test – for reading stored fault codes and cancelling fault codes
Select Actuator drive tests – for fault finding and fault correction
Select Airbag ECU test – reading fault codes and cancelling fault codes
Select Idle stabilisation adaptation – to reset the idle speed and optimise the LH ECU.
Select Knock counting tests - for fault finding
Select Digital dash diagnosis – a useful menu of fault diagnosis and monitoring
The sequence repeats, until a selection is made by pressing enter.
1-LH/EZK/PSD ECU test
If LH/EZK/PSD ECU test is selected, then the display will make a request to switch on the ignition
“SWITCH ON IGNITION”, or if it has been left on in error, to turn it off and re-start the test. The tester
then requests that the enter button is pressed to start the diagnosis of the LH (or DME) ECU, and then displays
”LH DIAGNOSIS READY PRESS ENTER TO START”
The green LED below the main LCD display panel will then start to flash as the tester establishes
communication with the LH ECU, and the display will show “WORKING…..” The LED is the equivalent of
the “Check engine” lamp fitted to some cars. The fault codes and other responses are indicated by sequences
of flashes shown by the LED.(See Appendix 1)
If there any stored fault codes in the ECUs, they will be shown on the display with their fault code number,
and also a text description - such as “O2 SENSOR OVER_RICH MIXTURE 1123” or “KNOCK
SENSOR 2 (REAR) FAULTY 2132” .
The fault code number is the same as used in the fault finding section of the factory workshop manuals, which
give detailed fault analysis routines.
The tester will pause on each fault found, until prompted to continue. When all the faults on each ECU are
completed, there is the option to erase all the fault codes and continue to the next ECU, or to retain them and
to proceed. The displays “ TO CLEAR LH CODES PRESS ENTER NOW” and “ TO RETAIN LH
CODES PRESS ENTER NOW” alternate until the required option is selected.
If there are no stored fault codes the tester will display “LH DIAGNOSIS 1500 NO FAULTS FOUND”
alternating with “PRESS ENTER TO CONTINUE TESTING”
After the first ECU has been diagnosed ( LH, or DME according to model of vehicle) the tester then will
display “LH OUTPUT END 1000” or “DME OUTPUT END 1000” and then prompt the user to press the
enter button to proceed.
The tester then will start to initialise and test the next ECU – EZK (928 only) PSD, Tiptronic (964 only) and
Heater ECU (964 only).The ECU’s are checked in sequence, it is not possible to “skip” to the next ECU
without reading the fault memory of each ECU in turn.
When all the available ECU’s fitted to the car have been read, then the tester displays “ NO FURTHER ECU
RESPONSES” and returns to the top menu..
IMPORTANT NOTE
The LH/EZK/PSD ECU tests will not function if there are any Airbag fault codes stored in the car’s Airbag
ECU. Any such fault codes MUST be cleared before diagnosis of the LH/EZK/PSD ECUs is possible. As
mentioned in section 3) this tester can only clear MY90 USA airbag codes at present. To clear Airbag codes
on a MY91 onwards car will require the use of a KTS300 “Hammer”, until an upgrade of software is available
for this tester.
2-Actuator drive tests
This option allows the operator to check various actuators and switch inputs into the ECU’s. This is to assist
fault finding. Before starting these tests, push the heater slider to the far left detent position. Keep you foot
away from the throttle switch.
To activate these tests, check that the immobiliser is disarmed, then select “SELECT ACTUATOR DRIVE
TEST” in the top level menu. The display prompt will then respond with the prompt “ACTUATOR TESTS
PRESS ENTER TO START”. The display “SWITCH ON IGNITION WITHIN 8 SECONDS” is then
shown. If you fail to switch on within 8 seconds the tester just reverts to the previous prompt.
IMPORTANT NOTE:
With some MY software the Actuator Drive Tests will not function if the throttle closed switch is not closing
correctly. Therefore keep the foot away from the throttle until instructed to do so as in test (f) below.
Before MY 91 a fault code is not stored in the LH or EZK ECUs to advise that the throttle closed switch is
open circuit (it will report a permanently short circuit one). From MY 91 the reported code is 1115 or 1215.
If the Actuator drive tests will not run on a pre MY91 car, check that the throttle is closing properly. Listen in
the engine bay and manually slowly open and release the throttle operating arm at the side of the inlet plenum.
As the throttle is slowly opened, a faint click should be heard almost as soon as the throttle plate starts to
move. When the throttle arm is released, the switch should click again. This should be repeated several times
to confirm consistent operation. If the throttle plate arm has to be firmly pushed closed in order to hear the
click on release, then check that the other cables, such as the cruise control and kick down cables are not
preventing the throttle to close correctly. Otherwise, refer to the workshop manual for further checks on the
throttle switch system. Note that because the Actuator Drive Test may not run due to this problem, it is not
possible to use the tester to confirm the fault
a) After “WORKING………” prompt, the tester will proceed to the first check of the fuel injectors. (Code
1311)
The injectors are cycled on an off on a continuous basis, until stopped by pressing enter. They are pulsed at a
rate of approximately once a second, and will be heard to gently “click” each time. All 8 injectors are
triggered simultaneously. This enables checks to be made to determine if one injector is not operating, and if
not then the actuating voltage feed can also be checked.
Note that if the engine has been run immediately prior to this diagnosis, the remaining residual pressure in the
fuel rails will allow some fuel to be pumped into the cylinders during this test. For prolonged fault finding
using this feature it is recommended to delay at least one hour after last starting the engine
b---The injectors will be pulsed until the enter key is pressed. The tester then moves onto the second check of
the idle stabiliser actuator valve. (Code 1321) It is repeatedly switched from one end of its range to the
other. An audible click will be heard about once a second. If not an electrical can be carried out.
Note that the car may be slightly more difficult to start after this procedure, some fuel may pumped into the
cylinders by the injectors if there is residual fuel pressure, as noted above. If the car is reluctant to start after
the diagnostic checks are completed, hold the throttle fully open and crank the engine until it starts .
Proceed to the next check with the enter button.
c---The third test is for the fuel tank venting valve to the carbon canister (where fitted) Code 1322. A
faint click once a second should be heard.
d---The fourth check is for the resonance flap on the inlet manifold, so electrical and vacuum checks can be
carried out. . (Code 1323) A clear “click” should be heard about once a second.
Note: the resonance flap is operated by a vacuum valve. The valve is electrically triggered by the ECU.
If there is no residual vacuum in the system e.g the car was not run in the last 1/2hour, or it has a vacuum leak,
the click will not of course be heard.
e---The fifth check is of the engine speed pulse into the ECU from the engine flywheel sensor. (Code
1331)
The operator is prompted to crank the engine for 5 seconds. The engine will not usually start because the fuel
injector pulse is suppressed for this test. But if some fuel was injected into the cylinders during check a) above
then the engine may run briefly. When releasing the ignition switch from the cranking position, do not switch
off the ignition !
When the EZK pulse has been acknowledged by the ECU, the LED is extinguished. (code 0000) this confirms
the check was successful. This is also verified by the LCD display text. The absence of a EZK pulse suggests
a faulty engine flywheel sensor, or faulty EZK ECU.
f---The sixth check is the throttle idle switch . (Code 1332) Press the throttle as prompted by the display,
and then release. The ECU should respond with the “0000” code and corresponding text on the LCD display.
g---The seventh check is for the wide open throttle switch (WOT switch) . (Code 1333) Open the throttle
as prompted, and then release. The ECU should again respond with the “0000” output.
h/i---The eighth and ninth checks are for the air conditioning switched input to the ECU . (Code 1334
and 1335)
The eighth check requests that the Air conditioning is switched on, the LH ECU then checks that the voltage
at the LH ECU terminal 15 is correct.
The ninth check is when the air conditioning is switch off, that the signal at pin 14 of the LH ECU is correct.
j--The tenth check is the auto transmission Park/neutral switch to the ECU. (not cars with manual
transmission) . (Code 1336). When prompted, move the gear lever from “Park” to “D”. The tester will again
respond with a “0000” display and text response if the test is satisfactory.
This completes the actuator test routine and the tester will return to the main menu
3-Airbag test
The airbag ECU is read in a different manner by the tester, so its diagnosis is selected from the top menu
.When prompted code 1311 will appear followed by airbag testing completed (code 3500) if no faults are
found.
Note that this option is functional for MY 90 US and Canadian market cars only at present
Also please see the note at the end of section 1), requiring the clearing of Airbag fault codes before
LH/EZK/PSD diagnosis is possible.
4-Idle stabilisation adaptation
The engine must be at normal operating temperature for this procedure The throttle switch must be closed for
idle adaptation to take place. Keep your foot away from the throttle during this sequence.
IMPORTANT NOTE:
Before MY 91 a fault code is not stored in the LH or EZK ECUs to advise that the throttle closed switch is
open circuit (it will report a permanently short circuit one). From MY 91 the reported code is 1115 or 1215.
If the Idle stabilisation routine will not run on a pre MY91 car, check that the throttle is closing properly.
Listen in the engine bay and manually slowly open and release the throttle operating arm at the side of the
inlet plenum. As the throttle is slowly opened, a faint click should be heard almost as soon as the throttle plate
starts to move. When the throttle arm is released, the switch should click again. This should be repeated
several times to confirm consistent operation. If the throttle plate arm has to be firmly pushed closed in order
to hear the click on release, then check that the other cables, such as the cruise control and kick down cables
are not preventing the throttle to close correctly. Otherwise, refer to the workshop manual for further checks
on the throttle switch system.
This routine resets the idle stabilisation loop. (Code 1411) The engine is run for 45 seconds at idle speed, and
the ECU adapts its default setting for the correct idle speed. (675rpm for automatic transmission cars, manual
S4 and manual GTS, 775rpm for GT/SE/CS models)
This is routinely carried out by Porsche specialists when they have cars for serving or repair. Idle speed is
properly set, and the car will generally run better generally, as the LH system is “adapted” to the engine.
It is recommended that that is carried out at each annual service, and also if any work is done on the engine
inlet system components.
The prompt “IDLE SPEED ADAPTATION PRESS ENTER START” is shown. Before pressing enter,
check the alarm/immobiliser is disarmed, then press enter. The prompt “START ENGINE WITHIN 8
SECONDS” will be shown. If the engine is not started, the then the tester will return to the idle adaptation top
menu. If the engine is started, then the tester will acknowledge this with “ENGINE TURNING” followed by
the display “IDLE SPEED FOR 45 SECONDS !..”, followed by “1411 IDLE STABILISATION IN
PROGRESS”.
At the end of the 45 seconds the tester will show “IDLE STABILSATION IS COMPLETE” and then
“SWITCH OFF ENGINE”.
5-Knock counting tests
The engine must be run at full load (wide open throttle at high rpm) for knock counting to be detected so the
test can only be executed on a rolling road dynamometer.
This test monitors any engine detonations (“pinking” or “knocking”) from the engine, while being driven,
over 10,000 cylinder firing cycles. Any detonation or pre-ignition as it is sometimes called can cause severe
engine damage.
The tester monitors the knock count outputs from the ECU in the 10,000 period (approximately 2 minutes at
3,000 rpm). If the count is more than 50 knocks, then detonation is taking place and must be corrected.
During the test, the knock number display is continuously updated. At the end of the test period, the total
number of counts is shown, and displays “Fault” if the total count is greater than 50.
The test can be repeated readily with a single “enter” press.
6-Digital dash diagnosis
This is a very useful additional feature available cars with digital dashboards.
Normally, a special link tool is required to enable this feature. The JDS Porsche tester has this function built
in.
It is fully described in the Porsche Service Information booklet WKD 495 021 of 1989. A copy of this is
provided on the CD-ROM supplied with the tester.
Briefly, it can display
Engine temperature
Coolant temperature
Coolant level
Outside temperature
Fuel level, including the calibration level
Oil pressure
Alternator voltage
Function of all warning circuits/switches
If a fault has been signalled to the dash while driving, it will log the elapsed time or distance travelled after the
warning.
The precise tests available depends on the version of software that is fitted to the digital dash in the car under
test. This varies from model year to model year.
On some versions of digital dash, this feature of the tester can also be used to change the displayed language
of the digital dashboard. This is enabled as follows – select “Digital Dash Diagnosis” with the tester. Pull the
control level towards you for 3 seconds. If the language change feature is available, the “LANGUAGE” is
displayed on the dashboard. Pulling the lever repeatedly will scroll through the option available.
These are typically - German “D”, English “US”, French “F”, and Italian “I”.
When the ignition is switched off, the last selected language is retained. For MY 90, the language change is
not retained if the battery is disconnected. For MY 91 it is retained.
VIEWING DATA AND SOFTWARE UPDATES
Viewing data with a laptop computer
The RS232 connection at the base of the tester is provided to enable the use of a laptop computer for data
viewing and control, using the serial port of the laptop.
To install and enable this feature, install the viewer program by running the installation file “setup.exe”
contained within the directory “VB viewer V0_5” on the CD-ROM provided with this tester.
Note: this feature requires Windows 2000 or higher to be installed on the host laptop.
To make a shortcut on the desktop, right click the mouse on a clear area of the desktop and select New
shortcut, then browse in the folder “Program files” to the folder “Program 1” and select JDS_Porsche.exe for
the shortcut.
The on screen “enter” button can be activated with the mouse or the space bar.
With the serial cable connected, the viewer display will follow the tester display. The space bar acts as the
enter button, or a mouse can be used on the enter segment of the display.
Software updates:
To enable and install this feature, run the installation file
“Bootloader” on the CD-ROM provided with this tester.
“setup.exe” contained within the directory
To make a shortcut on the desktop for this feature proceed as indicated above, and select the the file “AVR
Bootloader.exe” for the shortcut.
The tester will require to be powered up via the vehicle lead while updates are installed. If a laptop is not
available for this, a d.c. power cable is available from JDSPorsche.
To install a software update, connect the serial cable from the computer to the tester. Start the Bootloader
program from the desktop, then check that “Com port selection” is set to COM 1, and the “Baud rate
selection” to 19200.
When the diagnostic tester is first powered up via the vehicle or power lead, it will display
“XXXXXXXXXX” on the display for the first 5 seconds.. During these 5 seconds, click the tab “Jump to
Bootloader then Download”. If you have missed the 5 second window the tester will just start up in the normal
way, and no download will take place. Start the sequence again, and repeat. If down load has started, look at
the status line is the Bootloader window, where you should see the number of downloaded files counting
down. After about 2 minutes the bootloader will confirm that the download was successful. The Tester will
then automatically revert to normal operation.
As a last check, check that the software version number displayed on start up of the tester is the correct one.
Note: Do not try to run both JDSPorsche viewer and Bootloader programs at the same time.
CONTACT John Speake at [email protected] for further information.
APPENDIX 1
TROUBLESHOOTING AND GENERAL INFORMATION
Flash sequence
It is not necessary to read these “flashes” as the diagnostic tester decodes and displays the code as well as a
text explanation.
Therefore the following explanation is for interest only – the flash sequence starts with a longer pulse which is
a marker of approximately 2.5 seconds. This is followed by groups of short (approx. 0.5 second) pulses.
The time between the pulses in a group is 0.5 seconds, and the time between groups is 2.5 sec. Therefore in
the example shown in the picture below code 1114, the sequence is 2.5 sec. marker, 2.5 sec gap, 0.5sec pulse,
2.5 sec gap, 0.5sec pulse, 2.5 sec gap, 0.5sec pulse, 2.5 sec gap, then a group of 4 0.5 sec. pulses with 0.5 sec.
gaps and then the sequence repeats with the 2.5sec. marker.
A zero is not indicated, so that the code 1500 (LH ECU, no faults found) is sent as 1,5 to the tester. The tester
decodes this and displays it as “LH DIAGNOSIS 1500 NO FAULTS FOUND”.
Fault codes and their meanings
There are approximately
40 fault codes possible for the LH/EZK and DME ECUs.
15 fault codes for the PDS/ABS system
50 fault codes for the Airbag system
26 fault codes for the 964 Heater system
30 fault codes for the 964 Tiptronic system
The fault codes for LH/EZK or DME have 4 figures, the first figures identifies the ECU
1XXX is for LH/EZK or DME ECU’s
2XXX is for EZK ECU
3XXX is for the airbag ECU
5XXX is for the PSD/ABS ECU
8XXX is for the Heater ECU (964)
The second figures can either be a 1 or a 2. The former signifies that the fault is currently present, the latter
that the fault is not always present (intermittent)
The third and fourth figures are the unique fault code identifier.
Examples:
“TEMPERATURE SENSOR 2 OPEN CIRCUIT 1114” is a steady fault for the LH/DME ECU
“KNOCK SENSOR 2 (REAR) FAULTY 2232”
is an intermittent EZK fault.
Comparison with KTS 300 “Hammer
The KTS 300 communicates with the ECU’s in a somewhat different manner. But the only major function not
provided by the JDSPorsche tester is the bleeding of the PDS system fitted to the later 928s and the PDAS
system fitted to the 964 Carrera 4 cars.
Any stored PDS fault codes will be read out by the JDSPorsche tester (PDAS fault codes TBD)
JDSPorsche will be producing a separate control box to enable the bleed function to be carried out quickly and
safely.
The JDSPorsche tester will not diagnose the RDK system.
Issue 5.0 © 2004 JDSPorsche


![3 Janela do ESI[tronic]](http://vs1.manualzilla.com/store/data/006056768_1-d0b5f68eb94df67d86abc425e279ce6e-150x150.png)