1
BatteryShop Manual
Disclaimer
While every effort is made to ensure that the information contained in this manual is accurate and up-to-date,
Cadex Electronics Inc. does not warrant or guarantee the accuracy of the contents of this manual. Further, Cadex
makes no warranties, either expressed or implied, as to the merchantability or fitness for a particular purpose of
the BatteryShop software or Cadex Battery Analyzer equipment and/or its documentation.
In no event will Cadex or its officers or employees be responsible for any consequential, incidental, or indirect
damages (including damages for loss of business profits, business interruption, and the like) arising out of the use
or inability to use the BatteryShopTM software or the Cadex Battery Analyzer equipment and/or its documentation.
Revisions
Cadex Electronics Inc. reserves the right to revise this publication and make changes in its contents without
obligation to notify any person of such changes.
Trademark
CADEX is a registered trademark of Cadex Electronics Inc. All other trademarks mentioned herein are the property
of their respective owners.
Copyright
Copyright (c) 2008 by Cadex Electronics Inc. All rights reserved. No part of this publication, the BatteryShopTM
software or the firmware controlling Cadex product(s) may be reproduced, transmitted, transcribed, stored in a
retrieval system, or translated into any language or computer language in any form or by any means without the
express written permission of Cadex Electronics Inc.
i
Contents
BatteryShop Manual ..................................................................................................................................... i
Contents......................................................................................................................................................... ii
Getting started with Cadex BatteryShop 7.1.............................................................................................. 1
Welcome to Cadex BatteryShop .............................................................................................................. 1
Computer Requirements.......................................................................................................................... 2
Getting ready to use Cadex BatteryShop................................................................................................. 3
Installing Cadex BatteryShop.................................................................................................................. 3
Before installing Cadex BatteryShop… ........................................................................................... 3
Running Setup on Windows XP or Windows 2000 ......................................................................... 3
To upgrade from an earlier version of BatteryShop ......................................................................... 4
To uninstall BatteryShop and go back to the previous version of BatteryShop............................... 5
Setting up battery analyzers .................................................................................................................... 6
Set up a C7000 battery analyzer for use with Cadex BatteryShop................................................... 6
Set up a Cadex 7000 C-Series or Cadex 7000 Series battery analyzer for use with Cadex
BatteryShop...................................................................................................................................... 7
Set a C7000 battery analyzer for stand-alone use............................................................................. 7
Set a Cadex 7000 C-Series or Cadex 7000 Series battery analyzer for stand-alone use .................. 8
Set analyzer program options........................................................................................................... 8
Connecting battery analyzers to the computer...................................................................................... 11
To connect a single battery analyzer to your computer.................................................................. 11
To connect more than one battery analyzer to your computer ....................................................... 11
Setting up Cadex BatteryShop............................................................................................................... 12
Installing label and report printer drivers....................................................................................... 12
Setting up Cadex BatteryShop using the Setup Wizard ................................................................. 13
Setting the serial ports connected to battery analyzers................................................................... 15
Selecting the language for Cadex BatteryShop menus, dialog boxes, and messages..................... 16
Setting up labels and service reports .............................................................................................. 17
Setting up Service labels......................................................................................................... 17
Setting up Battery ID labels .................................................................................................... 18
Setting up service reports........................................................................................................ 19
Entering information about your site.............................................................................................. 20
Set System Options ........................................................................................................................ 21
Set or change the password............................................................................................................ 23
Synchronize analyzer and computer clocks ................................................................................... 24
Update Settings .............................................................................................................................. 24
Working with the database.................................................................................................................... 25
Using and editing the database....................................................................................................... 25
Working with battery manufacturer data........................................................................................ 25
Add a battery manufacturer record.......................................................................................... 26
Modify a battery manufacturer record .................................................................................... 26
Delete a battery manufacturer ................................................................................................. 26
Refer to the Appendix to find a record.................................................................................... 26
Working with battery model data................................................................................................... 27
Add a battery model................................................................................................................ 27
ii
Modify a battery model........................................................................................................... 27
Delete a battery model ............................................................................................................ 27
Copy a battery model.............................................................................................................. 28
Modify the C-Code for a battery model .................................................................................. 28
Model Update.......................................................................................................................... 29
Finding, Sorting, and Grouping model records....................................................................... 29
Import battery model data....................................................................................................... 29
Export battery model records .................................................................................................. 30
Delete matrix for the selected battery model .......................................................................... 30
Working with customer data.......................................................................................................... 31
Sort, Group, or Search for a customers................................................................................... 31
Add a customer to the database............................................................................................... 31
Modify a customer record in the database............................................................................... 31
Delete a customer from the database....................................................................................... 31
Working with battery ID data......................................................................................................... 32
About battery IDs.................................................................................................................... 32
Types of Battery IDs............................................................................................................... 32
Examples of battery IDs with identifying prefixes: ................................................................ 32
Add a battery ID record to the database.................................................................................. 33
Modify a battery ID record ..................................................................................................... 33
Search, Group, or Sort Battery ID records .............................................................................. 33
Delete battery ID records from the database ........................................................................... 33
Print battery ID labels ............................................................................................................. 34
Import Battery IDs .................................................................................................................. 34
Export Battery IDs .................................................................................................................. 34
Working with battery-service data ................................................................................................. 35
Display battery-service records............................................................................................... 35
Creating battery-service reports .............................................................................................. 35
Graph Battery Characteristics ................................................................................................. 35
Graph Cycles........................................................................................................................... 36
Exporting battery characteristic graph data to a Microsoft Excel file..................................... 37
Exporting battery-service data ................................................................................................ 37
Delete battery-service records................................................................................................. 37
Compact the database..................................................................................................................... 37
Servicing batteries................................................................................................................................. 38
Connect to battery analyzers.......................................................................................................... 38
Service batteries by model number ................................................................................................ 39
Service batteries by Battery ID ...................................................................................................... 41
Service favorite battery models...................................................................................................... 42
Service batteries by favorite battery ID.......................................................................................... 43
Service batteries by entering battery specifications ....................................................................... 44
Service batteries by Battery ID or Battery Model.......................................................................... 45
Restarting a service ........................................................................................................................ 45
Monitoring battery service ............................................................................................................. 46
Displaying the current status of batteries being serviced........................................................ 46
Displaying the Data Monitor................................................................................................... 49
Battery Service Programs............................................................................................................... 50
Basic Programs ....................................................................................................................... 50
Advanced Programs................................................................................................................ 52
Custom Programs ........................................................................................................................... 58
Custom battery service programs............................................................................................ 58
Analyzing and Reporting Service Data ................................................................................................. 62
Displaying the current status of batteries being serviced ............................................................... 62
Working with battery-service data ................................................................................................. 62
iii
Programming Adapters ......................................................................................................................... 63
Troubleshooting .................................................................................................................................... 63
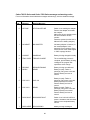
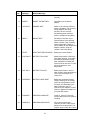
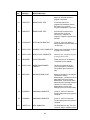
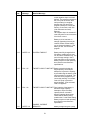
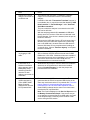
C7000 and C7000ER message and warning codes ........................................................................ 63
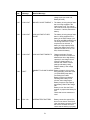
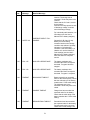
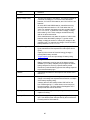
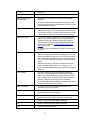
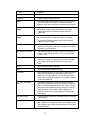
Cadex 7000 C-Series and Cadex 7000 Series message and warning codes ................................... 66
DAO Error on Windows XP/2000 in User-level mode.................................................................. 80
Analyzer LED does not match Service Status record in BatteryShop database............................. 80
USB connectivity issues…............................................................................................................. 81
Glossary....................................................................................................................................................... 84
Appendix ..................................................................................................................................................... 90
Cadex BatteryShop................................................................................................................................ 90
Connect to battery analyzers .......................................................................................................... 90
Export real-time battery-service data ............................................................................................. 91
Open a comma-separated values or text file in Microsoft Excel .................................................... 91
Analyzer icon colors ...................................................................................................................... 92
Ports with incorrect firmware version ............................................................................................ 92
Group records................................................................................................................................. 93
Find a record .................................................................................................................................. 93
Sort records .................................................................................................................................... 94
Display battery-service records ...................................................................................................... 95
Select and rearrange fields to include in battery-service reports .................................................... 97
Select battery-service records......................................................................................................... 98
Print a customized report................................................................................................................ 99
Creating battery-service reports ................................................................................................... 100
Save service data to a Cadex BatteryShop file............................................................................. 100
Save service data to a Microsoft Excel file .................................................................................. 100
Save service data to an HTML file............................................................................................... 101
Set the serial ports connected to battery analyzers ....................................................................... 101
Ports with incorrect firmware version .......................................................................................... 102
Q-Learn Program ......................................................................................................................... 102
Erasing a Matrix for a battery model from the BatteryShop database.......................................... 103
Precaution with Nickel-based batteries during Learn................................................................... 104
Protect a matrix ............................................................................................................................ 104
Confidence grade ......................................................................................................................... 104
Database Security......................................................................................................................... 105
Set analyzer program options....................................................................................................... 106
Program Phases............................................................................................................................ 107
Set a program as active or inactive............................................................................................... 109
Change the name of a custom program ........................................................................................ 109
Modify a custom program............................................................................................................ 110
Database naming conventions...................................................................................................... 111
Calibrating a Cadex 7000 C-Series, Cadex 7000 Series or Cad ex 7000 battery analyzer............ 111
Calibrating an Adapter ................................................................................................................. 112
Update Rules................................................................................................................................ 113
Cadex Analyzers.................................................................................................................................. 114
Connect Cadex battery analyzers to a COM port......................................................................... 114
Connect Cadex battery analyzers to a USB port .......................................................................... 115
To connect one or more battery analyzers to the USB port of your computer............................. 115
Expanding COM ports with a multiport adapter.......................................................................... 115
RocketPort........................................................................................................................................... 117
Install a RocketPort adapter for Windows 2000/XP Professional................................................ 117
USB ..................................................................................................................................................... 118
iv
Confirm USB Setup ..................................................................................................................... 118
Installing C7xx USB drivers on Windows XP............................................................................. 118
Dymo LabelWriter............................................................................................................................... 119
Set up LabelWriter for Windows 2000 Professional.................................................................... 120
Set up LabelWriter for Windows XP ........................................................................................... 121
Index.......................................................................................................................................................... 122
v
Getting started with Cadex BatteryShop 7.1
Welcome to Cadex BatteryShop
Cadex BatteryShop™, created by Cadex Electronics Inc., is a two-way Battery Maintenance
System (BMS) for Microsoft® Windows® systems to control and monitor battery service
operations using Cadex battery analyzers from a computer with the minimum required setup.
Cadex BatteryShop can be used with the following Cadex battery analyzers:
Cadex 7000 C-Series with firmware version 1.10 or higher
Cadex 7000 Series with firmware version 6.12 or higher
Cadex 7000 using firmware version 3.53 or higher
Cadex BatteryShop is optimized for servicing and tracking batteries efficiently using one or
more Cadex battery analyzers. The Cadex BatteryShop database contains C-Code
parameters for hundreds of battery models, which can be called up, with a few clicks. New
battery models can be added to the database as needed. Basic, specialty, or customized
battery-service programs for the analyzers can be selected and run with ease.
The batch-servicing feature allows fast simultaneous servicing of hundreds of batteries of the
same model. The database can also be set up to provide information about customers,
manage service records and print out reports.
For management of battery fleets, each battery can be tagged with a unique ID that allows
precise tracking and efficient data entry for servicing.
A bar code scanner can be used with Cadex BatteryShop’s battery ID labels to input unique
battery IDs or with the manufacturer’s battery model label to input battery model information.
The contents of this manual are also available as online Help from within Cadex BatteryShop.
Press F1 from most dialogs within BatteryShop to launch context-sensitive Help.
1
Computer Requirements
Dedicated computer for Cadex BatteryShop (not used to run other programs)
Windows XP Professional SP2 (32-bit) or Windows 2000 Professional SP4.
1 GHz or better CPU.
256 MB required for one connected analyzer; 512 MB required for more than one
connected analyzer.
At least 250 MB free hard drive space required after installing all software.
One serial port for each Cadex battery analyzer. Cadex 7000 C-Series analyzers can
also connect via USB port on the PC or via USB 2.0 hub connected to PC.
If using USB 2.0 hubs, ensure that the USB 2.0 hubs have "Transaction Translator"
support.
Color monitor 1024x768 or better, 16-bit color minimum; mouse & keyboard.
A standard printer is required for report printing and for correct operation of BatteryShop.
1
Consider installing a PDF Printer as the default printer if a standard printer is
unavailable.
A label printer is required for label printing. DYMO LabelWriter is recommended for use
with Cadex BatteryShop. Cadex recommended labels support a max. of 12 characters for
barcode printing. For Battery IDs longer than 12 characters, the end-user must supply a
label printer and labels with support for long Battery ID barcode printing.
2
UPS device recommended when collecting real-time data.
Web Update requires a working Internet connection.
Note:
Cadex recommended labels support a maximum of 12 characters for barcode
printing. For Battery IDs longer than 12 characters, the end-user must supply a
label printer and labels with support for long Battery ID barcode printing.
1. http://www.dopdf.com/
2. http://global.dymo.com/enUS/Categories/LabelWriter_Printers.html
2
Getting ready to use Cadex BatteryShop
IMPORTANT:
BatteryShop must meet System Requirements to allow Cadex 7000 C-Series
battery analyzers to connect via USB cable. However, it is strongly
recommended that all Cadex battery analyzers connect to the PC via
Serial cable.
Before you can use Cadex BatteryShop, you must install the software, and set up the
program and battery analyzers to work together:
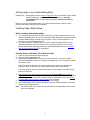
Installing Cadex BatteryShop
Before installing Cadex BatteryShop…
1
2
You must have Microsoft Internet Explorer (IE) 5.5 (or greater) installed before you can
install Cadex BatteryShop. This ensures that all the latest Windows components required
by Cadex BatteryShop are installed in your system. A copy of Internet Explorer 5.5 is
included on the Cadex BatteryShop CD.
You must configure the default printers for service reports and labels before running
Cadex BatteryShop the first time. Failure to do so will cause problems for the Setup
Wizard and will result in printing problems for Cadex BatteryShop. See topic Installing
label and report printer drivers for more details.
Running Setup on Windows XP or Windows 2000
1
2
3
Logon as a user with Administrative privileges.
Insert the Cadex BatteryShop CD.
Double-click the setup.exe file on the CD, and then follow the on-screen prompts.
The default installation location is C:\Program Files\Batshop, but you can specify another
drive and/or folder.
If the setup program prompts you to update system files, choose Yes and allow the
system to reboot. In this case, the setup program should restart automatically.
If the setup program does not start automatically, you must restart it by double-clicking
setup.exe on the CD.
4
5
6
Launch BatteryShop the first time and walk through the Setup Wizard to provide all
required information. This will generate a configuration file that allows other user profiles
to use BatteryShop in the way that it was set-up by the Administrator. See topic Setting
up Cadex BatteryShop using the Setup Wizard for more details.
Exit BatteryShop and logon as a user with User level privileges.
Launch BatteryShop and connect to Analyzers to confirm that BatteryShop is running as
configured by the Administrator.
Note:
The Administrator must ensure that all users who will use BatteryShop have at least
User level privileges.
3
To upgrade from an earlier version of BatteryShop
If you have an earlier version of Cadex BatteryShop installed on your computer, the setup
program will detect it automatically.
1
2
3
Logon as a user with Administrative privileges.
Insert the Cadex BatteryShop CD.
Double-click the setup.exe file on the CD, and then follow the on-screen prompts.
When the setup program detects the previous version of BatteryShop, click Yes to
proceed with the upgrade. The setup program automatically backs up your old
BatteryShop database, and then copies your data to the new database file after it installs
the latest version of Cadex BatteryShop. The Cadex BatteryShop database file has the
file name bs.mdb and is located in the \Batshop\Db\ directory. See Appendix topic
Database naming conventions for details.
When the setup program backs up an existing database file, it copies it to
bs_100x_y.mdb in the same directory, where x is the database version, and y is the
number of times that version of the database has been updated.
The default installation location is C:\Program Files\Batshop, but you can specify another
drive or folder.
If the setup program prompts you to update system files, choose Yes and allow the
system to reboot. In this case, the setup program should restart automatically.
If the setup program does not start automatically, you must restart it by double-clicking
setup.exe on the CD.
If you have any problems installing Cadex BatteryShop, see the ReadMe.txt file on the Cadex
BatteryShop CD. If you want to uninstall BatteryShop, follow the uninstall instructions.
4
To uninstall BatteryShop and go back to the previous version of BatteryShop
After installing the most current BatteryShop, you decide that you want to keep using the old
BatteryShop because you find that the current BatteryShop does not support old-format
matrices.
Note: It is strongly recommended that you use the most current version of BatteryShop
because it offers new features including Advanced Learn.
1
2
3
Logon as a user with Administrative privileges.
Use Windows Explorer, Start > Programs > Accessories > Windows Explorer, to
locate the directory where the BatteryShop database folder is located. This is
C:\Program Files\Batshop\Db by default.
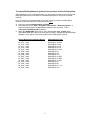
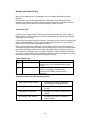
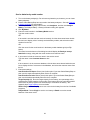
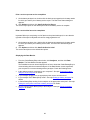
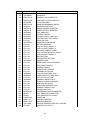
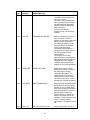
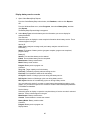
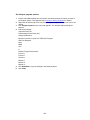
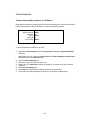
Within the \BatShop\Db folder look for a file named as bs_nnnn_m.mdb, where
1000<nnnn<9999 and 1<m<k (k is some positive integer). Sample backup BatteryShop
database names appear in the following table with the BatteryShop version:
Backup BatteryShop Database Names
BatteryShop Version
bs_1013_1.mdb
bs_1012_1.mdb
bs_1011_1.mdb
bs_1010_1.mdb
bs_1010_1.mdb
bs_1009_1.mdb
bs_1009_1.mdb
bs_1008_1.mdb
bs_1007_1.mdb
bs_1007_1.mdb
bs_1006_1.mdb
bs_1005_1.mdb
bs_1004_1.mdb
bs_1003_1.mdb
bs_1002_1.mdb
BatteryShop 7.0.0.22
BatteryShop 6.1.2.0
BatteryShop 6.0.3.0
BatteryShop 6.0.1.0
BatteryShop 6.0.0.22
BatteryShop 5.1
BatteryShop 5.0
BatteryShop 4.21
BatteryShop 4.1 SP3
BatteryShop 4.1 SP2
BatteryShop 4.1 SP1
BatteryShop 4.1
BatteryShop 4.0
BatteryShop 2.5 – 3.0
BatteryShop 2.01
5
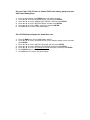
4
5
Copy the \Batshop\Db folder to C:\Temp
Uninstall the current BatteryShop:
a. Launch the Control Panel: Start > Settings > Control Panel
b. Double-click on Add/Remove Programs to Launch the Add/Remove Programs
window.
c. Locate Cadex BatteryShop … in the list
d. Choose Change/Remove button for that row in the list.
e. Choose Custom for the Uninstall Method and choose Next.
f. Choose Select All to remove listed Private Files and choose Next.
g. Choose Select All to remove listed System Files and choose Next.
h. Choose Select All to remove listed Directories and choose Next.
i. Choose Select All to remove listed Registry Keys and choose Next.
j. Choose Select All to edit listed Registry Keys and choose Next.
k. Choose Finish to perform uninstall.
l. Choose Yes to All to remove Shared Components.
6 Close the Control Panel.
7 Install the previous version of the BatteryShop.
8 Copy the required backup BatteryShop database from C:\Temp\Db to \BatShop\Db.
9 Rename bs.mdb to bsOrig.mdb.
10 Rename \BatShop\Db\bs_mmmm_n.mdb to \BatShop\Db\bs.mdb.
11 Launch BatteryShop and confirm that the database has all battery models records (some
with matrices) and service records.
Setting up battery analyzers
Each analyzer must be set up correctly for use with Cadex BatteryShop. This simple
procedure involves using the menu system on the analyzer.
If connecting a Cadex 7000 C-Series or Cadex 7000 Series battery analyzer to Cadex
BatteryShop, you can also specify certain analyzer settings from Cadex BatteryShop.
Set up a C7000 battery analyzer for use with Cadex BatteryShop
Once a C7000 battery analyzer is set up for use with Cadex BatteryShop, all front panel
controls are disabled except the MENU key.
1
2
3
4
5
6
7
Press the MENU key on the C7000 battery analyzer.
Press ▲ or ▼ to scroll to SYSTEM SETUP (on the analyzer display screen), and then
press ENTER.
Press ▲ or ▼ to scroll to OUTPUT DEVICES, and then press ENTER.
Press ▲ or ▼ to scroll to SERIAL PORT DEVICE, and then press ENTER.
Press ▲ or ▼ to scroll to BATSHOP, and then press ENTER.
Press ENTER again to confirm your selection.
Press ESC twice to return to the global display.
6
Set up a Cadex 7000 C-Series or Cadex 7000 Series battery analyzer for use
with Cadex BatteryShop
1
2
3
4
5
6
From the global display, press MENU key on the battery analyzer.
Press ▲ or ▼ to scroll to SYSTEM SETUP, and then press ENTER.
Press ▲ or ▼ to scroll to SERIAL PORT DEVICE, and then press ENTER.
Press ▲ or ▼ to scroll to BATTERYSHOP, and then press ENTER.
Press ▲ or ▼ to scroll to YES, if necessary, and press ENTER.
Press ESC twice to return to the global display.
Set a C7000 battery analyzer for stand-alone use
1
2
3
4
5
6
7
Press the MENU key on the C7000 battery analyzer.
Press ▲ or ▼ to scroll to SYSTEM SETUP (on the analyzer display screen), and then
press ENTER.
Press ▲ or ▼ to scroll to OUTPUT DEVICES, and then press ENTER.
Press ▲ or ▼ to scroll to SERIAL PORT DEVICE, and then press ENTER.
Press ▲ or ▼ to scroll to any setting other than BATSHOP, and then press ENTER.
Press ENTER again to confirm your selection.
Press ESC twice to return to the global display.
7
Set a Cadex 7000 C-Series or Cadex 7000 Series battery analyzer for standalone use
1
2
3
4
5
6
From the global display, press MENU key on the battery analyzer.
Press ▲ or ▼ to scroll to SYSTEM SETUP, and then press ENTER.
Press ▲ or ▼ to scroll to SERIAL PORT DEVICE, and then press ENTER.
Press ▲ or ▼ to scroll to any setting other than BATTERYSHOP, and then press
ENTER.
Press ▲ or ▼ to scroll to YES, if necessary, and press ENTER.
Press ESC twice to return to the global display.
For more information about serial port device settings on the Cadex 7000 C-Series or Cadex
7000 Series, see the User’s Manual for the battery analyzer.
Set analyzer program options
1
2
3
4
Ensure Cadex BatteryShop has connected to the battery analyzer for which you want to
set analyzer options. Consult the Appendix on how to Connect to battery analyzers.
Right-click the bottom half of the icon representing the analyzer for which you want to set
options.
Click Analyzer Options on the menu that appears. The Analyzer Options dialog box
appears.
Enter these settings:
Automatic OhmTest.
Select (check) this option if you want the battery analyzer to perform an OhmTest every
time it runs a charge cycle.
Note
OhmTest is always performed as part of the QuickTest, Learn, and LifeCycle
programs regardless of this setting.
Self-Discharge Rest Period (hrs).
Enter Self-Discharge Rest Period
Click the up- or down-arrow button to set the number of hours to allow a battery to selfdischarge between the first and second capacity readings of a Self-Discharge Test.
Charge Optimization.
Click the down-arrow button and select an option:
Time.
Choose this option to minimize the amount of time required to charge a battery.
Capacity.
battery.
Choose this option to maximize the percentage capacity for the charged
Ni dT/dt Charge Termination
Click the down-arrow button and select an option to stop charging a Ni-based battery
when temperature change per time exceeds one of the available settings.
Maximum number of cycles for LIFECYCLE Program
Click the up- or down-arrow button to set the maximum number of cycles for LIFECYCLE
Program.
The default value is 5000. The maximum value is 20000.
8
OhmTest Setpoints:
NiCd.
NiMH.
SLA.
Li
LiPh.
Runtime Program Parameters:
Percent 1
Enter Runtime Phase 1 setting
Set the load (up to 100% -- with default set to 100%) for the Receive phase of the
Runtime program:
Type the desired number in the text box.
OR
Click the up- or down-arrow button to scroll through the numbers.
Percent 2
Enter Runtime Phase 2 setting
Set the load (up to 100% -- with default set to 50%) for the Transmit phase of the
Runtime program:
Type the desired number in the text box.
OR
Click the up- or down-arrow button to scroll through the numbers.
Percent 3
Enter Runtime Phase 3 setting
Set the load (up to 100% -- with default set to 10%) for the Standby phase of the Runtime
program:
Type the desired number in the text box.
OR
Click the up- or down-arrow button to scroll through the numbers.
Minutes 1.
Enter Runtime Phase 1 time
Set the duration (up to 59 minutes – with default set to 1 minute) for the Receive phase of
the Runtime program:
Type the desired number in the text box.
OR
Click the up- or down-arrow button to scroll through the numbers.
To skip this phase entirely, set the time to 0.
9
Minutes 2.
Enter Runtime Phase 2 time
Set the duration (up to 59 minutes – with default set to 1 minute) for the Transmit phase
of the Runtime program:
Type the desired number in the text box.
OR
Click the up- or down-arrow button to scroll through the numbers.
To skip this phase entirely, set the time to 0.
Minutes 3.
Enter Runtime Phase 3 time
Set the duration (up to 59 minutes – with default set to 18 minutes) for the Standby phase
of the Runtime program:
Type the desired number in the text box.
OR
Click the up- or down-arrow button to scroll through the numbers.
To skip this phase entirely, set the time to 0.
5
6
7
Click Download to copy the settings to the battery analyzer.
Click Save to save the settings to the PC so that the next time that the form is opened,
these settings will be remembered. Choosing Save will not copy the settings to the
analyzer.
Click Close.
10
Connecting battery analyzers to the computer
To connect a single battery analyzer to your computer
You can connect a battery analyzer to your computer in two ways:
To a COM port on your computer using the Serial RS-232 cable terminated with DB-25
plugs that are shipped with Cadex BatteryShop. Consult the Appendix on how to
Connect Cadex battery analyzers to a COM port.
To a USB port on your computer, if you have one. Consult the Appendix on how to
Connect Cadex battery analyzers to a USB port.
To connect more than one battery analyzer to your computer
You can connect more than one battery analyzer to your computer in two ways:
Using a multiport adapter installed in your computer. Consult the Appendix on how to
install a RocketPort adapter for your version of Windows.
Using a USB expansion module connected to a USB port on your computer. Consult the
Appendix on how to Connect Cadex battery analyzers to a USB port.
11
Setting up Cadex BatteryShop
The first time you run Cadex BatteryShop, the Setup Wizard starts. This Wizard helps you
customize Cadex BatteryShop to work with your particular setup of battery analyzers and
printers. If your setup changes at any time, you can run the Wizard again to change Cadex
BatteryShop settings, or you can use the Cadex BatteryShop menus to change individual
settings.
Before you work with Cadex BatteryShop, you must install printer drivers for label and report
printers, even if you do not intend to print labels or reports.
Refer to required topic for details:
Install label and report printer drivers
Set up Cadex BatteryShop using the Setup Wizard
Set the serial ports connected to battery analyzers
Select the language for Cadex BatteryShop menus, dialog boxes, and messages
Set up Service labels
Set up Battery ID labels
Set up service reports
Enter information about your site
Set system options for any of the following:
print service labels and reports automatically
detailed data analysis reminder
turn On/Off database security
retire battery if Target Cap. not met
capture data after service completion
activate daily data-log
activate real-time service data capture to the database
set analyzer icon size
configure visible Analyze Battery pages
activate Serial Number Entry for Analyze Battery – Quick Entry
activate auto print Battery ID labels for Quick Entry
set Target Capacity for Quick Entry
turn On/Off “Other Software” interface links
customize Database Backup frequency and location
specify Proxy Server settings if you access the Internet via a Proxy Server
turn On/Of database security
Installing label and report printer drivers
Whether or not you intend to create service labels, battery ID labels, or reports, you must
install both a standard printer driver (set as default printer) and a label printer driver for Cadex
BatteryShop to work correctly.
Cadex BatteryShop is compatible with any Windows-compatible standard printer. Consult
your printer manual for information on setting up your standard printer.
12
If you do not have a standard printer, you must still install a printer driver and set this as the
default printer for Cadex BatteryShop to work correctly. Windows comes with a large
database of drivers for standard printers from which you can select a driver to install.
Printer Drivers for the Dymo 400 LabelWriter are approved for use with Cadex BatteryShop.
These drivers are included on the Dymo CD. The latest driver for the Dymo LabelWriter is
available on the DYMO website (www.dymo.com).
After installing the Dymo printer driver, configure the printer driver to use Paper Size 30334,
Print Quality Barcode and Graphics, and Print Density Normal.
If you plan to use a Windows’ label printer from an alternate manufacturer, please insure that
you have the correct Windows’ printer drivers and that the printer supports a label size that
has at least 1.5 inches horizontal and 1-inch vertical dimensions.
To install the LabelWriter printer for your version of Windows, see the Appendix on Dymo
LabelWriter.
Setting up Cadex BatteryShop using the Setup Wizard
1
If the Setup Wizard does not start by itself when Cadex BatteryShop is launched:
a. Click System Setup.
b. Click Setup Wizard.
2
Read the information on the first screen, and then choose Next.
3
Verify that the site information displayed is correct. To change site information:
a. Click Site Info.
b. Enter site details in the dialog box that appears. See topic Entering information
about your site for details.
c. Click OK.
4
5
Click Next.
Select the COMM (serial) ports to which battery analyzers are connected:
a. Click Ports Map.
b. Select the serial ports to which battery analyzers are connected in the Ports
Configuration Map that appears. See topic Setting the serial ports connected to
battery analyzers for details.
c. Click OK.
6
7
Click Next.
Set up the format and printer for battery ID labels:
a. Click Battery ID Label.
b. Use the Battery ID Label Designer dialog box to set up battery ID label formatting.
See topic Setting up Battery ID labels for details.
c. Click OK.
8
Click Next.
9
Set up the format and printer service labels:
13
a. Click Service Label.
b. Use the Service Label Designer dialog box to set up service label formatting. See
topic Setting up Service labels for details.
c. Click OK.
10 Click Next.
11 Set up the format and printer for service reports:
a. Click Service Report.
b. Use the Service Report Designer dialog box to set up service report formatting. See
topic Setting up service reports for details.
c. Click OK.
12
13
14
15
Click Next.
Choose a time period from the list to determine your default battery Service-Due period.
Click Next.
Click these system settings to select (check) or clear them according to your
requirements:
a. Auto Print Service Label. Select (check) this option if you want a service label to
print automatically every time a battery service is completed.
b. Auto Print Service Report. Select (check) this option if you want a service report to
print automatically every time a battery service is completed.
c. Save Daily Log. Select (check) this option if you want Cadex BatteryShop to create
a daily log. This feature logs all analyzer messages for 24 hours. The daily log file is
overwritten every 24 hours at midnight.
d. Detailed Analysis Data Reminder. Select (check) this option if on completion of a
battery service you want to be reminded to open the Real-Time Status dialog box and
export the service data to a file. Consult the index to learn how to export real-time
battery service data.
16 Click Next.
17 Click Finish.
14
Setting the serial ports connected to battery analyzers
Note
1
2
BatteryShop will limit analyzer connections to the license version of BatteryShop
purchased. If you find that you cannot move COM Ports to the Ports to search for:
list, you will need to upgrade your BatteryShop license version. Please contact a
Cadex sales representative to purchase an upgrade license.
Click System Setup, and then click Ports Map. The Ports Map dialog box appears.
Move all serial ports to which you have connected battery analyzers from the Ports not
to search for list to the Ports to search for list:
Click the double left arrow (◄◄) to move all ports to the Ports to search for list.
OR
3
Select the serial ports to move from the Ports not to search for list:
To select one port, click that port. The port is highlighted.
To select ports listed consecutively ports, click the first port in the list, hold down Shift
key, and then click the last port in the list. All ports between the first and last are
highlighted.
To select additional ports, hold down the Ctrl key while clicking the ports.
4
5
Click the single left arrow (◄) or double-click the required port to move the ports to the
Ports to search for list.
Move serial ports in the Ports to search for list to which you have NOT connected battery
analyzers to the Ports not to search for list:
Click the double right arrow (►►) to move all ports to the Ports not to search for list.
OR
6
Select the serial ports to move from the Ports to search for list:
To select one port, click that port. The port is highlighted.
To select ports listed consecutively ports, click the first port in the list, hold down Shift
key, and then click the last port in the list. All ports between the first and last are
highlighted.
To select additional ports, hold down the Ctrl key while clicking the ports.
7
8
Click the single right arrow (►) or double-click the required port to move the ports to the
Ports not to search for list.
Click OK.
15
Selecting the language for Cadex BatteryShop menus, dialog boxes, and
messages.
1
2
3
Click System Setup, and then click Language. The Select Language dialog box
appears.
Click the language in which you want dialog box and command text to appear.
Click OK.
Note
The Cadex BatteryShop online Help file is available in English only.
16
Setting up labels and service reports
Cadex BatteryShop has three label and report designers that you can use to customize the
appearance of your battery-ID labels, service labels, and service reports. You also use these
designers to set your label and report printers. Default printers must be selected in order for
Cadex BatteryShop to function correctly even if you do not intend to print labels or reports.
If you are using Windows NT, you must set label and report formats and default printers for
each User Profile under which Cadex BatteryShop is used.
See the following topics for details
Setting up Service labels.
Setting up Battery ID labels.
Setting up service reports.
Setting up Service labels
Before you set up your customized service label format, you must install the correct label
printer driver. See section on Installing label and report printer drivers for details.
1
2
3
Click System Setup, and then click Service Label. The Service Label Designer dialog
box appears displaying the default service-label format.
On the File menu, click Printer Setup.
Enter these settings in the dialog box that appears:
Name. Click the down-arrow button and, from the list that appears, select the DYMO
LabelWriter label printer. If the Dymo LabelWriter label printer does not appear on the list,
you must close Cadex BatteryShop and install the appropriate printer driver before you
continue setting up Service or Battery-ID labels.
Size. Ensure that 30334 2-1/4 in x 1-1/4 in appears in this box. If it does not, click the
down-arrow button and select it from the list that appears.
4
5
6
Orientation. Ensure that the Portrait option is selected.
Click OK.
To customize the service-label format, click the Label Caption menu, and then click Use
Custom Label. The Custom Label form appears in the Service Label Designer.
Under Label Field, select (check) the fields you want to appear on your customized
service label. Clear any fields you do not want to include on the label.
If the checked fields do not appear in the Designer Area, click the Label Caption menu,
and then click Set Default Positions. The checked fields should now appear outside of
the Print Area under the label.
7
8
In the label-preview area, click and drag the field names to position them as desired. You
can move all the fields in the Print Area at once by dragging the Print Area to the desired
location.
If you are creating a custom service-label format, click the File menu, and then click Test
Print to print out a sample label so you can verify your label format. (This menu
command is not available if you are using the default service-label format)
If any of the fields do not appear properly or appear cut off, reposition them or the Print
Area in the designer, and then choose Test Print again.
17
9
Click OK to save your settings and close the Service Label Designer.
Note:
If you plan to use a different Label Printer, you can follow the instructions above
substituting the Printer Driver and Paper Size for your Label Printer.
Setting up Battery ID labels
Before you set up your battery ID labels, you must install the correct label printer driver.
1
2
3
Click System Setup, and then click Battery ID Label. The Battery ID Label Designer
dialog box appears.
On the File menu, click Printer Setup.
Enter these settings in the dialog box that appears:
Name. Click the down-arrow button and, from the list that appears, select the DYMO
LabelWriter label printer. If the DYMO LabelWriter label printer does not appear on the
list, you must close Cadex BatteryShop and install the appropriate printer driver before
you continue setting up Service or Battery-ID labels.
Size. Ensure that 30334 2-1/4 in x 1-1/4 in appears in this box. If it does not, click the
down-arrow button and select it from the list that appears.
4
5
6
7
Orientation. Ensure that the Portrait option is selected.
Click OK.
Under Label Field, select (check) the fields you want to appear on your Battery ID labels.
Clear any fields you do not want to include on the labels.
In the label-preview area, click and drag the field names to position them as desired. You
can move all the fields in the Print Area at once by dragging the Print Area to the desired
location.
On the File menu, click Test Print to print out a sample label so you can verify your label
format.
If any of the fields do not appear properly or appear cut off, reposition them or the Print
Area in the designer, and then choose Test Print again.
8
If you have included the bar code on your label, test the bar code by scanning it with a
bar-code scanner.
If the scanner cannot read the bar code, it was probably cut off. Reposition it on the label,
print a test label, and try the scan again.
9
Click OK to save your settings and close the Battery ID Label Designer.
Note:
If you plan to use a different Label Printer, you can follow the instructions above
substituting the Printer Driver and Paper Size for your Label Printer.
18
Setting up service reports
Before you set up your service reports, you must install an appropriate printer driver.
1
2
3
Click System Setup, and then click Service Report. The Service Report Designer dialog
box appears displaying the default service-report format.
On the File menu, click Printer Setup.
Enter these settings in the dialog box that appears:
Name. Click the down-arrow button and, from the list that appears, select the printer on
which to print service reports. If your standard printer does not appear on the list, you
must close Cadex BatteryShop and install the appropriate printer driver before you
continue setting up service reports.
Size. Click the down-arrow button and, from the list that appears, select the size of the
paper on which you want to print service reports.
Source. Click the down-arrow button and, from the list that appears, select the printer
tray that holds the paper on which you want to print service reports. Choices available
depend on the selected printer.
Orientation. Select an option:
Portrait. The report page is taller than it is wide.
4
5
Landscape. The report page is wider than it is tall.
Click OK.
If you want to use the default service-label format, go to step 9.
If you want to customize the service-label format, click the Options menu, and then click
Use Custom Report. The Custom Report form appears in the Service Label Designer.
6
7
8
Under Label Field, select (check) the fields you want to appear on your customized
service report. Clear any fields you do not want to include in the report.
In the report-preview area, click and drag the field names to position them as desired.
On the File menu, click Test to print out a sample report so you can verify your report
format.
If any of the fields do not appear properly or appear cut off, reposition them in the
designer, and then choose Test again.
9
Click OK to save your settings and close the Service Report Designer.
19
Entering information about your site
1
2
Click System Setup, and then click Site Information. The Site Information dialog box
appears.
Enter the appropriate information into these required text boxes:
Site Name. Type the site name within your organization.
Company Name. Type the name of your organization.
Serial Number. Type the Cadex BatteryShop serial number found on the back of your
Cadex BatteryShop CD jewel case.
Phone No.: Type the phone number for your site.
This information must be entered in order to be able to use Cadex BatteryShop.
3
You can also type information into any combination of these text boxes, as needed:
Manager. Type the name of the site manager.
Street. Type the street address for the site.
City. Type the name of the city in which the site is located.
Province/State. Type the name of the province or state in which the site is located.
Zip/Postal Code. Type the zip code or the postal code for the address of the site.
Email address. Type the e-mail address of the site manager or other person responsible
for working with Cadex BatteryShop.
Notes. Enter any additional information that you might find useful. An example might be
the types and serial numbers of connected battery analyzers.
4
Click OK.
20
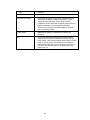
Set System Options
Some BatteryShop features can be customized to suit the operator’s preferences.
Click System Setup, and then click Options. The System Setup Options dialog box appears.
System Options include the following preferences:
1
Battery ID Service Due Period. The default setting is blank. However, if you want
BatteryShop to stamp the Service Due date on the Battery ID service label, you must
specify a Service Due period. Click the down-arrow button to display a list of Service
Due periods, and select the period you want to use for the Service Due period.
2
Auto Print Service Report. Select (check) this box if you want Cadex BatteryShop to
print a service report.
If you want reports to print when the battery is removed, check the “Print Label/Report
when battery is removed” checkbox. Leaving the “Print Label/Report when battery is
removed” checkbox unchecked will cause reports to print automatically when the
analyzer has finished servicing a battery.
3
Auto Print Service Label. Select (check) this box if you want Cadex BatteryShop to
print a battery service label.
If you want labels to print when the battery is removed, check the “Print Label/Report
when battery is removed” checkbox. Leaving the “Print Label/Report when battery is
removed” checkbox unchecked will cause labels to print automatically when the analyzer
has finished servicing a battery.If you want duplicate Service Labels printed, check the
“Print duplicate service labels” checkbox. Leaving the “Print duplicate service labels”
checkbox unchecked will cause a single service label to print.
4
Print on Pass. Select (check) this box if you want Cadex BatteryShop to print a battery
service label only if a Battery Service passes.
5
Print on Fail. Select (check) this box if you want Cadex BatteryShop to print a battery
service label only if a Battery Service fails.
6
Print Label/Report when battery removed. Select (check) this box if you want Cadex
BatteryShop to print a battery service label after service completion only when a Battery
is removed from an adapter.
7
Print duplicate Service Labels. Select (check) this box if you want Cadex BatteryShop
to print duplicate service labels.
8
Detailed Analysis Data Reminder. Select (check) this option if on completion of a
battery service you want to be reminded to open the Real-Time Status dialog box and
export the service data to a file. See Appendix for details on exporting real-time batteryservice data.
Secure Database Access. Select (check) this option if you want to secure the
BatteryShop database. Once the database is secure, it is not possible to add, modify, or
delete existing battery model or Program records. You can add new Battery Ids via
Quick Entry.
9
See topic Set or change the password for details on changing the security password..
10 Prompt to un-retire Battery ID before service start. Select (check) this box to be
prompted each time a service is requested for a Battery ID that has been retired. Clearing
21
the box will suppress the prompt and the Battery ID will become un-retired the moment
that the service starts.
11 Retire Battery if Target Cap. not met. Select (check) this option if you want to retire a
Battery ID if Target Capacity is not met. If you select this option, BatteryShop will prompt
you to un-retire a retired Battery ID the next time you try to service the Battery ID.
12 Capture Data After Service Completion. Select (check) this option if you want
BatteryShop to continue data capture for a service after service completes. The default
setting is OFF. If you select this option, service data will continue to be collected after the
service completes. Setting this option OFF could help to keep the database from growing
rapidly.
This feature is particularly useful when a program applies a Trickle Charge to the battery
to keep the battery fully charged after the service completes. In some of these cases, a
battery could become over-charged or have it’s protection circuitry tripped resulting in a
warning message from the analyzer. In such cases, turning this feature OFF will prevent
the Battery Service Status from changing from PASS to FAIL after a service has
completed.
13 Save Daily Log. Select (check) this option if you want Cadex BatteryShop to create a
daily log.
This feature logs all analyzer messages for 24 hours. The daily log file is overwritten
every 24 hours at midnight..
14 Save Real-Time Data. Select (check) this option if you want to save the real-time data
(voltage, amperage, temperature, and impedance) to the database.
If you do not select this option, real-time data is saved in a temporary database, which is
emptied and compacted each you start Cadex BatteryShop. You will not be able to
display battery characteristics or cycle graphs for service records.
Note. If your computer does not have a UPS (uninterruptible power supply) device, it is
strongly recommended that you not select this option. Selecting this option means that
during battery service, your database is updated once every minute. If you do not have a
UPS device and your power fails during a database update, your Cadex BatteryShop
database will be corrupted and you will not be able to access your data..
15 Display Capacity As. Choose % or mAh as the display unit whenever capacity is
reported in reports or labels.
16 Select the required Analyzer Icon display size (Small, Medium, or Large).
17 Select the options for QuickTest and QuickSort Result formats.
Service Options include preferences that control the behavior of the Analyze Battery form:
1
Visible Analyze Battery Pages. This is a checkbox list of visible Analyze Battery pages.
The Analyze Battery form offers several methods, via distinct pages on the form, to start
a battery service. It is possible to hide pages on the Analyze Battery form that are never
used. This feature allows an end-user to have some control on the complexity of the
Analyze Battery form.
Select (check) the checkbox(s) for the pages you want to be visible and clear the
checkbox(s) for the pages you do not want to be visible on the Analyze Battery form.
22
2
3
4
Serial Number Entry. Select (check) this option (default) if you want BatteryShop to
display the Serial No. combo box control on the Quick Entry page of the Analyze Battery
form. Uncheck this option to hide the Serial No. control.
Auto-Print Battery ID label. Select (check) this option (default) if you want BatteryShop
to print a long Battery ID barcode label each time a new long Battery ID is created via the
Quick Entry page on the Analyze Battery form. Uncheck this option to disable Auto long
Battery ID printing.
Quick Entry Target Capacity. Specify the Target Capacity (default 80%, range 50% 150%) for a Quick Entry Service.
Click Close to close the System Setup Options form.
Other Software includes controls to enable/disable BatteryShop interfaces that have links to
other software. Select (check) Phone Checker checkbox to enable it or clear (un-check) to
disable it.
If the Phone Checker interface is enabled and Will’tek Phone Checker is installed on the
same machine, it is possible to launch Phone Checker from the following locations within
Cadex BatteryShop:
1
2
From the Cadex BatteryShop main window, click Analyzers, and then click Analyze
Phone.
From the Quick Entry page of the Analyze Battery – Battery Information window, click
Launch Phone Checker.
DB Backup includes controls to configure frequency and location of database backup. The
database will be backed-up to the specified location after the specified number of days have
passed and BatteryShop is re-launched.
1
2
DB Backup frequency (days). Specify an integer in the range 1..365 for the backup
frequency in days. Backup will occur when at least the specified number of days have
passed and BatteryShop is re-launched.
DB Backup Path. Specify a directory by selecting the ellipses button and choosing a
directory inside of which to store the backup database.
Web Update includes controls to specify rules for updating BatteryShop and Proxy Server
settings if you access the Internet via a Proxy Server.
1
2
3
4
5
6
7
The Url control contains the web address for BatteryShop configuration files.
The Password control is also required for BatteryShop to access files located at the
specified address in the Url control.
Check the required checkboxes to specify Rules for Updating BatteryShop (See
Appendix Rules for Updating BatteryShop).
Check the Use Proxy Server checkbox only if you connect to the Internet via a Proxy
Server. Otherwise leave it un-checked.
Specify the IP address for the Proxy Server only if the “Use Proxy Server” checkbox is
checked.
Specify a Proxy Port only if the “Use Proxy Server” checkbox is checked.
Specify a Connection time-out in the range 1..5 only if the “Use Proxy Server” checkbox
is checked.
Set or change the password
23
1
Click System Setup, and then click Security.
If no password currently exists, the Create Password dialog box appears. If a password
has already been set, the Modify Password dialog box appears.
2
3
4
5
Type the old password under Enter old password. If no password was set, leave this
text box blank.
Type the new password under Enter new password.
Type the new password again under Verify new password.
Click OK.
A message appears stating that the password has been modified.
6
Click OK to clear the message from the screen.
Synchronize analyzer and computer clocks
1
Click System Setup, and then click Set Clock.
A message appears stating that the operation was successful.
2
Click OK to clear the message from the screen.
Update Settings
BatteryShop can update Programs, and System Settings via the Internet. This feature
requires a working Internet connection.
Choose the Update Settings option under System Setup menu to update BatteryShop
components over the Internet.
Choose the Update Rules options that you want Web Update to follow to update
BatteryShop:
Replace System Settings based on Web configuration file will reset all BatteryShop
System Settings to their install defaults. This option is unchecked by default.
Replace existing Program records will replace existing Program information with
install defaults.
Add new Program records automatically will add new Program records that don’t
exist in the BatteryShop database.
Choose OK to proceed with Web Update or Cancel to ignore operation.
Note:
To update Battery Models, you must launch the Battery Model form and choose
Model Update
24
Working with the database
Using and editing the database
The Cadex BatteryShop database is made up of several smaller interrelated databases that
you can use to keep track of your customers, your battery service programs, and your battery
inventory, including battery services, programs, and related C-Codes. These databases allow
you to gather and store information about manufacturers, battery models, customers,
individual batteries (through battery ID), battery service programs, and battery services
performed.
Databases are made up of individual records, each one of which has specific fields. All
records contain the same fields, or types of data. Only specific data entered in the fields
differs from record to record. Cadex databases are displayed in a grid format, in which the
records are displayed in rows and the fields in columns. The intersection of a column and a
row displays the data for a specific field in a specific record.
After you add or modify a large number of records in any of the databases, you may find
Cadex BatteryShop runs more slowly. If this is the case, you can compact the database so
that the program is able to find database records more efficiently.
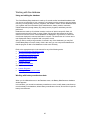
Refer to the appropriate topic in the manual for any of the following tasks:
Working with battery manufacturer data
Working with battery model data
Working with customer data
Working with battery ID data
Database Security
Compact the database
See also
Custom Programs
Working with battery-service data
Working with battery manufacturer data
When you click Manufacturers on the Database menu, the Battery Manufacturers database
window appears.
In this window, you can add a new battery manufacturer record, modify battery manufacturer
records already in the database, delete battery manufacturer records, and search for specific
battery manufacturers.
25
Add a battery manufacturer record
1
2
3
4
From the Cadex BatteryShop main window, click Database, and then click
Manufacturers. The Battery Manufacturers database window appears.
Click Add. The Add Manufacturer dialog box appears.
Type the name of the manufacturer in the Manufacturer Name text box.
Click Add.
Modify a battery manufacturer record
1
2
3
4
From the Cadex BatteryShop main window, click Database, and then click
Manufacturers. The Battery Manufacturers database window appears.
Click Modify. The Modify Manufacturer dialog box appears.
Make the required changes to the name of the manufacturer in the Manufacturer Name
text box.
Click Modify.
Delete a battery manufacturer
You cannot delete battery manufacturer records that have battery model records associated
with them. You must delete the battery model records first.
1
2
3
4
5
Delete any battery models associated with the manufacturer you want to remove from the
database. See topic Delete a battery model from the database for details
From the Cadex BatteryShop main window, click Database, and then click
Manufacturers. The Battery Manufacturers database window appears.
Select the battery manufacturer that you want to delete from the database.
Click Delete.
Click Yes to confirm that you want to delete the record.
Refer to the Appendix to find a record
26
Working with battery model data
When you click Battery Models on the Database menu, the Battery Models database window
appears.
In this window, you can add a new battery model record, modify battery model records
already in the database, delete battery model records, search for specific battery models, sort
and group the battery model records according to a variety of criteria.
Add a battery model
1
2
From the Cadex BatteryShop main window, click Database, and then click Battery
Models. The Battery Models database window appears.
Click Add.
OR
3
4
Right-click a battery model entry in the grid that is made by the same manufacturer as the
battery model you want to add to the database.
Choose Add on the menu that appears.
The Add Battery Model Wizard appears.
5
Follow the on-screen prompts to enter data into the appropriate fields in the new battery
model record.
For more information about the battery C-Code data required, see the battery analyzer User’s
Manual.
Modify a battery model
1
2
3
From the Cadex BatteryShop main window, click Database, and then click Battery
Models. The Battery Models database window appears.
Select the battery model for which you want to change data.
Click Modify.
The Modify Battery Model Wizard appears.
4
Follow the on-screen prompts.
For more information about the battery C-Code data required, see the battery analyzer User’s
Manual.
Delete a battery model
Deleting a battery model deletes all battery IDs that use the model from the Battery ID
database. All service records for the model are also deleted.
27
1
2
3
4
From the Cadex BatteryShop main window, click Database, and then click Battery
Models. The Battery Models database window appears.
Select the battery model you want to delete.
Click Delete.
In the warning or confirmation dialog box that appears, click Yes to confirm deletion of
the battery model and all associated battery ID and service records.
Copy a battery model
1
2
3
4
From the Cadex BatteryShop main window, click Database, and then click Battery
Models. The Battery Models database window appears.
Select the battery model you want to copy.
Click Copy.
A new record with the name “Copy of <original model name>” will appear having the
same properties as the original record.
Modify the C-Code for a battery model
1
2
3
4
From the Cadex BatteryShop main window, click Database, and then click Battery
Models. The Battery Models database window appears.
Select the battery model for which you want to change the extended C-Code.
Click C-Code.
Change these basic C-Code settings as appropriate:
Chemistry
Voltage (V)
Battery Rating (mAh)
5
For NiCd or NiMH batteries, change these extended C-Code settings as appropriate:
Charge Rate (mA)
Discharge Rate (mA)
Trickle Charge (mA)
Recond. Discharge (mA)
Capacity Offset (%)
Temp. Sensing. (°C)
Negative Slope (mV/Cell)
End of Discharge (V/Cell)
End of Recond (V/Cell)
Charge Method
For SLA or Li batteries, change these extended C-Code settings as appropriate:
Charge Rate (mA)
Discharge Rate (mA)
Capacity Offset (%)
Temp. Sensing. (°C)
Max. Standby Voltage (V/Cell).
Max. Charge Voltage (V/Cell).
End of Charge/Topping Charge
End of Discharge (V/Cell)
28
To restore Cadex BatteryShop’s default extended C-Code settings, click Default.
6
7
Click OK.
In the confirmation dialog that appears, click Yes to save the new extended C-Code
settings.
Model Update
You can update your Battery Models database if your PC is connected to the Internet. The
Model Update will follow Web Update Rules, as specified in System Setup Options, to update
battery model records in the database.
Note:
If you delete a battery model record, all associated service records and Battery
ID records will also be deleted.
1
2
From the Cadex BatteryShop main window, click Database, and then click Battery
Models. The Battery Models window appears.
Click Model Update. Click OK on the confirmation dialog. The Web Update will start.
When the update is complete, you will see a dialog displaying the number of records
updated. Click OK to clear the dialog.
Finding, Sorting, and Grouping model records
You can group database records by any category of data, or field, stored in the database.
1
2
Click the column heading for the field by which you want to group the records in the
database.
Drag and drop the column heading cell into the dark grey area just above the column
headings.
Records are sorted into groups according to the heading you chose.
You can now further sort the records within each group by clicking any of the remaining
column headings.
3
If you want to group the records further, you can drag and drop another column heading
cell into the dark grey area beside the first one. You can continue to "daisy-chain" column
headings to group records into smaller and smaller groups.
In this example, battery model records are grouped by manufacturer and then by chemistry.
Within each chemistry group, records are sorted by model. Move the mouse over the
example and click the hotspots (indicated by the hand icon) to see details about different
parts of the grid.
Import battery model data
Cadex BatteryShop can import battery model data from a bsmodels.txt text file created by
another Cadex BatteryShop system.
1
2
3
From the Cadex BatteryShop main window, click Database, and then click Battery
Models. The Battery Models database window appears.
Click Import to select the bsmodels.txt file. If required specify an alternate directory
where the bsmodels.txt file is located. The default location is usually C:\Program
Files\Batshop\Temp.
Choose the bsmodels.txt file and click Open to import the bsmodels.txt file.
29
Export battery model records
You can save your battery model database to a text file that can be imported to other Cadex
BatteryShop databases or opened in other applications.
Method 1:
1
2
3
4
From the Cadex BatteryShop main window, click Database, and then click Battery
Models. The Battery Models database window appears.
To export all battery model records, click Exportwithout choosing any battery model
records. To export a subset of battery model records, use the Ctrl and Ctrl+Shift
keyboard combinations to select the required battery models for export and click Export
Model.
If required specify a directory for the bsmodels.txt file. The default export location is
usually C:\Program Files\Batshop\Temp.
Click Save to save the bsmodels.txt file.
Method 2:
1
From the main Cadex BatteryShop window, click Database, and then click Export
Models.
Cadex BatteryShop creates a comma-separated-values text file called bsmodels.txt.
2
3
Note the location of the text file.
Click OK to close the confirmation dialog box.
Delete matrix for the selected battery model
1
2
3
4
5
From the Cadex BatteryShop main window, click Database, and then click Battery
Models. The Battery Models database window appears.
Use the Ctrl and Ctrl+Shift keyboard combinations to select the required battery model
record(s).
Click Delete Matrix
Choose to delete either the C72/C74/C74ER Series matrix or the C72/C74/C74ER CSeries matrix or both matrix types for the record.
Choose OK to delete the selected matrix type(s).
30
Working with customer data
When you click Customers on the Database menu, the Customers database window
appears.
In this window, you can add a new customer record, modify customer records already in the
database, delete customer records, search for specific customers, and sort and group the
customer records according to a variety of criteria.
Sort, Group, or Search for a customers
Add a customer to the database
1
2
3
4
From the Cadex BatteryShop main window, click Database, and then click Customers.
The Customers database window appears.
Click Add. The Add Customer dialog box appears.
Type the name of the customer in the Customer Name text box.
Type any notes or comments about the customer in the Notes text box.
Some examples might be customer address, phone number, or, if the customer name is
a company, the name of the person you deal with at the company.
5
6
If you want to include the customer in a list of favorite customers, click Include in
Favorites list.
Click Add.
Modify a customer record in the database
1
2
3
4
5
6
From the Cadex BatteryShop main window, click Database, and then click Customers.
The Customers database window appears.
Select the customer for which you want to change data.
Click Modify. The Modify Customer dialog box appears.
Make any required changes to the Customer Name and Notes text boxes.
Click the Include in Favorites list checkbox to select or clear it as needed.
Click Modify.
Delete a customer from the database
Deleting a customer deletes all battery ID and service records for batteries associated with
the customer.
1
2
3
4
From the Cadex BatteryShop main window, click Database, and then click Customers.
The Customers database window appears.
Select the customer that you want to remove from the database.
Click Delete.
In the warning or confirmation dialog box that appears, click Yes to confirm deletion of
the customer and all associated battery ID and service records.
31
Working with battery ID data
When you click Battery IDs on the Database menu, the Battery IDs database window
appears.
In this window, you can add a new battery ID, modify battery ID records already in the
database, delete battery ID records, search for specific battery IDs, print battery ID labels,
and sort and group the battery ID records according to a variety of criteria.
About battery IDs
In general, if you routinely service a fleet that includes a few batteries of a wide variety of
battery models, you will probably find it easiest to create battery IDs and labels as batteries
are brought in for servicing.
If you have a large single-model fleet, however, it might be more convenient to create a large
batch of sequential battery IDs and corresponding ID labels ahead of time, then label the
batteries one by one as they are brought in for service.
When you are dealing with a large fleet of mixed battery models, you will find it easiest to
create distinct groups among your battery ID’s by adding to the numeric ID numbers prefixes
that identify the battery model or group to which the battery belongs. Using group IDs, you
can create and print ahead of time, for example, 200 IDs for each of 4 battery models active
in your fleet. The prefix allows you to identify the right label for each model without confusion
when labeling batches of mixed batteries brought in for service.
Types of Battery IDs
Pure Individual
Individual in Group
Long Battery IDs
Always 10 digits in length.
Battery IDs that belong to a Group. These BIDs
have a prefix of up to 5 characters and a 6 digit
number.
Long Battery IDs allow up to 30 characters and
support a combination of alpha-numeric
characters, the PERIOD, and the DASH ( -)
characters.
Examples of battery IDs with identifying prefixes:
MOT.000001 to MOT.000200
200 battery ID numbers for Motorola
Communications model NTN714AR
NTT.000001 to NTT.000200
200 battery ID numbers for NTT model
TZ-803
RA.000001 to RA.000200
200 battery ID numbers for Racal model
520018
MIT.000001 to MIT.000200
200 battery ID numbers for Mitsubishi
model SW1450
32
Add a battery ID record to the database
1
2
From the Cadex BatteryShop main window, click Database, and then click Battery IDs.
The Battery IDs database window appears.
Click Add.
The Add Battery ID Wizard appears.
3
Follow the on-screen prompts.
Modify a battery ID record
1
2
3
From the Cadex BatteryShop main window, click Database, and then click Battery IDs.
The Battery IDs database window appears.
Select the battery ID for which you want to change data.
Click Modify.
The Modify Battery ID Wizard appears.
4
Follow the on-screen prompts.
Search, Group, or Sort Battery ID records
Delete battery ID records from the database
Deleting a battery ID record deletes all service records for the battery.
1
2
From the Cadex BatteryShop main window, click Database, and then click Battery IDs.
The Battery IDs database window appears.
Select the battery ID record you want to delete.
OR
Select the group of battery ID records you want to delete.
3
4
Tip
Click Delete.
In the warning or confirmation dialog box that appears, click Yes to confirm deletion of
the battery ID or group of battery IDs and all associated service records.
Battery ID groups are identified with G in the Type column of the battery ID database
grid. Individual battery ID records have iG in the Type column.
33
Print battery ID labels
Important! When you are placing a roll of labels on the printer label spool, be sure that the
right side of the spool is adjusted so that it fits snugly against the roll.
1
2
3
4
5
From the Cadex BatteryShop main window, click Database, and then click Battery IDs.
The Battery IDs database window appears.
Select the Battery ID record for which you want to print a battery ID label.
Click Print Label.
Click Yes in the confirmation dialog box that appears.
The label prints to the default printer specified for Battery ID labels.
Tip Before you can print a battery ID label, you must set up the Battery ID label format and
printer.
Import Battery IDs
To import Battery IDs from a text file, a Battery ID file must previously have been exported
from BatteryShop.
If a Battery ID file is available, follow these steps to import the data into BatteryShop:
1
2
Choose Import on the Battery IDs form to display the Open file dialog.
Navigate to the directory containing the file bsbid.txt and choose Open. The Battery IDs
in the file will be imported into the database and the data should appear in the Battery
IDs form.
Export Battery IDs
To export Battery IDs to a text file, follow these steps:
1
2
3
From the Battery IDs form, select the record(s) in the grid to export
Choose Export to display a Save file dialog.
Specify a name for the text file, default is bsbid.txt, and choose OK.
34
Working with battery-service data
Cadex BatteryShop battery-service records provide a valuable store of information about the
batteries you service and manage.
You can create a wide variety of service-data reports using Cadex BatteryShop Reports to
display battery-service records in a grid-style dialog box. You can then work with the records
to create customized reports or graphs of battery characteristics or cycles. You can also
delete individual battery-service records, or save battery-service records to a variety of file
formats for export to other Cadex BatteryShop databases or use with other types of
programs.
There are three main report types available:
Service History provides a complete history of service records for selected batteries.
Service Counts provides the total number of services and failures for selected batteries.
Battery ID Service Due displays services that are due for selected battery IDs.
This report is available only for battery IDs that have a Service Due Period specified.
You can run these reports for a number of different combinations of serviced batteries:
All batteries.
All batteries for a specific customer.
All batteries of a specific model.
All batteries of a specific model for a specific customer.
An individual battery.
You can specify for each of these combinations (except for an individual battery) whether you
want to include only active batteries, only retired batteries, or both active and retired
batteries. You can also specify service dates.
Cadex BatteryShop Reports runs independently of Cadex BatteryShop. You can open it from
within Cadex BatteryShop by selecting Database and then selecting Reports, or you can
choose it from the BatteryShop group in the Windows Start menu. Cadex BatteryShop does
not need to be running to start Cadex BatteryShop Reports.
Refer to either of the following topics for more details:
Display battery-service records
Creating battery-service reports
Graph Battery Characteristics
1
Display battery-service information, selecting View Services as the Query Type.
The Services database window appears.
35
2
3
4
Select the battery-service record for which you want to graph battery characteristics.
On the View menu, click Battery Characteristics Graph to display the data in graph
format.
You can use the controls in the window to specify starting and ending points for
displaying data, and to format, print, and export the battery characteristics graphs.
Note
In order to be able to display battery characteristics graphs, the Save Real-Time Data
system option must be selected. See topic on setting System Options for instructions
on how to do this.
Graph Cycles
Cycle Graphs display capacities taken at the end of each Discharge cycle for selected
service(s).
A full-discharge is required for the analyzer to return a capacity for the cycle. A discharge with
a User-defined timeout that does not result in a full discharge will not store the capacity to the
database. In such a case, the Cycle Graph will not have the data to plot the capacity prior to
the user defined discharge time-out.
1
Display battery-service information, selecting View Services as the Query Type.
The Services database window appears.
2
3
4
Select the battery-service record(s) for which you want to graph cycles.
On the View menu, click Cycle Graph to display the cycle data in graph format.
You can use the controls in the window to specify starting and ending points for
displaying data, and to format, print, and export the battery characteristics graphs.
Note
In order to be able to display cycle graphs, the Save Real-Time Data system option
must be selected. See topic on setting System Options for instructions on how to do
this.
Setting this option one-time, prior to running services, is important so that BatteryShop
saves service data.
36
Exporting battery characteristic graph data to a Microsoft Excel file
1
From the Battery Characteristic Graph, choose the Export Graph button.
The Export Data dialog appears.
2
Specify the Directory and Filename for the .csv file and choose Save.
Exporting battery-service data
You can save your service-history, service-count, and service-due reports as Microsoft Excel
or HTML files.
Service data records can also be saved as Cadex BatteryShop files for importing into another
Cadex BatteryShop system
Refer to the appropriate topic for the following tasks:
Save service data to a Cadex BatteryShop file
Save service data to a Microsoft Excel file
Save service data to an HTML file
Delete battery-service records
1
Display battery-service information. See topic Display battery-service records for details.
You must choose View Services as the Query Type. The Services database window
appears.
2
3
4
Select the battery-service record(s) you want to delete. See topic Select battery-service
records for details.
From the Actions menu, click Delete Selected Records.
Click OK to confirm record deletion.
Note
Service records currently in use by Cadex BatteryShop cannot be deleted.
Compact the database
1
If Cadex BatteryShop is currently connected to any Cadex battery analyzers (you see
analyzer icons in the dark-red analyzer area), you must end the connection before you
can compact the database. The only way to do this is to exit Cadex BatteryShop and then
restart the program.
This does not affect any battery service programs running on the analyzers; however,
service data will not be saved to Cadex BatteryShop.
2
From the Cadex BatteryShop main window, click Database, and then click Compact DB.
37
Servicing batteries
You can service batteries by entering the battery model or the unique battery ID and selecting
the program you want to run. You can also service batteries by entering battery specifications
manually.
When you service batteries, the Cadex BatteryShop main window displays an icon for each
connected analyzer that is turned on. Icons are arranged by the number of the COM Port to
which the analyzer is connected, starting in the top left corner. You can, however, drag and
drop these icons anywhere you want within the dark-red analyzer icon area.
You can also display a window on-screen that updates the status of the battery service once
a minute or whenever there is a change in service status.
Before you can service batteries, you must ensure that the battery analyzers are properly
connected to the computer, and that Cadex BatteryShop is communicating with the
connected analyzers.
Refer to the following topics for more details on servicing batteries:
Connect to battery analyzers.
Service batteries by model number.
Service batteries by Battery ID.
Service favorite battery models.
Service batteries by favorite battery ID
Service batteries by entering battery specifications.
Connect to battery analyzers
1
2
From the Cadex BatteryShop main window, click Analyzers, and then click Connect.
Click Yes in the confirmation dialog box that appears.
Cadex BatteryShop searches for battery analyzers connected to the serial ports listed in the
Ports Configuration map. Refer to the Appendix topic Set the serial ports connected to
battery analyzers for more information.
When it has connected with the available battery analyzer(s), it shows each analyzer as an
icon in the dark-red analyzer window. Refer to the Appendix for details on Analyzer Icon
colors.
Tip Before Cadex BatteryShop can communicate with your Cadex battery analyzers, the
analyzers must be connected to the computer (See topic Connecting battery analyzers to the
computer for details), and the Cadex BatteryShop Ports map must be configured to look for
the analyzers on the serial ports to which they are connected (See topic Setting up battery
analyzers for details).
Note
BatteryShop will limit analyzer connections to the license version of BatteryShop
purchased. If you need to connect to more analyzers, please contact a Cadex sales
representative to upgrade your BatteryShop license version.
It is important that all connected analyzers have the required Firmware version for correct
BatteryShop operation. See Appendix topic Ports with incorrect firmware version for
more details.
38
Service batteries by model number
1
2
3
4
5
Turn on the battery analyzer(s). Do not insert any batteries yet; however, you can insert
battery adapters.
Ensure Cadex BatteryShop has connected to the battery analyzers. See topic Connect
to battery analyzers for more details?
From the Cadex BatteryShop main window, click Analyzers, and then click Analyze
Battery. The Analyze Battery – Battery Information dialog box appears.
Click By Model.
Enter the model number in the Battery Model text box:
Type the model number.
OR
If the model is one that has been serviced recently, click the down-arrow button beside
the text box to display a list of recently serviced battery models, and select the model
number from the list.
OR
Click the record for the model number in the battery model database grid (see Tip
below).
The status bar at the bottom of the dialog box should display the Ready to accept
batteries! message, along with the model number and customer name.
6
If you want to include the customer name in the service record:
Type the name in the Customer Name text box.
OR
7
If the customer is in the customer database, click the down-arrow button beside the text
box to display the list of customers in the database, and select the customer name from
the list.
Enter these settings:
Auto Print Service Report. Select (check) this option if you want Cadex BatteryShop to
print a service report automatically when service is complete.
Auto Print Service Label. Select (check) this option if you want Cadex BatteryShop to
print a service label automatically when service is complete.
Target Capacity (%). Enter the target capacity for the battery, as a percentage of the
manufacturer’s stated capacity for the model. If the battery does not reach this pass/fail
benchmark, the Auto program runs automatically to recondition the battery. See
Appendix topic Target capacity for more details.
Station Program. Select a program to use to service the battery from the list of available
programs.
Analyze Mode. Choose Single to service one battery or Batch to service several
batteries of the same model.
39
8
To verify or change the extended C-Code settings for the battery model, click Advanced.
Enter the appropriate settings as required.
9 Specify service notes to associate with this service record.
10 Insert the first battery in an analyzer battery station.
11 If you selected the Batch Analyze Mode in step 7, insert the next battery when the
Service Started message appears in the status bar.
Repeat until all batteries to be serviced have been inserted in analyzer battery stations
and service has started.
12 Click Done when you have no more batteries to service.
The Analyze Battery – Battery Information dialog box closes, but battery service continues
until complete, or until you interrupt it by removing the battery from the station.
Note
Battery service continues even if you exit from Cadex BatteryShop; however, service
records are not created.
Tip
You can sort and group the records in the battery model database grid to make it
easier to find the model you want to service.
See Appendix on how to Sort records.
See Appendix on how to Group records.
40
Service batteries by Battery ID
1
2
3
4
5
Turn on the battery analyzer(s). Do not insert any batteries yet; however, you can insert
battery adapters.
Ensure Cadex BatteryShop is communicating with the battery analyzers. See topic
Connect to battery analyzers for more details.
From the Cadex BatteryShop main window, click Analyzers, and then click Analyze
Battery. The Analyze Battery – Battery Information dialog box appears.
Click By Battery ID.
Enter the ID number in the Battery ID text box:
Type the battery ID number.
OR
If the battery is one that has been serviced recently, click the down-arrow button beside
the text box to display a list of recently serviced battery IDs, and select the battery ID
from the list.
OR
Click the record for the battery ID in the battery ID database grid (see Tip below).
The status bar at the bottom of the dialog box should display the Ready to accept
batteries! message, along with the battery ID number.
6
Enter these settings:
Auto Print Service Report. Select (check) this option if you want Cadex BatteryShop to
print a service report automatically when service is complete.
Auto Print Service Label. Select (check) this option if you want Cadex BatteryShop to
print a service label automatically when service is complete.
Target Capacity (%). Enter the target capacity for the battery, as a percentage of the
manufacturer’s stated capacity for the model. If the battery does not reach this pass/fail
benchmark, the Auto program runs automatically to recondition the battery. See
Appendix topic Target capacity for more details.
Station Program. Select a program to use to service the battery from the list of available
programs.
7 To verify or change the extended C-Code settings for the battery model, click Advanced.
Enter the appropriate settings as required.
8 Specify service notes to associate with this service record.
9 Insert the battery in an analyzer battery station.
10 Click Done when the Service Started message appears in the status bar.
The Analyze Battery – Battery Information dialog box closes, but battery service continues
until complete, or until you interrupt it by removing the battery from the station.
Note
Battery service continues even if you exit from Cadex BatteryShop; however, service
records are not created.
Tip
You can sort and group the records in the battery ID database grid to make it easier
to find the battery you want to service.
See Appendix on how to Sort records.
See Appendix on how to Group records.
41
Service favorite battery models
1
2
3
4
5
Turn on the battery analyzer(s). Do not insert any batteries yet; however, you can insert
battery adapters.
Ensure Cadex BatteryShop is communicating with the battery analyzers. See topic
Connect to battery analyzers for more details?
From the Cadex BatteryShop main window, click Analyzers, and then click Analyze
Battery. The Analyze Battery – Battery Information dialog box appears.
Click By Favorite Model. Only battery model records that have been selected as
favorites appear in the battery model database grid.
Click the record for the battery model you want to service (see Tip below).
The status bar at the bottom of the dialog box should display the Ready to accept
batteries! message, along with the model number and customer name.
6
Enter these settings:
Auto Print Service Report. Select (check) this option if you want Cadex BatteryShop to
print a service report automatically when service is complete.
Auto Print Service Label. Select (check) this option if you want Cadex BatteryShop to
print a service label automatically when service is complete.
Target Capacity (%). Enter the target capacity for the battery, as a percentage of the
manufacturer’s stated capacity for the model. If the battery does not reach this pass/fail
benchmark, the Auto program runs automatically to recondition the battery. See
Appendix topic Target capacity for more details.
Station Program. Select a program to use to service the battery from the list of available
programs.
Analyze Mode. Choose Single to service one battery or Batch to service several
batteries of the same model.
7
To verify or change the extended C-Code settings for the battery model, click Advanced.
Enter the appropriate settings as required.
8 Specify service notes to associate with this service record.
9 Insert the first battery in an analyzer battery station.
10 If you selected the Batch Analyze Mode in step 7, insert the next battery when the
Service Started message appears in the status bar.
Repeat until all batteries to be serviced have been inserted in analyzer battery stations
and service has started.
11 Click Done when you have no more batteries to service.
The Analyze Battery – Battery Information dialog box closes, but battery service continues
until complete, or until you interrupt it by removing the battery from the station.
Note
Battery service continues even if you exit from Cadex BatteryShop; however, service
records are not created.
Tip
You can sort and group the records in the battery model database grid to make it
easier to find the model you want to service.
See Appendix on how to Sort records.
See Appendix on how to Group records.
42
Service batteries by favorite battery ID
1
2
3
4
5
Turn on the battery analyzer(s). Do not insert any batteries yet; however, you can insert
battery adapters.
Ensure Cadex BatteryShop is communicating with the battery analyzers. See topic
Connect to battery analyzers for more details.
From the Cadex BatteryShop main window, click Analyzers, and then click Analyze
Battery. The Analyze Battery – Battery Information dialog box appears.
Click By Favorite Battery ID. Only battery ID records that have been selected as
favorites appear in the battery ID database grid.
Click the record for the battery model you want to service (see Tip below).
The status bar at the bottom of the dialog box should display the Ready to accept
batteries! message, along with the battery ID number.
6
Enter these settings:
Auto Print Service Report. Select (check) this option if you want Cadex BatteryShop to
print a service report automatically when service is complete.
Auto Print Service Label. Select (check) this option if you want Cadex BatteryShop to
print a service label automatically when service is complete.
Target Capacity (%). Enter the target capacity for the battery, as a percentage of the
manufacturer’s stated capacity for the model. If the battery does not reach this pass/fail
benchmark, the Auto program runs automatically to recondition the battery. See
Appendix topic Target capacity for more details.
Station Program. Select a program to use to service the battery from the list of available
programs.
7 To verify or change the extended C-Code settings for the battery model, click Advanced.
Enter the appropriate settings as required.
8 Specify service notes to associate with this service record.
9 Insert the battery in an analyzer battery station.
10 Click Done when the Service Started message appears in the status bar.
The Analyze Battery – Battery Information dialog box closes, but battery service continues
until complete, or until you interrupt it by removing the battery from the station.
Note
Battery service continues even if you exit from Cadex BatteryShop; however, service
records are not created.
Tip
You can sort and group the records in the battery ID database grid to make it easier
to find the battery you want to service.
See Appendix on how to Sort records.
See Appendix on how to Group records.
43
Service batteries by entering battery specifications
1
2
3
4
5
Turn on the battery analyzer(s). Do not insert any batteries yet; however, you can insert
battery adapters.
Ensure Cadex BatteryShop is communicating with the battery analyzers. See topic
Connect to battery analyzers for more details.
From the Cadex BatteryShop main window, click Analyzers, and then click Analyze
Battery. The Analyze Battery – Battery Information dialog box appears.
Click Manual Entry.
Enter these settings according to the battery manufacturer’s specifications.
Chemistry. Select the battery chemistry from the list. Chemistry is often labeled on the
battery.
Voltage. See Appendix topic Battery Voltage (volts) for more details.
Rating. See Appendix topic Battery Rating (mAh) for more details.
The status bar at the bottom of the dialog box should display the Ready to accept
batteries! message, along with the chemistry, voltage, and rating settings.
6
Enter these settings:
Auto Print Service Report. Select (check) this option if you want Cadex BatteryShop to
print a service report automatically when service is complete.
Auto Print Service Label. Select (check) this option if you want Cadex BatteryShop to
print a service label automatically when service is complete.
Target Capacity (%). Enter the target capacity for the battery, as a percentage of the
manufacturer’s stated capacity for the model. If the battery does not reach this pass/fail
benchmark, the Auto program runs automatically to recondition the battery. See
Appendix topic Target capacity for details.
Station Program. Select a program to use to service the battery from the list of available
programs.
Analyze Mode. Choose Single to service one battery or Batch to service several
batteries of the same model.
7
To verify or change the extended C-Code settings for the battery model, click Advanced.
Enter the appropriate settings as required.
8 Specify service notes to associate with this service record.
9 Insert the battery in an analyzer battery station.
10 Click Done when the Service Started message appears in the status bar.
The Analyze Battery – Battery Information dialog box closes, but battery service continues
until complete, or until you interrupt it by removing the battery from the station.
Note
Battery service continues even if you exit Cadex BatteryShop; however, service
records are not created.
44
Service batteries by Battery ID or Battery Model
1
2
3
4
5
Turn on the battery analyzer(s). Do not insert any batteries yet; however, you can insert
battery adapters.
Ensure Cadex BatteryShop is communicating with the battery analyzers. See Connect to
battery analyzers for more details.
From the Cadex BatteryShop main window, click Analyzers, and then click Analyze
Battery. The Analyze Battery – Battery Information dialog box appears.
Click Quick Entry.
Enter the following information to start a Quick Entry service.
Serial No.
Model#.
Program.
The Serial No. combo box is visible only if the option is set (default) in System Setup
Options (Service Options page). The combo box lists favorite battery IDs only.
The Model# dropdown box only lists favorite battery models from which to select a model
to associate with the Serial#. You cannot type into the Model# dropdown control. If a
battery model is already associated with a Serial#, the Model# control will be disabled
and it will not be possible to associate another model with the Serial# via the Quick Entry
screen. However, it is possible to associate a different battery model to the Serial# via
the Modify Battery ID Wizard.
The status bar at the bottom of the dialog box should display the Ready to accept
batteries! message, along with the chemistry, voltage, and rating settings.
6
7
8
Specify service notes to associate with this service record.
Insert the battery in an analyzer battery station.
Click Done when the Service Started message appears in the status bar.
The Analyze Battery – Battery Information dialog box closes, but battery service
continues until complete, or until you interrupt it by removing the battery from the station.
Notes: Battery service, on the analyzer, continues even if you exit Cadex BatteryShop;
however, BatteryShop service records are not updated.
The Other Software interface is strictly for launching other software that can be
launched from BatteryShop. If Phone Checker is installed on the same PC as
BatteryShop, it is possible to launch Phone Checker by clicking on the Launch
Phone Checker button or by clicking Analyzers and then clicking Analyze
Phone in the main BatteryShop window. The Other Software interface can be
disabled by clicking on the Disable Other Software button. The Other Software
interface can be enabled via System Setup Options.
Restarting a service
You can re-start a running service on a C7200/C7400/C7400 ER analyzer.
To re-start the service, right-click on the required analyzer icon station, on the main
BatteryShop window, and choose Restart Service.
Notes: The Analyze Battery window must be closed to restart a service.
You cannot change the Program or C-Code for the service you want to restart.
45
Monitoring battery service
You can use the Cadex BatteryShop Real-Time Status function to keep track of batteryservice progress. The Detail Info form displays information about the battery being serviced
along with real-time values of current, voltage, temperature, capacity, and impedance, or you
can display a chart showing amperage, voltage, battery temperature, and impedance from
the start of service to the current moment.
You can also use the Data Monitor to check the connection between your computer and
analyzer and ensure that data is being communicated between both devices.
Both the real-time status dialog box and the Data Monitor update and display the status of the
battery service once a minute. The Data Monitor also registers any change in service status
(for example, when the battery analyzer switches from Charging to Discharging a battery) as
it happens.
Refer to the following topics for details on monitoring a battery service:
Displaying the current status of batteries being serviced.
Displaying the Data Monitor to verify communication between your computer and analyzers.
Displaying the current status of batteries being serviced
To display real-time battery status
An analyzer icon can have two or four stations depending on the analyzer to which
BatteryShop has connected to on a given COM Port. See Appendix topic Analyzer icon
colors for more details on the meaning of station colors.
The Real-Time Status dialog box appears after double-clicking on the analyzer icon battery
station. You can use this dialog box to view detailed battery information or a chart showing
amperage, voltage, battery temperature, and impedance readings since the start of service,
to print service reports and labels, and to export data to other formats.
You can have Real-Time Status dialog boxes open for up to four battery stations at a time.
Refer to the following topics for more details on the current status of batteries being serviced:
Display detailed battery information.
Display real-time status as a chart.
Print a service report immediately.
Print a service label immediately.
Print a service report at service completion.
Print a service label at service completion
Export real-time battery-service data.
46
Display detailed battery information
1
2
Open the Real-Time Status window for the battery station for which you want to see
battery-service data by double-clicking on the corresponding bar in the analyzer icon.
Click the Detail Info tab, if necessary, to display detailed battery information.
The Detail Info tab displays information about the battery being serviced, including C-Code
settings, as well as these real-time values that are updated to reflect current battery service
as long as the Real-Time Status dialog box is open:
Current. The electrical current (in milliamps) being applied to the battery at the moment.
Battery Status. The service currently being performed on the battery. This is not the
same as the program being run, which is shown as part of the C-Code information. For
example, if you are running the Auto program, Battery Status could read Charge or
Discharge, depending on the current program cycle being performed.
Capacity (1st, 2nd, final). This displays up to three battery capacities measured by the
battery analyzer to the current moment.
If battery capacity is determined more than once during a program, the first number is the
first battery capacity reached, the second number is the second battery capacity reached,
and the third number is the most recent battery capacity reached. If the analyzer has
determined battery capacity only once, the first and third numbers are identical, and the
second is blank.
Voltage. The number of milliVolts per cell currently being applied to the battery.
Temperature. The current battery temperature in degrees Celsius.
Impedance. The most recent impedance (OhmTest) reading (in milliOhms), if available.
47
Display real-time status as a chart
1
Open the Real-Time Status window for the battery station for which you want to see
battery-service data by double-clicking on the corresponding bar in the analyzer icon.
2 Click the Chart tab to display the data charts.
3 If you want to change the size of the chart:
a. Position the mouse cursor on any chart border or corner until you see the cursor
change to a double-headed arrow.
b. Click and drag the border to the size you want.
The Chart tab displays four graphs. For each graph, the x-axis (the horizontal axis) displays
elapsed time in minutes. Each graph displays a different battery service value along its y-axis
(vertical axis):
Amperage (mA). This line graph displays a green line indicating the electrical current
applied to the battery by the analyzer from the start of battery service to the present.
Voltage (mV). This line graph displays a blue line indicating the voltage applied to the
battery from the start of battery service to the present.
Temperature ( C). This line graph displays a red line indicating battery temperature from
the start of service to the present.
Impedance (mOhm). This bar graph displays impedance (OhmTest) readings as purple
bars from the start of service to the present.
Graphs are updated to reflect current values as long as the Real-Time Status dialog box is
open.
Print a service report immediately
1
On the battery analyzer icon, double-click the bar that corresponds to the battery station
for which you want to print a battery service report. The Real-Time Status dialog box
appears.
2 Click File, and then click Print Service Report.
The service report prints on the default printer. It reflects service data completed to the time
the report was printed.
Print a service label immediately
Important! When you are placing a roll of labels on the printer label spool, be sure that the
right side of the spool is adjusted so that it fits snugly against the roll.
1
On the battery analyzer icon, double-click the bar that corresponds to the battery station
for which you want to print a battery service label. The Real-Time Status dialog box
appears.
2 Click File, and then click Print Service Label.
The service label prints on the default label printer.
48
Print a service report at service completion
1
On the battery analyzer icon, double-click the bar that corresponds to the battery station
for which you want to print a battery service report. The Real-Time Status dialog box
appears.
2 Click Options, and then click Auto Print Service Report.
The service report prints on the default printer when the battery service is complete.
Print a service label at service completion
Important! When you are placing a roll of labels on the printer label spool, be sure that the
right side of the spool is adjusted so that it fits snugly against the roll.
1
2
On the battery analyzer icon, double-click the bar that corresponds to the battery station
for which you want to print a battery service label. The Real-Time Status dialog box
appears.
Click Options, and then click Auto Print Service Label.
The service label prints on the default label printer.
Displaying the Data Monitor
From the Cadex BatteryShop main window, click Analyzers, and then click Data
Monitor. The Data Monitor window appears.
The Data Monitor screen should display lines of text to show that Cadex BatteryShop is
communicating with the connected analyzers. If the Data Monitor screen stays blank,
your computer is not communicating with any analyzer. Check the following items:
Is the analyzer properly connected to your computer? See topic Connecting battery
analyzers to the computer for details.
Is your analyzer plugged in to an appropriate power source and turned on?
Is your analyzer set to BatteryShop mode? See topic Setting up battery analyzers for
details.
Is Cadex BatteryShop looking for the analyzer on the appropriate serial port? See topic
Setting the serial ports connected to battery analyzers for details.
Did you connect Cadex BatteryShop to the analyzer? See topic Connect to battery
analyzers for details.
49
Battery Service Programs
Cadex BatteryShop comes with twelve pre-programmed battery services. These programs
are also available on Cadex battery analyzers in stand-alone mode.
Basic Programs
The four basic programs are well suited for most battery service applications:
Auto. See topic Auto Program for details.
Charge. See topic Charge Program for details.
Prime. See topic Prime Program for details.
QuickSort (Cadex 7000 C-Series battery analyzers only) See topic QuickSort Program for
details.
QuickTest (Cadex 7000 Series battery analyzers only). See topic QuickTest Program for
details.
Auto Program
The Auto Program exercises batteries to maintain optimum performance. If the target
capacity of NiCd and NiMH batteries cannot be reached, a reconditioning cycle is
automatically applied.
Use this program to
Restore batteries affected by memory.
Perform routine weekly or monthly battery maintenance.
Identify marginally performing batteries.
Service batteries in unknown condition.
Verify battery condition for warranty claim
Approximate service time at default C-rate:
NiCd and NiMH
2.5 – 10 hours
SLA
20 – 40 hours
Li-ion
6 – 20 hours
Charge Program
The Charge Program applies a fast charge to a battery. No capacity readings are taken and
no discharge is applied.
Use this program to
Charge batteries quickly.
Top up partially discharged or partially used batteries.
Approximate service time at default C-rate:
NiCd and NiMH
1.5 hours
50
SLA
10 hours
Li-ion
4 hours
Prime Program
The Prime Program repeatedly cycles battery until maximum capacity is reached. If capacity
improvement is more than 5% over previous reading, an additional cycle is applied.
Use this program to
Prepare new batteries for field use.
Condition batteries that have been in storage. Do not store Smart Batteries in discharged
state.
Approximate service time at default C-rate:
NiCd and NiMH
5 – 10 hours
SLA
40 – 80 hours
Li-ion
12 – 25 hours
QuickTest Program
The QuickTest program tests battery SoH using data from other batteries of the same model,
as stored in the QuickTest matrix.
If you do not have a QuickTest matrix for the model of battery you want to test, you can
create one using the Learn program.
You can tell whether there is a QuickTest matrix available for your battery by looking up the
battery in your Battery Models database. The Battery Models database has a Confidence
Grade (CG) field. If you see a letter “C” or “B” in the CG column for a battery model, there is a
QuickTest matrix stored in the database for that battery model.
Note: You must be using a Cadex 7200 or a Cadex 7400 battery analyzer with a 16 k battery
adapter to be able to use the QuickTest program.
A QuickTest matrix must be re-learned whenever the C-Code for the battery model is altered.
Otherwise, a QuickTest service for the battery model will yield incorrect SOH readings. The
matrix for the battery model will be erased whenever the C-Code is modified. It is possible to
manually erase a matrix. See Appendix topic Erasing a Matrix for a battery model from the
BatteryShop database for details.
BatteryShop cannot use pre-firmware 6.00 matrices for QuickTest. If you upgraded from a
pre-version 6.00 BatteryShop, the matrices will not be imported into the new database.
Therefore, you will have to run the Learn program again to create a new matrix before you
can run a QuickTest service.
Use this program to
Analyze battery SoH quickly and accurately.
Approximate service time:
All chemistries:
Approximately 2 minutes
51
It is safe to stop a QuickTest service that lasts longer than 15 minutes and assume a poor
battery. Running a QuickTest for a longer duration will not yield better results.
QuickSort Program
QuickSort can only be used with single cell Li-ion batteries with a rating in the range of
500mA – 1500mA to quickly sort a large pool of batteries prior to thorough testing or
conditioning. The battery must have at least 40% State of Charge.
It will determine if a battery’s SoH is good enough to be sent back out in to the field, or if the
battery should be more thoroughly tested so that it can be returned for warranty replacement
or recycled.
A QuickSort percentage result DOES NOT imply battery capacity:
80% or greater implies a good battery.
70% - 79% implies a battery with low SoH that requires priming.
69% or less implies a poor battery that either qualifies for warranty replacement or should be
recycled.
Use this program to
Sort a large number of single cell Li batteries quickly prior to through testing.
Approximate service time:
Single cell Li batteries only: Approximately 30 seconds
Notes:
QuickSort is available only on 16k battery adapters. These adapters are marked with a ‘16K’
label on the rear of the adapter. QuickSort can be selected only when the Li-ion C-Code is
selected.
The battery must have at least 40% State of Charge.
This program works for single cell Li-ion, 3.6V, and 500mA to 1500mAh batteries and with the
FlexArm adapter (07-110-0180).
Advanced Programs
There are also eight specialty programs to meet a wider variety of battery service needs:
OhmTest. See topic OhmTest Program for details.
Runtime. See topic Runtime Program for details.
Self Discharge. See topic Self Discharge Program for details.
Life Cycling. See topic Life Cycling Program for details.
Discharge Only. See topic Discharge Only Program for details.
Extended Prime. See topic Extended Prime Program for details.
Learn (Cadex 7000 C-Series and Cadex 7000 Series battery analyzers only). See topic
Learn Program for details.
52
Boost (Cadex 7000 C-Series and Cadex 7000 Series battery analyzers only). See topic
Power Boost Program for details.
QuickTest (Cadex 7000 C-Series battery analyzers only). See topic QuickTest Program
for details.
For more detailed information about Cadex basic and advanced programs, consult your
Cadex battery analyzer user’s manual.
OhmTest Program
The OhmTest Program tests internal resistance against a user-definable resistance threshold
and passes or fails the battery.
If using a Cadex 7000 C-Series or Cadex 7000 Series battery analyzer, set the analyzer
resistance threshold points (OhmTest setpoints) from Cadex BatteryShop. How?
Use this program to
Check if the battery is in good condition.
Determine if the battery requires to be analyzed further.
Approximate service time:
All chemistries:
Approximately 10 seconds
Runtime Program
The Runtime Program measures the length of time a battery can provide a given current and
remain above its End of Voltage point. The service time of the Runtime Program depends on
the settings.
If using a Cadex 7000 C-Series or Cadex 7000 Series battery analyzer, you can specify the
Runtime program settings from Cadex BatteryShop. See Appendix topic Set analyzer
program options for details
Use this program to
Test runtime of batteries for wireless communications equipment.
53
Self Discharge Program
Reads fully charged battery capacity, recharges and reads the capacity again after a user
definable rest period. If the second reading is lower by 30% or more, the battery is failed.
If using a Cadex 7000 C-Series or Cadex 7000 Series battery analyzer, you can specify the
rest period from Cadex BatteryShop. See Appendix topic Set analyzer program options for
details.
Use this program to
Identify high self discharge on batteries that otherwise may have good capacity readings.
Approximate service time:
NiCd and NiMH
30 hours
SLA
60 hours
Li-ion
50 hours
Life Cycling Program
The Life Cycling Program continuously cycles the battery until capacity drops below the
target capacity. It displays the initial capacity, final capacity, OhmTest result, and self
discharge readings (if included).
Note
This is a destructive test that cycles a battery until it fails. Do not run this program on
a battery you need to use.
Use this program to
Verify battery life cycle.
Estimate performance time.
Approximate service time:
NiCd
1500 cycles
NiMH
500 cycles
SLA
200 – 500 cycles
Li-ion
1000 cycles
54
Discharge Only Program
The Discharge Only Program discharges a battery to the End Of Discharge setting in the
battery’s C-Code.
Use this program to
Determine residual capacity of battery.
Prepare batteries for storage. Do not store Smart Batteries in discharged state.
Determine battery performance under load.
Approximate service time at default C-rate:
NiCd and NiMH
1.5 hours
SLA
20 hours
Li-ion
4 hours
Extended Prime Program
The Extended Prime Program applies a 16-hour trickle charge, followed by cycling to obtain
peak capacity.
Use this program to
Prepare new batteries or batteries that have been in extended storage for use.
Approximate service time at default C-rate:
NiCd and NiMH
21 – 26 hours
SLA
56 – 96 hours
Li-ion
28 – 41 hours
55
Learn Program
The Learn program profiles a battery to create a QuickTest matrix. The QuickTest program
uses the matrix to quickly estimate the State of Health (SoH) of a battery.
Ensure that both the analyzer and adapter used to create a matrix are calibrated.
How to calibrate:
C7x00
Adapter
To create an effective QuickTest matrix follow theses steps:
1
2
3
4
5
6
Calibrate the adapter and ensure that the C-Code for the battery is correct.
If you are using a battery that has not been used for two months or more, run the Prime
program on the battery before running it through the Learn program. Follow precaution
for Nickel-based batteries before running Learn program.
Run the Learn program using a good battery (metered capacity > 80%). After Learn
has completed, take the same battery and run it again in the same adapter using
QuickTest. The final SoH (state of Health) result should be within the range of the actual
battery capacity. If not, erase the matrix (Delete matrix for the selected battery model)
and start over. Once successful, test other batteries of the same capacity if possible to
ensure that the SoH readings are within an acceptable range.
To create the most effective matrix, repeat the previous step with more batteries. It is
recommended to run a Learn program on at least three batteries: above 90% capacity,
70-80% capacity and less than 70% capacity. The batteries can be Learned in any order.
Changing anything in the C-Code, apart from the target capacity and program will erase
the matrix.
You can freeze a matrix from further unwanted augmentation by follow instructions to
protect the matrix.
Note: You must use a Cadex 7000 C-Series or Cadex 7000 Series battery analyzer with a
16kb battery adapter to be able to use the Learn program.
Batteries with resistance above 800mOhm (as measured by OhmTest) should not be
used with the Learn program.
Use this program to
Create QuickTest matrices for a battery model.
Increase QuickTest accuracy for a battery model.
Approximate service time:
All chemistries:
4 – 8 hours per battery for Learn
5 minutes for Q-Learn
56
Power Boost Program
The Power Boost program applies a trickle charge for 60 seconds or until battery voltage
increases past the end-of-discharge voltage setting (whichever comes first), and then
discharges for ten seconds.
Note A Cadex 7000 C-Series or Cadex 7000 Series battery analyzer is required to use the
Boost program.
Use this program to
Reactivate batteries with open or shorted protection circuits, or with voltage so low that
Cadex BatteryShop does not recognize them when they are inserted in battery adapters
in the analyzer.
Approximate service time:
All chemistries:
Approximately 70 seconds
57
Custom Programs
You can also create your own battery service programs to meet your specific needs.
Custom battery service programs
You can create customized battery service programs with any combination of service
operations for specialized battery service needs or for special batteries. Each program can
have up to six phases. See Appendix topic Program Phases for details.
There is no limit to the number of custom programs you can create and store in Cadex
BatteryShop.
It is possible to overheat and damage a battery by using an incorrect or inappropriate
program. For this reason, the use of custom programs is recommended only for those who
have a detailed understanding of batteries and battery maintenance, as well as of how
battery analyzers in the Cadex 7000 series function.
Basic and advanced programs cannot be deleted or modified, although it is possible to copy
and rename an existing program to create a new custom program.
Cadex creates Custom Programs regularly. You can download these programs from the
Cadex Web site (www.cadex.com) and import them into Cadex BatteryShop.
Note
If security is active, you cannot add or delete custom programs, or modify any
settings in custom programs.
Refer to the following topics for more details on Custom programs
Add a custom program.
Create a custom program from an existing program.
Modifying programs.
Delete a custom program.
Import a custom program.
Export a custom program.
58
Add a custom program
1
2
3
From the Cadex BatteryShop main window, click Database, and then click Programs.
The Custom Programs dialog box appears.
Click Add. The Add Custom Program dialog box appears.
Enter these settings:
Program Name. Type a name for your new program.
Analyzer Short Name. Type a shortened version of the program name (to a maximum of
9 characters). This is the name that appears on the battery analyzer display screen.
Set Program as Active. Select (check) this option if you want to be able to select the
program when you are servicing batteries. Clear the option if you do not want to make it
available for battery service.
4 Click Add. The new program appears in the list of programs with the name highlighted.
5 Click Phase 1 in the Program Phases section of the dialog box.
6 Select the actions to be performed in Cycles 1 and 2 and the Test of Phase 1, and enter
any required settings for the chosen actions. See Appendix topic Program Phases for
details.
7 Repeat steps 5 and 6 for Phases 2 through 6.
8 Click Save.
9 In the confirmation dialog box that appears, click Yes.
10 Click OK.
11 Click Close to return to the Cadex BatteryShop main window.
59
Create a custom program from an existing program
You can modify a copy of an existing basic, advanced, or custom program to create a new
custom program quickly.
1
2
3
4
From the Cadex BatteryShop main window, click Database, and then click Programs.
The Custom Programs dialog box appears.
Click the name of the basic, advanced, or custom program you want to copy.
Click Copy. The Copy Custom Program dialog box appears.
Enter these settings in the dialog box that appears:
Program Name. Type a name for your new program.
Analyzer Short Name. Type a shortened version of the program name (to a maximum of
9 characters). This is the name that appears on the battery analyzer display screen.
Set Program as Active. Select (check) this option if you want to be able to select the
program when you are servicing batteries. Clear the option if you do not want to make it
available for battery service.
5
6
7
Click Copy. The new program appears in the list of programs with the name highlighted.
Click Phase 1 in the Program Phases section of the dialog box.
Select the actions to be performed in Cycles 1 and 2 and the Test of Phase 1, and enter
any required settings for the chosen actions. See Appendix topic Program Phases for
details.
8 Repeat steps 5 and 6 for Phases 2 through 6.
9 Click Save.
10 In the confirmation dialog box that appears, click Yes.
11 Click OK.
12 Click Close to return to the Cadex BatteryShop main window.
Modifying programs
You can set any basic, advanced, or custom program as active or inactive. Active programs
are included in the list of Station Programs in the Analyze Battery – Battery Information dialog
box, and are therefore available to use for servicing batteries. See topic Servicing batteries
for details.
You can also edit the name, analyzer name, and program phase settings for any custom
program in your programs database.
Refer to the following topics for details:
Set a program as active or inactive.
Change the name of a custom program.
Modify a custom program.
Import a custom program.
Export a custom program
60
Delete a custom program
Deleting a custom program deletes all related service records.
From the Cadex BatteryShop main window, click Database, and then click Programs. The
Custom Programs dialog box appears.
1
2
3
Select the custom program that you want to delete.
Click Delete.
In the warning or confirmation dialog box that appears, click Yes to confirm deletion of
the program and all associated service records.
Import a custom program
You can import a Custom Program file as a completely new custom program or as an update
to an existing custom program of the same name.
1
2
3
From the Cadex BatteryShop main window, click Database, and then click Programs.
The Custom Programs dialog box appears.
Click Import. The Import Custom Program File dialog box appears.
Select the file to import.
Custom program files have a .cpg extension.
4
Click Open. The imported program appears in the list.
Export a custom program
1
2
3
4
From the Cadex BatteryShop main window, click Database, and then click Programs.
The Custom Programs dialog box appears.
Click the name of the basic, advanced, or custom program you want to export.
Click Export. The Export Custom Programs dialog box appears.
Enter a name for the custom program file.
The file name is automatically given an extension of .cpg.
5
6
If you want to export the program as a read-only file, select (check) the Open as readonly check box.
Click Save.
61
Analyzing and Reporting Service Data
Displaying the current status of batteries being serviced
Working with battery-service data
Cadex BatteryShop battery-service records provide a valuable store of information about the
batteries you service and manage.
You can create a wide variety of service-data reports using Cadex BatteryShop Reports to
display battery-service records in a grid-style dialog box. You can then work with the records
to create customized reports or graphs of battery characteristics or cycles. You can also
delete individual battery-service records, or save battery-service records to a variety of file
formats for export to other Cadex BatteryShop databases or use with other types of
programs.
There are three main report types available:
Service History provides a complete history of service records for selected batteries.
Service Counts provides the total number of services and failures for selected batteries.
Battery ID Service Due displays services that are due for selected battery IDs.
This report is available only for battery IDs that have a Service Due Period specified.
You can run these reports for a number of different combinations of serviced batteries:
All batteries.
All batteries for a specific customer.
All batteries of a specific model.
All batteries of a specific model for a specific customer.
An individual battery.
You can specify for each of these combinations (except for an individual battery) whether you
want to include only active batteries, only retired batteries, or both active and retired
batteries. You can also specify service dates.
Cadex BatteryShop Reports runs independently of Cadex BatteryShop. You can open it from
within Cadex BatteryShop by selecting Database and then selecting Reports, or you can
choose it from the BatteryShop group in the Windows Start menu. Cadex BatteryShop does
not need to be running to start Cadex BatteryShop Reports.
Refer to the following topics for details:
Display battery-service information.
Creating battery-service reports.
Graph Battery Characteristics.
Graph Cycles.
Exporting battery-service data.
Delete battery-service records.
62
Programming Adapters
You can manually program C-Code/Matrix settings on a Cadex battery adapter.
1
2
3
Insert an adapter into a Cadex C7000 Series analyzer.
From BatteryShop, right-click on the analyzer station icon where the adapter was
inserted.
Select C-Code/Matrix Transfer menu option from the context menu to display the CCode/Matrix Transfer dialog.
Troubleshooting
C7000 and C7000ER message and warning codes
For more information about individual messages and warnings, see the battery analyzer
User’s Manual.
Code
0
1
2
3
4
5
6
7
8
9
10
11
12
13
14
15
16
17
18
19
20
21
22
23
26
27
28
Global Message
Detail Message
OFFLINE
NO ADAPT
CHARGE
TRKL CHRG
RECOND
READY
DCHG WAIT
DISCHARGE
INSERT
CHG WAIT
EMPTY
START
COLD WAIT
HOT WAIT
OVERHEAT
FINISHED
WARNING
REMOVED
INTERRUPT
RESTING
INSERTED
RESTING
CAL WAIT
CALIBRATE
REMOVED
OHMTEST
OHMTEST
STATION OFF LINE
NO ADAPTER
CHARGING
TRICKLE CHARGE
RECONDITIONING
READY
DISCHARGE WAIT
DISCHARGING
INSERT THE BATTERY
CHARGE WAIT
NO BATTERY
START BATTERY PROCESSING
BATTERY TOO COLD
BATTERY TOO HOT
BATTERY OVER TEMP
PROCESS COMPLETED
PROGRAM FAULT DETECTED
BATTERY REMOVED
PROCESS SUSPENDED
RESTING XX:XX
BATTERY INSERTED
RESTING XX:XX
SETTING UP CALIBRATION
STATION CALIBRATING
BATTERY REMOVED
RESISTANCE TEST
RESISTANCE TEST
63
Code
29
30
31
32
33
34
35
36
112
113
115
118
120
121
122
123
124
125
126
127
128
129
130
135
142
144
146
150
152
154
156
158
159
160
162
164
170
188
192
195
200
201
202
207
208
Global Message
Detail Message
CALIBRATE
END CYCLE
END CYCLE
RESUMED
END CYCLE
BATSHOP
SM ADP IN
SM BAT IN
WARNING
WARNING
WARNING
WARNING
FAIL 120
SHORT/REV
FAIL 122
FAIL 123
FAIL 124
FAIL 125
FAIL 126
FAIL 127
FAIL 128
FAIL 129
WARNING
FAIL 135
FAIL 142
FAIL 144
FAIL 146
FAIL 150
WARNING
WARNING
FAIL 156
WARNING
FAIL 159
FAIL 160
FAIL 162
FAIL 164
FAIL 170
INTERRUPT
READY
READY
POWER ON
ADAPT IN
ADAPT OUT
SYS-TEMP
FAIL 208
CALIBRATE
CHARGE CYCLE COMPLETE
DISCHARGE CYCLE COMPLETE
CYCLE RESUMED
USER PROGRAMMED TIMEOUT
BATSHOP MODE WAIT
SM-BUS ADAPTER INSERTED
SMART BATTERY INSERTED
CELL MISMATCH
PLATEAU TIMEOUT
TARGET CAPACITY NOT MET
SOFT BATTERY STEP DOWN
OVER VOLTAGE
SHORTED OR REVERSED
BATTERY SHORTED
LOW VOLTAGE TIMEOUT 1
LOW VOLTAGE TIMEOUT 2
NO SLOPE TIMEOUT ZONE 1
LOW VOLTAGE NEGATIVE SLOPE
LOW VOLTAGE TIMEOUT 3
SOFT BATTERY
INTERMITTENT BATTERY
CURRENT RISE
RESISTANCE THRS. EXCEEDED
DISCHARGE TIMEOUT
CHARGE TIMEOUT
RECONDITION TIMEOUT
THERMISTOR FAILURE
LOW VOLTAGE TEMP. RISE
CHRG COMPLETE TEMP. RISE
HOT AT LOW VOLTAGE
CHARGE COMPLETE HOT
TRICKLE CHARGE OVERHEAT
BAD FUSE OR DRIVER
DISCHARGE CURRENT LOW
CHARGE CURRENT LOW
CALIBRATION FAULT
SUSPENDED PROCESS ABORTED
CELL MISMATCH CORRECTED
CAP. IMPROVED TO TARGET
POWER ON
ADAPTER INSERTED
ADAPTER REMOVED
SYSTEM TEMPERATURE HIGH: COOLING
ADAPTER NOT SETUP
64
Code
209
210
211
212
Global Message
Detail Message
FAIL 209
FAIL 210
FAIL 211
PIC ERROR
ADAPTER DATA INVALID
BAD ADAPTER
NULL C-CODE IN ADAPTER
PIC COMMUNICATIONS ERROR
65
Cadex 7000 C-Series and Cadex 7000 Series message and warning codes
For more information about individual messages and warnings, click the detailed message.
Code
Global
Message
Detailed Message
0
OFFLINE
STATION OFFLINE
Station is not reading the adapter.
Remove the adapter and restart
the analyzer.
Make sure all your analyzers have
the same firmware version
number.
Reset the system (see the User’s
Manual for the battery analyzer).
1
NO ADAPT
NO ADAPTER
No battery adapter is inserted, or
the inserted adapter is not
detected. Check contacts. Clean
with a lint-free cotton swab dipped
in 100% isopropyl alcohol.
2
CHARGE
CHARGING
Battery is being charged normally.
3
TRKL CHRG
TRICKLE CHARGE
The reconditioning process is
complete, and the battery is being
recharged.The program has
specified a trickle charge.
4
5
RECOND
READY
RECONDITIONING
READY
Battery is being reconditioned.
Battery is ready. Faults or
warnings (if any) were corrected.
Remove battery and use as
normal.
5
CAP: XX%
CAP. OK
5
CAP: XX%
READY
6
DCHG WAIT
DISCHARGE WAIT
Station is on hold until sufficient
power is available. Wait until other
stations have completed battery
service.
7
DISCHARGE
DISCHARGING
Battery is being discharged
Battery is ready. Faults or
warnings (if any) were corrected.
Battery capacity is as stated.
Remove battery and use as
normal.
Battery is ready. Faults or
warnings (if any) were corrected.
Battery capacity is as stated.
Remove battery and use as
normal.
66
Code
Global
Message
Detailed Message
normally.
8
INSERT
INSERT THE BATTERY
Insert battery in the battery
adapter.
9
CHG WAIT
CHARGE WAIT
Station is on hold until sufficient
power is available. This is normal
if large batteries are being
serviced. Service resumes
automatically when sufficient
power is available to the station.
10
EMPTY
NO BATTERY
No battery is inserted, or the
inserted battery is not detected.
Check contacts. Turn on battery
switch if applicable. Check for
correct battery for the adapter and
adapter contacts. Clean all
contacts. Run Power Boost.
11
START
START BATTERY PROCESS
Battery service has started.
12
COLD WAIT
BATTERY TOO COLD
Battery temperature is below set
value when inserted. The battery
automatically starts processing
when temperature reaches the
minimum value set in the C-Code.
Warm the battery to room
temperature.
13
HOT WAIT
BATTERY TOO HOT
Battery temperature is too hot
when inserted. Allow the battery to
cool or use the analyzer in a
cooler room.
14
OVERHEAT
BATTERY OVER TEMP
Battery has overheated during
charge. Station goes to Resting
(code 19) until the battery cools.
If using a non-OEM battery, the
battery thermistor may be
incorrect for the adapter. Contact
Cadex to upgrade the adapter for
your particular battery.
15
FINISHED
PROCESS COMPLETE
(Code 15, Code 35, Code 36)
Current battery-service program is
complete.
16
WARN 016
PROGRAM HAS FAILED
The custom program has
produced an error, and the Next
statement is not processed. The
program stops. Check the custom
67
Code
Global
Message
Detailed Message
program statements.
Learn program was unable to
update the QuickTest™ matrix
due to poor battery condition,
usually high internal resistance.
Discard the battery and run the
program with a different battery.
17
REMOVED
BATTERY REMOVED
Battery is removed when the
program is complete. This
message appears briefly when the
battery is removed.
18
INTERRUPT
PROCESS SUSPENDED
Battery is removed during service.
Re-insert battery within 5 seconds
to resume service.
19
RESTING
RESTING
Station is in an automatic rest
period specified in the charge
program for NiMH batteries when
temperature sensing for the
adapter is not enabled.
20
INSERTED
BATTERY INSERTED
The battery analyzer detects a
battery in an adapter.
21
RESTING
RESTING
Station is in an automatic rest
period specified in the charge
program for NiMH batteries when
temperature sensing for the
adapter is not enabled.
22
CAL WAIT
SETTING UP CALIBRATION
Station is preparing for a
calibration process.
23
CALIBRATE
STATION CALIBRATING
(Code 23, Code 29) Station is
being calibrated. Process takes 10
- 20 seconds
25
RESUME
PROCESS RESUMING
Battery service is continuing after
a power interruption of one hour
or less. This message appears
after the initial startup screen and
remains until the analyzer
determines the point at which
battery service was interrupted
and resumes the current program
from that point.
26
REMOVED
BATTERY REMOVED
A five-second delay after the
68
Code
Global
Message
Detailed Message
battery is removed when the
program completed.
27
OHMTEST
RESISTANCE TEST
A manually selected or
programmed resistance test for
the battery is in progress.
Program completes in 5 seconds.
28
OHMTEST
RESISTANCE TEST
An automatic resistance test
under the Life Cycling or
QuickTest™ program is in
progress. Program completes in 5
seconds.
29
CALIBRATE
STATION CALIBRATING
(Code 23, Code 29) Station is
being calibrated. Process takes 10
- 20 seconds
30
END CYCLE
CHARGE CYCLE COMPLETE Charge cycle completed. Program
is going to the next step.
31
END CYCLE
DCHG CYCLE COMPLETE
Discharge cycle completed. Program
is going to the next step.
32
RESUMED
CYCLE RESUMED
Power resumed or the battery is
re-inserted into the adapter.
33
END CYCLE
USER PROGRAMMED
TIMEOUT
The time programmed in the
custom program is completed.
The program goes to the next
step.
34
BATSHOP
BATSHOP MODE WAIT
Battery is detected on an analyzer
connected to Cadex
BatteryShop™. Waiting for user to
start battery service in Cadex
BatteryShop. If service has been
started and this message remains,
check the C-Code in Cadex
BatteryShop to ensure that
settings are correct for the battery.
35
FINISHED
PROGRAM COMPLETE
(Code 15, Code 35, Code 36)
Current battery-service program is
complete.
36
FINISHED
PROGRAM COMPLETE
(Code 15, Code 35, Code 36)
Current battery-service program is
complete.
ALERT 112
CELL MISMATCH
For NiCd batteries only. The cells
reach full charge at different times
112
69
Code
Global
Message
Detailed Message
so the negative slope is not well
defined. The program proceeds to
the next cycle as normal. Wait
until processing is complete
because the Auto and Prime
programs attempt to correct this
warning. If corrected, code 192
(Cell mismatch corrected)
appears.
The negative slope in extended CCode may have to be increased to
32 mV/cell or more.
Battery is old or has been in
storage. Operating time may be
reduced. Either monitor battery
use or discard the battery. If the
battery is new, use the Prime
program.
113
ALERT 113
PLATEAU TIMEOUT
115
FAIL 115
TARGET CAPACITY NOT MET Battery capacity is below the
target capacity. The analyzer
attempts to improve the capacity
by reconditioning the battery. Wait
until processing is complete. The
Auto and Prime programs try to
correct this warning. If corrected,
Code 195 (Cap. improved to
target) appears. If not corrected,
Code 116 appears.
116
FAIL 116
118
ALERT 118
TARGET CAPACITY NOT MET Final capacity of the battery is
below the target capacity.
Attempts to improve battery
capacity did not succeed in
bringing capacity above target.
Check that the battery rating
matches the C-Code mAh setting.
Battery may be old and operating
time less than manufacturer's
specification.
CHARGE CURRENT
REDUCED
Battery voltage rising too quickly
70
Battery was fully charged before
full-charge conditions were met.
For SLA and Li batteries only. The
end-of-charge setting in the CCode may have to be increased.
Battery may be old and operating
time less than manufacturer's
specifications.
Code
Global
Message
Detailed Message
while charging. Analyzer is cutting
the charge rate in half and will
attempt to complete service at
lower current rate. Wait until
processing is complete. If voltage
rises again, code 128 (Soft
battery) appears and the program
ends. Charge rate in the extended
C-Code may have to be reduced.
If the battery is new or has been in
storage, use the Prime program.
120
FAIL 120
OVER VOLTAGE
Battery voltage is too high on
insertion. Check the battery
voltage setting in the C-Code.
Safety circuits in Li-ion batteries
may be activated. Discharge the
battery in its original equipment.
Check the electrolyte.
If all fails, discard the battery.
121
REVERSED
BATTERY REVERSED
Negative voltage detected. Battery
may be connected backwards in
the adapter. Ensure that battery
leads are firmly connected to the
battery.
122
SHORTED
BATTERY SHORTED
Battery is not accepting charge in
the initial charge cycle (the
voltage remains low). Check that
the battery voltage is above 0.30
V/cell. The charge rate may have
to be lowered. If all else fails,
discard the battery.
Battery voltage is too low on
insertion. Battery may have
shorted cells. If so, discard
battery.
Ensure battery leads are firmly
connected to the battery.
Battery may be fully discharged.
Recharge battery in its original
charger before placing it in the
analyzer, or run Power Boost.
123
LOW VOLT
LOW VOLTAGE TIMEOUT 1
The battery stopped accepting
charge 1 C-minute into the charge
cycle (see code 122, Battery
shorted).
124
LOW VOLT
LOW VOLTAGE TIMEOUT 2
The battery stopped accepting
charge 10 C-minutes into the
71
Code
Global
Message
Detailed Message
charge cycle (see code 122,
Battery shorted).
125
LOW VOLT
NO NEG. SLOPE TIMEOUT 1 The battery is losing charge faster
that it is being supplied in the
initial charge cycle. The charge
rate in the C-Code may have to be
increased. If all fails, discard the
battery.
126
LOW VOLT
LOW VOLTAGE AT NEG.
SLOPE
127
LOW VOLT
LOW VOLTAGE TIMEOUT 3
128
SOFT
129
FAIL 129
The battery is losing charge faster
than it is being supplied to the
battery in the initial charge cycle.
For NiCd and NiMH batteries only.
The charge rate in the C-Code
may have to be reduced. If
battery is a high capacity NiCd,
reduce the charge rate to 0.5 C.
Otherwise reduce to 0.6 C.If all
fails, discard the battery.
Charge terminated. Correct
voltage could not be obtained in
allotted time due to high battery
capacity for set charge current,
incorrect voltage setting, or
shorted cells. Check C-Code
settings and battery rating.
Replace battery if low voltage
remains.
UNABLE TO CLAMP CHARGE Battery voltage is rising quickly
V
during charging, even after code
118 (Soft battery step down).
Processing has ended.
Battery may be overcharged.
Discharge the battery for 10
minutes, then charge again.
Battery may be a high capacity
type battery. Reduce the charge
rate.
Battery is new. Use the Prime
program to prepare the battery for
use.
Check that correct contacts are
used.
INTERMITTENT BATTERY
72
Battery connection opened five
times in one minute. Check and
clean the battery contacts. Check
that correct contacts are used.
Check that the battery is properly
Code
Global
Message
Detailed Message
inserted. The charge rate in
extended C-Code may have to be
reduced.
Check that the C-Code is correct
for the battery.
Protection circuitry opened at endof-discharge voltage. Increase
end-of-discharge voltage.
For intrinsically safe batteries, use
I/S settings (see the User’s
Manual for the battery analyzer).
130
ALERT 130
CURRENT RISE AT FULL
CHARGE
135
FAIL 135
HIGH CELL RESISTANCE
The battery resistance has
exceeded the OhmTest setpoint
threshold. Program has been
stopped.
136
FAIL 136
HIGH CELL RESISTANCE
The battery resistance has
exceeded the OhmTest setpoint
threshold. Program is complete.
142
TIMEOUT
DISCHARGE TIMEOUT
Battery capacity has exceeded
250% of the rated capacity. Check
that the mAh rating of the battery
matches the C-Code mAh setting.
The discharge rate in the
extended C-Code may have to be
raised.
144
TIMEOUT
CHARGE TIMEOUT
Charge time has exceeded the
expected value for the battery.
Check that the mAh rating of the
battery matches the C-Code mAh
setting.
146
TIMEOUT
RECONDITIOIN TIMEOUT
Recondition time has exceeded
the expected value for the battery.
Program goes to the next cycle.
Check the C-Code settings. The
73
Generally for SLA and Li only.
Battery current suddenly
increased as the end-of-charge
condition was achieved, possibly
indicating a "cell mismatch"
condition. If the SLA battery is a
Hawker cell, use the Hawker CCode settings (see the User’s
Manual for the battery analyzer).
Allow the station to complete
service.
Code
Global
Message
Detailed Message
recondition discharge rate may
have to be raised.
The battery may be intrinsically
safe, preventing deep discharge.
Use I/S settings for the battery
(see the User’s Manual for the
battery analyzer).
Cells are mismatched.
If battery is new, use the Prime
program.
150
FAIL 150
THERMISTOR FAILURE
Battery or adapter thermistor is
open or shorted. Clean the
contacts on the battery. Warm the
battery to room temperature.
The battery thermistor may be
damaged. Check by testing a
known good battery and
comparing; discard battery if
damaged. If the battery is good
and this message persists,
contact Cadex.
Thermistors on non-OEM
batteries may not match those of
OEM batteries and thus may be
inappropriate for the adapter.
Contact Cadex to upgrade the
adapter for your particular battery.
152
TEMP RISE
RAPID HEAT RISE
Battery temperature is rising
rapidly at low voltage (usually at
the initial stage of charge).
Charging is terminated. The
charge rate in the extended CCode may have to be reduced.
The battery may be old or have
shorted cells. Discard the battery.
154
HOT BATT
HEAT TERMINATION
Battery is being charged normally
but temperature is rising rapidly
towards its end-of-charge state.
Wait until processing is complete.
An appropriate WAIT code may
appear until the battery has
cooled before the next process
begins. The charge rate in the
extended C-Code may have to be
lowered. Observe battery
performance. The battery may be
old.
156
FAIL 156
HOT AT LOW VOLTAGE
Battery temperature went to its
74
Code
Global
Message
Detailed Message
maximum setting in the initial
charge cycle. Cool the battery to
the service temperature. Increase
the temperature sensing in the CCode.
The internal cells may have
shorted or the battery is old. Either
monitor battery use or discard.
158
HOT BATT
HEAT TERMINATION
159
FAIL 159
HOT BATT ON TRICKLE
CHARGE
160
FAIL 160
BAD FUSE OR DRIVER
Battery is fully charged but the
temperature is at or above the
maximum value set in the CCode, (see code 154, Chg
complete temp rise). Reduce
charge rate if problem persists.
The temperature on the battery
has exceeded its maximum
setting. The trickle charge stops.
The trickle-charge rate or the
maximum standby voltage in the
extended C-Code may have to be
reduced. Check that the mAh
rating of the battery matches the
C-Code mAh setting. Lower the
room temperature.
The analyzer is not able to supply
current to the battery through its
current drivers. Very low values of
current (about 0 mA) may be
displayed on the analyzer before
this code appears and processing
stops. Unlike primary fuses,
station fuses cannot be replaced
by users.
Check the following items before
contacting Cadex for service:
Ensure that battery and
adapter contacts are
clean.
Verify that mAh rating of
the battery matches the
C-Code mAh setting.
The battery may not be
able to accept the current
load. Lower or raise the
charge rate in the
extended C-Code.
The battery may be
75
Code
Global
Message
Detailed Message
intrinsically safe. Use I/S
settings (see the User’s
Manual for the battery
analyzer).
The battery may be faulty.
Try a different battery in
the same station.
162
FAIL 162
DISCHARGE CURRENT LOW The analyzer cannot discharge
the battery. Very low values of
current (< 50 mA) are displayed
on the analyzer before this code
appears (see code 160, Bad fuse
or driver).
164
FAIL 164
CHARGE CURRENT LOW
Current driver cannot provide the
requested charge current (see
code 160, Bad fuse or driver).
170
FAIL 170
CALIBRATION FAULT
Current cannot pass through
shorted terminal during
calibration. Repeat calibration
procedure (see User’s Manual for
battery analyzer). An AWG 10 (2.5
mm) wire (minimum size) is
recommended to short
contacts/leads.
175
WARN 175
BATTERY UNDERCHARGED
Current cannot pass through
shorted terminal during
calibration. Repeat calibration
procedure (see User’s Manual for
battery analyzer). An AWG 10 (2.5
mm) wire (minimum size) is
recommended to short
contacts/leads.
176
WARN 176
BATTERY OVERCHARGED
Current program completed;
battery SoC (State of Charge) is
too high.
Discharge the battery for 10
minutes, then charge again.
Battery is new. Use the Prime
program to prepare the battery for
use.
Check that correct contacts are
used.
Battery may have a high internal
resistance. Verify with OhmTest
and discard the battery.
76
Global
Message
Detailed Message
177
ALERT 177
BATTERY UNDERCHARGED
Current program completed;
battery SoC (State of Charge) low.
Run the Charge program on the
battery.
178
ALERT 178
BATTERY OVERCHARGED
Current program completed;
battery SoC (State of Charge) is
too high.
Discharge the battery for 10
minutes, then charge again.
Battery is new. Use the Prime
program to prepare the battery for
use.
Check that correct contacts are
used.
Battery may have a high internal
resistance. Verify with OhmTest
and discard the battery.
179
FAIL 179
UNABLE TO LEARN MATRIX
Failure to create or update a
Learn Matrix during a
Learn/Quicklearn service is due to
one or all of the following
conditions:
Code
1
2
3
Target Capacity is not met
Impedance is too high
State of Charge is not in
range.
188
INTERRUPT
SERVICE INTERRUPTED
Battery is removed during service
for more than five seconds.
Program terminated.
192
READY
CELL MISMATCH
CORRECTED
Cell mismatch (code 112) is
corrected through several
charge/discharge cycles. Use the
battery as normal.
195
READY
CAP. IMPROVED TO TARGET Target capacity is achieved or
exceeded after an initial warning
(see code 115, Target capacity
not met).
200
POWER ON
POWER ON
Power is detected inside the
analyzer.
201
ADAPT IN
ADAPTER INSERTED
Adapter is detected on a station. If
message persists, remove and reinsert adapter. If it still persists, reenter the C-Code.
77
Global
Message
Detailed Message
202
ADAPT OUT
ADAPTER REMOVED
Adapter is removed from a station.
If message persists, press ESC
on the battery analyzer.
203
(blank)
PASSWORD ENTERED
System password has been
entered and activated. Password
is required for some actions,
depending on analyzer security
level selected (see the User’s
Manual for the battery analyzer).
204
(blank)
INVALID PASSWORD
ENTERED
An incorrect password has been
entered. Enter the correct
password. If message persists or
if no password should be required,
replace backup battery (see the
User’s Manual for the battery
analyzer).
If correct password is unknown,
contact Cadex with battery
analyzer serial number.
205
(blank)
SECURITY ENABLED
System security has been
activated. Password required for
some actions, depending on
analyzer security level selected
(see the User’s Manual for the
battery analyzer).
206
(blank)
ADAPTER SETUP UPDATED
At least one C-Code in the battery
adapter has been updated by
Cadex BatteryShop.
207
SYST-TEMP
SYSTEM TEMP. HIGH:
COOLING
208
FAIL 208
ADAPTER NOT SET UP
Adapter is not programmed with a
C-Code, or the C-Code is invalid.
Re-enter a C-Code.
209
INV ADAPT
ADAPTER DATA INVALID
Invalid value in selected C-Code.
Modify the C-Code or delete and
re-enter the C-Code.
The C-Code is not compatible with
the firmware; the C-Code may
have been configured for a newer
Code
78
All cycles are briefly suspended
due to high temperature inside the
analyzer. Service will resume in a
few minutes, after the board has
cooled down. If it reoccurs
continually, move the analyzer to
a cooler room.
Code
Global
Message
Detailed Message
firmware, Delete and reenter the
C-Code, reset the extended CCode to default values or
upgrade the analyzer with the
latest firmware using Cadex
Firmware Utility software.
210
BAD ADAPT
BAD ADAPTER
Adapter is not recognized by the
analyzer. Remove and re-insert
the adapter. Clean the gold
contacts on the underside of the
adapter.
Reset the extended C-Code to
default values or delete and reenter the C-Code.
If message persists, adapter may
be damaged.
211
NULL CODE
NULL C-CODE IN ADAPTER
An empty C-Code is selected.
Select a programmed C-Code or
program the selected empty CCode.
214
CCODE N/U
C-CODE NOT USABLE
C-Code is not suitable or is out of
range for the analyzer. C-Code
may have been created on an
"Extended Range" (ER) analyzer
or an analyzer with more recent
firmware version. Check required
battery parameters and edit or reenter the C-Code. Update the
firmware on your analyzer to the
most recent version, if necessary,
using Cadex Firmware Utility
software.
Run the program on a Cadex ER
analyzer.
79
DAO Error on Windows XP/2000 in User-level mode
A DAO Error may have one of two causes:
4
5
The database is corrupt, or
The Discretionary Access Control List (DACL) access permissions for the \Batshop\Db
folder have been reset to their defaults – preventing User-level access to the database.
If the BatteryShop database is corrupt, the only options available are to work with a recent
good database backup or to request Cadex Customer Support to attempt database repair.
The later may incur a cost.
If a Windows Service Pack has reset the DACL for the \BatShop\Db folder, follow these steps
to reset DACL on the folder:
6
7
8
9
10
11
12
13
Log-ON as Administrator
Navigate to the \Batshop folder using File Explorer.
Right-click on the Db folder and choose Properties.
Click on the Security tab.
Choose the Users group and click on the Full Control checkbox.
Uncheck the Allow inheritable permissions from parent to propagate to this object.
Click on the Copy button.
Click on OK to save changes.
Analyzer LED does not match Service Status record in BatteryShop database
In most cases, the Analyzer LED, BatteryShop Station Icon, and Service Status record in the
BatteryShop database should match exactly.
However, in some cases, it is possible to see the Service Status record in the BatteryShop
database display a pass when the Analyzer LED displays fail. This indicates that the battery
has completed and passed the service but failed while in trickle charge mode.
Check the fault-code, reported by the Analyzer or Real-Time Status Panel in Batteryshop,
and cross-reference with Cadex 7200 and Cadex 7400 message and warning codes in
BatteryShop Help. Move the mouse pointer over the Detailed Message column for the
required message and warning code and click on the mouse button when the cursor changes
from an I-beam to a Link Select (Pointing Hand) cursor. This will display a description of the
Message/Warning code and possible actions that can be taken to prevent the
message/warning from appearing while servicing the problem battery.
Note: If the C-Code for a problem battery model is altered to prevent the occurrence of a
message/warning code, the associated QuickTest matrix must be deleted and re-learned
using the modified C-Code before starting a QuickTest service. See topic QuickTest
Program for details..
80
USB connectivity issues…
Consult the following list to troubleshoot USB connectivity issues with C-Series analyzers.
Exit from Cadex BatteryShop or Cadex Firmware Utility before starting to troubleshoot USB
connectivity:
Issue
Check
81
Issue
Check
Cannot see C-Series
analyzer connected
directly to the PC via
USB cable.
Right-click on My Computer and choose Properties to
display the System Properties dialog.
Click on the Hardware tab and choose the Device
Manager button.
Close the System Properties dialog.
Choose the + sign beside Ports (COM & LPT).
Choose the + sign beside Universal Serial Bus controllers.
The USB device drivers for the C7xx should be visible as
they appear circled in red in the following diagram:
With the analyzer powered-ON, unplug the USB cable
from the back of the analyzer and monitor the Device
Manager.
The Device Manager should reset and re-display connected
devices.
Plug the USB cable back into the back of the analyzer.
The Device Manager should reset and re-display the list of
connected devices.
On detection of the USB device, the PC will prompt for USB
Device Drivers if the Device Drivers were not pre-installed.
This indicates that BatteryShop is not yet installed because
BatteryShop Setup pre-installs the required USB drivers. If
the Device Drivers are present, the PC will automatically
load the newly detected USB device.
82
Issue
Check
Cannot see C-Series
analyzer connected via
a USB 2.0 Hub
The USB 2.0 Hub must have “Transaction Translator”
support for communications with a C-Series battery
analyzer.
If a USB 2.0 Hub with "Transaction Translator" support is
not available, then, it may still be used after disabling "USB
Host Controller" in "Device Manager" under "Universal
Serial Bus controllers"
The port to which the analyzer is connected on the USB
Hub can be defective.
With the analyzer powered-ON, connect the USB cable
directly into the PC and see if the device is detected in the
Device Manager. If the device is detected, then the port on
the Hub is defective.
Disconnect the USB cable from the PC and connect into a
different port on the USB Hub. Repeat until a functioning
port on the USB Hub is located. When the USB device is
detected, Windows XP may complain about installing an
un-signed driver; Choose "Continue Anyway" to complete
the driver installation.
The PC crashes after
un-plugging a USB
cable.
Ensure that the PC is running Windows 2000 Professional
SP4 or Windows XP SP2 and that it has at least 512MB
RAM and a 1 GHz CPU. Windows will become unstable if
the required resources are not available for it to unload or
load device drivers each time that a USB device is
disconnected from or connected to the PC.
In Windows XP, a
Hardware Installation
dialog appears during
BatteryShop Setup
and during first-time
detection of each
analyzer connected via
USB cable.
Windows XP will prompt to continue with driver installation
whenever an un-signed driver is about to be installed.
Choose "Continue Anyway" to clear the prompt and
proceed with driver installation.
Why is it that the Port
number assigned to
C74xx USB to UART
Bridge Controller
changes each time the
PC is powered-ON?
This is the nature of USB device enumeration. There is no
guarantee that the PC will enumerate USB devices in the
same way each time that the PC is powered-ON. This is the
primary reason for recommending that analyzers be
connected to the PC via Serial Cable instead of USB. A
Serial COM Port always has the same Port number each
time that the PC is powered-ON
Note: The Port# is displayed on the Service Report and on
the Battery Characteristic Graph. If the service was run
on an analyzer connected directly via USB cable, the Port#
on the Report/Graph is valid only for the duration of that
service during that PC session.
83
Issue
Check
Why is it that Analyzer
Icons in BatteryShop
disappear when an
analyzer connected via
USB cable is
disconnected from the
PC or when the
analyzer is poweredOFF?
Whenever a C74xx USB to UART Bridge Controller
device driver is unloaded from the system, BatteryShop
detects the removal and removes the associated icon for
the analyzer.
Note: Disconnecting or powering-OFF analyzers connected
to BatteryShop via USB is not recommended while
BatteryShop is running. Doing this may cause BatteryShop
to disconnect other analyzers connected via USB also.
Glossary
Term
Battery adapter
Definition
Interface between the battery analyzer and the battery,
configured for specific battery types. The battery adapter is
equipped with a serial EEPROM (electrically erasable
programmable read-only memory) programmed with Ccodes for specific batteries.
To insert an adapter
1
2
Place the empty battery adapter into the battery
adapter station of the Cadex analyzer.
Press down on the back panel (with the label) until the
adapter snaps in place.
To remove an adapter
1
2
Battery cycle
Remove the battery from the adapter.
Press the latch bar behind the adapter label and lift the
adapter upwards.
One charge followed by one discharge (or one discharge
followed by one charge). Even when batteries are only
partially charged or discharged, a cycle is considered to
have occurred.
84
Term
Battery Voltage (volts)
Definition
The terminal voltage of the battery. The voltage is based on
a nominal cell voltage of 1.2 V/cell for NiCd and NiMH
batteries, 2 V/cell for SLA batteries, and 3.6 V/cell for Li-ion
batteries.
On some NiCd and NiMH batteries, manufacturers may
rate their batteries based on 1.25 V/cell rather than 1.2
V/cell. For example, the battery may have a stated voltage
of 7.5 V or 12.5 V. To obtain the correct voltage, multiply
this number by 0.96. These voltages are definitions only
and do not affect test results.
Some manufacturers may state the number of cells in their
batteries rather than battery voltage. To get the correct
voltage, multiply the number of cells by the voltage for the
chemistry type. For example, the voltage of a six-cell NiCd
battery would be 6 x 1.2 V = 7.2 V.
Battery Rating (mAh)
The nominal capacity of the battery, or capacity specified
by the manufacturer and expressed in milli-ampere hours
(mAh).
Capacity is the amount of electrical energy (charge) a
rechargeable battery can hold.
Target capacity is set as a percentage of battery rating.
C-Code
Configuration Code
Battery parameters stored as part of the battery models
database (or in battery adapters) that configure the Cadex
battery analyzer for servicing a specific battery model.
Describes a particular battery type and the settings required
to process that battery type.
C-Minute
A proportional measure of time equal to one minute at a Crate of 1 C.
C-Rate
Unit by which charge and discharge times are scaled;
charge or discharge rate expressed as a fraction or multiple
of the battery capacity rating.
A battery rated at 1000 mAh provides 1000 mA for one
hour if discharged at 1 C, which draws a current equal to
the rated capacity. The same battery discharged at 0.5 C
would provide 500 mA for two hours.
Capacity
The amount of energy that a fully-charged battery is
capable of holding.
Capacity Offset
Adjusts the capacity readings during discharge of a battery
at a C-rate different than that specified by the manufacturer.
Primarily used for SLA batteries.
85
Term
Charge Method (NiCd
and NiMH only)
Definition
Specifies the method used to charge NiCd and NiMH
batteries.
The reverse load method intersperses discharge pulses
during the charge cycle to keep batteries cool and promote
the recombination of gases.
Charge Rate (C-Rate)
The rate at which the analyzer charges the battery. A 1000
mAh capacity battery with a charge current of 500 mA has
a charge rate of 0.50 C. A lower C-Rate reduces the charge
current and increases time required to charge the battery.
Confidence Grade
The level of accuracy expected from a specific QuickTest
matrix. The confidence grade level for a specific matrix
increases as the Learn program adds to the matrix by
gathering data from same-model batteries with differing
levels of SoH. See topic Creating effective QuickTest
matrices for details.
Confidence grade is indicated as A (high), B (satisfactory),
or C (low).
Discharge Rate
The rate at which the analyzer discharges the battery. A
1000 mAh capacity battery with a discharge current of 500
mA has a discharge C-Rate of 0.50 C. A lower discharge CRate reduces the discharge current and increases service
time. The maximum discharge power is 35 W per analyzer
station.
Maximum discharge is reduced for batteries with higher
nominal voltage (2400 mA for a 14.4 V battery). For a
single-cell NiCd or NiMH battery, the maximum discharge is
2500 mA.
End of Charge
The rate of charge supplied by the battery analyzer at
which SLA and Li batteries are considered fully charged.
When the detected charge rate drops below the specified
end-of-charge value, the battery is fully charged and the
analyzer completes the charge cycle on the battery.
The Charge Optimization setting affects the way the end-ofcharge setting is used during a charge.
End of Discharge
The level to which battery charge must drop for the
discharge cycle to be complete.
End of Recondition
The level to which battery charge must drop for the
reconditioning cycle to be complete.
Intrinsically safe battery
A battery with built-in safety protection circuitry. These
batteries are used primarily in explosive environments.
Li
Refers to any lithium-based battery chemistry.
LiPh
Refers to lithium-phosphate battery chemistry.
Li-ion
Lithium-ion battery chemistry.
86
Term
Definition
Li-polymer
Lithium-polymer battery chemistry.
Matrix
The set of battery parameters for a specific battery model
stored during the Learn program and used for testing
batteries of the same model during the QuickTest program.
Maximum Charge
Voltage
The voltage level per cell for SLA and Li batteries at which
the analyzer stops charging the batteries. The charge
current drops while the maximum charge voltage is
maintained.
Maximum Standby
Voltage
The level of voltage per cell at which SLA and Li batteries
are maintained at full charge after service is complete.
The maximum standby voltage must be lower than the
maximum charge voltage.
Memory
Reversible capacity loss in NiCd and NiMH batteries
caused by an increase in the size of crystals formed within
the battery. See Recondition.
Milli-ampere hour (mAh)
Unit of battery capacity or rating. A battery that provides a
current of 1000 milli-amperes for 1 hour is rated at 1000
mAh (or 1 Ah)
Negative Slope
A measure of the voltage drop that occurs when the battery
reaches full charge. The charge cycle is terminated when
the voltage drop reaches the specified negative slope
value.
NiCd
Nickel Cadmium battery chemistry.
NiMH
Nickel-Metal Hydride battery chemistry.
Recondition
A deep discharge below 1.0 V/cell with a controlled current.
Reconditioning helps break down large crystals, which
develop as a result of memory, to more desirable small
sizes, often restoring the battery to its full capacity. Applies
to NiCd and NiMH only.
Recondition Discharge
Rate
Recondition discharge is a slow and gradual discharge
applied during reconditioning after the battery reaches the
end-of-discharge voltage specified in the C-Code. During
this process, the crystalline build-up (memory) on the cell
plates dissolves, and the battery often restores itself.
Expressed in mA and as a percentage of the Discharge
Rate setting.
Residual capacity
Charge capacity remaining in the battery when it is inserted
in an analyzer.
Resistance
Also called internal resistance. Opposition to current flow,
and dissipation of energy in the form of heat. Batteries with
high resistance are not able to deliver heavy current pulses
or elevated loads.
87
Term
Definition
Self-discharge
Battery capacity lost during storage because of internal
leakage between the positive and negative cell plates.
Smart battery
A battery equipped with specialized circuitry that can
communicate with an analyzer and provide battery
information.
State of Charge (SoC)
The current energy content of a battery.
State of Health (SoH)
The overall condition of a battery, taking into account its
capacity, resistance, self-discharge, and state of charge.
SLA
Sealed lead-acid battery chemistry.
Target capacity
Capacity is the amount of electrical energy (charge) a
rechargeable battery can hold. As a battery ages, its
capacity declines. Target Capacity is the percentage of the
battery capacity compared to the nominal capacity. It allows
the user to set a pass/fail criteria based on the final
capacity reading after a battery is serviced.
Recondition, a special cycle that can rejuvenate a battery’s
capacity, is automatically applied by the Auto program for
NiCd and NiMH batteries that fail.
The Target Capacity can be set between 50% and 150%.
Typical settings:
90%
Maintains batteries for critical applications
which require maximum energy reserve and high reliability.
Fewer batteries will pass.
80%
Recommended (default) setting. It satisfies
both the need for an adequate energy reserve as well as
the economic need to get the longest possible service life
from each battery.
70%
Recommended for less stringent applications
where battery power demand is not critical or is of brief
duration. More batteries will pass.
Lowering target capacity increases the number of batteries
that pass, at the expense of greater performance variation
between batteries. Increasing Target capacity provides
more consistent high performance at the expense of a
larger rate of failure. For example, if target capacity is set to
80%, a battery with a capacity reading of 78% fails.
However, if the target capacity switch is set to 70% with the
same battery, the battery passes.
Target capacity is a pass/fail mark only. It does not affect
the charge level. Batteries are always fully charged
regardless of the target capacity set.
88
Term
Temperature Sensing
Definition
Defines the temperature range within which the analyzer
can service the battery. If battery temperature moves
outside the specified range, service stops until the
temperature is back within the acceptable range. Refers to
battery temperature, not surrounding temperature.
Effective only for batteries or battery adapters equipped
with a temperature sensor.
Trickle charge
Maintenance charge to compensate for battery selfdischarge.
UPS
An uninterruptible power supply (UPS) device provides
power to your computer for at least a short time during a
power failure. It also protects against power surges. A UPS
device is able to sense a loss of power and activate its
battery before data loss occurs. This gives you the time to
save your data and shut down the computer before the
battery runs out.
89
Appendix
Cadex BatteryShop
Connect to battery analyzers
1
2
From the Cadex BatteryShop main window, click Analyzers, and then click Connect.
Click Yes in the confirmation dialog box that appears.
Cadex BatteryShop searches for battery analyzers connected to the serial ports listed in the
Ports Configuration map. See topic Setting the serial ports connected to battery analyzers for
details.
When it has connected with the available battery analyzer(s), it shows each analyzer as an
icon in the dark-red analyzer window. Consult the Appendix for more on Analyzer icons
colors.
Tip: Before Cadex BatteryShop can communicate with your Cadex battery analyzers, the
analyzers must be connected to the computer, and the Cadex BatteryShop Ports map must
be configured to look for the analyzers on the serial ports to which they are connected.
Note:
BatteryShop will limit analyzer connections to the license version of BatteryShop
purchased. If you need to connect to more analyzers, please contact a Cadex sales
representative to upgrade your BatteryShop license version.
It is important that all connected analyzers have the required Firmware version for correct
BatteryShop operation.
90
Export real-time battery-service data
1
2
3
4
On the battery analyzer icon, double-click the bar that corresponds to the battery station
for which you want to export battery-service data. The Real-Time Status dialog box
appears.
Click File, and then click Export Data.
Note the name of the data file for future reference.
Click Yes in the confirmation dialog box that appears.
Cadex BatteryShop creates a Microsoft Excel comma-separated values file containing
this information:
Battery ID
Manufacturer
Battery Model Number
Customer
Adapter Number
Time Service Started
Station program selected
C-Code
All amperage, voltage, temperature, and impedance data collected and plotted on the
real-time status chart to the time of file creation.
Cadex BatteryShop assigns a file name with a .csv extension, and stores the file in the Cadex
BatteryShop Temp directory (usually C:\Program Files\BatShop\Temp).
Tip: You can open the data in Microsoft Excel for further data analysis.
Open a comma-separated values or text file in Microsoft Excel
1
2
3
4
5
6
Start Microsoft Excel.
Click File, and then click Open.
In the dialog box that appears, navigate to the Cadex BatteryShop Temp directory
(usually C:\Program Files\BatShop\Temp).
In Files of Type, select Text Files (*.prn; *.txt; *.csv).
Click the name of the comma-separated values or text file you want to open in Microsoft
Excel.
Click Open.
You can now use Microsoft Excel functions to analyze, graph, or create a report of the Cadex
BatteryShop data.
91
Analyzer icon colors
Analyzer icons display the serial port number and the type of Cadex analyzer (70 for C7000,
72 for Cadex 7200, and 74 for Cadex 7400) in the top half, and have two or four vertical bars
in the bottom half representing the analyzer’s battery stations. The color of these bars
indicate the current status of the station.
Color
Status
Black
No adapter
White
Adapter inserted
Yellow
Program running
Green
Ready (program finished successfully)
Red
Program failed
Ports with incorrect firmware version
All connected analyzers are required to have the minimum required firmware version for
correct operation with BatteryShop.
Ports connected to analyzers that do not meet this requirement appear in the Firmware
Version dialog immediately after connecting to analyzers.
In such a case, BatteryShop services may exhibit unexpected results.
Firmware that works with this version of BatteryShop can be found on the BatteryShop CD
and as a downloaded from the Cadex website (www.cadex.com).
Please consult Cadex Firmware Utility Help for details on upgrading the firmware on
connected analyzers.
92
Group records
You can group database records by any category of data, or field, stored in the database.
1
2
Click the column heading for the field by which you want to group the records in the
database.
Drag and drop the column heading cell into the dark grey area just above the column
headings.
Records are sorted into groups according to the heading you chose.
You can now further sort the records within each group by clicking any of the remaining
column headings.
3
If you want to group the records further, you can drag and drop another column heading
cell into the dark grey area beside the first one. You can continue to "daisy-chain" column
headings to group records into smaller and smaller groups.
In this example, battery model records are grouped by manufacturer and then by chemistry.
Within each chemistry group, records are sorted by model. Move the mouse over the
example and click the hotspots (indicated by the hand icon) to see details about different
parts of the grid.
Find a record
You can search for battery ID records by specifying a battery ID, for battery manufacturer
records by specifying a manufacturer name, for customer records by specifying a customer
name, and for battery model records by specifying a manufacturer name, model name,
battery adapter number, or battery application ("Used in").
1
2
Sort the database records in ascending order according to the field you are using to
search for a record. How?
Type the first few letters of your search string in the Search by text box.
The first record that matches the search string is highlighted.
For example, if you are searching in the battery model database for a battery model
manufactured by Alexander, you might type AL in the Search by Manufacturer text box.
The first record highlighted may be Alcatel, which also matches the specified search
string.
3
To refine your search, type more letters in the search string until the record you are
looking for is highlighted.
You can also use the wildcard character "*" to search for a battery ID, manufacturer,
customer, or battery model, where "*" stands for any string of one or more characters.
For example, if you are looking for a specific customer record and you can’t remember the
exact customer name but know that it has the word "Power" as the second or third word, you
could type *Power in the Search by text box to narrow the search.
93
Sort records
You can sort database records by any category of data, or field, stored in the database.
To sort data in ascending order (from 0 to 9 and A to Z)
Click the column heading for the field by which you want to sort the database
To sort data in descending order (from Z to A and 9 to 0)
Double-click the column heading for the field by which you want to sort the database
94
Display battery-service records
1
Open Cadex BatteryShop Reports:
From the Cadex BatteryShop main window, click Database, and then click Reports.
OR
From the Windows Start menu, select Programs, then select BatteryShop, and then
click Reports.
The BatteryShop Reports dialog box appears.
2
Under Query Type, select the battery-service information you want to display for
selected batteries:
View Services.
Select this option to display the most complete information about battery service. These
columns appear in the grid:
Service ID.
Code. Battery analyzer message code (see battery analyzer manual for more
information).
Status. Final status of battery service (program complete, program not completed,
program failed)
Battery ID.
Started. Time and date battery service started.
Ended. Time and date battery service completed.
Manufacturer. Battery manufacturer.
Model. Battery model number.
Program. Battery service program run.
Customer.
Targ. Cap. Target capacity set for the battery.
Final Cap. Final battery capacity achieved during service.
Final Imp. Final impedance achieved for the battery.
CH Cycles. Number of charge cycles run during the battery service.
DCH Cycles. Number of discharge cycles run during battery service.
REC Cycles. Number of reconditioning cycles run during battery service.
You must select this option if you want to create battery-characteristics graphs or cycle
graphs, or if you want to export service records to another Cadex BatteryShop database
or a SiteMonitor database.
Service History.
Select this option to display or report the complete history of service records for selected
batteries. These columns appear in the grid:
Manufacturer. Battery manufacturer.
Created. Time and date the record was created.
Battery Model. Battery model number.
Customer.
Program. Battery service program run.
Display Status.
95
Final Capacity. Final battery capacity achieved during service.
Final Impedance. Final impedance achieved for the battery.
Retired. A checkmark in this column indicates that the battery has been retired from
active service.
Service Counts.
Select this option to display or report the total number of services and failures for
selected batteries. These columns appear in the grid:
Manufacturer. Battery manufacturer.
Model. Battery model number.
Battery.
Battery ID.
Failures.
Percent Failure.
Battery ID Service Due.
Select this option to display or report batteries that are due for servicing from selected
batteries. These columns appear in the grid:
Battery.
Battery Type.
Manufacturer. Battery manufacturer.
Model. Battery model number.
Customer.
In Service.
Last Service.
Service Freq.
3
4
Under Select, choose the batteries for which you want to print service data:
All. Select this option if you want to create a report for all batteries, all active batteries, all
retired batteries, or all batteries for a specific customer.
Battery ID. Select this option if you want to create a report for a specific battery. If you
choose this option, you must also enter the Battery ID for which you want to create a
report. How?
Battery Model #. Select this option if you want to create a report for one battery model. If
you choose this option, you must also enter the Battery Model # for which you want to
create a report. How?
If you selected All or Battery Model # in step 3 and you want to create a report for
batteries from a specific customer, enter the customer name.
Enter the required data in one of three ways:
Type the data in the text box.
Click the down-arrow button to the right of the text box to select from a list of recent
entries.
96
5
Use the Browse function:
a. Click Browse or .
b. In the grid dialog box that appears, find the record that has the data you want
to enter.
c. Double-click the appropriate record.
If you selected All or Battery Model # in step 3, choose an option from the Retired
Batteries list:
Include All Batteries.
Include Only Retired Batteries.
Include Only Active Batteries.
6
Under Service Period, enter the time period for which you want to include service data:
Select (check) All Dates to include all service data for specified batteries regardless of
date.
OR
Include service data from a specific time period only:
a. Clear the All Dates option.
b. Enter a Start Date for the beginning of the period you want to report.
c. Enter an End Date for the end of the service-report period.
Dates selected are inclusive (the report includes services performed on the selected Start
and End dates).
7
Click Run.
The records for the report appear in a database grid window.
Tip You can rearrange the information in the database grid by sorting and grouping it
according to column heading.
Select and rearrange fields to include in battery-service reports
1
2
Display battery-service information. How?
On the Grid Options menu, click Column Selector. The Customize window opens in the
bottom right-hand corner of the database grid window.
Any column (field) heading that appears in the Customize window does not appear as
part of the service report.
3
Choose the fields you want to appear in your report:
To remove a specific field from the battery-services report you are creating:
Click and drag the column (field) heading from the database grid window to the
Customize window.
To restore a removed field to the battery-services report:
Click the heading in the Customize window and drag it into place among the column
headings in the database grid window.
97
4
Size the columns so that you can see the information you need to see:
a. Place the mouse cursor on the line to the right of the column heading for the column
whose size you want to change until the left-right sizing cursor appears.
b. Click and drag the cursor until the column is the desired size.
OR
On the Grid Options menu, click Best Fit (all columns).
5
Put the fields in the order you want them to appear in your report:
a. Place the mouse cursor on the heading of a column you want to move.
b. Click and drag the heading to its new location among the column headings.
Select battery-service records
1
2
See Appendix for details on how to display Battery Service Information.
To select one record only:
Click the record.
To select more than one record listed continuously:
a. Click the first record you want to select.
b. Hold down the Shift key and click the last record you want to select.
To select more than one record not listed continuously.
c. Click the first record you want to select.
d. Hold down the Ctrl key and click the next record you want to select.
e. Repeat step b until you have selected all desired records.
To select all records:
On the Actions menu, click Select All Records.
98
Print a customized report
Once you have displayed battery-service data in the Reports database grid and arranged it in
a way that meets your needs, you can print the customized report you have created.
1
2
From the File menu, choose Print Preview. The Print Preview Caption window appears,
displaying your report as it will appear on paper.
Set up the report page:
a. On the Report menu, click Page Setup.
The page representation shown at the top of the dialog box changes to reflect the
choices you make in the dialog box.
3
4
b. Under Paper, choose the paper size from the Size list.
c. Under Orientation, specify whether you want the report to print out as portrait (taller)
or landscape (wider).
d. Under Margins, enter the sizes for all four margins in inches. (1 inch is approximately
equal to 25 mm.)
e. Click OK.
Set up the printer:
a. On the Report menu, click Print.
b. In the Name text box, enter the printer on which you want to print your report.
c. Click Properties.
d. Make any necessary changes in the dialog box that appears. Settings in this dialog
box depend on the printer selected. See your printer user’s manual for more
information.
e. Click OK to close the printer properties dialog box.
Under Page range, select an option to determine which pages are printed:
All. Select this option to print all pages in the report.
Current Page. Select this option to print only the page currently on-screen.
Pages. Select this option to print selected pages. If you select this option, you must also
specify the pages you want to print.
5
Under Copies, enter these settings:
Number of Pages. Click the down-arrow button and select an option from the list that
appears:
All. Print both even and odd pages.
Even. Print even-numbered pages only. This option is useful if you want to print the
report using both sides of the paper.
Odd. Print odd-numbered pages only. This option is useful if you want to print the report
using both sides of the paper
6
Number of Copies. Enter the number of copies of the report or pages to print.
Click OK.
99
Creating battery-service reports
There are a number of procedures that you can follow to customize a battery-service report
so that it includes the information you want to report in the order you want to report it:
Display battery-service records
Select and arrange the fields you want to include in the report.
Group the records by column heading.
Sort the records by column heading.
Select records to include in the report.
Print the report.
Save service data to a Cadex BatteryShop file
1
Display battery-service information, choosing View Services as the Query Type.
The Services database window appears.
2
3
4
On the File menu, point to Export To, and then click BatteryShop File. The Export
Analysis Data dialog box appears.
In the File name box, type a name for your Cadex BatteryShop file. It is automatically
given a .bse extension.
Click Save.
Your file is saved to the Batshop\Temp folder unless you specify a different folder.
Save service data to a Microsoft Excel file
1
Display battery-service information, choosing any Query Type.
The report or services database window appears.
2
3
4
On the File menu, point to Export To, and then click Microsoft Excel File. The Save As
dialog box appears.
In the File name box, type a name for your file. It is automatically given an .xls
extension.
Click Save.
Your file is saved to the Batshop\Temp folder unless you specify a different folder.
100
Save service data to an HTML file
1
Display battery-service information, choosing any Query Type.
The report or services database window appears.
2
3
4
On the File menu, point to Export To, and then click HTML File. The Save As dialog box
appears.
In the File name box, type a name for your file. It is automatically given an .htm
extension.
Click Save.
Your file is saved to the Batshop\Temp folder unless you specify a different folder.
Set the serial ports connected to battery analyzers
Note:
BatteryShop will limit analyzer connections to the license version of BatteryShop
purchased. If you find that you cannot move COM Ports to the Ports to search for:
list, you will need to upgrade your BatteryShop license version. Please contact a
Cadex sales representative to purchase an upgrade license.
BatteryShop will automatically detect C-Series analyzers connected with a USB cable
via a USB 2.0 Hub or directly to the USB 2.0 Port on the PC. It is NOT required to
map these ports using the Port Manager.
1
2
Click System Setup, and then click Ports Map. The Ports Map dialog box appears.
Move all serial ports to which you have connected battery analyzers from the Ports not
to search for list to the Ports to search for list:
Click the double left arrow (◄◄) to move all ports to the Ports to search for list.
OR
a. Select the serial ports to move from the Ports not to search for list:
To select one port, click that port. The port is highlighted.
To select ports listed consecutively ports, click the first port in the list, hold down Shift
key, and then click the last port in the list. All ports between the first and last are
highlighted.
To select additional ports, hold down the Ctrl key while clicking the ports.
3
b. Click the single left arrow (◄) or double-click the required port to move the ports to
the Ports to search for list.
Move serial ports in the Ports to search for list to which you have NOT connected
battery analyzers to the Ports not to search for list:
Click the double right arrow (►►) to move all ports to the Ports not to search for list.
OR
a. Select the serial ports to move from the Ports to search for list:
To select one port, click that port. The port is highlighted.
To select ports listed consecutively ports, click the first port in the list, hold down Shift
key, and then click the last port in the list. All ports between the first and last are
highlighted.
To select additional ports, hold down the Ctrl key while clicking the ports.
101
4
b. Click the single right arrow (►) or double-click the required port to move the ports to
the Ports not to search for list.
Click OK.
Ports with incorrect firmware version
All connected analyzers are required to have the minimum required firmware version for
correct operation with BatteryShop.
Ports connected to analyzers that do not meet this requirement appear in the Firmware
Version dialog immediately after connecting to analyzers.
In such a case, BatteryShop services may exhibit unexpected results.
Firmware that works with this version of BatteryShop can be found on the BatteryShop CD
and as a downloaded from the Cadex website www.cadex.com.
Please consult Cadex Firmware Utility Help for details on upgrading the firmware on
connected analyzers.
Q-Learn Program
Calibrate the adapter and ensure that the C-Code for the battery is correct. Take several
batteries having metered capacity of 100% or greater. Confirm this capacity by servicing the
batteries using the Prime program. Note the final capacity and resistance reading in each
case. Take the battery with the highest capacity (ensure that it is 100% or greater) and the
highest resistance and run this battery using Q-Learn program. After Q-Learn has completed,
take the same battery and run it again in the same adapter using QuickTest. The final SoH
(state of Health) result should be 100%. If it is less than 100%, erase the battery matrix
(Delete matrix for the selected battery model) and start over. Once successful, test the other
batteries with the same capacity to ensure that the SoH readings are within an acceptable
range. Changing anything in the C-Code, apart from the target capacity and program will
erase the matrix.
Note:
You must use a Cadex 7200/7400/7400ER battery analyzer with a 16kb battery
adapter to be able to use the Q-Learn program.
Q-Learn assumes that the battery capacity is 100% or greater. If a battery with less
than 100% capacity is used with Q-Learn, it will give erroneous results.
Use Q-Learn program, to create a matrix, when you have only one brand new battery
(100% or better metered capacity) primed within the last day. Use Learn Program
instead if you have several batteries of the same model each with capacity of 100% or
greater to create a matrix.
Batteries with resistance above 800mOhm (as measured by OhmTest) should not be
used with the Q-Learn program. It is a good idea to run OhmTest on any battery you
plan to put through the Q-Learn program.
Only custom adapters should be used. Universal adapters such as the Alligator Clips
(07-110-0115), the Claw (07-110-0170) and the FlexArm (07-110-0180) are NOT
recommended. These adapters will give inaccurate results due to resistance errors
from long leads.
102
Q-Learn and QuickTest cannot be used with the following batteries:
SLA batteries greater than 2Ah (2000mAh).
1-cell (1.20V) and 2-cell (2.40V) NiCd and NiMH batteries.
Batteries with resistance above 800mΩ(as measured by OhmTest). It is a
good idea to run OhmTest on any battery you plan to put through the Q-Learn
program.
Batteries that disconnect or reset or give failures during Learn or Q-Learn.
Batteries that cannot accept a charge rate and discharge rate of at least 1.00C.
These batteries tend to give errors if they are serviced on the analyzer using
the Auto or Prime program.
Erasing a Matrix for a battery model from the BatteryShop database
To erase a matrix for a battery model:
1
Insert an 16Kb adapter for the battery model into a station in a Cadex 7200/7400
analyzer
2 From BatteryShop, right-click on the analyzer station icon where the adapter was inserted
3 Select C-Code/Matrix Transfer menu option from the context menu to display the CCode/Matrix Transfer dialog.
4 Select C-Code location C10 from the list in the C-Code/Matrix Transfer dialog
5 Select the Write C-Code/Matrix to adapter radio button
6 Select the Ellipses button to launch the Battery Model database
7 Select the battery model record with the matrix to be erased and choose the Close
button. The C-Code for the battery model should appear in the text area to the left of the
Ellipses button and the selected battery model name should appear below the C-Code
text area
8 Choose the Run button to write the C-Code/Matrix to adapter location C10
9 Select the Erase Adapter Matrix radio button
10 Then select the Run button to erase the matrix at the specified adapter C-Code location
11 Select the Read C-Code/Matrix from adapter radio button
12 Then select the Run button to read the C-Code record, without the matrix, back into the
database from the specified adapter C-Code location. The "Matrix: Not found" caption
will appear below the Battery Model name in the C-Code/Matrix Transfer dialog.
103
Precaution with Nickel-based batteries during Learn
If you run an Auto or Prime program to confirm that the battery does have a metered capacity
> 80%, it is important that you run a Discharge program on the battery for half an hour before
running the Learn program. This precaution is designed to minimize temperature rise.
Protect a matrix
After you have created a QuickTest matrix that you are satisfied with, you can freeze a matrix
from further unwanted augmentation. To freeze a matrix, follow these steps to protect the
matrix:
1
2
3
Enable database security.
Launch Battery Models form and search for the battery model with the matrix you want
to protect.
Right-click on the record and choose "Protect Matrix".
Confidence grade
The level of accuracy expected from a specific QuickTest matrix. The confidence grade level
for a specific matrix increases as the Learn program adds to the matrix by gathering data
from same-model batteries with differing levels of SoH.
Confidence grade is indicated as B (satisfactory), or C (low).
104
Database Security
When database security is disabled, default for the generic version of BatteryShop, an
operator can make edits to Battery Model records, modify C-Codes, manage Battery ID
records, delete records, and run Web Update to update Battery Model records in the
database.
In some cases however, an operator may decide to enable database security so as to be
able to protect against matrix augmentation or to prevent other operators from making edits
to the database. With database security enabled, an operator can still scan new Battery IDs
via Quick Entry form, but cannot create/modify battery model information.
To use the database security feature, you must first create a password. Choose the Security
menu option from the System Setup menu. Specify a password twice on the Create
Password form. You can now enable/disable database security via System Setup Options.
To enable database security:
1
2
3
4
5
6
Choose Options from the System Setup menu.
Click on the Secure Database Access checkbox on the Standard Options page.
Enter the password and choose OK.
You will see a checkmark, in the Secure Database Access checkbox, if database
security is enabled.
Choose Close followed by Yes to close the System Options form.
Choose OK to clear the information dialog confirming that the new configuration file was
saved.
To disable database security:
1
2
3
4
5
6
7
Choose Options from the System Setup menu.
Enter the password and choose OK.
Click on the Secure Database Access checkbox on the Standard Options page.
Enter the password and choose OK.
You will see no checkmark, in the Secure Database Access checkbox, if database
security is disabled.
Choose Close followed by Yes to close the System Options form.
Choose OK to clear the information dialog confirming that the new configuration file was
saved.
105
Set analyzer program options
1
2
3
4
Ensure Cadex BatteryShop has connected to the battery analyzer for which you want to
set analyzer options. See Appendix topic Connect to battery analyzers for details?
Right-click the bottom half of the icon representing the analyzer for which you want to set
options.
Click Analyzer Options on the menu that appears. The Analyzer Options dialog box
appears.
Enter these settings:
Automatic OhmTest.
Self-Discharge Rest Period (hrs).
Charge Optimization.
Maximum number of cycles for LIFECYCLE Program.
OhmTest Setpoints:
NiCd.
NiMH.
SLA.
Li.
Runtime Program Parameters:
Percent 1.
Percent 2.
Percent 3.
Minutes 1.
Minutes 2.
Minutes 3.
5
6
Click Download to copy the settings to the battery analyzer.
Click Close.
106
Program Phases
A custom program consists of six phases. Each of the first five phases consists of two cycles
and a test. The sixth phase, Phase DONE, consists of one cycle only and does not proceed
to any other cycle.
Cycle 1 and Cycle 2
There are seven different actions that can be performed as Cycle 1 or Cycle 2 of phases 1
through 5:
Skip Cycle.
Skips the current cycle and goes on to the next cycle or to the TEST statement.
Discharge.
Discharges the battery for the specified time period at the specified rate.
Charge.
Charge the battery for the specified time period. The Charge rate is set in the Extended
C-Code.
Recondition.
Reconditions (deep discharges) the battery for the specified time period. The Recondition
Discharge rate is set in the extended C-Code.
This cycle is skipped for SLA and Li batteries because these chemistries cannot be
reconditioned.
Can be applied only after a discharge cycle..
Trickle Charge.
Trickle-charge NiCd and NiMH batteries for a specified interval. The trickle-charge rate is
set in the extended C-Code.
This cycle is skipped for SLA and Li batteries.
Rest.
No current is applied for the specified time period.
Impedance Test.
Performs an OhmTest on the battery.
Test
You can choose from ten different test conditions, or IF statements, when you are setting
tests for phases 1 through 5:
Skip Test.
Go to the TRUE statement. The FALSE statement is ignored.
Target Capacity Met.
If the capacity reached during the last discharge cycle meets or exceeds the target
capacity, go to the TRUE statement; otherwise, go to the FALSE statement.
Target Capacity Not Met.
107
If the capacity achieved during the last discharge is below the target capacity, go to the
TRUE statement; otherwise, go to the FALSE statement.
Capacity increase < 5%.
If the improvement in capacity during the last two discharge cycles is less than 5% (for
example, the last capacity reached is 88% and the capacity reached before is 85%), go
to the TRUE statement; otherwise (for example, if the last capacity reached is 90% and
the one before is 80%), go to the FALSE statement.
Capacity increase > 5%.
If the improvement in capacity during the last two discharge cycles is greater than 5% (for
example, the last capacity reached is 90% and the capacity reached before is 80%), go
to the TRUE statement; otherwise (for example, if the last capacity reached is 88% and
the one before is 85%), go to the FALSE statement.
Loop Count < Max.
If the number of charge/discharge cycles required to bring the battery to target capacity is
less than the value set in the Count box, go to the TRUE statement; otherwise, go to the
FALSE statement.
Loop Count > Max.
If the number of charge/discharge cycles required to bring the battery to target capacity is
greater than the value set in the Count box, go to the TRUE statement; otherwise, go to
the FALSE statement.
Total Capacity < 5%.
If the capacity reached during the last discharge cycle is less than 5% of nominal
capacity, go to the TRUE statement; otherwise, go to the FALSE statement.
Total Capacity > 5%.
If the capacity reached during the last discharge cycle is greater than 5% of nominal
capacity, go to the TRUE statement; otherwise, go to the FALSE statement.
User Defined Timeout.
If the time period set in Cycle 1 or Cycle 2 expires before the battery is fully charged,
discharge, or reconditioned, go to the TRUE statement; otherwise, go to the FALSE
statement.
For Trickle Charge and Rest, the program goes to the TRUE statement only.
You can choose from ten different possible responses to the results of the IF statements.
Each of these responses is available as a THEN statement (for when the battery passes the
test) or as an ELSE statement (for when the battery fails the test).
Go to next Phase.
Go to Phase 1.
Go to Phase 2.
Go to Phase 3.
Go to Phase 4.
Go to Phase 5.
Go to Phase 6 (Done).
Repeat N Times.
Repeat the current phase the number of times specified (to a maximum of 100 times).
108
Rest.
No current is applied for the specified time period.
Fail.
Stop the program and fail the battery.
Phase Done
You can choose one of three different actions to perform as the final phase of your custom
program:
Ready – No Charge.
Completes the program. No trickle charge is applied.
Ready – Trickle Maintenance.
Completes the program, but continues to trickle-charge the battery at the trickle-charge
rate in the extended C-Code. Includes the Standby maintenance cycle, which performs a
discharge/charge cycle every 30 days (180 days for SLA).
Ready – Trickle.
Completes the program, but continues to trickle-charge the battery at the trickle-charge
rate in the extended C-Code.
Set a program as active or inactive
1
2
3
4
From the Cadex BatteryShop main window, click Database, and then click Programs.
The Custom Programs dialog box appears.
Locate the basic, advanced, or custom program whose status you want to change.
Select (check) the box in the Active column to make the program available for battery
service, or clear the box to remove the program from the list of programs available for
battery service.
Click Close to return to the Cadex BatteryShop main window.
Change the name of a custom program
1
2
From the Cadex BatteryShop main window, click Database, and then click Programs.
The Custom Programs dialog box appears.
Click the name or short name you want to change.
You cannot change the name of a preprogrammed basic or advanced program.
3
Type the new name or short name for the custom program.
Short names can have a maximum of 9 characters.
4
Click Close to return to the Cadex BatteryShop main window.
109
Modify a custom program
1
From the Cadex BatteryShop main window, click Database, and then click Programs.
The Custom Programs dialog box appears.
2 Click the name of the custom program you want to modify.
3 You cannot modify a preprogrammed basic or advanced program.
4 Click Phase 1 in the Program Phases section of the dialog box.
5 Make the desired changes to the Cycle 1, Cycle 2, and Test actions, or to their settings.
See Appendix topic Program Phases for details.
6 Repeat steps 3 and 4 for Phases 2 through 6.
7 Click the name of any other program in the programs grid.
8 Click Save.
9 In the confirmation dialog box that appears, click Yes.
10 Click OK.
11 Click Close to return to the Cadex BatteryShop main window.
110
Database naming conventions
The Cadex BatteryShop database file has the file name bs.mdb and is located in the
\Batshop\Db\ directory.
When the setup program backs up an existing database file, it copies it to bs_100x_y.mdb in
the same directory, where x is the database version, and y is the number of times that
version of the database has been updated.
Calibrating a Cadex 7000 C-Series, Cadex 7000 Series or Cadex 7000 battery
analyzer
Every electronic instrument needs periodic calibration to compensate for component drift due
to aging. The Cadex Analyzer Voltage Calibration Kit offers a do-it-yourself method that is
economical, quick and easy. For ISO9000 users, this kit includes a renewable calibration
certificate that is valid for three years from the date of purchase and is traceable to a national
standard.
Voltage Calibration Kit
Contact a Cadex sales representative to obtain a Voltage Calibration Kit
C7000 Voltage Calibration Procedure
1. Turn ON the analyzer.
2. When the global screen is displayed, firmly insert the Voltage Calibration Adapters, one
in each station (the C7200 battery analyzer requires only two Voltage Calibration
Adapters).
3. Press the MENU key.
4. Scroll to SYSTEM SETUP using the ▲
key (On C7000/ER or BOS use S1 key) and
press ENTER.
5. a. C7200, C7400, BOSII: scroll to ‘Calibrate Voltage’.
b. C7000, C7000ER, BOS: scroll to ‘Calibration’, press ENTER scroll to ‘Voltage
Calibration.’
6. Press ENTER to begin calibration. The calibration process takes about 5 seconds.
7. Remove the Voltage Calibration Adapters when instructed on the screen.
8. Press the Menu key to return to the Global screen.
9. Press and release the Fn key, then press the number 7 to display the startup screen. The
“#” should appear in the upper right corner to indicate a successful calibration.
10. The C7x00 is now voltage calibrated.
11. Perform Adapter/Station Calibration. Refer to the C7x00 Users Manual for adapter/station
calibration instructions.
Maintaining Calibration
Voltage Calibration: Using the Voltage Calibration Kit, calibrate the C7000 C-Series and
C7000 Series battery analyzer at least once a year to maintain performance
specifications.
111
Adapter/Station Calibration: Refer to the C7x00 Users Manual for information on
maintaining adapter calibration.
Recalibrating the Voltage Calibration Adapters: Return the voltage calibration kit to the
factory every three years for recalibration and recertification. Contact Cadex or e-mail
[email protected] for a cost estimate and a Return Authorization.
Calibrating an Adapter
Battery adapters should be calibrated once a year or whenever they are moved from one
analyzer to another. Station calibration corrects variations in tolerances due to aging of the
components in the adapter and compensates for voltage loss from cables and electrical
contacts.
Failure to calibrate battery adapters can cause inaccurate capacity readings, especially on
low voltage batteries or single cells operating at high charge or discharge currents. OhmTest
and QuickTest results can also be affected, in some cases dramatically.
Use an electrical short with a 10 AWG wire or a copper plate for this procedure.
To calibrate an adapter
1 Make sure that there is no battery inserted into the adapter.
2 From the global display, press FN, then press 8
or
a. From the global display, press MENU
b. Press ▲ or ▼ to scroll to SYSTEM SETUP, and then press ENTER
c. Press ▲ or ▼ to scroll to CALIBRATE STATION, and then press ENTER.
3
4
Press the station key for the station that contains the adapter you want to calibrate.
Use a short length of heavy gauge wire (AWG 10) or a copper plate to short all terminals
on the battery adapter together.
Warning.
Never short the contacts on a battery.
5
Press ENTER to start calibrating. Calibration takes about 20 seconds.
Remove the adapter when prompted.
112
Update Rules
BatteryShop has configurable features that include System Setup Options, Battery Models
database, and Programs.
These features can be updated via the Web depending on options set on the Web Update
page of System Setup Options
Rules for updating BatteryShop features:
Replace System Setup Options will reset all BatteryShop System Setup Options to their
install defaults. This option is unchecked by default so as not to overwrite current
settings.
Update Battery Models will update the battery model database. Records that are
marked Favorite will retain Favorite status and will not be updated. Battery Model update
will not work when database security is enabled. The two options available for Battery
Model updates are:
a) Only add new battery models (Default)
b) Add new / over-write existing (incl. matrix)
Update Programs will update Programs.
Note:
To make Update Rules settings permanent, choose Options under System Setup
menu and then choose the Web Update page. Select the checkboxes you want
remembered and then choose Close. Choose Yes to save settings.
113
Cadex Analyzers
Connect Cadex battery analyzers to a COM port
BatteryShop requires the following Serial Communication Settings for communication with a
Cadex 7000 C-Series, Cadex 7000 Series, or Cadex 7000 battery analyzer:
Bits per second:
Data bits:
Parity:
Stop bits:
Flow control:
9600
8
None
1
None
To verify the Serial Port settings on your PC:
1
Right-click on My Computer and select Properties to display the System Properties
dialog box.
(Alternatively, you can launch the Control Panel from Start >Settings >Control Panel
and double-click on the System icon.)
2
3
4
5
6
7
Select the Device Manager tab.
Select the + sign to the left of the Ports icon.
Double-click on a Serial Port to which an analyzer is connected to get the Properties
dialog box.
Select the Port Settings tab.
Select OK after verifying that the settings match those listed above.
Re-boot the PC before attempting to connect to an analyzer via BatteryShop.
114
Connect Cadex battery analyzers to a USB port
The recommended method to connect Cadex analyzers to the PC is directly via serial cable
or by using an USB to Serial adapter such as the EdgePort USB Expansion Module(s) from
Digi.
Cadex C-Series analyzers can connect directly, via a USB cable, to a USB 2.0 port on the PC
or to a USB 2.0 Hub, with “Transaction Translator” support, that is connected to a USB 2.0
port on the PC. To connect directly to a PC via USB 2.0 Port or a USB 2.0 Hub, the PC must
be running on Windows 2000 SP4 or Windows XP SP2.
To connect one or more C-Series battery analyzers to the USB 2.0 port of your computer:
1
2
3
Follow instructions to install BatteryShop if not already done. BatteryShop Setup will preinstall install the required USB drivers for C-Series analyzers.
If you want to connect more than one analyzer, connect USB 2.0 Hub(s), in bus-powered
mode, to the USB 2.0 Port on the PC. Note: Hubs that support bus-powered mode do not
require a Power Adapter to power the Hub. The USB 2.0 nub must have “Transaction
Translator support” for communications with a C-Series battery analyzer.
Power-ON the C-Series analyzer before connecting into the USB 2.0 Hub or the USB 2.0
Port on the computer. See special instructions in Appendix under USB for installing C7xx
USB drivers on Windows XP.
Note:
For issues with USB, see "USB connectivity issues" under Troubleshooting.
Cadex 7000 Series battery analyzers cannot connect directly to a USB port. Install and use
an USB-to-serial adapter to use the USB port on your computer. Cadex recommends the
Edgeport USB Expansion Modules from Digi. These modules work with Windows 2000 and
Windows XP, providing multiple high-speed serial connections through one USB port on your
computer.
To connect one or more battery analyzers to the USB port of your computer
1
2
3
Install the USB-to-serial adapter or expansion module according to the manufacturer’s
instructions.
Confirm USB setup and note the new COM port number(s). How?
Connect the Cadex battery analyzer(s) to the USB-to-serial adapter or expansion module
using the cable and cable adapter shipped with Cadex BatteryShop.
Expanding COM ports with a multiport adapter
You can use a COM port multiport adapter to connect up to 32 battery analyzers to a
computer. Multiport adapters that add 4, 8, 16, or 32 COM ports to your system are available
from Cadex. For configuration details, see the installation and configuration guides that come
with the multiport adapters.
Cadex supplies and strongly recommends RocketPort plug-and-play multiport adapters by
Comtrol. Moxa multiport adapters also work well, but require manual configuration. Other
multiport adapters that emulate serial COM ports should work, but as they have not been
tested, no assurance can be made to that effect. Cadex does not provide technical support
115
for installation of multiport adapters not provided by Cadex.
Do not install a RocketPort adapter and an USB-to-serial adapter on the same system.
Installing a RocketPort adapter on a computer with an USB port may cause problems with
any devices connected to the USB port.
116
RocketPort
The most current RocketPort manuals can be downloaded from the Comtrol website
(www.comtrol.com).
Install a RocketPort adapter for Windows 2000/XP Professional
1
2
3
4
Turn off the computer and insert the RocketPort PCI adapter card(s) into the PCI slot(s)
on your computer’s motherboard. How?
Turn on the computer and log on.
Windows 2000 automatically detects the new hardware and installs the required
RocketPort drivers.
Set up the adapter(s):
a.
b.
c.
d.
Click Start on the Windows Task Bar, point to Settings, and then click Control Panel.
Double-click System. The System Properties dialog box appears.
Click Device Manager.
Double-click Multi-function adapters, and then double-click RocketPort – PCI # Port,
PCI-BUS, where # is the number of ports supported by the adapter.
e. Click the Main Setup tab, and then click Properties.
f. Specify a COM port number for the first RocketPort COM port. COM5 is
recommended. The remaining COM port numbers are assigned automatically.
g. Click OK to save your settings.
h. Click OK again.
i. Click Yes to add program manager menu commands to the utility.
j. Close the Device Manager window and the Comtrol RocketPort RocketModem
window.
k. Click OK to close the System Properties dialog box.
5
Verify your new RocketPort COM port numbers:
a. Repeat steps 4a – 4c.
b. Under Ports (COM & LPT), ensure that the RocketPort COM port numbers that you
are assigned are listed.
c. Make a note of the RocketPort COM port numbers. You will need this information
during Cadex BatteryShop setup.
d. Click OK.
6
7
Close the Control Panel window.
Restart the computer for all changes to take effect.
Your RocketPort adapter is now complete. See the RocketPort manual for instructions on
connecting your battery analyzers to the RocketPort interface.
117
USB
Confirm USB Setup
1
2
3
4
Click Start on the Windows Task Bar, point to Settings, and then click Control Panel.
Double-click System. The System Properties dialog box appears.
Click the Device Manager tab.
Verify that you have the following devices installed under Universal Serial Bus
Controller:
a. A Host Controller
b. USB Root Hub
5
If you installed an Edgeport USB Expansion Module, you should also see one or both of
these devices listed:
a. Inside Out Networks Edgeport/#
b. Inside Out Networks Edgeport/# Serial ports [device serial number]
If you installed a USB-to-serial adapter other than the recommended Edgeport USB
Expansion Module, you should see your device listed rather than the Edgeport devices listed
above.
6
7
8
Under Ports (COM & LPT), verify that at least one new COM port is present (usually
COM 3 and above).
Make a note of these new COM port numbers. You will need them during Cadex
BatteryShop setup.
Click OK.
Installing C7xx USB drivers on Windows XP
Windows XP will prompt twice to confirm driver pre-installation during BatteryShop Setup and
again for each analyzer connected via USB serial port.
1
2
Choose the Continue Anyway button to proceed with driver installation for C74xx USB
to UART Bridge Controller.
Choose the Continue Anyway button again to proceed with driver installation for C74xx
USB COM Port.
118
Dymo LabelWriter
A Label Printer driver must be installed for Cadex BatteryShop to work correctly. This is the
case even if a label printer is not available and there is no plan to print labels.
If using the DYMO LabelWriter, install the printer driver that comes with the printer.
Refer to the DYMO manual for instructions on installing the DYMO printer drivers.
The latest driver for the Dymo LabelWriter, which supports the three printer models, is
available on the DYMO website (www.dymo.com)
If using a Windows’ label printer from an alternate manufacturer, please insure that the
correct Windows’ printer drivers are available and that the printer supports a label size that
has at least 1.5 inches horizontal and 1-inch vertical dimensions. Please consult the
alternate manufacturer printer manual to set up their printer for your version of Windows.
119
Set up LabelWriter for Windows 2000 Professional
A Label Printer driver must be installed for Cadex BatteryShop to work correctly. This is the
case even if a label printer is not available and there is no plan to print labels.
If using the DYMO LabelWriter, install the printer drivers that come with the printer.
Refer to the DYMO manual for instructions on installing the DYMO printer drivers.
Install the label printer driver using the Administrator profile. Also, run the Setup Wizard once
for the Administrator profile and for each User profile under which Cadex BatteryShop is
used. Failure to do so will cause printing problems.
1
2
3
4
For a LabelWriter label printer, follow the manufacturer's instructions for connecting the
printer to your computer, and then turn the printer on.
Run Install.exe on the Dymo CD to install the LabelWriter driver.
On the Windows Task Bar, click Start, then point to Settings, and then click Printers.
Configure the printer:
a. Right-click DYMO LabelWriter in the Printers window and click Printing
Preferences on the menu that appears.
b. Under Paper size, choose 30334 2-1/4 in x 1-1/4 in.
c. Under Print Quality select Barcodes and Graphics.
d. Under Print Density, select Normal. This option ensures that bar code scanners can
read printed bar codes.
For an older label printer, experiment to find a setting that allows bar codes to be read
consistently by a scanner held 1/4 inch from the bar code. If none of the settings work,
replace the label printer with a newer model.
5
Click OK.
Note:
If planning to use a different Label Printer, follow the instructions above substituting
the Printer Driver and Paper Size for your Label Printer.
120
Set up LabelWriter for Windows XP
Install a Label Printer driver for Cadex BatteryShop to work correctly. This is the case even if
a label printer is not available and there is no plan to print labels.
If using the DYMO LabelWriter, install the printer drivers that come with the printer.
Refer to the DYMO manual for instructions on installing the DYMO printer drivers.
Install the label printer driver using the Administrator profile. Also, run the Setup Wizard once
for the Administrator profile and for each User profile under which Cadex BatteryShop is
used. Failure to do so will cause printing problems.
1
2
3
4
For a LabelWriter label printer, follow the manufacturer's instructions for connecting the
printer to the PC, and then turn the printer on.
Run Install.exe on the Dymo CD to install the LabelWriter driver.
On the Windows Task Bar, click Start, then point to Settings, and then click Printers.
Configure the printer:
a. Right-click DYMO LabelWriter in the Printers window and click Printing
Preferences on the menu that appears.
b. Under Paper size, choose 30334 2-1/4 in x 1-1/4 in.
c. Under Print Quality select Barcodes and Graphics.
d. Under Print Density, select Normal. This option ensures that bar code scanners can
read printed bar codes.
If you have an older label printer, you may have to experiment to find a setting that allows
bar codes to be read consistently by a scanner held 1/4 inch from the bar code. If none of
the settings work, replace your label printer with a newer model.
5
Click OK.
Note:
If you plan to use a different Label Printer, you can follow the instructions above
substituting the Printer Driver and Paper Size for your Label Printer.
121
Index
Service, 101
Sort, 100
Requirements
Computer, 8
Rules
Update, 119
Adapter
Calibrating, 118
Analyzer
Calibrating, 117
Icon Colors, 98
Database
Battery IDs, 38
Battery Manufacturer, 31
Battery Model, 33
Battery Services, 41
Customers, 37
DAO Error, 86
Exporting Battery Service Data, 43
Exporting graph data to MS Excel, 43
Working with, 31
Security
Database, 111
Servicing Batteries
By Battery ID, 47
By Battery ID or Model, 51
By Battery specifications, 50
By favorite model, 48
By favotite Battery ID, 49
By Model, 45
Monitoring, 52
Real-time status, 52
Restarting, 51
Setup
Analyzers, 12
BatteryShop, 18
BatteryShop caption language, 22
BatteryShop Setup Wizard, 19
Connecting analyzers to the PC, 17
Installing BatteryShop, 9
Labels and Reports, 23
Printer Drivers, 18
Serial Communication, 21
Site Information, 26
System Options, 27
Uninstalling BatteryShop, 11
Upgrading BatteryShop, 10
Program
Auto, 56
Charge, 56
Custom, 64
Discharge Only, 61
Extended Prime, 61
Learn, 62
Life Cycling, 60
OhmTest, 59
phases, 113
Power Boost, 63
Prime, 57
QuickSort, 58
QuickTest, 57
Runtime, 59
Self Discharge, 60
USB
Connectivity issues…, 87
Installing C7xx drivers on Windows XP, 124
Records
Find, 99
Group, 99
122