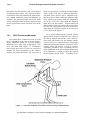
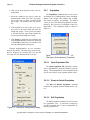
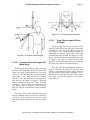
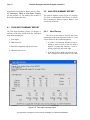
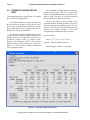
1
3D Static Strength Prediction ProgramTM
Version 5.0.4
User's Manual
The University of Michigan
Center for Ergonomics
August 2005
3D Static Strength Prediction Program Version 5cm
3D Static Strength Prediction ProgramTM
Version 5.0.4
User's Manual
The University of Michigan
Center for Ergonomics
QUESTIONS?
Questions regarding computer hardware and operating systems should be addressed by the analyst's computer support personnel.
Questions regarding this software may be addressed to The University of Michigan,
Office of Technology Transfer, University of Michigan,
Wolverine Tower, Suite 2071, 3003 South State Street, Ann Arbor, MI 48109-1280.
Tel: (734) 936-0435, Fax: (734) 936-1330. email: [email protected]
umichergo.org
Copyright 2005: The Regents of The University of Michigan, ALL RIGHTS RESERVED
Page ii
3D Static Strength Prediction Program Version 5
COPYRIGHT AND DISCLAIMER
The program contained on the original distribution disk is the sole property of The Regents of The
University of Michigan. NO part of the program or this manual may be reproduced or distributed in
any form or by any means without the prior written permission of The Regents of The University of
Michigan, with the exception that you may transfer copies of the original program to a hard disk to
run or to another disk for backup purposes only.
THE PROGRAM ON THE ORIGINAL DISTRIBUTION DISK IS PROVIDED "AS IS" WITHOUT WARRANTY OF ANY KIND, EITHER EXPRESS OR IMPLIED, INCLUDING WARRANTIES OF MERCHANTABILITY AND FITNESS FOR A PARTICULAR PURPOSE.
The entire risk as to the performance of the program and interpretation of the output from the program is with the user. The University of Michigan assumes no responsibility or liability of any kind
for errors in the program, errors in the output from the program, or for any consequential or incidental damages that may arise from use of the program.
All display screens used by the program are copyrighted by the University of Michigan. No screen
or part thereof may be used in any publication or promotion without the express written consent of
The Regents of The University of Michigan.
U.S. GOVERNMENT RESTRICTED RIGHTS. The PROGRAM and documentation are provided
with restricted rights. Use, duplication, or disclosure by the Government is subject to restrictions as
set forth in subdivisions (c)(1)(ii) of the Rights in Technical Data and Computer Software clause at
252.227-7013. Contractor/Manufacturer is The University of Michigan, Ann Arbor, Michigan,
48109.
Copyright 2005 The Regents of The University of Michigan
Windows NT, Windows 2000, Windows ME, and Windows XP are registered trademarks of the
Microsoft Corporation.
Copyright 2005: The Regents of The University of Michigan, ALL RIGHTS RESERVED
3D Static Strength Prediction Program Version 5cm
Page iii
End-User License Agreement
PROGRAM: 3D Static Strength Prediction Program TM Software
IMPORTANT – READ CAREFULLY: This Agreement is a legal agreement between LICENSEE and The Regents
of The University of Michigan, a constitutional corporation of the State of Michigan, ("MICHIGAN"). The term
“LICENSEE” shall mean the person installing the PROGRAM (defined below in Paragraph 1) if it is solely for personal use by that person on the personal equipment of that person. Alternatively, if the PROGRAM is being installed
on equipment for use by another legal entity, such as a corporation, limited liability company or partnership, then the
person installing the PROGRAM by proceeding with the installation certifies that he or she has authority to bind that
legal entity to this Agreement; and that legal entity shall be considered to be the LICENSEE. By installing, copying,
downloading, accessing or otherwise using the PROGRAM, you and LICENSEE agree to be bound by the terms of
this Agreement. If you or LICENSEE (if a separate legal entity) do not agree with the terms of this Agreement, do not
install, access or use the PROGRAM; instead you should return it to the University of Michigan for a full refund.
BACKGROUND
1.
The University of Michigan through its Center for Ergonomics has developed a proprietary computer program and
related documentation, known as the 3D Static Strength Prediction Program, for use by trained individuals as a job
physical stress analysis model in the field of ergonomics, (hereinafter referred to as "PROGRAM"); and
2.
LICENSEE desires to obtain and MICHIGAN, consistent with its mission of education and research, desires to
grant a license to use the PROGRAM subject to the terms and conditions set forth below.
The parties therefore agree as follows:
I.
LICENSE
MICHIGAN hereby grants to LICENSEE a non-exclusive, non-transferable right to install and use the PROGRAM on one CPU at a time, in executable form only and subject to the terms and conditions of this Agreement. If the PROGRAM is being installed and used on behalf of an educational entity, then LICENSEE shall
have the right to install and use multiple copies of the PROGRAM for academic, training or educational purposes.
II. LIMITATION OF LICENSE AND RESTRICTIONS
A. LICENSEE shall not use, print, copy, translate, reverse engineer, decompile, disassemble, modify, create derivative works of or publicly display the PROGRAM, in whole or in part, unless expressly authorized by this
Agreement.
B. LICENSEE agrees that it shall use the PROGRAM only for LICENSEE'S sole and exclusive use, and shall
not disclose, sell, license, or otherwise distribute the PROGRAM to any third party without the prior written
consent of MICHIGAN. LICENSEE shall not assign this Agreement, and any attempt by LICENSEE to assign it shall be void from the beginning. LICENSEE agrees to secure and protect the PROGRAM and any
copies in a manner consistent with the maintenance of MICHIGAN'S rights in the PROGRAM and to take
appropriate action by instruction or agreement with its employees who are permitted access to the PROGRAM in order to satisfy LICENSEE'S obligations under this Agreement. LICENSEE is authorized to copy
the PROGRAM for backup purposes only.
III. TITLE AND OWNERSHIP
A. No ownership rights of MICHIGAN in the PROGRAM are conferred upon LICENSEE by this Agreement.
B. LICENSEE acknowledges MICHIGAN'S proprietary rights in the PROGRAM and agrees to reproduce all
copyright notices supplied by MICHIGAN on all copies of the PROGRAM, and on all PROGRAM outputs
and copies of PROGRAM outputs.
IV. DISCLAIMER OF WARRANTY AND LIMITATION OF LIABILITY
A. THE PROGRAM IS PROVIDED "AS IS" WITHOUT WARRANTY OF ANY KIND, EITHER EXPRESS
OR IMPLIED, INCLUDING WITHOUT LIMITATION THE IMPLIED WARRANTIES OF MERCHANTABILITY AND FITNESS FOR A PARTICULAR PURPOSE. MICHIGAN DOES NOT WARRANT
Copyright 2005: The Regents of The University of Michigan, ALL RIGHTS RESERVED
Page iv
3D Static Strength Prediction Program Version 5
THAT THE FUNCTIONS CONTAINED IN THE PROGRAM WILL MEET LICENSEE'S REQUIREMENTS OR THAT OPERATION WILL BE UNINTERRUPTED OR ERROR FREE. MICHIGAN shall not
be liable for special, indirect, incidental, or consequential damages with respect to any claim on account of or
arising from this Agreement or use of the PROGRAM, even if MICHIGAN has been or is hereafter advised
of the possibility of such damages. Because some states do not allow certain exclusions or limitations on implied warranties or of liability for consequential or incidental damages, the above exclusions may not apply to
LICENSEE. In no event, however, will MICHIGAN be liable to LICENSEE, under any theory of recovery,
in an amount in excess of the license royalty paid by LICENSEE under this Agreement.
B. LICENSEE agrees that MICHIGAN has no obligation to provide to LICENSEE any maintenance, support, or
update services. Should MICHIGAN provide any revised versions of the PROGRAM to LICENSEE, LICENSEE agrees that this license agreement shall apply to such revised versions.
C. MICHIGAN does not warrant, endorse or certify any individual or organization as a trainer for the PROGRAM, or any special strength testing, data input or other equipment to be used with the PROGRAM.
D. If the physical media provided hereunder contains any defects upon receipt by LICENSEE, LICENSEE shall
have thirty (30) days in which to return said defective media and MICHIGAN shall provide a replacement
free of charge.
V. WARRANTY OF LICENSEE
LICENSEE warrants and represents that it will carefully review the User's Manual and that it is aware of the
necessity for training in the field of ergonomics and the underlying biomechanical model of the PROGRAM
and of the necessity for having an expert in the field of ergonomics review and interpret data provided in or by
the PROGRAM, including the User's Manual. LICENSEE further warrants and represents that it either has
such training or will incorporate the services of individuals with such training in any use or interpretation of
data provided in or by the PROGRAM.
VI. TERMINATION
If LICENSEE at any time fails to abide by the terms of this Agreement, MICHIGAN shall have the right to immediately terminate the license granted herein, require the return or destruction of all copies of the PROGRAM from
LICENSEE and certification in writing as to such return or destruction, and pursue any other legal or equitable
remedies available.
VII. MISCELLANEOUS
A. This Agreement shall be construed in accordance with the laws of the State of Michigan. Should LICENSEE for any reason bring a claim, demand, or other action against MICHIGAN, its agents or employees,
arising out of this Agreement or the PROGRAM licensed herein, LICENSEE agrees to bring said claim only
in the Michigan Court of Claims.
B. THIS AGREEMENT REPRESENTS THE COMPLETE AND EXCLUSIVE STATEMENT OF THE
AGREEMENT BETWEEN MICHIGAN AND LICENSEE AND SUPERSEDES ALL PRIOR AGREEMENTS, PROPOSALS, REPRESENTATIONS AND OTHER COMMUNICATIONS, VERBAL OR WRITTEN, BETWEEN THEM WITH RESPECT TO USE OF THE PROGRAM. THIS AGREEMENT MAY
BE MODIFIED ONLY WITH THE MUTUAL WRITTEN APPROVAL OF AUTHORIZED REPRESENTATIVES OF THE PARTIES.
C. The terms and conditions of this Agreement shall prevail notwithstanding any different, conflicting, or additional terms or conditions which may appear in any purchase order or other document submitted by LICENSEE. LICENSEE agrees that such additional or inconsistent terms are deemed rejected by MICHIGAN.
D. Unless otherwise exempt therefrom, LICENSEE agrees that it will be responsible for any sales, use or excise
taxes imposed by any governmental unit in this transaction except income taxes.
E. LICENSEE acknowledges that the PROGRAM is of United States origin. Licensee agrees to comply with all
applicable international and national laws that apply to the PROGRAM, including the United States Export
Administration Regulations, as well as end-user, end-use, and destination restrictions issued by the United
States.
Copyright 2005: The Regents of The University of Michigan, ALL RIGHTS RESERVED
3D Static Strength Prediction Program Version 5cm
Page v
TABLE OF CONTENTS
Copyright and Disclaimer............................................................................................................... ii
End-User License Agreement ........................................................................................................ iii
Chapter 1: INTRODUCTION .......................................................................................................
1.1
PURPOSE OF MANUAL ......................................................................................
1.2
CAUTION ..............................................................................................................
1.3
BACKGROUND ....................................................................................................
1.3.1 L5/S1 Forces and Moments..............................................................................
1.3.2 3D Compression and Torso Muscle Force Optimization at L4/L5 ..................
1.3.3 Static Strength Model .......................................................................................
1.4
NEW FEATURES OF VERSION 5 .....................................................................
1.5
REMOTE OPERATION ........................................................................................
1.6
ERROR REPORTING ...........................................................................................
1.7
SPECIAL DEFINITIONS ......................................................................................
1.8
SPECIAL TYPEFACES ........................................................................................
1
1
1
1
2
3
4
4
4
5
5
6
Chapter 2: GETTING STARTED .................................................................................................
2.1
HARDWARE REQUIREMENTS .........................................................................
2.2
SOFTWARE REQUIREMENTS...........................................................................
2.3
INSTALLING AND STARTING 3D SSPP ..........................................................
2.4
REGISTRATION ...................................................................................................
2.5
STARTUP SCREENS............................................................................................
2.6
DEMO MODE........................................................................................................
2.7
2D MODE ..............................................................................................................
7
7
7
7
7
8
8
8
Chapter 3: SCREEN AREAS ........................................................................................................
3.1
PROGRAM WINDOW..........................................................................................
3.2
ORTHOGONAL VIEW (“3-VIEW”) WINDOWS ...............................................
3.2.1 Direct Manipulation..........................................................................................
3.2.2 Preferred Order and Techniques of Joint Manipulation ...................................
3.2.2.1 Right and Left Ankles .............................................................................
3.2.2.2 Hips..........................................................................................................
9
9
10
11
11
12
12
Copyright 2005: The Regents of The University of Michigan, ALL RIGHTS RESERVED
Page vi
3D Static Strength Prediction Program Version 5
3.2.2.3 Trunk Flexion..........................................................................................
3.2.2.4 Trunk Axial Rotation ..............................................................................
3.2.2.5 Trunk Lateral Bending............................................................................
3.2.2.6 Right and Left Elbows ............................................................................
3.2.2.7 Hand Positions ........................................................................................
3.2.2.8 Modeling Whole Body Postures .............................................................
OBLIQUE VIEW WINDOW ................................................................................
STATUS WINDOW..............................................................................................
REPORT WINDOWS ...........................................................................................
12
12
13
13
13
13
14
15
15
Chapter 4: FILE MENU COMMANDS .......................................................................................
4.1
FILE MANAGEMENT DIALOG BOXES...........................................................
4.2
NEW ......................................................................................................................
4.3
OPEN .....................................................................................................................
4.4
SAVE .....................................................................................................................
4.5
SAVE AS ...............................................................................................................
4.6
SET STARTUP TASK TO CURRENT ................................................................
4.7
RESET STARTUP TASK .....................................................................................
4.8
PRINT ACTIVE WINDOW..................................................................................
4.9
PRINT PREVIEW .................................................................................................
4.10 PRINT SETUP ......................................................................................................
4.11 PRINT APPLICATION.........................................................................................
4.12 PRINT DESKTOP .................................................................................................
4.13 COPY APPLICATION..........................................................................................
4.14 COPY DESKTOP..................................................................................................
4.15 PRINTING THROUGH THE WINDOWS CLIPBOARD ...................................
4.16 EXIT ......................................................................................................................
17
17
18
18
18
18
18
18
19
19
19
20
20
20
21
21
21
Chapter 5: TASK INPUT MENU COMMANDS ........................................................................
5.1
DESCRIPTION......................................................................................................
5.2
SET METRIC / ENGLISH UNITS .......................................................................
5.3
SET 2D / 3D MODE..............................................................................................
5.4
GRAVITY..............................................................................................................
5.5
SUPPORT SELECTION .......................................................................................
5.5.1 Standing or Seated Support Selection .............................................................
23
23
24
24
24
24
24
3.3
3.4
3.5
Copyright 2005: The Regents of The University of Michigan, ALL RIGHTS RESERVED
3D Static Strength Prediction Program Version 5cm
Page vii
5.5.2 Feet Support......................................................................................................
5.2.2.1 Foot Splay Angle .....................................................................................
5.5.3 Seating Parameters ...........................................................................................
5.6
ANTHROPOMETRY ............................................................................................
5.6.1 Population.........................................................................................................
5.6.1.1 Open Population File ...............................................................................
5.6.1.2 Select Default Population ........................................................................
5.6.1.3 Edit Population ........................................................................................
5.7
BODY SEGMENT ANGLES ................................................................................
5.7.1 An Introduction to Body Segment Angles Method of Posture Entry...............
5.7.2 Body Segment Angle Dialog Box (2D Mode) .................................................
5.7.3 Body Segment Angle Dialog Box (3D Mode) .................................................
5.7.4 Body Segment Angle Descriptions ..................................................................
5.7.4.1 Lower Leg Vertical Angle (2D and 3D Mode) .......................................
5.7.4.2 Upper Leg Vertical Angles (2D and 3D Mode) ......................................
5.7.4.3 Upper Arm Vertical Angles (2D and 3D Modes)....................................
5.7.4.4 Upper Arm Horizontal Angles (3D Mode Only).....................................
5.7.4.5 Forearm Vertical Angles (2D and 3D Modes) ........................................
5.7.4.6 Forearm Horizontal Angles (3D Mode Only) .........................................
5.7.4.7 Trunk Flexion Angle (2D and 3D Mode)................................................
5.7.4.8 Trunk Axial Rotation (3D Mode Only)...................................................
5.7.4.9 Lateral Bending Angle (3D Mode Only).................................................
5.8
POSTURE PREDICTION (3D MODE ONLY) ....................................................
5.8.1 Introduction to the Inverse Kinematics Method of Posture Entry....................
5.8.2 Posture Prediction Dialog Box .........................................................................
5.9
LOCKING MODE .................................................................................................
5.10 UNDO/REDO POSTURE CHANGE ....................................................................
5.11 HAND LOADS. .....................................................................................................
5.11.1 Hand Force Vector Descriptions (2D Mode) ...................................................
5.11.2 Hand Load Entry (2D Mode)............................................................................
5.11.3 Hand Load Force Vector Descriptions (3D Mode) ..........................................
5.11.3.1 Horizontal Angle .....................................................................................
5.11.3.2 Vertical Angle..........................................................................................
5.11.4 Hand Load Entry (3D Mode)............................................................................
5.12 ADVANCED HAND LOADS...............................................................................
Copyright 2005: The Regents of The University of Michigan, ALL RIGHTS RESERVED
25
25
25
25
26
26
26
26
27
27
27
28
29
29
29
30
30
30
31
31
32
32
33
33
33
34
35
35
35
36
36
36
37
37
37
Page viii
3D Static Strength Prediction Program Version 5
5.13 JOINT LOADS.......................................................................................................
5.13.1 Zero Current .....................................................................................................
5.13.2 Zero All ...........................................................................................................
5.14 RUN BATCH FILE ...............................................................................................
5.14.1 Batch File Format .............................................................................................
5.14.1.1 First Line of File ......................................................................................
5.14.1.2 Command Structure.................................................................................
5.14.2 COMMENT Command ....................................................................................
5.14.3 DESCRIPTION Command ..............................................................................
5.14.4 ANTHROPOMETRY Command.....................................................................
5.14.5 JOINTANGLES Command..............................................................................
5.14.6 HANDLOADS Command................................................................................
5.14.7 EXPORT Command .........................................................................................
5.14.8 AUTOEXPORT Command..............................................................................
5.14.9 Example Batch File ..........................................................................................
37
38
39
39
39
39
39
39
40
40
40
40
40
41
41
Chapter 6: DISPLAY MENU COMMANDS ...............................................................................
6.1
AUTO TILE ...........................................................................................................
6.2
TILE NOW .............................................................................................................
6.3
STATUS BAR........................................................................................................
43
43
43
43
Chapter 7: 3-VIEWS MENU COMMANDS ................................................................................ 45
7.1
SHOW FORCES .................................................................................................... 45
7.2
COLORS ................................................................................................................ 45
Chapter 8: OBLIQUE-VIEW MENU COMMANDS...................................................................
8.1
HUMAN FIGURE..................................................................................................
8.1.1 Model Type ......................................................................................................
8.1.2 Figure Color......................................................................................................
8.1.3 Hand Type ........................................................................................................
8.1.4 Enable Shoes ....................................................................................................
8.1.5 Clothing Color ..................................................................................................
8.2
ENVIRONMENT...................................................................................................
8.2.1 Floor .................................................................................................................
8.2.2 Handheld Object ...............................................................................................
Copyright 2005: The Regents of The University of Michigan, ALL RIGHTS RESERVED
47
48
48
48
48
49
49
49
49
49
3D Static Strength Prediction Program Version 5cm
Page ix
8.2.3 Barrier ..............................................................................................................
8.2.4 Color ................................................................................................................
8.3
CAMERA ..............................................................................................................
8.4
BACKGROUND ...................................................................................................
8.4.1 Color ................................................................................................................
8.4.2 Load New Image..............................................................................................
8.5
LIGHT ...................................................................................................................
50
50
50
52
52
52
52
Chapter 9: REPORTS MENU COMMANDS..............................................................................
9.1
TASK INPUT SUMMARY REPORT ..................................................................
9.2
ANALYSIS SUMMARY ......................................................................................
9.2.1 Hand Forces .....................................................................................................
9.2.2 Disc Compression Force ..................................................................................
9.2.2.1 BCDL and BCUL Limit Flags................................................................
9.2.3 Percent Capable. .............................................................................................
9.2.3.1 SDL and SUL Limit Flags ......................................................................
9.2.4 Leg Load and Balance .....................................................................................
9.2.5 Required Coefficient of Ground Friction.........................................................
9.3
FATIGUE REPORT ..............................................................................................
9.4
3D LOW-BACK ANALYSIS REPORT ...............................................................
9.5
SAGITTAL PLANE LOW-BACK ANALYSIS REPORT ..................................
9.5.1 Estimated L5/S1 Ligament Strain....................................................................
9.6
STRENGTH CAPABILITIES REPORT ..............................................................
9.7
ANTHROPOMETRY REPORT ...........................................................................
9.8
BALANCE REPORTS (SEATED AND STANDING) ........................................
9.8.1 Center of Pressure Calculation.........................................................................
9.8.2 Stability Regions..............................................................................................
9.8.3 Balance Conditions ..........................................................................................
9.8.4 Center of Pressure Graphic ..............................................................................
9.9
FORCES REPORT ................................................................................................
9.10 LOCATIONS REPORT.........................................................................................
9.11 MOMENTS REPORT ...........................................................................................
9.12 POSTURE REPORT ............................................................................................
9.13 SPINAL FORCES AND MOMENTS REPORT ..................................................
9.14 STRENGTH DIRECTION VECTORS REPORT.................................................
53
54
54
54
55
56
56
56
56
57
57
58
59
59
60
61
62
62
63
64
64
65
66
67
68
69
70
Copyright 2005: The Regents of The University of Michigan, ALL RIGHTS RESERVED
Page x
3D Static Strength Prediction Program Version 5
9.15 PRINT REPORT COMMAND ............................................................................. 71
9.16 EXPORT OUTPUT SUMMARY.......................................................................... 71
9.16.1 Export Output File Format............................................................................... 72
References
................................................................................................................................ 75
Index
................................................................................................................................ 77
Copyright 2005: The Regents of The University of Michigan, ALL RIGHTS RESERVED
3D Static Strength Prediction Program Version 5.0
Page 1
Chapter 1: INTRODUCTION
The University of Michigan's 3D Static Strength
Prediction Program TM (3DSSPP) is based on over
30 years of research at the Center for Ergonomics
regarding the biomechanical and static strength capabilities of the employee in relation to the physical
demands of the work environment. This manual
provides the user of the 3D Static Strength Prediction Program with an instructional reference for
properly applying 3DSSPP to aid in the evaluation
of the physical demands of a prescribed job. Furthermore, 3DSSPP can aid the analyst in evaluating
proposed workplace designs and redesigns prior to
the actual construction or reconstruction of the
workplace or task. Used both as a job design/
evaluation tool and for instructional purposes, the
program is applicable to worker motions in three
dimensional space.
1.1
PURPOSE OF MANUAL
The purpose of this manual is to provide the analyst
with:
1. A description of the hardware and software
necessary to run the program.
2. An explanation of the task parameters, program options, and the information obtainable
from the program.
3. Instructions on how to apply the program and
interpret the results.
1.2
CAUTION
3DSSPP should not be used as the sole determinant
of worker strength performance or job designs based
on that performance. Other criteria and professional
judgment are required to properly design safe and
productive jobs. Be sure to read the End-User License Agreement at the beginning of this manual.
1.3
BACKGROUND
3DSSPP is most useful in the analysis of the
"slow" movements used in heavy materials handling tasks since the biomechanical computations
assume that the effects of acceleration and momentum are negligible.
Such tasks can be evaluated best by dividing the
activity into a sequence of static postures and analyzing each individual posture.
To aid in posture entry, an inverse kinematics
algorithm was developed from research on the preferred postures of individuals manipulating loads
with known hand positions. This behavioral-based
algorithm is intended to provide a first approximation of the posture based on the specified hand positions and torques and forces on the hands and joints.
However, the inverse kinematics algorithm may not
yield a posture representative of the actual posture
being modeled since the actual posture can be affected by individual factors such as differences in
body type, postural preference and training, as well
as environmental factors such as the nature of the
object being handled, workplace obstructions, trac-
Copyright 2005: The Regents of The University of Michigan, ALL RIGHTS RESERVED
Page 2
3D Static Strength Prediction Program Version 5.0
tion and the feet-floor interface, and worker apparel.
To minimize these effects, only experienced workers should be observed performing the tasks in question. Should additional posture modifications be
necessary, the program contains easy-to-use methods for altering the initial predicted posture to more
closely represent the posture observed in the workplace.
these two shear forces is called the “Resultant Shear
Force” on the L5/S1 disc. In addition to the Resultant Shear Force, the disc may be subjected to further stress due to those loading and postural conditions which create torsion about the longitudinal
axis of the L5/S1 disc, often called the “Moment
about the L5/S1 disc normal”. Uneven hand loads
and/or rotation of the torso from side to side during
the task can easily generate an axial rotation moment about the L5/S1 disc normal (or the torsion on
L5/S1), depicted by Figure 1.2.
1.3.1
For a typical lifting task, the low-back Erector
Spinae muscle produces a contractile force, acting at
the muscle moment arm distance (this varies between male and female), for the moment equilibrium at L5/S1 level. Abdominal force, acting at the
abdominal moment arm distance (which also varies
between males and females as well as between
population percentiles), also is balancing the moment equilibrium on the Erector Spinae muscle side
of the equation (i.e., helping to reduce the required
Erector Spinae muscle force). According to the
L5/S1 Forces and Moments
The Lumbar Disc Compression Force at L5/S1
level is calculated as the sum of Erector Spinae /
Rectus Abdominus (either one active per posture),
abdominal force, upper body weight above L5/S1
level, and hand load, Figure 1.1. Furthermore,
forces acting upon the L5/S1 disc are resolved to
compute the shear components in the AnteriorPosterior and Lateral directions. The vector sum of
Figure 1.1: Simplistic diagram of low-back forces for lifting (Sagittal Model)
Copyright 2005: The Regents of The University of Michigan, ALL RIGHTS RESERVED
3D Static Strength Prediction Program Version 5.0
Page 3
Torsion About the L5/S1 Normal
Vertebrae
+X (Right Side) Frontal
Plane Shear Force
+Y (Anterior-Posterior Dir)
Sagittal Plane Shear Force
On L5/S1 Disc
Resultant (Vector Sum of X and Y)
Shear Force On L5/S1
Figure 1.2: Shear forces and torsion on a vertebral disc
model’s algorithm for a press-down task, however,
the anterior rectus abdominus muscle would produce a contractile force to maintain L5/S1 moment
equilibrium, acting at the muscle moment arm distance (which also varies between males and females
as well as between population percentiles). As
documented so far, the L5/S1 compression algorithm is based on Erector Spinae muscle contraction, Rectus Abdominus muscle contraction (either
one active at any given time), the Abdominal Pressure (affected by posture), and the resultant moment
and forces at L5/S1 joint.
Erector Spinae, Rectus Abdominus, and Abdominal Force computation for L5/S1 moment equilibrium are based on the moment arm length data
(with standard deviation) as compiled from studies
by McGill, Patt and Norman (1988); Reid, Costigan
& Comrie (1987); Nemeth and Ohlsen (1986); and
Chaffin, Redfern, Erig and Goldstein (1989).
1.3.2
3D Compression and Torso Muscle Force Optimization at L4/L5
Torso muscle moment arms and muscle orientation data for the L4/L5 level have been studied more
extensively than at any other lumbar level. Hence,
the three dimensional back compression optimization is computed at L4/L5 lumbar level. L4/L5
level torso muscle (five on the left side and five on
the right side) areas, moment arms, and contractile
force direction data were utilized from studies by
McGill, Patt and Norman (1988); Reid, Costigan &
Comrie (1987); Nemeth and Ohlsen (1986); Chaffin, Redfern, Erig & Goldstein (1989); Kumar
(1988), Tracy et. al. (1989); and McGill and Norman
(1986).
Torso muscle tensile forces are computed using
the double optimization technique of Bean, Chaffin
and Shultz (1988). First, an upper bound on muscle
intensity (the ratio of muscle force to physiological
cross sectional area) is found by minimizing the
maximum muscle intensity such that the moment
equilibrium conditions are satisfied; and second, the
muscle forces satisfying the moment conditions and
muscle intensity bounds which minimize the muscular contribution to spinal compression force are determined. L4/L5 joint resultant moments (after the
abdominal force effect) and joint forces in three dimensions over the tilted L4/L5 disc, torso muscle
moment arms (lateral and anterior-posterior), and
muscle areas are the inputs to the three dimensional
torso muscle force optimization routine. The routine outputs the resultant muscle contraction forces
at the L4/L5 level and the disc compression force as
the vector sum of muscle (ten muscles) contractile
forces, abdominal force, upper body weight above
L4/L5 level, and the hand loads.
Copyright 2005: The Regents of The University of Michigan, ALL RIGHTS RESERVED
Page 4
3D Static Strength Prediction Program Version 5.0
L4/L5 LEVEL
+Y
L Rectus Abdo.
LEFT
R. Rectus Abdo.
RIGHT
Anterio-Posterior
Shear F
L. External Ob.
R. External Ob.
L. Internal Ob.
-X
R. Internal Ob.
+X
Lateral Shear F
L.
Latis. Dorsi
R.
Latis. Dorsi
L. Erector Spi.
R. Erector Spi.
-Y
Figure 1.3: Low-back forces and moments.
Depiction of torso muscle areas and orientation
with respect to the L4/L5 disc is shown in Figure
1.3. The initials “L” and “R” before the muscle labels represent the Left (in the - X quadrant) and
Right (in the + X quadrant) sides of torso. The vector sum of Anterior-Posterior Shear Force and Lateral Shear Forces represents the Total Shear Force.
1.3.3
Static Strength Model
A technical discussion of the static strength
model used in the program is provided in Chapter 6
of Occupational Biomechanics; 3rd Edition by
Chaffin, Andersson, and Martin; 1999 (published by
J. Wiley & Sons, Inc., 605 Third Ave., New York,
NY 10158). Worker strengths used for the prediction model have been compiled from a collection of
strength studies described and referenced in the
same textbook, in addition to other studies (found in
the scientific journals) which offer strength data
updates on experimental joint strength capabilities
of industrial and civilian populations. Results from
this model demonstrate a strong correlation with
average population static strengths (r = 0.8).
1.4
NEW FEATURES OF VERSION 5
// New in 5! // Version 5 includes many enhancements to the tools and data at the user’s disposal. If
you are familiar with 3DSSPP, you may want to
look through the manual for sections beginning
with the “New in 5!” header, as you see at the beginning of this paragraph.
1.5
REMOTE OPERATION
3DSSPP may be operated remotely (by another program) through a COM library interface. This permits value added software vendors to use the
3DSSPP biomechanical as an engine in their products.
Copyright 2005: The Regents of The University of Michigan, ALL RIGHTS RESERVED
3D Static Strength Prediction Program Version 5.0
In this case 3DSSPP must still be licensed from
the University of Michigan as either the fullfeatured program or the 2D Mode only version. In
either case the program may be operated as a stand
alone biomechanics or ergonomics analysis tool.
Value added vendors wishing to implement the
3DSSPP engine must purchase a special license
from the University of Michigan. COM library
commands and header files will then be provided
for either Visual Basic or Visual C++ software development.
University of Michigan Software
Technology Management Office
Wolverine Tower, Room 2071
3003 South State Street
Ann Arbor, MI 48109-1280.
Tel: (734) 936-0435, Fax: (734) 936-1330.
1.6
ERROR REPORTING
Considerable effort has been made to eliminate
software errors (“bugs”) from this version of the
3DSSPP software prior to release.
If, however, a software error occurs at any time
during 3DSSPP operations, Windows will display
an error message and request to close the application. Should this occur, please note the posture being analyzed, any other programs currently running,
and the type of computer system being used. Then
please copy the message in its entirety, close the
application, and contact the Center for Ergonomics
at the University of Michigan.
By providing the above information when problems
occur, the Center is aided greatly in its efforts to
develop useful software of the highest quality.
The University of Michigan
The Center For Ergonomics
1205 Beal - IOE Building
Ann Arbor, MI 48109-2117
[email protected]
Phone: (734) 763-2243, Fax: (734) 764-3451
1.7
Page 5
SPECIAL DEFINITIONS
This manual assumes the user is familiar with basic
Windows terminology such as icons, clipboard, dialog boxes, click, drag, and re-sizing windows. If
this is not the case, please refer to the Windows
Help for additional details. In addition, the following definitions will aid in understanding the descriptions and instructions found in this manual:
Orthogonal (3-View) views: The three posture
entry windows displaying the posture being
modeled in top, right side, and front views.
Oblique view: The window displaying a figure
in the posture modeled from a user-defined
orientation. In new files, this is the lower left
hand window.
Vertical Tilt: Referring to the camera metaphor
of the oblique view, this is a measure of the
angle from the horizontal plane at which the
object is being observed. Ranging from -89
to 89 degrees, 0 degrees is at waist level
looking at the object and 89 degrees is directly overhead looking down on the object.
Rotation: Also referring to the camera metaphor
of the oblique view, this is a measure of the
angle from a vertical plane separating the left
and right halves of the object at which it is
being observed. Ranging from -180 to 180
degrees, 0 degrees is looking directly at the
front of the figure while 90 degrees is looking at the figure's left side.
Focal length: Also referring to the camera metaphor of the oblique view, this simulates the
effect of the camera focal length on the image for better posture matching with photographs. Long focal lengths magnify and flatten images while short focal lengths shrink
and distort images.
Distance: Referring to the camera metaphor of
the oblique view, this is the distance from
which the figure is observed.
Input field: The section of the screen highlighted
or underlined by the cursor.
Copyright 2005: The Regents of The University of Michigan, ALL RIGHTS RESERVED
Page 6
3D Static Strength Prediction Program Version 5.0
Model output: All of the output with respect to
one set of task parameters. Only part of the
output is displayed on the screen at any one
time.
Posture: The different angles about the joints of
the body describing the orientation of the
body in space
Reactive load: Reaction force or moments provided by the body's musculoskeletal system
to the resultant load.
Record: One set of task parameters.
Resultant load: The load in force or moments
acting upon the body.
them. The first key should be held while the
second key is pressed. For example, if instructed to hold ALT and press PrtSc (print
screen), the instruction will appear as follows:
press: ALT+PrtSc
4. If a specific menu sequence is to be followed,
the sequence will appear in italicized bold
faced text with a pipe symbol ( | ) between
each item. For example, to access the units
selection dialog, the instruction to choose the
Task-Input menu and select the Units item
would appear as:
Task-Input | Units…
Task parameters: Data describing the task including the force magnitude and direction,
anthropometry, and postural angles.
1.8
SPECIAL TYPEFACES
The format described below is used throughout the
manual to indicate if or when information should be
entered or a key pressed, to describe messages that
appear on the screen, and outline examples used
within the manual.
1. If instructed to type information, the information will appear in capital letters. For example, if a task description is to be typed, the
instruction will appear as follows:
type: CART PUSHING TASK
2. If one key is to be pressed, the key to be
pressed will appear in bold faced text. For
example, if the TAB key is to be pressed, the
instruction will appear as follows:
press: TAB
3. If two keys are to be pressed at the same
time, the keys to be pressed will appear in
bold faced text with a plus sign (+) between
Copyright 2005: The Regents of The University of Michigan, ALL RIGHTS RESERVED
3D Static Strength Prediction Program Version 5.0
Page 7
Chapter 2: GETTING STARTED
2.1
HARDWARE REQUIREMENTS
2.3
Due to the complexity of the interactions between
3DSSPP and the Windows environment as well as
the computations that are performed by the posture
prediction, inverse kinematics, human modeling
graphics, and 3D back optimization routines, the
minimum hardware configuration recommended to
run the program consists of the following:
1. Insert media or download and find the installation file (it will be named
“3DSSPP_500_Setup.exe” or something
very similar) and double-click its icon.
2. Follow the on-screen instructions. Be sure
to read the End-User License Agreement.
IBM PC or compatible with a Pentium processor
running at 1 GHz or greater;
3. To begin working with 3DSSPP, doubleclick on the main program icon (3D) or the
filename (3DSSPP.exe). If the program has
been added to the Start Menu or desktop,
then it can be started there as well.
128 MB RAM;
20 MB of available hard disk space;
VGA monitor and graphics card, 256 colors or
better.
2.2
SOFTWARE REQUIREMENTS
A Microsoft Windows 2000 or XP operating system
is required to run 3DSSPP. It may also run under
Windows 98, ME, and NT depending upon the capabilities of the computer. The program has bees
successfully tested to run under Vertual PC Version
7 for the Mac running Windows XP. The program
is available on a CD or can be downloaded from the
website umichergo.org.
INSTALLING AND STARTING
3DSSPP
Note: If your computer is on a network, your
account may not have sufficient privileges to install
new software. If you experience difficulties with
installation, consult your network administrator.
Installation of 3DSSPP on a network (not just a
single workstation) requires a special license.
2.4
REGISTRATION
// New in 5! // In order to use the full version of
3DSSPP, the user must enter a registration code
(Figure 2.1). This should have been provided with
your purchase of 3DSSPP. To register, simply enter your company name and registration code in the
spaces indicated.
If you choose not to enter a registration code
Copyright 2005: The Regents of The University of Michigan, ALL RIGHTS RESERVED
Page 8
3D Static Strength Prediction Program Version 5.0
Figure 2.1: 3DSSPP Registration dialog box
initially, you can still choose to experience 3DSSPP
in Demo Mode.
To enter a registration number after running the
program for the first time, simply choose registration under the About menu.
A correct registration code will only need to be
entered once. When a major revision of 3DSSPP is
released, however, a new code may be required.
2.5
2.7
2D MODE
If you have purchased a 2D version of the program,
your registration code will indicate this, as it contains the string “2D.” There are some features of
3DSSPP that 2D users will be unable to use. 2D
users can operate the 3DSSPP in demo mode, see
section 2.6.
STARTUP SCREENS
Before the data entry windows appear, three preliminary screens of general information are displayed which should be read carefully if the program is being used for the first time. After each
screen is read, either press ENTER or click on the
OK button to continue. After the final information
screen, the program will load.
2.6
DEMO MODE
// New in 5! // Users without a proper registration
code can run 3DSSPP in Demo Mode. In Demo
Mode, all functionality of 3DSSPP can be accessed,
but the Anthropometry of the hominoid will be
locked at 5th Percentile Male, and calculations
should not be used as indicative of the general
population.
Copyright 2005: The Regents of The University of Michigan, ALL RIGHTS RESERVED
3D Static Strength Prediction Program Version 5.0
Page 9
Chapter 3: SCREEN AREAS
3.1
PROGRAM WINDOW
The program window (Figure 3.1) contains the
3DSSPP application with its view windows, dialogs, and report windows. At the top of the main
program window is the main program title bar
which contains the program title, the name of the
postural data file currently in use, and standard
Windows control buttons for the entire program. If
the task file has been modified from its last saved
state, an asterisk will appear in the title bar after the
filename.
Note: The remaining part of section 3.1 is for
users unfamiliar with Windows program operation.
Whenever you see the text “// New to Windows? //”
Figure 3.1: 3DSSPP main program window
Copyright 2005: The Regents of The University of Michigan, ALL RIGHTS RESERVED
Page 10
3D Static Strength Prediction Program Version 5.0
you can skip to the next paragraph if you are already familiar with standard Windows program operation.
// New to Windows? // Note that the "3D" (or
“2D” in 2D mode) button in the upper left hand corner is the Control Menu box; when this button is
clicked, a menu appears which allows control over
the location, size, and status of the entire program
window. The right hand buttons include
“minimize” (convert the program window to an
entry on the windows status bar),
“maximize” (alternate the program window between a full or partial screen display), or
“close” (close the program window and quit the
program). The operation of the title bars of the five
windows within the program window operate in
similar fashion except that they control only their
respective view, not the entire program. The main
five windows (3-Views, Oblique View, and Status
Window) cannot be closed.
// New to Windows? // Positioning the cursor
over the program window borders will change the
cursor to a different arrow shape. If the left mouse
button is then clicked and held, the border can then
be dragged to change the size of the window. When
adjusting the program window borders in this way,
two separate applications can be displayed (e.g.,
3DSSPP and a word processing program).
// NEW TO WINDOWS? // PLEASE BE
AWARE THAT DOUBLE-CLICKING ON
THE CONTROL MENU BUTTON, SE-
LECTING CLOSE FROM THE CONTROL
MENU, OR CLICKING ON THE PROGRAM WINDOW CLOSE BUTTON WILL
RESULT IN EXITING THE CURRENT
3DSSPP SESSION. A WARNING WILL
APPEAR ONLY IF THE POSTURE OR
TASK INPUTS HAVE BEEN MODIFIED
SINCE THE LAST SAVE.
3.2
ORTHOGONAL VIEW ("3-VIEW")
WINDOWS
The three orthogonal view posture entry windows
display the posture being modeled in the top, front,
and right side views (Figure 3.2). The posture is
displayed using stick figures so that joint angles are
easily seen. Each orthogonal view window has its
own title bar which contains the direction of the
view and has buttons on the right side for controlling the sizing of that window: either convert to a
button or enlarge to full screen for easier posture
manipulation (close is not allowed).
The joint angles of the hominoid can be directly
manipulated by clicking any joint and dragging it to
a new location. // New in 5! // When the mouse
cursor is over a selectable joint, it will change from
an arrow into a hand. The name of the joint currently pointed to will be displayed in the status bar
at the bottom of the main window.
Figure 3.2: Orthogonal View (3-View) window
Copyright 2005: The Regents of The University of Michigan, ALL RIGHTS RESERVED
3D Static Strength Prediction Program Version 5.0
// New in 5! // Clicking the right mouse button
(right-clicking) inside one of the 3-View windows
will bring up a context menu of commonly used
commands.
The windows within a program are sometimes
referred to as tiles, and the act of arranging the windows is called tiling. The tiling of the three orthogonal view window and the other two windows
is controlled under the Display menu. To automatically fit all five main windows inside the primary
program window, just press Ctrl+T or select Display | Tile Now. See Chapters 6 and 7 for additional comments and more details on display options.
// New to Windows? // As with the program
window, the borders of the orthogonal view windows may be dragged to re-size the window. Positioning the cursor over the program or view window borders will change the cursor to a different
arrow shape. If the left mouse button is then clicked
and held, the border can then be dragged to change
the size of the window. When adjusting the view
window borders in this way, all five windows can
be shrunk to remain in view when the program window is shrunk or to allow the display of an additional window or dialog box. Refer to Windows
Help for more details on window sizing, arranging,
and button functions.
3.2.1
Direct Manipulation
To manipulate the posture through the Orthogonal View windows, select the joint to be manipulated by clicking on one of the round solid joint
markers on the orthogonal view windows. The cursor changes from the normal arrow to a pointing
finger when the cursor is over a marker. When the
left mouse button is pressed and a marker is selected the cursor changes to a set of cross hairs.
When the mouse button is released the cross hairs
vanish and the joint is no longer selected. Joints
with hollow markers cannot be selected. They may
be directly movable, as in the knees, or they may be
locked, see section 5.9.
Page 11
To move a joint, select the marker as above and
drag it to a new location. The marker itself will not
move, but the cross hairs will. Release the mouse
button and the stick figure will update. If the error
checking algorithm decides that the joint position is
not feasible from a biomechanical standpoint, a program message will be displayed.
The hand positions will not move unless the
hand marker is specifically moved. The inverse
kinematics algorithm will automatically estimate
the positions of the body segments between the
joint selected and the hands such that the hands remain in the same position. For example, if the legs
are altered, then the positions of the torso and elbows are predicted. If the torso is altered, then only
the position of the elbows are predicted and the position of the legs remain the same. Note that the
hand locations are measured with respect to the
center of the feet in standing mode. Thus if one foot
is moved, then the origin of the measurement is
moved and the numerical hand locations will
change, but the relative location of the hands to the
stationary foot will be maintained.
3.2.2
Preferred Order and Techniques
of Joint Manipulation
When attempting to position any joint or body
segment using the inverse kinematics method, keep
in mind that the algorithm always attempts to produce a reasonable positioning of the body segments
not being manipulated based on the current (fixed)
position of the hands. The manipulation of the torso
(particularly in lateral bending or axial rotation) is
especially sensitive to this program tendency. Without going into a detailed explanation of the inverse
kinematics algorithm, users should be aware that
there must be a moderate amount of bending at the
elbows before one attempts to move the torso in
either lateral bending or axial rotation. A few attempts at moving the torso with and without elbow
bending should confirm the necessity of having
some bend at the elbows. The preferred order of
entry is given in Figure 3.3 with descriptions for
each joint.
Copyright 2005: The Regents of The University of Michigan, ALL RIGHTS RESERVED
Page 12
3D Static Strength Prediction Program Version 5.0
left hip are selected simultaneously. As was true
for the ankles, the position of the hips can only be
altered in two dimensional (sagittal plane) space
and is easiest to manipulate in the side view. To
increase the bend in the legs, adjust the hips
downward; conversely, to straighten the legs,
move the hips upward.
3.2.2.3
Figure 3.3: The sequence in which joint angles
are determined using posture prediction
3.2.2.1
Right and Left Ankles
The ankle positions can be entered most easily
in the side view since in 3DSSPP, the legs and feet
can only move in two dimensional (sagittal plane)
space. When moving the ankle, the position of the
knee will be calculated to accommodate the positions of the ankle and hips. The position of the floor
on the screen is always the same. Therefore, if one
foot is lifted off the ground and then the other is
lifted, the body will drop to the floor. Both feet are
always assumed to be supported, even when positioned at different levels. For one foot support, see
Support Selection, Section 5.5.
Note again that the hand locations are measured
with respect to the center of the feet in standing
mode. Thus if one foot is moved, then the origin of
the measurement is moved and the numerical location of the hands will change, however the hands
will remain in the same relative location with respect to the stationary foot.
3.2.2.2
Hips
Since the knees cannot be moved or manipulated, the most straightforward manner for bending
or straightening the legs is by adjusting the hip position. The left and the right hip can only be moved
in tandem; when the hips are selected, the right and
Trunk Flexion
Trunk flexion corresponds to the forward
bending of the trunk. The center of rotation is the
hip. The side view gives the best perspective on
trunk flexion. The graphic marker associated with
trunk flexion is located at the base of the head.
Note that within the biomechanical model the
trunk is formed by the pelvis and the torso links
which are each assigned separate angles based on
the entered trunk flexion angle according to an
algorithm derived from empirical data. The two
links are visible in the human graphics in the display view windows.
3.2.2.4
Trunk Axial Rotation
Trunk axial rotation corresponds to the rotation of the trunk about the axis of the spine. To
change the rotation value select and move the
solid marker at the shoulder. Axial rotation is the
most difficult of the joint angles to enter. At times
the computer may have difficulty in interpreting
the cursor position. Therefore, it may be necessary to click in several locations to see how the
computer interprets the cursor position. For this
angle, trying the different view windows may be
helpful if altering axial rotation in one of the
views does not appear to work well; however, in
general, the top view tends to be more favorable
for erect postures, whereas the front view tends to
be easier to manipulate with stoop postures. It
may be useful to utilize the Undo program feature, Section 5.10.
Copyright 2005: The Regents of The University of Michigan, ALL RIGHTS RESERVED
3D Static Strength Prediction Program Version 5.0
3.2.2.5
Trunk Lateral Bending
Trunk lateral bending corresponds to side-toside bending of the trunk. Positioning is best accomplished with squat/stoop postures via the top
view or, with erect postures, via the front view. Select and move the marker which is midway between
the two shoulder joints.
3.2.2.6
Right and Left Elbows
The elbow positions that can be entered are
constrained by the positions of the shoulders and of
the hands (Figure 3.4). The elbow must always be
the correct distance from both the shoulder and the
hand. Thus, there is a limit to the positions that can
be assumed by the elbow. For example, when holding one hand in a given location (i.e., grabbing a
door knob) and holding the body still, the elbow
can be moved around somewhat. The positions that
can be reached by the elbow with the hand and
shoulder fixed are the ones that can be selected.
Since a point selected may not always be a valid
elbow location, the program will attempt to find the
valid elbow position nearest to the location that has
been clicked.
Shoulder Position
(fixed)
Hand Position
(fixed)
Upper Arm Length
(fixed)
3.2.2.7
Page 13
Hand Positions
If the locations of the hands in three dimensional space are known, then the best method for
specifying the hand locations is to choose TaskInput | Posture Prediction to use the posture prediction dialog box. However, sometimes the hand
locations are not known. In this case, the user may
want to specify the hand locations by selecting the
hands and dragging to the desired location in an
appropriate orthogonal view. The other hand will
remain in the same location, but the rest of the body
will be predicted. Therefore, the hand positions
should be set before altering the rest of the body.
Both hands can be moved at the same time by holding down the CTRL key while selecting either
hand.
3.2.2.8
Modeling Whole Body Postures
In order to model postures most efficiently
when using the inverse kinematics method, the joint
positions must be specified in the order specified
above. As mentioned earlier, the general procedure
is first obtain a starting posture by specifying the
position of the hands in the posture prediction window, and then “fine-tune” or adjust the posture by
manipulating joints beginning with the legs and
then proceeding upward towards the hands.
Remember that when manipulating joints other than
the hands, the hands will remain in the same position and that the inverse kinematics algorithm will
always estimate the positions of body segments
which are between the joint altered and the hands.
Forearm Length
(fixed)
Elbow
(movable)
Figure 3.4: Constraints on elbow position
Copyright 2005: The Regents of The University of Michigan, ALL RIGHTS RESERVED
Page 14
3.3
3D Static Strength Prediction Program Version 5.0
OBLIQUE VIEW WINDOW
The oblique view window is the lower left hand
view window (Figure 3.5) and, by default, displays
a shaded flesh human graphic figure. The title bar
displays the task title as entered under the TaskInput | Description menu.
// New in 5! // Right-clicking inside the oblique
view window will bring up a context menu of commonly used commands.
// New in 5! // The oblique view of the hominoid can be manipulated from the Oblique View
menu (see Chapter 8), by using the context menu
(see previous paragraph), or manually with the following commands (note: “click” alone always refers to left-clicking):
•
Click+Drag: Move hominoid
•
Right-Click+Drag: Rotate hominoid (Ctrl +
left-click + Drag can also be used)
•
Shift+Click+Drag Left/Right: Zoom in/out
•
Shift+Click+Drag Up/Down: Move camera
forward or backward (Alternatively, rotate the
mouse wheel to achieve the same effect).
// New to Windows? // The title bar also includes buttons for controlling its size, similar to the
orthogonal view windows. In addition its borders
may also be dragged to re-size the window. Positioning the cursor over the program or view window borders will change the cursor to a different
arrow shape. If the left mouse button is then clicked
and held, the border can then be dragged to change
the size of the window. Refer to Windows Help for
more details on window sizing, arranging, and button functions.
Figure 3.5: Oblique View window
Copyright 2005: The Regents of The University of Michigan, ALL RIGHTS RESERVED
3D Static Strength Prediction Program Version 5.0
3.4
STATUS WINDOW
This window is positioned in the lower right hand
corner of the standard program window. It lists
miscellaneous input data and summary results (see
Figure 3.6). The Status Window also displays a
graphical representation of the hominoid’s Center
of Pressure. See Section 9.8 for information about
balance and this graphic.
For information about other items in the Status
Report, see Section 9.2: Analysis Summary Report.
3.5
REPORT WINDOWS
Report windows are generated whenever a report
option is selected from the Reports menu. Changes
in units, anthropometry, load, or posture will automatically be reflected in any open report windows.
Page 15
To close a report window easily, simply press the
Escape key while the report is the active window
(or use the standard close command on the window’s title bar).
// New in 5! // A report can now be closed by
pressing the “Escape” key when it is active (has just
been clicked).
// New to Windows? // As with the view windows mentioned above, these windows also have
their own respective title bars for controlling size.
Depending on the monitor and graphics hardware
installed, use of the full screen display button may
be necessary to view an entire report on the screen.
As an alternative the report windows have scrollbars on the right side and bottom to scan the contents within the window. The window borders may
also be dragged to re-size the window. Refer to
Windows Help for more details on window sizing,
arranging, and button functions. See Chapter 9 for a
description of each report.
Figure 3.6: Results Status window
Copyright 2005: The Regents of The University of Michigan, ALL RIGHTS RESERVED
Page 16
3D Static Strength Prediction Program Version 5.0
Copyright 2005: The Regents of The University of Michigan, ALL RIGHTS RESERVED
3D Static Strength Prediction Program Version 5.0
Page 17
Chapter 4: FILE MENU COMMANDS
The File Menu (Figure 4.1) contains the file management and printing options for 3DSSPP. Additional file management functions are available
through Windows.
the working directory for a program item if task
files are to be stored in a directory separate from the
program's executable file. Once a file is saved or
opened in a directory other than the working directory, the directory used last becomes the default
directory for the remainder of the session.
// New to Windows? // If the file name desired is
already displayed, double-click it. Use the following controls to display file names in other drives or
directories:
File name: This is the input field where the file
to be opened or saved is chosen, either by
typing its name in the edit field or clicking
on its name in the list above the edit field.
Look In: This section displays the working directory. To change to a different directory or
drive, click the down arrow.
Figure 4.1: File Menu
4.1
FILE MANAGEMENT DIALOG
BOXES
Files of type: This control regulates the files displayed by specifying the file extensions. By
default, this is set to display all 3DSSPP task
files (these files end with ".tsk"). The other
option available is to click on the arrow to
the right and choose "All Files" to display all
files in the current directory.
// New to Windows? // The DOS wildcard characters (* and ?) can be used in any part of the File
Name edit field to limit the files displayed. For example, *.TXT lists all files with the extension
".txt".
// New to Windows? // When any of the file management dialog boxes are opened for the first time
in any 3DSSPP session, the files displayed are located in the "working directory". Refer to the Windows User's Manual for instructions on changing
Copyright 2005: The Regents of The University of Michigan, ALL RIGHTS RESERVED
Page 18
4.2
3D Static Strength Prediction Program Version 5.0
NEW
1. Choose File | Save As (Figure 4.1)
To start a new analysis, choose File | New. 3DSSPP
resets all task parameters to their default values and
changes the file name in the title bars to
"UNTITLED". If a file is in use currently, a dialog
box appears asking if the current file should be
saved; if the file is not saved, any changes to that
file since its last save are lost. Choose NO to continue or YES to invoke the File Save As dialog box
and save changes (see Section 4.5).
4.3
OPEN
1. Choose File | Open (Figure 4.1)
2. Select the desired file using the methods
listed above in Section 4.1.
3. 3DSSPP will then restore the program to all
the task settings in force at the time when the
file was last saved.
SAVE
Choosing File | Save will save the current task settings to the file name under which the file was last
saved. If the task parameters have never been
saved, choosing File | Save opens the same dialog
box used by File | Save As.
4.5
3. If the file name already exists, a dialog box
appears asking if the existing file is to be replaced with the new file. Choose the appropriate response. If NO, the previous dialog
box is reopened to allow a new file name to
be entered. If YES, the existing file is overwritten.
4.6
To work with previously defined task parameters
(posture, loads, etc.) saved in version 4.3.1 or later
of 3DSSPP:
4.4
2. Enter the desired file name using the methods listed above in Section 4.1.
SAVE AS
SET STARTUP TASK TO CURRENT
// New in 5! // New to 3DSSPP 5 is the ability to
save a set of input and view parameters as the
“Startup Task.” Selecting this option will cause
3DSSPP to save all current parameters (including
joint angles, colors, window positions, reports open,
hand loads, etc.) in a startup task file. This file will
be opened automatically whenever 3DSSPP loads.
Use this option to create a default workspace with
commonly used parameters.
// New in 5! // For example, if the you wish to
always work with a different colored background,
or to position the workspace windows a certain way
every time you start a new task, just create a new
task file, change the background color or reposition
the windows, and click “Set Startup Task to Current.”
4.7
RESET STARTUP TASK
// New in 5! // Use this option to restore the startup
task to the factory defaults— the same startup parameters that come with a new install of 3DSSPP.
Choosing File | Save As will allow the current task
settings to be saved under a new file name. To do
so,
Copyright 2005: The Regents of The University of Michigan, ALL RIGHTS RESERVED
3D Static Strength Prediction Program Version 5.0
4.8
PRINT ACTIVE WINDOW
Page 19
Close: This option exits the Print Preview screen
and returns to the prior view.
Five printing options are possible in 3DSSPP: Printing analysis screens and individual windows using
the Print Active Window command, printing a series of reports using the Print Reports command,
generating custom reports using the Copy-toClipboard commands and a word processing program, printing the Windows desktop, or printing the
3DSSPP main program window. The first option
will be discussed here. Instructions for printing a
series of reports can be found in Section 9.15. Printing by copying to the clipboard is found in Section
4.15. The final two printing options are found in
Sections 4.11 and 4.12. In each case, printing is
handled through Windows, which does not support
printing more than one window at a time. Please
consult the Windows documentation for additional
details on these options. To print a specific view or
report window:
1. Make sure the item to be printed is in the currently active window (the window with the
highlighted status bar; not the main program
title bar). This can also be verified by using
File | Print Preview (Section 4.9).
2. Choose File | Print Active Window.
4.9
PRINT PREVIEW
Selecting File | Print Preview opens the Windows
Print Preview display (Figure 4.2). Print Preview
displays the contents of the currently active window
as it would be printed were the File | Print option
selected. The following options are relevant to
3DSSPP:
Print: Prints the displayed window.
Zoom in/Zoom out: Three levels of magnification are possible: 25%, 50%, and 100%. 25%
allows the entire page to be seen while 100%
allows any text to be clearly read. Zooming
in increases the magnification while zooming
out decreases the magnification.
Figure 4.2: File | Print Preview display
4.10 PRINT SETUP
Selecting File | Print Setup displays a dialog box
(Figure 4.3) that allows the following items to be
controlled. Since many of the settings are printer
specific, not all may be available. Refer to the Windows documentation and the specific printer manual for more information on these settings.
Printer:
For generating hard copies of the
reports and individual postural views, environment or select another installed printer
from the list by clicking on the right hand
arrow and clicking on a printer name in the
resulting list.
Orientation: Referring to the printout and its
orientation on the paper, this setting should
never have to be changed in 3DSSPP. The
default is portrait (page is taller than it is
wide when the output is viewed upright).
Copyright 2005: The Regents of The University of Michigan, ALL RIGHTS RESERVED
Page 20
3D Static Strength Prediction Program Version 5.0
Paper Size: This option allows the use of nonstandard size paper; the default is standard
letter size (8 1/2" x 11").
Paper Source: This option refers to the paper
handling capability of the printer: upper and
lower tray/bin feeders for single sheets of
paper, tractor settings for continuous feed, or
manual feeds for one sheet at a time.
Properties: These are options specific to the
printer selected, generally regarding printing
quality. Refer to the printer manual or click
on the HELP button (if available) for details.
Network: This button allows you to connect to a
printer on your local network.
4.11 PRINT APPLICATION
Selecting File | Print Application prints the
3DSSPP main program window (i.e., Figure 3.1) as
displayed at the time of selection. Printing begins
without any further user input, relying instead on
the default print settings. The process may be interrupted by clicking on CANCEL in the print status
box that appears onscreen.
4.12 PRINT DESKTOP
Selecting File | Print Desktop prints the contents of
the screen at the time of selection. This is similar to
the DOS "print screen" (PrtSc) key and immediately starts the printing process using the default
print settings. The process may be interrupted by
clicking on CANCEL in the print status box that
appears onscreen.
4.13 COPY APPLICATION
Selecting this menu option will copy a picture of
the 3DSSPP program window to the Windows clipboard. Once copied, the picture can be pasted into
drawing and publishing applications.
// New to 5! // This effect can also be achieved
by pressing Alt + PrintScreen if the main window
is highlighted. (Alt + PrintScreen will copy to the
clipboard whatever window is active. This is useful
for copying individual 3DSSPP windows or reports.
This functionality is standard in Windows.)
Figure 4.3: File | Print Setup dialog box
Copyright 2005: The Regents of The University of Michigan, ALL RIGHTS RESERVED
3D Static Strength Prediction Program Version 5.0
4.14 COPY DESKTOP
Selecting this menu option will copy a picture of
the entire screen (including visible programs other
than 3DSSPP) to the Windows clipboard. Once
copied, the picture can be pasted into drawing and
publishing applications.
This effect can also be achieved by pressing the
PrintScreen key.
4.15 PRINTING THROUGH THE WINDOWS CLIPBOARD
In this printing method, the Windows Clipboard is
used as a translator between 3DSSPP and another
Windows application, typically a word processor.
After the 3DSSPP views are arranged (tiled) in the
desired format, the program window is copied to
the clipboard by choosing File / Copy Application
or File / Copy Desktop. Next, the operation is
switched to the other Windows application and the
Clipboard contents are pasted into the working area.
Since the pasted 3DSSPP layout is treated as a
graphic image, it can be manipulated within the
other application as necessary to create a custom
report. Please note that only one display can be copied to the Clipboard at one time.
For example, to copy the five views into a Windows-based word processing program (Figure 4.4):
1. Arrange the windows as desired by clicking
and dragging the borders to shrink each window and then by clicking and dragging on
the title bars.
Page 21
contents into the document.
To copy reports as in Figure 4.4 to the word
processor,
1. Select the desired report.
2. Maximize the report window to full screen
using the button in the window title bar.
3. Choose: File / Copy Application.
4. Switch to the word processing application; if
not already running, load word processing
application with an appropriate document.
5. Position the cursor in the word processor at
the desired location and paste the Clipboard
contents into the document.
Once the desired 3DSSPP data is pasted into
the word processor, comments or a report body can
be added and the entire report package printed at
one time through the word processing application.
4.16 EXIT
// New to Windows? // Selecting File | Exit will end
the program. If the current task parameters have
been changed since the last save, a dialog box will
appear asking if changes to the file should be saved.
Choose the appropriate response: if YES, the file is
saved (if the task parameters have never been
saved, the File Save As dialog box will appear); if
NO, the program terminates and the recent changes
to the file are lost; and if CANCEL, the program
continues running with the file currently opened.
2. Choose: File / Copy Application.
3. Switch to the word processing application; if
not already running, load the word processing application with an appropriate document.
4. Position the cursor in the word processor at
the desired location and paste the Clipboard
Copyright 2005: The Regents of The University of Michigan, ALL RIGHTS RESERVED
Page 22
3D Static Strength Prediction Program Version 5.0
Figure 4.4: Sample report layout as printed through the Windows clipboard and a word processor
Copyright 2005: The Regents of The University of Michigan, ALL RIGHTS RESERVED
3D Static Strength Prediction Program Version 5.0
Page 23
Chapter 5: TASK INPUT MENU COMMANDS
The Task Input Menu (Figure 5.1) contains the dialog boxes for specifying a description of the analysis task, the main program controls, and the three
major inputs required to use 3DSSPP: the worker
anthropometry, posture, and hand loads for the task
to be analyzed.
There are three methods by which postures can
be entered into 3DSSPP: the body segment angle
method, the posture prediction method, and the direct manipulation method. The body segment angle
method requires the analyst to specify the appropriate 15 angles for the body through the Task-Input |
Body Segment Angle dialog box. The posture prediction method requires the user to define the loca-
tion of the hands in three dimensional space
through the Task-Input | Posture Prediction dialog
box. 3DSSPP then predicts a possible posture based
on inverse kinematics and a posture preference algorithm.
For either method, the user may adjust the posture further using the direct manipulation method
by selecting a joint segment and indicating a new
joint position by dragging to the location. Or, if desired, the direct manipulation may be used initially
to explore various joint positions without using either of the other posture entry methods.
5.1
DESCRIPTION
Selecting Task-Input | Description allows the user
to specify the name and other information relative
to the task being analyzed and include additional
comments about the task. The name and part of the
comment field appear in the analysis report headers.
The following inputs are available (Figure 5.2):
Task name: This field allows input of the task
name.
Analyst name: This field defaults to the User
Name used when starting 3DSSPP.
Comments: This field allows additional comments relevant to the task such as environmental conditions to be appended to the task
record.
Figure 5.1: Task-Input menu in 3DSSPP
Copyright 2005: The Regents of The University of Michigan, ALL RIGHTS RESERVED
Page 24
3D Static Strength Prediction Program Version 5.0
5.4
GRAVITY
// New in 5! // This menu item will open a dialog
box that allows the user to alter the gravity factor
that 3DSSPP uses in its calculations (Figure 5.3).
Several suggested alternative gravity values are
provided. Note that changing the gravity value will
not affect external forces on the body—only the
force caused by the weight of the body’s links.
Figure 5.2: Task-Input | Description dialog
Figure 5.3: Task-Input | Gravity dialog
5.2
SET METRIC / ENGLISH UNITS
This command toggles the units used for data entry
and analysis results between the Metric and English
systems. The current units are switched to the units
specified in the displayed command. The default is
English units. Any open windows will be updated
immediately.
5.5
// New in 5! // This command opens the Support
Selection dialog, which controls standing and
seated support parameters (Figure 5.4).
5.5.1
5.3
SET 2D / 3D MODE
SUPPORT SELECTION
Standing or Seated Support Selection
This command toggles between the 2D and 3D entry mode. The 3D/2D program icon at the top left
corner of the program windows changes to indicate
the current mode. 2D mode limits the input to a
sagittal plane symmetric posture with symmetric
hand forces. The entry dialog boxes are simplified
and posture prediction is disabled. The posture can
only be entered and changed by body segment angle entry.
// New in 5! // Use this box to convert between
a standing analysis and a seated analysis. In a
standing analysis the program automatically estimates support forces for the feet in order to balance
the bodyweight and other forces on the body. In a
seated analysis the program can estimate support
forces including forces supporting the ischial tuberosities of the pelvis, the back of the upper legs behind the knees, the back of the torso, and the feet.
A version of 3DSSPP may be purchased which
prohibits the operation of the 3D Mode. In this case
the 3D Mode can only be run in demo mode. Posture prediction and other features are disabled.
// New in 5! // In addition, when in seated
mode, the center of the measurement coordinate
system is at the Seat Reference Point (SRP). The
SRP is automatically calculated from the intersection of the trunk and upper leg angles and is displaced perpendicular to the body segments by population factors which are fractions of stature.
Copyright 2005: The Regents of The University of Michigan, ALL RIGHTS RESERVED
3D Static Strength Prediction Program Version 5.0
Page 25
Figure 5.4: Support Selection dialog
When seated mode is selected, the user can
choose whether or not to include front seat pan support and whether or not to include support from a
back rest. If the front seat pan support is selected,
then forces are applied to the back of the upper legs
from the front edge of the seat pan. The length of
the seat pan is set by population factors which are a
fraction of stature. If the back rest is chosen, then
the height of the back rest can be adjusted to as low
as 7.5 inches from the Seat Reference Point (SRP).
directly forward of the subject. A smaller degree
angle will result in the feet being nearly parallel; a
larger angle will result in the feet being splayed out.
Suggested “normal” values are displayed. Note that
at this time the foot splay angle is only used to set
the basis of support; the feet and legs themselves
are not rotated.
5.5.3
5.5.2
Feet Support
// New in 5! // The user can specify which feet
are supported. If two feet are chosen then the program will automatically determine the load in each
foot. Otherwise the full load is placed in the chosen
foot. The case of “No foot support” is only valid
when the subject is seated.
// New in 5! // Here the user can change the
pelvic tilt. The program estimates the pelvic tilt
assuming a standing posture. Additional tilt as
when seated can be added. Suggested “normal”
values are displayed.
5.6
5.5.2.1 Foot Splay Angle
// New in 5! // This is the angle between the
foot direction (heel to toe) and the vector pointing
Seating Parameters
ANTHROPOMETRY
Selecting Task-Input | Anthropometry opens the
Anthropometry dialog box (Figure 5.5). To change
the anthropometry being analyzed,
1. Choose Task-Input | Anthropometry
Copyright 2005: The Regents of The University of Michigan, ALL RIGHTS RESERVED
Page 26
3D Static Strength Prediction Program Version 5.0
2. Click on the desired gender; male is the default gender.
3. Select the method to be used to select the
anthropometry: either 95th, 50th, 5th population or data entry to input a specific height
and weight. The default is the 50th percentile.
4. If the method to be used is data entry, move
the cursor to the input fields and enter the
height and weight. If one of the percentiles
is selected then the input fields contain the
selected percentile height and weight.
5.6.1
Population
The Population command can be used to select
an alternate set of anthropometry values including:
Stature, body weight, link lengths, link weights,
link centers of gravity, and strength. The default
values are for a US industrial population as determined by the University of Michigan Center For
Ergonomics. The population dialog is shown in
Figure 5.6.
5. Click Apply to update the view windows and
keep the anthropometry dialog box displayed
or click OK to update the view windows and
close the anthropometry dialog box.
Extreme anthropometries are not accommodated by the model. The data entry values acceptable for height are 50-76 inches (127-193 cm) and
for weight are 100-244 pounds (45.4-110 kg).
Figure
5.6:
Task-Input | Anthropometry | Population
5.6.1.1
Open Population File
The Open Population File command is used to
select a population file using the Windows open file
dialog. The anthropometric values contained in the
file are used in place of the program default values.
5.6.1.2
Reset to Default Population
The Reset to Default Population command
reinstates the program default anthropometric values.
5.6.1.3
Figure 5.5: Task-Input | Anthropometry dialog
Edit Population
The Edit Population command is used to create
new population files. A password is required to
use this command and it is not recommended for
normal program users.
Copyright 2005: The Regents of The University of Michigan, ALL RIGHTS RESERVED
3D Static Strength Prediction Program Version 5.0
5.7
5.7.1
BODY SEGMENT ANGLES
An Introduction to the Body
Segment Angles Method of Posture Entry
When using this method for entering postures,
3DSSPP can model virtually any posture if the user
enters the appropriate fifteen joint angles described
below. In 2D entry mode only five angles must be
set. The feet are always assumed to be on solid
ground, even if placed at different heights (i.e.,
standing on one leg can only be analyzed by entering a posture which balances the body over the single leg).
Care has been taken to make body segment angle entry as consistent as possible. Nonetheless, the
extra degrees of freedom at the trunk, arms, and
hand force vectors require special attention for
proper entry. Depending on what is being described, the reference planes for some of these angles differ. The program will, in certain cases, disallow an input if its error checking algorithm decides
that the input exceeds a joint's range of motion. The
angle definitions are given below.
Note that the horizontal angles do not have
meaning when the arms are perfectly vertical and
need not be entered in this case.
5.7.2
Page 27
Body Segment Angle Dialog Box
(2D Mode)
Choosing Task-Input | Body Segment Angles
indicates that the body segment angle method for
posture entry is to be used and displays the Body
Segment Angle entry dialog box (Figure 5.7).
To use the body segment angle method for posture entry,
1. Choose Task-Input | Body Segment Angle to
display the Body Segment Angle dialog box
(Figure 5.7).
2. Enter the angles according to the conventions
described below for 2D Mode angles. To
enter a value in a specific field, click on the
field or use the TAB key to move from field
to field.
3. A body segment angle can also be altered
using the INCREMENT buttons. Click on
the angle value, then click on the increment
value desired (1, 5, 10, 15, 20, 25), finally
click on the "+" to increase the value in steps
of the increment selected or click on the "-"
to decrease the value. The posture will redraw automatically to provide feedback as to
the effect of the incremental posture change.
Note that the body segment angle changed is
the angle highlighted in the section prior to
using this feature.
4. When all the angles have been entered or a
check of the posture is desired, click on REDRAW to update the view windows. This
Figure 5.7: Task-Input | Body Segment Angles dialog box for 2D Mode
Copyright 2005: The Regents of The University of Michigan, ALL RIGHTS RESERVED
Page 28
3D Static Strength Prediction Program Version 5.0
keeps the body segment angle dialog box
displayed should additional changes be necessary.
5. An UNDO button can be selected to revert to
the previous posture.
6. A NEUTRAL SIT/STAND button can be
used to set the limb and trunk angles for a
sitting or standing neutral posture.
7. When the posture is satisfactory, click OK to
close the dialog box.
5.7.3
Body Segment Angle Dialog Box
(3D Mode)
Choosing Task-Input | Body Segment Angles
indicates that the body segment angle method for
posture entry is to be used and displays the Body
Segment Angle entry dialog box (Figure 5.8).
To use the body segment angle method for posture entry,
1. Choose Task-Input | Body Segment Angles
to display the Body Segment Angle dialog
box (Figure 5.8).
2. Enter the angles according to the conventions
described below for 3D Mode angles. To
enter a value in a specific field, click on the
field or use the TAB key to move from field
to field. The field sequence using the TAB
key is to move through the left side first, then
the right side, and finally the trunk angles.
3. If the posture is symmetric, enter the angles
for the right side and click on the SYMMETRY button. This time-saving feature copies
the values from the right side into the respective left side spaces; however, the left side
values can still be changed or entered individually if desired. Note that this feature only
copies the right side values to the left side,
not vice versa.
4. A body segment angle can also be altered
using the INCREMENT buttons. Click on
the angle value, then click on the increment
value desired (1, 5, 10, 15, 20, 25), finally
click on the "+" to increase the value in steps
of the increment selected or click on the "-"
to decrease the value. The posture will redraw automatically to provide feedback as to
the effect of the incremental posture change.
Note that the body segment angle changed is
the angle highlighted in the "Limb Angles"
or "Trunk Angles" section prior to using this
feature.
5. When all the angles have been entered or a
check of the posture is desired, click on RE-
Figure 5.8: Task-Input | Joint Angle dialog box for 3D Mode
Copyright 2005: The Regents of The University of Michigan, ALL RIGHTS RESERVED
3D Static Strength Prediction Program Version 5.0
Page 29
DRAW to update the view windows. This
keeps the body segment angle dialog box
displayed should additional changes be necessary.
6. An UNDO button can be selected to revert to
the previous posture.
7. A NEUTRAL SIT/STAND button can be
used to set the limb and trunk angles for a
sitting or standing neutral posture.
8. When the posture is satisfactory, click OK to
close the dialog box.
5.7.4
5.7.4.1
Body Segment Angle Descriptions
Figure 5.9: Lower leg vertical angle
Lower Leg Vertical Angle (2D
and 3D Mode)
This angle may also be called the ankle angle
from horizontal. With the horizontal plane defined
as the X-Y plane, this is the angle formed between
the lower leg and the horizontal plane at the ankle.
For example, in Figure 5.9, the lower leg forms a 30
degree angle with the horizontal plane. Likewise, a
straight legged standing posture would form an angle of 90 degrees. This convention holds for both
the right and left lower leg.
Figure 5.10: Upper leg vertical angle
5.7.4.2
Upper Leg Vertical Angles (2D
and 3D Mode)
This angle may also be called the knee vertical
angle. This is the angle between the upper leg and
the positive horizontal vector Y extending forward
from the knee. For example, in Figure 5.10, the upper leg forms a 170 degree angle with the positive
Y vector. A straight legged standing posture would
form an angle of 90 degrees. This convention holds
for both the right and left upper legs.
Copyright 2005: The Regents of The University of Michigan, ALL RIGHTS RESERVED
Page 30
5.7.4.3
3D Static Strength Prediction Program Version 5.0
Upper Arm Vertical Angle (2D
and 3D Mode)
This is the angle formed between the upper arm
and a horizontal plane (X-Y) at the shoulder. When
the upper arm is entirely in the horizontal plane, the
joint angle is 0 degrees. If the upper arm is above
the horizontal plane, the angle is positive; if the upper arm is below, the angle is negative. For both the
right and-left upper arm vertical angles, the value
increases as the arm moves up and away from the
horizontal plane and decreases as it moves down
and away. Refer to Figure 5.11 for clarification. Be
aware that the horizontal plane is fixed in orientation and does not rotate with the trunk. This allows
the upper arm angles to be measured independent of
the overall posture.
upper arm is projected onto the X-Y plane at the
shoulder), see Figure 5.12. When the upper arm lies
along the X axis with the arm pointing away from
the body, the angle is 0 degrees. If the upper arm is
forward of the X axis (toward the positive Y axis),
then the angle is positive; if the upper arm is behind
the X axis (toward the minus Y axis), the angle is
negative. This convention holds for both the right
and left upper arm horizontal angles.
Note that the upper arm horizontal angle does
not have meaning when the upper arm is perfectly
vertical (it has no projection onto the X-Y plane
other than a point) and need not be entered in this
case.
Figure 5.12: Upper arm horizontal angles
5.7.4.5
Figure 5.11: Upper arm vertical angles
5.7.4.4
Upper Arm Horizontal Angles
(3D Mode Only)
In contrast to the legs, the shoulder joint in
3DSSPP is capable of three degrees of freedom
which makes the upper arm capable of rotation
about the vertical (Z-axis). The upper arm horizontal angle measures this rotation and is the angle
formed by the upper arm with the X axis when
viewing the figure from overhead (i.e. when the
Forearm Vertical Angles (2D
and 3D Mode)
This angle is interpreted in a similar fashion as
the upper arm vertical angle, Section 5.7.4.3, and is
the angle formed between the lower arm and the
horizontal plane intersecting the elbow. Again, the
horizontal plane is assumed to be the X-Y plane.
When the hand is level with the elbow, the joint
angle is 0 degrees. If the hand is above the elbow,
the forearm vertical angle is positive; if below, the
angle is negative. For both the right and left forearm vertical angles, the value of the angle increases
as the hand moves upward and decreases as the
hand moves downward as indicated by Figure 5.13.
Be aware that, in this convention, the origin of
the horizontal plane is located at the elbow and is
independent of upper arm angles and overall body
posture.
Copyright 2005: The Regents of The University of Michigan, ALL RIGHTS RESERVED
3D Static Strength Prediction Program Version 5.0
Page 31
Figure 5.14: Forearm horizontal angles
5.7.4.7
Figure 5.13: Forearm vertical angles
5.7.4.6
Forearm Horizontal Angles (3D
Mode Only)
While looking down onto the figure (such that
the lower arm is projected onto the X-Y plane at the
elbow), the angle formed between the lower arm
and the X axis constitutes the forearm horizontal
angle (Figure 5.14). When the forearm is aligned
with the X axis and the hands are pointing away
from the body, the angle is 0 degrees. When the
forearm is located in front of the X-axis, the angle
is positive. If the forearm crosses behind the Xaxis, then the angle is negative. This convention
holds for both the right and left forearm horizontal
angles.
Trunk Flexion Angle (2D and
3D Mode).
This is the angle between the projection of the
trunk axis (the center of the hips to the center of the
shoulders) onto the Z-Y plane and the positive Y
axis (Figure 5.15). When standing straight, the
trunk angle is 90 degrees. If the trunk is level with
the horizontal plane (ground), the angle is 0°. If the
trunk is flexed below the horizontal plane, the angle
is negative. The range of motion for this angle
should be such that the angle between the trunk and
the upper legs is between 40 and 100 degrees.
Note that within the biomechanical model the
trunk is formed by the pelvis and the torso links
which are each assigned separate angles based on
the entered trunk flexion angle according to an algorithm derived from empirical data. The two links
are visible in the human graphics in the display
view windows.
Note that the lower arm horizontal angle does
not have meaning when the lower arm is perfectly
vertical (it has no projection onto the X-Y plane
other than a point) and need not be entered in this
case.
Copyright 2005: The Regents of The University of Michigan, ALL RIGHTS RESERVED
Page 32
3D Static Strength Prediction Program Version 5.0
Figure 5.17: Negative axial rotation
for counter-clockwise rotation, the angle is positive
and vice versa. The range of motion for this angle is
limited to +/-90 degrees.
Figure 5.15: Trunk flexion angle
5.7.4.8
Trunk Axial Rotation (3D Mode
Only)
The trunk axial rotation is defined as the rotation of the torso about the axis formed by the line
segment from the L5/S1 disc to the center of the
shoulders. The rotation should be measured as the
left shoulder location relative to the X axis. As
shown in Figure 5.16, if the left shoulder is rotated
behind the X axis, the angle is positive. As shown
in Figure 5.17, if the left shoulder is rotated in front
of the X axis, the angle is negative. In other words,
Figure 5.16: Positive axial rotation
5.7.4.9
Lateral Bending Angle (3D
Mode Only)
This is the angle formed between the trunk axis
and the Z-Y plane. If the torso is bent towards the
positive X axis, the angle is positive. If the torso is
bent toward the negative X axis, the angle is negative. Referring to Figures 5.18 and 5.19, note that
this convention holds whether the torso is bent or
erect. The range of motion for lateral bending is
limited to +/-40 degrees.
Figure 5.18: Lateral bending angle with
stooped torso
Copyright 2005: The Regents of The University of Michigan, ALL RIGHTS RESERVED
3D Static Strength Prediction Program Version 5.0
Page 33
experiential, and training differences between individuals, not everyone will assume the same posture
when the hands are at the same location. However,
predicting a posture from known hand locations is
always a good starting point for an analysis, since
the preferred posture generated by inverse kinematics algorithm is typically a reasonable posture for
the sake of analysis.
Figure 5.19: Lateral bending angle with erect
torso
5.8
Once the starting posture is specified, the posture can be “fine-tuned” through “manipulating” or
moving individual body joints or segments. Thus, in
most cases, the general procedure employed when
using the inverse kinematics method will be to first
specify a starting posture by setting the locations of
the hands, and then adjusting the posture by manipulating other joints of the body. No matter how
much the rest of the body is manipulated, the hands
will remain in the same position.
POSTURE PREDICTION (3D MODE
ONLY)
5.8.2
5.8.1
Introduction to the Inverse Kinematics Method of Posture Entry
Choosing Task-Input | Posture Prediction indicates the inverse kinematics method of posture entry
is to be used. It only functions in 3D Mode.
The basic concept behind inverse kinematics is
that if the positions of the hands relative to the feet
can be specified, the positions of the other body
joints and segments can be computed from algorithms based upon behavioral data. This means that
in order to specify a posture, all that needs to be
done is for the analyst to enter the positions of the
hands, and the program will automatically “predict”
the locations of the other body segments and joints.
This prediction is based on these hand locations, the
anthropometry of the worker, and the load at the
hands. However, because the inverse kinematics
algorithm is based upon regression equations, it
yields the average posture a person would tend to
take as a function of the hand locations and other
task parameters. Obviously, because of behavioral,
Posture Prediction Dialog Box
The posture prediction dialog box (Figure 5.20)
is used in 3D entry mode to specify the positions of
the hands relative to a point on the floor between
the ankles. Note that the hand orientation helps the
computer decide upon elbow elevation. When the
palm is prone (palm down), the elbow tends to be
high in the air. The elbow is lower when the hand is
semi-prone and is very low when the palm is supine
(palm upward). A good rule of thumb is that if there
is any doubt about the hand orientation, choose
semi-prone. If the palm is not completely pointing
down or completely pointing up, the best choice is
semi-prone. To use posture prediction,
1. Choose Task-Input | Posture Prediction.
2. Select the hand orientation that best describes
the worker:
Supine: palms up
Semi-prone: palms facing each other
Prone: palms down
Copyright 2005: The Regents of The University of Michigan, ALL RIGHTS RESERVED
Page 34
3D Static Strength Prediction Program Version 5.0
Figure 5.20: Task-Input | Posture Prediction dialog box
3. Enter the hand locations referenced to a point
on the ground between the ankles by using
the TAB key to move from field to field or
clicking on the desired fields.
Horizontal: refers to the distance from the
above point in the forward-backward direction where forward distances are positive and
backward distances are negative.
sitions. If the legs are not locked, the legs will be
“re-predicted” and the joint angles changed by the
inverse kinematics algorithm. A second segment of
the body which can be locked is the trunk. The default is that no segments are locked. The joint markers change to hollow circles which cannot be selected for direct manipulation.
To lock body segments,
Vertical: refers to the distance from the floor
where positive values are above the floor and
negative values are below the floor.
1. Choose Task-Input | Locking Mode to display the Locking Mode dialog box (Figure
5.21).
Lateral: refers to the side-to-side distance
from the center of the body where positive
values are to the right and negative values are
to the left.
2. Select the body segments to be locked: none,
legs only, legs and trunk, or arms and trunk.
3. Click OK.
4. Click OK after the parameters are entered to
predict posture and exit the dialog box.
5.9
LOCKING MODE
One way to enhance the inverse kinematics method
is by using segment locking. This feature allows
certain body segments of the modeled posture to be
“locked,” preventing the inverse kinematics algorithm from changing the joint angles of those segments. For example, if the legs are in the desired
posture while using direct manipulation, the legs
should be locked before manipulating the hand po-
Figure 5.21: Task-Input | Locking Mode dialog box
Copyright 2005: The Regents of The University of Michigan, ALL RIGHTS RESERVED
3D Static Strength Prediction Program Version 5.0
5.10 UNDO/REDO POSTURE CHANGE
// New to 5! // The Undo Posture Change command
returns the posture to the previous posture after a
change in the joint angles. Redo Posture Change
will redo the changes made to posture.
Page 35
vertical angle is the angle between the positive Y
axis and the force vector. See Figures 5.22 and
5.23. The force vector may point forward or backward with respect to the subject.
// New to 5! // The user can now undo any
number of posture changes. (In previous versions,
only a single change could be undone.) Similarly,
Redo can be used to redo any number of changes to
the joint angles. Undo and Redo work for all posture changes, whether made by direct manipulation,
posture prediction, or directly through the Body
Segment Angles dialog. Changes made by moving
to 2D mode, or by loading a new file, cannot be
undone.
// New to 5! // We have designed this new functionality to aid you in making adjustments to the
hominoid’s posture. It should be most useful when
making minute manipulations of the hominoid’s
posture to achieve the desired position.
5.11 HAND LOADS
Please note that, in this program, “hand force” refers to the force being applied TO the hand, not
the force applied by the hand. A verbal description
of the action of each hand in response to the force
exerted on it is displayed to confirm the correct entry.
Figure 5.22: Vertical hand force vector angles
with a horizontal angle of 90°
5.11.1 Hand Load Force Vector Descriptions (2D Mode)
The hand force vector angle convention used in
the 2D Mode is different than in the 3D Mode. The
notation includes a vertical angle value and a backwards indicator.
Illustrating the hand load force as a vector with
its tail in the grip center of the hand and its arrow
pointing in the direction of the force, the hand load
Figure 5.23: Vertical hand force vector angles
with a horizontal angle of (-90)°
Copyright 2005: The Regents of The University of Michigan, ALL RIGHTS RESERVED
Page 36
3D Static Strength Prediction Program Version 5.0
Figure 5.24: Task-Input | Hand Loads dialog box for 2D mode
5.11.2 Hand Load Entry (2D Mode)
To enter the hand loads in 2D Mode,
1. Choose Task-Input | Hand Loads to display
the Hand Loads dialog box (Figure 5.24).
2. Enter the combined load magnitude for both
hands. This value will be split equally between the hands.
3. Enter the force vector vertical angle according to the convention described previously. If
the vector points backward, select the Backward button such that the box is checked.
4. Click OK when the parameters are entered
correctly.
its tail in the grip center of the hand and its arrow
pointing in the direction of the force, the hand load
horizontal angle is the angle between the X axis and
the force vector when viewing the figure from overhead (i.e. when the force vector is projected onto
the X-Y plane). If the vector is directed forward of
a vertical plane at the hand, the angle has a range of
0 to 180 degrees. If the vector is directed behind a
vertical plane at the hand, the angle has a range of 0
to -180 degrees. For both hand vectors, 0° lies
along the positive X axis. Refer to Figures 5.25 and
5.26 for clarification.
Note that the horizontal angle does not have
meaning when the force direction is perfectly vertical (it has no projection on to the X-Y plane other
than a point) and need not be entered in this case.
5.11.3 Hand Load Force Vector Descriptions (3D Mode)
The hand force vector angle convention used in
the 3D Mode is different than in the 2D Mode.
Separate force magnitudes and directions are entered for each hand. The angle convention is the
same for both hands.
5.11.3.1 Horizontal Angle
Illustrating the hand load force as a vector with
Figure 5.25: Positive horizontal hand force vector angles
Copyright 2005: The Regents of The University of Michigan, ALL RIGHTS RESERVED
3D Static Strength Prediction Program Version 5.0
Page 37
5.11.4 Hand Load Entry (3D Mode)
To enter the hand loads in 3D Mode,
1. Choose Task-Input | Hand Loads to display
the Hand Loads dialog box (Figure 5.28).
2. Enter the load magnitudes for each hand; the
magnitudes can differ between hands.
3. For each hand, either enter the force vector
angles, according to the conventions described previously, or select one of the predefined efforts as provided. Each hand may
have a different force vector. Alternatively,
the force directions may be entered using
direct manipulation (see Section 3.2.1).
Figure 5.26: Negative hand force vector horizontal angles
4. Click OK when all parameters are entered
correctly.
5.11.3.2 Vertical Angle
Assuming the hand force vector tail is in the
grip center of the hand, the angle between the vector and the horizontal X-Y plane is the hand force
vertical angle. If the vector is directed above the
horizontal plane, the angle has a range of 0 to 90
degrees. Should the vector be directed below the
horizontal plane, the angle ranges from 0 to -90 degrees. Refer to Figures 5.22, 5.23, and 5.27 for additional clarification.
5.12 ADVANCED HAND LOADS
// New to 5! // In addition to the Hand Loads dialog,
SSPP now provides the Advanced Hand Loads dialog (Figure 5.29) for component entry of hand
loads. To enter either a force or a torque for either
hand, just enter the component forces or component
torques, and SSPP will automatically compute the
total torque or force. Use “Zero All” to set all hand
loads forces and moments to zero. The coordinate
system is defined with the X-axis extending laterally with positive to the subjects right. The positive
Y-axis extends forward and the positive Z-axis extends vertically. This forms a right-had coordinate
system and the forces and moments are defined accordingly.
5.13 JOINT LOADS
Figure 5.27: Vertical hand force vector angles
with right horizontal angle of 0° and left horizontal angle of 180°
// New to 5! // The Task Input | Joint Loads dialog
box is used to enter loads at joints other than the
hands (Figure 5.30). Torques and forces can be
applied to any joint (Elbows, Shoulders, L5S1,
Copyright 2005: The Regents of The University of Michigan, ALL RIGHTS RESERVED
Page 38
3D Static Strength Prediction Program Version 5.0
Figure 5.28: Task-Input | Hand Loads dialog box for 3D mode
Figure 5.29: Task Input | Advanced Hand Loads dialog box
Hips, Knees, Ankles). Use this functionality to
simulate situations like leaning against a table
(force on the hips) or carrying a backpack (force on
the shoulders and L5S1).
5.13.1 Zero Current
// New to 5! // This button will zero the force and
torque on the currently selected joint.
// New to 5! // Joint forces are by default displayed
in the orthogonal view windows. To turn off the
display of these joints, uncheck the 3-Views | Show
Forces menu option.
Copyright 2005: The Regents of The University of Michigan, ALL RIGHTS RESERVED
Page 39
3D Static Strength Prediction Program Version 5.0
5.14.1 Batch File Format
5.14.1.1 First Line of File
The first line of all batch files must be:
3DSSPPBATCHFILE #
5.14.1.2 Command Structure
Figure 5.30: Task Input | Joint Loads dialog
5.13.2 Zero All
// New to 5! // This button will clear the forces and
torques on every joint—even those not currently
shown. This button will not affect hand loads.
All lines must have one and only one command. The command must begin with a command name, upper case only, and must end
with the terminating character “#”. No characters should follow the terminating character.
Blanks are used to delimit all commands, data
items, and the terminating character. At least
one blank must be used; additional blanks for
visual organization are acceptable.
The legal commands and their abbreviations are as follows:
5.14 RUN BATCH FILE
COMMENT
(COM)
The Run Batch File feature enables automatic
analysis of tasks specified in a data file. It is useful
when many biomechanical analyses are to be performed on data derived from another program. The
input data file must follow a specific format and
must include all of the information normally specified for an analysis. The results of the analyses are
output to an export file (see Section 9.16).
DESCRIPTION
(DES)
ANTHROPOMETRY
(ANT)
JOINTANGLES
(JOI)
HANDLOADS
(HAN)
EXPORT
(EXP)
AUTOEXPORT
(AUT)
5.14.2 COMMENT Command
The COMMENT command is used to document the batch file and can be used as often as
desired in the batch file. It is ignored by
Copyright 2005: The Regents of The University of Michigan, ALL RIGHTS RESERVED
Page 40
3D Static Strength Prediction Program Version 5.0
3DSSPP. An ordinary comment command
might be entered as follows:
COM Anything you want to type to document
your file. #
5.14.3 DESCRIPTION Command
The DESCRIPTION command is used to
set the analysis units and the three documentation fields which are normally entered under
the Task Input | Description menu dialog. The
first data item is an integer, either 0 or 1, which
sets the analysis units. English is 0 and metric
is 1. The remaining three data items are strings
which must be enclosed in quotes. They are
the Task Name, Analyst Name, and the Analysis Comment. A typical description command
line is as follows:
DES 0 "Task Name" "Analyst Name" "Just
some comments." #
5.14.4 ANTHROPOMETRY Command
The ANTHROPOMETRY command is
used to set the gender and anthropometry values for the subsequent analyses. The first data
item is an integer representing the gender;
Male is 0 and Female is 1. The second data
item is an integer representing the percentile
for height and weight; 95th is 0, 50th is 1, and 5th
is 2. If the percentile integer is 3 then the
height and weight are set according the next
two data items. The third data item is the entry
for Height and the last data item is the entry for
Weight. These are both floating point values.
If the percentile data item is not 3 then the third
and last data items are not used in the analysis
and should be entered as zeros.
5.14.5 JOINTANGLES Command
The JOINTANGLES command is used to
enter the posture segment angles as listed in the
Segment Angles Menu Dialog for subsequent
analyses. All of the values are integers and the
data items are input in the order of left side,
right side, and trunk. Specifically: Forearm
left horizontal, forearm left V, upper arm left
horizontal, upper arm left vertical, upper leg
left vertical, lower leg left vertical, forearm
right horizontal, forearm right vertical, upper
arm right horizontal, upper arm right vertical,
upper leg right vertical, lower leg right vertical,
trunk flexion, trunk rotation, and trunk bending.
JOI 85 -25 10 -80 145 70 70 -20 5 -85 140 70
40 -5 10 #
5.14.6 HANDLOADS Command
The HANDLOADS command is used to
input the magnitude and direction of the loads
on each hand for the subsequent analyses. The
magnitude data items are floating point values
and the angle data items are integers. The values must be specified in the following order:
Left magnitude, left vertical angle, left horizontal angle, right magnitude, right vertical angle,
and right horizontal angle.
HAN 15.5 -20 85 22.2 -15 80 #
5.14.7 EXPORT Command
The EXPORT command initiates an analysis and exports the results to the export file.
This command has no data items.
EXP #
ANT 0 2 65.5 150.2 #
Copyright 2005: The Regents of The University of Michigan, ALL RIGHTS RESERVED
3D Static Strength Prediction Program Version 5.0
5.14.8 AUTOEXPORT Command
The AUTOEXPORT command causes all
subsequent ANT, JOI, and HAN commands to
be followed by an analysis and exportation of
result to the export file. The data item is an
integer digit representing the desired state of
the command. On is 1 and off is 0.
AUT 1 #
5.14.9 Example Batch File
3DSSPPBATCHFILE #
COM #
COM #
DES 0 "Sample Batch" "Suzy Anybody"
"Nothing very meaningful" #
AUT 0 #
ANT 1 2 64.2 115.0 #
JOI 85 -25 10 -80 145 70 70 -20 5 -85
140 70 40 -5 10 #
HAN 15 -20 85 22 -15 80 #
EXP #
COM #
COM #
COM Enable autoexport and do 5 different hand loads #
AUT 1 #
DES 0 "Loads A" "Suzy Anybody" "Hand
loads case A" #
HAN 15 -20 85 15 -15 80 #
DES 0 "Loads B" "Suzy Anybody" "Hand
loads case B" #
HAN 20 -20 85 20 -15 80 #
DES 0 "Loads C" "Suzy Anybody" "Hand
loads case C" #
HAN 25 -20 85 25 -15 80 #
DES 0 "Loads D" "Suzy Anybody" "Hand
loads case D" #
HAN 30 -20 85 30 -15 80 #
DES 0 "Loads E" "Suzy Anybody" "Hand
loads case E" #
HAN 35 -20 85 35 -15 80 #
COM #
COM #
COM Do 3 different postures with metric
output #
Page 41
COM #
DES 1 "Posture A" "Suzy Anybody"
"Posture case A" #
JOI 60 -10 10 -75 135 60 70 -20 5 -80
145 75 45 -5 0 #
DES 1 "Posture B" "Suzy Anybody"
"Posture case C" #
JOI 80 -20 15 -80 140 70 75 -25 10 -85
150 80 40 -15 10 #
DES 1 "Posture C" "Suzy Anybody"
"Posture case C" #
JOI 90 -25 20 -85 145 80 80 -30 15 -90
155 85 35 -25 15 #
COM #
COM Do the 3 different percentiles for
female with English output #
COM Note: For values of percentile not
equal to 3, the height and weight #
COM
data entries are ignored and may
be anything readable (here set to 0) #
COM #
DES 0 "Anthro A" "Suzy Anybody"
"Female 5th" #
ANT 1 2 0 0 #
DES 0 "Anthro B" "Suzy Anybody"
"Female 50th" #
ANT 1 1 0 0 #
DES 0 "Anthro C" "Suzy Anybody"
"Female 95th" #
ANT 1 0 0 0 #
Copyright 2005: The Regents of The University of Michigan, ALL RIGHTS RESERVED
Page 42
3D Static Strength Prediction Program Version 5.0
Copyright 2005: The Regents of The University of Michigan, ALL RIGHTS RESERVED
3D Static Strength Prediction Program Version 5.0
Page 43
Chapter 6: DISPLAY MENU COMMANDS
The Display Menu (Figure 6.1) contains the dialog
boxes for controlling the program display window.
Automatic tiling of the default five window arrangement can be enabled or disabled, or the program can be tiled on command. In addition the message bar can be displayed or hidden.
6.1
6.2
If the Tile Now command is selected the view window tiling will be reset to the standard 3 over 2 arrangement.
6.3
AUTO TILE
If the Auto Tile command is checked, then the standard 3 over 2 arrangement of the view windows
will be reset when ever the program window is
sized. If an alternative arrangement of the view
windows is desired, then the Auto Tile feature
should be disabled. To enable or disable simply
click on the command.
TILE NOW
STATUS BAR
This command controls the appearance of the message bar. The message bar displays various help
and error messages. It is displayed if the command
is checked and hidden if it is not checked. To check
or uncheck simply click on the command.
Figure 6.1: Display menu in 3DSSPP
Copyright 2005: The Regents of The University of Michigan, ALL RIGHTS RESERVED
Page 44
3D Static Strength Prediction Program Version 5.0
Copyright 2005: The Regents of The University of Michigan, ALL RIGHTS RESERVED
3D Static Strength Prediction Program Version 5.0
Page 45
Chapter 7: 3-VIEWS MENU COMMANDS
The 3-Views Menu (Figure 7.1) contains the dialog
boxes for controlling the display attributes of the
three orthogonal view windows. These windows
may be rearranged and manipulated as desired by
the analyst. The orthogonal view windows consist
of three views: top view (horizontal plane), front
view (frontal plane), and right side view (sagittal
plane). When a new task file is opened, the default
layout locates the top view in the top left window,
the front view in the top center window, and the
side view in the top right window. The figures, representing the posture being modeled, are drawn to
scale according to the selected anthropometry and
include force direction arrows originating from the
hand locations (force vectors which are perpendicular to the plane of the screen are not drawn).
These are the only windows in which direct
manipulation can be used to adjust the modeled
posture; in addition, direct manipulation can only
be used when the figures are displayed as stick figures.
Figure 7.1: 3-Views menu in 3DSSPP
7.1
SHOW FORCES
Selecting 3-Views | Show Forces allows the user to
toggle the display of joint and hand forces in the
orthogonal view windows.
7.2
COLORS
Selecting 3-Views | Colors brings up a dialog box
(Figure 7.2) that allows the user to change the color
of any element in the orthogonal view windows.
To change any color, simply click the corresponding button and use the color selection dialog box to
choose a new color.
Figure 7.2: 3-Views | Colors dialog box
Copyright 2005: The Regents of The University of Michigan, ALL RIGHTS RESERVED
Page 46
3D Static Strength Prediction Program Version 5.0
Copyright 2005: The Regents of The University of Michigan, ALL RIGHTS RESERVED
3D Static Strength Prediction Program Version 5.0
Page 47
Chapter 8: OBLIQUE-VIEW MENU COMMANDS
The Oblique-View Menu (Figure 8.1) contains the
dialog boxes for controlling the display attributes of
the oblique view window. While the orthogonal
views are useful for viewing vertical and horizontal
angles for data entry, they do not offer an accurate
means of comparing the final posture to photographs or video of the actual worker performing the
task. 3DSSPP provides this user-defined oblique
view utilizing a Graphic Human Model. This view
simplifies the process of comparing the modeled
posture to photographs and aids in more realistically representing proposed changes to task postures.
In the oblique view window the human figure
representing the modeled posture may be viewed
from any distance and view angle. Additionally, a
camera focal length can be simulated which
changes the perspective in the scene. This is very
useful when comparing the modeled posture to photographs taken with different focal length lenses
since different focal lengths can produce vastly different perspective distortions. These can be
matched by setting the focal length to match the
camera in the Oblique View | Camera dialog box.
When taking posture photographs for later use with
3DSSPP, remember to note the camera focal length.
The oblique view window can also enhance
posture evaluation and realism if environment objects are used. 3DSSPP provides four different
kinds of objects that can be placed in the figure’s
immediate environment: a hand-held object (cube,
sphere, or cylinder), a barrier (vertical wall or horizontal table), a seat, and a floor. These can be displayed in any combination along with the human
figure. The barrier can be user-defined for length
and width as well as positioned using a cylindrical
coordinate system centered on the human figure.
3DSSPP automatically sizes and positions the seat
and floor and fits the handheld object to the space
between the figure’s hands. Be aware that 3DSSPP
always centers the hands on the sides of the handheld object: if the task being modeled involves an
asymmetrically held object, the modeled image will
not match the actual task. This is a function of the
Figure 8.1: Oblique-View menu in 3DSSPP
Copyright 2005: The Regents of The University of Michigan, ALL RIGHTS RESERVED
Page 48
3D Static Strength Prediction Program Version 5.0
graphics display and has no bearing on the biomechanical analyses, provided the task parameters are
correctly entered.
The selection of model type and rendering has a
considerable effect on the time required to generate
the figure displayed on the screen, especially in systems with slower CPU’s and clock speeds. In general, improved graphics realism will noticeably increase the time required for the program to accurately display and analyze a given posture.
8.1.1
Model Type
Four different models of the human figure are
provided. The default is to display the wire frame
figure. The Stick, Skeleton, and Flesh are the same
as were discussed in the 3-Views Menu Chapter.
None: This option prevents the hominoid from
being displayed in the oblique view window.
Wireframe: This model provides a partially
transparent wireframe model of the hominoid. This model renders faster, and allows
the user to see elements of the environment
which are obscured by the hominoid.
Flesh: This model provides a fleshed-out figure
which is useful for comparisons to photographs or in any situation where a more realistic representation is needed (e.g., viewing
interference and/or proximity with objects in
the human figure’s environment). On slow
machines, this figure utilizes a compromise
between display accuracy and speed.
8.1.2
Figure Color
The figure’s skin can be changed to any color. The
current skin color is displayed in the color box; to
change the color, click “Figure Color” and select a
new color using the provided dialog box.
Figure 8.2: Oblique-View | Human Figure dialog box
8.1.3
8.1
HUMAN FIGURE
Selecting Oblique-View | Human Figure displays a
dialog box (Figure 8.2) which allows the user to
select the following display options relevant to the
human figure.
Hand Type (Not Implemented)
The hand grip displayed with the figure can be
open, cupped, or in a fist. The default is open hands
and can only be changed in the oblique view. This
option is for viewing purposes only, and does not
factor into the program’s calculations.
Copyright 2005: The Regents of The University of Michigan, ALL RIGHTS RESERVED
3D Static Strength Prediction Program Version 5.0
8.2
Page 49
ENVIRONMENT
Selecting Oblique-View | Environment displays a
dialog box (Figure 8.3) which allows the user to
select the following display options relevant to environment objects. This feature is provided to aid
the analyst in matching postures to photographs or
video images. However, physical interaction between the environment items and the human figure
is not calculated nor are analysis results affected by
the presence or absence of environment objects.
8.2.1
Floor
This object has fixed dimensions and is automatically positioned beneath the figure’s feet. Click on
the box to insert or remove the floor from display.
8.2.2
Figure 8.3: Oblique-View | Environment dialog box
8.1.4 Enable Shoes
This selection applies shoes to the oblique display
of the human model. It makes no difference to the
calculations or results.
8.1.5 Clothing Color
Selecting this button allows the user to change the
color of the hominoid’s apparel.
Handheld Object
Be aware that 3DSSPP always positions the handheld object between the hands with the hands centered on the sides of the object: if the task being
modeled involves an asymmetrically held object,
the modeled image will not match the actual task.
The inclusion of the hand-held object on the graphics display has no bearing on the biomechanical
analyses and is only included for realistic appearance.
Type:
Four object options are available none, cube, cylinder, or sphere. The object is
automatically positioned at the midpoint of
the hands and scaled to fill the space between
the hands. The default is no object.
Height:
With this field, the vertical dimension of the handheld object is specified in
inches or centimeters, depending on the units
currently selected. The vertical dimension is
measured from the bottom to top of the object at its largest cross section.
Copyright 2005: The Regents of The University of Michigan, ALL RIGHTS RESERVED
Page 50
3D Static Strength Prediction Program Version 5.0
Depth:
With this field, the horizontal
(forward-backward) dimension of the handheld object can be specified in inches or centimeters, depending on the units currently
selected. The horizontal dimension is measured from the front of the object (farthest
side from the figure) to its back (closest side
to the figure) along a line that lies in the
global horizontal plane and is perpendicular
to the line connecting the hand centers. In the
three-dimensional display, typically appears
as the “depth” of the object when the figure
is viewed from the side.
8.2.3
Barrier
A barrier represents either a wall or a table as a thin
plate of user-defined thickness. A wall and a table
cannot be displayed simultaneously. The barrier
may be repositioned if it appears to be in contact
with the humanoid. The “Distance”, “Elev”, and
“Azimuth” input fields refer to a cylindrical coordinate system with the origin over the center of the
feet at the height of the hips when standing. The
central axis points up vertically and the angle reference line projects straight ahead from the figure.
(The reason for the odd measurement center is that
the human graphic drawing origin is at the center of
the hips. This is to be improved in the future.))
Type: Three barrier options are available - none,
wall, and table. Only one barrier can be displayed at a time and the default is no barrier.
The wall type is oriented vertically and always faces the figure. The table type is oriented horizontally with its inner edge always
facing the figure.
Length: This field specifies the barrier’s left-toright horizontal dimension. This dimension
appears the same and is measured the same
for either the wall or the table barrier types.
Width: This field allow the user to specify the
barrier’s vertical dimension as a wall or its
horizontal front-to-back dimension as a table.
Thickness: This field allows the user to specify
thickness of the barrier.
Distance: This input field specifies the radial
distance of the barrier from the hominoid’s
central vertical axis. For both the wall and
the table, this dimension is measured horizontally from the vertical axis of the cylindrical coordinate system to the barrier’s center
(see above).
Azimuth: This input field specifies, in degrees,
the angular position of the barrier’s center
with respect to a reference line projecting
straight out in front of the hominoid from the
feet center point. Facing the hominoid from
the front, positive azimuth values move the
barrier to the viewer’s right (the figure’s left)
in a circular arc centered on the cylindrical
coordinate system’s vertical axis. Negative
azimuth values move the barrier around to
the viewer’s left. The range of azimuth values is -180 to 180 degrees.
Elevation: For both the wall and the table, this
input field asks for the dimension measured
vertically from the origin to the barrier’s top
surface.
8.2.4
Color
Environment items can be displayed in any
color including a separate color for the outline. See
Color section 8.4.1.
8.3
CAMERA
For viewing the figure, the human graphic display
uses a camera metaphor. To understand the dimensions that follow, imagine viewing the figure
through a camera. Viewing position is changed by
moving toward or away from the figure (changing
radius); circling around the figure to the right or left
(changing rotation); or circling up and over or down
Copyright 2005: The Regents of The University of Michigan, ALL RIGHTS RESERVED
3D Static Strength Prediction Program Version 5.0
Page 51
Figure 8.4: Oblique-View | Camera dialog box
and under the figure (change in vertical tilt). As
this movement occurs, the camera remains directed on the figure’s hips and always upright
(e.g., does not roll). In addition, the figure can
be made to appear larger or smaller by increasing or decreasing the camera’s focal length,
similar to using a zoom lens. Although different
combinations of and radial distance from the
figure will produce the same apparent size, the
figure will appear bloated and distorted for short
focal lengths and flattened for long focal lengths
- just like an actual camera. 3DSSPP provides
the camera metaphor for more exact matching of
hominoid postures to photographs or video.
Selecting Oblique-View | Camera displays a
dialog box (Figure 8.4) which allows the user to
select the following model viewing options.
Focal Length: This field specifies the camera’s
focal length. High focal length values magnify and
flatten the image, low values make the image
smaller and distorted.
Distance: This field specifies the radial distance
of the camera’s film plane to the center of the figure’s hips.
Vertical Tilt This field specifies the vertical
angle of the camera in degrees. Vertical tilt is a
measure of the angle from the horizontal plane at
which the object is being observed. Ranging from 89° to 89°, 0° is at waist level looking at the object
and 89° is directly overhead looking down on the
object.
Rotation: This field specifies the angle from a
Figure 8.5: Oblique View | Background selection dialog box
Copyright 2005: The Regents of The University of Michigan, ALL RIGHTS RESERVED
Page 52
3D Static Strength Prediction Program Version 5.0
vertical plane separating the left and right halves of
the object from which it is being observed. Ranging
from -180 to 180 degrees, 0 degrees is looking directly at the front of the figure while 90 degrees is
looking at the figure’s left side (observer’s right
side).
// New to 5! // The camera view can be adjusted using the mouse by clicking and dragging in
the oblique view window. See Section 3.3.
Windows file input dialog will appear. Select an
image file and click Open. Currently supported file
types include: gif, ico, and jpeg. The digital image
will appear in the background of the oblique window. The Graphic Human Model will be visible on
top of the image. Choose either Center or Stretch
to adjust the view of the image. Finally select the
Use Image box to enable the image to be displayed.
8.5
8.4
BACKGROUND
Selecting Oblique View | Background allows the
user to set the background of the oblique view window for the task being analyzed to either a solid
color or a digital image (Figure 8.5).
8.4.1
LIGHT
The light dialog (Figure 8.6) controls the shading of
the hominoid. Automatic shading can be selected
by checking the “Use fixed 3-point lighting
scheme” button. The light intensity can then be
chosen for the desired effect.
Color
Click on Select Color to select a solid color background for the oblique window. The Windows colors dialog will appear. For basic colors, click on
the color desired and click OK. For custom colors,
either click on a defined color and click OK or
click on Define Custom Colors to open the custom
color screen. In the left box, move the crosshairs
around to the color desired. In the right box, move
the little arrowhead at the far right up and down to
select the shade of the color. The Color | Solid box
will display the current color as defined by the
crosshair and arrowhead position. The color may
also be defined using the input fields. When the
desired color is attained, click on Add to Custom
Colors to update the Custom Color list in the primary dialog box.
8.4.2
Load New Image
Click on Browse to load a digital image file and set
it as the background for the oblique window. The
Figure 8.6: Oblique View | Light dialog box
Copyright 2005: The Regents of The University of Michigan, ALL RIGHTS RESERVED
3D Static Strength Prediction Program Version 5.0
Page 53
Chapter 9: REPORTS MENU COMMANDS
The Reports Menu (Figure 9.1) contains the many
analysis options available in 3DSSPP. A task input
summary report is also available which lists all of
the input data entered by the user. Two additional
options include commands for printing reports and
exporting output data to a file.
When a report is selected, the report data is displayed in a new window over the posture entry windows which may be manipulated as any other window. For example, its contents can be printed
through File | Print Active Window or be copied to
the clipboard, or the window can be re-sized.
Changes in units, anthropometry, load, or posture will automatically be reflected in any open report windows. Remember that, although running
additional reports may appear to close an existing
report window by hiding the previous report window, no existing report windows are closed by this
action. To close individual report windows, use the
control menu on the report window’s title bar.
Each report contains a header block with basic
information about the analyzed task. Included are
the company, analyst, date, task name, gender, percentile anthropometry, height, weight, and task
comment. For all report screens the output can be
Figure 9.1: Reports menu in 3DSSPP
Copyright 2005: The Regents of The University of Michigan, ALL RIGHTS RESERVED
Page 54
3D Static Strength Prediction Program Version 5.0
toggled between English or Metric units by choosing Task-Input | Metric or Task-Input / English
(see also Section 5.2). The windows do not have to
be closed to change the units.
9.1
9.2
ANALYSIS SUMMARY REPORT
The analysis summary report (Figure 9.3) displays
five areas of information: Hand Forces, Lowback
Disc Compression, Percent Capable, Balance, and
Coefficient of Friction
TASK INPUT SUMMARY REPORT
The Task Input Summary (Figure 9.2) displays a
summary of the data entered under the Task-Input
menu items including the:
1. Joint angles,
2. Hand locations,
3. Hand force magnitude and direction, and
9.2.1
Hand Forces
The forces on the hand are listed as the vector
components of the load projected onto the X, Y and
Z axes and also as the resultant magnitude.
1. A positive X-component indicates a task requiring a sideways push to the left while a
negative X-component indicates a task requiring a sideways push to the right.
4. Additional joint forces.
2. If the task involves pulling towards the body,
the Y-component will be positive if the task
Figure 9.2: Task input summary report
Copyright 2005: The Regents of The University of Michigan, ALL RIGHTS RESERVED
3D Static Strength Prediction Program Version 5.0
involves forward pushing, the Y-component
will be negative.
3. If the task involves lifting, the Z-component
of the hand forces will be negative (-); a positive Z-component (+) indicates a task using a
downward push.
9.2.2
Disk Compression Force
Page 55
value and a bar graph are shown. The disc compression force predictions are compared with the Back
Compression Design Limit (BCDL = 770 pounds or
3400 newtons) and the Back Compression Upper
Limit (BCUL = 1430 pounds or 6400 newtons) as
specified by NIOSH.
The back compression results should be interpreted with care. Refer to Section 1.3 for technical
details on the algorithms used to determine the disc
compression forces and the following sections for
the NIOSH guidelines used to establish the strength
capability and disc compression limits.
The 3D low-back compression force at L4/L5 is
displayed below the hand forces. Both a numeric
Figure 9.3: Analysis summary report
Copyright 2005: The Regents of The University of Michigan, ALL RIGHTS RESERVED
Page 56
9.2.2.1
3D Static Strength Prediction Program Version 5.0
BCDL and BCUL Limits
The NIOSH Back Compression Limit notation
has been revised to BCDL (Back Compression Design Limit) and BCUL (Back Compression Upper
Limit) as opposed to AL and MPL. The limiting
values are set forth in the Work Practices Guide for
Manual Lifting (NIOSH, 1981).
The BCDL guidelines are consistent with the
biomechanical and psychophysical criteria used to
develop the revised 1991 lifting equation (Waters et
al, 1993) while the BCUL are consistent with the
criteria used to develop the 1981 equation. In the
3DSSPP the BCDL is delimited in the bar graphs
by the green to yellow transition and the BCUL is
delimited by the yellow to red transition. Because
the 1991 version of the Lifting Guide has moved
from a three-stage decision matrix to a single lifting
index in assessing the risk of low-back pain, these
upper limits were not included as criteria for the
1991 version. Further discussion concerning the
back compression design and upper limits as well
as the basis for strength design and upper limits can
be found in Occupational Biomechanics.
9.2.3
Percent Capable
notation has been revised to the SDL (Strength Design Limit) and SUL (Strength Upper Limit) as opposed to the AL (Action Limit) and MPL
(Maximum Permissible Limit). The SDL designation is delimited by the green to yellow transition in
the bar graphs and is set at 99% for men or 75% for
women. The SUL designation, on the other hand, is
delimited by the yellow to red transition and is set
at 25% for men or 1% for women. The limiting
values are set forth in the Work Practices Guide for
Manual Lifting (NIOSH, 1981).
The SDL guidelines are consistent with the biomechanical and psychophysical criteria used to develop the revised 1991 lifting equation (Waters et
al, 1993) while the SUL are consistent with the criteria used to develop the 1981 equation. Because
the 1991 version has moved from a three-stage decision matrix to a single lifting index in assessing
the risk of low-back pain, these upper limits were
not included as criteria for the 1991 version. Further discussion concerning the back compression
design and upper limits as well as the basis for
strength design and upper limits can be found in
Occupational Biomechanics as mentioned previously.
9.2.4
Leg Load and Balance
The upper portion of the screen below the report header is devoted to the strength capability of
the selected gender at the major joints. The displayed value for each joint is the lowest value obtained from the strength capabilities calculated for
the joint actions on the left and right side of the
body. The torso value is the smallest of axial rotation strength, lateral bending strength and flexion/
extension strength. All of the strength capability
percentages can be viewed in the Strength Capabilities report described in Section 9.6.
The lower left corner of the screen reports the
balance condition for the input posture. The
“percentage load” refers to the fraction of total
weight (body and load) supported by that leg. For
example, if the task involves a forward leaning posture with the right foot forward, then the right foot
might be expected to bear a greater fraction of the
overall load. Conversely, for a lateral bending left
posture, the upper torso weight and hand loads
would be borne primarily by the left foot.
9.2.3.1
In addition to calculating the percent load on
each foot, the program calculates the center of pressure (COP) of the forces applied to the supporting
surfaces. For standing, these are the front and heel
of the feet, and for sitting, these are the ischial tuberosities and back of the thighs or the feet.
SDL and SUL Limits
For percent capables (percent of the population
with sufficient strength) the NIOSH Strength Limit
Copyright 2005: The Regents of The University of Michigan, ALL RIGHTS RESERVED
3D Static Strength Prediction Program Version 5.0
The center of pressure is compared to the Basis
of Support and the Functional Stability Region (not
delimited on the graphic) to determine if the balance condition is either ACCEPTABLE, CRITICAL, or UNACCEPTABLE. See Section 9.8 for
definitions and the detailed balance reports..
pulling tasks for risk of falls due to slippage, this is
the coefficient of static friction between the floor
and the shoe soles required to prevent slippage
given this specific combination of posture and load.
9.3
9.2.5
Required Coefficient of Ground
Friction
Horizontal forces at the L5/S1 vertebral disc are
transmitted directly to ankle level since there is no
horizontal external force entry at the lower extremities. Therefore, the ratio of horizontal forces at the
L5/S1 level (where upper extremity is assumed to
be connected to the lower extremity) to the sum of
upper body weight, lower body weight, and vertical
hand loads is the required coefficient of ground
friction at the feet. Useful in analyzing pushing and
Page 57
FATIGUE REPORT
// New in 5! // The Fatigue Report (Figure 9.4) displays the calculated percent of maximum voluntary
contraction (MVC) of the required effort at each
joint. Percentages are calculated for three population strength capabilities; 5, 25, and 50 percentile
corresponding to very weak, weak, and average
strength workers. These values can be used with
frequency and duration information to estimate localized muscular fatigue. See Rohmert (1973) and
other more recent work.
Figure 9.4: Fatigue report
Copyright 2005: The Regents of The University of Michigan, ALL RIGHTS RESERVED
Page 58
9.4
3D Static Strength Prediction Program Version 5.0
3D LOWBACK ANALYSIS REPORT
The predicted disc compression force shown in the
analysis summary screen are detailed in 3D Lowback Analysis (Figure 9.5). The report lists the L4/
L5 disc compression force and can be compared to
the NIOSH BCDL of 3400 Newtons (or 770
pounds) and BCUL of 6400 Newtons (or 1430
pounds.). See Appendix III for details on the
NIOSH guidelines.
The 3D Lowback Analysis linear programming
optimization algorithm calculates the L4/L5 disc
rotated moments and forces and optimizes the resultant disc compression force on the disc as a result of
a three dimensional analysis of the contractile
forces expected from ten major muscles in the lumber region, upper body weight above the disc, and
the hand forces. Refer to Section 1.3.2 for a diagram of the torso cross section at the L5/L4 lumbar
level, depicting the ten muscles taken into account
in this three dimensional back compression algorithm, and additional technical details on the algorithm.
Figure 9.5: 3D Lowback Analysis
Copyright 2005: The Regents of The University of Michigan, ALL RIGHTS RESERVED
3D Static Strength Prediction Program Version 5.0
9.5
SAGITTAL PLANE LOWBACK
ANALYSIS REPORT
The sagittal plane low-back analysis report (Figure
9.6) displays low-back data for the gender selected.
Positive muscle force values or segment weights
indicate the downward direction of the forces acting
on the vertebral disc. Shear forces on the vertebral
disc are due to the upper body weight, posture, and
the horizontal hand forces. When appropriate and
known +/- one standard deviation is displayed.
The L5/S1 disc compression force analysis is
based on a model using the contraction forces from
the Erector Spinae and Rectus Abdominus muscles.
Although this yields acceptable results for symmetric lifts in the sagittal plane, such results may underestimate the disc compression force generated in
asymmetric lifting. Because asymmetric lifts require recruitment of additional torso muscles, large
asymmetric muscle activities and loads may be cre-
Page 59
ated about the spine. In these cases, the use of the
3D Low-back Analysis is recommended. For further details on the L5/S1 model, refer to Section
1.3.1.
9.5.1
Estimated L5/S1 Ligament Strain
At the bottom of the report, the estimated L5/S1
ligament strain for the gender selected is displayed.
This represents the strain in the lumbodorsal fascia,
which is attached between the L5 and S1 vertebrae
and plays a major role in resisting forward flexion.
Since the observed elastic limit for the lumbodorsal
fascia is 30%, estimated L5/S1 ligament strain values which exceed 30% may indicate risk for injury.
See Anderson et al (1985), Anderson (1983), Bazergui et al (1978), and Farfan (1973).
Figure 9.6: Sagittal Plane Lowback Analysis
Copyright 2005: The Regents of The University of Michigan, ALL RIGHTS RESERVED
Page 60
9.6
3D Static Strength Prediction Program Version 5.0
STRENGTH CAPABILITIES REPORT
The strength capabilities report (Figure 9.7) outputs
the results of the strength model.
The Required Moments (torque) produced by
the load and body weight for each joint are calculated using a biomechanical model based on a static
linkage algorithm and are dependant upon the anthropometry, posture, and hand load.
The Population Mean Strengths and their standard deviations are computed from empirical mean
strength equations. The equations are based on experimental strength studies by Stobbe (1980);
Shanne (1972); Burgraaff (1972); Clarke (1966);
Smith and Mayer (1985); Mayer et al. (1985); Kishino et al. (1985); Kumar, Chaffin, and Redfern
(1985); and many others.
The Population Strength Means depend upon
the gender and posture. They are not stratified by
height or weight (anthropometry) because the correlation is weak. Also there is currently insufficient
data to stratify the strength means by age.
The Percent Capable is the percentage of the
population with the strength capability to generate a
moment larger than the resultant moment. It is calculated as a function of the resultant moment, mean
strength, and standard deviation of the mean
strength using a normal distribution as follows:
Percent Capable =
Φ(Z) = [(2-1/2)/π] ƒz−∞ exp (-x2/2) dx
where Z = {Required Moment at joint Mean Strength} / Std Dev of Strength.
Figure 9.7: Strength Capabilities Report
Copyright 2005: The Regents of The University of Michigan, ALL RIGHTS RESERVED
3D Static Strength Prediction Program Version 5.0
9.7
ANTHROPOMETRY REPORT
The anthropometry report (Figure 9.8) displays anthropometric data including: the link lengths, the
center of gravity distances, and the link weights.
The lower arm shown in the first row combines the
hand and lower arm links. Hence, the hand weight
is included in the link weight. The center of gravity
distance for the elbow is similarly adjusted. As
noted by the citation, the L5 to shoulder link includes the head and neck weight but not the head
and neck length: the length displayed is that of the
Page 61
L5/S1 to the center between the shoulders. The Hipto-L5 link represents the pelvic bone and surrounding muscles to the L5/S1 disc. Finally, the center of
gravity distances are measured from the end of the
link which is internally closest to the feet; the proximal end for the upper extremity and the distal end
for the lower extremity.
Near the end of the report is the name of the
population used for the analysis as set in the Anthropometry dialog, Section 5.6.
Figure 9.8: Anthropometry Report
Copyright 2005: The Regents of The University of Michigan, ALL RIGHTS RESERVED
Page 62
9.8
3D Static Strength Prediction Program Version 5.0
BALANCE REPORTS (SEATED
AND STANDING)
// New to 5! // The seated and standing balance reports (Figures 9.9 and 9.10) display the body support and balance details. The stability condition as
well as intermediate calculation values are listed
and are most helpful in validating the balance calculations. To select the type of support, seated or
standing, see the Support Selection dialog.
9.8.1
Center of Pressure Calculation
The Center of Pressure (CP) balance algorithm
calculates the center of pressure and determines
whether this location is within a stability region
defined by the supporting surfaces. The Center of
Pressure algorithm calculates the whole-body center
of mass location from the bodyweights and centers
of mass locations of each body part. Then the hand
locations and the vertical and horizontal hand forces
are included along with the additional forces and
moments added to the joints. Finally the support
reaction forces are estimated and the lower extremity joint forces and moments are re-calculated to
include these loads. Residual moments are the moments calculated at the center of the pelvis that remain after the supporting forces are included. They
are error factors that indicated that the supporting
forces are not perfectly balancing the body.
Figure 9.9: Balance Report - Seated
Copyright 2005: The Regents of The University of Michigan, ALL RIGHTS RESERVED
3D Static Strength Prediction Program Version 5.0
9.8.2
Stability Regions
For balance to be obtained the COP must be
contained within a stability region defined by the
supporting surfaces. Two stability regions are determined and considered. The Basis of Support
(BOS) is a region defined by the size and location
of the supporting surfaces. For example, in standinthe feet can only support a posture if the Center of
Pressure is within the BOS, otherwise the person
Page 63
will fall over. However it has been shown that people do not normally let the Center of Pressure get
close to the edge of the BOS, supposedly as a safety
factor. Therefore a Functional Stability Region
(FSR) has been defined and experimentally determined within which people tend to keep the Center
of Pressure. Between the perimeter of these two
regions is a critical region of balance where a person may feel insecure.
Figure 9.10: Balance Report - Standing
Copyright 2005: The Regents of The University of Michigan, ALL RIGHTS RESERVED
Page 64
9.8.3
3D Static Strength Prediction Program Version 5.0
Balance Condition
The calculation values listed in the balance reports include the Basis of Support coordinates (X to
the right and Y forward with respect to the human
form graphic); the Center of Pressure coordinates;
and the distances from the Center of Pressure to the
front, back, right, and left boundary. The stability
condition output is either ACCEPTABLE, CRITICAL, or UNACCEPTABLE.
ACCEPTABLE CP BALANCE: The Center of
Pressure location is within the FSR and the
posture is stable.
CRITICAL CP BALANCE: The Center of Pressure location is outside the FSR and yet
within the BOS. The posture is stable but the
person will not feel secure.
UNACCEPTABLE CP BALANCE: The Center
of Pressure is outside the BOS and posture
cannot be maintained.
9.8.4
Center of Pressure Graphic
The balance reports include a graphical depiction of the COP, BOS boundary, and the supporting
surfaces. The output is also included in the Status
Window of the main screen.
For the standing case the graphic shows the feet
and the green BOS region. The COP appears as a
small yellow dot. The images of the feet will
change as the posture of the lower extremity is
changed and the BOS will automatically adjust.
For the seated case the graphic shows the pelvis
and feet if feet support has been selected in the Support Selection dialog. The BOS region is depicted
by the outer edge of the green band. It will adjust
according to the type of seat support selected.. The
COP appears as a small yellow dot. The small red
dots show the location of the ischial tuberosities,
which are the lowest most bone surfaces of the pelvis. The images of the pelvis and feet will change
as the posture of the lower extremity is changed and
the BOS boundary will automatically adjust.
Copyright 2005: The Regents of The University of Michigan, ALL RIGHTS RESERVED
3D Static Strength Prediction Program Version 5.0
9.9
FORCES REPORT
// New to 5! // The forces report (Figure 9.11) lists
the resultant forces produced by the loads and body
weight in the direction of the main reference axes
(x, y, and z) at each joint or surface. The X-axis
Page 65
extends laterally from the origin with positive to the
subject’s right. The Y-axis extends from the origin
to the front and the back of the body with positive
being forward. Lastly, the Z-axis extends vertically
from the origin with positive upwards. This definition follows the right hand rule.
Figure 9.11: Forces Report
Copyright 2005: The Regents of The University of Michigan, ALL RIGHTS RESERVED
Page 66
3D Static Strength Prediction Program Version 5.0
9.10 LOCATIONS REPORT
The locations report (Figure 9.12) lists the calculated locations of each joint, hand, and supporting
surface. The locations (x, y, z) are listed in the
hand reference coordinate system. For standing
cases, the origin (0, 0, 0) of this coordinate system
is at the center of the feet. (Center of the ankles projected downward to the floor support of the lowest
foot.) For seated cases, the origin (0, 0, 0) of this
coordinate system is at the Seat Reference Point
(SRP). The SRP is automatically calculated from
the intersection of the trunk and upper leg angles
and is displaced perpendicular to the body segments
by population factors which are fraction of stature.
The X-axis extends laterally from the origin with
positive to the subjects right. The positive Y-axis
extends forward from the origin and the positive Zaxis extends vertically from the origin with positive
upwards. This forms a right-had coordinate system.
Figure 9.12: Locations Report
Copyright 2005: The Regents of The University of Michigan, ALL RIGHTS RESERVED
3D Static Strength Prediction Program Version 5.0
9.11 MOMENTS REPORT
The moments report (Figure 9.13) lists the resultant
moments produced by the loads and body weight
about the main reference axes (x, y, and z) at each
joint and support surface. The X-axis extends laterally from the origin with positive to the subject’s
right. The Y-axis extends from the origin to the
Page 67
front and the back of the body with positive being
forward. Lastly, the Z-axis extends vertically from
the origin with positive upwards. A negative (-)
moment value indicates a clockwise moment about
the given joint axis; a positive moment represents a
counterclockwise moment. This definition follows
the right hand rule.
Figure 9.13: Moments Report
Copyright 2005: The Regents of The University of Michigan, ALL RIGHTS RESERVED
Page 68
3D Static Strength Prediction Program Version 5.0
9.12 POSTURE REPORT
The posture report (Figure 9.14) displays the limb
and torso angles calculated by vector analysis on
the input posture. They are the included joint angles
often used to describe postures. Technically speaking, the included joint angles need to be corrected
(re-computed by a vectorial screening of the posture
editor) in order to input the most accurate variables
possible into the empirical strength prediction rou-
tines. Since the population percent capable values
are highly sensitive to variations in the mean
strengths and standard deviations, these corrected
angles are used as independent variables in the empirical strength equations to reduce the mean
strength variability. Note that the torso and pelvic
angles combine to form the entered trunk flexion
angle and that a lateral trunk rotation will induce a
torso rotation if the trunk is also flexed.
Figure 9.14: Posture Report
Copyright 2005: The Regents of The University of Michigan, ALL RIGHTS RESERVED
3D Static Strength Prediction Program Version 5.0
9.13 SPINAL FORCES AND MOMENTS
REPORT
For the spinal forces and moments report (Figure
9.15), the resultant moments and forces at the spinal
segments are displayed. First, these are presented
with respect to the main x, y, and z (global) coordinate system defining the Coronal (top down), Sagittal (side view), and Horizontal (front view) planes;
second, these are presented with respect to the lumbar rotation coordinate system as defined by translating the moments and forces at the segmental
level onto the disc surface, which rotates dependent
Page 69
upon posture. The Euler Matrix approach is implemented for the translation described (projection on
to the disc surface).
Furthermore, as related to the postural input,
L4/L5 disc rotation is considerably less than L2/L3
disc rotation (the L4/L5 disc is located lower within
the torso). The empirical relations between the disc
rotation (three dimensional) and the worker’s maximum flexion/extension, lateral bend, and the torso
axial rotation have been derived from published
experimental x-ray studies.
Figure 9.15: Spinal Forces and Moments Report
Copyright 2005: The Regents of The University of Michigan, ALL RIGHTS RESERVED
Page 70
3D Static Strength Prediction Program Version 5.0
9.14 STRENGTH DIRECTION VECTORS
REPORT
The strength direction vectors report (Figure 9.16)
displays the unit vectors for the directions of the
strength moments in the main reference (global)
coordinate system. The X-axis extends laterally
from the origin with positive to the subjects right.
The Y-axis extends from the origin to the front and
the back of the body with positive being forward.
Lastly, the Z-axis extends vertically from the origin
with positive upwards.
Figure 9.16: Strength Direction Vectors
Copyright 2005: The Regents of The University of Michigan, ALL RIGHTS RESERVED
3D Static Strength Prediction Program Version 5.0
Page 71
9.15 PRINT REPORTS COMMAND
9.16 EXPORT OUTPUT SUMMARY
A series of reports can be printed using the Reports
| Print Reports command (Figure 9.17). The reports will print in the order they are listed. Use File
| Print Setup to change printers or printer options.
Through Reports | Export Output Summary, selected data generated by 3DSSPP can be saved as
an external, tab or comma delimited text file for
import and further analysis in spreadsheet or other
applications software (Figure 9.18). Other than this
data, no reports can be exported text files.
1. Choose Reports | Print Reports.
2. Click on the check boxes to select the reports
to be printed.
To export the summary data to a text file,
1. Choose Reports | Export Output Summary.
3. Press ENTER or click OK..
Note the Select All and Select None buttons.
These select all or no reports for printing and can
speed the selection of desired combinations of reports.
Figure 9.17: Reports | Print Reports dialog
2. The dialog box is opened with the default file
name of “summary.txt”. Enter the file name
and extension desired.
3. Press ENTER or click OK.
Figure 9.18: Reports | Export Summary dialog box
Copyright 2005: The Regents of The University of Michigan, ALL RIGHTS RESERVED
Page 72
3D Static Strength Prediction Program Version 5.0
4. The Export Summary Options dialog box
appears. Select the type of output, the type
of delimiter, and file mode desired.
5. Press ENTER or click OK.
6. When the file has been written, a dialog box
appears stating “Summary successfully exported.”
the six strength capables from the summary
analysis report, coef. of friction, load on left
foot (%), and balance condition.
Strength capable values include: “str cap”, right
elbow (flex/ext), right shoulder humeral rot.,
fwd/bkwd rot., and adduc./abduc., left elbow
(flex/ext), left shoulder humeral rot., fwd/
bkwd rot., and adduc./abduc., torso flexion/
ext., lat. bend., and axial rot., right hip (flex/
ext), right knee (flex/ext), right ankle (flex/
ext), left hip (flex/ext), left knee (flex/ext),
and left ankle (flex/ext).
9.16.1 Export Output File Format
All selected output values for each analysis are exported on one line as text values. The following
values are always exported at the beginning of the
line: Analyst, company, units, task name, gender,
height, and weight. Immediately thereafter follow
the selected blocks of data values. Each block begins with the block abbreviation text (string value).
Posture angle values include: “post ang”, r. elbow included, r. upper arm vert., r. upper arm
horiz., r. humeral rot., r. hip included, r. knee
included, r. ankle included, l. elbow included, l. upper arm vert., l. upper arm horiz.,
l. humeral rot., l. hip included, l. knee included, l. ankle included, pelvic rotation,
torso flexion, torso axial rotation, and torso
lateral bending.
The abbreviations and block values are as follows: Hand forces (hand forces), body segment
angles (seg ang), summary results (summary),
strength (str cap), posture angles (post ang), joint
locations (jnt loc), joint moments (jnt mom), and
low-back (low back).
Location values include: “jnt loc” followed by
(x,y,z) locations for: right hand, right elbow,
right shoulder, left hand, left elbow, left
shoulder, L5S1, right hip, right knee:, right
ankle, left hip, left knee, and left ankle
The data values included in each block
listed as follows:
are
Hand forces include: “hand forces”, right force
magnitude, r. force vert. angle, r. force horiz.
angle, left force magnitude, l. force vert. angle, and l. force horiz. angle.
Body segment angles include: “seg ang”, r.
forearm vert. angle, r. forearm horiz. angle, r.
upper arm vert. angle, r. upper arm horiz.
angle, r. upper leg angle, r. lower leg angle, l.
forearm vert. angle, l. forearm horiz. angle, l.
upper arm vert. angle, l. upper arm horiz.
angle, l. upper leg angle, l. lower leg angle,
torso lat. bend angle, torso flex angle, and
torso ax. rotat. angle.
Summary values include: “summary”, L5 S1
disc compression, L4/L5 disc compression,
Force values include: “jnt forces” followed by
(x,y,z) forces for: right elbow, right shoulder,
left elbow, left shoulder, L5S1, right hip,
right knee, right ankle, left hip, left knee, left
ankle.
Moment values include: “jnt mom“ followed by
(x,y,z) moments for: right elbow, right
shoulder, left elbow, left shoulder, L5S1,
right hip, right knee, right ankle, left hip, left
knee, and left ankle.
Low-back values include: “low back”, L5 S1
disc compression, L5 S1 disc compression
std dev., L5S1 sagittal shear, L5S1 frontal
(lateral) shear, L4/L5 disc compression force,
L4/L5 disc anterio-posterior shear, and L4/
L5 disc lateral shear. Then include the resultant force, shear force, X force, Y force,
and Z force for each of the following: r.
erector spi., r. rectus abdo., r. internal ob., r.
Copyright 2005: The Regents of The University of Michigan, ALL RIGHTS RESERVED
3D Static Strength Prediction Program Version 5.0
external ob., r. latis. dorsi., l. erector spi., l.
rectus abdo., l. internal ob., l. external ob.,
and l. latis. dorsi.
Fatigue values include: “fatigue” followed by
5th%, 25th%, and 50th% values for left elbow
flex/ext, left shoulder humeral rot, left shoulder rot'n bk/fd, left shoulder abduc/adduc,
left hip flex/ext, left knee flex/ext, left ankle
flex/ext, right elbow flex/ext, right shoulder
humeral rot, right shoulder rot'n bk/fd, right
shoulder abduc/adduc, right hip flex/ext,
right knee flex/ext, right ankle flex/ext, torso
flex/ext, torso lat'l bending, torso rotation.
Copyright 2005: The Regents of The University of Michigan, ALL RIGHTS RESERVED
Page 73
Page 74
3D Static Strength Prediction Program Version 5.0
Copyright 2005: The Regents of The University of Michigan, ALL RIGHTS RESERVED
3D Static Strength Prediction Program Version 5.0
Page 75
REFERENCES
Anderson, C.K.; Chaffin, D.B.; Herrin, G.D.; and
Matthews, L.S. "A Biomechanical Model of the
Lumbosacral Joint During Lifting Activities"; J.
Biomechanics, Vol. 18, No. 8, pp. 571-584, 1985
Chaffin, D. B., Redfern, M. S., Erig, M., Goldstein
S. A., Lumbar muscle size and locations from
CT scans of 96 women of age 40 to 63 years.
Clinical Biomech, 1990; 5(1):9-16.
Anderson, C.K.; "A Biomechanical Model of the
Lumbosacral Joint for Lifting Activities." Ph.D.
Thesis; Department of Industrial and Operations
Engineering, The University of Michigan, 1983.
Clarke, H. H., Muscle Strength and Endurance in
Man, Prentice-Hall, Englewood Cliffs, 1966, pp
39-51.
Bazergui, A.; Lamy, CX.; and Farfan, H.F.
"Mechanical Properties of the Lumbodorsal Fascia." Paper no. IA-08 Proceedings of the 1978
Society for Experimental Stress Analysis Meeting, Wichita, KS; 1978
Bean J. C., Chaffin D. B., Schultz A. B., Biomechanical model calculation of muscle contraction forces: A double linear p r o g r a m m i n g
method. J Biomech, 1988; 21: 59-66
Beck, D. J., An Evaluation of Inverse Kinematics
Models for Posture Prediction, CAES ’92, Tampere, Finland, 1992.
Burgraaff, J. D., An Isometric Biomechanical
Model for Sagittal Plane Leg Extension, Unpublished MS Thesis (Industrial Engineering), University of Michigan, Ann Arbor, 1972.
Chaffin, D. B., Biomechanical Modeling for Simulation of 3D Static Human Exertions, Computer
Applications in Ergonomics, Occupational
Safety and Health, Elsevier Publishers, B.V.,
1992.
Chaffin, D. B., Andersson, G. B. J., and Martin, B.
J., Occupational Biomechanics (3rd edition).
John Wiley & Sons, New York, 1999.
Farfan, H.F.; Mechanical Disorders of the Low
Back; Lea and Febiger, Philidelphia, 1973.
Holbein, M. A., Chaffin, D. B., Stability Limits In
Extreme Postures: Effects of Load Positioning,
Foot Placement, and Strength. Human Factors,
1997; 39(3): 456-468.
Kerk, C. J., Chaffin, D. B., Keyserling, W. M., Stability as a constraint in sagittal plane human
force exertion modeling. Occupational Ergonomics, 1998; 1(1):23-39.
Kerk, C. J., Chaffin, D. B., Page, G. B., Hughes, R.
E., A comprehensive biomechanical model using strength, stability, and COF constraints to
predict hand force exertion capability under sagittally symmetric static conditions. IIE Transactions, 1994; 26(3):57-67.
Kishino, et al., Quantification of Lumbar Function:
Part 4. Spine, 1985; 10(10):921-927.
Kumar, S., Moment arms of spinal musculature determined from CT scans. Clinical Biomech,
1988; 3:137-44.
Kumar, S., Chaffin, D. B., and Redfern, M., Isometric and Isokinetic Back and Arm Lifting
Copyright 2005: The Regents of The University of Michigan, ALL RIGHTS RESERVED
Page 76
3D Static Strength Prediction Program Version 5.0
Strengths: Device and Measurement. J Biomechanics, 1988; 21(1):35-44.
Mayer, et al., Quantification of Lumbar Function:
Part 2 and Part 3. Spine, 1985; 10(8):765-772
and 10(10):912-920.
McGill, S. M. and Norman, R. W., Partitioning of
the L4/L5 dynamic moment into disc, ligamentous, and muscular components during lifting.
Spine, 1986; 11: 666-78.
McGill, S. M. and Norman, R. W., Effects of an
anatomically detailed erector spinae model of
L4/L5 disc compression and shear.
J
Biomech, 1987; 20: 591-600.
McGill, S. M., Patt, N., Norman, R. W., Measurement of the trunk musculature of active males
using CT scan radiography: implications for
force and moment generating capacity about the
L4/L5 joint. J Biomech, 1988; 21: 329-41.
Shanne, T. A., A Three-Dimensional Hand Force
Capability Model for the Seated Operator, Unpublished Ph.D. Thesis (Industrial Engineering),
University of Michigan, Ann Arbor, 1972.
Smith and Mayer, Quantification of Lumbar Function: Part 1. Spine, 1985; 10(8):757-764.
Stobbe, T., The Development of a Practical
Strength Testing Program for Industry, Unpublished Ph.D. Thesis (Industrial
Engineering), University of Michigan, Ann Arbor, 1980.
Tracy, et.al., The geometry of the muscles of the
lumbar spine determined by magnetic resonance
imaging. Spine, 1989; 14: 186-93.
Waters, T. R., Putz-Anderson, V., Garg, A., and
Fine, L. J., Revised NIOSH Equation for the
Design and Evaluation of Manual Lifting Tasks.
Ergonomics, 1993; 36 (7): 749 -776.
National Institute for Occupational Safety and
Health, Work Practices Guide for Manual Lifting, Technical Report No. 81-122, U.S. Dept. of
Health and Human Services (NIOSH), Cincinnati, Ohio, 1981.
Nemeth, G. and Ohlsen, H., Moment arm lengths of
trunk muscles to the lumbosacral joint obtained
in vivo with computed tomography. Spine,
1986; 11: 158-60.
Parkinson, M.B., Chaffin, D.B., and Reed, M.P.,
Center of pressure excursion capability in performance of seated lateral-reaching tasks. Submitted for publication in Clinical Biomechanics
Reid, J. G., Costigan, P. A., and Comrie, W., Prediction of trunk muscle areas and moment arms
by use of anthropometric measures. Spine,
1987; 12: 273-5.
Rohmert, W., Problems of determination of rest
allowances, Part 2: Determining rest allowances
in different human tasks. Applied Ergonomics,
1973, 4:158-162.
Copyright 2005: The Regents of The University of Michigan, ALL RIGHTS RESERVED
3D Static Strength Prediction Program Version 5.0
Page 77
Index
2D/3D Mode, 24
3-View
Menu commands; see Menus
Windows; see Windows, 3-View
3D low-back; see Disc compression force
Abdominal force, 2, 3, 59
About menu; see Menus
Action Limit; see NIOSH limits
Active window; see Windows
Adjusting posture
Body segment angles; see Body segment angles
Direct manipulation, 11-13
Analyses; see Reports
Analysis summary report; see Reports
Analyst name (task description), 23
Ankle
Included angle, 68
Anthropometry, 25
Center of mass, 62
Dialog box (data entry), 25-26
Gender, 26
Height, 26
Link lengths, 61
Link weights, 61
Percentiles, 26
Report, 61
Weight, 26
Asymmetric lifting, 58
Axial rotation; see Body segment angles
Azimuth; see Environment objects
B/W; see Human figure
Back compression force; see Disc compression
force
Back compression design limit; see NIOSH limits
Back compression upper limit; see NIOSH limits
Background; see Color
Balance, 62-64
Center of Pressure, 62
Barrier; see Environment objects
Body segment angles, 27-33
Angle descriptions, 29-33
Dialog box, 27, 28
Entering values, 27, 28
Forearm angles
Horizontal, 31
Vertical, 30
Increment, 28
Lower leg angle, 29
Neutral, 28, 29
Reported; see Reports, Task input summary
Symmetry, 28
Trunk angles
Axial rotation, 32
Calculated (torso), 68
Direct manipulation, 11-13
Flexion, 31
Lateral bending, 32
Upper arm angles
Horizontal, 30
Vertical, 30
Upper leg vertical angle, 29
Copyright 2005: The Regents of The University of Michigan, ALL RIGHTS RESERVED
Page 78
3D Static Strength Prediction Program Version 5.0
Camera, 50-51
Distance, 50
Focal length, 50
Rotation, 51
Vertical tilt, 50
Center for Ergonomics, 1
Center of gravity; see Balance
Center of mass; see Anthropometry
Clipboard; see Printing, Using Window’s clipboard
Coefficient of ground friction, 57
Color
Background, 51
Environment, 48
Human figure, 48
Comments (task description), 23
Compression force; see Disc compression force
Coordinate system, 66
Coronal plane, 69
Cube; see Environment object, Handheld object
Cylinder; see Environment object, Handheld object
Barrier, 49-50
Color, 50
Floor, 49
Handheld object, 49
Erector spinae muscle, 2, 59
Error reporting, 5
Exit, 21
Export output summary, 71-72
File format, 72
Feet, 11, 24-25
Center of feet, 66
Ground friction, 57
Load on feet, 57
Shoes, 48
Splay angle, 25
Support, 25
File
Menu; see Menus
Name, 17
New, 18
Open, 18
Save, 18
Save as, 18
Flesh; see Render or Human figure, Model type
Floor; see Environment objects
Focal length; see Camera
Force at hands; see Hand loads
Forearm angles; see Body segment angles
Front view; see Windows, 3-View
Frontal plane, 69
Description (task description), 23
Direct manipulation; see Posture entry methods
Disc compression force
Analysis summary report, 55
3D low-back report, 58
L4/L5 disc, 3-4, 58
L5/S1 disc, 2-3, 59, 70
L5/S1 report, 59
NIOSH guidelines, 58
Sagittal plane low-back, 59
Optimization algorithm, 3, 58
Display menu; see Menus
Distance; see Camera or Environment objects, Barrier
Gender; see Anthropometry
Graphic human model; see Human figure
Elbow, 13
Included angle, see Posture Report
Elevation; see Environment objects, Barrier
Environment objects, 48-50
Hand forces; see Hand loads
Handheld object; see Environment objects
Hand loads
Arrow display, 45
Copyright 2005: The Regents of The University of Michigan, ALL RIGHTS RESERVED
3D Static Strength Prediction Program Version 5.0
Arrow colors, 45
Dialog box, 36, 38
Descriptor, 35
Force vectors, 36-37
Magnitude, 35, 36
Reported; see Reports, Task input summary
Vector components, 37
Hand locations
Direct manipulation, 13
Measurement, 33-34
Reported; see Reports, Analysis summary or
Task input summary
Status window, 15
Hand orientation, 33
Hand position; see Hand locations
Hand type;
see Human figure
see Report header
Height, see Anthropometry
Anthropometry (stature), 22
Environment, 51
Report header, 57
Hips
Included angle, see Posture Report
Direct manipulation,12
Hominoid; see Human figure
Horizontal plane, 29, 69
Human figure, 48
Color, 48
Model (figure) types, 48
Hand type, 48
Lighting, 52
Humeral rotation angle; see Shoulder
Importing files; see File, Import
Included joint angles, 68
Increment; see Body segment angles
Inverse kinematics, 1
See Posture entry method
Page 79
Joint angles; see Body segment angles or Included
joint angles
Joint location report; see Reports
Joint moments report; see Reports
Knee
Adjust by moving hips, 12
Included angle, see Posture Report
L2/L3 - L4/L5 forces and moments, 69
L4/L5 disc, 3
L5/S1 disc; see Disc compression force
Definition, 2
Forces and moments, 69
Ligament strain, see Ligament strain
Location, 66
Reported, 58
Lateral bending; see Body segment angles
Length of barrier; see Environment objects, Barrier
Ligament strain (L5/S1), 60
Lighting (graphic display), 52
Link lengths; see Anthropometry
Link weights; see Anthropometry
Locking mode, 34
Lower arm angle; see Body segment angles
Lower leg angle; see Body segment angles
Lumbar rotated coordinate system, 69
Lumbodorsal fascia, 59
Maximum permissible limit (MPL); see NIOSH
limits
Mean strength, 60
Menus (pull-down), 10
Model type; see Human figure
Moments, 67
New features, 4
NIOSH limits
Action limit (AL), 56
Disc compression guidelines, 56
Copyright 2005: The Regents of The University of Michigan, ALL RIGHTS RESERVED
Page 80
3D Static Strength Prediction Program Version 5.0
Strength guidelines, 56
Guidelines, 56
Maximum permissible limit (MPL), 56
Quitting program, 21
Oblique view, 14
Menu; see Menus
Occupational Biomechanics, 4
Opening files; see File, Open
Orthogonal view; see 3-View
Output summary, see Reports, Analysis summary or
see Windows, Result status
Rectus abdominus muscle, 2, 58-59
Reports, 15, 53
Header information, 58
Printing, 19
Printing multiple reports, 71
Units, 24
see also Exporting output summary
Resultant load moment, 67
Rotation; see Camera
Pelvic rotation
Adjustment, 24-25
Reported, 68
Percent capable; see Strength percent capable
Percentiles; see Anthropometry
Population strength, 61
Posture report; see Reports
Posture entry methods
Body segment angle, 27
Direct manipulation, 11
Posture prediction, 33
Preferred order, 11
Inverse kinematics, 33
Undo, 35
see also Body segment angles
Posture prediction; see Posture entry methods
Printer, 19
Printing
Active window, 19
Application, 20
Desktop, 20
Preview, 19
Reports, 19, 53
Setup, 19
Using Window’s clipboard, 21
Prone; see Hand orientation
Pushing/pulling tasks, 35-38
Sagittal plane, 69
Low-back report, 59
Saving data; see Files
Seat; see Support Selection
Segment locking; see Locking mode
Semiprone; see Hand orientation
Shaded; see Render
Shear forces, 2-4, 58-59
Shoulder, 27
Included angles, see Posture Report
Location, see Location Report
Side view; see Windows, 3-View
Skeleton; see Human figure, Model type
Slips and falls; see Coefficient of ground friction
Software errors, 5
Sphere; see Environment objects, Handheld object
Stick figure; see Human figure, Model types
Strength
Data base, 60
Design limit, 56
Direction vectors, 70
Model, 4
Limits; see NIOSH limits
Reported; see Reports, Strength capability
see also Strength percent capable
Strength percent capable, 60
Copyright 2005: The Regents of The University of Michigan, ALL RIGHTS RESERVED
3D Static Strength Prediction Program Version 5.0
Analysis summary report, 56
Concept, 60
Limits; see NIOSH limits
Strength report; see Reports, Strength capability
Superimposed; see Human figure, Model types
Supine; see Hand orientation
Support Selection, 24
Feet, 25
Seat type, 25
Seated mode, 25
Standing mode, 25
Symmetry; see Body segment angle
Page 81
Wall; see Environment objects, Barrier
Weight; see Anthropometry
Width; see Environment objects, Barrier or Handheld objects
Zoom; see Print preview
Table; see Environment objects, Barrier
Task-Input menu; see Menus
Task input summary, see Reports
Task name (task description), 23
Thickness; see Environment objects, Barrier
Tile now, 43
Tiling, 43
Title bars; see Windows
Top view; see Windows, 3-View
Torso angles; see Body segment angles or Posture
report
Transparent; see Render
Trunk angles; see Body segment angles
Type; see Environment objects, Barrier or Handheld objects
Typefaces, 6
Undo posture, 35
Units (English/metric), 24
Unlocking body segments; see Locking mode
Upper arm angles; see Body segment angles
Upper leg angle; see Body segment angles
Vectors (force); see Hand loads
Vertical tilt; see Camera
Copyright 2005: The Regents of The University of Michigan, ALL RIGHTS RESERVED