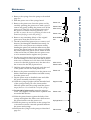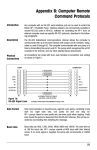
1
402 Syringe Pump Users Guide 402 Syringe Pump User’s Guide LT801239/G - ©2003 Gilson SAS All rights reserved July 2003 Contents Table of Contents 0 Safety 1 Introduction Notational Conventions ............................................................... 1-2 Description ..................................................................................... 1-3 Unpacking ...................................................................................... 1-4 Warranty ......................................................................................... 1-5 Customer Service .......................................................................... 1-6 2 Description General Description ...................................................................... 2-2 Valve .......................................................................................... 2-3 Tee Junction .............................................................................. 2-3 Syringes ..................................................................................... 2-3 Operational Description .............................................................. 2-4 Single Syringe Configuration ................................................ 2-4 Dual Syringe and Tee Junction Configuration .................. 2-4 Dual Syringe and Dual Valve Configuration .................... 2-7 3 Installation Installing the Syringes .................................................................. 3-2 Assembling the Syringe and Piston ..................................... 3-2 Mounting the Syringe on the Valve or Tee Junction ........ 3-2 Electrical Assembly ...................................................................... 3-4 Sector Block .............................................................................. 3-4 Operating Voltage Range ...................................................... 3-4 Installing the Fuses ................................................................. 3-4 Connceting the Power Cord .................................................. 3-5 GSIOC Connector .................................................................... 3-5 Setting the Microswitches ...................................................... 3-5 Hydraulic Connections ................................................................ 3-9 Single Valve and Dual Valve Configuration ..................... 3-9 Valve and T Configuration ............................................... 3-10 4 Upgrading to a Dual Syringe Configuration Installing the Tee Junction Module ........................................... 4-2 Connecting the Flat Cable ..................................................... 4-3 Inserting the Module .............................................................. 4-3 Installing the Syringe and Valve Module ................................ 4-5 Connecting the Flat Cable ..................................................... 4-5 Inserting the Module .............................................................. 4-5 Removing the Syringe and Tee Junction Module ................... 4-6 Table of Contents-1 5 Maintenance Cleaning the Exterior of the Instrument ................................... 5-2 Autoclaving .................................................................................... 5-3 Autoclaving the Tubing ......................................................... 5-3 Cleaning the Valve ....................................................................... 5-4 Dismounting the Valve .......................................................... 5-4 Disassembling the Valve ........................................................ 5-4 Cleaning the Tee Junction ........................................................... 5-5 Cleaning the Syringe Assembly ................................................. 5-6 Cleaning the Syringe Piston Assembly ..................................... 5-7 Changing the Piston Syringes and piston Noses .................... 5-8 Changing the 100 µl and 250 µl Piston Noses.................... 5-8 Changing the 500 µl Piston Noses ..................................... 5-10 Changing the 1 ml Piston Noses ........................................ 5-11 Changing the 25 ml Piston Noses ...................................... 5-12 Changing the 5 ml and 10 ml Piston Noses ..................... 5-12 6 Troubleshooting Mechanical Problems ................................................................... 6-2 Hydraulic Problems ..................................................................... 6-3 Electrical Problems ....................................................................... 6-4 Appendices A - Parts and Accessories Lists.............................. Appendix A-1 402 Single Syringe and Valve Config. ............ Appendix A-2 402 Dual Syringe with Tee Junction Config. . Appendix A-3 402 Dual Syringe with Dual Valve Config. ... Appendix A-4 Additional Accessories ..................................... Appendix A-5 Spare Parts ........................................................... Appendix A-6 B - GSIOC ................................................................... Appendix B-1 402 Mode - Immediate Commands ................. Appendix B-2 402 Mode - Buffered Commands ..................... Appendix B-4 401B Emulation Mode - Immediate CommandsAppendix B-8 401B Emulation Mode - Buffered Commands .. Appendix B-9 C - Technical Data ..................................................... Appendix C-1 Hydraulics ............................................................ Appendix C-2 Mechanics ............................................................. Appendix C-5 Electrical ................................................................Appendix C-6 Environmental Conditions ................................ Appendix C-7 Index Table of Contents-2 0 Safety Safety Read this section carefully before installing and operating the instrument. For safe and correct use of the instrument, it is essential that both operating and service personnel follow generally accepted safety procedures as well as the safety instructions given in this document, the 402 Syringe Pump Users Guide. The instrument described in this document is a syringe pump unit for transferring liquids. It should only be used in the laboratory or similar indoor environment by qualified personnel. If an instrument is used in a manner not specified by Gilson, the protection provided by the instrument may be impaired. Voltages present inside the instrument are potentially dangerous. If there is a problem with the instrument, the power cable should be removed until qualified service personnel have repaired it. This is to prevent anyone from inadvertently using the instrument, thus causing possible harm to themselves, or damage to the instrument itself. The leakage current of this instrument is within the limits allowed by international safety standards for laboratory equipment. An efficient ground connection is imperative for the physical protection of the user. Power supply cord reference 7080316106 is for use in France and Germany. Power supply cord reference 7080316105 is for use in USA and Canada. For other countries contact your local Gilson distributor. You must only use the type of fuse described in this document: 1.0 Amp type T slow blow. Adequate protection including clothing and ventilation must be provided if dangerous liquids are used in the analytical work. In case of incidental spillage, carefully wipe with a dry cloth, taking into account the nature of the spilled liquid and the necessary safety precautions. Cleaning, dismantling, maintenance, adjustment and repair should only be performed by personnel trained in such work, and who are aware of the possible dangers involved. These instruments must not be sterilized, using an autoclave, or any other mechanical device. Safety-1 Safety When you need to clean an instrument, use one of the three following methods: 1 - a clean dry cloth, 2 - a cloth dampened with water, 3 - a cloth dampened with soapy water. If a cloth dampened with soapy water is used to clean the instrument, only domestic soap may be used. No other form of detergent or chemical may be used. Symbol Explanation ~ Alternating current PROTECTIVE CONDUCTOR TERMINAL I On (Supply switch) O Off (Supply switch) Caution, risk of electric shock ! Safety-2 Caution (refer to User’s Guide) These electronic and hazard symbols appear on the 402 Syringe Pump: Introduction 1 The following chapter describes the instrument and the service and warranty conditions. 1-1 1 Notational Conventions Introduction Notational Conventions Typographical conventions used in this Users Guide for software options are as follows. Key touches and on-screen messages are as follows: Gilson Keypad controlled systems: For any soft-key option that must be pressed, the function is represented in bold, for example: Press the Prime soft-key to prime the pump. Keystrokes relating to specific keys on the Gilson Keypad are represented in bold capitals, for example: key in the value and press ENTER where ENTER is the Enter key on the keypad. or press the STOP key to stop a run where STOP is the Stop key on the keypad. On-screen messages are represented as normal typeface inside a frame representing the keypad display. For PC controlled systems, refer to the relevant software Users Guide. Options are usually displayed as screen capture images incorporated in the guide. Key functions are normally represented in the body text in bold. When the pump is used with version A samplers, refer to the programming section of the Users Guide. Symbols representing the function keys on the Version A keypad are incorporated in the Users Guide. 1-2 1 Introduction Refer to Appendix A for the standard equipment, additional accessories and spare parts lists. The 402 Syringe Pump is a low pressure syringe pump for transferring liquids. There are three standard configurations, for a wide range of applications. The three configurations are: * Syringes are not included. Order the size of syringe/s appropriate to your method (volume, accuracy and flow rate requirements). Refer to the syringe data table in Appendix D for more information about the syringes. Description Description (a) • Single syringe and single valve* (a). • Dual syringe with Tee junction* (b). • Dual syringe and dual valve* (c). The flow path materials inside the valve are ceramic and PEEK. The flow path material inside the Tee junction is PEEK. For further technical information relating to the valve and Tee junction, including dead volumes, refer to Appendix D, Technical Data. The 402 Syringe Pump is supplied with a tubing kit for connecting to a solvent reservoir. (b) There are two kits available for upgrading a single syringe 402 to the two configurations shown in (b) and (c): • Tee junction kit (without syringe). Refer to Appendix A for references. • Valve kit (without syringe). Refer to Appendix A for references. A description of how the three configurations can be used is given in Chapter 2. The configuration you use depends on your application, however, the configuration must be compatible with the version software you are using. (c) 1-3 1 Unpacking Introduction Unpacking The 402 Syringe Pump is shipped in a single box with its various accessories. The original box and packing assembly should be kept in case the equipment has to be returned to the distributor. All parts contained in the box must be checked off against the packing list supplied. Do this now, even if the product is not to be used immediately. The supplier should be notified immediately of any inconsistencies between the contents of the shipping box and the packing list or of any damage to parts. When unpacking the instrument: - Remove the standard accessories carton from the shipping box. - Remove and open the carton containing the instruments standard accessories. - Slide the instrument and packing assembly out of the shipping box. - Remove the packing assembly. 1-4 Introduction If the instrument does not appear to function correctly, first verify the electrical connections are correct and that the instrument is switched ON. Contact your Gilson distributor for technical advice or an eventual service visit. Any service required will be given within the warranty conditions assured by your Gilson distributor. Warranty Warranty 1 1-5 1 Customer Service Introduction Customer Service Gilson and its worldwide network of authorized representatives provide you with four types of assistance: sales, technical, applications and service. Customer Service personnel are able to serve you more efficiently if you provide the following information: 1) The serial number and model number of the equipment involved. 2) Computer model (if used), available memory, microprocessor and operating software version(s) in operation. 3) The installation procedure you used. 4) A concise list of the symptoms. 5) A list of operating procedures and conditions you were using when the problem arose. 6) A list of other devices connected to the system and a system diagram showing the connections. 7) A list of other electrical connections in the room. 1-6 Description 2 The following chapter describes the mechanics and hydraulics of the pumps. 2-1 2 General Description Description General Description The 402 Syringe Pump is available in three versions: Single syringe and valve, dual syringe with one valve and a Tee junction, and dual syringe with dual valve. The front panel of the instrument contains a syringe pump unit with three-port, two-position valve on the left, and one of three possible units on the right: a blanking plate, a syringe and Tee junction module, or another syringe and valve module. The rear panel of the unit contains the microswitches, the GSIOC connector and the sector block (power socket with ON/OFF switch and voltage selector/ fuse holder). The main module (single syringe and valve or dual syringe and Tee junction) is a liquid transfer station, designed to optimize sample transfer and sample injection applications. It can be used to deliver up to 25 ml at one stroke, and down to 1 µl (typical value) with high accuracy (refer to Appendix C for Technical Data). It consists of two motors, one that operates the syringe piston to aspirate and dispense, and a second motor that controls the switching valve. The module equipped with two syringes and a Tee junction may be fitted with two syringes of different volumes. The left syringe is the large volume syringe and is used to deliver a large volume of liquid in a minimum time. The right syringe can be used to transfer smaller volumes with high reproducibility and accuracy (refer to Appendix C for Technical data). The benefits of this configuration are: a large dilution ratio (10-4) with the best reproducibility, and fast transfer times. The module equipped with two syringes and two valves offers two liquid transfer stations in one unit. In addition to saving space, the single housing also represents an economic advantage. 2-2 2 Description From reservoir The valve is a three-port, two-position valve. It switches the syringe port to either the pump reservoir or the sampler needle. The angle between adjacent ports is 120°. The liquid contact surfaces are in PEEK and ceramic. The dead volume of the valve is 123 µl. More information is available in the Technical Data section in Appendix C. Transfer tubing to needle To waste Syringe General Description Valve Tee Junction The Tee junction is a single piece and has no moving parts. There are three ports on the Tee junction: the inlet from the left valve, the outlet to the needle, and the syringe port. Liquid contact surfaces are in PEEK. The dead volume of the Tee junction is 51 µl. From reservoir Transfer tubing to needle Syringes There are seven syringe sizes available for the 402. All the syringe sizes can be used in normal mode, but when the instrument is used in 401 emulation mode, only the volumes originally available to version A instruments can be used. The available syringe sizes are: Part Number Description 25025341 0.1 ml (not for 401 emulation mode) 25025342 25025347 0.25 ml (not for 401 emulation mode) 0.5 ml 25025343 25025344 1 ml 5 ml 25025345 25025343 10 ml 25 ml (not for 401 emulation mode) Syringe 1 ml 0.5 ml 0.25 ml 0.1 ml 5 ml 10 ml 25 ml 2-3 2 Operational Description Description Operational Description Single Syringe Configuration It is impossible to dispense to the reservoir. The instrument has a single syringe and valve on the left, and a blanking plate on the right. It can be used to aspirate from the reservoir or from the needle, depending on the position of the valve. The instrument only dispenses to the needle. (a) Aspirating from reservoir (b) Aspirating from needle From reservoir (c) Dispensing From needle Piston descends to aspirate Piston descends to aspirate To needle Piston rises to aspirate When aspirating from the needle, it is important to take into account the volume of transfer tubing connecting the pump outlet to the needle. The liquid aspirated from the needle must never enter the valve. The maximum volume of liquid that can be aspirated from the needle is limited to the volume of the syringe, or the volume of the transfer tubing, whichever is the smaller. Dual Syringe and Tee Junction Configuration This configuration only works with the following software versions (or higher): 709, 719 V1.10, 720 and 721 (from V2.0), 735. The instrument should be configured with a large syringe on the left (mounted on the valve) and a small syringe, or equal volume, on the right (mounted on the Tee junction). This allows large volumes to be dispensed quickly from the left syringe, or smaller sample volumes to be dispensed with a high degree of accuracy from the right syringe. 2-4 2 Description It is impossible to dispense to the reservoir with either syringe. When using the Syringe Pump in primitive mode (GSIOC commands, Appendix B), it is possible to simultaneously aspirate diluent with the left syringe and a sample liquid with the right syringe. Use the buffered A command stating aspirate with both syringes, or aspirate sequentially (two buffered A commands). However, the dispensing of these liquids is performed sequentially (sample first, then diluent). This can be set using the buffered T commandtimely start. See Appendix B for details. When aspirating from the needle, it is important to take into account the volume of transfer tubing connecting the pump outlet to the needle. The liquid aspirated from the needle must never enter the valve or either of the syringes. The maximum volume of liquid that can be aspirated from the needle is limited to either the volume of the syringe that is used to aspirate, or the volume of the transfer tubing, whichever is the smaller. The left syringe can aspirate from the reservoir or the needle. It can only dispense to the needle. The right syringe can only directly aspirate from and dispense to the needle. Aspirating from the Reservoir (Left Syringe only) It is impossible to aspirate from the reservoir with the right syringe. Operational Description In general, the left syringe is used for dispensing diluent or for transferring sample liquids when the sample volume to be transferred is greater than the volume of the right syringe (for volume limitations, see the opposite note). From reservoir The valve switches to connect the left syringe to the reservoir. The piston of the right syringe remains in the top position. The left syringe descends to aspirate the programmed volume of diluent. Left piston descends to aspirate Left Syringe Dispensing To tee Right piston remains at upper position To needle The valve switches to connect the left syringe to the Tee and needle. The piston of the right syringe remains in the top position to prevent liquid from entering the syringe. The left syringe raises to dispense the programmed volume of diluent. Left piston rises to dispense Right piston remains at upper position 2-5 2 Operational Description Description From tee From needle Aspirating Large Liquid Volumes from the Needle The valve switches to connect the left syringe to the Tee and needle. The piston of the right syringe remains in the top position to prevent liquid from entering the syringe. Left piston descends to aspirate Right piston remains at upper position Valve switched to reservoir From needle The left syringe descends to aspirate the programmed volume of sample liquid. Aspirating Small Volumes from the Needle The valve switches to connect the left syringe to the reservoir, thus disconnecting the left syringe from the right syringe. The piston of the left syringe remains in the top position. Left piston remains inactive Right piston descends to aspirate Valve switched to reservoir To needle The right syringe descends to aspirate the programmed volume of sample. Right Syringe Dispensing to the Needle The valve remains switched to connect the left syringe to the reservoir, thus disconnecting the left syringe from the right syringe. The piston of the left syringe remains in the top position. Left piston remains inactive Right piston rises to dispense The right syringe raises to dispense the programmed volume of sample. Special Feature - Continuous Dispense Mode From reservoir (a) Left piston descends to aspirate 2-6 Right piston remains at upper position It is possible to pump in continuous flow mode when pumping large volumes from the pump reservoir. In this case, the right syringe is used in conjunction with the left syringe to ensure a constant flow pumping action from the reservoir. The necessary conditions (ratio of left syringe volume to right syringe volume) for continuous flow mode are explained in your software User's Guide. The procedure is as follows: The left syringe aspirates from the reservoir (a). 2 Description • When the left syringe is empty, the valve switches to the reservoir and the left syringe aspirates from the reservoir while the right syringe continues the dispense action (c). The two syringes work in this manner until the programmed volume has been dispensed. The action is only continuous if the aspirate rate of the left syringe is fast enough to fill the syringe before the right syringe has finished dispensing. There is however, a small period where both syringes are at rest while the valve switches. Dual Syringe and Dual Valve Configuration This configuration has a second syringe and valve module installed on the right. To needle (b) Left piston rises to dispense From reservoir Right piston aspirates half of the solvent To needle Operational Description To tee • As the left syringe dispenses to the needle, the right syringe aspirates some of the diluent being pumped (b). (c) Left piston empy, starts to aspirate Right piston dispenses solvent It can be controlled by 735 software and 719 V 2.0 software. The second module functions in the same way as the left module. The module has two motors, one for the syringe and one for the valve, and two motor control-boards. In this configuration, the 402 can be used as a true dual pump to aspirate from different reservoirs. This can be used with a sample preparation system where two diluents are used, or with ASTED where the use of the dialysis block and trace enrichment cartridge requires the use of two (independent) pumps. The second syringe and valve module functions in the same way as the single pump 402, described page 2-4. 2-7 Description 2-8 2 Installation 3 This chapter explains how to install the fuses, syringes and hydraulics, and how to set the rear panel microswitches according to your system requirements. 3-1 3 Installing the Syringes Installation Installing the Syringes Outlet Inlet Valve Waste Syringe The three configurations of 402 are supplied without the syringes. Order and install the syringe(s) relevant to your application. It is possible to upgrade a single syringe and valve 402 to either a dual syringe with Tee, or a dual syringe and dual valve configuration. Two kits are available, one consisting of a syringe and Tee module, and the other consisting of a syringe and valve module. Refer to Chapter 4. The dual syringe with Tee junction configuration can similarly be upgraded to a dual syringe and dual valve module. The Tee junction module must be removed and replaced by a syringe and valve module. Assembling the Syringe and Piston Piston operating rod The syringe and piston are supplied assembled. If you remove the syringe from the piston, ensure that the piston and the piston nose are free from dust or contamination before introducing the piston into the syringe. Wet the piston nose (water will suffice) before inserting the piston in the syringe. Insert the piston nose in the syringe body and push the piston into the syringe. Mount the syringe on the valve or Tee junction. Mounting the Syringe on the Valve or Tee Junction Cover seal Valve screw The 100 µl, 250 µl and 500 µl syringes are supplied with a cover seal to ensure an airtight fit between the syringe and the valve or Tee. Refer to the opposite figure for the correct orientation of the cover seal. Syringe body Before mounting one of the smaller syringes (100 µl, 250 µl, 500 µl, and 1 ml), manually prime it. Place its open end in the pump reservoir and use the piston to aspirate the liquid. This manual prime is not necessary for the 5 ml, 10 ml and 25 ml syringes. Ensure that the piston operating rod is not in the uppermost position. For Gilson software there is a change syringe function that lowers the piston operating rod. 3-2 3 Installation Installing the Syringes This allows you to dismount and mount the syringe and valve/Tee assembly without damaging the syringe. Refer to your software Users Guide for the precise sequence. Lower the piston operating rod using the change syringe function. Remove the valve or Tee from the front panel by undoing the two securing screws. Tightly screw the syringe into the valve or Tee. Do not overtighten the syringe. Install the assembly on the Syringe Pump. When installing a valve and syringe assembly, ensure that you align the valve axle with the recess in the valve motor. Secure the valve/Tee using the two screws mounting screws. Move the piston so that it comes into contact with the piston operating rod. Align the threaded recess on the piston button with the screw on the piston operating rod. Tighten the piston holding screw. Quit the program for changing the piston. Reinitialize the Syringe Pump by switching it OFF, then ON. If you change the syringe size, dont forget to change the declared syringe volume in your softwares system configuration. 3-3 3 Installation Electrical Assembly Electrical Assembly The rear panel of the 402 pump houses: • One sector block containing the power socket, fuse drawer and ON/OFF switch. • One GSIOC connector for connecting to the master device. Sector Block The sector block contains the power socket, fuse holder and ON/OFF switch. The instrument can be connected to a 100-120 V supply or a 220-240 V supply. Whether operating from a 100-120 V supply or a 220-240 V supply, two 1.0 Amp type “T” slow blow fuses (5 x 20 mm) must be installed. Operating Voltage Range The instrument has no physical voltage selector. The instrument can be connected to 100 or 240 V. Power control is carried out electronically on the power supply board. Installing the Fuses ON/OFF switch Fuse holder For safety reasons, the 402 Syringe Pump is delivered without the fuses installed. You must install the correct value and type fuses (supplied) on installation (1.0 Amp type “T” slow blow). To install the fuses: 1) The power lead must be disconnected from the instrument. 2) Use a small screwdriver to pry open the fuse holder drawer and slide it out from the power receptacle. The drawer hinges downwards to allow access to the fuse receptacle. 3) Push the fuses into position. 4) Push the fuse holder back into position in the sector block. 3-4 3 Installation Electrical Assembly Connecting the Power Cord Make sure that the ON/OFF switch is in the OFF (down) position. Connect the power cord to the power socket at the rear of the instrument and then to the power supply source. When the ON/OFF switch is put to the ON position, the instrument initializes; the valve motor rotates the spindle and stops with the valve set to the outlet position. The piston motor rises the piston to the upper position. GSIOC Connector The 402 Syringe Pump is a slave device and must be connected to the controlling instrument/system via the rear panel GSIOC connector. The GSIOC connector is used for coordination with other Gilson or non-Gilson devices; either directly to a sampler using GSIOC cable, or to a PC via a Gilson 605 or 506 interface. Setting the Microswitches 8 7 6 5 4 3 2 1 The eight microswitches on the rear panel of the Syringe Pump are used to set the instrument identification (ID) number, the baud rate, 401 emulation mode and to set the clock source. The microswitches are numbered 1 to 8. Switch 1 is at the bottom, switch 8 is at the top. The three main configurations that the pump will be used in are: Standard 402 Setting The 402 is factory set for control by a Controller software that has the 402 Syringe Pump among the slave devices that it controls. The factory setting for the microswitches on the 402 is shown opposite. Factory settings for use with a Sampler Controller that controls the 402. ID 8 7 6 5 4 3 2 1 3-5 3 Electrical Assembly Installation 401 Emulation Setting - Not for use with Version A Instruments ID 8 7 6 5 4 3 2 1 If you are using a version of Gilson controller software that does not allow control of the 402 Syringe Pump, you must set the microswitches so that the pump operates in 401 emulation mode. The pump will respond to 401 Dilutor commands. Set the microswitches as shown below (ID = 0 in this example). You can set an ID number between 0 and 15 if you wish, but no higher than 15. Setting for use in 401 emulation mode, with a Sampler Controller that does not control the 402. 401 Emulation Setting - For use with Version A Instruments or non-Gilson Controller ID 8 7 6 5 4 3 2 1 When the pump is to be controlled by Version A instruments or non-Gilson controller that does not allow control of the 402, you must set the microswitches so that the pump operates in 401 emulation mode. You cannot set the ID higher than 15. Only use switches 1 to 4 to set the ID. Setting for use in 401 emulation mode with a non-Gilson Sampler Controller that does not control the 402. GSIOC Identification Number Each instrument connected via GSIOC must have a different identification number (also known as the GSIOC address). The identification number is set using microswitches one to five. The identification number is factory set at 0. The (decimal) identification number varies according to sequence of switches 1 to 5 on the rear panel. The switches set the identification number in binary. When a switch is set to the left, it represents a value of 0. When a switch is set to the right, it represents a binary value that depends on the position of the switch in the sequence. - When the lowest switch (switch 1) is set to the right, it represents a value of 1. - When switch 2 is set to the right, it represents a value of 2. 3-6 3 Installation - When switch 4 is set to the right, it represents a value of 8. - When switch 5 is set to the right, it represents a value of 16. The actual identification number is calculated by adding the values of all these switch settings. Decimal Value 5 4 Switch Position 3 2 0 1 2 3 4 5 6 7 8 9 10 11 12 13 14 15 16 17 18 19 Left Left Left Left Left Left Left Left Left Left Left Left Left Left Left Left Right Right Right Right Left Left Left Left Left Left Left Left Right Right Right Right Right Right Right Right Left Left Left Left Left Left Left Left Right Right Right Right Left Left Left Left Right Right Right Right Left Left Left Left Left Left Right Right Left Left Right Right Left Left Right Right Left Left Right Right Left Left Right Right Left Right Left Right Left Right Left Right Left Right Left Right Left Right Left Right Left Right Left Right 20 21 22 23 24 25 26 27 28 29 30 31 Right Right Right Right Right Right Right Right Right Right Right Right Left Left Left Left Right Right Right Right Right Right Right Right Right Right Right Right Left Left Left Left Right Right Right Right Left Left Right Right Left Left Right Right Left Left Right Right Left Right Left Right Left Right Left Right Left Right Left Right Electrical Assembly - When switch 3 is set to the right, it represents a value of 4. 1 3-7 3 Electrical Assembly Installation Switch 6 Operating mode setting Left 401B emulation mode* Right Normal 402 mode * When using the 402 with Version A samplers, or with a Sampler Controller that does not control the 402, set switch 6 set to the left (401 emulation mode). There is a special set of GSIOC commands for using the instrument in this mode. Refer to the list of GSIOC commands in Appendix B. Operating Mode Microswitch 6 is used to set the operating mode. When the switch is set to the left, the instrument operates in 401 emulation mode. When the switch is set to the right, the operating mode is normal 402 mode. The default position is to the right. Bit Rate Selection Microswitch 7 is used to set the bit rate or baud rate. This is the speed at which data is transmitted between devices. Switch 7 setting Left Right Bit rate 19200 9600 The bit rate of each slave instrument (sampler, 402 etc.) must be the same as the master (controlling) device. The bit rate selection is only valid when the instrument is in internal clock mode. The default position is to the left, a bit rate of 19200. Clock Source Microswitch 8 is used to determine the clock control mode. Switch 8 setting Left Right 3-8 Clock source The two options are: switch set to left, internal clock control, switch set to right, external clock control. Internal clock External clock The default position is with the switch set to the right, external clock control. 3 Installation Single Valve and Dual Valve Configuration Inlet The inlet tubing connects the valve inlet to the solvent reservoir. One single length of inlet tubing is supplied with the 402 Syringe Pump module. An identical length of tubing is also provided with the second syringe and valve module. The reference for this tubing is given in the parts listing in Appendix A. This tubing is used to connect the inlet of each valve to a liquid reservoir. There is a PVDF union connector at one end of each length tubing and a 20 µm filter on the other end. From reservoir Transfer tubing to needle Hydraulic Connections Hydraulic Connections Valve To waste Syringe Screw the PVDF union connector into the left-hand (inlet) port of the valve (do the same for the second module, if installed), and put the end with the filter attached into the appropriate liquid reservoir. Waste Connect a suitable length of tubing from the waste outlet of the valve to a suitable receptacle. The valve releases liquid through the waste outlet if the pressure inside the valve is too high. For the pressure limits of the valve, refer to Appendix C, Technical Data. Outlet For the single syringe model, use transfer tubing to connect the valve outlet to the sampler needle. It connects between the outlet of the valve and the needle. This tubing is provided with your sampler. Gilson samplers are provided with different lengths of spiral transfer tubing. Install the appropriate length, according to the distance between your pump and the needle, taking into account the area that the needle will cover in its field of movement. For a dual valve configuration: Both outlets of the valves may be connected to a single needle via the Gilson low pressure valve. The outlet of each syringe valve is connected to an 3-9 3 Hydraulic Connections Installation inlet of the low pressure valve. The outlet of the low pressure valve connects to the needle. Valve and ‘T’ Configuration From valve outlet Transfer tubing to needle Tee Syringe Valve Inlet The inlet tubing connects the pump inlet to the solvent reservoir. One single length of inlet tubing is supplied with the 402 Syringe Pump. There is a PVDF union connector at one end of the tubing and a 20 µm filter on the other end. The reference for this tubing is given in the parts listing in Appendix A. Screw the PVDF union connector into the left-hand (inlet) port of the valve, and put the end with the filter attached into the appropriate liquid reservoir. Valve Waste Connect a suitable length of tubing from the waste outlet of the valve to a suitable receptacle. The valve releases liquid through the waste outlet if the pressure inside the valve is too high. For the pressure limits of the valve, refer to Appendix C. Connection Tubing The connection tubing connects from the valve outlet to the Tee junction inlet. It is supplied in two sizes: 0.8 mm diameter and 2.0 mm diameter. The references for these tubings are given in the parts listing in Appendix A. There is a PVDF union connector at each end of the tubing. Install the 0.8 mm diameter connection tubing if the inner diameter of the transfer tubing used is 0.8 mm or smaller. Install the 2.0 mm inner diameter connection tubing if the inner diameter of the transfer tubing used is greater than 0.8 mm. Tee Junction Outlet Transfer tubing connects from the Tee junction outlet to the sampler needle. Gilson samplers are provided with different lengths of spiral transfer tubing. Install the appropriate length, according to the distance between your pump and the needle, taking into account the area that the needle will cover in its field of movement. 3-10 Upgrading to a Dual Syringe Config. 4 This chapter explains how to add the extra module to upgrade your pump to a dual syringe pump. You can install a second module on the front panel so that your syringe pump has two syringes. The right hand module can be a Tee junction or a second valve, depending on the instruments and software you are using. 4-1 Installation the Tee Junction Module Upgrading to a Dual Syringe Configuration 4 Installing the Tee Junction Module The single syringe 402 can be upgraded to improve the versatility of your system. To upgrade a single syringe 402 to combine fast liquid transfer times and high dilution ratios with high accuracy for very small volumes, install the syringe and Tee junction module (reference F4015010). The syringe and Tee junction module must be mounted on the right of the 402. The Tee junction module has one stepper motor that operates the syringe, and one motor drive board. To install the module: 1) Make sure that the ON/OFF switch is in the OFF position. 2) Remove the power cord from the instrument. 3) Disconnect any hydraulic connections to the instrument. 4) Tilt the instrument on one side and undo the four screws that secure the top cover to the instrument. Place the instrument in the upright position and pull the covers sides outwards and lift the cover off upwards. 4-2 4 Upgrading to a Dual Syringe Configuration Installing the Tee Junction Module 5) Undo the two nuts securing the blanking plate inside the front panel (near the top) and remove the blanking plate. Connecting the Flat Cable Inside the instrument there is a flexible flat cable that connects the logic board to the main syringe and valve unit. This cable has two free connectors for upgrading the instrument. Use one of these free connectors to connect to the motor drive board on the upgrade module. The second connector (at the end of the short length of flat cable) is not used. 1) Hold the module upright, in front of the 402 front panel. 2) Thread the flat cable through the aperture for the module and connect it to the bottom connector on the syringe motor drive board on the Tee module. Second connector is not used To tee module Inserting the Module The module must be correctly installed. Trying to force the module into position may affect the alignment of components. Before installing the module, ensure that the rubber strip is mounted on the bottom of the mounting recess. This strip acts as a damper to suppress vibrations. 1) Tilt the top of the module backwards and carefully insert the upper part of the module into the aperture in the 402 front panel until the syringe drive motor is inside the aperture, then hold the module upright. 4-3 Upgrading to a Dual Syringe Configuration Installing the Tee Junction Module 2) Insert the module into the mounting recess, making sure that none of the cables become trapped between the module and the aperture. The module rests on the rubber damper strip. 3) Secure the module in place at the top using the two screws (provided). 4) Replace the instrument cover by pulling the sides outwards slightly and lowering the cover over the instrument. 5) Tilt the instrument on its side and reposition and tighten the four screws that secure the cover to the lower chassis. 6) Install the Tee piece on the front of the module using the two screws provided. 7) Install the syringe. Follow the procedure described page 3-2. Do not forget to modify the software configuration, including the syringe volumes. 4-4 4 8) Connect the hydraulic tubing according to page 3-9. The connecting tubing between the valve outlet and the Tee junction inlet is supplied in two diameter sizes: 0.8 mm and 2.0 mm. Install the 0.8 mm diameter tubing if the inner diameter of the transfer tubing used is 0.8 mm or smaller. Install the 2.0 mm inner tubing if the inner diameter of the transfer tubing used is greater than 0.8 mm. 9) Reconnect the power cord and switch the instrument ON. Upgrading to a Dual Syringe Configuration Connecting the Flat Cable Inside the instrument there is a flexible flat cable that connects the logic board to the main syringe and valve unit. This cable has two free connectors for upgrading the instrument. Use these free connectors to connect to the motor drive board on the upgrade module (the order of the connectors is not important): 1) Hold the module upright, in front of the opening in the 402 front panel. 2) Thread the flat cable through the aperture for the module and connect both connectors to the syringe and valve motor drive boards. Installing the Syringe and Valve Module Installing the Syringe and Valve Module 4 Inserting the Module The module must be correctly installed. Trying to force the module into position may damage or affect the alignment of components. 1) Tilt the top of the module backwards and carefully insert the upper part of the module into place in the mounting recess. 2) When the syringe and valve motor drive assemblies are inside the instrument, hold the module upright. 3) Insert the module into the mounting recess, making sure that no cables are trapped between the module and the aperture. The module rests on a rubber strip that acts as a damper to suppress vibrations and to ensure a correct fit in the recess. 4) Secure the module in place at the top using the two screws (provided). 5) Replace the instrument cover by pulling the sides outwards slightly and lowering the cover over the instrument. 6) Tilt the instrument on its side and reposition and tighten the four screws that secure the cover to the lower chassis. 7) Install the valve; align the flat on the valve axle with the drive slot on the valve motor and tighten the two screws to secure the valve on the instrument. 4-5 Installing the Syringe and Valve Module Upgrading to a Dual Syringe Configuration 4-6 4 8) Install the syringe using the procedure described page 3-2. Do not forget to modify the software configuration, including the syringe volumes. 9) Connect the hydraulic tubing according to page 3-9. 10)Reconnect the power cord and switch the instrument ON. Upgrading to a Dual Syringe Configuration The configuration of the 402 can be changed to meet your method requirements. To upgrade a dual syringe with Tee junction configuration to a dual syringe and dual valve configuration, the Tee junction module must be removed. 1) Make sure that the ON/OFF switch is in the OFF position. 2) Remove the power cord from the instrument. 3) Disconnect any hydraulic connections to the instrument. 4) Remove the syringe from the Tee piece, as described in page 5-5. 5) Tilt the instrument on one side, and undo the four screws that secure the top cover to the instrument. Place the instrument in the upright position and pull the covers sides outwards and lift the cover off upwards. Removing the Syringe and Tee Junction Module Removing the Syringe and Tee Junction Module 4 6) Undo and remove the two screws securing the Tee piece to the front plate of the module. 7) Remove the Tee piece. This reveals two other screws that secure the module to the 402 chassis. 8) Undo the two screws that secure the module to the front chassis. 9) Remove the module: a) Support the module by holding the piston operating bar on the outside of the module and the syringe die-cast motor chassis on the inside of the instrument. b) Gently pull the module forward until the front plate is about 2 cm in front of the 402 front chassis. c) Tilt the bottom of the module outwards and carefully lower the module forwards and downwards out of the instrument. d) Hold the module upright in front of the front chassis and disconnect the flat flexible cable from the syringe motor control board. 10) Install the syringe and valve module, as described in page 4-5. 4-7 Upgrading to a Dual Syringe Configuration 4-8 4 Maintenance 5 This chapter explains how to perform the routine maintenance procedures. The only maintenance operations necessary for the 402 are: Cleaning the exterior of the instrument. Cleaning of the valve, Tee, syringe assemblies and the tubings. Replacement of the syringe after approximately 30 000 cycles. 5-1 5 Cleaning the Exterior of the Instrument Maintenance 5-2 Cleaning the Exterior of the Instrument The instrument cover and front panel may be cleaned. Ensure that the instrument is switched OFF and the power cord is removed when you clean the instrument. When you need to clean the instrument, use one of the three following methods: 1) A clean dry cloth. 2) A cloth dampened with water. 3) A cloth dampened with soapy water. If a cloth dampened with soapy water is used to clean the instrument, only domestic soap may be used. No other form of detergent or chemical may be used. 5 Maintenance Autoclaving Autoclaving Certain parts of the 402 can be autoclaved. They must be removed from the instrument for autoclaving. The autoclavable parts of the valve/syringe assembly are: The valve (disassembled). The syringe (except the 25 ml syringe). The piston assembly. PTFE and FEP tubing. The autoclavable parts of the Tee junction/syringe assembly are: The Tee junction. The syringe (except the 25 ml syringe). The piston assembly. PTFE and FEP tubing. Autoclaving the Tubing The tubing can be cleaned or autoclaved. Precautions to take when autoclaving the tubing: 1) To preserve the flanged end of the tubing, perform the following steps for the first time that you autoclave these components. 2) Insert and tighten the flanged end of the inlet tubing into one end of the PVDF union connector. Tighten the flanged end of the outlet tubing to the other end of the PVDF union connector. Connect the other end of the inlet tubing to the filter. PVDF union connector Inlet tubing Outlet tubing 3) Autoclave the tubing while connected to the union connector. 4) Disconnect the PVDF union connector. 5) Autoclave the tubing a second time to sterilize the interior of the tubing. This procedure prevents the end of the tubing from deforming. It is only necessary for the first time you autoclave the tubing. 5-3 5 Cleaning the Valve Maintenance Cleaning the Valve The valve must be cleaned after any of the following: - Handling of corrosive or hazardous liquids. - Possible back flow of liquids into the waste tubing. - Leakage. The valve must be dismounted from the 402 and separated from the syringe, then disassembled. The valve can be cleaned or autoclaved. It is not necessary to autoclave the valve axle or spring. Dismounting the Valve 1) Disconnect the inlet, outlet and waste tubing from the valve. 2) Separate the syringe from the valve. 3) Undo the two screws securing the valve to the 402 front plate and remove the valve. Disassembling the Valve Hold the valve body firmly in one hand. Use a 17 mm open end spanner to undo the inner body of the valve from the valve main body. Pull apart the two halves of the valve. 1) Pull the axle away from the valve main body. 2) Remove the ceramic stator from the valve axle. 3) Tap the valve inner body against a clean, solid surface to remove the spring and PTFE spring cover. 4) Do not remove the inner ceramic surface from the valve main body. PTEF seal Ceramic stator 5) The parts can be cleaned with a non-abrasive cloth dampened with alcohol, or by autoclaving them. 6) Dry the components using a lint-free cloth. 7) Check that the ceramic parts are dry and wait for them to cool to room temperature before reassembling the valve. Ceramic and PEEK rotor Spring Valve axle PTFE-end piece 5-4 Valve axle guide Maintenance The Tee junction is a single piece. Apart from dismounting it from the 402, there is no disassembly procedure. The Tee junction can be cleaned or autoclaved. 1) Disconnect the inlet and outlet tubing from the Tee junction. 2) Dismount the Tee junction and syringe assembly and separate the syringe from the Tee junction. 3) Undo the two screws securing the Tee junction to the 402 front plate and remove the Tee junction. Cleaning the Tee Junction Cleaning the Tee Junction 5 4) Autoclave the Tee junction. 5) Reinstall the Tee junction by following the instructions given page 3-2. 5-5 5 Cleaning the Syringe Assembly Maintenance Cleaning the Syringe Assembly The 25 ml syringe is not autoclavable, all of the other size syringes are autoclavable. You must dismount the syringe and piston assembly from the instrument and then separate the syringe and piston assembly before cleaning or autoclaving them. 1) Dismount the Syringe assembly from the instrument. 2) Undo the piston securing screw to free the piston assembly from the piston operating rod. 3) Lower the piston operating rod; for Gilson software there is a change syringe program that lowers the piston operating rod - use this software option to lower the piston operating rod away from the syringe piston. Refer to your software Users Guide for the precise sequence. This allows you to dismount and mount the syringe and valve/Tee assembly without the risk of damaging the syringe. 4) Undo the syringe from the body of the valve or Tee. 5) Remove the piston and syringe assembly from the pump. 6) Pull the piston out of the syringe body. For large syringes; 5, 10 and 25 ml syringes, you must screw the piston securing screw back into the bottom of the piston and pull on the screw to remove the piston from the syringe barrel. 7) Clean or autoclave the two parts (except the 25 ml syringe). 8) Ensure that the syringe and piston assembly have cooled to room temperature before reassembling the syringe and piston. Ensure that the piston and the piston nose are free from dust or contamination before introducing the piston into the syringe. Wet the piston nose (water will suffice) before inserting the piston in the syringe. Insert the piston nose in the syringe body and push the piston into the syringe. 9) Remount the syringe assembly on the valve or Tee. Screw the threaded end of the syringe body into the valve or Tee. 10) Lower the piston so that it comes into contact with the piston holding screw. 11)Tighten the piston holding screw so that the piston assembly is secured against the piston operating rod. Exit the procedure for changing the syringe. 5-6 5 Maintenance For all syringe sizes, it is necessary to replace the piston assembly after approximately 30 000 cycles. The correct reference piston kit must be ordered: Replacing the Piston 1) Dismount the Syringe assembly from the instrument, as described page 5-6. 2) Pull the piston out of the syringe body. 3) Reassemble the syringe and piston as described page 5-6. 4) Remount the syringe assembly on the valve or Tee junction as described page 5-6. Item Part Number 100 µl piston kit 250 µl piston kit 500 µl piston kit 1 ml piston kit 5 ml piston kit 10 ml piston kit 25 ml piston kit F4015072 F4015073 F4015074 F4015075 F4015076 F4015077 F4015078 Changing the Syringe Piston Assembly Changing the Syringe Piston Assembly 5-7 5 Changing the Piston Syringes and Piston Noses Maintenance Changing the Piston Syringes and Piston Noses The piston nose should be replaced after the pump has performed approximately 30 000 cycles. All piston noses are replaceable, the process is relatively easy, but for most pistons (except the 25 ml pistons), special tools are required to mount the piston nose. Part Number 100 µl Piston: F4015062 Description F4015072 5 x piston noses, 2 x support collars and mounting tool (for 100 and 250 µl pistons). 1 piston assembly kit 250 µl Piston: F4015063 F4015073 5 x piston noses and mounting tool (for 100 and 250 µl pistons) 1 piston assembly kit 500 µl Piston: F4015064 5 x piston noses and mounting tool kit 1 ml Piston: F4015065 F4015005 5 x 1 ml piston noses and mounting tool 1 nose mounting tool 5 ml Piston: F4015066 F4015003 1 x piston nose plus O-ring Piston nose mounting kit 10 ml Piston: F4015067 F4015004 1 x piston nose plus O-ring Piston nose mounting kit 25 ml Piston: F4015068 1 x piston nose Changing the 100 and 250 µl Piston Noses Part Number Description F4015062 5 x piston noses, 2 x support collars and mounting tool (for 100 and 250 µl pistons) F4015063 5 x piston noses and mounting tool (for 100 and 250 µl pistons) To optimize the fitting of the 100 µl and 250 µl syringes on the syringe pump valve, each syringe is supplied with a cover seal. The orientation of this seal must be respected to ensure that the connection with the syringe is airtight. Figure page 5-11 shows the correct orientation of the cover seal on a syringe. 5-8 5 Maintenance 2. Slide the piston out of the syringe barrel. 3. Remove the piston nose from the piston rod by carefully pinching the piston nose with a pair of cutters and gently pulling the piston nose off the piston rod. Take care not to damage the end of the piston rod when removing the nose. (It is possible to remove the nose by pinching it between the thumb and forefinger nails and pulling.) 4. Remove any remaining debris of the original piston nose from the end of the rod. Piston rod Piston button Allen screw Piston nose Nose holding tool 5. The 100 µl and 250 µl pistons have a narrow rod that may be damaged if handled incorrectly. In order to fit a new piston nose without unduly bending the piston rod, undo the Allen screw that secures the piston button to the piston rod. Slide the button down the piston rod to within 10 mm of the end of the rod where the new piston nose is to be mounted and re-tighten it in position. 6. Put the new piston nose in its recess in the piston nose mounting tool. The 100 µl and 250 µl piston noses use a common tool. One face of the tool has a recess for the 100 µl piston nose, the other face has a recess for the 250 µl piston nose. 7. Hold the piston button and gently push the end of the piston rod into the new piston nose. 8. Remove the piston assembly from the piston nose holder. Slacken the piston button and slide it away from the piston rod. Changing the Syringe Piston and Piston Noses 1. Remove the syringe from the pump as described page 5-6. Allen screw Piston button Piston rod 9. Dip the piston nose in distilled water and slide the piston assembly into the syringe. 10. Hold the syringe upright with the threaded end of the syringe resting on a flat, clean surface. Slide the piston into the syringe until the piston stops (the nose is level with the end of the syringe). 11. For the 100 µl piston only, insert the support collar. The support collar should be replaced after around 60 000 strokes. 12. Slide the piston button against the body of the syringe and tighten the Allen screw that secures the piston button onto the piston rod. Support collar Piston nose Syringe barrel 13. Slide the piston up and down in the syringe five or six times to ensure a smooth operation between the piston and syringe. 14. Remount the syringe on the pump as described page 5-6. Valve screw 5-9 5 Changing the Piston Syringes and Piston Noses Maintenance Changing the 500 µl Piston Noses Part Number Description 1. Remove the syringe from the pump as described page 5-6. F4015064 2. Slide the piston out of the syringe barrel. 5 x 500 µl piston noses and mounting tool kit 3. Remove the piston nose from the piston rod by carefully pinching the piston nose with a pair of cutters and gently pulling the piston nose off the piston rod. Take care not to damage the end of the piston rod when removing the piston nose. 4. Remove any remaining debris of the original nose from the end of the piston rod. 5. Put the new piston nose in its recess in the piston nose holding tool. 6. Turn the tool upside down and place the piston assembly. 7. Slacken the piston button and remove it from the piston rod. Slide the clamping tool down the piston rod and press the 2 tools firmly against each other. A slight rotation of the clamping tool ensures a correct fitting. 8. Remove the tools away from the piston assembly. Piston rod Clamping tool Piston nose Piston nose holding tool 9. Dip the piston nose in distilled water and slide the piston into the syringe. 10.Hold the syringe upright with the threaded end of the syringe resting on a flat, clean surface. Slide the piston into the syringe until the piston stops (the nose is level with the end of the syringe). 11. Slide the piston button against the body of the syringe and tighten the Allen screw that secures the piston button onto the piston rod. 12. Slide the piston up and down in the syringe five or six times to ensure a smooth operation between the piston and syringe. 13. Make sure of the presence of the plastic cover when re-mounting the syringe on the pump as recommended below. 14. Remount the syringe on the pump as described page 5-6. 5-10 5 Maintenance Cover seal Valve screw Changing the 1 ml Piston Noses Syringe body You need the special tool for mounting the piston nose on the 1 ml piston. The nose push-fits onto the piston shaft. 1. Remove the syringe from the pump as described page 5-6. Part Number Description 2. Slide the piston out of the syringe barrel. F4015065 5 x 1 ml piston noses and mounting tool. F4015005 1 nose mounting tool. 3. Remove the piston nose from the piston rod by carefully pinching the piston nose with a pair of cutters and gently pulling the piston nose off the piston rod. Take care not to damage the end of the piston rod when removing the piston nose. 4. Remove any remaining debris of the original nose from the end of the piston rod. Changing the Syringe Piston and Piston Noses Before Mounting a 500 µl Syringe: To optimize the fitting of the 500 µl syringe on the Dilutor valve, the 500 µl syringe is supplied with a cover seal. The orientation of this seal must be respected to ensure that the connection with the syringe is airtight. (See the opposite figure). 5. Put the new piston nose in its recess in the piston nose holding tool. 6. Turn the tool upside down and place the piston assembly. 7. Press the piston shaft firmly into the piston nose holding tool. A slight rotation of the piston shaft ensures a correct fitting. 8. Slacken the piston button Allen screw and remove the piston button from the piston rod. 9. Remove the tool from the piston assembly. Piston rod 10.Dip the piston nose in distilled water and slide the piston into the syringe. 11. Hold the syringe upright with the threaded end of the syringe resting on a flat, clean surface. Slide the piston into the syringe until the piston stops (the nose is level with the end of the syringe). 12.Slide the piston button against the body of the syringe and tighten the Allen screw that secures the piston button onto the piston rod. 13.Slide the piston up and down in the syringe five or six times to ensure a smooth operation between the piston and syringe. Piston nose Piston nose holding tool 14.Remount the syringe on the pump as described page 5-6. 5-11 5 Changing the Piston Syringes and Piston Noses Maintenance Changing the 25 ml Piston Noses Part Number Description F4015068 1 x 25 ml piston nose. You dont need a special tool for mounting the piston nose on the 25 ml piston. The nose screw-fits onto the piston shaft. 1. Remove the syringe from the pump as described page 5-6. 2. Slide the piston out of the syringe barrel. It may be necessary to screw the piston securing screw back into the bottom of the piston and pull on the screw to remove the piston from the syringe barrel. 3. Hold the piston nose firmly in one hand and unscrew the nose from the piston shaft. 4. Screw a new piston nose on the shaft. 5. Slide the piston into the syringe and complete the piston nose fitting by screwing the shaft until the piston nose turns with the piston shaft. 6. Remove the piston from the syringe and dip the piston nose in distilled water and slide the piston up and down in the syringe five or six times to ensure a smooth operation between the piston and syringe. 7. Remount the syringe on the pump as described page 5-6. Changing the 5 ml and 10 ml Piston Noses Part Number Description F4015003 5 ml piston nose mounting kit. F4015004 10 ml piston nose mounting kit. F4015066 1 x 5 ml piston nose and O-ring. F4015067 1 x 10 ml piston nose and O-ring. The piston nose mounting kits are composed of a piston nose holder and a piston shaft holder. 1. Remove the syringe from the pump as described page 5-6. 2. Slide the piston out of the syringe barrel. It may be necessary to screw the piston securing screw back into the bottom of the piston and pull on the screw to remove the piston from the syringe barrel. 3. Remove the piston nose from the shaft by carefully pinching the piston nose with a pair of cutters and gently pulling the piston nose off the shaft. Take care not to damage the end of the shaft when removing the piston nose. 4. Remove any remaining debris of the original piston nose from the end of the shaft. 5-12 5 Maintenance 6. Place the piston shaft in the piston shaft holder. 7. Screw the two parts of the tool together until tight. 8. Unscrew the tool, the piston nose should be correctly seated on the shaft. 9. Dip the piston nose in distilled water and slide the piston into the syringe. 10.Slide the piston up and down in the syringe five or six times to ensure a smooth operation between the piston and syringe. 11.Remount the syringe on the pump as described page 5-6. O-ring Piston nose Piston nose holder Changing the Syringe Piston and Piston Noses 5. Insert the new piston nose in the recess of the piston nose holder. Make sure that the aperture is facing outward and the O-ring is inside the seal. Piston shaft Piston shaft holder 5-13 Maintenance 5-14 5 Troubleshooting 6 This chapter explains how to diagnose possible problems and how to overcome them. 6-1 6 Mechanical Problems Troubleshooting 6-2 Mechanical Problems Problem Possible Cause Valve does not fit on to the 402. Valve axle not properly aligned with the motor drive. Valve moves during aspirate or dispense. Solution Ensure that the flat on the axle is aligned with the drive slot on the motor. Valve mounting screw not tight. Check that the mounting screws, syringe and syringe mounting screw are all tight. Syringe does not move properly. Tubing blocked. Check that the inlet tubing or transfer tubing is not blocked. Valve sticks Remove the valve (see page 5-4). Use the valve key, reference F123674 to turn the valve axle and turn the key to free the valve. Do not try turning the axle with your fingers, it is not possible to apply the necessary torque. Instrument left unused. 6 Troubleshooting Problem Possible Cause Solution Liquid leakage Connections incorrectly made. Tighten all tubing connections. Liquid leaving by the waste tube. Tubing blocked. Check all tubing for blockages. Ensure that the inlet filter is clear. Dirt trapped between the ceramic surfaces. Clean the valve. Refer to page 5-4. Hydraulic Problems Hydraulic Problems 6-3 6 Electrical Problems Troubleshooting Electrical Problems Problem Possible Cause Instrument does not Power cord not connected. respond. 402 is not switched on. Fuse blown. Solution Check power cord is properly connected. Check ON/OFF switch. Check the fuses. See page 3-4. GSIOC cable not connected. Check the GSIOC cable is not properly connected. Microswitch or rear panel 6-4 Check that the unit is ID correctly set (see pages 3-6, 3-7). Check operating mode 402/401, switch 6, (see page 3-8). Parts & Accessories Lists Appendix A Parts lists for the 402 Syringe Pump, consisting of Standard equipment, Additional Accessories, and Spare parts. Appendix A-1 402 Single Syringe and Valve Configuration Parts & Accessories Lists Appendix 402 Single Syringe and Valve Configuration Part Number Qty Description 3645357 F4420577 F1410050 6730104006 F4075101 LT801239 Appendix A-2 1 1 1 5 1 1 PTFE inlet tubing, 650 x 3 x 2 mm with a 316L, 20 µm filter FEP waste tubing, 200 x 4 x 3 mm PVDF union connector Fuse, 1.0 Amp type ‘T’ slow blow (5 x 20 mm) Valve key + leaflet 402 Syringe Pump User’s Guide A Parts & Accessories Lists Appendix Part Number Qty Description 3645357 F4420577 F1410050 6730104006 F4015001 F4015002 F4075101 LT801239 1 1 1 5 1 1 1 1 PTFE inlet tubing, 650 x 3 x 2 mm with a 316L, 20 µm filter FEP waste tubing, 200 x 4 x 3 mm PVDF union connector Fuse, 1.0 Amp type ‘T’ slow blow (5 x 20 mm) Connection tubing: Valve - Tee Junction (0.8 mm i.d. x 70 mm length) Connection tubing: Valve - Tee Junction (2.0 mm i.d. x 70 mm length) Valve key + leaflet 402 Syringe Pump User’s Guide 402 Dual Syringe with Tee Junction Configuration 402 Dual Syringe with Tee Junction Configuration A Appendix A-3 402 Dual Syringe with Dual Valve Configuration Parts & Accessories Lists Appendix A 402 Dual Syringe with Dual Valve Configuration Part Number Qty Description 3645357 F4420577 F1410050 6730104006 F4075101 LT801239 Appendix A-4 2 2 2 5 1 1 PTFE inlet tubing, 650 x 3 x 2 mm with a 316L, 20 µm filter FEP waste tubing, 200 x 4 x 3 mm PVDF union connector Fuse, 1.0 Amp type ‘T’ slow blow (5 x 20 mm) Valve key + leaflet 402 Syringe Pump User’s Guide Parts & Accessories Lists Appendix Part Number Description 25025341 25025342 25025347 25025343 25025344 25025345 25025346 2954671 2954672 F1410050 100 µl syringe (not for 401 elution mode) 250 µl syringe (not for 401 elution mode) 500 µl syringe 1 ml syringe 5 ml syringe 10 ml syringe 25 ml syringe (not for 401 elution mode) FEP coiled transfer tubing, 1.6 mm i.d. (3 ml) FEP coiled transfer tubing, 1.6 mm i.d. (10 ml) 5 PVDF union connectors 3651181 F4015011 F4015010 F4015001 F4015002 Tubing clip Valve upgrade kit Tee junction upgrade kit Connection tubing: Valve - Tee junction (0.8 mm i.d. x 70 mm length) Connection tubing: Valve - Tee junction (2.0 mm i.d. x 70 mm length) Additional Accessories Additional Accessories A Appendix A-5 Spare Parts Parts & Accessories Lists Appendix Spare Parts Part Number Description F4015072 F4015073 F4015074 F4015075 F4015076 F4015077 F4015078 100 µl piston kit 250 µl piston kit 500 µl piston kit 1 ml piston kit 5 ml piston kit 10 ml piston kit 25 ml piston kit Appendix A-6 A GSIOC B Appendix GSIOC stands for Gilson Serial Input Output Channel. This communications channel links all of the Gilson modules in a system together. The system controller (master) controls all of the modules in a system by sending GSIOC commands to the slave modules. Pumps and detectors are considered as slave modules in a Gilson system. Each device connected to the GSIOC channel is distinguished by a GSIOC identification (ID) number between 0 and 63. The GSIOC identification number is set by switches on each module or by the module software for certain devices (for example, the 305 piston pump ID number is set in the configuration menu). The system controller communicates with one slave device at a time. GSIOC commands can also be used to control Gilson modules directly from a PC. The following are the default values (factory settings) for samplers and pumps: Instrument If you have more than one instrument of the same type, each instrument must have a unique ID number. All samplers* High pressure pumps** 401 Dilutors/402 Syringe Pumps Minipuls 3 To change the ID number on an instrument, refer to its Users Guide. ID Number 10 1 0 30 * All samplers = 221, 222, 231, 232, 233, ASPEC, ASPEC XLi. ** Applies to 305, 306, 307, 308 Piston Pumps. There are two types of commands: buffered commands and immediate commands. Buffered commands are executed as background processes. They are used to send commands. Immediate commands have a higher priority; the execution of a buffered command will be interrupted so that an immediate command can be executed. They are mainly used to return messages from slave devices. Appendix B-1 402 Mode - Immediate Commands GSIOC Appendix B 402 Mode - Immediate Commands The table below gives the GSIOC commands the 402 slave obeys in its normal mode. Command % Description Request module identification Response format: 402SVa.bc where Va.bc is the software version. $ Master reset Response format: $ where The returned $ indicates that the machine has been reset in its powerup state. M Read syringe status Response format: fnnnnnngmmmmmm where f is the left syringe status. It can have one of the following values: N for no errors. R for motor running. O for overload error (motor has lost steps ; the syringe must be reinitialized. I for a syringe not initialized or being initialized. M for a syringe motor missing ; either it is not installed (single syringe 402) or the syringe drive is defective or locked because of a software error. H for an uncompleted motion ; either the motion has been specified by a buffered A or D command but not started yet, or the syringe has been halted by a buffered H command. W for a syringe waiting for the other syringe as set by the buffered command W. nnnnnn is the left syringe contents volume. The unit is the microliter, or the step if syringe 39000 is used. g is the right syringe status, identical to f (see above). In the case of an O error, the syringe must be reinitialized before normal operation can resume. S Return global status Response format: ab where a is the command status buffer a = 0 for buffer empty, a = 1 for buffer occupied. When the buffer is empty, the commands previously sent are being processed ; when it is occupied, they are not necessarily being processed, and it is not possible to send more buffered commands. b is the error flag status b = 0 for no error, all commands have been accepted. b = 1 for one or more rejected buffered commands since the last immediate $ command. This flag is reset to 0 just after the immediate $ command has been executed. Appendix B-2 GSIOC V Description Valve status Response format: ab where a is the left valve status b is the right valve status. R for valve to reservoir. N for valve to needle. X for valve running.. O for valve overload error (the motor has lost steps) or failure to detect one or both rest positions. May happen on initialization. M for valve absent. B 402 Mode - Immediate Commands Command Appendix Appendix B-3 402 Mode - Buffered Commands GSIOC Appendix B 402 Mode - Buffered Commands It is possible to control the syringe stepper motor stepwise. That is, the strokes are expressed in steps and the speed in steps/second. A full stroke correspond to 38400 steps for the normal capacity of the syringe. The syringe size must be declared as 39000 using GilBasic commands, the volume unit flow rate limitations are detailed in the following GSIOC description. Command A Description Aspirate volume Syntax: Anvvvvv where n is the syringe identification. n = L for left syringe, n = R for right syringe. vvvvv.v is the aspirated volume in microliters (0 up to syringe volume), or in steps if syringe 39000 is used. This command sets the next aspiration but does not initiate liquid flow. To begin aspiration, use the buffered B command. Volume range Syringe (µl) Vol. min (ml) Vol. max (ml) Increment (ml) 100 0.1 100 0.1 250 0.1 250 0.1 500 1 500 1 1000 1 1000 1 5000 1 5000 1 10000 1 10000 1 25000 1 25000 1 39000 0* 39000* 1* This command will be rejected if the syringe involved has not been defined and successfully initialized or if it is an error. Use the immediate M command to see if there no error after initialization. If the volume is greater than the volume that can be aspirated by the syringe, the command will be rejected. Rejection is flagged by the immediate S command. * These units are in steps, not µl. B Start syringe Syntax: Bn where n is the syringe identification n = L for left syringe, n = R for right syringe, n = B for both syringe. Send the designated syringe(s) to the destination defined by the previous buffered A or D commands if any. If both syringes are selected, they start simultaneously. If the destination is not defined for a syringe, this command has no effect. The syringe(s) will not start until the valve on the same side (if any) is at rest. Furthermore, the start of the syringe can be delayed under more conditions, using the buffered command T. D Dispense volume Syntax: Dnvvvvv n is the syringe identification n = L for lrft syringe, n = R for right syringe. vvvvv is the dispensed volume in microliters (0 up to syringe volume), or in steps if syringe 39000 is used. This command sets the next dispense but does not initiate liquid flow. Appendix B-4 GSIOC Description To begin dispense, use the buffered B command. Volume range: see buffered A command above. If the volume is greater than the volume currently held by the syringe, the command will be rejected. This is flagged by the immediate S command. This command will be rejected until the syringe involved has been defined and successfully initialized or it is an error. Use the immediate M command to check if there is no error after initialization. F Set syringe motor force Syntax: Fna where n is the syringe identification n = L for left syringe, n = R for right syringe. a selects the amplitude of the motor current: 0 = 0% of nominal current (the motor is unpowerd) 1 = 25%, 2 = 37.5%, 3 = 50%, 4 = 75%, 5 = 100%. B 402 Mode - Buffered Commands Command Appendix The current level is automatically set according to the syringe type, as follows: 100, 250, 500, 1000 µl: level 3 ; 5000, 10000, 25000 µl, 39000 steps: level 5. Use this command to set the syringe motor force to a different value if the need arises. Send it after defining the syringe using the buffered P command, and before to send the first motion command. If a motion is already in progress, this command will only take effect at the next motion. After a delay of about ten seconds of idling, the current will be automatically reduced to level 1 to reduce temperature rise, but it will be restored to the specified value at the beginning of every motion without the need to issue this command each time. N Halt syringe motors Syntax: Hn where n is the syringe identification n = L for left syringe, n = R for right syringe, n = B for both syringe. If the specified syringe is at rest, the command is ignored. No error is flagged. O Initialize syringe Syntax: On where n is the syringe identification n = L for left syringe, n = R for right syringe, n = B for both syringe. This command sends the piston to the topmost position, until the plunger touches the valve body; then the piston moves down by a small amount to provide a clearance between the piston and the syringe top. The motor force is set automatically according to the syringe selected. If necessary the force may be adjusted with the buffered F command before initializing the syringe. Care must be taken that some liquid will be dispensed during initialization. If the syringe motor is missing, this command has no effect. This command acts immediately, even if a motion is already in progress. After successful initialization, the immediate M command returns a N for no error and the contents of the syringe are set to zero. If the initialization failed, the M error is returned. The syringe must be initialized prior to any syringe movement command. Appendix B-5 402 Mode - Buffered Commands GSIOC Appendix Command P B Description Set syringe size Syntax: Pnvvvvv where n is the syringe identification n = L for left syringe, n = R for right syringe, n = B for both syringe. vvvvv is the syringe volume, in microliters. The syringe size for both syringes must be taken in the following list: 100, 250, 500, 1000, 5000, 10000, 25000. The value 39000 is also accepted to indicate that the commands A, D and S will be expressed in steps or steps/s. S Set syringe flow Syntax: Snvvvvv where n is the syringe identification n = L for left syringe, n = R for right syringe. vvvvv is the flow in ml/min, or in steps/s if the syringe 39000 is used. Volume range Syringe (µl) 100 250 500 1000 5000 10000 25000 39000 Flow min (ml/min) 0.001 0.001 0.001 0.01 0.01 0.02 0.04 1* Flow max (ml/min) 6 15 30 60 120 240 240 39000* Increment (ml/min) 0.001 0.001 0.001 0.01 0.01 0.01 0.01 1* If the parameter flow is out of range, the flow rate will be set to either the maximum or the minimum possible. This event will be flagged by the immediate S command. The new syringe flow rate will be effective at the next aspirate or dispense command. The syringe flow cannot be changed while the syringe is running. * These units are in steps, not ml. T Timely start Syntax: Tn where n is the syringe identification n = L for left syringe, n = R for right syringe. This command delays the motion of the specified syringe to synchronize it with the other syringe. It must be sent before the buffered B command, and may be sent before or after the buffered A or D command that defines the next motion. For a single syringe, single valve 402, it does not apply. For a dual syringe, single valve 402, the syringe waits until the other syringe and the valve are at rest. For a dual syringe, dual valve, the syringe waits both the other syringe and the other valve. Even if this command is not sent, the syringe will not start until the valve on the same side is at rest. U Valve configuration option Syntax: Un where n is 1 or 2. For a 402 dilutor fitted with two valve drives, sending U1 forces the right-hand valve to be missing as though the motor had not been installed. This is necessary to allow a proper sequencing of the syringes in case the functions that are specific to a single valve, dual syringe configuration are used with a dual valve dilutor. Sending U2 or the immediate $ command restores the dual syringe configuration. This command has no effect in single-syringe, or dual-syringe and single valve configurations. Appendix B-6 GSIOC V Description Valve control Syntax: Vnp where n is the syringe identification: n = L for left syringe. n = R for right syringe. p is the desired valve position: R for valve to reservoir. N for valve to needle. If the valve is already at the desired position or if the valve is missing, this command has no effect. B 402 Mode - Buffered Commands Command Appendix Appendix B-7 401B Emulation Mode - Immediate Commands GSIOC Appendix B 401B Emulation Mode - Immediate Commands The table below gives the commands available when the 402 is switched to the 401 emulation mode. In this mode, only the left hand syringe and valve are used. The set of commands includes only the commands that belong to the primitive mode of the 401 and that are effectively used by the version A samplers. Command % Description Request module identification Response format: 401V9.0 The software version allows to distinguish between a true 401 and a 402 emulating a 402. Later versions of the software will be 9.1, 9.2, etc. There is no problem with the version number since version A samplers do not check for it. To consult the real version number, the 402 must be switched back to its normal mode. In the other mode, the answer is 402S. D Start Response format: D Restarts the syringe motion that has been stopped by a H immediate command. Otherwise, do nothing. H Halt syringe motor Response format: H Halts the motor if it is running. To restart, send a D immediate command. M Read syringe status Response format: xy where x is the syringe status. It can have one of the following values: 0 if stopped, no errors. 1 is motor running. 2 is overload error (motor has lost steps). 4 is syringe being initialized at power on or after an immediate Z command. 8 is syringe halted by immediate H command. y is the valve status. It can have one of the following values: 0 is stopped at needle side. 1 is stopped at reservoir side. 2 is valve running. 2 is valve error. In the case of a 2 error, the syringe must be reinitialized before normal operation can resume. Z Master reset Response format: $ Returns Z and reset the machine in its power-up state, and initializes the syringe. The motor drives the plunger to the upper position, until the bottom of the syringe is touched, then back so that it does not touch the bottom of the syringe when it is at rest. The syringe size is set to 10000 µl by default, and the flow rate is set to 1600 µl/s. Appendix B-8 GSIOC Appendix Command Description A Aspirate volume Syntax: Avvvvv where vvvvv is the aspirated volume in microliters (0 up to syringe volume). This command starts the aspiration at once. If the argument is greater than the size of the syringe, the command is ignored. The size of the syringe must been previously defined using the command P. D Dispense volume Syntax: Dvvvvv vvvvv is the dispensed volume in microliters (0 up to syringe volume). This command starts the dispensing at once. If the argument is greater than the size of the syringe, the command is ignored. The size of the syringe must have been previously defined using the command P. F Set syringe flow Syntax: Fvvvvv where vvvvv is the flow in µl/s. Flow range Syringe size 500 µl Flow max (µl/s) 333 1 ml 666 401B Emulation Mode - Buffered Commands 401B Emulation Mode - Buffered Commands B 5 ml 10 ml 1600 1600 If the parameter flow is out of range, it will be set to the maximum value. The default value is also the maximum value. The new syringe flow rate will be effective at the next Aspirate or Dispense command. The syringe flow cannot be changed while the syringe is running. The size of the syringe must have been previously defined using the command P. O Initialize syringe Syntax: O This command sends the piston to the topmost position. The motor drives the plunger in the upper position, until the optical switch is actuated. Care must be taken because some liquid will be dispensed during initialization. Like the real 401B, the search for the bottom position is done at the maximum speed for the syringe size chosen, a speed corresponding to 333, 666, 1600 or 1600 µl/s for syringes of 500, 1000, 5000 and 10000 µl respectively. P Enter syringe size Syntax: Pvvvvv where vvvvv is the syringe volume, in microliters. The syringe size for both syringes must be taken in the following list: 500, 1000, 5000, 10000. Q Start/Stop purge Syntax: Q The purge consists in aspirating from the reservoir and dispensing to the needle repeatedly for the full size of the syringe at the flow rate specified by the last F buffered command. If the syringe is not defined, the default size is taken as 10 000 µl, and the flow rate is defaulted to 1600 µl/s as stated above. The first Q command starts the process, and the second Q command stops it when the syringe is empty (at top). Appendix B-9 401B Emulation Mode - Buffered Commands GSIOC Appendix Command S B Description Set control mode Syntax: Sa where a is any character. This is to ensure the compatibility with the corresponding command of the 401B, though the 402 in this mode understands only a subset of the primitive mode of the 401B. V Appendix B-10 Set valve position Syntax: Sa where a is 0 for needle, or 1 for reservoir. The valve turns to the requested position. Technical Data Appendix C This chapter contains the Technical Data concerning the 402 Syringe Pump. The instrument is a slave syringe pump to be used in conjunction with automatic samplers. It is used for the transfer of liquids between vials, to the sampler needle, and from the pump reservoir to the sampler needle. There are three possible configurations: single syringe and valve configuration, dual syringe with one valve and a Tee junction configuration, and dual syringe and dual valve configuration. Appendix C-1 Hydraulics Technical Data Appendix C Hydraulics Dilution Ratio When using the dual syringe with Tee junction configuration equipped with a 25 ml syringe on the left and a 100 µl syringe on the right, the dilution ratio is 2 µl/20 ml giving a dilution ratio of 10 -4. Minimum Volume For all 720, 721 and 735 liquid transfer tasks (except calibration and injection tasks), the minimum programmable transfer volume is 1 µl. However, precise and accurate transfer of such volumes depends on the following parameters: volumetric capacity of the syringe, size of the air gap used, geometry of the needle tip, flow rate used, nature of the liquid to be transferred. Maximum Volume For all 720, 721 and 735 tasks, the maximum volume that can be aspirated from a vial or a transfer port is limited to the capacity of the syringe or on the transfer tubing, whichever is the smaller. The total aspirated volume (air gaps plus liquid volumes) must be inferior to this volume. Therefore, where suitable transfer tubing is used (the volume of the transfer tubing is greater than the syringe volume), the maximum aspirated volume is equal to the syringe volume. Flow Rate The minimum possible flow rate depends on the syringe capacity and the stepper motor speed. The maximum possible flow rate depends on the pressure resulting from the needle and the internal diameter of the transfer tubing, the valve orifice and the viscosity of the liquid being transferred. To accomodate the majority of requirements for both liquid handling and injection with 720, 721 and 735 software, the flow rates have been limited to the values given in the table at the top of page C-3. Appendix C-2 Technical Data Appendix Procedure: Liquid is pipetted from open vials, into open vials. Pump configuration: Single syringe and valve. Liquid: Deionized water. Temperature: 19-20°C. * Although these are the recommended specified minimum volumes, it is possible to program smaller volumes. The accuracy for smaller volumes is not documented. Flow rate and back pressure data Syringe capacity (µl) 100 250 500 1000 5000 10000 25000 Maximum Flow (ml/min) 4 10 20 40 100 120 120 Minimum Flow (ml/min) 0.0001 0.001 0.001 0.01 0.01 0.01 0.1 0.8 0.8 0.8 0.8 0.8 0.8 0.3 Maximum Back Pressure (MPa) Hydraulics The data is given for the following conditions: C Specifications Specifications for liquid handling are given for a specific configuration of the 402 which defines the transfer tubing, the needle type and its internal diameter, and the transfer procedure. The specifications and typical values are given for volumes of 10 % to 100 % of the syringe capacity. Refer below. Typical values are indicated on page C4. Volumetric specifications Syringe Volume Accuracy capacity (µl) pipetted (µl) % 100 250 RSD % The mentioned values were obtained by pipetting de-ionized water, at 21 ± 2°C from open vials. 1 = Septum piercing needle, 316L, 162 x 0.7 x 0.4 mm. 2 = Beveled edge needle, 316L, 160.5 x 1.5 x 1.1 mm. Aspiration & Dispense Configuration Flow rate (ml/min) Needle Transfer tubing 10 50 100 1.8 1.5 1.5 0.8 0.25 0.15 0.5 2 2 200 µl, 0.5 mm i.d. Part Number 20 125 250 1.5 1.0 0.8 0.8 0.25 0.15 0.5 0.5 5 440 µl, 0.8 mm i.d. Part Number 49943392 1 49942392 Part Number 50 250 500 1.5 1.0 0.8 0.50 0.25 0.15 0.2 5 10 1000 100 500 1000 1.5 0.8 0.6 0.50 0.25 0.15 0.4 20 20 5000 500 2500 5000 1.2 0.8 0.6 0.5 0.25 0.15 10 20 20 1000 5000 10000 1.2 0.8 0.6 0.5 0.25 0.15 10 20 20 2000 12500 25000 1.0 0.8 0.6 0.50 0.25 0.15 6 20 20 500 10000 25000 27067235 1100 µl, 1.5 mm i.d. Part Number 2954583 5 ml, 1.5 mm i.d. Part Number F451255 2 Part Number 27067211 10 ml, 1.5 mm i.d. Part Number 2954672 Appendix C-3 Hydraulics Technical Data Appendix C Typical values Syringe capacity % The mentioned values were obtained using the same method and conditions, as described for the Volumetric Specifications. Max. accuracy Max.error imprecision +A% RSD % 100 50 10 0.50 0.80 1.00 0.10 0.20 0.50 Junction Tubing (between valve and Tee) Material: FEP, with two PVDF union connectors. Small tubing dimensions: 0.8 mm i.d., 70 mm length. Small tubing dead volume: 35 µl. Large tubing dimensions: 2.0 mm i.d., 70 mm length. Large tubing dead volume: 220 µl. Chemical Compatibility All liquids compatible with PTFE, FEP, PEEK, glass and ceramic. Appendix C-4 Technical Data Appendix C Mechanics Mechanics Valve Type: Three port, two position. Angle between ports: 120°. Valve drive: Stepper motor. Rotation time: 0.5 Second. Liquid contact materials: PEEK and ceramic. Lifetime: 1 000 000 cycles. Dead volume: 123 µl. Maximum Pressure: 0.8 MPa. Tee Junction Type: Three port, no moving parts. Diameter of channels: 1.5 mm. Length of channels: 14 mm. Angle between channels: 120°. Liquid contact material: PEEK. Dead volume: 51 µl. Cross section of Tee Syringes Piston drive: Stepper motor. Piston displacement control: Coded disk. Piston movement resolution: 1.6 µm. Minimum piston travel time: 1.5 seconds for one complete stroke. Maximum syringe displacement: 60 mm ± 20 µm. Minimum syringe speed: 60 mm in 10 hours. Maximum syringe speed: 60 mm in 1.5s. Appendix C-5 Electrical Technical Data Appendix C Electrical Interface Control from a Gilson instrument via GSIOC cable or controllable by PC via a RS-232/GSIOC adapter such as the Gilson 605 or 506 interface. Baud Rate: 9600 or 19200 selectable. Number of modules that can be controlled by a single master: Eight. Data format: 8 bits with parity error checking. Commands: Refer to Appendix B GSIOC . Conformity to Norms Gilson's 402 Syringe Pump conforms to EEC Directive 89/336/EEC for electromagnetic compatibility: Standard EN 50081-1 for emission, Standard EN 50082-1 for immunity, Standard EN 61326. Gilson's 402 Syringe Pump conforms to EEC Directive 73/23/EEC for safety: Standards EN 61010-1, UL 3101-1, and CAN/CSA C22.2 N° 1010-1. Appendix C-6 Technical Data Appendix Storage Indoor use only. Installation: Category II. Altitude: operating storage Temperature range: operating storage up to 2000 m. up to 4600 m. 4°C to 40°C. -15°C to +40°C. Environmental Conditions Environmental Conditions C Pollution degree 2. Humidity: Maximum relative humidity 80% for temperatures up to 31°C decreasing linearly to 50% relative humidity at 40°C. Power Requirements Frequency: 50 to 60 HZ. Voltage: 100 to 240 V ac, mains supply voltage fluctuations should not exceed ±10% of the nominal voltage. Power rating: 110 VA. Each 402 Syringe Pump is subjected to a Dielectric Test (1500 V between live/neutral and earth) and an Earth Bonding Impedance Test (압 0.1 ⏲). Size and Weight Dimensions: (W x D x H) 70 x 215 x 240 mm. Weight: single syringe model: 5kg dual syringe and Tee junction model: 7kg dual syringe and dual valve model: 7.5 kg. Appendix C-7 Technical Data Appendix C-8 Appendix C 0 Index 401 Emulation mode Microswitch setting GSIOC command 3-6 B-5 Additional accessories list Assembling the syringe and piston Autoclaving 3-2 5-3 Baud rate selection Bit rate selection 3-8 3-8 Changing the piston assembly Cleaning the instrument - exterior the syringe assembly the Tee junction the tubing the valve Control mode (setting) 5-6 5-2 5-6 5-5 5-3 5-4 3-8 Dead volume of the valve Dilution ratio Disassembling the valve Dismounting the valve Dual syringe/Tee configuration Dual syringe/Dual valve config. x-x x-x 5-4 5-4 2-4 2-7 Electrical problems Error of accuracy precision External clock setting 6-2 x-x x-x 3-8 Flow path materials Fuses - installing/changing 1-3 3-4 GSIOC commands B-1 402 Mode - Immediate commands B-2 402 Mode - Buffered commands B-x 401B - Immediate commands B-x 401B - Buffered commands B-x GSIOC connector 3-5 GSIOC ID number 3-6 Hydraulic connections Tee junction outlet Transfer tubing Valve inlet tubing Valve outlet Waste tubing Hydraulic problems 3-9 3-10 3-9 3-9, 3-10 3-9, 3-10 3-9, 3-10 6-2 Installing syringes Installing the fuses Interface - Technical Data Internal clock setting 3-2 3-4 C-x 3-8 Liquid contact materials C-x Maintenance 5-1 Autoclaving 5-3 Changing the piston assembly 5-6 Cleaning the instrument 5-2 Cleaning the syringe assembly 5-6 Cleaning the Tee junction 5-5 Cleaning the tubing 5-3 Cleaning the valve 5-4 Disassembling the valve 5-4 Dismounting the valve 5-4 Mechanical problems 6-2 Microswitches/settings 3-5 401 emulation mode setting 3-6 Baud rate selection 3-8 Bit rate selection 3-8 Control mode 3-8 External clock setting 3-8 GSIOC ID number 3-6, 3-7 Internal clock setting 3-8 Norms, conformity to C-x Parts lists Additional accessories list Spare parts list Standard equipment lists Piston assembly - changing x-x x-x x-x x-x 5-6 Index-1 Index Power cord connecting types 3-5 Safety-1 Safety Safety-1 Sector block 3-4 Fuses - Installing/changing 3-4 Installing the fuses 3-4 Power cord - connecting 3-5 Power cord - types Safety-1 Voltage Safety-1, 3-4 Service 1-6 Spare parts list x-x Standard equipment lists x-x Syringe installing 3-2 Technical data x-x Syringe and piston - assembling 3-2 Syringe assembly - cleaning 5-6 Technical data Dead volumes Dilution ratio Error of accuracy Error of precision Interface Liquid contact materials Norms - conformity to Syringe Tee junction cleaning outlet connections Transfer tubing connections Troubleshooting Electrical problems Hydraulic problems Mechanical problems C-1 x-x x-x x-x x-x x-x x-x x-x x-x x-x, x-x 5-5 3-9 3-9 6-1 6-2 6-2 6-2 Unpacking Upgrading second syringe and valve syringe and tee junction 1-4 Valve disassembly dismounting inlet tubing connections outlet connections x-x 5-4 5-4 3-9 3-9 Index-2 4-5 4-7 Voltage 3-4 Warranty Waste tubing connections 1-5 3-9 World Wide Web: www.gilson.com E-mail: [email protected], [email protected], [email protected] World Headquarters Gilson, Inc. 3000 W. Beltline Hwy., P.O. Box 620027, Middleton, WI 53562-0027, USA Telephone: (1) 800-445-7661 or (1) 608-836-1551 • Fax: (1) 608-831-4451 Gilson SAS 19 avenue des Entrepreneurs, 95400 Villiers-le-Bel, France Telephone: (33) 1-34-29-50-00 • Fax: (33) 1-34-29-50-80