1
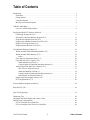
Part No. 92797SL, Rev. A
ToroPC
User’s Manual
TM
AUTOMATED CONTROL ELECTRONICS TM
Commercial Products
© The Toro Company – 1992, 1993
This page is blank.
FORM 92-797-SL, Rev. A
ToroPC
User’s Manual
This copyrighted software is for use on an IBM compatible PC and for use with the Toro ACE TM system
ECU. It is to be used by a trained technician only. Loading and/or using this software indicates your
acceptance of the terms of the Software License Agreement stated below.
Software License Agreement:
1. This software is a proprietary product of The Toro Company and is protected by U.S. and international
copyright laws.
2. You may make one (1) backup copy only.
3. You can use the software only in conjunction with the Toro ACE TM system ECU.
4. You may not sublicense, rent, or lease the software.
5. Any decompilation, recompilation, or modification of the software, not expressly authorized by Toro,
is unauthorized.
© The Toro Company – 1992, 1993. All Rights Reserved.
Information in this document is subject to change without notice.
IBM is a registered trademark of International Business Machines Corporation.
MS-DOS is a registered trademark of Microsoft Corporation.
This page is blank.
Table of Contents
Introduction . . . . . . . . . . . . . . . . . . . . . . . . . . . . . . . . . . . . . . . . . . . . . . . . . . . . . . . . . . . . . . . . . . . .
Definitions . . . . . . . . . . . . . . . . . . . . . . . . . . . . . . . . . . . . . . . . . . . . . . . . . . . . . . . . . . . . . . . . .
Getting Started . . . . . . . . . . . . . . . . . . . . . . . . . . . . . . . . . . . . . . . . . . . . . . . . . . . . . . . . . . . . . .
Using the Program . . . . . . . . . . . . . . . . . . . . . . . . . . . . . . . . . . . . . . . . . . . . . . . . . . . . . . . . . . .
Moving Around in the Program . . . . . . . . . . . . . . . . . . . . . . . . . . . . . . . . . . . . . . . . . . . . . . . . .
1
2
3
5
6
TOROPC Main Menu . . . . . . . . . . . . . . . . . . . . . . . . . . . . . . . . . . . . . . . . . . . . . . . . . . . . . . . . . . . . 7
Overview of Main Menu Options . . . . . . . . . . . . . . . . . . . . . . . . . . . . . . . . . . . . . . . . . . . . . . . 8
Program and Read ECU Memory Menu (P). . . . . . . . . . . . . . . . . . . . . . . . . . . . . . . . . . . . . . . . . . . 9
Calibrating Analog Ports (P-1). . . . . . . . . . . . . . . . . . . . . . . . . . . . . . . . . . . . . . . . . . . . . . . . . 11
Erasing ECU Memory Machine Program (P-2). . . . . . . . . . . . . . . . . . . . . . . . . . . . . . . . . . . . 13
Program New Monitor From File (P-3) . . . . . . . . . . . . . . . . . . . . . . . . . . . . . . . . . . . . . . . . . . 14
Program New Machine Software From File (P-4). . . . . . . . . . . . . . . . . . . . . . . . . . . . . . . . . . 15
Display ECU Program Status (P-5) . . . . . . . . . . . . . . . . . . . . . . . . . . . . . . . . . . . . . . . . . . . . . 18
Display Monitor Revision Level (P-6). . . . . . . . . . . . . . . . . . . . . . . . . . . . . . . . . . . . . . . . . . . 18
Toro Machine Diagnostics Menu (T) . . . . . . . . . . . . . . . . . . . . . . . . . . . . . . . . . . . . . . . . . . . . . . .
Watch Switches Without Running Machine (T-1) . . . . . . . . . . . . . . . . . . . . . . . . . . . . . . . . .
Watch Switches While Running (T-2). . . . . . . . . . . . . . . . . . . . . . . . . . . . . . . . . . . . . . . . . . .
Faults . . . . . . . . . . . . . . . . . . . . . . . . . . . . . . . . . . . . . . . . . . . . . . . . . . . . . . . . . . . . . . . . .
Filter Inputs by Functional States (T-3) . . . . . . . . . . . . . . . . . . . . . . . . . . . . . . . . . . . . . . . . . .
Open Data File for PC Capture (T-4). . . . . . . . . . . . . . . . . . . . . . . . . . . . . . . . . . . . . . . . . . . .
Watch Machine As It Ran (1) . . . . . . . . . . . . . . . . . . . . . . . . . . . . . . . . . . . . . . . . . . . . . .
Compare Input to Functional State Requirements (2). . . . . . . . . . . . . . . . . . . . . . . . . . . .
Analyze Data From Data Log Controller (T-5) . . . . . . . . . . . . . . . . . . . . . . . . . . . . . . . . . . . .
Save File For Analysis Later (4) . . . . . . . . . . . . . . . . . . . . . . . . . . . . . . . . . . . . . . . . . . . .
Watch the Machine as It Ran (1) . . . . . . . . . . . . . . . . . . . . . . . . . . . . . . . . . . . . . . . . . . . .
Compare Input to Functional State Requirements (2). . . . . . . . . . . . . . . . . . . . . . . . . . . .
Search Inputs for Functional State (3). . . . . . . . . . . . . . . . . . . . . . . . . . . . . . . . . . . . . . . .
Display Input and Output Locations (T-6). . . . . . . . . . . . . . . . . . . . . . . . . . . . . . . . . . . . . . . .
ECU Program Status (T-7) . . . . . . . . . . . . . . . . . . . . . . . . . . . . . . . . . . . . . . . . . . . . . . . . . . . .
19
21
22
23
24
27
29
30
32
33
34
35
37
39
40
Activate Machine Program and Run (J) . . . . . . . . . . . . . . . . . . . . . . . . . . . . . . . . . . . . . . . . . . . . . 41
Reset the ECU (R). . . . . . . . . . . . . . . . . . . . . . . . . . . . . . . . . . . . . . . . . . . . . . . . . . . . . . . . . . . . . . 42
Quit This Program (Q) . . . . . . . . . . . . . . . . . . . . . . . . . . . . . . . . . . . . . . . . . . . . . . . . . . . . . . . . . . 43
Diagnosing Tips . . . . . . . . . . . . . . . . . . . . . . . . . . . . . . . . . . . . . . . . . . . . . . . . . . . . . . . . . . . . . . .
Languages other than English and Country Codes. . . . . . . . . . . . . . . . . . . . . . . . . . . . . . . . . . . . .
Backing Up the Program Disk . . . . . . . . . . . . . . . . . . . . . . . . . . . . . . . . . . . . . . . . . . . . . . . . . . . .
If Your Computer Has a Hard Disk . . . . . . . . . . . . . . . . . . . . . . . . . . . . . . . . . . . . . . . . . . . . .
If Your Computer Does Not Have a Hard Disk. . . . . . . . . . . . . . . . . . . . . . . . . . . . . . . . . . . .
ToroPC User’s Manual
1
44
46
48
48
48
Table of Contents
This page is blank.
Introduction
The program TOROPC is used to allow interaction with the Toro Electronic Control Unit (ECU) used on
machines equipped with Toro AUTOMATED CONTROL ELECTRONICS TM (ACE TM). This allows the user to
perform diagnostics on a machine equipped with the ECU or to program new software into an ECU.
The program is menu driven, which means that at each step, you are prompted with the available choices.
At each point, you need only to enter a minimum amount of information, usually only one letter or
number. This makes the program more easily used by those who may not be good typists and those who
use it infrequently.
There are two types of choices on the menus. One type is indicated by two dashes following the menu
choice (i.e. J – – ). This indicates that choosing this option will cause the requested action to occur. The
second type of menu choice is indicated by an arrow following the menu choice (i.e. P – >). This
indicates that a submenu of choices will be displayed when this option is selected.
ToroPC User’s Manual
3
Introduction
Definitions
Certain words are used in this manual which may be unfamiliar to the user. Some of these words and
their definitions are listed here as a quick reference.
NOTE: Information which will be displayed on the PC will be shown like this:
Information displayed on PC
NOTE: Anything that you must enter into the PC (type on the PC keyboard) will be in bold italics.
UPPER and lower case letters may be used interchangeably within the program, except for the
password, which must be entered in the correct case.
<CR> in this manual means pressing the ENTER or RETURN key on the PC keyboard.
ESC in the manual means pressing the key labelled ESC, which is usually on the left top of the keyboard.
PC refers to the personal computer on which the program TOROPC is run. DOS refers to the disk
operating system which is supplied on the PC. TOROPC is designed to run on any IBM or compatible
PC, and requires only an RS232 communication port, configured as COM1, a 3.5 inch low or high density
floppy disk drive and DOS 3.1 or higher.
ECU refers to the Toro designed electronic control unit (85-4400) which is used as the machine controller
on Toro products equipped with AUTOMATED CONTROL ELECTRONICS TM (ACE TM).
Record is used with regard to the Data Log information. All of the input settings, all of the output
settings and any fault indications for one moment of time are saved as one record. When one of the
settings changes, a new record is saved.
Fault means that the controller has detected either a short circuit or open circuit condition on one of the
outputs, and has flagged that output as having a “fault”.
Functional state refers to one of the different machine functions which may be permitted if the required
inputs are met. For example, START (or engine cranking) is one functional state. LIFTing the cutting
units is another functional state.
Introduction
4
ToroPC User’s Manual
Getting Started
CAUTION
To avoid the possibility of personal injury, before using TOROPC on a machine:
Certain machine functions (such as lowering implement, etc.) may occur even when
the engine is not running. To avoid personal injury, be certain to lower
implement(s) completely to the ground and lock the parking brakes before starting
the program.
NOTE: Before using the program, make a backup copy of the program disk (see Backing Up the Program
Disk). Use the backup and save the original in a secure location. This way, if a disk is damaged, another
copy can be made. To use all options of ToroPC, the disk must not be write protected. This is because the
save option requires saving a file to the disk.
1. In order to use TOROPC, it must be connected to a Toro product which is equipped with a Toro ECU,
(part number 85-4400) via the special cable (part number 85-4560). To connect the PC to the machine:
Turn the key OFF. Find the 6 pin communication connector on the machine wire harness and carefully
remove the loop-back connector. Connect the 6 pin end of the special cable to the communication
connector on the machine and the 9 pin end of the special cable to the COM1 port (communication RS232
port) on the PC.
PC
Loop-back connector
Special
cable
Electronic Control Unit (ECU)
PC connected to machine
Reelmaster 5100-D shown
2. Turn the ignition key switch on the machine to the ON (RUN) position – DO NOT start the engine.
3. Turn on the PC and wait for it to “boot” (start up). After it has booted, insert the Toro program disk
into the disk drive.
4. Type a:<CR>. Then type toropc<CR>.
ToroPC User’s Manual
5
Introduction
5.The program will prompt you with:
Toro ECU Control Program Started
(c) Copyright 1991 - The Toro Company All Rights Reserved
Enter Password:
You must enter a valid password, (followed by a <CR>) or the program will not allow you to continue.
6. The program will prompt you with: (for example)
Program files to choose from:
1:
2:
3:
4:
854690 Reelmaster 5100-D Revision 1.0
854770 Reelmaster 223D Revision 1.0
854630 Reelmaster 223D Revision 2.0
854710 Data Log Controller Revision 1.0
(production RM5100-D)
(field refit RM223-D)
(production RM223-D)
(service tool)
Enter number of your choice:
At this point you must chose the version of software with which you will be working and enter the
number (from 1 to 4 in this example) of the desired choice and <CR>. If you choose the wrong
alternative, the diagnostic prompts will not correspond to the actual machine information, and/or it will
not be possible to program the ECU.
NOTE: Selection 4 in this example is used only for programming the Data Log Controller. You must
select a machine program (such as 1 in this example) to analyze data from the Data Log Controller when
doing machine diagnostics.
7. The program will prompt you with: (depending upon which file you select in step 5, this example is for
the RM5100D)
Toro ECU Control Program Version 1.0a 01/18/92 File: 854690
Machine: Reelmaster 5100-D Version 1.0
J – – Activate machine program and Run
P – > Program and Read ECU Memory
Q – – Quit this program
R – – Reset ECU
T – > Toro Machine Diagnostics
Enter your choice:
You may select the letter which corresponds to whichever option you wish to use.
Introduction
6
ToroPC User’s Manual
Using the Program
The program is menu driven, which means you are led through the program by a series of prompts. The
menu structure is as follows: (Some of these options may not be available to you, depending upon your
password.)
Toro ECU Control Program Version 1.0a MM/DD/YY File: (name)
Machine: (machine description)
J – – Activate machine program and Run
P – > Program and Read ECU Memory
1 – Calibrate Analog Ports
2 – Erase ECU Memory machine program
3 – Program new monitor from file
4 – Program new machine software from file
5 – Display ECU program status
6 – Display monitor revision
Q – – Quit this program
R – – Reset ECU
T – > Toro Machine Diagnostics
1 – – Watch switches without running machine
2 – – Watch the machine while running
3 – > Filter inputs by functional states
(Choices of functional states depends on machine)
4 – > Open Data file for PC capture
Enter the file name:
5 – > Analyze data from Data Log controller
1 – > Analyze a previously saved file
Enter the file name:
2 – > Read data from the Data Log controller
(from either 1 or 2:)
1 – Watch the machine as it ran
2 – Compare input to functional state
requirements
3 – Search inputs for functional state
4 – Save file for analysis later
6 – – Display input and output locations
7 – – ECU program status
ToroPC User’s Manual
7
Introduction
Moving Around in the Program
Moving around in the program is accomplished by simply entering the letter or number of the option of
choice. In most cases, there is no need for a <CR> following the choice, where a <CR> is required, this
manual reminds you to enter it. (The keyboard entries required to get to each selection are shown after
the title of each section in parenthesis, for ease of use.)
To move back a menu, or if a wrong choice is entered, simply press the ESC key. The ESC key will back
up one level, and you may return to the main menu by pressing ESC one or more times.
Introduction
8
ToroPC User’s Manual
TOROPC Main Menu
The main menu display and prompt is as follows:
Toro ECU Control Program Version 1.0a MM/DD/YY File: (name)
Machine: (machine description)
J – – Activate machine program and Run
P – > Program and Read Memory
Q – – Quit this program
R – – Reset ECU
T – > Toro Machine Diagnostics
Enter your choice:
MM/DD/YY is the current month, day, and year as read from the PC clock. If this date or time is
incorrect, refer to your PC manual to correct it. (It is necessary to have this date and time correct, since
each file saved will have a date and time stamp, so that looking at the files will tell you when they were
saved. This is necessary when using the Data Log controller to debug customer machines.)
File: (name) and Machine: (machine description) are the name of the file and the description of the
machine which were selected in the program startup stage. If the wrong file was selected at startup, you
must exit the program and restart, selecting the correct file. If not, the diagnostic prompts and input and
output listings will be incorrect for the machine on which the user is working, and it will not be possible
to program the ECU.
There are two types of choices on the menus. One type is indicated by two dashes following the menu
choice (i.e. J – – ). This indicates that choosing this option will cause the requested action to occur. The
second type is indicated by an arrow following the menu choice (i.e. P – >). This indicates that a
submenu of choices will be displayed when this option is selected.
ToroPC User’s Manual
9
TOROPC Main Menu
Overview of Main Menu Options
J – – Activate machine program and Run
In order for the machine to operate, the machine program must be running. If the PC was
connected (or the loopback connector disconnected) when the key switch was turned on, the
machine program will not be running. In order to activate the machine program, select this
option.
P – > Program and Read Memory
A number of alternatives are available including programming the ECU and reading what
software is currently loaded in the ECU. These options are displayed in a submenu which is
described under the “Program and Read Memory Menu” section.
Q – – Quit this program
This option allows the user to quit using the program and exit to the DOS prompt on the PC.
R – – Reset ECU
This option allows the user to reset the ECU forcing it to start over and verifying that
communications are working correctly between the PC and the ECU.
T – > Toro Machine Diagnostics
A number of alternatives are available allowing the user to diagnose problems with the
machine or ECU. These options are displayed in a submenu which is described under the
“Toro Machine Diagnostics Menu” section.
TOROPC Main Menu
10
ToroPC User’s Manual
Program and Read ECU Memory Menu (P)
The ECU memory menu display and prompt is as follows:
Toro ECU Programming Menu
1 – Calibrate Analog Ports
2 – Erase ECU Memory machine program
3 – Program new monitor from file
4 – Program new machine software from file
5 – Display ECU program status
6 – Display monitor revision
Enter your choice:
The ECU memory menu gives the user a number of choices: learning what software is currently in the
ECU, programming new software into the ECU, and allowing calibration of the analog inputs.
1 – Calibrate Analog Ports
The analog inputs to the ECU are capable of reading a voltage supplied through a variable
resistor (potentiometer). In order for the ECU to know how to interpret (how to scale) the
voltage reading it receives, it must know the minimum and maximum readings of the
potentiometer connected to the analog input. With this option, the user is able to allow the
ECU to “learn” what these values are.
2 – Erase ECU Memory machine program
This option allows the user to erase the ECU memory. Note: this option is not required to be
used, even when reprogramming, since option 4 – Program new machine software from file
erases memory as part of the programming function.
3 – Program new monitor from file
This option allows the user to program a new monitor to the ECU. The monitor is the
operating system for the ECU, and is very rarely updated. If this is done, option “4 - Program
new monitor from file” must also be done since programming a monitor erases the machine
software.
4 – Program new machine software from file
This option allows the user to program new machine application software to the ECU. This
option would be selected to program a new ECU installed from service parts, or to update a
field unit after adding new options or when an improved version of software becomes
available.
ToroPC User’s Manual
11
Program and Read ECU Memory Menu (P)
5 – Display ECU program status
This option will read the current application program information from the ECU and display
it on the PC screen. In this way, the user can learn what software is currently installed in an
ECU.
6 – Display monitor revision
This option will read the current monitor revision from the ECU and display it on the PC
screen.
Program and Read ECU Memory Menu (P)
12
ToroPC User’s Manual
Calibrating Analog Ports (P-1)
The Calibrate Analog Ports menu is as follows:
(This menu depends upon the specific machine software chosen, and this example is from the RM5100D.)
Analog Channel
High
Low
———————————————————————————————————————
0:Start
1:HOC Selection Control
2:not used
3:not used
4:not used
C) calibrate channel, E) exit and save, Q) quit
If you want to calibrate an analog input, note the number of the analog channel, and enter C
The prompt will be:
Enter channel number:
Follow the prompt, and enter the channel number followed by <CR>.
The prompt will be:
Turn knob to maximum position in the clockwise direction and press any key.
Following the prompt, turn the knob clockwise to the maximum position (as far as it will go) and
press any key. The new prompt will be:
Turn knob to minimum setting in the counterclockwise direction and press any key.
Following the prompt, turn the knob counterclockwise to the minimum setting on the decal (not as far
as it will go) and then press any key. At this point, you are telling the ECU of the minimum setting,
not how far it will turn. Refer to the Operator’s Manual for your machine if you are not sure what the
minimum setting is.
ToroPC User’s Manual
13
Program and Read ECU Memory Menu (P)
The new prompt will be:
Turn knob to maximum setting in the clockwise direction and press any key.
Following the prompt, turn the knob clockwise to the maximum setting on the decal (not as far as it
will go – this will not be as far as in the first step) and then press any key. At this point, you are
telling the ECU of the maximum setting, not how far it will turn.
The prompt will be:
Analog Channel
High
Low
—————————————————————————————————————————
0:Start
1:HOC Selection Control
XXX
YYY
2:not used
3:not used
4:not used
C) calibrate channel, E) exit and save, Q) quit
If you want to save the calibration, enter E.
If you want to quit without saving any changes, enter Q. (This is rarely used.)
The prompt will be:
Are you sure that you want to quit (y or n)?
This confirms that you do not want to save any changes. (If you changed the calibration and want the
change to be permanent, you must save with E.)
Program and Read ECU Memory Menu (P)
14
ToroPC User’s Manual
Erasing ECU Memory Machine Program (P-2)
Erasing the memory is not normally required, since when the ECU is programmed, the memory is erased
as part of the programming process.
If this option is selected, the prompt will be:
Are you sure you want to erase (y or n)?
If n is entered, the prompt will be:
Press any key to continue
If y is entered, the display will be:
Erasure in process.
Erasing page XX%
When the erasing process is complete, this prompt will appear:
Press any key to continue
After erasing the application program from the ECU, it must be programmed before it can be used on
any machine. To verify what application program is loaded in an ECU, chose option Program and
Read ECU Memory, then option Display ECU program status.
ToroPC User’s Manual
15
Program and Read ECU Memory Menu (P)
Program New Monitor From File (P-3)
The monitor is the operating system for the ECU, and is not likely to change. However, in case it would
need to be changed, this menu selection will allow a new monitor version to be programmed. When this
option is selected, the program automatically starts to reprogram the monitor. It gives the following
message:
Programming new monitor...
Loading into PC memory...
At this point, the program will check to see that the disk which you have inserted into the PC actually
has a new monitor file on it. If the program does NOT find a new monitor file or if the Toro ECU
Monitor Program was not selected when starting ToroPC, it will display this message:
You have selected the wrong option!!
Program selected requires the program new machine software option.
Check your diskette.
To program a new monitor you must select the monitor program file after typing TOROPC.
Press any key to continue
If the program does find a new monitor file, it will load the new monitor into the ECU. It will display
the following message:
Downloading to the ECU...
pages programmed – XX
Programming new monitor...
Program download successful
Press any key to continue
Erasure in progress
Erasing page - XX%
At this point, the new monitor is loaded. NOTE: after loading a new monitor, it is necessary to
load the machine software again, even if the ECU had machine software loaded prior to the new
monitor being loaded, since the ECU is like new. Follow the instructions for “Program new
machine software from file”.
Program and Read ECU Memory Menu (P)
16
ToroPC User’s Manual
Program New Machine Software From File (P-4)
When this option is selected, the program automatically starts to reprogram the ECU. It will attempt to
load the file which you selected when you started TOROPC. Be certain that you select the correct file
when you start! The following message will be displayed: (this message is dependent upon the file
chosen, this example is for the RM5100D)
ECU Programming status:
Product Name
Model Number
Serial Number
Software Revision
Date Programmed
Comment
Number of cycles
: RM5100D
:
:
: 1.0
: 112291
: Autoclip control
:3
Enter the model number of machine
In order to program new machine software, you must know the model number and serial number of
the machine on which the ECU will be installed. The model and serial number are located on the
serial number plate on the machine. At this point, you must enter a valid model number followed by
a <CR>. The program will check the model number entered against the model number required for
the software which you are attempting to load. If you enter a valid model number, the following
message will appear:
ECU Programming status:
Product Name
Model Number
Serial Number
Software Revision
Date Programmed
Comment
Number of cycles
: RM5100D
: XXXXX
:
: 1.0
: 112291
: Autoclip control
: 3
Enter the serial number
You must enter a valid serial number. The program will also check the serial number entered against
the valid serial number range for the software which you are attempting to load.
ToroPC User’s Manual
17
Program and Read ECU Memory Menu (P)
After entering a valid model and serial number, the following message will appear:
ECU Programming status:
Product Name
Model Number
Serial Number
Software Revision
Date Programmed
Comment
Number of cycles
: RM5100D
: XXXXX
: YYYYYY
: 1.0
: 112291
: Autoclip control
:3
Is everything ok (y or n or q)?
Pressing n allows the user to correct any mistake which may have been made, and the user will again
be asked to input the model and serial numbers.
Pressing q will cancel the attempt to program new machine software.
Pressing y will result in the following display:
Programming ECU for new machine...
Programming new ECU program...
Loading into PC memory ...
Downloading to ECU...
Pages programmed XX%
followed by:
Programming new ECU program...
Loading into PC memory...
Program verified YY%
As the program is loading the new software, it will update the percent done. The percent done is
listed so that you can see that the program is working as it takes several minutes to load a new
software file.
When the programming process is complete, the following message will be added to the display:
Program download successful
Press any key to continue
Program and Read ECU Memory Menu (P)
18
ToroPC User’s Manual
If you do not enter a valid model number or valid serial number for the software which you are trying
to load, the following message will appear:
ECU Programming status:
Product Name
Model Number
Serial Number
Software Revision
Date Programmed
Comment
Number of cycles
: RM5100D
: XXXXX
Software does not support this machine
: YYYYYY
Software does not support this machine
: 1.0
: 112291
: Autoclip control
:3
Is everything ok (Y or N or Q)?
Please check model or serial number
If you have selected the wrong file at the start of TOROPC and are trying to load a new application
program, TOROPC will not allow it due to the model and serial numbers being out of the range. If
you are in the Program new application from file option and discover you have selected the wrong
file, simply enter <CR> until the Is everything ok (Y or N or Q)? prompt appears, and then select
choice Q. Then you may quit from the program and start over, selecting the correct file.
If the program fails to program the ECU successfully, a number of error messages may occur. Some
examples of error messages are:
Error on command to ECU, please try again
Please note message which follows:
page failed to load correctly
Programming aborted
Press any key to continue
Timeout on communications with ECU
Please try again
Press any key to continue
If any error messages occur, and programming is not completed successfully, do the following steps:
1)
2)
3)
4)
Quit from TOROPC.
Turn the machine key switch OFF for 2 - 5 seconds, and ON again.
Start TOROPC again.
Try again to program the ECU.
ToroPC User’s Manual
19
Program and Read ECU Memory Menu (P)
Display ECU Program Status (P-5)
This option will read the program from the ECU and display that information to the PC so that you can
tell what software is in the ECU. The following is an example of this display:
ECU Programming status:
Product Name
Model Number
Serial Number
Software Revision
Date Programmed
Comment
Number of cycles
: RM5100D
: XXXXX
: YYYYYY
: 1.0
: 112291
: Autoclip control
:3
Press any key to continue
Display Monitor Revision Level (P-6)
This option will read the monitor revision level from the ECU and display that information to the PC so
that you may tell what monitor revision is in the ECU. The following is an example of this display:
Current monitor revision level: XX
Press any key to continue
Program and Read ECU Memory Menu (P)
20
ToroPC User’s Manual
Toro Machine Diagnostics Menu (T)
The Toro Machine Diagnostics menu and prompt is as follows:
Toro Diagnostic Options:
1 – – Watch switches without running machine
2 – – Watch the machine while running
3 – > Filter inputs by functional states
4 – > Open Data File for PC capture
5 – > Analyze data from Data Log controller
6 – – Display input and output locations
7 – – ECU Program Status
Enter your choice:
The Toro machine diagnostics menu gives the user a number of choices of how to approach the diagnostic
session, depending upon the information which the user needs to fix the problem. The options are
explained below:
1 – – Watch switches without running machine
This is the RECOMMENDED METHOD TO VERIFY THAT ALL INPUTS TO THE ECU ARE
FUNCTIONING NORMALLY. This option allows the user to watch the state of all input
switches without running the application software. With this option, the machine will not
run, so the outputs will not turn on, but the ECU and the PC will be aware of each input
switch change. Using this option is somewhat similar to looking at the “inputs displayed” on
the handheld diagnostic display tool.
2 – – Watch the machine while running
CAUTION
When this menu selection is made, the machine will function normally. For example,
you can start the engine, operate cutting units, etc. To avoid personal injury, sit on
the seat (at operator’s station), warn personnel to stay clear of machine, lower
implement(s) to ground and lock the parking brakes before starting the program.
This option appears much like option 1, except that IN THIS OPTION THE MACHINE WILL
FUNCTION NORMALLY. For example, you can start the engine, operate cutting units, etc.
Both inputs and outputs will be displayed on the PC. Using this option is similar to both the
“inputs displayed” and “outputs displayed” on the handheld diagnostic display tool.
ToroPC User’s Manual
21
Toro Machine Diagnostics Menu (T)
3 – > Filter inputs by functional states
This option allows the user to have the program compare the input switch setting to a desired
functional state. The user is asked to select a desired function an a submenu, and the program
then compares the actual input settings to those required to allow that function to occur.
4 – > Open Data File for PC capture
This option allows the user to capture and analyze data with a PC. The display is the same as
option 2, however a log of all input/output changes is saved to disk for later review.
5 – > Analyze data from Data Log controller
This option is used when the user wants to read the information from a Data Log controller
and save it on a PC file, or analyze it without saving it.
6 – – Display input and output locations
This option will tell the user which inputs are used for which switches, and which outputs are
used for which solenoids, relays or other electrical loads.
7 – – ECU Program Status
This option will tell the user what program is in the ECU.
Toro Machine Diagnostics Menu (T)
22
ToroPC User’s Manual
Watch Switches Without Running Machine (T-1)
The watch switches without running machine display is as follows: (This display is different depending
upon which machine option is selected at program startup, this example is RM5100D. The text will be
different for different machines, but the format is identical.)
Toro controller Status: Reelmaster 5100-D Revision 1.0
Open
Open
Closed
Closed
Closed
Open
Open
Open
Open
Open
Open
Open
Open
Open
Open
Open
Open
Open
Not used
Not used
Run input from key
Traction neutral
Seat switch
High engine temperature
Not used
Raise reels
Enable reels
Front reels down
Front backlapping
Rear backlapping
Lower/Mow reels
5/8 (Cl=5) blade switch
Front reel speed
Rear reel speed
Transmission speed
Not used
Off
Off
Off
Off
Off
Off
Off
Off
Off
Off
Off
Off
Off
Off
3
3
3
3
3
0) Fri Dec 20 07:56:04 1991
1
Out of range lamp
Solenoid S8,S9 (backlap)
Solenoid S2 (rear reels)
Solenoid S3 (center lift/lower)
Solenoid S4 (wing lift/lower)
Solenoid S5 (rear lift/lower)
Solenoid S6 (lower front/rear)
ETR hold, Alt run
Solenoid VS1 (front speed control)
Solenoid VS2 (rear speed control)
Solenoid S1 (front reels)
Solenoid S7 (lift front/rear)
Start
Preheat
Start
HOC selection control
Not used
Not used
Not used
Battery: 13.7V
This screen is used to check the performance of each input switch. For example, changing the “enable”
switch from disable to enable should result in the Enable reels listing changing from Open to Closed.
When this option is selected, the machine will not run, and all of the outputs will always be listed as Off.
This option can be used to verify the correct performance of the analog inputs to the ECU (Start and HOC
selection control). NOTE: When the key is off, the ECU will not be powered. For example, the Start
input is shown as 3 in this display above. When the key is in the run position, this number must be low.
However, when the key is turned to the start position, this number must become larger. Or, for the
example above, turning the HOC selector while watching this screen should result in the number in front
of HOC selection control changing.
ToroPC User’s Manual
23
Toro Machine Diagnostics Menu (T)
Watch Switches While Running (T-2)
CAUTION
When in this part of the program, the machine will function normally. For example,
you can start the engine, operate cutting units, etc. To avoid personal injury, sit on
the seat (at operator’s station), warn personnel to stay clear of machine, lower
implement(s) to ground and lock the parking brakes before beginning diagnostics.
The watch switches while running display is as follows: (this display is different depending upon which
machine option is selected at program startup, this example is RM5100D)
NOTE: after selecting this option, if no data appears on the screen, simply move any input switch (i.e.
move enable switch from enable to disable) to get the data to appear.
Toro controller Status: Reelmaster 5100-D Revision 1.0
Open
Open
Closed
Closed
Closed
Open
Open
Open
Open
Open
Open
Open
Open
Open
Open
Open
Open
Open
Not used
Not used
Run input from key
Traction neutral
Seat switch
High engine temperature
Not used
Raise reels
Enable reels
Front reels down
Front backlapping
Rear backlapping
Lower/Mow reels
5/8 (Cl=5) blade switch
Front reel speed
Rear reel speed
Transmission speed
Not used
Off
Off
Off
Off
Off
Off
Off
On
Off
Off
Off
Off
Off
Off
0) Fri Dec 20 07:56:04 1991
1
Out of range lamp
Solenoid S8,S9 (backlap)
Solenoid S2 (rear reels)
Solenoid S3 (center lift/lower)
Solenoid S4 (wing lift/lower)
Solenoid S5 (rear lift/lower)
Solenoid S6 (lower front/rear)
ETR hold, Alt run
Solenoid VS1 (front speed control)
Solenoid VS2 (rear speed control)
Solenoid S1 (front reels)
Solenoid S7 (lift front/rear)
Start
Preheat
This screen is used for two functions; the first is to check the performance of each input switch.
Changing the “enable” switch from disable to enable should result in the Enable reels listing changing
from Open to Closed, for example.
This screen also allows the user to check the output state of each solenoid. While in this display, the
machine will actually run if desired. NOTE: A more useful way to use the diagnostics is usually with the
KEY SWITCH ON BUT THE MACHINE NOT RUNNING. In this way, the outputs will be turned on and off
Toro Machine Diagnostics Menu (T)
24
ToroPC User’s Manual
as if the machine were running, but the machine will not move. Then as the inputs are changed, the
outputs will be turned on as required, and the user can verify their performance.
Faults
The Watch switches while running display will also display output faults if they occur:
Toro controller Status: Reelmaster 5100-D Revision 1.0
Open
Open
Closed
Closed
Closed
Open
Open
Open
Open
Open
Open
Open
Open
Open
Open
Open
Open
Open
Not used
Not used
Run input from key
Traction neutral
Seat switch
High engine temperature
Not used
Raise reels
Enable reels
Front reels down
Front backlapping
Rear backlapping
Lower/Mow reels
5/8 (Cl=5) blade switch
Front reel speed
Rear reel speed
Transmission speed
Not used
Off
Out of range lamp
Off
Solenoid S8,S9 (backlap)
Off
Solenoid S2 (rear reels)
Off
Solenoid S3 (center lift/lower)
Off
Solenoid S4 (wing lift/lower)
Off
Solenoid S5 (rear lift/lower)
Off F Solenoid S6 (lower front/rear)
On
ETR hold, Alt run
Off
Solenoid VS1 (front speed control)
Off
Solenoid VS2 (rear speed control)
Off
Solenoid S1 (front reels)
Off
Solenoid S7 (lift front/rear)
Off
Start
Off
Preheat
0) Fri Dec 20 07:56:04 1991
1
In the example shown above, the ECU has detected a fault (F) on the output for Solenoid S6 (lower
front/rear). This means that the output is either short-circuited or open-circuited. The user is immediately
directed to correct the electrical problem to S6.
To reset a faulted output, the ECU must be turned off, by turning the key switch to the off position. As
long as the fault has been detected and not reset, the ECU will not turn that output on again. After the key
is turned off and back on, press ESC to back up the program and then reselect option Watch machine
while running to restart the ECU.
NOTE: You can use this option if the diagnostic light on the machine is flashing. By connecting the PC to
the ECU on the machine without turning the ignition key switch off, or changing a input switch, the fault
will be displayed. If the machine is turned off, the ECU will reset and not show the fault. You can stop the
engine by manually pushing the fuel stop lever on the diesel injection pump or engaging the parking
brake, then raising off the seat and pushing the traction pedal (interlock circuit will shut off the engine).
ToroPC User’s Manual
25
Toro Machine Diagnostics Menu (T)
Filter Inputs by Functional States (T-3)
The Filter inputs by functional states display and prompt is as follows: (this screen is dependant upon the
machine option selected upon program startup, this example is of RM5100D)
Choices:
1.)
2.)
3.)
4.)
5.)
6.)
7.)
8.)
9.)
10.)
11.)
12.)
Preheat
Start
Run(with traction neutral)
Run(with operator in seat)
Lower (with reels disabled)
Transport Raise (with reels disabled)
Lower/Mow (with reels enabled)
Raise(with reels enabled)
Backlap Front
Backlap Rear
Mow
Engine stops
Enter number of your choice: (1 to 12):
Enter the number (1 to 12 in this example) followed by <CR>.
This option allows the computer to compare the actual inputs to the inputs which are required to allow a
certain machine function to occur. For example, if the machine will not lower the cutting units to mow,
the user could select choice 7.
Toro Machine Diagnostics Menu (T)
26
ToroPC User’s Manual
The resulting display of inputs filtered by functional states is as follows: (This display again is machine
specific, this example is RM5100D)
NOTE: After selecting this option, if no data appears on the screen, simply change any input switch (i.e.
move enable switch from enable to disable) to start the data display.
Toro controller Status: Reelmaster 5100-D Revision 1.0
OK
OK
OK
OK
OK
OK
OK
OK
OK
OK
OK
OK
OK
OK
OK
OK
OK
OK
Not used
Not used
Run input from key
Traction neutral
Seat switch
High engine temperature
Not used
Raise reels
Enable reels
Front reels down
Front backlapping
Rear backlapping
Lower/Mow reels
5/8 (Cl=5) blade switch
Front reel speed
Rear reel speed
Transmission speed
Not used
Off
Off
Off
Off
Off
Off
Off
On
Off
Off
Off
Off
Off
Off
0) Fri Dec 20 07:56:04 1991
1
Out of range lamp
Solenoid S8,S9 (backlap)
Solenoid S2 (rear reels)
Solenoid S3 (center lift/lower)
Solenoid S4 (wing lift/lower)
Solenoid S5 (rear lift/lower)
Solenoid S6 (lower front/rear)
ETR hold, Alt run
Solenoid VS1 (front speed control)
Solenoid VS2 (rear speed control)
Solenoid S1 (front reels)
Solenoid S7 (lift front/rear)
Start
Preheat
Options: R) return to menu, N) new machine state
This display will help isolate hydraulic problems from electrical problems.
ToroPC User’s Manual
27
Toro Machine Diagnostics Menu (T)
If the ECU finds an error in the inputs causing the requested function not to occur, the display would look
like this: (again this is a RM5100D example)
Toro controller Status: Reelmaster 5100-D Revision 1.0
OK
OK
OK
OK
OK
OK
OK
OK
OK
OK
OK
OK
BAD
OK
OK
OK
OK
OK
Not used
Not used
Run input from key
Traction neutral
Seat switch
High engine temperature
Not used
Raise reels
Enable reels
Front reels down
Front backlapping
Rear backlapping
Lower/Mow reels
5/8 (Cl=5) blade switch
Front reel speed
Rear reel speed
Transmission speed
Not used
Off
Off
Off
Off
Off
Off
Off
On
Off
Off
Off
Off
Off
Off
0) Fri Dec 20 07:56:04 1991
1
Out of range lamp
Solenoid S8,S9 (backlap)
Solenoid S2 (rear reels)
Solenoid S3 (center lift/lower)
Solenoid S4 (wing lift/lower)
Solenoid S5 (rear lift/lower)
Solenoid S6 (lower front/rear)
ETR hold, Alt run
Solenoid VS1 (front speed control)
Solenoid VS2 (rear speed control)
Solenoid S1 (front reels)
Solenoid S7 (lift front/rear)
Start
Preheat
Options: R) return to menu, N) new machine state
This display indicates to the user that the reason that the machine will not perform the requested function
is that the Lower/Mow switch is not in the correct position. The switch may be set incorrectly, or may be
non-functional, but the user is directed to the Lower/Mow switch to determine the malfunction in this
example.
The user has the choice to either return to the previous menu or continue filtering the input switches by
selecting a new machine state by which to filter.
Toro Machine Diagnostics Menu (T)
28
ToroPC User’s Manual
Open Data File for PC Capture (T-4)
This option is used to open a file in the PC to save information while doing diagnostic servicing, or to
read such a file at a later date. This is different from using the Data Log controller and the resulting files
should not be confused with the Data Log controller files.
Choosing this option will result in the following display and prompt:
Enter file name:
The user must type in the name of a file into which machine operating information will be saved. There
are several choices of how to proceed. A new file (one which does not already exist) may be opened and
used to save data from the debugging session, or an old file (one which already exists) may be opened and
the data read from that. The program will automatically add the .MDD to the end of the entered file
name. This allows files generated with this option to be distinguished from all other files.
If the file already exists, the message and prompt will be:
File exists!!: XXXX.MDD
O) Overwrite, R) read, A) append, Q) quit
If O is chosen, the old file will be destroyed, and a new file created, saving the data which is being
generated while the user is diagnosing the machine.
If R is chosen, the old file will be read, and the user will be able to analyze this previously saved
information.
When R is chosen, the display and prompt will be:
Read: File contains XX records
At which record would you like to begin scan?
If you would like to review the file from beginning to end, enter record
number 1 <CR>. This will allow you to review the file just as the machine ran.
If you know that the problem occurred just before the data was saved, (which is just before
the end of the file) then enter a number which is about 10 less than the number of records in
the file. This will allow you to skip the initial part of the file in which you are likely not
interested.
If you know that the problem occurred just at the end of the file, and you want to look
through the file backwards, enter the value XX<CR>. This will allow you to begin at the end
of the data. Note that this may be confusing since the information is in backwards order from
how it actually happened.
ToroPC User’s Manual
29
Toro Machine Diagnostics Menu (T)
If A is chosen, the old file is kept, and new information will be added on to the end of the old file.
This can get very confusing, since it is very difficult to know where the old data ends and the new
data begins, so use this option with care!
If Q is chosen, the program will cancel the attempt to open a data file. This may be selected if the
wrong file name is entered, and the user does not wish to overwrite, read, or append the selected file.
After the file is opened and the data (if any) is read, the following message and prompt will appear:
Toro Diagnostic options:
Source: (Machine or file) | Data Log: (ON or OFF) | File: filename.MDD
Options:
1.) Watch the machine as it ran.
2.) Compare input to functional state requirements
Enter your choice:
One of the options listed in this menu, 1 or 2, must be selected to capture data. It is also used to watch
an old file.
The message tells that File: filename.MDD is the name of the file which was input by the user. Note
that the .MDD is automatically appended by the program.
The message Source: Machine indicates that the information (data) which goes into the file will come
from watching what is happening on the actual machine. This would be the case for opening a new
file. The message Source: filename.MDD indicates that the information which is being interpreted by
the program is coming from the file which was opened.
The message Data Log: ON indicates that the file is capturing (saving) the information to the file.
This would be the case when opening a new file. (When reading data from a file, the message
DataLog:OFF does not appear.
When the user exits from this option (pressing ESC key), the file which has been created is
automatically saved under the file name which was specified at the beginning. The user does not
have to remember to save the file, as it is done automatically.
Toro Machine Diagnostics Menu (T)
30
ToroPC User’s Manual
Watch Machine As It Ran (1)
This option allows the user to look through a previously recorded file and observe what happened with
the machine during that diagnostic session.
This option also allows the user to watch the machine with the PC connected and save the information to
a file. While the file is open and the machine is running, each record of input and output information is
saved to the file. At the same time, the inputs and outputs are displayed to the user.
The display and prompt will be: (example from a RM5100-D)
Toro controller Status: Reelmaster 5100-D Revision 1.0
Open
Open
Closed
Closed
Closed
Open
Open
Open
Open
Open
Open
Open
Open
Open
Open
Open
Open
Open
Not used
Not used
Run input from key
Traction neutral
Seat switch
High engine temperature
Not used
Raise reels
Enable reels
Front reels down
Front backlapping
Rear backlapping
Lower/Mow reels
5/8 (Cl=5) blade switch
Front reel speed
Rear reel speed
Transmission speed
Not used
Off
Off
Off
Off
Off
Off
Off
On
Off
Off
Off
Off
Off
Off
record XX of record XX) Fri Dec 20 07:56:04 1991
Out of range lamp
Solenoid S8,S9 (backlap)
Solenoid S2 (rear reels)
Solenoid S3 (center lift/lower)
Solenoid S4 (wing lift/lower)
Solenoid S5 (rear lift/lower)
Solenoid S6 (lower front/rear)
ETR hold, Alt run
Solenoid VS1 (front speed control)
Solenoid VS2 (rear speed control)
Solenoid S1 (front reels)
Solenoid S7 (lift front/rear)
Start
Preheat
1
ESC) to exit, “b” goes back one record, press any key to continue
ToroPC User’s Manual
31
Toro Machine Diagnostics Menu (T)
Compare Input to Functional State Requirements (2)
This option allows the user to look at a previously saved data file, and to compare the information in the
file to the settings which are required to allow a certain function to occur. It is also useful for diagnosing
a machine without the saved data file, where the technician doing the troubleshooting is not certain what
inputs are required for certain output functions to occur. In this way, the user may determine if the
machine is being “told” to do the desired function. The display will be as follows:
Choices:
1.)
2.)
3.)
4.)
5.)
6.)
7.)
8.)
9.)
10.)
11.)
12.)
Preheat
Start
Run(with traction neutral)
Run(with operator in seat)
Lower(with reels disabled)
Transport raise(with reels disabled)
Lower/Mow(with reels enabled)
Raise(with reels enabled)
Backlap front
Backlap rear
Mow
Engine stops
Enter number of your choice: (1 to 12):
The user should enter the number which corresponds to the desired function followed by a <CR>. The
program will then filter the data in the file to tell if the desired function is allowed or not. If the desired
function is not allowed, the display will tell which switch is not set correctly to allow the desired function.
The display will be as follows: (this example is for lower/mow for a RM5100D).
Toro Machine Diagnostics Menu (T)
32
ToroPC User’s Manual
The display will be as follows: (this example is for lower/mow for a RM5100D)
Toro controller Status: Reelmaster 5100-D Revision 1.0
OK
OK
OK
OK
OK
OK
OK
OK
OK
OK
OK
OK
BAD
OK
OK
OK
OK
OK
Not used
Not used
Run input from key
Traction neutral
Seat switch
High engine temperature
Not used
Raise reels
Enable reels
Front reels down
Front backlapping
Rear backlapping
Lower/Mow reels
5/8 (Cl=5) blade switch
Front reel speed
Rear reel speed
Transmission speed
Not used
Off
Off
Off
Off
Off
Off
Off
On
Off
Off
Off
Off
Off
Off
0) Fri Dec 20 07:56:04 1991
1
Out of range lamp
Solenoid S8,S9 (backlap)
Solenoid S2 (rear reels)
Solenoid S3 (center lift/lower)
Solenoid S4 (wing lift/lower)
Solenoid S5 (rear lift/lower)
Solenoid S6 (lower front/rear)
ETR hold, Alt run
Solenoid VS1 (front speed control)
Solenoid VS2 (rear speed control)
Solenoid S1 (front reels)
Solenoid S7 (lift front/rear)
Start
Preheat
In this example, the Lower/Mow reels was found to be in the wrong position to allow the desired function
to occur. This may be because the switch is set wrong (operator error) or because the switch is
malfunctioning. In any case, the technician is directed to the exact switch which is the cause of the
desired function not occurring.
ToroPC User’s Manual
33
Toro Machine Diagnostics Menu (T)
Analyze Data From Data Log Controller (T-5)
NOTE: When the Toro PC program is first started, a list of program files to choose from is shown (see
Page 4). You must select the program for the machine you are diagnosing, not Data Log Controller.
This option is selected to extract the information which was previously saved in a Data Log controller
while on a machine. The Data Log controller may be accessed in two ways: either while still connected
to the machine, or after it has been disconnected from the machine.
The Data Log controller is used to capture what happens on a machine, usually in the field, and is usually
used to diagnose a machine which is experiencing intermittent failures or problems which are elusive to
find.
If the Data Log is still connected to the machine, locate the 6 position connector on the Data Log which
has a loopback connector on it. Remove the loopback connector, and connect the adapter harness
between the 6 pin connector and the PC, and then turn on the machine key switch. The machine key
switch must be turned on to power the Data Log controller and allow extraction.
If the Data Log is not connected to the machine, a battery must be connected to the Data Log to power it.
The harness allows the connection of a standard Toro walk power mower battery for this purpose.
Remove the loopback connector from the 6 position connector on the Data Log harness and connect the
adapter harness between the 6 pin connector and the PC, and then connect the battery after connecting the
PC. (If the Data Log does not have power, it will not respond to communication.)
Note: When done accessing the information in the Data Log, be certain to replace the loopback
connector on the 6 pin connector. If this is not done, the Data Log will not be able to collect information
the next time it is connected to a machine!
To analyze data from the Data Log controller, the display and prompt will be as follows:
Toro Data Log Controller Analysis
1.) Analyze a previously saved file
2.) Read data from the Data Log controller
Enter your choice:
If option 1 is chosen, the prompt will be:
Enter the file name:
The user must enter the file name and <CR> (which already must exist) which contains previously
saved data from the machine. This file may have been created from previously reading of the Data
Log controller.
Toro Machine Diagnostics Menu (T)
34
ToroPC User’s Manual
If the file does not exist, the message will be:
File not found!
Press any key to continue
If option 2 is chosen, the display will be:
Reading the Data Log information!
Pages programmed – XX
After the information is completely read in, the following display and prompt will appear:
Options:
1.)
2.)
3.)
4.)
Watch the machine as it ran.
Compare input to functional state requirements
Search inputs for functional state
Save file for analysis later
Enter your choice:
Enter the number of your choice.
Save File For Analysis Later (4)
Often, the user will save the file so that it can be called up later if desired. If the option to save the file is
chosen, the prompt will be:
Enter the file name:
At this point, enter your desired file name and a <CR>. If the file already exists, the message and prompt will be:
File exists – overwrite?
Overwrite? (y or n)
If Y is chosen, the old file will be destroyed, and a new file created,
If N is chosen, the attempt to save the file will be aborted, and the old file will remain. The cursor moves
to Enter the file name: to allow entering a new filename.
ToroPC User’s Manual
35
Toro Machine Diagnostics Menu (T)
Watch the Machine as It Ran (1)
The option watch machine as it ran will allow the user to step through the data in the Data Log file (either
forward or backward) to examine the state of each input and each output every time one of the inputs or
outputs changed. This allows understanding exactly what the machine (and operator) did. Selection of
this option will result in the following display and prompt:
Toro controller Status: Reelmaster 5100-D Revision 1.0
Open
Open
Closed
Closed
Closed
Open
Open
Open
Open
Open
Open
Open
Open
Open
Open
Open
Open
Open
Not used
Not used
Run input from key
Traction neutral
Seat switch
High engine temperature
Not used
Raise reels
Enable reels
Front reels down
Front backlapping
Rear backlapping
Lower/Mow reels
5/8 (Cl=5) blade switch
Front reel speed
Rear reel speed
Transmission speed
Not used
0 of X) time prior to last data capture
Off
Off
Off
Off
Off
Off
Off
On
Off
Off
Off
Off
Off
Off
Out of range lamp
Solenoid S8,S9 (backlap)
Solenoid S2 (rear reels)
Solenoid S3 (center lift/lower)
Solenoid S4 (wing lift/lower)
Solenoid S5 (rear lift/lower)
Solenoid S6 (lower front/rear)
ETR hold, Alt run
Solenoid VS1 (front speed control)
Solenoid VS2 (rear speed control)
Solenoid S1 (front reels)
Solenoid S7 (lift front/rear)
Start
Preheat
-0.0
ESC) to exit, “f” goes forward one record, “space” back one record
The state of each of the inputs and outputs at that point in time is reported. Stepping forward one record
at a time will allow the user to “watch” exactly what the machine did while it was running. The number
is a timer which tells the user how many seconds before the end of the file that the currently displayed
record was recorded. This may be helpful to the diagnostic process if the user knows when the problem
occurred. This will display the latest record in time – the one that just happened – and the user will step
backward in time through the data.
Toro Machine Diagnostics Menu (T)
36
ToroPC User’s Manual
Compare Input to Functional State Requirements (2)
Selection of this option allows the user to “filter” the inputs to determine if they will allow a certain
function to occur. For example, if the engine is unexpectedly stopping while being used, the
troubleshooting technician may choose this option and “filter” the inputs for an “engine kill” condition.
When this option is selected, the following display and prompt will appear:
Choices:
1.)
2.)
3.)
4.)
5.)
6.)
7.)
8.)
9.)
10.)
11.)
12.)
Preheat
Start
Run(with traction neutral)
Run(in seat)
Lower cutting units to turnaround
Transport raise
Lower/Mow
Raise(in mow)
Backlap front
Backlap rear
Mow
Engine stops
Enter number of your choice: (1 to 12):
Enter the number of the function for which you desire to “filter” and a <CR>. For this example of
diagnosing and “engine kill”, select option 12.
ToroPC User’s Manual
37
Toro Machine Diagnostics Menu (T)
After the choice is entered, the program will search through the data in the file (starting at the beginning)
until it finds the requested function occurring. At that point, the following display and prompt will appear:
Toro controller Status: Reelmaster 5100-D Revision 1.0
Open
Open
Open
Closed
Closed
Open
Open
Open
Open
Open
Open
Open
Open
Open
Open
Open
Open
Open
Not used
Not used
Run input from key
Traction neutral
Seat switch
High engine temperature
Not used
Raise reels
Enable reels
Front reels down
Front backlapping
Rear backlapping
Lower/Mow reels
5/8 (Cl=5) blade switch
Front reel speed
Rear reel speed
Transmission speed
Not used
Off
Off
Off
Off
Off
Off
Off
Off
Off
Off
Off
Off
Off
Off
Out of range lamp
Solenoid S8,S9 (backlap)
Solenoid S2 (rear reels)
Solenoid S3 (center lift/lower)
Solenoid S4 (wing lift/lower)
Solenoid S5 (rear lift/lower)
Solenoid S6 (lower front/rear)
ETR hold, Alt run
Solenoid VS1 (front speed control)
Solenoid VS2 (rear speed control)
Solenoid S1 (front reels)
Solenoid S7 (lift front/rear)
Start
Preheat
0) time prior to last Data capture 573.6
ESC) to exit, –“f” goes forward one record, “space” back one record
In this instance, the engine stopped because the Key Run switch was open – either the key was turned
OFF or the switch or wiring was bad.
Toro Machine Diagnostics Menu (T)
38
ToroPC User’s Manual
Search Inputs for Functional State (3)
Selection of this option will cause the program to search through the data file to find a certain state of
inputs. Rather than the user being required to look at each record in the file, the user can have the
program look for the desired state. This is very useful for the case of a machine which has intermittent
shutdown problems, for example. The user would instruct the program to sort for “engine kill” as a state,
and the program would find each time that would happen, and display the conditions at each of those
times.
The display and prompt would be:
Choices:
1.)
2.)
3.)
4.)
5.)
6.)
7.)
8.)
9.)
10.)
11.)
12.)
Preheat
Start
Run(with traction neutral)
Run(in seat)
Lower cutting units to turnaround
Transport raise
Lower/Mow
Raise(in mow)
Backlap front
Backlap rear
Mow
Engine stops
Enter number of your choice: (1 to 12):
ToroPC User’s Manual
39
Toro Machine Diagnostics Menu (T)
The user should enter the number of the choice followed by a <CR>. This instructs the program to search
through the data file to find an occurrence of the requested state. For example, if the requested state was
12.) Engine stops, then the display and prompt might be:
Toro controller Status: Reelmaster 5100-D Revision 1.0
Open
Open
Closed
Open
Closed
Closed
Open
Open
Closed
Closed
Open
Open
Open
Open
Open
Open
Open
Open
Not used
Not used
Run input from key
Traction neutral
Seat switch
High engine temperature
Not used
Raise reels
Enable reels
Front reels down
Front backlapping
Rear backlapping
Lower/Mow reels
5/8 (Cl=5) blade switch
Front reel speed
Rear reel speed
Transmission speed
Not used
Off
Off
Off
Off
Off
Off
Off
Off
Off
Off
Off
Off
Off
Off
Out of range lamp
Solenoid S8,S9 (backlap)
Solenoid S2 (rear reels)
Solenoid S3 (center lift/lower)
Solenoid S4 (wing lift/lower)
Solenoid S5 (rear lift/lower)
Solenoid S6 (lower front/rear)
ETR hold, Alt run
Solenoid VS1 (front speed control)
Solenoid VS2 (rear speed control)
Solenoid S1 (front reels)
Solenoid S7 (lift front/rear)
Start
Preheat
Options: R) return to menu, N) new machine state, S) continue search
In the example listed, the user can look at the data record, and learn that the High engine temperature
input is closed, indicating that the machine is overheating or the sensor is malfunctioning, and has shut
down because of that.
The program will search through the data file to find the first occurrence of that state. If the first
occurrence of that state does not appear to explain the problem, then choose option S) Continue search to
instruct the program to continue looking through the data file to find that state again. In this way, the user
can locate the data record associated with the problem quickly and determine the cause of the problem.
Toro Machine Diagnostics Menu (T)
40
ToroPC User’s Manual
Display Input and Output Locations (T-6)
The display input and output locations display is as follows: (This display is dependent upon which
machine option was selected at program startup. This example is RM5100D.)
Reelmaster 5100-D Revision 1.0
0)
1)
2)
3)
4)
5)
6)
7)
8)
9)
10)
11)
12)
13)
14)
15)
16)
17)
Not used
Not used
Run input from key
Traction neutral
Seat switch
High engine temperature
Not used
Raise reels
Enable reels
Front reels down
Front backlapping
Rear backlapping
Lower/Mow reels
5/8 (Cl=5) blade switch
Front reel speed
Rear reel speed
Transmission speed
Not used
0)
Out of range lamp
1)
Solenoid S8,S9 (backlap)
2)
Solenoid S2 (rear reels)
3)
Solenoid S3 (center lift/lower)
4)
Solenoid S4 (wing lift/lower)
5)
Solenoid S5 (rear lift/lower)
6)
Solenoid S6 (lower front/rear)
7)
ETR hold, Alt run
8)
Solenoid VS1 (front speed control)
9)
Solenoid VS2 (rear speed control)
10)
Solenoid S1 (front reels)
11)
Solenoid S7 (lift front/rear)
12)
Start
13)
Preheat
A2D Ports:
0)
Start
1)
HOC Selector Control
2)
Not used
3)
Not used
4)
Not used
Press any key to continue
This display informs the user of which inputs, outputs and analog inputs are located where on the wiring
connector. This display is used to check which inputs and outputs exist for a given machine.
ToroPC User’s Manual
41
Toro Machine Diagnostics Menu (T)
ECU Program Status (T-7)
The ECU program status display is as follows: (This display is dependent upon which software is loaded
in the ECU which is being interrogated. This example is RM5100D.)
ECU Programming status:
Product Name
Model Number
Serial Number
Software Revision
Date Programmed
Comment
Number of Cycles
: RM5100D
: 03502
: 10001
: 1.0
: 112191
: Autoclip control
:3
Press any key to continue
This display informs the user of the software which is loaded into the ECU. The software revision level,
date programmed, model and serial number are listed for information, as well as a software comment and
the total number of times the ECU has been programmed.
Toro Machine Diagnostics Menu (T)
42
ToroPC User’s Manual
Activate Machine Program and Run (J)
The ECU is designed with an operating system which is called the Monitor. In addition to the Monitor it
has a machine application program which is the software which makes the ECU know what machine it is
on, and how to control that machine. When the ECU is powered up (turned on), it must be told whether
or not to run the machine program. The ECU is instructed to run the machine program by having the
loopback connector on the 6 pin serial connector on the machine wiring harness. If this connector is not
connected, the machine application software program will not run. This means the machine will not
operate without the loopback connector! However, when the PC is connected to the ECU during the
use of TOROPC, the loopback connector must be removed, since it is connected via the same serial port
connector. Thus, if the PC is connected when the key is off, the machine will not operate when the key is
turned on. If you desire to run the machine with the PC connected, selecting the option J – – Activate
machine program and run will cause the ECU to start running the machine application program to allow
the machine to operate.
Some of the other options in the program TOROPC will automatically issue the J – – Activate machine
program and run command (when it is required), so that after using the program the machine may operate
normally with the PC connected even though you may have never issued the command yourself.
Selection of this option will result in the following message:
ECU is now executing from memory
Press any key to continue
ToroPC User’s Manual
43
Activate Machine Program and Run (J)
Reset the ECU (R)
This option allows the user to reset the ECU, forcing the ECU to start over and verifying that
communications are working between the PC and the ECU. This option is normally selected after starting
the program to verify communications.
The ECU may only be reset if it is not yet executing the machine application program. If the ECU is
executing application program, and the reset command is issued, the following message will appear:
No response from the ECU please check the following:
1) Be certain the serial cable is connected.
2) Be certain the key switch is turned on.
3) Turn the key switch off and on again with the loopback connector
off and the computer connected.
Correct the problem and press any key. ESC to return to main menu
If this message appears, follow the instructions and attempt to reset again. If the ECU is executing
application program, you must turn off the key switch and turn it on again in order to allow the program
to reset the ECU.
If this message appears, and you do not wish to reset the ECU, simply press ESC.
If the command is successful in resetting the ECU, the following message appears:
Resetting ECU:
ECU reset successful.
Press any key to continue.
Reset the ECU (R)
44
ToroPC User’s Manual
Quit This Program (Q)
This option is selected when the diagnostic session is completed, and the user wishes to exit from
TOROPC to either use the PC for other use or turn off the PC. It is not recommended to turn off the PC
while in the program TOROPC. When disconnecting the PC from the machine, always replace the
loopback connector on the machine to allow the machine to operate.
Selection of this option will result in the PC displaying the DOS prompt.
ToroPC User’s Manual
45
Quit This Program (Q)
Diagnosing Tips
In order to use TOROPC, it must be connected to a Toro product which is equipped with a Toro ECU,
(part number 85-4400) via the special cable (part number 85-4560). To connect the PC to the machine,
find the 6 pin communication connector on the machine wiring harness and carefully remove the
loop-back connector. Connect the 6 pin end of the special cable to the machine, and the 9 pin end to the
COM1 port (communication RS232 port) on the PC.
PC
Loop-back connector
Special
cable
Electronic Control Unit (ECU)
Reelmaster 5100-D shown
PC connected to machine
If Controller Diagnostic Light is Flashing On and Off:
The PC may be connected while the Controller Diagnostic Lamp (on the machine) is still blinking, and
without turning off the machine. NOTE: If the machine is turned off, the ECU will reset and not show the
fault. You can stop the engine by manually pushing the fuel stop lever on the diesel injection pump or
engaging the parking brake, then raising off the seat and pushing the traction pedal (interlock circuit will
shut off the engine). Once the PC is connected and in the program TOROPC, choose option Toro machine
diagnostics, then Watch machine while running and simply move any switch (to get the display to show).
The fault indicator will appear next to the faulted output.
If Controller Diagnostic Light is NOT Flashing:
Turn key switch OFF and connect the PC to the machine. Once the PC is connected and in the program
TOROPC, select option Toro machine diagnostics, then option Watch machine without running machine.
Move input switches and watch to see that the display shows that they change. If the display does not
show that the switch changes, either the switch or the wiring to the switch is faulty.
Diagnosing Tips
46
ToroPC User’s Manual
To Find an Intermittent Problem:
Install the Data Log TM controller on the machine.
1. Turn OFF key switch. Find 6 pin communication connector on machine wiring harness and carefully
remove loop-back connector. Connect 6 pin connector on Data Log to 6 pin connector on machine wiring
harness.
2. Put Data Log in a secure location on machine, such as in toolbox, on platform, etc. and fasten in place
securely to prevent damage due to Data Log falling off the machine.
3. Turn key switch to RUN position. The green light on the Data Log will illuminate to indicate that the
Data Log is connected and operating.
4. Operate machine as normal until intermittent problem occurs. DO NOT turn off key switch after
problem has occurred !
5. Press the switch on the Data Log. The red light on the Data Log will illuminate to indicate that the Data
Log has stored the information. The switch MUST be pressed before the key switch is turned off or the
information is lost. If the information is inadvertently lost, simply operate the machine as normal until the
problem occurs again, then save by pressing the switch.
6. Turn off the key switch and remove the Data Log. Connect the loop-back connector on the machine
wiring harness.
Connect the Data Log controller to the PC and with TOROPC, select option Toro Machine diagnostics,
then option Analyze data from Data Log controller to read the information into the PC. Analyze the data
to determine the problem. NOTE: An alternate power source is required for the Data Log when it is
connected to the PC. Battery (55-7520) and Charger (92-1743 or 22-4710) for Toro walk power mowers
are recommended.
Data Log controller
Data Log Controller
PC
Data Log controller connected to machine
Data Log controller connected to PC
NOTE: If the machine will not operate, check to be certain that the loop-back connector is installed on the
6 pin communication connector near the machine ECU.
ToroPC User’s Manual
47
Diagnosing Tips
Languages and Country Codes
TOROPC is configured to print out text in the language of the user automatically. If you desire a
language other than English, refer to the table below:
Country or location
Country code
Code page
Keyboard code
Language
Belgium
Canada (French)
Denmark
Finland
France
Germany
International English
Italy
Japan
Latin America
Netherlands
Norway
Portugal
Spain
Sweden
Switzerland
United Kingdom
USA
032
002
045
358
033
049
061
039
081
003
031
047
351
034
046
041
044
001
850
863
850
850
850
850
437
850
932
850
850
850
850
850
850
850
850
437
be
cf
dk
su
fr
gr
us
it
jp
la
nl
no
po
sp
sv
sg
uk
us
Dutch
French
Danish
English
French
German
English
Italian
Japanese (Kanji)
Spanish
Dutch
Norwegian
Portuguese
Spanish
English
German
English
English
Note that the program defaults to USA English, and no changes are required to cause the program to print
English prompts to the screen.
To cause the program to display in another language, the PC files “config.sys” and “autoexec.bat” must
be changed. Config.sys must include:
device = ansi.sys
country = country_code,code_page,country.sys
device = display.sys con = (lcd,437,1)
Note: Country_code must be replaced by the number of the country code of the desired language, and
code_page must be replaced by the number of the code page of the desired language. lcd is correct for
portable computers with liquid crystal displays, for a PC with an EGA or VGA display, replace lcd
with ega.
Note: If the files country.sys and/or display.sys are in a subdirectory, i.e. C:\DOS\country.sys rather than
C:\country.sys, the subdirectory name must be included in the line in config.sys.
Note: Use of Japanese lanuage (Kanji) requires IBM PC-DOS J4.ØV
Languages and Country Codes
48
ToroPC User’s Manual
Autoexec.bat must include:
nlsfunc
mode con cp prep = ((code_page) lcd.cpi)
keyb keyboard_code,code_page,keyboard.sys
chcp code_page
Note: keyboard_code must be replaced by the two letter code for the keyboard code of the PC keyboard
layout, and code_page must be replaced by the number of the code page of the desired language. lcd is
correct for portable computers with liquid crystal displays, for a PC with an EGA or VGA display,
replace lcd with ega.
For example, to cause the program to display in German for Germany, the config.sys file would
look like this:
device = ansi.sys
country = 49,850,country.sys
device = display.sys con = (lcd,437,1)
And the autoexec.bat file would look like this (for a PC with a German layout keyboard):
nlsfunc
mode con cp prep = ((850)lcd.cpi)
keyb gr,850,keyboard.sys
chcp 850
If you need help to change these files, refer to the MS-DOS manual with your PC. Whenever the PC
finds the country code in the Config.sys file, it will automatically print the prompts and messages in that
language. In order to change the language, it is necessary to change the Config.sys file, and reboot the PC.
ToroPC User’s Manual
49
Languages and Country Codes
Backing Up the Program Disk
It is recommended that you make a copy of the program disk to avoid the risk of being without the
program if the disk should be damaged in some way. There are a number of ways to do this, depending
upon what PC configuration you have.
If Your Computer Has a Hard Disk
If you have a PC with a hard disk drive, you will want to create a directory for just the Toro diagnostic
and application program files. Then you will want to copy the program disk onto the hard disk to the
directory you created.. For example:
Insert the Toro program disk in drive A:
C:\>md toropc<CR> (to create a directory named toropc)
C:>copy a:\*.* c:\toropc\*.*<CR> (to copy on the files from the Toro program disk)
Then, to use TOROPC from the hard drive, you would do these commands:
C:\>cd toropc<CR>
C:\TOROPC\>toropc<CR>
NOTE: ANSI.SYS must be in your config.sys file.
If Your Computer Does Not Have a Hard Disk
If you do not have a hard drive on your PC, you will want to make a copy of the Toro program disk.
There are two choices: 1) making a bootable copy (the most useful choice), or 2) making a plain copy
(the easiest choice).
To make a bootable copy:
Insert a blank disk into the disk drive
C:\>format a:<CR> (follow instructions for formatting)
C:\>sys a:<CR> (puts DOS on the disk)
C:\>copy command.com a:\.<CR> (puts command table on disk)
C:\>copy ansi.sys a:\.<CR> (puts the file on disk)
C:\>copy keyboard.sys a:\.<CR> (puts the file on disk)
Backing Up the Program Disk
50
ToroPC User’s Manual
C:\>copy country.sys a:\.<CR> (puts the file on disk)
Insert the MS-DOS Operating System diskette (came with the PC) into the disk drive
C:\>copy a:\display.sys b:\.<CR> (this will copy the file from the MS-DOS disk to the new disk.
whenever you are prompted for disk a:, insert the MS-DOS disk; whenever you are prompted for
disk b:, insert the new disk)
C:\>copy a:\lcd.cpi b:\.<CR> (same as above)
Insert the Toro program disk in the disk drive
C:\>copy a:\*.* b:\*.*<CR> (this will copy all of the program disk to the new disk)
(whenever you are prompted for disk a:, insert the Toro disk, whenever you are prompted for disk b:,
insert the new disk, both disks go into the same disk drive slot).
Create the config.sys and autoexec.bat files as described above, and save them on the new disk.
If you make a bootable copy, you may insert the disk into the disk drive before turning on the PC, and
then simply type toropc<CR> to start the program.
To make a plain copy:
C:\>format a:<CR> (follow instructions for formatting)
Insert the Toro program disk in the disk drive
C:>\diskcopy a: a:<CR> if the computer has one disk drive, or C:>\diskcopy a: b:<CR> if the
computer has two disk drives. This will copy all of the program disk to the new disk.
If you make a plain copy, you must turn on the PC and then insert the program disk and type a:<CR>
then toropc<CR> to start the program.
The advantage to making a bootable copy is this: If the PC battery goes dead on a battery powered laptop
computer, such as the Toshiba T1000SE, the PC will forget that you changed the config.sys file to allow
the display control to function correctly for ToroPC. If it forgets, you must again go through the process
of changing the config.sys file. However, if you make a bootable disk, the new config.sys file is on the
disk, and the PC boots from that disk so it knows to do the right thing even if the battery has gone dead in
the mean time. If the battery goes dead, it is important to check and set the system date and time on the
PC to be certain that files get dated correctly and to avoid confusion later.
If you are using the program with displays in some other language than English, it is very advisable to
create a bootable copy of the program disk. This allows the config.sys and autoexec.bat files to be on the
boot disk and makes starting the program much easier.
ToroPC User’s Manual
51
Backing Up the Program Disk
Backing Up the Program Disk
52
ToroPC User’s Manual
ToroPC User’s Manual
53
Backing Up the Program Disk
Backing Up the Program Disk
54
ToroPC User’s Manual
This page is blank.
Commercial Products
© The Toro Company