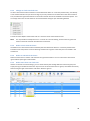
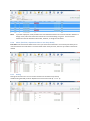
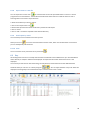
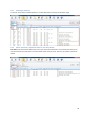
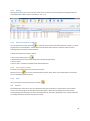
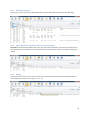
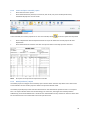
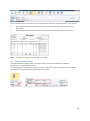
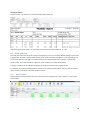
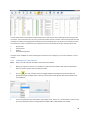
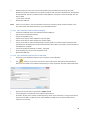
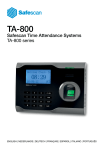
1
Manual Safescan Workforce Planner Content 1 Introduction ..................................................................................................................................... 5 2 3 Summary of the manual .................................................................................................................. 6 2.1 Using the user manual ............................................................................................................. 6 2.2 System requirements .............................................................................................................. 6 2.3 Explanation of symbols............................................................................................................ 6 2.4 Set title bar .............................................................................................................................. 8 Installation ....................................................................................................................................... 9 3.1 Program installation ................................................................................................................ 9 3.2 Setting up the software ......................................................................................................... 12 4 First Steps ...................................................................................................................................... 13 5 Status ............................................................................................................................................. 13 5.1 5.1.1 Filters (free filter, department filter or user drop-down) ............................................. 14 5.1.2 Sorting ........................................................................................................................... 15 5.1.3 Printing .......................................................................................................................... 15 5.1.4 Send report by email ..................................................................................................... 15 5.1.5 Export overviews as a CSV file ....................................................................................... 16 5.2 6 Presence/real-time summary ................................................................................................ 13 System log ............................................................................................................................. 16 5.2.1 Filters (free filter, department filter or user drop-down) ............................................. 16 5.2.2 Sorting ........................................................................................................................... 17 5.2.3 Printing .......................................................................................................................... 17 5.2.4 Send report by email ..................................................................................................... 17 5.2.5 Export views as a CSV file .............................................................................................. 17 Overview........................................................................................................................................ 18 6.1 Clock - list view ...................................................................................................................... 18 6.2 Adjust clocking times ............................................................................................................. 18 6.2.1 Add clocking times......................................................................................................... 18 6.2.2 Change an clock timeclock time .................................................................................... 20 6.2.3 Delete a clock timeclock time........................................................................................ 20 6.2.4 Delete an individual clock time ..................................................................................... 20 6.2.5 Delete more than one clock time .................................................................................. 20 6.2.6 Filters (free filter, department filter or user drop-down) ............................................. 21 6.2.7 Sorting ........................................................................................................................... 21 6.2.8 Export view as a CSV file ................................................................................................ 22 6.2.9 Send report by email ..................................................................................................... 22 6.2.10 Print ............................................................................................................................... 22 6.3 Day ......................................................................................................................................... 22 6.3.1 Creating a summary ...................................................................................................... 23 6.3.2 Filters (free filter, department filter or user drop-down) ............................................. 23 6.3.3 Sorting ........................................................................................................................... 24 6.3.4 Export overviews as a CSV file ....................................................................................... 24 6.3.5 Send report by email ..................................................................................................... 24 6.3.6 Print ............................................................................................................................... 24 6.4 Period .................................................................................................................................... 24 6.4.1 Creating a summary ...................................................................................................... 25 6.4.2 Filters (free filter, department filter or user drop-down) ............................................. 25 6.4.3 Sorting ........................................................................................................................... 25 6.4.4 Export overviews as a CSV file ....................................................................................... 26 6.4.5 Send report by email ..................................................................................................... 26 6.4.6 Print ............................................................................................................................... 26 6.5 Bulletins / Reports ................................................................................................................. 26 6.5.1 Monthly Bulletin / Report ............................................................................................. 26 6.5.2 Create and print a monthly report ................................................................................ 27 6.5.3 Weekly Bulletin / Report ............................................................................................... 27 6.5.4 Prepare and Print the Weekly Report ........................................................................... 28 6.5.5 Period Bulletin / Report ................................................................................................. 28 6.5.6 Prepare and Print the Period Report ............................................................................. 28 6.6 Work or Project Code ............................................................................................................ 29 6.6.1 Evaluation per Department or User .............................................................................. 30 6.6.2 Evaluation per Work / Project Code .............................................................................. 30 6.6.3 Condense search with the filter grouping (day / person / code). ................................. 30 6.6.4 Export overviews as a CSV file ....................................................................................... 31 6.6.5 Printing of selected summaries ..................................................................................... 31 6.6.6 Email .............................................................................................................................. 31 6.6.7 To capture the Work- / Project-Codes at the TA-800 Device ........................................ 32 6.6.8 To capture the Work- / Project-Codes at the TA-900 Device ........................................ 32 1 6.6.9 6.7 7 How to clock Work- / Project-Code at the device? ....................................................... 32 Clock grid view....................................................................................................................... 34 6.7.1 Report Chapter .............................................................................................................. 34 6.7.2 Report form ................................................................................................................... 35 6.7.3 Report Filters ................................................................................................................. 35 6.7.4 Freeform filter ............................................................................................................... 37 6.7.5 Department filter........................................................................................................... 37 6.7.6 User Filter ...................................................................................................................... 37 6.7.7 Setting the grid view ...................................................................................................... 38 6.7.8 Add clock times in the grid view.................................................................................... 41 6.7.9 Add missing clock times ................................................................................................ 42 6.7.10 Edit clock times in the grid view .................................................................................... 42 6.7.11 Delete a clock time in the grid view .............................................................................. 42 6.7.12 Export ............................................................................................................................ 42 6.7.13 Email .............................................................................................................................. 43 6.7.14 Print ............................................................................................................................... 43 Administration ............................................................................................................................... 43 7.1 Department/Group ............................................................................................................... 43 7.1.1 Creating a department/group ....................................................................................... 43 7.1.2 Changing a department/group ...................................................................................... 43 7.1.3 Deleting a department/group ....................................................................................... 43 7.2 User ....................................................................................................................................... 43 7.2.1 Creating users in the software ...................................................................................... 44 7.2.2 Fingerprint ..................................................................................................................... 45 7.2.3 Password ....................................................................................................................... 45 7.2.4 Create users on the device ............................................................................................ 45 7.2.5 Edit users ....................................................................................................................... 46 7.2.6 Deleting users ................................................................................................................ 46 7.2.7 System data information ............................................................................................... 46 7.2.8 Personal Data ................................................................................................................ 47 7.2.9 User – Vacation ............................................................................................................. 47 7.2.10 User - Annual Working Hours ........................................................................................ 48 7.2.11 View settings ................................................................................................................. 48 2 7.2.12 Export views as a CSV file .............................................................................................. 48 7.2.13 Send report by email ..................................................................................................... 49 7.2.14 Print ............................................................................................................................... 49 7.3 8 Work schedule/ Weekly work schedule ................................................................................ 49 7.3.1 Create a work schedule with fixed working hours ........................................................ 49 7.3.2 Create a work schedule with flexible hours (only break allowance)............................. 50 7.3.3 Rounding........................................................................................................................ 50 7.3.4 Automatic break allowance ........................................................................................... 51 7.3.5 Editing/changing a duty roster ...................................................................................... 52 7.3.6 Deleting the duty roster ................................................................................................ 52 7.3.7 Export overviews as a CSV file ....................................................................................... 52 7.3.8 Send report by email ..................................................................................................... 52 7.3.9 Print ............................................................................................................................... 53 Planning ......................................................................................................................................... 53 8.1 Planning Grid ......................................................................................................................... 53 8.1.1 Creation of the grid view ............................................................................................... 53 8.1.2 Planning Group .............................................................................................................. 53 8.1.3 Planning Period.............................................................................................................. 54 8.1.4 Planning Type ................................................................................................................ 54 8.1.5 User filter ....................................................................................................................... 55 8.1.6 Department filter........................................................................................................... 55 8.1.7 User ID Filter .................................................................................................................. 55 8.1.8 Icons: ............................................................................................................................. 55 8.1.9 Structure of the planning grid ....................................................................................... 56 8.1.10 Planning - List View........................................................................................................ 57 8.1.11 Planning with time plans ............................................................................................... 57 8.1.12 Create time plans .......................................................................................................... 58 8.1.13 Add a time plan ............................................................................................................. 58 8.1.14 Add work codes ............................................................................................................. 60 8.1.15 Employees with a work schedule to, temporarily replan.............................................. 61 8.1.16 Inserting and planning with time plans ......................................................................... 62 8.1.17 Planning with a time plan template for departments ................................................... 65 8.1.18 Planning with a time plan templates for ‘All’ ................................................................ 67 3 9 8.1.19 Add planning or time plan ............................................................................................. 67 8.1.20 Edit, change or delete the planning .............................................................................. 68 8.1.21 Print planning grid ......................................................................................................... 69 Holiday planning ............................................................................................................................ 70 9.1 Create Holiday Templates ..................................................................................................... 70 9.1.1 Holiday Time Plans - Work schedules............................................................................ 70 9.1.2 Holiday time plan for flexible time planning ................................................................. 70 9.1.3 Holiday Planning with Time Plans ................................................................................. 71 10 Holidays ..................................................................................................................................... 73 11 Settings ...................................................................................................................................... 73 11.1 General .................................................................................................................................. 73 11.1.1 Set language .................................................................................................................. 73 11.1.2 Database connection ..................................................................................................... 73 11.1.3 Backup ........................................................................................................................... 74 11.1.4 Device/time attendance device .................................................................................... 74 11.1.5 Data connection with TCP/IP ......................................................................................... 75 11.1.6 Synchronizing the user data .......................................................................................... 78 11.1.7 Data transfer using a USB stick...................................................................................... 78 11.1.8 Reading bookings on a PC ............................................................................................. 80 11.1.9 Synchronising user data ................................................................................................ 81 11.1.10 11.2 Import entries from a TA 655 onto the computer .................................................... 81 Work codes ............................................................................................................................ 82 11.2.1 Add/Create a work code................................................................................................ 82 11.2.2 Edit a work code ............................................................................................................ 84 11.2.3 Delete a work code ........................................................................................................ 84 12 Info ............................................................................................................................................ 85 12.1 Help ....................................................................................................................................... 85 12.1.1 12.2 Technical Support .......................................................................................................... 85 Impressum ............................................................................................................................. 85 12.2.1 Updates and upgrades................................................................................................... 85 13 Server installation...................................................................................................................... 85 14 Uninstalling Safescan Workforce Planner ................................................................................. 85 4 1 Introduction Safescan Workforce Planner is software for recording and planning time for collecting, processing and planning staff time. Plan your staff and time efficiently and accurately according to the requirements. Using the integrated calendar tool, you can schedule shifts, absence and availability requirements. The operational plans which were previously drawn up on paper can be easily included, edited and of course printed, using the planning interface of your Safescan Workforce Planner system. Thanks to the flexible system architecture, Safescan Workforce Planner can be used for small to medium sized operations in virtually any industry and meets the requirements for a powerful time evaluation tool. Safescan Workforce Planner supports all Safescan time attendance recording device. As all device types have their own specifications, the software functions described may possibly not be used with all Safescan time attendance device. Details about the features can be found in the information which comes with the Safescan time attendance device, but you can also contact your supplier. This manual describes the installation, functionality and application of the Safescan Workforce Planner software package. When using earlier software versions, there may be differences in the description of the functions. No specialized knowledge of computer technology is required to use the software. Familiarity with the graphic interface of Microsoft Windows is, however, a prerequisite. These instructions are no substitute for the necessary instruction and training on the system and merely serve as a reference. Safescan Workforce Planner was developed with great care and tested to comply with the latest advances in technology. If you have suggestions for improving the program or if you come across any errors in the software or the operating instructions, please let us know. 5 2 Summary of the manual The user manual gives you an overview of the handling of Safescan Workforce Planner and contains steps for frequently used operations. The screenshots shown are examples rather than specifications. 2.1 Using the user manual This user manual discusses mouse operation. "Click" always refers to pressing the left mouse button. If any rows are highlighted, this indicates that the left mouse button is being used to click on the entry. Other operating steps, such as working with the right mouse button, are described specifically. 2.2 System requirements To use Safescan Workforce Planner, your PC should meet the following requirements: • Pentium IV processor or higher • Main memory of at least 1024 MB • USB and TCP/IP ports • Free hard disk capacity of at least 100 MB • CD-ROM drive • Resolution of at least 1024 x 768 (1280 x 1024 is recommended) • Windows XP operating system or higher 2.3 Explanation of symbols Clock times in a grid overview Planning module for shift and vacation planning Send current views or reports by email Filter Download the schedule data from a TA 655 Synchronisation of the user data Print the configured overview Export data Send views or reports by email Print the view Add plan 6 Edit plan Clear plan Update data Switch to list view Switch to grid view Import national holidays Open and close the template list Open and close the work code legend in planning Print the weekly work schedules Save Undo Search for new hardware Time setting on the device Retreiving USB stick Connection interrupted Connection made Close the application Work schedule on / off 7 2.4 Set title bar If you click on the title bar with the right mouse button, you get a list of all possible columns in the current view that can be clicked on or off. The activated columns are indicated with . Any added columns will be attached to the end of the title bar in the display. All columns can be dragged to the desired location with the mouse (drag & drop). The settings are accepted by the system and stored. This means you can set up your own personal workspace. 8 Note: 3 The layout is individually customised to your workplace and will not be displayed to any other users. Installation 3.1 Program installation 1. 2. Insert the installation CD-ROM into the drive of your computer. Open the [TimeAttendanceSetup] file and the installation program will start. 9 3. Accept the license terms. 4. Specify the destination directory. c:/Program Files/Safescan/TA4 will be suggested to you as the default path for a different storage path, select [Browse] and search for the path you want. We recommend you use the default path. 10 5. Press [Next] to continue. The program will now be installed. 6. Use [Finish] to confirm that the installation is complete. 11 3.2 Setting up the software • • Use Start / Safescan Workforce Planner to open the software. Enter your email address and the license key which you have received by email. The first time you use the software or later if no supervisor/administrator is set (in the software and/or on the time attendance device), the following message will be displayed. As soon as a supervisor or administrator has been defined, you can log in using the user name and password. Forgotten your password? When asked for your user name, enter your user ID and the license code as the password. (You will find the license code on the CD packaging). Use OK to confirm. 12 4 1. 2. 3 4. 5. 6. 7. 8. 9. 5 First Steps Select the desired language, see Chapter 11.1.1 Create departments, see Chapter 7.1.1 Create work schedule Work Schedules, see Chapter 7.3 Create work codes, see Chapter 11.2.1 Add the user to the time attendance device or to the software, see Chapter 7.2.1 Connect your time attendance device to the software and synchronise the data with the time attendance device, see Chapter 11.1.6 Complete the employee master data, see Chapter 7.2 Plan your employees, see Chapter 8 Begin with the capture of clock times at the time attendance device. Status 5.1 Presence/real-time summary You can use the real-time summary to check the presence and absence of your employees. You can see at a glance who has signed in or out where and at what time, or who is taking a break. With the simple filtering method you can have the information you want up on the screen in no time, or you can print out the data on your printer. 13 5.1.1 Filters (free filter, department filter or user drop-down) Present filter: Select the setting you want from the drop-down menu; present, absent, break or all. Free filter: Enter the first few letters for the user you want into the free filter. The summary will show you all users that have these same letters. The more detail of the name you enter, the more your filter result will be limited. Department filter: Select the department you want from the drop-down menu. In the summary as well as in the user filter, all employees of that department are displayed. You can limit the results by using the user filter. 14 User filter: Select the user you want from the drop-down menu. 5.1.2 Sorting Sorting via the menu bar: You can use the menu bar to sort data at any time by double clicking the field you want. Repeat this to reverse the order (A - Z or Z - A). 5.1.3 Printing You can use 5.1.4 to print the real time summary at any time. Send report by email The overview you have created can be sent by email at any time. When you click on ,the current overview will be saved as a PDF, which can be attached to an email that you can subsequently edit and send. 15 5.1.5 Export overviews as a CSV file You can export the current overview similar program that can read CSV files. as a CSV file that can then be processed further in Excel or a The CSV file format describes the structure of a text file that can save or exchange data or lists with a simple structure. • Select the overview that you want to export. • • • • Click on the "Export CSV" icon . Name the export file and select the directory created for CSV export. Click on "Save". Click on "OK". The data is exported to the selected directory. 5.2 System log The system log summary displays all events, modifications or other manipulations on the time attendance device. The system log is used to log the communication sequence in and with the time attendance device in chronological order. When communication problems occur you can use the error description to eliminate the causes of these. 5.2.1 Filters (free filter, department filter or user drop-down) Free filter: Enter the first few letters for the user you want into the free filter. The summary will show you all users that have these same letters. The more detail of the name you enter, the more your filter result will be limited. Department filter: Select the department you want from the drop-down menu. In the summary as well as in the user filter, all employees of that department are displayed. You can limit the results by using the user filter. 16 User filter: Select the user you want from the drop-down menu. 5.2.2 Sorting Sorting via the menu bar: You can use the menu bar to sort data at any time by double clicking the field you want. Repeat this to reverse the order (A - Z or Z - A). 5.2.3 Printing You can now print the system log summary 5.2.4 . Send report by email The overview you have created can be sent by email at any time. When you click on this will print the current overview as a PDF attached to an email that you can subsequently edit and send. 5.2.5 Export views as a CSV file You can export the current overview as a CSV file that can then be processed further in Excel or a similar program that can read CSV files. The CSV file format describes the structure of a text file that can save or exchange data or lists with a simple structure. • Select the overview that you want to export. • Click on the "Export CSV" icon . • Rename the export file and select the directory created for CSV export. • Clicks "Save". • Click on "OK". The data is exported to the selected directory. 17 6 Overview Under "clock " you will find all the clock times that were recorded by the time attendance device and transferred directly via TCP/IP or USB stick into the software. You can select the list view, which shows you a chronological list of all the clock times, or the grid view, which shows you the clock times relating to the individual settings and work planning of each employee. 6.1 Clock - list view Incorrect bookings or missed clock times in this overview have an orange background (see image below). Please check whether the sequence matches (On/Off or On - Break - Return - Off etc.). Add a forgotten clock time as described in Chapter 6.2.1. Set the correct status (e.g. ignore) for duplicated clock times or incorrect bookings as described in Chapter 6.2.2 6.2 Adjust clocking times Clocking times can be added or corrected under both clock and in the clock grid. Selecting the grid overview provides simple tools to correct clocking times or add forgotten clocking times with one click. See Chapter 6.7 Clock Grid. 6.2.1 Add clocking times Missing clocking times can be subsequently added as follows: Select the required user in the user filter. Click on either "Add" or select Add clock time by clicking the right mouse button. 18 Complete the fields marked in red. These are mandatory and must be filled in. Change, if required, the clock time date Enter in the input field the time of the clock time. The value must be entered in accordance with the country settings on your computer (e.g. 08:30 or 08.30, depending on the country setting). Full hours can be entered as a simple numeric code (e.g. 8 = 8:00, 13 = 13:00) Select the appropriate function for check in/check out. If multiple time recording devices are connected to your software, select this. If you have to add an absencesuch as vacation or doctor’s appointment or allocate an employee to a project, contract, etc., add the required work code to the clock timeclock time. (See additional description of work codes explained in Chapter 11.20). Please note, if you are using work codes, breaks and returns to work are not posted with in. For work code calculations, in means the end of the work code, and at this moment normal working time or another project commences. You have the opportunity with comments to include further information that will be displayed in the reports. Close the add an clock timeclock time with OK if you want to save or press cancel to discard the clock timeclock time. 19 6.2.2 Change an clock timeclock time To edit a clock timeclock time created on a time attendance device or a manually created entry, click directly on the clock timeclock time you wish to change. If you only need to correct the status of the clock timeclock time, click with the right mouse button on the clock timeclock time to be modified to reveal the options. You can simply click on the correct status for clock time without having to open the editing window. Correct the status IN/OUT. Add a work code or a comment to the clock timeclock time. Note: It is not possible to modify the time. In a case of an incorrect booking, set the status to ignore and create a new clock timeclock time with the correct time. 6.2.3 Delete a clock timeclock time The deletion of a clock timeclock time created by the time attendance device or a manually created clock timeclock timeis not possible. Incorrect bookings must be set to ignore so that they are not included in the calculations. 6.2.4 Delete an individual clock time Select the clock time to "delete" and click with the right mouse button. You can now set the clock time to ignore without opening the edit window. 6.2.5 Delete more than one clock time If there are several incorrect bookings, you can select them by the holding down the control key (Ctrl) and simply clicking on the desired clock time. If you have to set all the clock times to ignore, hold down the Ctrl key while clicking the right mouse button and select "Switch to ignore." 20 Note: To protect employees, times posted on the time attendance device cannot be corrected or deleted. To change a time, add a new clock time and set the "incorrect booking" to ignore. This clock times created on the time attendance device will, however, no longer be calculated. 6.2.6 Filters (free filter, department filter or user drop-down) Free filter: Enter the first few letters for the user you want into the free filter. The summary will show you all users that have these same letters. The more detail of the name you enter, the more your filter result will be limited. 6.2.7 Sorting Sorting via the menu bar: You can use the menu bar to sort data at any time by double clicking the field you want. Repeat this to reverse the order (A - Z or Z - A). 21 6.2.8 Export view as a CSV file You can export the current view as a CSV file that can then be processed further in Excel or a similar program that can read CSV files. The CSV file format describes the structure of a text file that can save or exchange data or lists with a simple structure. • Select the view that you want to export. • Click on the “Export CSV” icon . • Rename the export file and select the directory created for CSV export. • Click on "Save". • Click on "OK". The data is exported to the selected directory. 6.2.9 Send report by email The overview you have created can be sent by email. When you click on the current overview will be saved as a PDF, which can be attached to an email that you can subsequently edit and send 6.2.10 Print The current view can be printed out at any time with . 6.3 Day All booking times from the current day that have been transferred to the software from your time attendance device directly via TCP/IP or USB stick are displayed. All important information about active users is also displayed. The summary shows the first and last booking, the daily balance, break absences and the dedicated work schedule which you can turn on or off by using the / . You can adjust the date at any time. Dates are displayed chronologically and can be filtered and/or sorted to suit the user's needs. 22 6.3.1 Creating a summary In "Period", select the pre-defined periods or use the date picker to select your own date range. 6.3.2 Filters (free filter, department filter or user drop-down) Free filter: Enter the first few letters for the user you want into the free filter. The summary will show you all users that have these same letters. The more detail of the name you enter, the more your filter result will be limited. 23 6.3.3 Sorting Sorting via the menu bar: You can use the menu bar to sort data at any time by double clicking the field you want. Repeat this and the order is reversed (A - Z or Z - A). 6.3.4 Export overviews as a CSV file You can export the current overview as a CSV file that can then be processed further in Excel or a similar program that can read CSV files. The CSV file format describes the structure of a text file that can save or exchange data or lists with a simple structure • Select the view that you want to export. • Click on the “Export CSV” icon . • Rename the export file and select the directory created for CSV export. • Click on "Save". • Click on "OK". The data is exported to the selected directory. 6.3.5 Send report by email The view you created can be sent by email at any time. When you click on the current overview will be saved as a PDF, which can be attached to an email that you can subsequently edit and send. 6.3.6 Print The current view can be printed at any time with . 6.4 Period All booking times of the active users are displayed in the period summary in compact form in the selected period. The summary gives you the total for the entire period, the hours according to the roster and the corresponding overtime balance as well as each daily balance. The data is displayed in user number order and can be filtered and/or sorted to suit the users' needs. 24 6.4.1 Creating a summary In "Period", you can select the pre-defined periods or use the date picker to select your own date range. 6.4.2 Filters (free filter, department filter or user drop-down) Free filter: Enter the first few letters for the user you want into the free filter. The summary will show you all users that have these same letters. The more detail of the name you enter, the more your filter result will be limited. 6.4.3 Sorting Sorting via the menu bar: You can use the menu bar to sort data at any time by double clicking the field you want. Repeat this to reverse the order (A - Z or Z - A). 25 6.4.4 Export overviews as a CSV file You can export the current overview as a CSV file that can then be processed further in Excel or a similar program that can read CSV files. The CSV file format describes the structure of a text file that can save or exchange data or lists with a simple structure. • Select the overview that you want to export. • Click on the “Export CSV” icon . • Rename the export file and select the directory created for CSV export. • Click on "Save". • Click on "OK". The data is exported to the selected directory. 6.4.5 Send report by email The view you created can be sent by email at any time. When you click on the current overview will be saved as a PDF, which can be attached to an email that you can subsequently edit and send. 6.4.6 Print The current rview can be printed out at any time with . 6.5 Bulletins / Reports To ensure that end-of-moth analyses display the desired result, check the clock times recorded by users under "clock times" for forgotten or incorrect entries and complete or correct them (see Chapter 6.2). You have the option of attaching a work code to the clock times. Safescan Workforce Planner is a system that computes instantly. All corrections made will be automatically allocated after entry to ensure the system is permanently up-to-date. Additional calculations are not required to create end-of-month statements. All the information entered into Safescan Workforce Planner is taken into consideration in the reports. The reports show you the current state of overtime and the accrued balance as well as the holiday time for the current year, the holiday time taken and the holiday time remaining until the end of the year, all are specified in hours. Once it has been installed, Safescan Workforce Planner offers various predefined reports that cater for most standard analyses. The following predefined reports are available in Safescan Workforce Planner: • • • • Monthly Report Weekly Report Period Report Work code report 6.5.1 Monthly Bulletin / Report The "Monthly Report" covers all schedules, balances and events for the selected time period. For schedules with a work code, this is indicated by notes/work code. 26 6.5.2 Create and print a monthly report • • Select the menu item reports. Select the desired time period (current month, last month, etc.) from the drop down menu; the default displays the current month. In the overview, the monthly reports for all users are available, select • and all the reports can be printed. • Select a department with the department filter and you will obtain the monthly reports for that department. Select the desired user with the user filter and you will obtain a monthly report for that user. Note: All reports can be printed or exported as a CSV file. 6.5.3 Weekly Bulletin / Report The weekly report is analogous to the monthly report. Select "week" from the drop down menu and use the same method as for the monthly report to obtain and print the desired oview. The weekly report displays all the essential information for the selected time period and users in a compact form. The report indicates the first and last bookings, the clock time, the target time and daily balance. Additionally, the accumulated balance is shown for the selected date and any reasons for absence. All the data for the selected users are summarised in the lower part of the list. 27 6.5.4 Prepare and Print the Weekly Report • • Select the menu item report. Select the desired time period (current week, last week, etc.) from the drop down menu; the default is to display the current week. In the overview, the weekly reports for all users are available, select print and all the reports can be printed. • • Select a department with the department filter and you will obtain the weekly reports for that department. Select the desired user with the user filter and you will obtain the weekly report for that user. Note: All reports can be printed or exported as a CSV file. 6.5.5 Period Bulletin / Report The "period report" is similar in configuration to the monthly and weekly report. However, the values for a selected time period are summarised. In the report, the totals for actual hours, target hours and the daily balances are displayed. In one column you can also see the cumulative total balance at the end of the selected time period. In the footer Chapter of the list, all the data for the selected employee are summarised. 6.5.6 Prepare and Print the Period Report • • Select the menu item report. Choose select from the drop-down menu and using the date picker, enter the desired dates from until. The default is to display the current month. 28 In the overview, the period reports for all users are available, select print and all the reports can be printed. • • Select a department with the department filter and you will obtain the period reports for that department. Select the desired user with the user filter and you will obtain the period report for that user. Note: All reports can be printed or exported as a CSV file. 6.6 Work or Project Code The registered work or project codes at the device are calculated and evaluated in the software. (This function is not possible with TA655). For the calculation or evaluation of the work- or project code choose under the "Reports" menu the button “Work Code” and set the Report Area according to your needs. 29 6.6.1 Evaluation per Department or User If you want to see how much time is spend on the different projects per department or employee, use the “Department- and/or User-Filter”. You will receive an overview of all activities which have been logged with a code. 6.6.2 Evaluation per Work / Project Code If you need the evaluation per Work / Project Code select Work code-Filter, followed by the required code. You will get an overview of all users with the dates they have been working at this project. 6.6.3 Condense search with the filter grouping (day / person / code). When you select "Day", the sum of project hours per day is shown. 30 When you select „Person“ the project hours are shown by user. When you select "Work-code" the total amount of hours for the selected project is shown. To see an overview of total hours per project, select under the Work code filter "All" and under grouping "Work code". 6.6.4 Export overviews as a CSV file You can export the current overview as a CSV file that can then be processed further in Excel or a similar program that can read CSV files. The CSV file format describes the structure of a text file that can save or exchange data or lists with a simple structure • Select the overview that you want to export. • Click on the “Export CSV” icon . • Rename the export file and select the directory created for CSV export. • Click on "Save". • Click on "OK". The data is exported to the selected directory. 6.6.5 Printing of selected summaries The selected overview can be exported with the export icon in a CSV-format and edited in for example Excel or can be printed directly by using the printer icon. 6.6.6 Email The overview you created can be sent by email at any time. When you click on the current overview will be saved as a PDF, which can be attached to an email that you can subsequently edit and send. 31 6.6.7 To capture the Work- / Project-Codes at the TA-800 Device For the registration of the Work- / Project-Codes at the Device by the employees there are 2 options. They can enter the code prior to the verification or enter the code after the verification at the device. Activate the function "Work-code" at your Device. At the TA-800 series proceed as followed: Press the menu button and log in at the device as a supervisor. Then select Options / System opt. / Advanced opt Scrolling down with the F2 button to the option the Work-code (default NO) and confirm with OK. The following selection is available: • No = Work- / Project code is not enabled • Mode 1 = enter the code after the verification at the device • Mode 2 = enter the code before the verification at the device With the TA-800 series only numeric codes can be entered. It’s recommended to place an overview with the codes next to the device. 6.6.8 To capture the Work- / Project-Codes at the TA-900 Device With the TA 900 series, you can define the Work- / Project-Code at the device. • Menu • User Project Add Create Note: The Work- or Project-Codes must match with the codes defined in the software! 6.6.9 How to clock Work- / Project-Code at the device? Depending on the set mode the user will be asked for a Work- / Project-Code before or after the verification at the device. The entry of the code may be ignored if the employee does not work on a specific project. Work- / Project-Codes must be clocked only with arrival or departure, not during breaks. In case a person is working on several projects during a day, he must select the “arrival” option when changing work codes. At the end of the working day or completion of the project and transition to normal working hours the booking has to be completed with clock-out. 32 For example: 8:00 -11:00 Project London (code 100) 10:00-10:15 Break 11:00-17:15 Project Paris (code 110) The employee should clock as followed: 8:00 Clock-In/Code 100 10:00 Break 10:15 Break return 11:00 Clock-In/Code 110 17:15 Clock-Out/Code 110 Calculation of Project: Project London 2 h 45 min, break 15 min, Project Paris 5 h 15 min (work schedule - 1 = h lunch break) = 8 h Overview on monthly report: If a user forgets to clock-out at the end of a working day, the system will automatically register the normal endtime according to the employees work schedule. If no work schedule is set for the employee, the administrator will need to add this entry manually in the software. For example: An employee has to leave at 4: 00 pm for a doctor’s appointment (code 6) and worked during the day on project London (code 100). After his doctor’s visit he will not return to work. The employee will clock as followed: 8:00 Clock-In /Code 100 16:00 Clock-In/Code 6 33 Calculation project: Project London = 7h, doctors visit = 1h total working hour per day 8 h Total working day 08:00-17:00 = 9 h minus the lunch break in the work schedule of 1 h = 8 h 6.7 Clock grid view The clock grid view shows the clock times for all employees in the current month (default setting) as well as the assigned work schedule or shift schedule and all events. Filter the results throught the incorrect bookings and correct them directly in the grid or see which employee has not fulfilled the work schedule on which days (holiday, early, arrive late) and which employees are on holiday or busy with which project. Changes, corrections or the addition of forgotten bookings are a breeze in the clock grid view. For example, an employee has forgotten to clock-in or out on the time attendance device or later you have to add a sick day or holiday; this can be done with one click. 6.7.1 Report Chapter Select the desired time period for which the overview is to be displayed. e.g. month, week, etc. in the report filter Chapter. 34 6.7.2 Report form Day = date e.g. 9.10.2012 Weeks = weekdays are visible in the title bar, calendar weeks in the user field as well as the date in the cell Months = displays all of the current month in which the specified time period is visible in the report Chapter. Days are visible in the title bar, months in the user field and the date in the cell Month - Week = in this view, the current month is shown in the same way as under month and also includes weekdays in the title bar. 6.7.3 Report Filters 35 Everything = this view shows all employees that are registered in the system (even employees without any registered clock times). Only present = this view only shows active employees with registered clock times for the selected time period. 36 Only Warnings = in this overview only employees with incorrect bookings for the selected time period are displayed. 6.7.4 Freeform filter Enter the first letter of the desired user in the freeform filter. All users starting with the same letter are displayed in the view. The more details you enter for the name, the more targeted your filter results will be. 6.7.5 Department filter Select the desired department from the drop-down menu. All the employees in this department are displayed in the view and the User filter. You can also narrow the results by using the "User Filter". 6.7.6 User Filter Select the desired user from the drop-down menu. You can individually set this view by using the filter functions. The settings are saved the application is closed. 37 6.7.7 Setting the grid view When selecting the view, select day, yesterday, this week, last week, this month, last month, this year, last year or select a desired time period In combination with the report form: day week, month or month - week and the report filter: all, only present or only errors as well as the department filter or user filter, you can individually customise the grid view. The default setting is the current month and the report type Month with All events, All Departments and All Employees selected. You can change this at any time Note: The layout is individually customised and will only be displayed in your workplace. Example: Report Chapter: this Month - report form: Month - Week - Report filter - All 38 These settings show the current month for all employees. All users are listed by the their User ID on the left of the grid as along with the name of the current month. In the title bar you can see each individual weekday Mon - Sun and, the date in the cells. In the grid you get an overview of the employee's worked hours. If you assign employees a work schedule or shift schedule this is displayed in blue when there are no more work hours for that day. 1 2 3 4 Fulfillment of a Work Schedule or Shift Schedule Fulfillment of a Work Schedule or Shift Schedule with Work Code Scheduled shift without fix Work Scheduler Vacation If the work schedule /shift schedule, however, is in accordance with the planned time, it is displayed in green. If the actual work time differs from the work schedule or shift schedule it is displayed with a blue background. (With shift planning, the colour for the plan is displayed). Planned Worked Project or work code: When, for example, a doctor’s appointment, holiday or project work are booked with a work code, these are displayed on the grid with the corresponding colour of the work code. Additional information is available when you move the cursor over the clock time. 39 Tool Tip: All the information about a certain day is displayed in an information window when you move the cursor over the corresponding entry. When looking at a day in the future, such as in the work schedule /shift schedule, you will see which breaks are provided for. On a day with attendances, the work schedule /shift schedule as well as the actual attendance and, if required, work codes will be displayed. This means you have all the information for that day. Error messages are indicated in a cell with an exclamation mark denoting that an clock time is missing or there is an incorrect booking. Click with the right mouse button on the day marked "error" and check whether it is due to an incorrect procedure or if an clock time has been forgotten. You can make immediate corrections by amending or adding an clock time. When adding, the date from the selected cell is adopted. The system is designed so that when a work schedule has been created, it is adopted in the work scheduled as a provisional addition to the clock time reservation, so that the calculation in the monthly report is complete. In the monthly report these forms of clock times are marked as corrected "by the system". In order to maintain a complete and error-free database, it is recommended that these error messages are corrected manually. Example 1: In this example, an employee forgot to log off on the time recording device. Since a work schedule exists for the employee, the system calculates the working hours until the finish time included in the work schedule and therefore indicates that the day was worked, but includes a warning note. The calculations in the monthly report will be correctly indicated and, on days when an an clock time is missing, there will be a note to state that this was logged by the system. Please correct the bookings by adding an clock time, if you know the exact time of the addition or accept the work schedule with "copy schedule to attendant records". 40 Example 2: In this example, the correct procedure was not properly complied with and an clock timewas added twice in a row. Correct this directly in the cell by clicking the right mouse button on the entry to be corrected and change the status to out or ignore. Once the error is cleared, the clock time appears normally or, if you filter the report to show "Only Errors" it will disappear from view. If you have set the report filter to "Only Errors", displayed in the overview are only employees that have errors in the attendance log for the selected time period. Once the errors are corrected, the bookings and employees are no longer displayed in the overview. Note: If you have an empty screen, check the setting for the report filter. If this is set to "Only Errors", there are no bookings with errors in the selected time period. Change the filter settings to "All". 6.7.8 Add clock times in the grid view To add entries in the grid overview, proceed as follows: Click with the right mouse button in the field in which you want to add the entry and select "Add New". The input screen is pre-set with all the data, so that you only have to input the time and the status IN/OUT and, optionally, add a work code. Of course you can adjust all the settings. Finally confirm the clock time with OK to complete the process. The booking is accepted. 41 6.7.9 Add missing clock times If you have to add a clock time retroactively for employees over several days or weeks, for example, due to illness or holiday or for lack of bookings at the time attendance device because of a lost ID card, you can do this with one click. Select the time period for which you want to add clock times and click with the right mouse button on the selected time period, select "copy schedule to attendant records", select the required work code, if needed, and confirm with OK. The work schedule or shift schedule will now be copied and used to indicate attendance or illness, etc. This means you do not have to amend clock times individually. 6.7.10 Edit clock times in the grid view To adjust or change an existing clock time, proceed as follows: Select the cell in which you wish to adjust or change an clock time and click with the right mouse button. Select the clock time that you wish to change or adjust. Complete the modifications in the screen and complete the process with OK. The changes will now take effect. 6.7.11 Delete a clock time in the grid view It is not possible to delete an entry. If there is a double entry or an incorrect booking that you cannot correct, set the status of this entry to ignore and create a new correct booking Note: To protect employees, times recorded with a time attendance device cannot be corrected or cleared. To change a time, add a new clock time and set the "incorrect booking" to ignore. The clock time in the time attendance device will remain, but will no longer be calculated. 6.7.12 Export It is not possible to export this view 42 6.7.13 Email It is not possible to send this view by email 6.7.14 Print It is not possible to print this view 7 Administration 7.1 Department/Group Departments and groups are used as selection and sorting criteria in Safescan Workforce Planner. They are used to administer users, as well as the departments/groups to which these users are assigned. These criteria can be used to select users and departments/groups in other parts of the program. 7.1.1 Creating a department/group To create a new department or group, select and enter a name and description for your department or group. Red fields are mandatory and must be completed. Press OK to confirm your entry. 7.1.2 Changing a department/group Highlight the department you want and select 7.1.3 to make the changes. Use OK to save the changes. Deleting a department/group Highlight the department you want to delete and click on Note: . The department can only be deleted if no users are connected to it. 7.2 User Organising, amending or creating users has never been so easy. Create your users directly in the software and synchronise them with the time attendance device - all the information required from the time attendance device will be transferred. You do not need to go to the device for each newly created user to achieve this (except fingerprint). 43 The user data contains all the personal information that is necessary for time recording and processing as well as analysis. The name of the user, the user's personnel number and user number as well as the allocation of the working time model, the management of holiday and annual working hours are listed in this interactive screen. The interactive screen is divided into four Chapters that can be accessed by clicking on the appropriate tab: • • • • System data Personal Data Holiday Annual Working Hours The data can be modified any time. Following the retirement of an employee, you can clear the data or set as inactive. 7.2.1 Creating users in the software Note: Once a user ID's has been selected it cannot then be modified. Before you register a new user in the software, synchronise the software with the time attendance device to ensure that the data are identical in both. Click on , the next available user ID and suggested department/group will be automatically displayed. Change the department, if desired, and accept the settings with OK. Fields marked in red are mandatory. You can complete the user information, set privileges (user, admin, etc.), set the status to active and, if your time attendance device is equipped with an RFID reader, add the RFID card number. 44 Confirm the applied input with Note: Please be aware that the following information will be synchronised with the time recording device: • • • • • • User ID User name Privileges Status RFID No. Password or go to the next input screen. Once you have input everything and the modifications have been completed, synchronise the software with your time attendance device. The new user may now log on and off on the time attendance device with the registered RFID card or user ID and password automatically assigned by the software (see Chapter 7.2.3). 7.2.2 Fingerprint If you have a time attendance device that only supports fingerprints, the user can log in and out using the user ID and password, which are assigned automatically by the software (see below for further information in Chapter 7.2.3"Password"). Save the user's fingerprint at a later time by following your time attendance device instructions for registering new users. 7.2.3 Password You can assign a password to a user or change an existing password at any time. • • Select the user for whom you wish to create or change a password Click on change password Enter a new password and accept by clicking OK Save your entries with 7.2.4 Create users on the device Note: Selected user IDs cannot be changed later. • Before you register a user on the time attendance device, synchronise the software with the time attendance device to ensure that the data are identical in both. in the user mask. 45 • • • Follow your time attendance device instructions for registering new users. Synchronise the software with the time attendance device again. Complete the user information and synchronise the completed information with the time attendance device. 7.2.5 Edit users User data can be modified at any time. Double click the user for whom you want to make changes. The edit field will open. Make additions or change the user information and then save it with . Synchronise the software with the time attendance device after you have made changes to one or more users so that the data are identical in both. 7.2.6 Deleting users • • To delete a user, highlight the user in the list and click on or Double click on the user and put the user in "Inactive" or "Delete" in status. (In "Inactive" the user ID will not be deleted and the user's data will no longer be processed or appear in any summary. In "Delete" the user will also be deleted on the time attendance device at the next synchronization). 7.2.7 System data information User name: Enter a user name. User ID: Enter the number of the employee's ID card. This can consist of up to nine digits. The user ID must be identical to the user's ID on the time attendance device. RFID no.: Enter the ID number of the transponder that has been assigned to the user. It is not mandatory to enter this. There are ways of transferring the transponder ID to the employee master data. • The RFID no. is entered into the "System data" field. After synchronization with the time attendance device, all user data for the function, including the transponder ID, is sent to the time attendance device. • The RFID no. is entered when a user is set up on the time attendance device and is sent to the software during synchronization. The user data it is then transferred to the system. User privileges: Use the user status to control the granting of rights on the time attendance device and in the software: • User: a standard user, who can only use the commonly available functions on the time attendance device. Users only see their own time entries in the software and cannot make changes. • Enroller: Employee who has permission to log other users onto the time attendance device. Enrollers only see their own time entries in the software and cannot make changes. • Administrator: Employee who has administrative rights and access to everything. Can make changes in the software. • Supervisor: Employees with all rights on the device and in the software. Int. phone: You can save the employee's internal telephone number if you wish. Duty roster: Select a duty roster from the drop-down field from which the user is to be assigned. 46 Changing your password: Assign a password. When you create users via the software, the software automatically assigns a password that matches the user ID no. For example, user ID 22 = password = 22. The user can use this password/PIN to log into the time attendance device. Add image: Add a photo of the user. Delete image: Delete the photo of the user. 7.2.8 Personal Data In the "Personal information" tab you can enter more information about individual employees of the company. With the exception of the personnel number, this information is of no significance to the actual time and attendance. Name and address: Save the personal data of the employee, such as private address, telephone number, etc. These fields are not mandatory and can be left blank. Personnel no.: Enter the employee's personnel number. This can consist of up to nine digits. The personnel number is shown on the monthly report. Note: Please enter the date of birth and starting/leaving date in the dd.mm.yyyy format in the entry field. 7.2.9 User – Vacation To calculate holiday times in the reports, you require some basic information. This is entered in the input screen. When all the data are complete, the global overview displays the respective current accrued holiday for the employees and the planned holiday, if a holiday is planned. Note: Holidays must be entered in hours! Enter the data as follows: Existing employees usually have accrued holiday. This can be entered in the field "accrued from last year". Convert days to hours (e.g. 4 days * 8h = 32 hours) using the number of working hours per day for your business. In the field "Correction" you can retroactively include plus or minus days (in hours) to correct the accrued holiday from the last year. 47 For example, the employee took some holiday during the last year that was not entered in the system. Now enter the current annual holiday balance of the employee (in hours). If during the current year your employee is entitled to extra holiday, e.g. own wedding, maternity vacation, etc., you can enter this under Extra Vacation I and II. The fields "holiday taken"," planned holiday" and "holiday remaining" are calculated by the system after you have entered or planned holiday times (Chapter 9. Planning). 7.2.10 User - Annual Working Hours The annual working hours give scope for organising a flexible work schedule for employees. Enter the target annual working hours. All further calculations are performed by the system based on the work hours posted for the employee. The overview shows you the current status of the hours remaining for the current year at all times. Note: The annual working hours must be entered as hours! 7.2.11 View settings Set up the view of employees in the desired way and according to your needs by right-clicking on the title bar and clicking the options ‘on’ or ‘off’. Any new columns are placed at the end and can be moved by dragging and dropping them in the desired location. The settings will be saved once the program is closed. 7.2.12 Export views as a CSV file You can export the current view as a CSV file that can then be processed further in Excel or a similar program that can read CSV files. The CSV file format describes the structure of a text file that can save or exchange data or lists with a simple structure. 48 • Select the view that you want to export. • Click on the “Export CSV” icon . • Rename the export file and select the directory created for CSV export. • Click on "Save". • Click on "OK". The data is exported to the selected directory. 7.2.13 Send report by email The view you created can be sent by email at any time. When you click on the current overview will be saved as a PDF, which can be attached to an email that you can subsequently edit and send. 7.2.14 Print The current view can be at any time. The exact view you set will be printed. 7.3 Work schedule/ Weekly work schedule Create work schedule /weekly work schedules for the employees that have regular duties. The work schedule /weekly work schedules can be individually assigned to a user or to an entire group/department. The work schedule /weekly work schedules are processed with the monthly report and serve as the basis for calculating working hours and overtime as well as for monitoring early leave and late arrivals. 7.3.1 Create a work schedule with fixed working hours Click on the in the screen, type in the name and description for the work schedule and then confirm with OK. Note: Fields marked in red are mandatory. From the drop-down menu "weekdays", select the desired days (more than one day can be selected). 49 Then under start type, select "IN". Enter the time for the start time (input format settings follow those for your country, e.g. 09:00) and the end time. (See example). Confirm the entries by clicking on 7.3.2 . Create a work schedule with flexible hours (only break allowance). If your employees have no fixed working hours, but you still want to schedule an automatic break for the workday, you can also set this up as a work schedule. Click on to create a new work schedule. Select the desired days as well as the implied breaks and enter the start and end times. An employee with this work schedule has flexible working hours with an automatic break allowance. 7.3.3 Rounding With the rounding of clock-in and clock-out hours, you can set working hours to commence at a fixed time. This means that overtime caused by arriving early (e.g. 5 minutes every day before the start of working hours) will be avoided. From the drop-down menu, select the desired time period (from 0 - 60) for "round before" and "round after" for both the start time and end time. 50 If, for example, you select 10 before the set start of the working time, all clock times entered 10 minutes prior to this time will be assigned a calculated "clock-in" at the set time. This means the employee does not receive 10 minutes extra work time. The same goes for "round after". However, all clock in entered 15 minutes before the start of work time set with round before 10 will count the time until 09:00 as overtime (15 minutes). Note: Rounding is not included in work code calculations. There, the actual worked time is taken into account. 7.3.4 Automatic break allowance With Safecan Workforce Planner you have the possibility to directly deduct fixed breaks that your employees must take. For example, there is no need to clock-in or out for a lunch break as it will be automatically logged by the system. Create a weekly work schedule as described above in Chapter 7.3.1. In the second row, enter the days when the break will be automatically logged. Then select break implied and enter a start and end time; rounding is not necessary here. If the breaks do not occur at the same time every day, you can set this as required. Confirm the entries by clicking on . 51 When all the information has been entered, you will receive an overview of the current work schedule. Break implied = includes breaks that are automatically logged. The break time is automatically logged and there is no need to clock-in or out on the time recording device. Break incl. = If you select "Break included" the total working time you have entered includes breaks (in a 40 hour week with a one hour lunch break, an additional 5 hours are added to the 40 hours as breaks. The total weekly working hours in this case amount to 45 hours). If a break time is checked-in at the time attendance device, it will be included in the calculation and the employee, in this case, will have a minus. Break excl = in the specified time period breaks must be clock-in and out as normal at the time attendance device. 7.3.5 Editing/changing a duty roster The weekly work schedule can be adapted/changed at any time. • • Highlight the weekly work schedule that you want to change and click on or double click directly on the weekly work schedule that you want to change. The editing field opens. Complete or change, as described in Chapter 7.3.1/7.3.2 or 7.3.3, then with . Your changes are immediately taken into account in the calculations. 7.3.6 Deleting the duty roster • To delete a weekly work schedule, select it in the list and click on Note: You can only delete a weekly work schedule if it has no link to a user. 7.3.7 Export overviews as a CSV file . You can export the current view as a CSV file that can then be processed further in Excel or a similar program that can read CSV files. The CSV file format describes the structure of a text file that can save or exchange data or lists with a simple structure • Select the view that you want to export. • Click on the “Export CSV” icon . • Rename the export file and select the directory created for CSV export. • Click on "Save". • Click on "OK". The data is exported to the selected directory.. 7.3.8 Send report by email The view you created can be sent by email at any time. When you click on the current overview will be saved as a PDF, which can be attached to an email that you can subsequently edit and send. 52 7.3.9 Print The current view can be printed out at any time with 8 . Planning 8.1 Planning Grid You can schedule your weekly/monthly or holiday planning quickly and easily in the planning grid with the help of templates. You can print an operational schedule that you can give or send to your employees by email. The planning grid provides you with a clear overview of all the employees (showing the work schedule or shift schedule) and their work plan or holiday plan. You can make adjustments quickly and easily as and when necessary. All schedules are transferred and displayed in the clock grid. 8.1.1 Creation of the grid view Filter: 8.1.2 Planning Group In the planning group, you have a choice between: User, Department or All Under User, a planning entry is listed for the selected user (e.g. shift) Under Department, a planning entry is listed for all employees in the selected department (e.g. team meeting, etc.) Under All, a planning entry is listed for all employees (e.g. public holiday, holiday or business trip, etc.) 53 8.1.3 Planning Period You can view and edit all the ranges of dates within the planning period in the planning grid. Note: Planning in the past must be entered through “Select” and the desired period must be specified 8.1.4 Planning Type Under planning type, you set up the desired grid view. Day = Date e.g. 9.10.2012 Weeks = weekdays are visible in the title bar, calendar weeks in the user field, as well as the date in the cell Months = displays the whole of the current month in which the specified time period is visible in the report Chapter. Days are visible in the title bar, months in the user field and the date in the cell 54 Month - Week = in this view, in the same way as for month view, the current month as well as weekdays are shown in the title bar. 8.1.5 User filter This filter is only active when you have selected the planning group "Users". You can use the user filter to enter a name to restrict the number of users displayed. 8.1.6 Department filter This filter is only active when you have selected the planning group "Users". If you select a department, in the grid rview, you see all the employees allocated to this department. 8.1.7 User ID Filter This filter is only active when you have selected the planning group "Users". The User ID filter lists all employees by user ID (also inactive users, but they cannot be included in the planning). 8.1.8 Icons: Icons for list view Note: Icons for grid view If the icons are grey, these options are inactive in the current view Export data - only in list view (not possible in the grid overview) View or send reports by email Print the view - only in list view (not possible in the grid overview) Add plan Edit plan Clear plan Refresh Switch to list view 55 Switch to grid view Import public holidays Open and close the list templates for work time plans and vacation time plans Open and close the work code legend 8.1.9 Structure of the planning grid The planning view consists of an information bar on the left, where the settings for the planning group filter are displayed, and a title bar at the top, where the date for the planning period is displayed. The cells contain fine lines that act as support for the daily routine view (9:00/13:00/17:00) 56 8.1.10 Planning - List View In the planning list view, all entries are listed per employee and they can also be edited. 8.1.11 Planning with time plans You can create time plans for the future planning of employees The time plans are templates that will simplify the scheduling of employees and they are flexible, in contrast to the work schedules, in which an employee is permanently assigned. You can add a shift you require or plan a day off at any time. When you have created the necessary time plans, you can move employees to the desired time point by using the ‘drag and drop’ method. 57 8.1.12 Create time plans Open the time plan window with here you can create templates for planning. 8.1.13 Add a time plan Select to add a work schedule. Give the time plan a name, time plan and work code. You can type the name directly into the cell. To add to a time plan, enter the time directly into the cell. With this version you may not include any breaks. 58 Note: With a time plan you must either post a time for example 09:00-17:30 or use a time plan template. or open a time plan template, in which you can also add breaks. Select the desired day (multiple selections possible) Select the start type; the end type is adjusted automatically. Enter the start time and end time. For rounding before or rounding after specify the time in minutes before or after the start/end time that the clocked work time is not to be counted as overtime (minus work time). Specify the desired break requirements. For the start type, select the desired break type (including break incl./No break/break impl.) 59 For break incl. the weekly working hours will be calculated including the breaks. An employee with this work schedule does not need to clock-in or out for breaks on the time recording device. The time is calculated on an ongoing basis. With no break, break time must be clock-in and out on the time attendance device during the specified time period. In this case, it is recommended that you use round before and round after. With break impl., break time is automatically included. An employee does not need to clock-in or out for breaks on the time recording device. 8.1.14 Add work codes For a good visual overview and proper mapping of selected schedules, connect them with a work code (previously created under "work codes") to the selected time plans. 60 Confirm these inputs by clicking . When you have created all the required time plans, you can now assign the employees by using the ‘drag and drop’ method. See Chapter 8.1.17. Delete a time plan To clear a time plan, select it and click on Note: . The time plan will be cleared. The plans created on a deleted time plan are retained by the employees and, if no longer required, must be deleted directly with the user. 8.1.15 Employees with a work schedule to, temporarily replan If you want to or need to provide employees with a permanent work schedule for a certain time period, whether as a holiday replacement or sprinter, etc., there is no need to change the entire work schedule for the employee. You can use the work code * "Replan" to create a time plan and replace the work schedule for the required time and plan a new work time. Select the employee and the required time period and ‘replan’ these by clicking schedule with the work code "REPLAN" (To create this work code see Chapter 11.2) and adding a new 61 You will see the colour code chosen for this work code in the time period selected. There is no work schedule for this employee anymore and the employee is no longer visible in the clock grid. Clock grid Now reschedule this employee! Note: Replanning of work schedules must be carried out by clicking defined as a time plan template. (add). This function cannot be 8.1.16 Inserting and planning with time plans When you have created the necessary schedules, you can move employees to the desired time point using the ‘drag and drop’ method. Select the time period or the member of staff and drag the time plan onto the selected area. 62 Individual Employees Select an overview of the planning data you want to add. Confirm this with OK if you want to overwrite the plan. Several employees simultaneously 63 Select an overview of the planning data you want to add. Confirm this with OK if you want to overwrite the plan. 64 After planning, this assignment will be in the clock grid and added as the "work schedule". 8.1.17 Planning with a time plan template for departments To schedule a time period as, for example, a work shop, etc. for an entire department. Select "department" in the planning group., All the departments are listed in the grid view. For the user, select the desired time period and drag and drop the schedule onto the selected area. 65 Confirm this with OK if you want to overwrite the plan. All the employees allocated to this department are now scheduled for this workshop. 66 8.1.18 Planning with a time plan templates for ‘All’ If you want to schedule a time period for the entire operation as, for example, with company holidays, long weekends, holidays, etc. Select "All" under planning group. In the grid view "All" is still the only option available. For the user, select the desired time period and drag and drop the schedule onto the selected area. The plan will apply to ALL employees. 8.1.19 Add planning or time plan If you want to set up a plan without a time plan template, select an employee, or if you want to set up a plan for a department select "Department" under planning group, or "All" if you want to set up a plan for the entire operation. Select the time period that you wish to add the plan to and click on directly into the selected area and select add. or with the right mouse button 67 • • • • • • • Rename the plan Adjust the start and end dates Enter the start time and the end time e.g. 08:00-17:00 If the fields are left blank 24 hours will be allocated Make sure you enter the correct times If necessary change the user Assign a work code to the plan Note: Breaks cannot be entered in this way. These must be entered using one further step. Note: Fields marked in red are mandatory 8.1.20 Edit, change or delete the planning Plans can be modified or adjusted by clicking with the right mouse button on the day cell. This gives an overview of the plan for this day with information about the time plan used. Delete the plan by clicking on Edit the plan by clicking on 68 • • • Add on a plan by clicking on and add the screen. Make sure you enter the correct times. If the fields are left blank 24 hours will be allocated. 8.1.21 Print planning grid In the planning grid you have the option to print weekly work schedules overview. Select the desired time period (this week, this month, etc.) as well as department and/or user. Click on weekly work schedule. Confirm with OK to print this. Note: . You get a preview of the Only weekly views can be printed - monthly views are split into weeks so that the data are legible. 69 9 Holiday planning The planning of days off and holidays for your employees is a breeze in the planning grid. The grid gives you a clear overview. Days off are added simply by using drag and drop to assign them to an employee. Create "Holiday templates for the Rapid Selection List" such as full-day holiday, half-day holiday; public holiday, etc. 9.1 Create Holiday Templates 9.1.1 Holiday Time Plans - Work schedules Draw up a time plan for holidays with a work schedule, then assign the appropriate work code (see Chapter 11.2). This time plan is required if your employees work on a fixed work schedule . Add a new work schedule to the list of templates • • • Enter a name directly into the field. In the "Time Plan" field enter a time of day that will cover all work schedules, (for example 01:0023:30). The vacation calculation will be adjusted in accordance with the work schedule. (For example, work schedule-1: Mon-Fri 08:00 to 12:00, 13:00 to 17:00 8hrs, this time is planned holiday). Include the holiday work code (that you prepared in advance) in the work code (See Chapter 11.2.1) 9.1.2 Holiday time plan for flexible time planning . This type of time plan is required if you are working in shifts or if employees are not assigned to a fixed work schedule. Add a new time plan to the list of templates . You can type the name directly into the cell. 70 Note: For a time plan you must either post a time between 09:00 and 17:00 or use a time plan template, • • or open a schedule template, and create a time scheme. See Chapter 8.1.13 Include the holiday code (Planned Holiday) that you had prepared in advance, in the work code (See Chapter 11.2.1) Confirm these inputs by clicking 9.1.3 . Holiday Planning with Time Plans Select the period requested by the employee for the holiday and drag the appropriate time plan (work schedule or flexible) directly onto the selected area. The holiday is posted and will be included in all the reports. 71 Holiday planning is reflected in all the reports as well as in the clock grid rview. Holiday hours are also calculated in the master data. Clock grid Employee master data Report review 72 10 Holidays Safescan Workforce Planner includes a large number of official European holidays that you can add with one click on the database. Select and you get an overview of all the available lists of public holidays sorted by country. Open the desired country and select your region (regions are not available for all countries). Confirm with OK. The data is imported directly into the software database. 11 Settings 11.1 General 11.1.1 Set language Select the language you want. Use to save this change. For the changes to take effect, close the software, then restart it. Note: After the language has been changed, the software must be restarted! 11.1.2 Database connection The software automatically uses the memory location that was selected during the software installation, in which the database is stored. The database connection field is empty, and should only be filled in manually in exceptional cases. 73 If the software and the database have been stored in different locations, this counts an exceptional case. In any such exceptional cases, please contact your IT department. 11.1.3 Backup If the database is stored locally on your computer, the software will perform an automatic backup at regular intervals. Set the interval you want from the drop-down menu. 11.1.4 Device/time attendance device Before time bookings can be processed in Safescan Workforce Planner, they must be entered using the time attendance device. Safescan Workforce Planner reads out the bookings on the time attendance device, transfers them to the PC and classifies them on the workforce planner database. Two options are available for the data transmission procedure: • Data line (TCP/IP, RS232, 485) • USB memory (cable) You can connect an unlimited number of time attendance devices to the software to calculate times. If you have not connected your time attendance device via your local network and are working with a USB stick, select the USB stick settings (a combination of TCP/IP and USB stick is possible). 74 Note: • Time bookings are only transferred from the time attendance device to the software! • User data must always be updated and synchronised manually. 11.1.5 Data connection with TCP/IP If you want to connect your time attendance device to your network via TCP/IP, you must assign a free IP address that falls within your IP address range to the device. The IP address 192.168.1.201 is stored on the time attendance device as standard. Find your IP address range: If the IP address prompt appears, type "ipconfig /all". • • Look at your IP address. This is your IP address; it usually begins with "192". 75 In the example: 192.168.1.149 Find an unused IP address. • Type "ping", then enter your IP address. Change the last two digits and press "Enter". In this example: ping 192.168.1.1 Once the IP address is active it receives all data packets. The software requires a free IP address. In this example: ping 192.168.1.10 76 Once you have found a free IP address, save it on the device by following the instructions of your time attendance device. When you have stored the IP address on the time attendance device and the device is connected to your network. Use in "Device" to search for new devices and confirm with "Yes". Or click on and enter a name and the IP address manually, click on "This computer" and enter the communication keys if you have saved them on the time attendance device (fields highlighted in red are required fields). If the device is connected, the status in "Active" will change to "Connection made". You can connect several time attendance devices with the software via your network. If a device cannot be connected to the network, you can add it manually as a USB drive. 77 Once your time attendance device is connected with the software, booking times that have already been stamped are automatically transferred to the software. The user data must be synchronized manually, see Chapter 11.1.6. 11.1.6 Synchronizing the user data If your time attendance device is connected to the software you must synchronize the user data from the time attendance device with the software. To do this, select ; all users that have been stored on the time attendance device are displayed in the summary. In this case you should synchronize "Device" to database and use "Run" to confirm. Then edit the user data in "User" as described in Chapter 7.2.5. If the users have been entered into the software, please synchronize: Database to device. If users have been entered into both the time attendance device and the software you should check, during synchronization, the location in which the data is more up-to-date and synchronize in the direction you want, see also Chapter 11.1.6. If you do not want to synchronize all the data or if the data does not all have the same direction, you can select any user ID individually and define the direction, or ignore it so that it will not be synchronized. To do this, click on the field next to "Resolution" to get drop-down list (empty = none Synchronization; DB /Device = database – device; Device/DB = device – database). 11.1.7 Data transfer using a USB stick To transfer the booking from the time attendance device to the PC, please follow the instructions below. Transferring bookings to a USB memory. a) Time attendance device with an LCD display • Connect the USB memory to the time attendance device USB port. • Log into the time attendance device. • Then press the [Menu] key. • Use the arrow keys to select "USBDrive Mng" (USB drive manager) and press [OK]. • Use the arrow keys to select "Download logs" (USB drive manager) and press [OK]. An indication that the data has been copied will then be displayed. If "Copy Data OK" appears, the data transfer to the USB memory is complete. The file saved with the bookings is called: 1_attlog.dat 78 • • Note: Repeat the process if you also want to load the data onto the USB stick by selecting "User dat" (download user data) and press OK. An indication that the data has been copied will then be displayed. If "Copy Data OK" appears, the data transfer to the USB stick is complete. The file saved with the user data is called: 1_User.dat or User.dat. Remove the USB stick. If there are variations in the time attendance device user interface, please read this Chapter in the user manual that was delivered with your time attendance device. 11.1.7.1 Time attendance device with TFT display • • • • • • • • • Connect the USB stick to the time attendance device USB port. Log into the time attendance device. Then press the [Menu] key. Use the arrow keys to select "USBDrive" and press [OK]. Use the arrow keys to select "Download" and press [OK]. Use the arrow keys to select "Dload bookings" and press [OK]. An indication that the data has been copied will then be displayed. If the words "Download ended" appear, press [OK]. The data transfer to the USB stick is complete. The file saved with the bookings is called: 1_attlog.dat Press the [ESC] key until you have exited the menu. Remove the USB stick. 11.1.7.2 Time attendance devices with a USB cable • Connect the time attendance device to your computer via the USB cable. • Use in "Device" to search for new devices, then confirm with "OK" that the time attendance device has connected to the software automatically, or enter the device manually as described above. • • Synchronize the user data as explained in Chapter 11.1.6. The booking data is transferred to the software automatically. On model TA 655, data is read at a lower frequency, which means that there is a longer time interval than for the TA-800 or TA-900 series (on the TA-800 and TA-900 series, the data transfer takes a maximum of 1 second). 79 11.1.8 Reading bookings on a PC If you want to synchronize the data with the software for the first time, you must first create a USB stick "Connection". Select , then assign a name (e.g. USB). The field with the IP address must be empty, fields highlighted in red are required fields. Press "This computer". If you have saved a communication key on the time attendance device, please enter it in "Communication key". Confirm with OK (see Chapter 11.1.6). • Connect the USB memory to the PC USB port. • The booking times will be read from the USB stick automatically and processed in the software. • To update the user data, highlight the row with the USB device. • Click on and select the file 1_user.dat from the USB memory and click on "Open". In the synchronisation window, please select the direction in which you want to perform the synchronisation. If you have data that is more up-to-date in the time attendance device than in the software, please select "Device/database". If the data in the software is more up-to-date, select - "Database/device". You can see in the summary of each user ID whether the user exists in the device only or in software only, or whether there is a difference between the software and the device. You can see which information is different in the difference description. Now select the synchronization direction. If you do not want to synchronize all the data or if the data does not all have the same direction, you can select any user ID individually and define the direction, or ignore it so that it will not be synchronized. To do this, click in the field next to "Resolution". You will then see a drop-down list (empty = no synchronization; DB/Device = database - device; Device/DB = Device - database). 80 Example of differences: A user with an ID has been created without a name on the device. If you synchronise data, you will see the following message: "Device only". Synchronise this data – device/DB and edit the user ID in "User". Add a new user name and synchronise it once again with the time attendance device. During the synchronisation you will now see the following message: "Different!" And, in the description: User name different. Now synchronise "DB/Device" so that the user names on the time attendance device are overwritten and the user is recognised at the next login. 11.1.9 Synchronising user data First synchronise the user data as described in Chapter 11.1.6. Make sure you confirm the direction for the synchronisation. Check the clock time for the data in the software and the time recording device. 11.1.10 Import entries from a TA 655 onto the computer Select the row in the device (see Figure) and click on The attendance log will be copied from the device and transferred to the software. After completing the data transfer, you will be asked whether the attendance log is to be deleted in the time recording device. Please only confirm this with Yes if you are absolutely sure to delete the data in the device. Only the attendance log will be cleared, not the user data. 81 11.2 Work codes With work codes, specific names are added to a user's clock times within the program. Work codes provide an overview and explanation of absences (added manually). Work codes can be added to the clock times in the software by a supervisor or administrator. Note: In the TA 800 series, the work codes must be entered directly (see user manual for TA 800 series). Use the work codes in your employees' clock times to specify, for example, business trips, holiday, doctor's appointments, etc. This information will appear in the monthly report. 11.2.1 Add/Create a work code Select 1 2 3 4 5 and edit the work code screen where you want to do one of the following: Select a work code no. Assign a short name Assign a description Under work code type, select the calculation method for the work code. Select the colour code. 82 Assigned time Scheduled time Vacation Holiday time Planned vacation time Unplanned time Sick • For assignment to projects • This work code will be calculated as normal working hours • The work time entered in the work schedule is converted into holiday days and will be recognised in reports as paid holiday. • Legally mandated holidays are reported as paid days. • Holiday time without work schedule • Required if you use shift schedules rather than a fixed work schedule. For this purpose, in the planning, a time plan will be created (see Chapter 9.1) • For unpaid working hours/vacation • This function removes an existing work schedule for the selected time period and during this time period you can enter a different schedule without replacing the whole work schedule. • Work codes for illnesses or accidents: reported as paid work time You will have an improved view later to plan your work, we recommend assigning colour codes to work codes. You can select a colour from the list or using Custom... create a suitable work code colour. Example: 83 11.2.2 Edit a work code To change or edit a work code, select and double-click or click on with OK. . Make the desired changes and confirm 11.2.3 Delete a work code Select the work code you want to delete, click on . Confirm with OK. 84 12 Info 12.1 Help 12.1.1 Technical Support a) b) Support on the Safescan website Our service page on our website is available 24 hours a day in is updated regularly. Please go to: www.safescan.com/manuals. You will find the answers to your questions and suggested solutions in the FAQ. Support hotline Our support team is available to answer any technical questions you may have by telephone from Monday to Friday, between 09:00 and 17:00. Please contact: www.safescan.com 12.2 Impressum 12.2.1 Updates and upgrades We will make updates and/or upgrades available to you at www.safescan.com/manuals. Please check regularly to ensure that you have the latest software version. 13 Server installation For more information about server installation, please visit our website www.safescan.com/updates_ta or contact our help desk. 14 Uninstalling Safescan Workforce Planner To uninstall Safescan Workforce Planner, please proceed as follows: • Start/configuration/software. • Select Safescan Workforce Planner, then select [Uninstall software]. 85