1
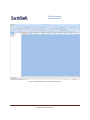
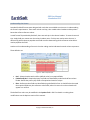
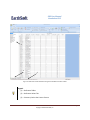
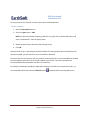
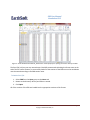
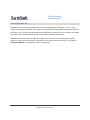
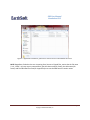
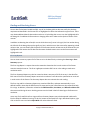
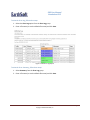
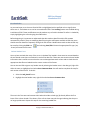
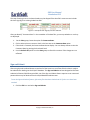
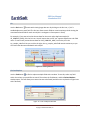
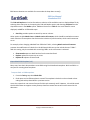
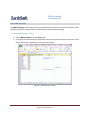
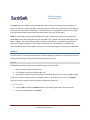
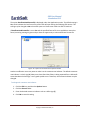
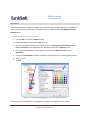
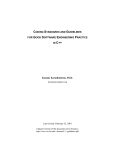
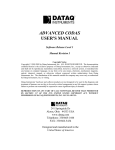
EQuIS Data Processor (EDP) User Manual EDP User Manual Introduction EQuIS Data Processor (EDP) Introduction The EQuIS Data Processor, or EDP, is today’s answer to the many data quality issues that plague data managers. The latest in EarthSoft’s family of data checking software, EDP sets a new standard for simplicity in data quality management while adding a host of new features and capabilities that allow the user the utmost in data checking flexibility. There are three desktop “modes” for using the EQuIS Data Processor: Standalone EDP, Professional EDP and EDP Express. This document is strictly for using Standalone EDP. EDP checks all of the following data quality issues: Required Fields Field Lengths Data Types Valid Dates Reference Values Duplicate Rows Range Checking Orphan Rows EarthSoft – EDP User Manual Page 2 Copyright © 2010 EarthSoft, Inc. EDP User Manual Standalone EDP Standalone EDP The Standalone EQuIS Data Processor, or Standalone EDP, is used to check data without having access to the EQuIS 5 database. All of the functionality found in Standalone EDP is also found in Professional EDP. The following Standalone EDP sections will outline the features found in both Standalone EDP and Professional EDP. All modes of EDP support formats for many fields of environmental data observation and acquisition. From analytical laboratory data to field activities such as drilling and sampling to automated surface water sampling – EDP can check data files quickly and easily. You need to know the EQuIS format or EDD format that your data resides in, what reference values you will use to check the data, and if there is an enumeration file associated with your format file. There are several EQuIS formats included with the EQuIS Data Processor software. The appropriate format to use is determined by the type of data to be imported. After determining the EDD format, you are ready to begin. 1. Start Standalone EDP by selecting Programs > EarthSoft > EQuIS Data Processor from the Start menu. If you are running the EQuIS Data Processor in evaluation mode, click the OK button on the EQuIS Data Processor Evaluation screen. The EQuIS Data Processor will open to the main window. EarthSoft – EDP User Manual Page 3 Copyright © 2010 EarthSoft, Inc. EDP User Manual Standalone EDP Figure 1 – Standalone EDP with the Barrick_NA format open EarthSoft – EDP User Manual Page 4 Copyright © 2010 EarthSoft, Inc. EDP User Manual Standalone EDP Format File The Format File is the essence of data checking in EDP. The Format File contains the definitions for each individual section belonging to the EDD format. For example, the Barrick_NA file contains 4 sections including sections for Locations, Field Parameters, Water Levels and Lab. There are three or four files that make a format file: The format definition file (xse) file Custom handler (vbe) file The enumeration (enum) file And, the reference values (rvf) file Together these files determine how your data is checked. The xse file contains the mapping and definition for the sections of the format file, such as – the mapping of the fields in the format to the data table and fields in the EQuIS database, required fields, primary keys, field length, field description and field type (numeric, text, etc.) The vbe file contains the custom handling and business rules that apply to the format. Such as: the analysis date cannot proceed sample date or reportable_result cannot be Yes where the lab_qualifier is E, G, P, or R. Another example of a business rule is if a certain sample type is encountered then another field must be populated. For example if you have a sample_type of FD (field duplicate), then the parent sample field must be populated to avoid an orphan quality assurance/quality control sample. The enum file is an optional file that allows EDP to enforce a set of lookup values similar to a reference table (rt.) lookup. This allows EDP to control the values for specific fields that are not linked to a reference table in the EQuIS database. The rvf is created as an export from EQuIS Professional, while the enumeration file is created and maintained manually using any text editor. Unlike the .rvf, the enumeration file is used in EQuIS Professional EDD as well as standalone EDP. It should be noted that the enum file may also be used to narrow a list of reference values to a smaller list. For example, typically a unit field such as elevation units would be linked to the rt_unit table which may contain 100 or more units. However, it may make sense to limit the elevation units to “meters” and “feet” since those are the only valid units for this type of data. EarthSoft – EDP User Manual Page 5 Copyright © 2010 EarthSoft, Inc. The rvf is created as an export from EQuIS Professional reference tables. This file is only needed when running standalone EDP and it allows EDP to check reference values remotely against values established in EQuIS Professional. EDP User Manual Standalone EDP Opening a Format File The first time EDP is launched, a format file must be selected before a data file can be loaded. To open a Format File: 1. Click on the Format button (located in the Open group on the Home tab). NOTE: The default location for system formats is ~\Program Files \EarthSoft\EQuIS\Formats. The default location for custom formats is Program Files\EarthSoft\EQuIS\Formats\Barrick_NA. 2. Select the Barrick_NA.xse format file and click Open. 3. Once the format file has been selected and successfully opened, the format’s sections are listed in the left hand portion of the EDP window. If prompted to open the reference file, select Barrick_NA.rvf. EarthSoft – EDP User Manual Page 6 Copyright © 2010 EarthSoft, Inc. EDP User Manual Standalone EDP 1 4 2 3 Figure 2 – EDP Standalone Legend Legend: (1) – The Sections of the Format (2) – The Format Tab (3) – The Directory Path to the current Format (4) – The Version of the Format EarthSoft – EDP User Manual Page 7 Copyright © 2010 EarthSoft, Inc. 4. Users can identify what format file and version has been loaded by selecting the Format tab. The path to the format file and the version are displayed in the lower left corner. It is recommended that all EDP users check this path and version prior to each use of EDP. Now that a Reference Value File and Format File have been successfully opened, EDP is ready to load and check a data file. EarthSoft – EDP User Manual Page 8 Copyright © 2010 EarthSoft, Inc. EDP User Manual Standalone EDP Understanding the Format Standard EarthSoft formats were designed with tools that are available to assist users in understanding the format’s requirements. These tools include: tool tips, color coded column headers and drop down boxes that enforce reference values. In each format file provided by EarthSoft, there are tool tips in the column headers. To access these tool tips, simply hold your mouse over the column headers name. Tool tips are used to assist the user in determining which values to populate each field as well as determining which reference value table is used to populate the field. Another aid in understanding a format is the color coding used to indicate what each column represents. These defaults are: Figure 3 – EDP Tooltip Example Red – Column headers with red font (default colour) are required fields. (Underlined) Red – Required primary key fields are identified by underlined red font column header. Recall that primary key fields are required and must be unique. Blue – Reference value fields are identified using a default blue font. It should further be noted that required fields may also reference value fields, when this occurs the column header will appear in a red font. The default font colors may be modified in the Options Tool in EDP. For details on making these modifications see the Options section of this manual. EarthSoft – EDP User Manual Page 9 Copyright © 2010 EarthSoft, Inc. EDP User Manual Standalone EDP An additional tool to assist users is the drop-down list that appears when the curser is placed over any Reference Value or Enumeration Value field. These drop-down lists include the approved reference values from the reference table indicated in the tool tip (explained above) or from the enum file. If an error indicating a Missing Reference Value exists, select one of the values from the drop-down to resolve the error. Reference Value File The Reference Value file specifies what reference values, or valid values, may be allowed in the data file. It is simply a lookup list that says, in effect, these are the values which you may choose from for a particular field. When EDP starts and a Reference Values File is selected, the Reference Values tab shows the various tables and values defined within those tables. Values displayed are not editable in the Reference Values tab. In order to assist clients in loading the appropriate set of reference values for each format, users do not have to manually open the reference value file. Rather, each time a user opens a format file, EDP looks in the same folder as the format file for a file with the extension .RVF (the reference value file). If a file is present, it is opened and used. If an *.RVF file is not located or if there are more than one *.rvf in the same directory as the Format File, then the user is prompted to browse to the appropriate *.RVF file. For example, if a user loads the format (C:\Program Files\EarthSoft\EQuIS\Formats\Barrick_NA\Barrick_NA.xse), EDP checks the same folder for an *.RVF file. If the file is found, it is loaded. If not, then the user is prompted to open another *.RVF file of their choice. If multiple *.RVF files exist in the \\EarthSoft\EQuIS\Formats\Barrick_NA folder, the user is prompted to select which *.RVF file they would like to use. This is useful when laboratories and other data providers are supporting multiple clients with different reference values files. EarthSoft – EDP User Manual Page 10 Copyright © 2010 EarthSoft, Inc. EDP User Manual Standalone EDP 1 2 3 Figure 4 – Reference Values Window showing the list of Reference Values Tables Legend: (1) – Reference Tables (2) – Reference Values Tab (3) – Directory Path to the Current Format EarthSoft – EDP User Manual Page 11 Copyright © 2010 EarthSoft, Inc. EDP User Manual Standalone EDP EarthSoft – EDP User Manual Page 12 Copyright © 2010 EarthSoft, Inc. EDP User Manual Standalone EDP Data Files The data files, often referred to as Electronic Data Deliverables (EDDs), are the files that contain the data to be checked. The EDDs must be in an electronic, tabular format that adheres to the layout and rules specified by the Format File. The data file may be a tab-delimited (.txt) or comma -separated (.csv) file, an Excel file (.xls), Access database (.mdb) or a zipped EDD files (.zip) may be loaded. Some formats may also be set up to accept an XML formatted dataset. Loading Individual Data Files Individual Data files can be loaded into the EQuIS Data Processor. First, highlight the section to load the data file into and then use one of the following methods: 1. Select Open > EDD from the Application menu. OR 2. Right-click a section and select Load Data File. When multiple sections exist within a given Format File, the data file selected is loaded into the currently selected section. By default when EDP is opened, the first section of the format is highlighted. If the users selects File > Open – immediately after opening a format file, the data is loaded into that section of the format regardless of the file’s content. For example, in the Barrick_NA File, the section Locations is the first section listed. A data file opened through the File menu is loaded into this section regardless of whether it is appropriate for this format or not (if another section was not selected). EarthSoft – EDP User Manual Page 13 Copyright © 2010 EarthSoft, Inc. EDP User Manual Standalone EDP For the purpose of this exercise we wish to open some Field Sample Data. To open a data file: 1. Select theLab_Results section. 2. Select the Open menu > EDD. NOTE: An alternate method of opening a data file is to right-click on the desired section and select "Load Data File" from the popup menu. 3. Browse to the directory where the EDD is being stored 4. Click OK. The data check occurs in the background while the data file is being loaded. After all of the data files have been loaded, you will review any errors that EDP has detected. To ensure that all of the business rules are properly processed by EDP it is recommended that the Data Files are loaded in the order that the sections appear in the format. This order represents the Parent/Child Relationship between the data in the data files. For example, FieldSample should be loaded before LabData. If the files are not opened in order, it is recommended that the user select the Refresh button frequently while correcting data errors. EarthSoft – EDP User Manual Page 14 Copyright © 2010 EarthSoft, Inc. EDP User Manual Standalone EDP Load and Append Multiple Data Files When loading data files, it is also possible to load multiple data files into the same section of the format file in the same “EDP session.” You can check multiple data files simultaneously in EDP by using the Load and Append utility. For example, if you receive multiple data files that include Field Sample data, you may load all of these files into the Lab_Results section of the format. Note that this functionality is only enabled once a data file has already been loaded. Using the Load and Append utility appends the new data file to the end of the original data file. Clear Tables If you accidentally load a data file into the wrong section, you can clear all data rows by right-clicking on the section name and selecting Clear Table. Alternately, if you would like to clear all of the data loaded into all of the sections of the format, you may select Clear> Clear EDD from the data group. Loading Excel Data Files When using Excel files with EDP, the worksheet must be named with the EDD section’s name. For example, the Excel workbook shown below contains data in the UK_EQEDD. The worksheet shown contains data in the Lab_Results format, so the worksheet is named accordingly. Note the additional worksheets are also named for their respective EDD section (Locations, Field_Results, etc.). EarthSoft – EDP User Manual Page 15 Copyright © 2010 EarthSoft, Inc. EDP User Manual Standalone EDP Figure 5 – Excel Workbook with Barrick_NA Sections named properly for opening all sections directly into EDP. The Excel file (.xls) may use any nomenclature. EarthSoft recommends including the format name at the end of the file name. However, to successfully load all of the sections of the EDD at once the worksheets must be named according to the EDD section name. To load an Excel file: 1. Select EDD from the Open group on the Home tab. 2. Browse to the directory where your EDDs are stored. 3. Click Open. All of the sections of the EDD are loaded into the appropriate sections of the format. EarthSoft – EDP User Manual Page 16 Copyright © 2010 EarthSoft, Inc. EDP User Manual Standalone EDP Loading Zipped Data Files Zipped data files can also be used with EDP. Any of the standard types of files (e.g., .txt, .csv, .xls, or .mdb) can be zipped and opened at the same time with EDP. When using Zipped data files with EDP, the data files (in the *.zip file) must be named with the EDD format’s section name. For example, the zipped file shown below contains data files which use the Barrick_NA name as file names. Additional information may be included in the data file’s name, such as the sample delivery group number, as long as that information is separated from the section name by a period (.). For example Lab_Results.SDG.txt is an acceptable name for loading data. EarthSoft – EDP User Manual Page 17 Copyright © 2010 EarthSoft, Inc. EDP User Manual Standalone EDP Figure 6 – Zipped file’s with Barrick_NA format’s section names as individual flat file names. NOTE: Regardless of whether the user is opening Excel, Access or Zipped files, notice that the file name (*.xls, *.mdb, *.zip) may use any nomenclature, but the sheet name (for Excel), the table name (for Access) and the individual file name (for zipped files) must use the EDD format’s section names. EarthSoft – EDP User Manual Page 18 Copyright © 2010 EarthSoft, Inc. EDP User Manual Standalone EDP Finding and Resolving Errors Once a data file has been loaded into EDP, any cell in the data grid that does not satisfy the checking requirements identified in the Format File are highlighted in colors that indicate the type of error. Users may obtain additional details about what each error is by holding their curser over the highlighted cell in the data grid. For additional information on changing these color codes see the Options section of this manual. In addition to denoting the cell and/or row in which the error(s) occur in the grid, the line number along the left side of the data grid may also signify any line in which an error has occurred by appearing in bold red text. Also, you can identify which sections of the formats contain at least one error because they are highlighted in red. Notice that all data files that were checked contain errors as the format names are highlighted in red. Error Log Reports You can view a summary report of all of the errors in the data files by reviewing the Error Log or Error Summary reports. The Error Log Report is a report that can be created to show what line in each section of the format contains exactly what error. The Error Log Report maintains EDP’s error color coding to make error resolution easier. The Error Summary Report may also be created to show a summary of all of the errors in the data files. Each row of the Error Summary Report contains the number of rows where the specified error occurred in each section of the format. The Summary Report does not maintain the color coding. The Error Log and Error Summary Reports are saved as HTML files, and open automatically in your default browser. Note that the EDD Format File name and version information are also reported in both Error Logs. In addition, information related to the EDD Data Files, User Name, and Reference Values File that were used during the error checking process are also listed in both of these logs to facilitate error resolution. Users may find it useful that Error Logs and Error Summary Reports may also be opened in Microsoft Excel to allow for additional sorting. To do this, browse to the saved Error log in Windows Explorer, right click on the file name and select Open With then select Microsoft Excel. EarthSoft – EDP User Manual Page 19 Copyright © 2010 EarthSoft, Inc. EDP User Manual Standalone EDP To view the Error Log, follow these steps: 1. Select the Error Log option from the Error Log group. 2. Enter a file name (or use the default file name) and click Save. Figure 7: EDP Error Log Report To view the Error Summary, follow these steps: 1. Select Summary from the Error Log group. 2. Enter a file name (or use the default file name) and click Save. EarthSoft – EDP User Manual Page 20 Copyright © 2010 EarthSoft, Inc. EDP User Manual Standalone EDP Error Resolution As you now know, errors that are found in EDP are highlighted with a specified color to signify what there error is. These data errors can be corrected within EDP if the Auditing feature was enabled during installation of EDP. These modifications may be made to any cell within the data file after it is loaded by simply highlighting the cell and typing the modification. Before beginning it is important to understand that edits made to data files within EDP are not automatically saved. If users are modifying data files using the edit feature available in EDP then users should save their data files frequently during their EDP Session. Modifications made to data in EDP may be saved by clicking the EDP icon and selecting Save\EDD. Choose the appropriate file type (.txt, .xls etc) and enter the file name. Column Header Errors You may have noticed that many of the errors in the data files loaded in these exercise are attributed to the two header rows that are contained in each of the data files. These two rows contain column header information that is useful to ensure that the correct data populates each column and to check that the appropriate data file was loaded into the correct section of the format. You can instruct EDP to ignore any header rows by selecting the header rows in the data grid, right-click while the rows are highlighted and select Set as Comment Row. You will need to complete this step for each section of the format. To do this: 1. Select the Lab_Result format. 2. Highlight the two header rows, right-click and select Set as Comment Row. Figure 8: Set as Comment Row The text in the first two rows becomes italicized and includes a hash sign (#) directly before the first letter of the column header. The colours of the cells in these rows also change indicating that they are no longer problematic. Repeat this step for the remaining loaded files. EarthSoft – EDP User Manual Page 21 Copyright © 2010 EarthSoft, Inc. EDP User Manual Standalone EDP The step of setting a row as a column header may be skipped if the data file’s comment rows include this hash sign (#) prior to being loaded into EDP. Figure 9 – Example of Hash Sign (#) Comment Indicator After you identify "Comment Rows" in the remainder of the data files, you can opt whether or not they are displayed. 1. On the View group, locate the option for Comment Rows. 2. Click to either place or remove a check in the box next to the Comment Row option 3. If the check is removed, the Comment Rows do not display. You can always choose to view the Comment Rows by putting the checkmark back. 4. Use the Refresh All option from the Data group to refresh the sections if the changes are not reflected. Sign and Submit After using the tools outlined above to resolve all of the issues in a set of Data Files the data is ready to be submitted for loading into the EQuIS 5 database. The Sign and Submit tool was designed to facilitate submittal of data to EQuIS Enterprise EDP. Use of the Sign and Submit feature requires a user name and password that may be obtained from the EQuIS Database Administrator. To use the Sign and Submit feature, after data files have been loaded and all of the errors have been resolved: 1. Click the EDP icon and select Sign and Submit. EarthSoft – EDP User Manual Page 22 Copyright © 2010 EarthSoft, Inc. Figure 10 – Sign and Submit Window EarthSoft – EDP User Manual Page 23 Copyright © 2010 EarthSoft, Inc. EDP User Manual Standalone EDP Enter your User Name and Password as well as the Facility Code that the data package is submitted. Use your User Name and Password, and for the appropriate Facility Code. This information is used to create a user certificate file that EQuIS Enterprise uses to ensure a valid user is submitting data to the appropriate facility. NOTE: The Facility Code is extremely important for Enterprise Data Submittals however the data entered into the Facility section of the Sign and Submit tool may be modified by the user as needed. 2. Click the Submit button. 3. You will be prompted to provide a filename and location where you would like to save the file. The Sign and Submit feature will save a Zipped file named with the current date, a full-stop, the Facility Code, a full-stop, and the Format File name used to create the EDDs. (Example file name: 20100406.Bald Mountain.Barrick_NA.zip). The contents of the Zipped file include text files named for the sections of the format file used to create them. 4. Click Save. Once the zipped EDD Package has been saved the following screen will appear. Figure 11 – Sign and Submit Verification Window 5. Click OK. After the zipped file is created the EDD Package is ready to be loaded into EQuIS Professional EDP or EQuIS Enterprise EDP. EarthSoft – EDP User Manual Page 24 Copyright © 2010 EarthSoft, Inc. EDP User Manual Standalone EDP EDP Tools There are several tools available in EDP to assist users in resolving errors and reviewing data. Sort Use the Sorting button to sort the data in ascending or descending order. For example, if you want to sort the result data based on chemical name, you can highlight the chemical name column and click the sorting button. Filter Use the Filter Column(s) button to narrow the data set for easier viewing. By clicking on the filter icon, each column is enabled with a pull-down menu which allows you to filter on the available values for that field. Figure 12 – Filtering columns. For example, if you are interested in reviewing the results for sample B-31_20080325, click the Filter icon and using the pull-down menu enabled for the sys_sample_code field, select the value B31_20080325. Now, you can review all of the results gathered for the sample in question. EarthSoft – EDP User Manual Page 25 Copyright © 2010 EarthSoft, Inc. EDP User Manual Standalone EDP Pin Use the Pin button to assist with viewing large data sets. By clicking on the Pin icon, a “pin” is enabled adjacent to each field. The Pin icon allows certain fields to remain stationary while viewing the associated related fields for each record (this is analogous to freeze panes in Excel). For example, if you want to look at the test data for the matrix spike duplicate sample (B45_20080325_MSD), click the Pin icon. You will notice that a small “pin” appears adjacent to each field name. To more easily review the test data for B-45_20080325_MSD, click on the pin in the sys_sample_code field. As you scroll to the right, the sys_sample_code field remains stationary so you can review the data associated with each sample. Figure 13 – Pinning Columns. Find and Replace Use the Find button to find or replace multiple fields with new data. To use this, select any field within the column you would like to search. Then select the Find button, and the Find and Replace window opens. This will allow you to enter the text to be found (and the text to replace the original text with if desired). Figure 14 – Find and Replace Window EarthSoft – EDP User Manual Page 26 Copyright © 2010 EarthSoft, Inc. TIP: Recent selections are available for reuse under the drop-down arrow(s). EDP User Manual Standalone EDP The Find and Replace tool can be focused on a selection of the available rows in a displayed data file by selecting these rows prior to the opening the Find and Replace option and choosing Selection from the drop-down menu in the Within: option. Additional choices are Table for the entire data file screen displayed, and All for all EDD tables open. Search by provides options to search by rows or columns. Other options include Match Case and Match entire cell contents, which should be used when an exact match is desired. These options also eliminate the inclusion of partial matches, which could create new errors. For example, when changing a Method from E300.0 to E310.1, selecting Match entire cell contents prevents the modification of a Batch ID or Lab QC Sample ID that may also include the text "E300.1". With this setting, only the method cells containing E300.1 as the sole content is selected. Show matches opens a detail box that lists the matches found. Replace replaces the items one at a time. Replace All replaces all items found. Export Blank EDD Template (.xls) Many users have their data providers create EDDs using Excel Workbook templates. Built into EDP is an easy tool for creating these templates. To export blank .xls EDD templates: 1. From the Tools group select Blank EDD. 2. Excel opens and an EDD template is created. The template includes the column header colour coding and tool tips described in a previous section. Users who create their own custom formats find this tool extremely useful. However, it should be noted that EarthSoft does not support custom formats, therefore custom formats will not be covered in this document. EarthSoft – EDP User Manual Page 27 Copyright © 2010 EarthSoft, Inc. EDP User Manual Standalone EDP Export EDD Description The EDD Description option allows users to export detailed descriptions of a format. This detail includes data types, key fields, required fields, field description and the database mapping. To review the descriptions in Excel: 1. Select EDD Description from the Tools group. 2. Excel opens and the description is displayed. If the format contains multiple sections such as the Barrick_NA format, a worksheet is created for each section. Figure 15 – EDD Description in Excel. EarthSoft – EDP User Manual Page 28 Copyright © 2010 EarthSoft, Inc. EDP User Manual Standalone EDP Auditing Auditing is a feature that enables users to save a log of what data is modified in the EDP data grid. This option may be enabled during EDP installation and allows users to select the location for the Audit logs to be saved. The default location for the Log Editing Changes to Directory is to the C:\Program Files\EarthSoft\EQuIS\Audit directory. The audit logs are stored in subfolders by computer and user name, with file names containing the date and time the xml log file was saved. The audit logs contain information about changes made to data files in the EDP data grid. EarthSoft – EDP User Manual Page 29 Copyright © 2010 EarthSoft, Inc. EDP User Manual Standalone EDP The Audit option was added to accommodate laboratories who need to log any changes made to an EDD. The audit does not track the EDD – only edits made to an EDD. This provides labs with an audit log that tracks any edits made to a dataset so, if the laboratory has to regenerate an EDD from their LIMS, they will know what edits were made to that data before it was sent to their client. NOTE: The audit folder is where the audit logs are stored - anyone who has permission to edit data needs WRITE access (but not READ access) to that folder. This is so EDP can write the audit logs to that folder. However, not everyone who performs edits has the permission to see/review everyone else's edits (which are also stored in the same folder). Therefore, only "QA Personnel" need READ (and optionally WRITE) access to that folder, so they can see all the audit logs from all the users making edits. Options To assist the user in resolving issues effectively, EDP was designed to allow the user to modify the visual and functional settings in both Standalone EDP and Professional EDP. General The default functionality of EDP may be modified by the user so that EDP: Will not recall the last Format File used Use a different comment indicator code, and Increase the number of errors that EDP will check when Data Files are initially loaded into EDP If you will not use the same Format File repeatedly, there is a preference you can set in the Options menu so the last Format File used is not always opened when EDP starts. To set this Option: 1. Click the EDP icon then the Options button on the bottom right (next to the Exit button). 2. On the Options dialog click on General. EarthSoft – EDP User Manual Page 30 Copyright © 2010 EarthSoft, Inc. EDP User Manual Standalone EDP The option RecallLastUsedFormatFile is displayed under the Application section. The default setting is Yes, which indicates the last format file used in EDP will open during the following EDP session. This setting may be changed to No to have EDP open to a blank screen each time EDP is launched. If RecallLastUsedFormatFile is set to Yes and the specified Format File is not available or cannot be found, a warning message is given and you have the opportunity to select a different Format File Figure 16 – Option to recall last format opened in EDP. Another modification users may want to make is to the comment row indicator. The default comment row indicator is a hash sign (#). Many users have found that if data is being exported from a Microsoft Access database the hash sign is not a good symbol to use. Therefore, the comment indicator may be changed. To change the comment row indicator: 1. Click the EDP icon and then the Options button. 2. Click the General folder. 3. Enter the desired comment indicator such as a dollar sign ($). 4. Click OK to save this setting. EarthSoft – EDP User Manual Page 31 Copyright © 2010 EarthSoft, Inc. EDP User Manual Standalone EDP Appearance The default appearance of Column Headers, Errors, and Informational Messages may be modified by users to enhance the user experience. This functionality is available through the Application menu > Options button. To modify any of these items’ appearance: 1. Click the EDP icon then the Options button. 2. Expand the node (+) to the left of Appearances. 3. Select an attribute you would like to modify. Such as the Reference Value Cell Errors under Errors > Cell Errors in the Appearance tree located in the left of the Options screen. 4. Click in the cell that appears in the right hand portion of the Options window next to BackColour. 5. Click on the Down Arrow to display the colours selection options for cell background colours. 6. Select a colour. 7. Click OK. Figure 17 – Example of Modifying Appearance in the Options Window. This process may be repeated for any Appearance setting that are applied to cells in EDP. EarthSoft – EDP User Manual Page 32 Copyright © 2010 EarthSoft, Inc. EarthSoft – EDP User Manual Page 33 Copyright © 2010 EarthSoft, Inc.