Download Installing Ocularis Base

Transcript
Installation and Licensing Guide
Smarter Surveillance
for a Safer World
On-Net Surveillance Systems, Inc.
th
One Blue Hill Plaza, 7 Floor, PO Box 1555
Pearl River, NY 10965
Phone: (845) 732-7900 | Fax: (845) 732-7999
Web: www.onssi.com
Ocularis 5.0
00005202015-1034-5.0.0.88
Legal Notice
This product manual is intended for general information purposes only, and due care has been taken in its preparation.
Any risk arising from the use of this information rests with the recipient, and nothing herein should be construed as constituting any kind of
warranty.
© 2002-2015 On-Net Surveillance Systems, Inc. All rights reserved. OnSSI and the ‘Eye’ logo are registered trademarks of On-Net Surveillance
Systems, Inc. Ocularis, Ocularis Client, Ocularis Client Lite, Ocularis Video Synopsis, NetEVS, NetDVMS, NetDVR, ProSight, NetGuard,
NetGuard-EVS, NetSwitcher, NetMatrix, NetCentral, NetTransact, NetPDA and NetCell are trademarks of On-Net Surveillance Systems, Inc. All
other trademarks are property of their respective owners.
On-Net Surveillance Systems, Inc. reserves the right to change product specifications without prior notice.
US patent # 8,390.684 B2 for Ocularis Client
Patents Applied For in the U.S. and Abroad
Ocularis Installation & Licensing Guide
Contents
Table of Contents
LEGAL NOTICE ..............................................................................................................................................................2
INTRODUCTION............................................................................................................................................................2
OCULARIS MODELS .......................................................................................................................................................2
WHERE TO INSTALL COMPONENTS .........................................................................................................................3
OCULARIS PROFESSIONAL..............................................................................................................................................3
OCULARIS ENTERPRISE .................................................................................................................................................4
OCULARIS ULTIMATE .....................................................................................................................................................5
GETTING STARTED WITH OCULARIS .......................................................................................................................6
MINIMUM SYSTEM REQUIREMENTS ..................................................................................................................................6
INSTALLING OCULARIS ON A NEW SYSTEM .......................................................................................................................6
UPGRADING TO OCULARIS VERSION 5.0 ..........................................................................................................................7
OCULARIS INSTALLATION & CONFIGURATION ......................................................................................................8
DOWNLOAD THE OCULARIS INSTALLATION FILE ..................................................................................................9
EXTRACT OCULARIS INSTALLATION FILES .......................................................................................................... 10
INSTALLING OCULARIS BASE ................................................................................................................................. 13
LICENSING OCULARIS BASE ................................................................................................................................... 17
INSTALLING OCULARIS COMPONENTS ................................................................................................................. 21
OCULARIS COMPONENT LOCATION................................................................................................................................ 21
INSTALLING OCULARIS ADMINISTRATOR ............................................................................................................. 23
INSTALLING OCULARIS CLIENT .............................................................................................................................. 24
INSTALLING OCULARIS RECORDER ...................................................................................................................... 25
FIREWALLS ................................................................................................................................................................. 25
RECORDER COMPONENTS............................................................................................................................................ 25
RECORDER COMPONENT INSTALLATION ......................................................................................................................... 26
OCULARIS RECORDER LICENSING ........................................................................................................................ 34
SUPPORTED RECORDERS ............................................................................................................................................ 34
LICENSING ONLINE ...................................................................................................................................................... 34
Licensing a Retail Version Online........................................................................................................................... 34
Licensing a Demo Version Online .......................................................................................................................... 34
LICENSING OFFLINE ..................................................................................................................................................... 34
First Time Licensing ............................................................................................................................................... 35
CHANGES TO SERVER HARDWARE ................................................................................................................................ 35
UPDATING A LICENSE .................................................................................................................................................. 36
OCULARIS RECORDER MANAGER ......................................................................................................................... 37
TO INSTALL ONLY THE OCULARIS RECORDER MANAGER .................................................................................................. 37
OCULARIS RECORDER EVENT PROXY .................................................................................................................. 38
TO INSTALL THE OCULARIS EVENT PROXY ..................................................................................................................... 38
TO CONFIGURE THE OCULARIS EVENT PROXY ............................................................................................................... 39
INSTALLING OCULARIS MEDIA SERVER ................................................................................................................ 43
APPENDIX A
OCULARIS PORTS ....................................................................................................................... 44
CONTACT INFORMATION ......................................................................................................................................... 45
On-Net Surveillance Systems, Inc.
i
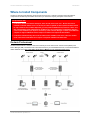
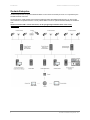
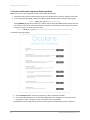
Introduction
Ocularis Installation & Licensing Guide
Introduction
Ocularis 5.0 is OnSSI’s newest and most innovated and cost effective open platform Video Management Software
(VMS) and is designed to enhance your security while simplifying your daily workload.
These instructions should be used by administrators installing an Ocularis system.
Ocularis Models
Ocularis version 5.0 is offered in three models, designed to meet the needs of organizations of all sizes and
structures, from single-location retail outlets or schools, to multiple-site, complex municipal and campus installations.
Ocularis Professional (PRO) – Scalable video management for small to medium single and multi-site applications.
Ocularis Enterprise (ENT)– Surveillance for locally managed or centrally managed mid to large scale installations.
Ocularis Ultimate (ULT) – Surveillance video management for mobile applications and complex environments with
multiple, simultaneous viewing clients..
The Ocularis™ Platform, regardless of model, consists of the following components:
•
Ocularis Base – server software application which regulates and manages the flow of data between video client
users, recording servers, video wall management and an integrated alerting application.
•
Ocularis Administrator - The front end software application used to manage Ocularis Base.
•
Ocularis Recorder - An application is required to supply camera configuration and recording.
•
Ocularis Client – OnSSI’s award winning video client application.
•
Optional Add-On Applications – these include Remote Video Wall, Ocularis Media Server, and Ocularis
OpenSight™. Add-ons are made available as they are introduced. See our website www.onssi.com or call
OnSSI Sales for information on Ocularis Add-Ons.
These instructions provide detailed instructions for installing Ocularis and its components. For a more concise
installation guide, see the Ocularis Quick Start Guide.
2
On-Net Surveillance Systems, Inc.
Ocularis Installation & Licensing Guide
Introduction
Where to Install Components
Ocularis 5.0 sample system diagrams are shown below and are only a sample to represent where the different
components of Ocularis may be installed. These are by no means the only way the system can be laid out.
It is important to note:
• For Ocularis Ultimate and Ocularis Enterprise, there must be at least one 'Core'. The first Core that is
installed is called the 'Master' Core. It is the only core that is required on these systems and there should
be only one Master Core installed. Optionally, you may install an additional core, known as a 'Slave' core
that automatically provides redundancy for the Master core. It is not necessary to install more than two
cores in these models but you may do so if necessary. Install a 'Device Manager' or DM on each additional
computer to support additional cameras. Only one recorder SLC is required in these models.
• For Ocularis Professional only, there must be a Master Core and DM on each server. There are no Slave
Cores in this model. Each Master Core requires a unique SLC available from OnSSI Sales.
Ocularis Professional
Ocularis Professional has a maximum limit of 64 cameras per server. Each server contains a Core (Master) and
Device Manager (DM). The Master Core is what is licensed so if you need additional servers, contact OnSSI Sales to
obtain additional SLCs. This is the ONLY model where a Master Core is required on each server.
On-Net Surveillance Systems, Inc.
3
Introduction
Ocularis Installation & Licensing Guide
Ocularis Enterprise
Ocularis Enterprise has no imposed software limitation on the number of cameras per server. It is only limited by the
available hardware resources.
On the first server, install a Master Core and Device Manager (DM). Add additional DM servers if you want to add
more cameras on a separate machine. You may install a 'Slave' core as an optional redundant backup for the Master
Core.
You do not need to add a core to each server, nor do you typically need more than 2 cores in any
environment.
4
On-Net Surveillance Systems, Inc.
Ocularis Installation & Licensing Guide
Introduction
Ocularis Ultimate
Ocularis Ultimate has no imposed software limitation on the number of cameras per server. It is only limited by the
available hardware resources.
On the first server, install a Master Core and optionally a Device Manager (DM). Add additional DM servers if you
want to add more cameras on a separate machine. You may install a 'Slave' core as an optional redundant backup
for the Master Core.
You do not need to add a core to each server, nor do you typically need more than 2 cores in any
environment.
If you have multiple Device Managers, you may configure them as failover services for each other or configure a
standalone machine dedicated as a backup DM. This configuration is done after installation.
If you have any questions or concerns whatsoever regarding where to install components, contact OnSSI Sales
Engineering at [email protected].
On-Net Surveillance Systems, Inc.
5
Getting Started with Ocularis
Ocularis Installation & Licensing Guide
Getting Started with Ocularis
Minimum System Requirements
Requirements for individual components may be found at: http://www.onssi.com/hardware-recommendations.
Installing Ocularis on a New System
Regardless of model, a recommended process flow to prepare the video management environment with Ocularis on
a new system is as follows:
1.
Download and extract the Ocularis feature set installation file(s) from
http://www.onssi.com/support/downloads.
2.
Install the Ocularis Base software component.
3.
•
In large environments, the Base component should be installed on a dedicated server. In some
cases, a dedicated server is not necessary. For Ocularis Professional, for instance, Ocularis Base
may be installed on the same PC as the other Ocularis components. As the system grows,
additional recorders may be added.
•
System requirements may be found on the http://www.onssi.com/hardware-recommendations
website for detailed hardware and operating system specifications.
•
Refer to Installing Ocularis Base on page 9 for details on the software installation.
•
Anti-Virus software must be disabled during the installation of the Ocularis Base component.
License Ocularis.
•
4.
5.
Prior to using Ocularis components, you must license your copy of Ocularis Base. See Licensing
Ocularis Base on page 17 for more details on how to activate the software.
Install the Ocularis Administrator application.
•
This component must be installed on a workstation with network connectivity to the Ocularis Base
component. It may reside on the same PC as the Base provided that graphic card requirements are
met. You may install it on as many PCs as needed.
•
Refer to Installing Ocularis Administrator on page 23 for details on the software installation.
Install the Ocularis recording component software.
•
The Ocularis Professional, Enterprise and Ultimate recorders contain the following components
supported in this version:
1.) Master Core Server – this is the service which manages the recorder configuration
2.) Device Manager (DM) – this is the server which manages the cameras and video storage
3.) Recorder Manager – this is the application used to configure the Core and DM
4.) Slave Core Server (optional and only in Ocularis ENT and ULT)
5.) Event Proxy
•
These components may all be installed on the same PC or separately.
6.
Use the Ocularis Recorder Manager application to change the default administrator password of the
recorder. This account will be used to import the recorder into Ocularis.
7.
Add and configure video cameras and devices on the recording component.
8.
Install the Ocularis Client on at least one workstation.
•
9.
See Installing Ocularis Client on page 24 for additional instructions on installation.
Configure Ocularis Base using Ocularis Administrator.
•
Refer to the Ocularis Administrator User Manual for further instructions.
10. Test connectivity of cameras by logging into Ocularis Base with Ocularis Client.
6
On-Net Surveillance Systems, Inc.
Ocularis Installation & Licensing Guide
Getting Started with Ocularis
11. Install any remaining workstations with Ocularis Client.
12. Configure the event proxy to forward events from the recorder to the Ocularis Base Server.
•
Installation and configuration of Event Proxies can be found at the end of this document.
13. Within 30 days of installing cameras on the recording component(s), you must register the Master Core.
•
See Ocularis Camera License RegistrationRecorder Licensing on page 34 for further instructions.
Upgrading to Ocularis Version 5.0
Refer to the document Upgrading to Ocularis 5.0 for full details on upgrading an Ocularis system. Use the instructions
found here for new installations.
On-Net Surveillance Systems, Inc.
7
Ocularis Installation & Configuration
Ocularis Installation & Licensing Guide
Ocularis Installation & Configuration
Items to consider prior to installation:
•
Once all components are installed, synchronize the date and time between the server and workstations.
Note:
The time and date tolerance for all PCs using Ocularis is a maximum of five (5) minutes.
If the time is off by more than 5 minutes between the Ocularis Base machine and
Ocularis Client workstations, log in attempts will fail.
•
The Ocularis Base component should be installed first. After that, the order of installing each component
does not matter.
•
You must either be logged in as the Windows account ‘Administrator’ when licensing Ocularis Base or as a
user with administrative privileges and select ‘Run as Administrator’ when launching the licensing
application.
•
Depending on your current Windows configuration, you may be asked to insert your original Windows
installation CD in order to install additional Windows components.
•
You will need to have your Ocularis Software License Code (SLC) on hand when you license the
application.
The following components are outlined in this document:
8
•
Download the Ocularis Installation File
•
Extract Ocularis Installation Files
•
Installing Ocularis Base
•
Licensing Ocularis Base
•
Installing Ocularis Components
•
Installing Ocularis Administrator
•
Installing Ocularis Client
•
Installing Ocularis Recorder
•
Ocularis Recorder Licensing
•
Ocularis Recorder Manager
•
Ocularis Recorder Event Proxy
•
Installing Ocularis Media Server
On-Net Surveillance Systems, Inc.
Ocularis Installation & Licensing Guide
Download the Ocularis Installation Files
Download the Ocularis Installation File
If necessary, Ocularis software may be obtained from the OnSSI website. Follow these instructions to download the
installation file.
1.
Open a browser and go to the Downloads page on the OnSSI website.
2.
Review the SLC requirements and any other instructions on the page.
3.
Click the link for the Ocularis feature set you wish to download (e.g. Ocularis ENT v5.0 Download)
4.
A short web form appears. Fill out the form and click Submit.
You will receive an email containing the link to the download file as well as other documentation.
5.
Click the link to download the Ocularis 5.0 installation file.
6.
You will be prompted to save the file. Select the desired file location and click Save.
The file download may take several minutes depending on your connection speed. Be sure to remember the
path to the directory where the file was saved.
On-Net Surveillance Systems, Inc.
9
Ocularis Installation & Licensing Guide
Extract Ocularis Installation Files
These steps outline the extraction of the Ocularis installation files and may be used for all Ocularis models and for
new or existing installations.
1.
Locate the Ocularis installation file. This file may have been downloaded from the OnSSI website or
obtained through other means. The file will have one of the following formats depending on the feature set:
Ocularis Feature Set
Filename
Ocularis Professional
Ocularis_ PRO_5.0.exe
Ocularis Enterprise
Ocularis_ ENT_5.0.exe
Ocularis Ultimate
Ocularis_ ULT_5.0.exe
Executable files are shared across Ocularis models. The SLC determines the model once it is applied.
WARNING: THIS PROCESS SHOULD BE PERFORMED ON THE SYSTEM WHERE
OCULARIS BASE EXISTS (IF AN UPGRADE) OR WHERE IT WILL BE INSTALLED (NEW).
2.
If it is not already there, copy the installation file from step 1 above to the Ocularis Base machine.
3.
Double-click the file from step 1 above to launch and begin the file extraction.
You’ll see messages regarding the installation validation which may take several minutes.
The Welcome to the Ocularis Installer Extraction Wizard screen appears.
Figure 1 Ocularis Installer Extraction Wizard
4.
Click Next.
On the Destination Folder screen, you may modify the path for the installation files to be placed.
10
On-Net Surveillance Systems, Inc.
Ocularis Installation & Licensing Guide
Extract Ocularis Installation Files
Figure 2 Select Destination Folder
Click Next.
5.
The Ready to Extract summary screen is next. Click Back to make changes or click Next to proceed.
Figure 3 Installation Summary
Files are extracted and copied to the location specified. This may take several minutes. When all files are
extracted, a Setup Wizard Complete screen appears. The installation files have been downloaded and
unpacked. No applications or components have been installed.
On-Net Surveillance Systems, Inc.
11
Ocularis Installation & Licensing Guide
Extract Ocularis Installation Files
Figure 4 Extraction Setup Wizard Complete
6.
If you choose to:
a.
b.
Install Ocularis Base now: make sure the corresponding checkbox is selected and click Finish.
Proceed to Installing Ocularis Base below.
If you choose to install Ocularis Base later: uncheck the Install Ocularis Base checkbox and click
Finish. Proceed to Installing Ocularis Base below.
You have completed the extraction of the Ocularis installation files.
12
On-Net Surveillance Systems, Inc.
Ocularis Installation & Licensing Guide
Installing Ocularis Base
Reminder:
•
Anti-Virus software must be disabled during the installation of the Ocularis Base component.
•
Follow this procedure when installing a new system or upgrading an existing Ocularis Base component.
•
Ocularis Base uses SQL Server to store configuration data. By default, SQL Server Express 2008 will be
used unless otherwise specified. Alternate instances of SQL Server may be used for advanced users.
TO INSTALL OCULARIS BASE
Use these steps for all feature sets of Ocularis.
WARNING: THIS PROCESS SHOULD BE PERFORMED ON THE SYSTEM WHERE OCULARIS BASE
EXISTS (IF AN UPGRADE) OR WHERE IT WILL BE INSTALLED (NEW).
1.
To install Ocularis Base after extracting the installer files (from Extract Ocularis Installation Files on page
10), go to the directory where the Ocularis files were extracted.
These installation files should be located on the Ocularis Base machine. If they are not, copy
them to the Ocularis Base system.
For Ocularis CS, the default location is: C:\Ocularis CS IS PS Installer. Launch (double-click) the
shortcut: Install Ocularis Base.
2.
The next step differs depending on the installation:
a.
For new installations, a notice appears recommending that you activate Ocularis now before
continuing with the installation. This is recommended
Figure 5 Activate Now?
You will need your Ocularis SLC to activate. Activation will be required at the end of the Base
installation if you do not do it now.
1.
Click Yes to activate Ocularis now.
The Ocularis License Activation screen appears as shown in Figure 9 on page 17.
b.
2.
Enter the Ocularis SLC and click Activate License.
3.
Click OK on the License Activate pop-up.
4.
Click Close on the Ocularis License Activation screen.
5.
Proceed to step 3 below.
If upgrading Ocularis, a message that a previous installation of this software has been detected.
Click Yes to proceed with the installation. Be sure to have your new SLC in hand. Click Yes when
ready
On-Net Surveillance Systems, Inc.
13
Ocularis Installation & Licensing Guide
Installing Ocularis Base
3.
The Ocularis Base Setup Wizard screen appears.
Figure 6 Ocularis Base Setup Wizard
Click Next.
4.
The License Agreement appears. Please read, click the “I accept..” radio button and then click Next.
5.
Select the type of installation: Typical or Custom. Typical will install all new files using default settings for
file locations and database instance. Custom allows you to change these settings. The vast majority of
installations should choose ‘Typical’.
Typical:
a.
Select the Typical radio button and click Next.
Ocularis Base is installed using these default settings:

Base installation files are placed in c:\Program Files\OnSSI\Ocularis Base

Bookmark location is designated as:
c:\inetpub\wwwroot\OcularisService\Bookmarks

Windows IIS is installed

SQL Server 2008 Express is installed with a Server Name of OCULARISSERVER, SA User
Name of sa and an encrypted SA password.
This installation may take several minutes.
Note:
You may see a warning message if you are installing Ocularis Base on Windows 7 or
other non-server level operating system. For demos and small applications, click ‘Yes’ to
continue with the installation. For most standard production systems we recommend
installing Ocularis Base on a server class operating system.
Note:
You may also see a message about dependencies required such as .Net Framework 4.0,
SQL Server 2008, VC++ Redistributable 2010 and DirectX9c. Click ‘OK’ to install these
(any missing components will be access from the OnSSI website).
Custom:
14
a.
Select the Custom radio button and click Next.
b.
On the SQL Server instance page, most users will use the default selection.
On-Net Surveillance Systems, Inc.
Ocularis Installation & Licensing Guide
Installing Ocularis Base
SQL Server Options Defined:
Use Ocularis default SQL Server instance – this default option will install SQL Server 2008 Express for
use with Ocularis.
Edit System Administrator login - If you wish to modify the administrator login for the SQL Server
instance, click the Edit System Administrator login checkbox. The corresponding fields will open to allow
entry of the required criteria.
Use another SQL Server 2008 instance - If you have an existing
SQL Server database that you wish to use, you may select this
option. You will be required to enter login credentials for this SQL
Server instance..
c.
When ready, click Next.
d.
On the Select Bookmarks Folder screen, you have the option to
specify the location for the storage of Ocularis Bookmarks.
Change the default location if necessary. When ready, click
Next.
e.
On the Select Destination Folder for Ocularis Base you may
modify the directory path for the Ocularis Base files. We
recommend using the default but you may modify the path here.
Click Next.
f.
Figure 7 SQL Server Instance
The next screen summarizes the installation folders and size. Click Back to make changes or click
Next.
Note:
Note:
You may see a warning message if you are installing Ocularis Base on Windows 7 or
other non-server level operating system. For demos and small applications, click ‘Yes’ to
continue with the installation. For most standard production systems we recommend
installing Ocularis Base on a server class operating system.
You may also see a message about dependencies required such as .Net Framework 4.x,
SQL Server 2008, VC++ Redistributable 2010 and DirectX9c. Click ‘OK’ to install these
(any missing components will be access from the OnSSI website).
The Ocularis Base files are installed to the specified directory and may take several minutes. A new installer
website is also created.
6.
When installation is completed, the Setup Wizard Complete for Ocularis Base screen appears.
Figure 8 Ocularis Base Setup Wizard Complete
7.
If you licensed Ocularis at the beginning of this procedure, you are done.
If you chose not to license Ocularis earlier, you are given the option to activate the Ocularis license upon
On-Net Surveillance Systems, Inc.
15
Installing Ocularis Base
Ocularis Installation & Licensing Guide
completion of the wizard. It is recommended (but not mandatory) to do this at this time if you haven’t already
done so. Ocularis must be licensed before use.
a.
If you choose to license Ocularis now, verify that the Activate License checkbox is checked and click
Finish. The Ocularis License Activation application is automatically launched. Proceed to Licensing
Ocularis Base below.
b.
If you choose to activate the Ocularis license later, uncheck the Activate License checkbox and click
Finish.
When you are ready to license Ocularis, launch the Ocularis License Activation application from the
desktop icon. Proceed to Licensing Ocularis Base below.
8.
If you want to launch the Ocularis component download page, click the link above the Finish button. If you
are finished installing on this computer, click Finish.
The installation of Ocularis Base will create the following icon on the desktop:
16
On-Net Surveillance Systems, Inc.
Ocularis Installation & Licensing Guide
Licensing Ocularis Base
Once the Ocularis Base component software is installed, an additional licensing step is required.
•
All new installations require the Ocularis Base to be licensed with an Ocularis 5.0 SLC.
•
You may license Ocularis automatically, any time of the day or night, 24/7/365!
•
Licensing may be done online or offline.
The actions related to Ocularis licenses include:
•
Activating the Ocularis SLC– Use when licensing Ocularis for the first time or with certain upgrades.
•
Refreshing the Ocularis SLC– Use when the license status of Ocularis changes.
•
Deactivating the Ocularis SLC– Use when you need to move Ocularis Base from one computer to another
or during certain upgrades.
Note:
To use the license activation application, you must be logged into the computer using an account
with Windows Administrator privileges.
Activating the Ocularis SLC
Activating an Ocularis SLC is done the first time Ocularis is installed. This applies when the installation is on a brand
new system or if you are upgrading from Ocularis versions 3.5 or earlier.
The steps to activate are different based on whether the Ocularis Base computer is connected to the internet or not.
•
To Activate an Ocularis license with Internet Connectivity
•
To Activate an Ocularis license without Internet Connectivity
To Ac tiva te a n Oc u la ris lic en s e with In te rn e t Co nn e c tivity
1.
Launch the Ocularis License Activation application.
2.
The first time you license Ocularis, you need to enter your new SLC. You receive this SLC when you
purchase the product.
Figure 9 Unlicensed Ocularis Base
On-Net Surveillance Systems, Inc.
17
Ocularis Installation & Licensing Guide
Licensing Ocularis Base
3.
Enter the SLC (or paste it from the Clipboard) and click Activate License.
The licensing application will collect relevant data including the SLC and send this information over the
internet to OnSSI’s licensing server. OnSSI’s licensing server validates the information and sends back the
activation required to license the software. This process is nearly instantaneous.
If there is no internet connectivity, a message appears indicating as such. You may try again if you think you
should have connectivity or click OK to proceed with offline activation. See To Activate an Ocularis license
without Internet Connectivity below.
Once activation is complete, a confirmation pop-up appears. Click OK. You are done! The License Status area
of the Ocularis License Activation screen displays updated camera counts and other information based on your
SLC.
A Note about License Counts:
Ocularis v5.0 introduces categories where recorder licenses are assigned. These categories are
labeled:
RL-1 Channels
RL-2 Channels
RL-3 Channels
The categories simply represent a counter where similar recorder counts are placed. Since
Ocularis v5.0 supports Mix & Match of recorders, different recorder counts can be combined into
the same category. For example: camera licenses for RC-E and Ocularis Ultimate Recorder
would both appear in the category RL-1 Channels. If you had 50 RC-E licenses and 50 Ocularis
Ultimate licenses, the RL-1 count would equal 100. This also gives you the flexibility to exchange
licenses between the two recorders, allowing you the time and flexibility to migrate cameras from
one recorder to another at your own pace.
You will see the new RL counts in the Ocularis License Activation application and in the About
Tab of the Ocularis Administrator application. Here you can get a detailed breakdown of each
specific recorder camera license count.
Figure 10 Sample Licensed Ocularis
4.
Proceed with Installing Ocularis Components below.
To Ac tiva te a n Oc u la ris lic en s e with o u t In te rn e t Co n n ectivity
18
1.
Launch the Ocularis License Activation application.
2.
The first time you license Ocularis, you need to enter your new SLC in the field labeled: Step 1: Enter SLC.
(see Figure 9 above).
On-Net Surveillance Systems, Inc.
Ocularis Installation & Licensing Guide
3.
Licensing Ocularis Base
Click the Activate License button. You will receive a pop-up with the message reminding you that there is
no internet connectivity and you should use offline activation. Click OK to close this dialog. The screen
updates with additional steps:
Figure 11 Additional Steps for Offline Licensing
4.
Click the link in Step 2: Click here to retrieve offline html file.
An html file is created named OcularisActivationRequest.html and stored in:
c:\Program Files (x86)\OnSSI\Ocularis Licensing Activation\OfflineActivation
5.
Copy this file to portable media and bring to a computer that has internet connectivity.
6.
Launch the OcularisActivationRequest.html file (double-click it).
7.
The default web browser should launch and load a page with a Download button. Click the Download
button.
8.
The browser may ask you if you want to save a file called response.xml from licensing.onssi.com.
Choose Save As and save it to portable media.
9.
Bring the response.xml file back to the Ocularis Base computer.
10. On the Ocularis License Activation screen (see Figure 11), click the link in Step 3: Click here and browse to
the response file.
11. In the resulting Windows’ Open dialog, browse to the response.xml file you just brought from the internet
connected machine. Select the file and click Open.
12. You should see a ‘License Activation Successful’ pop-up. Click OK.
You are done! The License Status area of the Ocularis License Activation screen displays updated camera
counts and other information based on your SLC. The ‘Activate License’ changes to ‘Refresh’ to accommodate
future updates.
Proceed with Installing Ocularis Components below.
Refreshing the Ocularis SLC
Refreshing your Ocularis SLC is done when a change is made to your Ocularis License. For instance, you add
additional camera licenses to Ocularis or you upgrade from a demo version to a retail version. Refreshing is simple
but the process differs, depending on the Ocularis Base computer having internet connectivity.
To Re fre s h a n Oc u la ris lic e ns e with In te rn e t Co n ne c tivity
1.
Launch the Ocularis License Activation application.
2.
Click the Refresh button. The licensing application will collect relevant data including the SLC and send
this over the internet to OnSSI’s licensing server. OnSSI’s licensing server validates the information and
sends back the activation required to license the software. This process is nearly instantaneous.
Once activation is complete, a confirmation pop-up appears. Click OK.
On-Net Surveillance Systems, Inc.
19
Licensing Ocularis Base
Ocularis Installation & Licensing Guide
You are done! The License Status area of the Ocularis License Activation screen displays updated license
information based on your SLC.
To Re fre s h a n Oc u la ris lic e ns e with o u t In te rn e t Con n e c tivity
1.
Launch the Ocularis License Activation application.
2.
Click the Refresh button. You will receive a pop-up with the message reminding you to check internet
connectivity or refresh offline. Click OK to close this dialog. The screen updates with additional steps.
3.
Click the link in Step 2: Click here to retrieve offline html file.
An html file is created named OcularisActivationRequest.html and stored in:
c:\Program Files (x86)\OnSSI\Ocularis Licensing Activation\OfflineActivation
4.
Copy this file to portable media and bring to a computer that has internet connectivity.
5.
Launch the OcularisActivationRequest.html file (double-click it).
6.
The default web browser should launch and load a page with a Download button. Click the Download
button.
7.
The browser may ask you if you want to save a file called response.xml from licensing.onssi.com.
Choose Save As and save it to portable media. For subsequent licensing. the file may have the format
‘response(x).xml’ where the ‘x’ is 1, 2, etc. based on the number of response files created.
8.
Bring the response.xml file back to the Ocularis Base computer.
9.
On the Ocularis License Activation screen, click the link in Step 3: Click here and browse to the response
file.
10. In the resulting Windows’ Open dialog, browse to the response.xml file you just brought from the internet
connected machine. Select the file and click Open.
11. You should see a ‘License Successfully Refreshed’ pop-up. Click OK.
You are done! The License Status area of the Ocularis License Activation screen displays updated information
based on your SLC.
Deactivating the Ocularis SLC
Deactivating your Ocularis SLC is done when you want to move the Ocularis Base software from one computer to
another computer or during certain upgrades. Before you begin, consider that when you move Ocularis Base from
one computer to another, the database which stores Ocularis settings, as well as existing Bookmarks, must be
moved manually from the source computer to the destination computer. There is also a limit to the number of
deactivations for each license. Typically, you may deactivate an Ocularis SLC up to five times. Beyond that, you need
to contact OnSSI Technical Support for further assistance.
To De a c tiva te a n Oc u la ris lice n s e
1.
Launch the Ocularis License Activation application.
2.
Notice the Deactivate License icon.
Click the Deactivate License icon. You will receive a pop-up with a warning message reminding you that
license deactivation stopped the Base from functioning.
3.
If you are sure you want to proceed, click Yes to deactivate the Ocularis SLC.
On the destination computer, install Ocularis Base (see Installing Ocularis Base on page 13) and activate the same
SLC on this computer (see Activating the Ocularis SLC on page 17). Restore the Ocularis SQL Database and
bookmarks (see the document Ocularis Base Database Backup). If you had events configured on the original
Ocularis Base computer, the event proxies will need to be updated to direct events to this new Ocularis Base IP
address.
20
On-Net Surveillance Systems, Inc.
Ocularis Installation & Licensing Guide
Installing Ocularis Components
Certain components of Ocularis, namely: Ocularis Client, Ocularis Administrator and Ocularis recording components,
are downloaded and installed from a central webpage located on the Ocularis Base machine. This makes installation
easy as system administrators need not obtain separate installation files and move them from computer to computer.
Since computers running Ocularis components need to have network connectivity to the Ocularis Base system
anyway, the installation files for Ocularis components may be accessed from the Base machine.
A local webpage must be launched in order to download Ocularis components.
Ocularis Component Location
Ocularis components may be installed in various locations on a network. The configuration chosen depends on many
factors including (but not limited to): the number of cameras licensed, the recording component used and the
availability of computer hardware for the system.
Single Server System
In most cases, a single server system will suffice. In this layout, a central server is used as the primary location for
the following components:
o
Ocularis Base
o
Recording Component
o
and perhaps even the Ocularis Administrator (depending on the graphics card)
The ’Single Server’ is a good system to start with when first implementing Ocularis, especially on smaller systems
(those with less than 30 cameras). In an Ocularis Professional environment, it is even acceptable to run the
components on a Windows 7 or 8 PC, rather than a server class machine, provided the camera count is low.
Networked workstations will have the Ocularis Client installed on them. You may install the Ocularis Client
component on an unlimited number of workstations.
As the system grows and cameras are added or upgraded, the capacity of the recording component computer will be
reached. The expansion process would be to then simply add an additional server on the network to house an
additional instance of the recording component and install the new cameras on the new recorder. With Ocularis, the
location of the camera is seamless to the operator.
Distributed System
In cases where the systems are larger or with Ocularis Enterprise or Ocularis Ultimate, a multiple server system (also
called ‘Distributed System’) is recommended. In a Distributed System, separate dedicated servers are used with
single components installed on each. The Ocularis Base may reside on one server (with or without a recording
component), recording components each on their own servers, and the Ocularis Administrator and Ocularis Client on
one or more networked workstations.
Which system is best for me?
It is important to determine the general layout of where you want components to be installed on new Ocularis
installations. In general, it is safe for most users to select a Single Server System and grow into a Distributed System.
If you have hundreds of cameras (or more), use a Distributed System as a model. Otherwise, most installations will
be fine with a Single Server layout to start.
There is no set formula to determine the layout for each installation, as each organization is unique. The system
layouts described here are simply for use as a general guideline. Contact OnSSI Sales Engineering for system layout
advice if you are unsure.
On-Net Surveillance Systems, Inc.
21
Ocularis Installation & Licensing Guide
Installing Ocularis Components
TO ACCESS THE OCULARIS COMPONENT DOWNLOADS PAGE
Note: Be sure to turn off any Firewalls running on the Ocularis Base machine.
1.
Determine the layout of the Ocularis system and go to the machine where you want to install the component.
2.
Access the download webpage located on the Base computer through a browser using the following URL:
http://[BASE_IP]:[port]/OcularisService
where [BASE-IP] is either the IP Address or computer name of the Ocularis Base machine and port is the IIS
port number. In most cases, the default port 80 is used and it is not necessary to enter it here. This URL will
redirect to a longer one, which may also be used:
http://[BASE_IP]:[port]/OcularisService/InstallerWebsite/install.html
The following web page appears:
Figure 12 Install Ocularis Components Web Page
3.
Click the Download button next to the component you wish to download and install.
4.
You may be asked whether to run or save the installation file for the component. You may save the file
locally and run it later or simply run it now. Click the file to launch the installer.
The installation for each component will continue. See the instructions below specific to each component.
22
On-Net Surveillance Systems, Inc.
Ocularis Installation & Licensing Guide
Installing Ocularis Administrator
•
Refer to the system requirements defined on the OnSSI website for hardware specifications.
•
The Ocularis Administrator must have network connectivity to the computer where the Ocularis Base
software is installed.
•
Prior to using Ocularis Administrator on a new system, you must license your copy of Ocularis Base. See
Licensing Ocularis Base on page 17 for more details.
•
Follow this procedure when installing a new system or upgrading an older version of Ocularis Administrator.
TO INSTALL OCULARIS ADMINISTRATOR
These instructions assume that you have installed Ocularis Base and are located at the system on which you wish to
install Ocularis Administrator. Use these steps for all feature sets of Ocularis.
1.
From the ‘Ocularis Component Downloads’ web page, click the Download button next to Ocularis
Administrator.
2.
You may be prompted to run or save the file; you may choose to either run it now or save it and run the
installation later. In a new installation, an extraction wizard screen will appear. Follow the prompts to extract
the files and then you’ll see the Welcome to Ocularis Administrator Setup Wizard screen.
3.
Launch file to run. Once Run has been selected, the Welcome to Ocularis Administrator Setup Wizard
appears. Click Next.
4.
The License Agreement appears. Please read, click the “I accept..” radio button, and then click Next.
5.
If a previous version of the Ocularis Administrator is detected, a notice will appear asking for your
confirmation to uninstall the older version and install the new version. Click Yes.
6.
a.
An “Are you sure you want to remove Ocularis Administrator…?” screen appears. Click Yes.
b.
When the uninstall is complete, click OK.
The Select Destination Folder screen appears.
You may leave the default directory path as is or change it if necessary according to your organization. If
installing a version to be used as a demo, keeping the default path is recommended. Click Next.
7.
The next screen, Ready to Install the Program, will confirm the file path and disk space requirements. Click
Next if OK. Click Back to make changes to the directory path or the folder.
The Ocularis Administrator software is installed.
8.
When completed, the Setup Wizard Complete for Ocularis Administrator screen appears.
9.
Click Finish.
The installation of Ocularis Administrator will create the following icon on the desktop:
On-Net Surveillance Systems, Inc.
23
Installing Ocularis Client
Ocularis Installation & Licensing Guide
Installing Ocularis Client
•
The Ocularis Client may be installed on as many systems as desired.
•
Refer to the system requirements defined on the OnSSI website for hardware specifications.
•
Follow this procedure when installing a new system or upgrading existing copies of Ocularis Client.
TO INSTALL OCULARIS CLIENT
These instructions assume that you have installed Ocularis Base and are located at the system on which you wish to
install Ocularis Client. Use these steps for all feature sets of Ocularis.
1.
From the ‘Ocularis Component Downloads’ web page, click the Download button next to Ocularis Client.
2.
You may be prompted to run or save the file, you may choose to either run it now or save it and run the
installation later. In a new installation, an extraction wizard screen will appear. Follow the prompts to extract
the files and then you’ll see the Welcome to Ocularis Client Setup Wizard screen.
3.
Once Run has been selected, if a previous version of the Ocularis Client is detected, a notice will appear
asking for your confirmation to uninstall the older version and install the new version. Click Yes.
a.
An “Are you sure you want to remove Ocularis Client…?” screen appears. Click Yes.
b.
When the uninstall is complete, click OK.
4.
The Welcome to Ocularis Client Setup Wizard appears. Click Next.
5.
The License Agreement appears. Please read, click the “I accept..” radio button and then click Next.
6.
The Select Destination Folder screen appears.
You may leave the default directory path as is or change it if necessary according to your organization. If
installing a version to be used as a demo, keeping the default path is recommended. Click Next.
7.
The Select Language screen appears. Select the desired language for Ocularis Client from the drop-down
menu. The language may be changed again after the software has been installed. Click Next.
8.
The next screen, Ready to Install the Program, will confirm the file path and disk space requirements. Click
Next if OK. Click Back to make changes to the directory path or the folder.
The Ocularis Client software is installed.
9.
When the Ocularis Client Setup is completed, the Setup Wizard Complete for Ocularis Client screen
appears. Click Finish.
The software installation will result in the display of the following desktop icons:
24
On-Net Surveillance Systems, Inc.
Ocularis Installation & Licensing Guide
Ocularis Recording Components
Installing Ocularis Recorder
•
The Ocularis Recorder may be installed on the same computer as other components.
•
Refer to the system requirements defined on the OnSSI website for hardware specifications.
•
Multiple scripts are used for installation, so you should disable any active virus scanners for the duration of
installation.
•
The Ocularis Recorder must not be installed on a compressed drive, since this can result in problems with
the database. A drive on which Ocularis Recorder is already installed must not be compressed
subsequently.
•
DirectX is installed during installation, and Microsoft .NET Framework 4 as well, which may require a restart
in the case of a first time installation.
•
The recording components included with Ocularis 5.0 all require a corresponding recorder license (SLC).
This code is used to generate a file (license.key or license.zip) that is imported using the Ocularis Recorder
Manager after the software is installed.
•
The server software (CoreService) can only be installed on computers with the NTFS file system.
Firewalls



Multiple ports on the computer must be available by default to allow the Ocularis Recorder software to
function correctly in a network environment with a firewall. These are in the range from 60000 to 60008 (TCP
communication), 63000 (TCP) and 60007 (UDP, image transmission).
The TCP alarm ports of the camera must also be accessible on the server computer that administers a
camera to guarantee alarm processing.
Some cameras use the ‘RTSP over RTP over UDP’ standard for MPEG4 image transmission. In this case, the
server sends the requirements (e.g. frame rate and resolution) to the camera via TCP port 554. The camera
sends the image data to the server via a UDP port.
The corresponding ports must therefore not be blocked between the camera and the server.
The versions of recording components included with Ocularis 5.0 include:
Ocularis Professional Recorder
Ocularis Enterprise Recorder
Ocularis Ultimate Recorder
v6.6.1
v6.6.1
v6.6.1
Recorder Components
These recorders have the following components:
•
•
•
CoreService – This service authenticates users, permissions and some alarms. It runs as a service. There
may be many cores in an installation. In Ocularis Enterprise and Ocularis Ultimate you can set up one core
(‘the slave’) to be redundant for the primary (‘the master’) core.
Device Manager (DM) – This service communicates with devices (cameras) and clients. There may be
many DMs in an installation. In Ocularis Ultimate, you may set up one DM to be a failover (redundant
recorder) for another DM in the event of a DM failure.
Ocularis Recorder Manager – This is the software application used to configure the Core and DM(s).
On-Net Surveillance Systems, Inc.
25
Installing Recording Components for PS, IS and CS
Ocularis Installation & Licensing Guide
Recorder Component Installation
These instructions assume that you have installed Ocularis Base and are located at the system on which you wish to
install the 5.0 Ocularis Recorder.
Reminder: the operating system on which you install this component should be 64-bit.
There are four set up types for installation:
a.
Standard installation (Manager & Server)
Use this set up type to install all components on the current system.
b.
Manager Installation only
Use this set up type to install only the Ocularis Recorder Manager software on the current system.
c.
Device Manager Installation
This set up type installs the Device Manager (DM) component as well as the Ocularis Recorder
Manager software on the current system. A ‘Device Manager’ is equivalent to ‘Recorder’ and the
terms are used interchangeably.
d.
Custom Installation
This setup type allows you to pick and choose which component you would like to install on the
current system.
The steps below outline each of the four set up types.
NOTE:
• With Ocularis Professional ONLY you must install a Master Core along with a DM on each server. You may
use the 'Manager & Server' option for each recording server. Each server requires a unique SLC from OnSSI
Sales.
• With Ocularis Enterprise or Ultimate there should be only one Master Core and optionally one or more
Slave Cores in the entire environment. Use the 'Manager & Server' option only on the first computer. Each
additional server will have just a 'Device Manager' or use 'Custom' to install a DM and a 'Slave' core. These
models use only one SLC per environment.
Standard installation (Manager & Server)
The standard installation installs the system with the managers (configuration application also called the 'Ocularis
Recorder Manager' and device manager) and Server ('Core') on a single system ('Manager & Server').
26
1.
From the ‘Ocularis Component Downloads’ web page, click the Download button next to Ocularis Recorder.
2.
Choose to Run the application to launch the installer.
3.
Select the installation language. You can configure the language of the user interface after installation.
4.
Click OK to start installation.
5.
At the Welcome screen, click Next.
6.
Read the software license agreement, accept the terms and then click Next.
7.
Change the destination folder if desired. Click Next.
On-Net Surveillance Systems, Inc.
Ocularis Installation & Licensing Guide
Ocularis Recording Components
Figure 13 Select the Set up Type
8.
Select 'Manager & Server' as the Setup Type and click Next.
Figure 14 Communication Information
The port number of the Management service is set at '60000'. If the port number must be changed, contact Tech
Support.
9.
In the Host field, enter the IP Address for the Master Core Server. You can do this typing it in or selecting it
from the drop-down list labeled IP addresses/host names found. This should be the IP Address of the
computer you are running the installation on.
Neither the IP 127.0.0.1 nor the host name ‘localhost’ may be used for communication with the
server.
Click Next.
On-Net Surveillance Systems, Inc.
27
Installing Recording Components for PS, IS and CS
Ocularis Installation & Licensing Guide
Figure 15 Video Database (Zone) Setup
10. If you want, alter the existing path for image storage, or delete or add additional folder paths. Additional
locations or ’zones’ for video storage may be added now or after the software has been installed. If the
folder is created on a network drive, enter the complete UNC path.
Example: \\IP Address\Release name\path
If the network drive is protected with a user name and password, select Using network authorization and
click Authorization.
Enter the user name and password for accessing the network drive, and then click OK. Ensure that the
specified user is available locally and that the domain is included in the user name field (e.g. "Domain\\User
name").
A Note About Zones
•
A zone should never be as large as the available maximum storage space on the hard disk.
•
The hard drive’s cluster size should be 64KB.
•
You can use a maximum of 10 zones per DM; each zone should be on its own dedicated partition;
it is better to have few larger zones than many smaller zones that this impacts performance
•
It is recommended to store video data on a separate hard disk or RAID system. Do NOT use a hard
disk connected via USB or firewire.
•
Zones on the network may be identified with a UNC path. You’ll also need to provide network
username and password.
•
Note: it is STRONGLY recommended to use a storage location with a minimum of 200 GB
available space and set the maximum size of the zone to ‘Unlimited’. Otherwise, there is a
risk of running out of disk space and having the recording stop.
Click Next.
11. Click Install.
12. When asked, accept the EULA (End User License Agreement) for installing the Microsoft DirectX 9
component. This window may appear behind the primary installation window.
28
On-Net Surveillance Systems, Inc.
Ocularis Installation & Licensing Guide
Ocularis Recording Components
The Ocularis Recorder components: Core Server, Device Manager and Recorder Manager are now installed on your
computer.
Manager Installation
In the 'Manager' installation, only the application to configure the recorder (Ocularis Recorder Manager) is installed on
the computer.
1.
From the ‘Ocularis Component Downloads’ web page, click the Download button next to Ocularis Recorder.
2.
Choose to Run the application to launch the installer.
3.
Select the installation language. You can configure the language of the user interface after the installation.
4.
Click OK to start installation.
5.
At the Welcome screen, click Next.
6.
Read the software license agreement, accept the terms and then click Next.
7.
Change the destination folder if desired. Click Next.
8.
Select 'Manager' as the Setup Type (see Figure 13) and click Next.
9.
Click Install to begin the installation.
10. When asked, accept the EULA (End User License Agreement for installing the DirectX 9 component. This
window may appear behind the primary installation window
The Ocularis Recorder Manager is then installed on your computer.
Device Manager Installation
In the Device Manager installation, only the database modules for the image database are installed together with the
Ocularis Recorder Manager on a different computer from the already installed Ocularis Recorder Manager and Core
server. The Device Manager reduces the utilization of the core server because the image database is located partially
or entirely on another server.
In order to configure the Device Manager server, you need an installed and configured Ocularis Recorder
Manager and Core server .
1.
From the ‘Ocularis Component Downloads’ web page, click the Download button next to Ocularis Recorder.
2.
Choose to Run the application to launch the installer.
3.
Select the installation language. You can configure the language of the user interface after installation.
4.
Click OK to start installation.
5.
At the Welcome screen, click Next.
6.
Read the software license agreement, accept the terms and then click Next.
7.
Change the destination folder if desired. Click Next.
8.
Select 'Device Manager' as the setup type (see Figure 13) and click Next.
On-Net Surveillance Systems, Inc.
29
Installing Recording Components for PS, IS and CS
Ocularis Installation & Licensing Guide
Figure 16 ;Communication Information
9.
In the Management service area, specify the IP address of the Master Core in the Host field. Leave the port
number unchanged at '60000'.
It is important to enter the IP address of the Master Core in the Host
field of the Management service area in order for the system to
function properly. Leave the port as 60000
In the IP address/host name for server communication area, the IP address of the Device Manager should
be placed in the Host field. This can be done either by typing it in or by selecting it from the IP address/host
names found in the drop-down list. The list shows you all of the existing network addresses and host names
of the PC or server. If there is more than one network adapter on this computer, be sure to select the correct
one.
Neither the IP 127.0.0.1 nor the host name ‘localhost’ may be used for communication with the
server.
Click Next.
Figure 17 Video Database Setup
10. If you want, alter the existing path for image storage, or delete or add additional folder paths. Additional
locations for video storage may be added now or after the software has been installed. If the folder is
created on a network drive, enter the complete UNC path.
30
On-Net Surveillance Systems, Inc.
Ocularis Installation & Licensing Guide
Ocularis Recording Components
Example: "\\Server name\Release name\Path..." or "\\IP address\Release name\Path..."
If the network drive is protected with a user name and password, select Using network authorization and
click Authorization.
Enter the user name and password for accessing the network drive, and then click OK. Ensure that the
specified user is available locally and that the domain is included in the user name field (e.g. "Domain\\User
name").
A Note About Zones
•
A zone should never be as large as the available maximum storage space on the hard disk.
•
The hard drive’s cluster size should be 64KB.
•
You can use a maximum of 10 zones per DM; each zone should be on its own dedicated partition;
it is better to have few larger zones than many smaller zones that this impacts performance
•
It is recommended to store video data on a separate hard disk or RAID system. Do NOT use a hard
disk connected via USB or firewire.
•
Zones on the network may be identified with a UNC path. You’ll also need to provide network
username and password.
•
Note: it is STRONGLY recommended to use a storage location with a minimum of 200 GB
available space and set the maximum size of the zone to ‘Unlimited’. Otherwise, there is a
risk of running out of disk space and having the recording stop.
11. Click Next.
12. Click Install. The Device Manager server is then installed on your computer.
Custom Installation
In a user-defined installation you can install selected modules. In certain Ocularis models, it is also possible to install
an additional core server in slave mode that serves as a redundant server and thus increases the reliability of the
core server.
1.
From the ‘Ocularis Component Downloads’ web page, click the Download button next to Ocularis Recorder.
2.
Choose to Run the application to launch the installer.
3.
Select the installation language. You can configure the language of the user interface after installation.
4.
Click OK to start installation.
5.
At the Welcome screen, click Next.
6.
Read the software license agreement, accept the terms and then click Next.
7.
Change the destination folder if desired. Click Next.
8.
Select 'Custom' as the setup type (see Figure 13) and click Next.
9.
Select the desired services and features. Core Service Slave and Core Service Master cannot both be
installed simultaneously on the same machine.
On-Net Surveillance Systems, Inc.
31
Installing Recording Components for PS, IS and CS
Ocularis Installation & Licensing Guide
Figure 18 Select Components to Install
You can deselect services and features that are not required.
IMPORTANT: if a previously installed service is deselected, it will be removed.
10. Click Next.
Figure 19 Communication Information
11. This screen is dynamic based on the components you selected to install.
•
•
32
If you are installing only a Master Core Server:
 Management service/Host and Port: these fields are disabled but should contain 'localhost' and
'60000'
 IP address/host name for server communication-Host: this field should contain the IP Address of
the Master Core Server
If you are installing only a Master Save Server:
 Management service/Host and Port: Enter the IP Address of the Master Core in the Host field and
'60000' in the Port field.
 IP address/host name for server communication-Host: these fields are disabled.
On-Net Surveillance Systems, Inc.
Ocularis Installation & Licensing Guide
•
•
•
Ocularis Recording Components
If you are installing only a Device Manager:
 Management service/Host and Port: Enter the IP Address of the Master Core in the Host field and
'60000' in the Port field.
 IP address/host name for server communication-Host: this field should contain the IP address of the
Device Manager
If you are installing a Master Core Server and a Device Manager:
 Management service/Host and Port: these fields are disabled but should be 'localhost' and '60000'
 IP address/host name for server communication-Host: this field should contain the IP Address of
the Master Core Server
If you are installing a Slave Core Server and a Device Manager:
 Management service/Host and Port: Enter the IP Address of the Master Core in the Host field and
'60000' in the Port field.
 IP address/host name for server communication-Host: this field should contain the IP address of the
Device Manager
The Host field in the IP address/host name for server communication area should be populated by selecting it
from the drop-down menu or you may enter it manually. The drop-down list shows you all of the existing network
addresses of the PC or server. If there is more than one network adapter on this computer, be sure to select the
correct one
12. When ready, click Install.
13. If asked, accept the EULA (end user license agreement) for installing the Microsoft DirectX 9 component.
This window may be behind the primary installation window.
The modules and services are now installed on your computer. Ocularis Recorder and its corresponding components
will not put an icon on the computer desktop. All relevant components appear in the Windows Start menu under
OnSSIOcularis Recorder.
On-Net Surveillance Systems, Inc.
33
Ocularis Recorder Licensing
Ocularis Installation & Licensing Guide
Ocularis Recorder Licensing
Unlike many other recorders, the Ocularis 5.0 Recorder does not license specific cameras. There is no longer a need
to identify MAC addresses to OnSSI. Rather, the number of channels (or streams) is licensed on the recorder’s Core.
The license process for the Ocularis 5.0 Recorders has been streamlined and simplified. With these recorders, simply
activate your recorder SLC from within the software. Licensing is available using an online or offline method.
Supported Recorders
The recorders supported using the license methods described here are: Ocularis Professional Recorder, Ocularis
Enterprise Recorder and Ocularis Ultimate Recorder. To register camera licenses for any other Ocularis recorder
(such as RC-E) use the instructions provided in the document Ocularis Camera License Registration.
For the supported recorders, the software provides a free 30-day trial. You may add cameras, configure the system,
and add the recorder to Ocularis Base all during this period. You must, however, be sure to license the recorder
within the 30 day period, otherwise, the recorder will cease to function. The seven digit v5.0 recorder SLCs contain
the prefix ‘500’.
The process to license a demo version is slightly different than licensing a retail version.
Licensing Online
Licensing should be done prior to the end of the 30-day trial. Licensing may be done online or offline.
Licensing a Retail Version Online
Use these steps when you need to license a production system:
From the Ocularis Recorder Manager application:
1.
From the Info menu, select Activate license.
2.
Click OK to the message reminding you that this feature requires a connection to the internet.
3.
Verify that the Personalize License radio button is selected. (this is the default selection).
4.
Enter your recorder SLC. This SLC should start have 7 digits starting with ‘500’
5.
Fill out the remainder of the form.
6.
Click OK to confirm your entries.
The application connects to the OnSSI registration server and obtains the license.
You are done!
To view your licensing information, from the Info menu, select Show license.
Licensing a Demo Version Online
Use these steps to license a demo system.
1.
You will receive a demo license file from OnSSI.
2.
In the Ocularis Recorder Manager application, choose the Info menu and select Import license file.
3.
Click Select to navigate to the license file from step 1. Select the file and then click Open.
4.
Click Import to use the license key.
You are done!
To view your licensing information or expiration date, from the Info menu, select Show license.
Licensing Offline
Offline licensing must be done via webpage on the OnSSI website (www.onssi.com/support/recorderlicensing)
34
On-Net Surveillance Systems, Inc.
Ocularis Installation & Licensing Guide
Ocularis Recorder Licensing
First Time Licensing
The first time (initial) license of the recorder software may be done online or offline. Offline in instructions are shown
here.
1.
Open the Ocularis Recorder Manager. In the Info menu, select Request Product ID.
2.
Click Copy to copy the Product ID to the Windows clipboard.
3.
Click OK to close the Product ID pop-up.
4.
Paste the contents of the clipboard to a Notepad or other text file. Save the file to portable media and bring it
to a computer that does have internet connectivity.
5.
From a browser, go to the URL: www.onssi.com/support/recorderlicensing
6.
In the section: ‘Initial installation: New license code’, enter your SLC (i.e. the 7 digit SLC with the prefix ‘500’)
and fill out the remainder of the form. In the Product-ID field, paste the contents of the text file that you
created from the Ocularis Recorder Manager in step 4.
7.
When done, click Submit.
8.
The SLC is verified with the OnSSI licensing server. A license key is emailed to the email account specified
on the form. There may be a delay of up to 10 minutes to receive the email from the licensing server.
9.
Detach the license key file from the email attachment and bring the file to the offline computer running the
Ocularis Recorder Manager.
10. In the Ocularis Recorder Manager application, choose the Info menu and select Import license file.
11. Click Select to navigate to the license file from step 5. Select the file and then click Open.
12. Click Import to use the license key.
You are done!
To view your licensing information or expiration date, from the Info menu, select Show license.
Changes to Server Hardware
If you need to use new hardware with an existing Ocularis Recorder, you need to update the license. This procedure
is currently only available by using a form on the website.
1.
On the new hardware, install the software and restore the backup. (See the document Ocularis Recorder
Database Management Guide on how to restore a backup).
2.
On the new system, open the Ocularis Recorder Manager. In the Info menu, select Request Product ID.
3.
Click Copy to copy the Product ID to the Windows clipboard.
4.
Click OK to close the Product ID pop-up.
5.
If the computer you are on has internet connectivity, skip to step 7.
6.
If the computer you are on does not have internet connectivity, paste the contents of the clipboard to a
Notepad or other text file. Save the file to portable media and bring it to a computer that does have internet
connectivity.
7.
Open a browser and go to the URL: www.onssi.com/support/recorderlicensing
8.
In the section ‘Modified server hardware: New product ID’, fill out the form providing your SLC and personal
credentials. Copy and paste the Product ID from the text file to the last field on the form. Click Submit.
9.
You will receive a new license key via the email you provided on the form. Extract the attachment.
10. On the new system’s Ocularis Recorder Manager, choose the Info menu and select Import license file.
11. Click Select to navigate to the license file from the email. Select the file and then click Open.
12. Click Import to use the updated license key.
You are done!
On-Net Surveillance Systems, Inc.
35
Ocularis Recorder Licensing
Ocularis Installation & Licensing Guide
Updating A License
If you have updated an existing installation, expanded your system or lost your license code, you can request a new
license code from our website.
1.
Open a browser and go to the URL: www.onssi.com/support/recorderlicensing
2.
Scroll to the section ‘License update: Re-licensing’. Enter your recorder SLC. This 7 digit SLC should start
with the prefix ‘500’. Click Submit.
3.
You will receive a new license key via the email account you provided when you first personalized the
original license. Extract the license key attachment.
4.
In the Ocularis Recorder Manager, choose the Info menu and select Import license file.
5.
Click Select to navigate to the license file from the email. Select the file and then click Open.
6.
Click Import to use the updated license key.
You are done!
36
On-Net Surveillance Systems, Inc.
Ocularis Installation & Licensing Guide
Ocularis Recorder Manager
The Ocularis Recorder Manager is the client application used to configure the v5.0 Ocularis Recorder. This software
application may be installed on any computer with network connectivity to the recorder. It is included with the
download and installation of the Ocularis Recorder download link.
The Ocularis Component Downloads webpage provides a separate installer which allows you to download and install
just this recorder component on another computer, saving you the time from having to download the entire recorder
package. Installing this component separately is optional. This application is available for 32-bit or 64-bit operating
systems so be sure to select the correct download link for your operating system.
Note: if you attempt to install this application on a computer on which it is already installed, you will see an error
message:
These instructions assume that you have installed Ocularis Base and are located at the system on which you wish to
install the Ocularis Recorder Manager. There should be no other instance of Ocularis Recorder Manager installed on
the local machine.
To Install only the Ocularis Recorder Manager
1.
From the ‘Ocularis Component Downloads’ web page, click the Download button next to Ocularis Recorder
Manager (32-bit or 64-bit).
Note:
The 32-bit version will download the installation file from the OnSSI ftp server so the
computer must have access to the internet.
2.
You may be prompted to run or save the file; you may choose to either run it now or save it and run the
installation later.
3.
Launch file to run. Once Run has been selected, you are prompted to select an installation language. Select
a language and click OK. You may change the language after installation if desired.
4.
At the Welcome screen of the installation wizard, click Next.
5.
The License Agreement appears. Please read, click the “I accept..” radio button, and then click Next.
6.
The Choose Destination Location screen appears.
You may leave the default directory path as is or change it if necessary according to your organization. Click
Next.
7.
The next screen, Ready to Install the Program, click Install if OK or click Back to make changes to the
directory path or the folder.
The Ocularis Recorder Manager software is installed.
8.
A Microsoft DirectX Setup software license agreement should appear. (it may be behind the installation
window). Click Yes to accept the terms of the agreement.
9.
When completed, the Wizard Complete screen appears. Click Finish.
On-Net Surveillance Systems, Inc.
37
Installing Ocularis Event Proxy
Ocularis Installation & Licensing Guide
Ocularis Recorder Event Proxy
Event Proxies are used to route events and other information from a server or recording component to the Ocularis
rd
Base or other 3 party system. The Ocularis 5.0 models all make use of the event proxy for events from the recorder.
To Install the Ocularis Event Proxy
These instructions assume that you have installed Ocularis Base and are located at the system on which you wish to
install Ocularis Recorder Event Proxy. Use these steps for all feature sets of Ocularis.
1.
From the ‘Ocularis Component Downloads’ web page, click the Download button next to Ocularis Recorder
Event Proxy.
2.
You may be prompted to run or save the file, you may choose to either run it now or save it and run the
installation later. In a new installation, you’ll see the Welcome to Ocularis Event Proxy Setup Wizard screen.
3.
Once Run has been selected, if a previous version of the Ocularis Recorder Event Proxy is detected, a
notice will appear asking for your confirmation to uninstall the older version and install the new version. Click
Yes.
a.
An “Are you sure you want to remove Ocularis Event Proxy…?” screen appears. Click Yes.
b.
When the uninstall is complete, click OK.
4.
The Welcome to Ocularis Event Proxy Setup Wizard appears. Click Next.
5.
The Select Destination Folder screen appears.
You may leave the default directory path as is or change it if necessary according to your organization. If
installing a version to be used as a demo, keeping the default path is recommended. Click Next.
6.
The next screen, Ready to Install the Program, will confirm the file path and disk space requirements. Click
Next if OK. Click Back to make changes to the directory path or the folder.
The Ocularis Recorder Event Proxy software is installed.
7.
When the Ocularis Recorder Event Proxy Setup is completed, the Setup Wizard Complete for Ocularis
Recorder Event Proxy screen appears. Click Finish.
The software installation will result in the display of the following desktop icons:
38
On-Net Surveillance Systems, Inc.
Ocularis Installation & Licensing Guide
Configure Ocularis Event Proxy
To Configure the Ocularis Event Proxy
1.
Launch the event proxy from the desktop icon or the Windows Start menu. (Start  All Programs 
OnSSI  Ocularis Event Proxy)
Figure 20 Ocularis Event Proxy
2.
The Recorder Settings button is the only one enabled. Click this button to enter recorder criteria.
Figure 21 Recorder Settings
3.
Enter the Server IP Address for the recorder. Note that localhost is not supported. Also provide a username
and password for an administrative account that is on the recorder.
4.
Click Test Connection. Communication with the server is tested and if successful, a pop-up message
appears indicating as such.
5.
Click Save & Close.
Once the recorder is configured, the Base Settings button becomes enabled.
On-Net Surveillance Systems, Inc.
39
Ocularis Installation & Licensing Guide
Installing Ocularis Event Proxy
Figure 22 Configure Base Settings
6.
Click Base Settings.
Figure 23 Base Settings
40
7.
Enter the IP address of Ocularis Base in the Base IP field and click Add Base. You can add multiple IP
addresses in the Base IP field if you need to send events to additional servers (for example: OpenSight). If
you need to remove a Base IP from the list, select it and click Remove Base.
8.
When done, click Save & Close.
On-Net Surveillance Systems, Inc.
Ocularis Installation & Licensing Guide
Configure Ocularis Event Proxy
Figure 24 Select Events
9.
The last step is to select the events that you wish the proxy to forward to the Base IP(s) you listed. Click
Event Filters.
Scroll list to see
all events
Figure 25 Select Events
On-Net Surveillance Systems, Inc.
41
Installing Ocularis Event Proxy
Ocularis Installation & Licensing Guide
The events you see listed are grouped by Camera Events and System Events. Check the events you want
transferred from the recorder to the Base. Note: any alarms that you have configured on the recorder will
automatically be transferred to the Base.
10. Select the events you wish to monitor.
11. Click Save & Close.
42
On-Net Surveillance Systems, Inc.
Ocularis Installation & Licensing Guide
Configure Ocularis Event Proxy
Installing Ocularis Media Server
The Ocularis Media Server is an add-on to Ocularis. It allows web and mobile users to access Ocularis video. There
is a separate installation document for Ocularis Media server that should be used during installation of this add-on.
TO INSTALL OCULARIS MEDIA SERVER
These instructions assume that you have installed Ocularis Base and are located at the system on which you wish to
install the Ocularis Media server. Use these steps for all feature sets of Ocularis.
1.
From the ‘Ocularis Component Downloads’ web page, click the Download button next to Ocularis Media
Server.
2.
You may be prompted to run or save the file; you may choose to either run it now or save it and run the
installation later.
3.
Launch file to run. Once Run has been selected, the Welcome to Ocularis Media Server Setup Wizard
appears.
4.
Follow the instructions found in the document Ocularis Media Server Installation & Administration Guide.
On-Net Surveillance Systems, Inc.
43
Ocularis Installation & Licensing Guide
Appendix A
Appendix A
Ocularis Ports
Please note the following ports should be open for data traffic on the network when using Ocularis.
Port Number
(inbound and outbound)
20 and 21
Used when devices use FTP for sending event messages. FTP (File Transfer
Protocol) is a standard for exchanging files across networks.
25
Used when recording servers listen for SMTP information. Also, some devices
use SMTP (e-mail) for sending event messages and /or for sending images to the
surveillance system server via e-mail. SMTP (Simple Mail Transfer Protocol) is a
standard for sending e-mail messages between servers.
80
Port 80 is typically used by the IIS (Internet Information Services).
554
1024 and above
(outbound only)
Used by some camera manufacturers.
(Except ports listed below): Used for HTTP traffic between cameras and
servers.
1801
Used for Message Queuing.
5432
Used when recording servers listen for alert socket/TCP information; some
devices use TCP for sending event messages.
7008
Used by Ocularis.net (communication with video walls and push video)
7210
Internal port (MaxDB) - Do not open this port in your Firewall
7563
Used for handling PTZ camera control commands and for communication with
Ocularis Client.
9100
RTSP Port
60000-60008
(inbound & outbound)
60021
63000-63001
64222
60601-60724
Any other port numbers
you may have selected
to use
44
Description
Recorder Core/DM/MDS
SIP/VOIP
Update Service
AV Export
LPR/Analytics/Transcoding Engine
Examples: If you have changed the IIS Default Web Site port from its default port
number (80) to another port number.
On-Net Surveillance Systems, Inc.
Ocularis Installation & Licensing Guide
Contact Information
Contact Information
On-Net Surveillance Systems (OnSSI)
One Blue Plaza
7th Floor
P.O. Box 1555
Pearl River, NY 10965
Website:
www.onssi.com
General:
[email protected]
Fax:
845.732.7900
845.732.7999
Sales Support:
[email protected]
845.732.7900 x 1
PreSales Support
[email protected]
845.732.7900 x 2
Technical Support:
[email protected]
845.732.7979
Training:
[email protected]
845.732.7900 x 4
Marketing:
[email protected]
845.732.7900 x 5
On-Net Surveillance Systems, Inc.
45