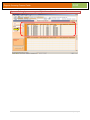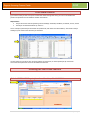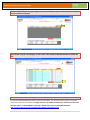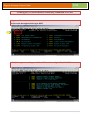
1
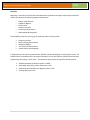
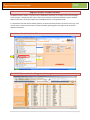
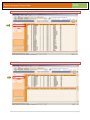
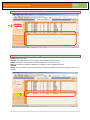
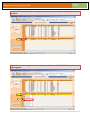
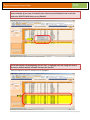
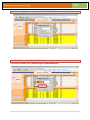
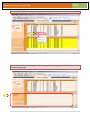
DIVISION OF PERFORMANCE AND ACCOUNTABILITY REGENTS EXAM SCANNING PROCESS FOR NEW YORK CITY SCHOOLS 2010-2011 Version 2.0 (December, 2010) 2010 Regents Scanning Process Guide Overview Beginning in June 2011, the New York State Department of Education will begin requiring the submission of item‐level data for the following Regents examinations: English Comprehensive Integrated Algebra Earth Science Living Environment US History & Government Global Studies & Geography The NYCDOE will pilot the scanning of the following exams in January 2011: Living Environment Physical Setting/Earth Science Integrated Algebra U.S. History and Government Global History and Geography In preparation for this upcoming requirement, NYCDOE has been developing a scanning process that will enable schools to simultaneously scan answer documents to score and capture individual item‐level data using existing technology in each school. This document will walk you through the following process: • • • • • • Scheduling students for Regents exams in STARS Generating and printing answer documents in ATS Scanning answer documents for Regents exams to ATS Printing reports from ATS 2 | P a g e Regents Scanning Process Guide 2010 Scheduling Students for the Regents Exams The STARS client allows you to schedule students to take the Regents and RCT exams in January and June. The exams are also given in August, ATSSUM is the system currently used for summer school. Scheduling students for the Regents/RCT exams, requires you to first create sections in the Master Schedule using exam codes. Student may then be scheduled into a section. You may create one section or multiple sections for each exam code based on the number of students taking the exam. Each section should be scheduled for a period outside of normal instructional periods (for example, period 11, 12 or 13). REGENTS CODES HXR$ - Global Studies HXRA – US History MXRE – Integrated Algebra SXRK – Living Environment SXRU – Physical Setting/Earth Science 3 | P a g e Regents Scanning Process Guide 2010 Regents Master Schedule Builder The Master Schedule “Builder” is a function on the STARS Client that allows you to define sections when building a master schedule. Through easy data entry, it allows you to add lines to the Master Schedule using the standard Regents exam codes. This section explains how to add MULTIPLE lines to the finalized master. It is important to note that when scheduling students, the amount of detail entered in the search criteria (e.g. enter room #, section, teacher) will increase the number of available printing options. See page 6 of this manual for additional information. Select Master Schedule Builder in Edit: The CURRENT Master Schedule will appear in the data grid: 4 | P a g e Regents Scanning Process Guide 2010 Click the arrow to the right of WORKING AREA in order to display the options: Click EMPTY: 5 | P a g e Regents Scanning Process Guide 2010 Click SHOW. Notice that the WORKING AREA is now blank: In the WORKING AREA, enter the following: COURSE: Enter exam code SECTION: Leave blank for now if you are going to have multiple sections of an exam PERIOD: Schedule for period outside of instructional periods (i.e. period11, 12, 13) CYCLE: You must have cycle days as 00000 if you are going to use the EXAM LOAD feature TEACHER: ROOM: You may choose to enter the room number of where the scheduled exam will be taking place, but it is not required. 6 | P a g e Regents Scanning Process Guide 2010 In the WORKING AREA, click the orange box next to the course code. This will highlight the line in yellow: Right click the same orange box next to the course code. Select CLONE RECORD when the menu below appears: 7 | P a g e Regents Scanning Process Guide 2010 Use the UP arrow to select the number of sections minus one that you want to add to your master schedule. If you want 10 sections, select 9 because you already have one row in the work area. SELECT CLONE when you are finished: Add section numbers by highlighting ALL the rows. To highlight, click the orange box next to the course, hold the button, and slide it down to the last line. Notice the original row that is on the bottom is not highlighted: 8 | P a g e Regents Scanning Process Guide 2010 Right click the highlighted area and select UPDATE RECORDS. A new menu box will appear: Click SECTION. Next, click AUTO INCREMENT: If you want to start with section 1, DO NOT change the STARTING FROM value. 9 | P a g e 2010 Regents Scanning Process Guide Click UPDATE. The sections have now been entered: To move records, place cursor in the yellow area and rightclick: 10 | P a g e 2010 Regents Scanning Process Guide Select MOVE RECORDS: Notice the work area is now empty and the message in the lower left hand box indicates 10 records were moved: 11 | P a g e 2010 Regents Scanning Process Guide If you scroll through your master, you will find the new lines that were moved: 12 | P a g e 2010 Regents Scanning Process Guide Scheduling Students into Exam Classes Once the exam ‘classes’ have been added to the master, students will need to be scheduled into these sections. You can use any of the following scheduling methods available in STARS to schedule your students into the exam classes: 1. Schedule Mass Change: If you are using a single section, you may be able to create a group of students and use the Schedule Mass Change function, Use the Group Administration function on the STARS WebPages to create groups. This function can also be used if you created multiple sections that correspond to the subject classes that the students are scheduled for. Use the “In” option to select the present class. 2. Load Exam Function: This function allows you to upload an Excel spreadsheet with the schedule information. Check the STARS screen to ensure that you have the required data and column heading). 3. Schedule Add Drop: Use this function to individually add/ drop students. 4. Walk‐In Scheduler: Walk ‐ In scheduler works the same way as the schedule add drop. It is done for individual students. School selects the course the student needs to have added and then selects the section (function provides all sections once the course is selected). Note – there is typically a deadline for scheduling your students so that the ATS attendance sheets and the answer documents can be generated for the testing days (see the STARS Newsletter/message board and/or the ATS news for more information on this). This section will explain how to use the Schedule Mass Change function. Schedule Mass Change Select Schedule Mass Change from the Edit menu: 13 | P a g e 2010 Regents Scanning Process Guide If you are using a group that you have created, you should see it listed on the bottom section of the screen. Click the line to highlight it and then click NEXT: If scheduling all students currently in a subject class, use the pulldown menu in the “IN” option to select the course and section that the students are currently taking. Once selected, click NEXT: 14 | P a g e 2010 Regents Scanning Process Guide The second screen will display a list of the students from the group or class. Click NEXT: On the third screen, use the ‘Add Course Section’ pulldown list to select the Regents code and section: 15 | P a g e 2010 Regents Scanning Process Guide Click the SUBMIT button to add the exam to the students’ schedule. When complete, you should see the message: ‘Schedule Changes Completed Successfully’: 16 | P a g e 2010 Regents Scanning Process Guide LOAD Exam Function If you have an Excel file with a list of the students who will be taking each exam, you can use the LOAD Exam function to upload the list into STARS to schedule the students. Requirements: The file will need to have the following column headings: StudentID, LastName, FirstName, Course, Section The tab for the worksheet MUST say “Sheet1.” This is a sample of what the file should look like (student IDs, and names have been hidden). Note names used for headings of each column and Tab name for worksheet. You may either use one file to enter all of the students for each exam, or load separate files for each exam. This section will explain how to access the LOAD Exam Function. Accessing the LOAD Exam Function Click the MISCELLANEOUS option from the toolbar. Next, click LOAD EXAM: 17 | P a g e Regents Scanning Process Guide 2010 Click on SELECT FILE in the upper right corner. You will be prompted to select the location of the file and then click open: Once the file is open, it will display on the screen. Click UPDATE CHANGES button to submit the file: Exam Invitations: You can use the EXAM INVITATION report to print exam invitations. You can also select the option to include the photo of the student on the invitation. See pages 271‐274 in the STARS User Manual for detailed instructions. This document (HSST v 1.1 LOAD EXAM) can be found in the document section of the STARS SharePoint. http://portal.nycboe.net/sites/FinanceAdmin/DIIT/AppDev/HSST/default.aspx 18 | P a g e 2010 Regents Scanning Process Guide Printing Answer Documents from ATS Once students have been scheduled, answer documents may be printed. There are three methods for printing answer documents for the following students: NYCDOE students previously scheduled in STARS An individual NYCDOE student A non‐DOE student (Please note these procedures also apply to the students who are “Walk‐Ins”) The amount of scheduling details provided in STARS, such as teacher name, section number, and room number, determines the printing options that are available. See page 6 for additional information. 1 .Printing for NYCDOE students previously scheduled in STARS This will allow you to print for a group of students at once. In order to utilize this option, students must be scheduled in STARS at least one day prior to printing. 2 .Printing for an individual NYCDOE student (Note: this option includes students not currently enrolled at your school) You will be prompted to enter in the Student ID number of the student whose answer document you wish to print. 3. Printing for a non‐DOE student The system will prompt you to enter in basic demographic information for the student prior to printing. Printing Requirements: Destination printer for print job can be any printer, or you can print directly to your attendance scanner (Lexmark Attendance Scanner ‐ models x646 or x656 or the Fujitsu Attendance Scanner ‐ model Fi6670). Verify that destination printer has sufficient toner level for printing this job In order assure problem‐free scanning, make sure all pages are clearly readable and free of any type of print defects. Discard any pages that have less than perfect print quality, correct cause of the print problem, and reprint those pages. 19 | P a g e Regents Scanning Process Guide 2010 Printing for NYCDOE Students Previously Scheduled in STARS 1.Log in to ATS. On the screen that appears below type: REGT 2. The following screen will appear. TAB to RGPR – and Press Right CTRL/ED ENTER 20 | P a g e 2010 Regents Scanning Process Guide 3. The following screen should appear. Ensure that printing requirements are met (see page 19) The default is “Y” for the option to print previously scheduled students. 4. Select REGENTS EXAM CODE and press F4. The following screen appears. Tab to the exam you wish to print answer documents for. Note: If the code is already known, you can type the code in the previous screen. Press F2 to execute. CODE: Available Regents Exam Codes SPEC: Specifies if exam has a 1 or 2 page answer document. 21 | P a g e 2010 Regents Scanning Process Guide 5. The following screen should appear. Ensure that printing requirements are met (see page 19) The default is “Y” for the option to print previously scheduled students. The printer default is set to “S” and needs to be changed to correct destination Attendance Scanner Press F6 to Execute The following screen should appear: Press F2 to Confirm or F3 to cancel. 22 | P a g e 2010 Regents Scanning Process Guide Printing an Answer Document for an Individual NYCDOE Student Complete steps 14 above until you reach the screen below: Ensure that printing requirements are met (see page 19) Enter STUDENT ID NUMBER Remove “Y” in the “Print Scheduled Students not Previously Printed” The printer default is set to “S” and needs to be changed to correct destination Attendance Scanner Press F6 to Execute The following screen should appear: Press F2 to Confirm or F3 to cancel. 23 | P a g e Regents Scanning Process Guide 2010 Printing an Answer Document for a NonDOE Student Complete steps 14 above until you reach the screen below: Ensure that printing requirements are met (see page 19) Student last and first name Date of Birth Sex Name of NonPublic School the student attends The printer default is set to “S” and needs to be changed to correct destination Attendance Scanner Press F6 to Execute The following screen should appear: Press F2 to Confirm or F3 to cancel. Note: a generic, unique Student ID will be generated for this nonpublic student at this time 24 | P a g e 2010 Regents Scanning Process Guide Reprinting Answer Documents Answer documents can be re‐printed for any student whose answer document had been previously generated and printed. Please note: the 12‐digit unique Page Number (located in the upper left portion of the answer document) for each student’s answer document will remain the same regardless of the number of times the answer document has been generated and printed. Note: For two page Regents Answer Documents, the page number of page one of the answer document will end in ‐1, while page two will end in ‐2. 25 | P a g e 2010 Regents Scanning Process Guide This section will discuss how to reprint answer documents. Move your tab to option 5 – RGRR – and Pres Right CTRL/ED ENTER. The following screen should appear. Complete the required information: Regents Exam Code: Select the appropriate exam by pressing F4 Starting Page Number: Will reprint all pages if no starting number is entered Press F6 to complete the printing process: 26 | P a g e 2010 Regents Scanning Process Guide Scanning Regents Exams to ATS After scheduled students take the Regents exams, the answer documents are ready to be scanned to ATS via the attendance scanner. To begin scanning, you will see the following home screen on the MFP. Select BETA Scan ATS Forms. Note: Please only scan 1 exam type at a time Load the scan sheets FACEUP into the automatic document feeder. The top of the page must be towards the feed direction. Press NEXT. See Appendix for Scanning tips and limits of pages to be scanned 27 | P a g e Regents Scanning Process Guide 2010 The following screen will appear as the MFP begins scanning pages: Once all the documents have been scanned, the following screen will appear. The MFP is connecting to the scan server. Please wait until processing is completed. 28 | P a g e Regents Scanning Process Guide 2010 Once the connection is complete, the following screen will appear. The application on the Scan Server is processing bubble sheets. Please wait until processing is completed. Once application is finished, it will display this message and print a confirmation page: 29 | P a g e 2010 Regents Scanning Process Guide Printing Reports from ATS Once the answer documents have been scanned, a number of reports are available in ATS in relation to Regents exams. These reports can be used to assist the school in validating the testing status of the students and their scores. This section will explain how to access these reports. On the screen below select option 6 – REDS – Regents Exams Document Status. The following screen appears. Enter the required information and Press F6 to execute. Note: When exam code is entered, exam list will appear. Type in exam code or select from list. 30 | P a g e 2010 Regents Scanning Process Guide The following screen appears: Available Reports The following three reports are available via ATS: 1. Status Report Provides information for each answer document scanned, and any potential warning flags that should be reviewed on the answer document. 31 | P a g e Regents Scanning Process Guide 2010 2. Item Report Provides information detailing the specific response marked on the answer document 3. Item Distribution Report Provides a frequency distribution for each item and the number of students who selected each potential response 32 | P a g e 2010 Regents Scanning Process Guide Data Flow: Each night the data is sent to the transcript system and to STARS. For students who are taking the exam in their own school, the record should be available in STARS for reporting purposes (report cards, exam report) the following day. For students who take the exam in a school other than their own, the records will be available on the transcript only. 33 | P a g e Regents Scanning Process Guide 2010 APPENDIX – Tips for Scanning DFS Scanning Procedure for Fujitsu Fi‐6670 Scanners: 1. In order to prevent rejections and errors from skewed pages, make sure that all pages in the batch are squared and aligned along the edges. 2. Place batch of pages on the Automatic Document Feeder of the scanner and make sure that paper guides are tight along the page edges. 3. Make sure not to put more than 200 pages in one batch. 4. Log on to your Scan PC. 5. Press the green scan button on the scanner to begin. 6. Once all of the pages in the batch are scanned, do not add any more pages to the scanner until DFS confirmation prints out. This process can take up to 12 minutes for 200 page jobs and only 3 minutes for 50 page jobs. 7. Once the DFS confirmation page prints out, collect your scanned and processed pages from the output bin of the scanner and file it together with the DFS confirmation page. This step is very important for troubleshooting scanning issue. The DFS confirmation page has ID number for each scan job, keeping it together with pages scanned in that batch allows us to find this job and verify what went wrong in case of any errors or discrepancies. 8. In scanning ATS period attendance, the ATS confirmation page is also generated. We also advise you to verify that the number of successfully processed pages matches both the ATS and the DFS confirmation pages. 9. If any of the pages were rejected due to missing “Attendance Taken” bubbles or barcode errors, locate those pages in the batch, correct the errors and rescan. If errors still come up and you don’t see anything wrong with the form, CLEAN THE SCANNER’S LENS. 10. Once this process is completed, proceed to scan the next batch of forms. 11. For all support/technical questions regarding the Attendance Scanners, please reach out to DFS via the DOE Help Desk at 718 935 5100 PLEASE REMEMBER TO CLEAN YOUR SCANNER EVERY WEEK. 34 | P a g e