1
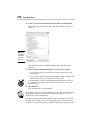
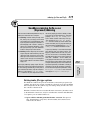
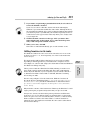
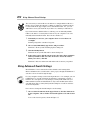
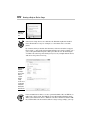
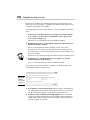
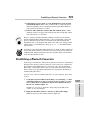
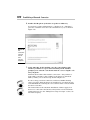
Windows 7 All-in-One
®
For Dummies
Book 3/Chapter 3: Searching Your Computer
and
Book 8/Chapter 2: Using Device Stage
ISBN: 978-0-470-48763-1
Copyright of Wiley Publishing, Inc.
Indianapolis, Indiana
Posted with Permission
Chapter 3: Searching
Your Computer
In This Chapter
✓ Nailed it: Sorting through the search maze
✓ Controlling indexes and indexing
✓ Using Search settings
✓ Saving and reusing searches
W
ant to know my first reaction to Windows 7, after I played with the
interface for about five minutes?
Yesssss! Microsoft finally — finally — fixed Search.
I had to find a document on my home server, like, really fast. I tried using
Vista and just couldn’t locate the stupid thing. So I switched over to
Windows 7 and, in a matter of seconds, found the document.
Yesssss!
You may not be as easily impressed as I, but I’ve collected a bunch of
screen shots over the years showing Windows Vista missing searches —
simple searches that should’ve resulted in easy hits, passed over for some
unknown reason or possibly no reason.
I’ll never use Vista to search again. (I never did rely on Windows XP.) Search
alone is reason enough for me to upgrade to Windows 7. True fact.
Even so, searches don’t always go the way you probably expect. This chapter explains how to use the Windows 7 search features in ways that don’t
leave you scratching your head (or other parts of your anatomy). First check
out the section “Searching Basics,” which provides tips to find which search
tools offer the best results. It also helps to know a little about what’s going
on under the hood — search quirks, which I translate into plain-English
advice for you. If you’re the tinkering sort, check out the section on twiddling
with the search index settings. (The index is the brain behind the Windows
search beast.) And last but not least, if you get lost searching for a must-have
file, flip to the section near the end of this chapter, “Finding Files That Got
Lost,” which walks you through the progressively powerful arsenal of searchand-recovery tools available to you in the big, bad world of lost files.
270
Searching Basics
If you want to understand how Windows really performs searches, you have
to be able to see filename extensions — the short (usually three-letter) suffix
of each file’s name that identifies the file’s type, such as .doc and .jpg.
Windows 7 doesn’t show you filename extensions unless you specifically tell
it to. To make heads or tails out of anything in this chapter, make Windows
show you filename extensions by following the steps I outline in Book II,
Chapter 1.
Searching Basics
Maybe you need to find all the handouts you typed for your Porcine
Prevaricators seminar. Maybe you remember that you have a recipe with
tarragon in it but you can’t remember where in the world you put it. Maybe
you accidentally moved or deleted all the pictures of your trip to Cancun or
Windows Media Player suddenly can’t find your MP3s of the 1974 Grateful
Dead tour.
Good. You’re in the right place.
People generally go looking for files or folders on their computers for one of
two reasons. Perhaps they vaguely remember that they used to have something — maybe a Christmas letter, a product description, or a great joke —
and now they can’t remember where they put it. Or, they have been playing
around with Windows Explorer, and whatever they thought was sitting in
a specific place isn’t there any more. In either case, the solution is to make
Windows 7 do the work and go searching for your lost files or folders.
Engaging your brain before the search
All the search engines in the world can’t help until you have your act
together. You can save a lot of time and frustration by following these suggestions:
✦ Visualize exactly what you want. Don’t search for lightning if you’re
looking for lightning bug.
✦ Know your tools. The Windows 7 search engine works in mysterious
ways, but you can increase your chances of finding what you want quickly
if you accommodate the foibles of Windows 7. This chapter can help.
✦ Narrow the search ahead of time. You can easily create massive lists
of files that match specific search criteria. But if you’re looking for a file
where Woody is the author, why search for all files?
✦ Stay flexible. If you keep typing the same search string, you keep receiving the same answers — guaranteed. Any idea how many different ways
you can spell Shakespeare — correctly?
Searching Basics
271
✦ Use every trick in the book. This book, of course.
Remember the First Law of Searching. If you know where the file you desire
might be located, navigate to the folder before you start the search. For example, if you know that the file you want is inside the \Documents\Invoices
folder, open that folder before you type the search argument (or arguments)
in the search bar.
✦ Corollary I: If you’re searching for an e-mail message, search from inside
your e-mail program. That effectively restricts the scope of the search.
✦ Corollary II: If you’re searching for a picture or video, use Windows Live
Photo Gallery (see Book IV, Chapter 5). For a song, use Windows Media
Player (or iTunes or Winamp or whichever player happens to ring your
chimes). For a video, use Windows Media Center. The tools there are
much better — aw, you get the idea.
Stepping through a basic search
Windows 7 packs Search boxes everywhere, most noticeably at the bottom
of the Start menu and in the upper-right corner of every Windows Explorer
window.
If you type something in a Search box, Windows 7 immediately runs to the
index, looking for matches in the current folder and all folders underneath
the current folder. It searches for all kinds of files — documents and text
files, of course, but also pictures and music, e-mail messages, and even the
contents of Web pages.
The result frequently reminds me of listening for a specific conversation in a
packed room — or in a mosh pit.
Here’s a simple example of a relatively tame search:
1. Choose Start➪Documents.
Windows Explorer opens your Documents library.
2. In the upper-right corner, where it says Search, type a word that
might appear inside your Documents library or one of the subfolders
of the folders in the library.
Book III
Chapter 3
Searching
Your Computer
The example in this section focuses on searching from an Explorer window,
although you can use the Start menu box with the steps as well. Note, however, that the Start menu Search box has a few extra peculiarities worth
knowing. I explain them in the section “Searching from the Start menu,” later
in this chapter. Ahem.
272
Searching Basics
Although there are exceptions (see the section, “What Windows can
(and can’t) find”), the word generally can
• Be inside a file, if Windows 7 recognizes the file type
• Appear at the beginning of the filename
• Exist as a tag or other metadata, such as the author or artist attached to
a file
In Figure 3-1, I typed adsl and Windows 7 found all files in my Documents
library (and its subfolders) that contain the text adsl or where adsl
appears at the beginning of the filename or in a file’s metadata.
Figure 3-1:
The Search
box finds
files in the
current
folder or
library
and all its
subfolders.
3. If you don’t find what you seek, scroll to the bottom of the results list
(see Figure 3-2), where you can choose to rerun your search in one of
these spots:
• All Libraries: Goes after the contents of your Documents, Music,
Pictures, and Videos libraries all at the same time.
• All shared folders on computers in your HomeGroup: If you have a
HomeGroup set up with other Windows 7 computers on your network (see Book VII, Chapter 1), Windows can automatically search
all the locations accessible to the HomeGroup.
• The whole computer: That can take some time, particularly in areas
that aren’t indexed (see the later section “Indexing for Fun and
Profit”).
• Selected locations: If you think you’re running the search on the
wrong folders, it’s usually faster to navigate to a different location
and run the search from there. If you like, this option allows you to
choose locations all over your computer.
Searching Basics
273
• The Internet: If you can’t find what you want on your computer, perhaps there’s something on the Internet that can help. You can open
your default Web browser and feed your default search provider
the search criteria. In this case, on my PC, if I click the Internet icon,
Windows launches Firefox (my default browser) and runs a Google
search (my default search provider) for adsl. See Book V, Chapter 5
for details.
Figure 3-2:
You can
easily
repeat the
search, but
in a different
location.
4. Alternatively, you can use the Boolean operators AND, OR, and NOT
to further refine your search.
Check out the section “Adding Boolean operators to a search,” later in
this chapter. If you’re feeling wild, check out the section on wildcard
characters.
data attached to the file).
For example, Office documents have a piece of metadata named author
that’s supposed to contain the author’s name. Thus, you can search
for adsl authors:woody. Or, you can search for dates, sizes, and artists’
aunts’ middle names.
See a discussion of this Advanced Query Syntax on the Microsoft site at
tinyurl.com/2nuk2n. (If you’ve never used a Tinyurl before, type it
into your Web browser’s address box and you end up in the right place.
It beats typing a verrrrry long address.)
What Windows can (and can’t) find
Here’s what I found, after hours of exhaustive testing, and even more hours
of struggling with the Microsoft Party Line. You don’t find this information in
any manual:
Searching
Your Computer
5. As another alternative, you can search on metadata (which is to say,
Book III
Chapter 3
274
Searching Basics
The stuff you type in the Search box is treated differently, depending on
whether Windows is looking at the contents of a file or looking at a filename. Suppose that you type dummy in the Search box. Here are the results
you see:
✦ When searching for filenames, dummy matches any file with dummy
appearing at the beginning of the filename, or any file where dummy
appears in the filename after a space or period. So you get matches on
dummy.doc, dummy2.xls, Any dummy can type.pdf and some.
dummy. But you don’t get a hit on mydummy.doc or adummy.xlsx.
✦ When searching for file contents, dummy matches any file that contains
dummy at the beginning of a word. (Capitalization doesn’t matter.) If
you have a Word document that contains the sentence this dummy
doesn’t know, the document is a match, as is a spreadsheet with a cell
that contains the word dummytotal. But a spreadsheet containing a cell
that says dodummy or an e-mail message with udummy doesn’t match.
If your searches don’t work the way you think they should, make sure that
you haven’t run afoul of Windows 7 search’s limitations. Don’t go looking for
dummy if you really want udummy. You won’t find it.
Your search options settings (and the list of locations included in the
Windows 7 index) have an enormous influence on what can be found and
what will appear in the search results. If you can’t find a file that you know
must be on your PC, check your options.
Adding Boolean operators to a search
Boolean operators give the Windows search hamster (or dog — remember
Rover, the old Search Companion pooch?) special instructions, and you can
use them to refine your search queries. For example:
✦ If I search on adsl OR provider, Windows finds a match on any file
that contains either the term adsl (which can be capitalized any way)
or the term provider.
✦ Whereas OR expands a search, AND narrows it, requiring that both
terms be in a file before a match occurs.
✦ And NOT is, well, NOT.
For reasons known only to Microsoft, the Boolean operators have to be capitalized. If you search for adsl or provider, you see a list of all files with
adsl or or or provider.
Not surprisingly, you can also use quotes in the search string — “adsl
provider” turns up only documents in which adsl and provider appear
next to each other, separated by a space. You can also use parentheses:
Searching Basics
275
muffin AND (blueberry OR banana) matches documents that have the
word muffin, and in addition to muffin the doc must have either blueberry or banana or both. Some people get all caught up in this stuff.
Breaking out the wildcard characters
Since the Dawn of DOS (somebody should write a book with that title),
searches have employed special characters commonly called wildcards. The
most common wildcard is an asterisk: *. When you type an asterisk in any
search, you’re telling the search engine “match any number of characters of
any kind” before matching whatever comes next — it’s the “don’t care” of
the search string business.
Except. Except Windows 7 doesn’t quite work that way.
When you type an asterisk in a Windows 7 Search box, Windows uses the
characters following the asterisk to match any part of a filename. Permit me
another example. If you type *dum in a Windows 7 Search box, here’s what
happens:
✦ Windows looks inside files for the text dum, but the text has to appear at
the beginning of a word. Thus, you find matches on files that contain the
words dumb and dumber, but there’s no match on files with the words
tadum or ridumcowboy.
To put it another way, if you search for *exe, you get all the files that end
with the .exe filename extension, as you might expect, but you also get
hexen.com.
Caveat searchor.
Searching from the Start menu
When you click the Windows 7 Start button, you can immediately type in the
Start Search bar and have Windows 7 look for the text you type.
You can change the way the Start Search bar behaves, but only in a limited
way. Here’s how:
1. Right-click the Start button and choose Properties.
Windows 7 shows you the Taskbar and Start Menu Properties dialog
box.
Searching
Your Computer
✦ Windows scans filenames and matches any file that has the characters dum in its filename. For example, you get a hit on madum.txt and
some.dummy and anotherdumbexcuse.ppt. But you don’t get a hit on
du.mht.
Book III
Chapter 3
276
Searching Basics
2. At the top, next to the Start Menu label, click the Customize button.
Windows 7 shows you the Customize Start Menu dialog box, shown in
Figure 3-3.
Figure 3-3:
Change the
Start menu
Search bar
behavior.
I discuss the Customize Start Menu dialog box at length in Book III,
Chapter 2.
3. In the Customize Start Menu dialog box, you have these options:
• Choose Don’t Search: The Search bar no longer appears above the
Start button.
• Choose Search with (or without) Public Folders: Include (exclude) the
folders under the Public folder in the search results.
You might want to choose Search without Public Folders if you have a
lot of items in your public folders that you never want to access from
the Start menu.
4. Click OK twice.
Your changes take effect immediately.
Note that these changes to the Start Menu Properties dialog box affect only
the way the Start menu Search bar acts. Changes here have no effect on
other kinds of search in Windows 7.
If you type in the Start Search bar and press Enter, the Windows 7 reaction
depends on the results you can see at that point. If the results include any
programs or Control Panel applets, Windows 7 runs the top program on the
Indexing for Fun and Profit
277
list when you press Enter. If the results don’t include any programs, pressing
Enter throws you into a simple search, covering everything in the Windows
7 search index, as shown in Figure 3-4. Note that the search shown in the
figure covers all indexed locations — it isn’t tied to a particular folder or
library.
Figure 3-4:
A full search
that started
in the Start
menu.
Indexing for Fun and Profit
Similarly, if you tell the Start menu’s Search bar to look for the word water,
Windows 7 consults its index and knows more or less immediately that your
computer has a bunch of matching entries, as you can see in Figure 3-5.
Building an index takes time, and maintaining an index can put quite a strain
on your computer. Windows 7 watches specific folders on your computer
(and a few on your network) and updates the index only when it has to. A
short delay can occur between the time you change a file and the time the
index is updated.
Windows 7 index doesn’t include every item from every file on your computer: You wouldn’t want to index, oh, the text of Windows warning messages or the patterns of bits inside picture or music files.
Searching
Your Computer
At the heart of the Windows 7 search feature sits the index. Much like the
index in this book, the Windows 7 index stores references to the book’s contents. If you’re looking for information about the taskbar, check the index in
the back of this book and you’re directed to pages x, y, and z (and this page,
too, for that matter).
Book III
Chapter 3
278
Indexing for Fun and Profit
Figure 3-5:
A Start
menu
search for
the word
water.
On the other hand, you do want the indexer to look at files that you’re likely
to go searching for. Scanning the index takes seconds. Scanning your unindexed files — looking through them, character by painful character — can
take hours. Or years.
Thus, the indexing dilemma: What should Windows 7 incorporate into the
index, and what can be safely left aside?
When Windows 7 builds and maintains its index, it keeps track of the files
going into and being removed from specific locations on your computer.
When a file is added or removed from one of the locations that the indexer
tracks, Windows 7 looks to see whether the file type (which is to say, if the
filename extension for the file) is on the list of file types that the indexer is
supposed to index. Then, and only then, is the file added to the index.
You have control over both processes:
✦ Tell Windows 7 to look in specific locations for files it should index.
✦ Tell Windows 7 that it should or should not index specific filename
extensions.
The rest of this section goes into details.
Indexing for Fun and Profit
279
Goodbye scanning, hello-o-o-o
(improved) indexing
You have two fundamentally different ways of
looking for information on a computer:
✓ Scanning: Involves looking through each
file, one by one, and trying to find what
you’re looking for. Think of Diogenes walking through the marketplace of Athens, in
broad daylight, with a lantern, seeking an
honest man. Sometimes Windows 7 stumbles upon the things you seek. Sometimes
it doesn’t. Every time, it takes forever.
✓ Indexing: Involves digesting the contents
of your computer and maintaining a list, not
unlike the index in the back of this book.
When you have to find an honest man, you
needn’t walk through the marketplace.
You just look under H in the Athens Yellow
Pages, eh?
In practice, indexing is one whole heckuvalot
more difficult than you might imagine. The
biggest problem Microsoft had, for years,
was the intrusiveness of the bloody indexer:
You’d be typing along, pause a few seconds to
think, and — WHAM! — all of a sudden, this
crazy program had taken over your machine.
Resume typing, and you had to wait an eternity
to regain control of your PC. That situation has
improved significantly in Windows 7. Really. A
good discussion of the techniques involved is
on the Microsoft Engineering Windows 7 blog
at tinyurl.com/3mdfs4 and a learned
white paper at tinyurl.com/b3r4j2.
Setting index file type options
The Windows 7 indexer keeps track of filenames, various file properties (for
example, the day it was created or modified or viewed), most other metadata
that’s assigned to the file (author, tags, star rating, artist), and in some cases
the contents of the file itself.
Windows 7 indexes files based on their filename extensions. (Another reason
to show filename extensions, eh?) For each filename extension that Windows
7 recognizes, you can tell the indexer to
✦ Ignore all files with that particular filename extension. The ignored
files, their filenames, properties, other metadata, and contents never
make it into the index.
Book III
Chapter 3
Searching
Your Computer
In principle, indexing is pretty simple: The computer waits until you aren’t doing anything; then
it starts looking, methodically, at every file on
your hard drive (or drives). Say the computer’s
looking at a file named Woody da Dummy.
doc. Inside the file, the computer discovers
the words jumping jack flash. It builds an index
entry that says, among other things, “The word
jumping is in Woody da Dummy.doc.”
Then it builds another index entry that says,
“The word jack is in Woody da Dummy.
doc.” And so on. When you ask for all files that
contain the word jack, any program looking at
the index realizes immediately that Woody da
Dummy.doc should be included on the list.
280
Indexing for Fun and Profit
✦ Index only the filename, file property information, and other metadata.
✦ Index the filename, information, other metadata, and the contents of
the file. To index the contents, Windows 7 must have a program — a
filter — available to look inside that particular kind of file and retrieve its
contents.
You can’t pick and choose the specific file information and other metadata
to be indexed: It’s an all-or-nothing issue.
By and large, the Windows 7 choices for indexing make a lot of sense. In
particular, if you install Adobe Acrobat or Adobe Reader to look at PDF files,
Windows 7 takes advantage of the Adobe filter to index the contents of all
PDF files in the areas of your hard drive that get indexed. (See the next
section, “Adding locations to the index.”) RSS feeds are indexed, too (see
Book V, Chapter 3), as are Rich Text Format (RTF) files and the titles of
pages in the Internet Explorer Favorites and History folders.
If you don’t want to index a particular kind of file, or if you want to tell
Windows 7 to index only the file information and other metadata for a particular type of file, ignoring the contents, making a change is easy. Here’s how:
1. Choose Start, immediately type index, and press Enter.
You see the Indexing Options dialog box.
2. Click the button marked Advanced, provide an administrator account
name and password if necessary, and then click the File Types tab.
Windows 7 shows you the File Types dialog box, shown in Figure 3-6.
Figure 3-6:
Indexing
options
listed by
filename
extension.
Indexing for Fun and Profit
281
3. If you want to stop indexing a particular kind of file, deselect the box
next to the filename extension.
If you elect to remove a filename extension from the indexing list,
Windows 7 goes back and rebuilds the entire index. Although in theory
the reindexing should take place in the background without interrupting
your work, in practice you find that your machine frequently slows to a
crawl. Remove a file type from the index only when you’re ready to take
a very long break.
4. Click the filename extension for the type of file you want to have
indexed differently. At the bottom, choose either Index Properties
Only or Index Properties and File Contents.
5. When you’re done, click OK.
New items are indexed immediately, give or take a minute or two.
Adding locations to the index
The Windows 7 indexer doesn’t even look at a file unless it’s in one of the
locations you chose — or, more frequently, one of the locations that was
chosen for you.
The depth and breadth of folders that have been selected for you differ
depending on which applications you installed. The computer I used to
shoot Figure 3-4, earlier in this chapter, has both Outlook 2007 and Windows
Live Mail. Your mileage may vary.
Note the entry in Figure 3-4 for the Start menu. Windows 7 indexes all
files in the All Users Start Menu folder (c:\Program Data\Microsoft\
Windows\Start Menu) and all the individual user’s Start Menu folders
(C:\Users\<username>\AppData\Roaming\Microsoft\Windows\
Start Menu).
Why index the contents of the Start menus? That way, the Windows 7 search
engine picks up the programs and systems that you expect it to find.
It may not be obvious, but the indexer picks up all folders in all libraries
for all users. Yes, it even indexes folders on network drives, as long as the
folders are part of one user’s Documents, Music, Pictures, or Videos library.
Want to add more folders to the index? That’s a common situation for
advanced users, who might store indexable files in locations other than in
the Documents library.
Searching
Your Computer
Unless you use Outlook or Windows Live Mail, indexing of e-mail is not a
given: Each e-mail program works differently. Note that e-mail indexing
works only if the mail sits on your computer. If you use Gmail or Hotma —
er, Windows Live Mail or Yahoo Mail or AOL Mail, Windows 7 indexing
doesn’t help one whit.
Book III
Chapter 3
282
Using Advanced Search Settings
The easiest way to add a folder to the index is to simply add the folder to a
library. Choose Start➪Documents (or Music or whatever), click the Library
Locations link in the upper right corner, and add the folder. Yes, you can
add folders out on your network, if you have one, and they’re indexed too.
If you don’t want to add the folder to a library, you can manually add the
folder to the index — but only if the folder is on your computer. You can’t
manually add networked folders. Here’s how to make it so:
1. Wait until you can leave your computer alone for a few hours. Or
overnight.
Indexing a big folder can take a long time.
2. Choose Start, immediately type index, and press Enter.
Windows 7 shows you the Indexing Options dialog box.
3. Click the Modify button.
Windows shows you the Indexed Locations dialog box.
4. In the upper panel, click the arrows next to the drives that contain the
folders you want to add. Select the check boxes next to the folders.
When you’re done, click OK.
Windows 7 wheezes and moans and indexes the locations you picked.
Using Advanced Search Settings
Most Windows 7 users want and need the default search settings that
Microsoft built into the search feature. Some people, though, find Windows 7
search too slow or not thorough enough.
It’s easy enough to change several search parameters — for example, you can
tell Windows 7 to search exclusively for file names, and not file contents —
but there are consequences to any changes you may make. Make sure you
understand the benefits and drawbacks to any search modifications before
you make them. Else, you may find yourself looking for a needle in a field of
electronic haystacks.
Here’s how to change the default simple search settings:
1. Choose Start➪Documents. In the upper-left area, click the down-arrow
next to Organize. Choose Folder and Search Options. Select the Search
tab.
You see the Search options, shown in Figure 3-7.
Using Advanced Search Settings
283
Figure 3-7:
One of
the most
confusing
dialog boxes
in all of
Windows 7
— dumb.
2. Use the tips in Table 4-1 to make any changes to the Windows 7 search
options.
Remember that altering the settings here can make all your searches
painfully slow.
3. When you’re happy with the results, click OK.
Table 4-1
Searching
Your Computer
The settings apply to any new simple searches you may make.
Book III
Chapter 3
Search Options
Setting
What It Means
Recommendation
In indexed locations,
search filenames
and contents. In
non-indexed locations, search
filenames only.
Windows 7 looks for filenames and, in addition,
contents for file types
you have chosen (refer
to Figure 3-5).
You probably want to pick
this setting.
Always search
filenames and
contents (might be
slow).
Ignore the index and
crawl through the contents of every file in the
current folder and its
subfolders.
Slow isn’t the right term —
try glacial. If you use this
option more than once,
modify the index using
the method described
in “Adding locations to
the index,” earlier in this
chapter.
(continued)
284
Using Advanced Search Settings
Table 4-1 (continued)
Setting
What It Means
Recommendation
Always search
filenames only
It looks exclusively at
filenames, ignoring file
contents, properties, and
other metadata.
This is the Windows XP
approach. If you can live
with it, results appear much
faster, but most people
need (and are willing to
wait for) the full text search.
Include subfolders
when typing in the
Search box.
Windows 7 looks in the
current folder and subfolders, as described
elsewhere in this chapter.
Leave the check box
selected.
Find partial
matches.
Match anywhere in the
word (but see the section “What Windows can
(and can’t) find,” earlier
in this chapter).
Leave the check box
selected.
Use natural language search.
You can type search
strings in a less structured way. For example,
if you select this check
box, you can type by
Woody and Windows 7
retrieves everything with
Woody listed as author.
If you select this check box,
you can still use “regular”
searches, but sometimes
Windows 7 gets confused.
I leave the option deselected. And I talk funny.
Don’t use the index
when searching the
file system (might
be slow).
Ignore the index entirely.
You can use this setting
if you think your index is
broken, but otherwise don’t
select the check box.
Include system
directories.
Include system folders
when searching for files.
If you commonly search for
system files and you don’t
want to navigate to c:\
Windows before initiating
every search, this setting
can help.
Include compressed files
(ZIP or CAB, for
example)
Look at the filenames
of the files inside compressed (ZIP and CAB)
files, which are normally
ignored by the indexer.
Select the check box, if
you like, but realize that
a performance hit occurs
when Windows 7 scans the
files inside zip files. If the
file is in an indexed location, both the filename and
its contents are indexed by
default.
Finding Files That Got Lost
285
Finding Files That Got Lost
Wish I had a nickel for every time people ask me why Windows stole their
files. The story always goes like this: “Woody, I used to have a whole bunch
of important files in Documents\Someplace, and now they’re gone! What
did Windows 7 do with them?”
Oy.
When you discover that your files are lost, save yourself a lot of time and
headaches and remember that there are only four possibilities:
✦ You moved them somewhere (probability: 90 percent).
✦ You deleted them, and they’re still available (probability: 9 percent).
✦ You permanently deleted them and it’s difficult, but probably not impossible, to get them back (Probability: less than 1 percent).
✦ Little green men broke into your office in the middle of the night and ate
them (Probability: varies).
First, don’t panic
If you suddenly discover that some of your files are “lost,” here’s the fastest,
most reliable way to get them back:
Douglas Adams’ sage advice pertains.
2. Don’t create any new files or delete any existing ones.
Do not choose this particular moment to defragment your hard drive.
Even when you “permanently” delete a file, all the data remains on your
disk until it’s overwritten.
3. Open Windows Explorer (choose Start➪Documents or Start➪Computer)
and look at the folders near the one that used to contain the “lost” files.
Chances are very good that you accidentally moved the files while you
were using Explorer. Accidentally dragging a bunch of files to a nearby
folder is easy. If you go back to the scene of the crime, you may be able
to retrace what went wrong.
4. Run Search to find one of the lost files.
Don’t bother trying to find all lost files at the same time. Just look for
one of them. With a little luck, you can remember something unique
about one lost file’s name, or part of a name, or some of the data inside.
Searching
Your Computer
1. Don’t panic.
Book III
Chapter 3
286
Finding Files That Got Lost
5. If you find one of the lost files, right-click the filename and choose
Open File Location. If the files (or file) are in a regular, everyday
folder, select them, right-click, and choose Cut. Navigate back to
where they belong. Right-click and choose Paste.
6. If that doesn’t work, take a chill break and continue with the next
section.
Second, get determined
If you can’t find the files by making a simple search, it’s time to haul out the
big guns. Or at least the bigger guns:
1. Go to your desktop and double-click the Recycle Bin icon.
Windows brings up the contents of the Recycle Bin. Any files you
deleted are probably there.
2. Scan the Recycle Bin for your lost file.
You already tried searching, but maybe you didn’t spell the name exactly
right — the Achilles heel of searches. A little bit of eyeballing might turn
up the culprit. Usually it’s fastest to look at the most recently deleted
items first. To do so, click the More Options icon near the upper right
area and choose Details. Then click the Date Deleted column heading.
3. If you find the lost files, select them and click the button marked
Restore This Item (or These Items).
4. If that still doesn’t work, shut down your machine and go buy a file
recovery program.
Even if you “permanently” deleted a file, its remnants remain and can
frequently be put back together. Norton Utilities has long been the
product of choice for undeleting files, but it has dozens of competitors,
all of which basically do the same thing. It’s important that you follow
the instructions precisely in order to maximize your chances of getting
your file back. I talk about using the free program Recuva in my Phuket
Gazette computer column, at tinyurl.com/cwt4f6.
5. If you still can’t find the file and no suspicious green men are lurking
about and you’re willing to spend many hundreds of dollars getting
your data back, look for a data recovery company.
These folks can scan every bit on your hard drive and bring seemingly
lost files back from the dead. Here’s the best way to find a data recovery
company, short of a recommendation from a satisfied customer: Go to
Google (google.com) and search on the phrase data recovery services.
Chapter 2: Using Device Stage
In This Chapter
✓ Understanding what Device Stage can — and cannot — do
✓ Controlling devices through Device Stage
✓ Connecting devices with Bluetooth
I
f you plug anything into your computer — printer, MP3 player, mobile
phone, scanner, whatever — Device Stage can bring order to the chaos
that has attended external devices since the dawn of the Windows age.
Before Windows 7, every printer manufacturer, every mobile phone manufacturer, every camera manufacturer had to come up with its own way of
interacting with you, and its hardware, on your PC.
The problem doesn’t lie so much with the drivers — some manufacturers
make good drivers, and others make lousy ones, and that hasn’t changed
with Windows 7. The problem isn’t with the custom applications that manufacturers offer — to retrieve photos from a camera, say, or set scanner preferences or adjust printer settings. (I rarely use a manufacturer’s application
when a built-in Windows application works just as well.)
The problem is that before Windows 7, every single lousy manufacturer had
a completely different way of interacting with you, the user. Some placed
pop-up messages or icons in the notification area. Others hooked into the
AutoPlay box (see Book VIII, Chapter 1). More than a few expected you to
know that you had to run their programs whenever you wanted to get things
done.
Device Stage brings some structure to the problem. It isn’t perfect — just
for starters, each manufacturer has to build its own hooks into Device Stage,
and applications and drivers remain the responsibility of the company that
makes the machine, so quality can be iffy at best. But at least Device Stage
represents a step in the right direction, giving us Windows consumers a
single place to look and at least a little uniformity among the polyglot manufacturers.
This chapter explains how Device Stage should work — when manufacturers
support it.
800
Getting a Grip on Device Stage
Getting a Grip on Device Stage
At the highest (some would say lowest) level, Device Stage is a gathering
place for all the pieces of hardware you have stuck on your computer, plus
any network devices that are accessible from your machine.
To see the collection, choose Start➪Devices and Printers. Windows 7 presents you with the Devices and Printers list — known to the marketers as
Device Stage (see Figure 2-1).
Figure 2-1:
The
gathering of
devices.
Not all devices are Device Stage savvy, but the list of compatible products
grows daily. You can tell whether your device works with Device Stage
by double-clicking its name in the Devices and Printers folder and seeing
whether any actions are specifically associated with it. For example, if I
double-click the Nokia 5800 XpressMusic icon in Figure 2-1, I see the service
page shown in Figure 2-2.
Depending on the device involved, the actions may include the ones in
this list:
Getting a Grip on Device Stage
801
Figure 2-2:
A Device
Stage
device has
a service
menu for
manipulating it
directly.
✦ Upload and download (syncing) music.
✦ Move pictures from the device to your PC.
✦ Adjust printer settings, such as the type and size of paper or the quality
of the print.
✦ Download software updates for the device or for the programs running
on your PC that support the device.
✦ Browse files on the device.
✦ Search the device’s user manual.
✦ Choose among multiple functions for the device; stereotypically on
multifunction printers, you would choose between print, scan, fax, and
copy, for example.
✦ Run out to the Web for all manner of things.
✦ Change internal settings for the device, such as copy darkness or the
way Windows reacts when you plug the device into your PC.
✦ Produce status reports that show, for example, the amount of memory
being used (refer to Figure 2-2), the number of print jobs backed up, or
the amount of ink left in the cartridges.
✦ Make the device jump and sing and dance the boogaloo.
In addition, Device Stage–cognizant devices are rewarded for their technical
acumen by having a picture of the device appear on the Windows taskbar.
If you right-click the device, you see a jump list that includes all activities
listed on the main menu, as shown in Figure 2-3.
Using DeviceSTage
✦ Spend money on goodies for the device. (What? You didn’t expect
that one?)
Book VIII
Chapter 2
802
Getting a Grip on Device Stage
Figure 2-3:
The jump
list.
Some Device Stage devices are added to the Windows right-click Send To
menu. That makes it easy, for example, to send a music file to a mobile
phone.
By contrast, when you double-click the names of devices that don’t support
Device Stage — such as the eHome Infrared Transceiver (refer to Figure 2-1) —
you see the plain-vanilla Properties dialog box, like the one shown in Figure
2-4. That’s the same Properties dialog box you see if you right-click the device
and choose Properties. B-o-r-i-n-g.
Figure 2-4:
Doubleclicking a
device that
doesn’t
support
Device
Stage
results in an
unadorned
Properties
dialog box,
like this one.
Device manufacturers have to create a particular kind of file, an XML file, to
make Device Stage work. The XML file is typically bundled with the driver.
When you install a new device, Windows 7 looks for the driver and the XML
file, and if it finds a well-constructed Device Stage–savvy package, you reap
Taking Device Stage for a Spin
803
the benefits. Not all manufacturers feel compelled to provide Device Stage
support, particularly for their older products. Hey, there’s no money in it,
right?
Taking Device Stage for a Spin
When things work the way they should, you can use Device Stage with a
USB-attached device:
1. Plug in the device.
Wait a while for the driver to be installed automatically.
2. Choose Start➪Devices and Printers.
You’re done.
In many cases, you don’t need to bother with Step 2 because an icon for
your attached device shows up on the Windows taskbar. Life’s tough, eh?
Many devices don’t pin their icons to the Windows taskbar. If you want to
see the icon all the time, you have to take the initiative. For example, the
Brother HL-2040 printer, shown in Figure 2-5, has an icon but it disappears
when the Devices and Printers window for the printer disappears.
Click to see a printer status dialog box.
Figure 2-5:
The Brother
HL-2040,
like most
printers,
doesn’t
put its icon
on the
Windows
taskbar
permanently.
Book VIII
Chapter 2
Click to see a printing preferences dialog box.
Using DeviceSTage
The Brother taskbar icon
804
Taking Device Stage for a Spin
Most devices work just fine with disappearing icons, but sometimes you
want to keep an icon around — typically, for troubleshooting. I like to keep
my printers up and directly available.
To permanently pin a Device Stage device’s icon to the taskbar, follow these
steps:
1. In the Devices and Printers list (refer to Figure 2-1), double-click the
device name to open the Devices and Printers service page for the
device (refer to Figure 2-5).
The device’s icon should appear on the Windows taskbar.
2. Right-click the device’s icon and (if the option presents itself) choose
Pin This Program to Taskbar.
If you see the Pin This Program to Taskbar option, you’re done.
If you don’t see an option to pin the program to the taskbar, the next
best alternative is to put a shortcut to the printer on your desktop, just
above the taskbar.
Printer icons generally don’t have a Pin This Program to Taskbar option.
3. From the Devices and Printers list (refer to Figure 2-1), click the
printer and drag it to the desktop.
You see a shortcut that can be moved anywhere you like.
If you can’t get your device’s drivers to install — as shown in Figure 2-6 —
you should check these problem areas:
Figure 2-6:
Windows
can’t install
the driver.
✦ Your Internet connection must work. Unless you have an installation
CD, if Windows doesn’t have the driver already, it has to go out to the
big Microsoft driver database on the Internet and look for one.
✦ You have to turn on Windows Automatic Update. But you turn it on
only long enough to find the driver. The installer doesn’t download or
install a driver unless you have Automatic Update turned on. Refer to
Book VI, Chapter 4 for details.
Establishing a Bluetooth Connection
805
✦ If that strategy doesn’t work, go to the manufacturer’s Web site and
download the driver. Make a note of which folder contains the driver,
and then unplug the device and plug it back in again. When Windows
asks, point it to the driver’s location.
✦ If all else fails, install the software that came with the device. That’s
definitely a last-resort approach, but desperate times frequently call for
desperate drivers, er, measures.
Before I could get my Nokia 5800 XpressMusic to work properly, I had to
download and install the Nokia Ovi Suite — the programs that connect the
phone to Windows. By the time you read this book, that download and
installation may occur automatically. If it doesn’t, and you’re trying to make
a Nokia phone o work with Device Stage, go to ovi.com and download the
latest version.
Sometimes, rebooting makes things work: Choose Start, click the right-arrow
next to Shut Down, and choose Restart. I’m not sure why, but rebooting can
suddenly make things work right. I guess the gremlins inside your machine
need a break from time to time.
Establishing a Bluetooth Connection
Device Stage isn’t limited to USB-connected devices. The Device and Printers
dialog box also shows you devices that are connected to your computer by
way of Bluetooth and WiFi wireless connections. (As you probably know,
Bluetooth is a short-range wireless way to connect two electronic products.
Not too many years ago, Bluetooth had all sorts of problems. Nowadays, it
usually works quite well.)
If you’ve never connected a Bluetooth device to your computer, here’s how
to do it:
1. Verify that your PC has Bluetooth working — broadcasting — so that
In Figure 2-7, you can see the Device Stage entry for the Bluetooth
“radio” on one of my laptops.
2. Right-click the Bluetooth device and choose Bluetooth Settings.
Windows shows you the settings shown in Figure 2-8.
Book VIII
Chapter 2
Using DeviceSTage
other Bluetooth devices can see it. How? Use Device Stage, of course.
Choose Start➪Devices and Printers and look for a Bluetooth device,
like the one shown in Figure 2-7.
806
Establishing a Bluetooth Connection
Figure 2-7:
The
Bluetooth
transmitter
on your
computer
shows up in
the Device
Stage list.
Figure 2-8:
Make sure
to enable
Discovery
on the
computer
side.
3. Select the check box that says Allow Bluetooth Devices to Find This
Computer, and then click OK.
Establishing a Bluetooth Connection
807
This step turns on the Bluetooth transmitter, which beams out a welcoming signal to every Bluetooth device in the area — generally 30 to 50
feet (or 10 to 20 meters) away.
4. Make sure that Bluetooth is working on the device you want to connect.
That can be a monumental pain in the tooth.
On the Nokia 5800 Xpress Music, which I use for this demo, I have to go
through all the following hidden steps to enable Bluetooth. Your phone
may be equally obtuse, particularly if it’s a Nokia:
• Tap the area next to the battery life indicator, and then click the two
unmarked horizontal arrows. That action shows the Connectivity
menu. (And you thought Windows 7 was confusing?)
• Tap the Bluetooth link.
• Tap the Off setting until it turns to On.
• Tap Exit.
5. Back in Device Stage, in the upper-left corner, click Add a Device.
If you enabled Bluetooth correctly on both your PC and the device, they
should — should — start talking to each other. When they get past the
handshake stage (that’s the technical term for it), you see the results
shown in Figure 2-9.
Book VIII
Chapter 2
Using DeviceSTage
Figure 2-9:
The phone
is ready to
connect.
808
Establishing a Bluetooth Connection
6. Double-click the phone (or headset or speaker or whatever).
If your device requires authentication — all phones do — Windows 7
generates a random connection code and shows it to you, as shown in
Figure 2-10.
Figure 2-10:
The
connection
code you
have to
enter
into your
telephone.
7. At the same time, if all is working correctly, your telephone asks
whether you want to accept a connection from your PC and then
prompts you to enter the code shown on the PC’s screen. Tap the code
into your phone.
Windows advises that it has made the connection — but you have to
wait a while (sometimes, quite a while) for the drivers to download.
While you wait, you see the message shown in Figure 2-11.
Be sure to keep your device turned on, and leave it within shouting
range of your PC, while the drivers are installed. I’ve encountered problems with Windows retrieving the correct drivers if the connection with
the device is broken.
The normal rules for the automatic installation of drivers apply: You
have to be connected to the Internet, and you have to have Automatic
Update turned on (see the “Taking Device Stage for a Spin” section, earlier in this chapter).
Establishing a Bluetooth Connection
809
Figure 2-11:
The
device is
connected,
but may not
work until all
drivers are
installed.
8. Go back into Device Stage by choosing Start➪Devices and Printers.
Wait until your new device appears on the screen without any swirly
icons or yellow “warning” icons.
At that point, you can use the device — but you aren’t done yet.
9. Right-click the Bluetooth device and choose Bluetooth Settings. In
the dialog box shown earlier (refer to Figure 2-8), deselect the check
box labeled Allow Bluetooth Devices to Find This Computer, and then
click OK.
Root around in your device and turn off Bluetooth there, too.
Good luck. Setting up Bluetooth can be challenging, but the results make it
worth the effort.
Book VIII
Chapter 2
Using DeviceSTage
Table of Contents
Introduction
About This Book
Conventions
What You Don’t Have to Read
Foolish Assumptions
Organization
Icons
Where to Go from Here
Book 1: Cranking Up Windows 7
Chapter 1.
Windows 7 4 Noobs
Why do PCs Have to Run Windows?
Buying a Windows 7 Computer
A Terminology Survival Kit
Chapter 2.
Windows 7 for the Experienced
What’s New for Vista Victims
What’s New for the XP Crowd
Do You Need Windows 7?
Chapter 3.
Chapter 4.
Which Version? Pick a 7, any 7
Upgrades, Clean Installs, Transfers
Product Activation
What if the Wheels Fall Off?
Chapter 5.
Getting Essentials: The Rest of Windows 7
Understanding Live Essentials
Inventorying the Essentials
Installing Essentially
Book 2: Windows Boot Camp
Chapter 1.
Running Windows from Start to Finish
Making the Desktop your own
Mousing with Your Mouse
Working with Files and Folders
Starting with the Start Button
Using Windows Explorer
Arranging libraries
Creating shortcuts and pinning
Sleep and Logoff
Chapter 2.
Controlling Users
Logging On
Choosing account types
Adding Users
Setting Passwords
Enabling the Guest Account
Changing Accounts
Switching users
Working with User Account Control
Chapter 3.
Maintaining Your System
Using the Control Panel
Removing Programs
Removing Windows Patches
Making Backups
Maintaining Disks
Scheduling Task Scheduler
Zipping and Compression
Creating Checkpoints and System Restore
Using the Windows 7 Resource Monitor
Chapter 4.
Getting the Basic Stuff Done
Burning CDs and DVDs
Improving Your Experience Index
Getting Word Processing - Free
Calculating - Free
Painting
Sticking Sticky Notes
Using Sneaky Key Commands
Chapter 5.
Getting Help with Windows 7
Tackling Windows Help and Support
Control Panel’s Troubleshooting Wizards
How to Really Get Help
Snapping and Recording Your Problems
Connecting to Remote Assistance
Getting the Most from Windows 7 Help
Getting Help on the Web
Book 3: Customizing Windows 7
Chapter 1.
Personalizing Your Desktop
Recognizing Desktop Levels
Setting Themes in Windows 7
Get Yer Gadgets Here
Controlling Icons
Changing Mouse Pointers
Selecting Screen Savers
Seeing Desktop Text
Chapter 2.
Organizing Your Interface
Taming the Taskbar
Adding Other Toolbars to the Taskbar
Customizing the Start Menu
Adding your own All Programs Entries
Controlling the Notification Area
Making Your Program Start Every Time
Chapter 3.
Searching Your Computer
A Brief History of Finds
Searching Basics
Saving and Re-Using Searches
Windows Search Advanced Query Syntax
Chapter 4.
Beating and Cheating Windows 7’s Games
Book 4: Joining the Multimedia Mix
Chapter 1.
Jammin’ with Windows Media Player
What You Need to Know About CRAP Music and Videos
Adjusting WMP Privacy Settings
Playing with Now Playing
Copying from a CD: Also Known as Ripping
Organizing Your Media Library
Burning CDs and DVDs
Syncing with a Portable Player/Mobile Phone
Choosing a Skin
Customizing WMP
Chapter 2.
iPod and iTunes in Win7
What You Can’t Do
iPod the Apple Way
Syncing
Copying Songs to Your PC
The iPod Ecosystem
Chapter 3.
Discovering Digital Cameras and Recorders
Choosing a Camera
How to Buy a Camera/Camcorder
Moving Images to Your Computer
Sharing Your Pictures on the Web
Troubleshooting
Chapter 4.
Setting up Media Center
Understanding Media Center
Setting Up a Media Center PC
Running Media Center
Getting the Most out of Other Media
Chapter 5.
Managing Pics with Photo Gallery
Chapter 6.
Lights! Action! Windows Movie Maker
Introducing Windows Movie Maker
Gathering Clips
Assembling a Movie
Publishing the Movie
Book 5: Windows and the Internet
Chapter 1.
Getting the Most from the Internet
What Is the Internet?
Getting Inside the Internet
What is the World Wide Web?
Who Pays for All This Stuff?
Connecting with Fiber, Wire or Wireless
Setting Up an Internet Connection
Running WiFi in your office or home
Finding Internet Reference Tools
Chapter 2.
Finding Your Way around Internet Explorer and Firefox
Exploring Internet Explorer Alternatives
Ready, Set, Browse!
Taking a Walk around the IE Window
Surfing with Style
Pick a Tab, Any Tab
Thwarting Phishers
Doing Stuff with Web Pages
Playing Favorites
Chapter 3.
Making Internet Explorer Your Own
Getting the Most from IE
Making IE Run Faster
Using Links
Dealing with Cookies
Working with RSS Feeds
Chapter 4.
Using Firefox: The Advanced Course
Tips and Tricks for Firefox
Best Add-Ins
Working with RSS Feeds
Chapter 5.
Searching on the Internet
Choosing a Search Engine
Changing Search Engines
Googling Tricks
Chapter 6.
Sending Windows Mail Live
Choosing an E-Mail Program
Getting Started with Windows Live Mail
Conversing with E-Mail
Chapter 7.
Chatting with Windows Live Messenger
Exploring the Alternatives
Making Windows Live Messenger Work
Tweaking Settings in Windows Live Messenger
Sharing Folders
Book 6: Securing Windows 7
Chapter 1.
Lock Down: Spies, Spams, Scams and Slams
Understanding the Hazards
Staying Informed
Getting Protected
Don’t Become Part of the Problem
Parental Controls
Bitlocker
Chapter 2.
Action Center Overview
Entering the Action Center
Working with the Action Center
Looking for Godot… er, Scanning for Rootkits
Chapter 3.
Windows Firewall
Comparing Firewalls
Understanding Windows Firewall
Speaking Your Firewall’s Lingo
Peeking into Your Firewall
Starting, Stopping and Goosing the Inbound Firewall
Making Inbound Exceptions
Coping with Windows 7’s Outbound Firewall
Chapter 4.
Patching and Plugging
Choosing an Automatic Update Level
Setting Your Update Level
Selectively Patching
Getting what you Need from a Security Bulletin
Chapter 5.
Virus Protection and the Big Defender
Understanding Antivirus Software
Caring for Your Antivirus Program
Downloading and Installing AVG-Free
Dealing with Spyware
Book 7: Networking with Windows 7
Chapter 1.
Attaching to a Network
How Homegroups Work
Using Public, Private and Home Networks
Playing WiFi Hide-and-Seek
Chapter 2.
Setting Up Your Own Network
Understanding Networks
Organizing Networks
Cutting Through the Terminology
Making Computers Talk
Chapter 3.
Building Your Network
Planning Your Network
Installing Your Network
Troubleshooting
Chapter 4.
Putting the Why in Wi-Fi
802.11g
Installing a Wireless System
Securing a Wireless Network
Chapter 5.
Connecting to Windows Home Server
Book 8: Using Other Hardware
Chapter 1: Finding and Installing the Hardware You Want
Understanding Hardware Types
Upgrading the Basic Stuff
Choosing a New Monitor
Picking a Video Adapter
Upgrading Keyboards
Choosing a Mouse – or Alternatives
Key Drives, SuperFetch, and ReadyBoost
USB Hubs
Installing New Hardware
Chapter 2: Using Device Stage
Chapter 3: Adding a Second (or Third) Hard Drive
Choosing a Second Hard Drive
Interfaces for Disk Drives
Installing a new SATA Hard Drive
Troubleshooting
Chapter 4: Picking Printers/Scanners/Faxes
Evaluating Printers
Installing a Printer
Using the Print Queue
Troubleshooting