1
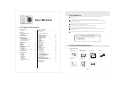
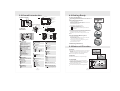
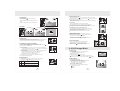
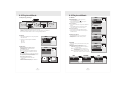
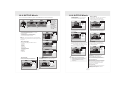
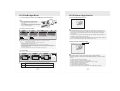
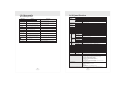
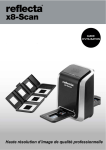
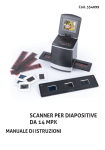
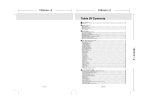
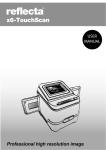
English
-i-
English
- ii -
English
- iii -
English
- iv -
2.0 Cautions
Do not try to disassemble the camera by yourself, which may damage the camera or cause
electric shock.
User Manual
Do not fire the flash in a close distance (less than 1 meter); it may hurt your eyes.
Keep the camera away from the reach of children or animals to prevent them from swallowing the
batteries or small accessories.
Stop using the camera if any kind of liquid or foreign object enters the camera. If it happens, power
off the camera and contact your dealer for help.
Do not operate this camera with wet hands; it may cause electric shock.
1.0 Table of Contents
1.0 Table of Contents
------------------- 1
1.1 Total pages - - - - - - - - - - - - - - - - - - - - - - - - - - 1
2.0 Cautions
7.0 Movie Clip Mode - - - - - - - - - - - - - - - - - - - - - - - - 7
7.1 Movie Recording - - - - - - - - - - - - - - - - - - - - - - - - - 7
7.2 Movie Size - - - - - - - - - - - - - - - - - - - - - - - - - - - - - - 7
--------------------------- 2
3.0 Overall Introduction- - - - - - - - - - - - - - - 2
3.1 Accessories- - - - - - - - - - - - - - - - - - - - - - - 2
3.2 External View- - - - - - - - - - - - - - - - - - - - - - 3
3.3 Display Information - - - - - - - - - - - - - - - - - 3
6.0 Still Image Mode - - - - - - - - - - - - - - - - - - 6
6.1 Shooting- - - - - - - - - - - - - - - - - - - - - - - - 6.2 Menu Mode - - - - - - - - - - - - - - - - - - - - - - 6.2.1 Size - - - - - - - - - - - - - - - - - - - - - - - - - 6.2.2 Quality - - - - - - - - - - - - - - - - - - - - - - - 6.2.3 Sharpness- - - - - - - - - - - - - - - - - - - - - 6.2.4 Saturation - - - - - - - - - - - - - - - - - - - - - 6.2.5 Effect - - - - - - - - - - - - - - - - - - - - - - - - 6.2.6 W.Balance- - - - - - - - - - - - - - - - - - - - - 6.2.7 Scene Mode - - - - - - - - - - - - - - - - - - - 6.2.8 Shooting & Continuous - - - - - - - - - - - - 6.2.9 ISO - - - - - - - - - - - - - - - - - - - - - - - - - -
6
6
6
6
7
7
7
7
7
7
7
It is normal that the temperature of the camera body rises if the camera works for a long time.
Small Tip to Save You Big Headache
A digital camera is in a way very similar to a computer. If the digital
camera hangs itself during operation, please follow the procedures
below and most likely the camera can be re-activated.
1. Remove the battery.
2. Reload the battery.
3. Switch on the camera.
9.0 Playback Mode - - - - - - - - - - - - - - - - - - - - - - 8
9.1 Playback of Still lmage - - - - - - - - - - - - - - - - - - 8
9.2 Playback of Movie Clip - - - - - - - - - - - - - - - - - - 8
9.3 Thumbnail Display - - - - - - - - - - - - - - - - - - - - - 8
9.4 Exploring an image - - - - - - - - - - - - - - - - - - - - 9
9.5 Slide - - - - - - - - - - - - - - - - - - - - - - - - - - - - - - - 9
9.6 Protect - - - - - - - - - - - - - - - - - - - - - - - - - - - - - 9
9.7 Delete - - - - - - - - - - - - - - - - - - - - - - - - - - - - - - 10
9.8 Copy To Card - - - - - - - - - - - - - - - - - - - - - - - - - 10
9.9 DPOF - - - - - - - - - - - - - - - - - - - - - - - - - - - - - - 10
4
4
4
4
5.0 Buttons & Function- - - - - - - - - - - - - - - - - - - 4
5.1 Power - - - - - - - - - - - - - - - - - - - - - - - - - - - 4
5.2 Shutter - - - - - - - - - - - - - - - - - - - - - - - - - - 4
5.3 Tele / Wide- - - - - - - - - - - - - - - - - - - - - - - - 4
5.4 Playback- - - - - - - - - - - - - - - - - - - - - - - - - 5
5.5 Mode - - - - - - - - - - - - - - - - - - - - - - - - - - - 5
5.6 Menu / OK - - - - - - - - - - - - - - - - - - - - - - - - 5
5.7 Up/Play & Pause/Voice Memo - - - - - - - - - - - 5
5.8 Right/Flash - - - - - - - - - - - - - - - - - - - - - - - 5
5.9 Down/Delete & +/- - - - - - - - - - - - - - - - - - - 6
5.9.1 EV (+/-)- - - - - - - - - - - - - - - - - - - - - - - - 6
5.9.2 Night Scene Long Time Shutter (LT) - - - - - 6
5.10 Left/Self-Timer- - - - - - - - - - - - - - - - - - - - 6
5.11 Focus Switch - - - - - - - - - - - - - - - - - - - - - 6
To avoid electricity leakage, please remove the battery if the camera is expected not to be in use
for a long period.
8.0 Voice Recording Mode ----------------- - 7
4.0 Getting Ready - - - - - - - - - - - - - - - - - - - - 4
4.1 Turn on/off Camera- - - - - - - - - - - - - - - - - 4.2 Loading the batteries - - - - - - - - - - - - - - - 4.3 Insert / Remove Memory Card- - - - - - - - - - 4.4 Attaching Wrist Strap - - - - - - - - - - - - - - - -
The camera may be damaged in an environment of high temperature.
10.0 Set Up Mode- - - - - - - - - - - - - - - - - - - - - - - - 11
10.1 Auto Off - - - - - - - - - - - - - - - - - - - - - - - - - - - 11
10.2 Language - - - - - - - - - - - - - - - - - - - - - - - - - - 11
10.3 Format - - - - - - - - - - - - - - - - - - - - - - - - - - - - 11
10.4 Date Input - - - - - - - - - - - - - - - - - - - - - - - - - - 11
10.5 Imprint - - - - - - - - - - - - - - - - - - - - - - - - - - - - 12
10.6 Beep - - - - - - - - - - - - - - - - - - - - - - - - - - - - - - 12
10.7 Light Frequency - - - - - - - - - - - - - - - - - - - - - - 12
10.8 Quick View - - - - - - - - - - - - - - - - - - - - - - - - - - 12
10.9 System Reset - - - - - - - - - - - - - - - - - - - - - - - 12
10.10 USB - - - - - - - - - - - - - - - - - - - - - - - - - - - - - 12
10.10.1 PC Cam - - - - - - - - - - - - - - - - - - - - - - - - - 12
10.10.2 Disk Drive- - - - - - - - - - - - - - - - - - - - - - - - 12
10.10.3 Printer - - - - - - - - - - - - - - - - - - - - - - - - - - 12
3.0 Overall Introduction
3.1 Accessories
Digital Camera
Camera Driver &
Software CD
User Manual
Wrist Strap
Camera Pouch
2xAA Batteries
11.0 PictBridge Mode - - - -- - - -- - - - -- - - - -- - - - - 13
11.1 Connecting the Camera to
a PictBridge-supported Printer - - - -- - - - -- - - - - 13
11.2 Select pictures to print -- - - -- - - - -- - - - -- - - - - 13
11.3 Custom Set-- - - - -- - - - -- - - -- - - - -- - - - -- - - - - 13
12.0 Software Application- - - -- - - - -- - - - -- - - - - 14
12.1 ArcSoft Medialmpression - - -- - - - -- - - - -- - - - - 14
12.2 Easy Link with YouTube by Arcsoft - - - - -- - - - - 14
13.0 Appendix-- - - - -- - - - -- - - -- - - - -- - - - -- - - - - 15
14.0 Specification - - - - -- - - - -- - - - -- - - -- - - - -- - 16
1
2
USB Cable
4.0 Getting Ready
3.0 Overall Introduction
3.2 External View
LCD Montior
Back
Flash LED
Front
LED indicator
Wide/ Tele
Button
Mode Button
Key Function
Button
Lens
Key Function Button
Voice Memo /
Up Button
Tripod
Socket
Play / Pause /
Up Button
OK / Menu
Button
Top
Strap
Eyelet
Self- timer /
Left Button
Down/Exposure/
Delete Button
1
-
+ X 8.0
3
100
9M
Focus
Switch
Side
16
15
Battery
Chamber
14
4
5
6
7
8
Strap Eyelet
16
17
2
Memory
Card Slot
13
12
USB
Connector
11
100
10
Battery Charmber/
Memory Card/
9
1
Battery Status
( )Battery Full
( )Battery Half Drained
( )Battery Drained
2
Working& Scene Mode
( )Image Shooting Mode
( )Playback Mode
( )Movie Clip Mode
( )Voice Recording Mode
( ) Auto Mode
( ) Sport Mode
( ) Night Mode
( ) Portrait Mode
( ) Landscape Mode
( ) Backlight Mode
(
) Voice Memo
) WARNING:
Holding Camera Stable
Focus Range
( ) Macro
5
Self-timer
( )10 Seconds
2S
( ) 2 Seconds
(
)Memory Card Inserted
13
Sharpness
( )Soft
( )Normal
( )Vivid
8 ISO Value
(
(
(
AUTO
100
200
)Auto
)100
)200
(
(
400
800
) 400
) 800
9
Shooting
( ) Continuous
Single
10
(
4
Flash Mode
( )Auto Flash
( )Fill-in Flash
( )Flash Off
4.2 Loading the batteries
1. Power off the camera.
2. Slide out the battery cover to open it.
3. Follow the polarity indications and load the batteries.
4. Close the Battery Cover.
+
The indication of the battery status.
(
): Battery power is full.
(
): Battery power is half drained.
(
): Battery power is drained. Replace with new
batteries.
Positive
Negative
-
The batteries may run out if the batteries are kept inside
the camera for a long time without using. Please remove
the batteries when the camera is not in use.
o
The battery may not work normally under 0 C or over
o
40 C.
4.3 Insert/Remove Memory Card
1. Power off the camera.
2. Open the Battery Cover.
3. Insert the memory card into the card slot and press
it down until a click sound happens.
4. Please press the memory card again to get it out
once a click sound happens.
5. Close the Battery Cover.
4.4 Attaching Wrist Strap
7
3
(
12
6
By pressing the Power Button can turn on the camera.
By pressing again the Power Button can turn off the camera.
Playback Button
Shutter Button
Power Button
Flash / Right
Button
3.3 Display
Information
4.1 Turn on/off Camera
)Exposure +- 2
11
W. Balance
( )Auto
( )Daylight
( )Cloudy
( )Tungsten
( )Fluorescent
3
14
Quality
( )S. Fine
( )Fine
( )Normal
15
Size
(16M) (Via interpolation)
(9M)
(5M)
(3M)
(VGA)
16
(100) Available Shots
17
Zoom Status Indicator
(
) 8.0X Digital Zoom
5.0 Buttons & Function
5.1 Power
Power
By pressing the Power Button can turn on the camera.
By pressing again the Power Button can turn off the
camera.
If there is no operation during the specified time,
the camera will power off automatically.
Shutter
5.2 Shutter
Press the Shutter Button to capture an image.
5.3 Tele/Wide
Press the Tele Button, the Zoom Bar Indicator
appearing on the top side of the LCD Monitor will
show the current zoom status.
Press the Wide Button, the Zoom Bar Indicator
will go back to the Wide view.
The camera allows maximum 8.0x digital zoom.
4
-
Maximum ( 8.0X)
+ X1.1
21
9M
5.0 Buttons & Function
5.0 Buttons & Function
5.9 Down/Delete & +/-
5.4 Playback
Select the Playback Mode by pressing the
Playback Button ( ).
100-0001
Playback Mode will show still images and movie
clips .
Press the Down Button (
& +/- ) to move the cursor to the down tab.
In Shooting Mode, you can press Delete Button (
) to adjust the EV and
Night Scene Long Time Shutter.
In Playback Mode, you can press Delete Button to delete the Still Image,
Movie Clips or Voice Clips.
5.9.1 EV (+/-)
Select an image by Press Left and Right Button.
21
9M
Press Left/Right Button to set the Exposure Value.
You can adjust from -2.0EV to +2.0EV (at 0.3EV increment).
After the preferred value is chosen press Menu/OK Button to confirm.
The higher the EV value, the brighter the image will be.
5.5 Mode
0.0EV
Still Image
Movie Clip
21
00:00:23
9M
VGA
Voice Recording
00:28:51
5.9.2 Night Scene Long Time Shutter (LT)
21
Press the Down Button, and then select Left/ Light Button to
adjust the value of the Long Time Shutter.
The Long Time Shutter ranged from Auto,1/8,1/4,1/2,1,2,3,4.
Press Menu/OK Button to confirm the value you select.
9M
LT
STANDBY
START : SH
00 : 00 : 06
START:SH
00 : 00 : 00
AUTO
5.10 Left/Self-Timer
Press the Left Button to move the cursor to the left tab.
With the 10 sec. Self-timer (
): Image will be taken after
10 seconds once the shutter is released.
2S
With the 2 sec. Self-timer (
): The image will be taken
after 2 seconds once the shutter is released.
5.6 Menu/OK
Press Menu/OK Button to go to the menu selection.
When the menu is displayed on the LCD monitor, the Menu/OK Button is
used for shifting the cursor to the sub menu or for confirming data.
)
There are two ways you can add your voice over to a stored still image.
1. Shooting Mode
i. Press Voice Memo Button and the icon ( ) will show on LCD Monitor.
ii. Press Shutter Button to take a picture.
iii. You can make a voice memo (10 sec.) right after the image is taken.
2. Playback Mode
i. Select a Still Image File and press Voice Memo Button.
ii. Press the shutter button to start the voice memo.
iii. 10 seconds of voice memo will be recorded.
The Up Button also operates as Play & Pause function to play
movie clip file in Playback Mode.
5.8 Right/Flash
Press the Right Button (
) to move the cursor to the right tab.
The Right Button (
) also operates as Flash function.
Auto Flash
The flash fires automatically as required under shooting mode.
Suggestion for getting a good exposure picture when using
Flash: The camera should keep 1.5~2 meters form the object
you're ready to capture.
Fill-in Flash This m ode will enable the flash to fire in any
Flash Off
21
9M
When you take a shot of a very close-up of object
within the distance of 20 cm, please push the
Focus Switch up to begin the Macro Function.
The Macro icon (
) will appear on the LCD Monitor.
5.7 Up/Play & Pause/Voice Memo
Press the Up Button (
) to move up the submenu cursor.
When the menu is not displayed on the LCD monitor, the Up Button(
operates as voice memo function .
5.11 Focus Switch
6.0 Still Image Mode
6.1 Shooting
Taking a Pictures
1. Press POWER Button to power on the camera.
2. Press Shutter Button fully to capture.
Using the Digital Zoom
Press the zoom lever (
) toward T or W
You are recommended to shoot with the camera attached
with the tripod or other device if the Hand Shaking(
)appears.
6.2 Menu Mode
6.2.1 Size (Default:9M)
This feature is for you to select the image resolution.
(16M) 4608 x 3456 (by interpolation)
( 9M ) 3488 x 2616 ( 5M ) 2560 x 1920
( 3M ) 2048 x 1536 (VGA) 640 x 480
c ircumstances.
6.2.2 Quality (Default: Fine)
The mode will disable the flash to fire in any circumstances.
This feature is for you to select the image quality.
( ) S. Fine (Super Fine)
( ) Fine
( ) Normal
5
Shutter
6
21
9M
9.0 Playback Mode
6.0 Still Image Mode
6.2.3 Sharpness (Default: Normal)
VIVID
6.2.6 W. Balance (Default: Auto)
This effect can turn the edges of
The captured image look sharper but
may result in more image noise.
NORMAL
This effect can turn the edge of the
captured image look sharp, which is
suitable for printing out.
SOFT
This effect can turn the edge of the
captured image look smoother, which
is suitable for image editing on PC.
Turn the image into yellowish
brown.
B&W
Turn the image into black
and white.
6.2.9 ISO (Default: Auto)
Auto
100
200
400
800
Press Playback Button to play the Movie
Clips.
When play the Movie Clips, press the
Menu Button and select 2X, 4X, 8X to
adjust the Fast Forward speed.
Note:The icon (
00:00:14
VGA
Recording
1.Press POWER Button to power on the camera
2.Press MODE Button to convert to Movie Clip Mode
3.Press Shutter Button to start movie recording
4.Press Shutter Button again to stop recording
100-0021
Press the Up Button to play or pause the
movie clip.
00:00:21
00:00:00
PLAY:
When play the Movie Clips, press the
Left/Self-Timer Button to play backward
and press the Menu Button to select the
2X, 4X and 8X Backward speed.
7.0 Movie Clip Mode
7.1 Movie Recording
Operation Steps
9.2 Playback of Movie Clip
1. Single: Single Image Shooting.
2. Continuous Shooting (
): Press Shutter Button
to start the Continuous Shooting function and on
hold and ending by letting go of Shutter Button.
Note: The Continuous Shooting function
will not be cancelled until “ Single” is chosen.
Turn the image into negative
film effect.
Press the Right or Left Button to go to or
back to the next or last image.
1. Playback Button
2. or
6.2.8 Shooting&Continuous(Default:Single)
No special effect is added to
the picture.
100-0021
Please press Playback Button to view the
images taken.
) shows up when
Note: The icon (
viewing still image comes with a voice
memo.
This feature is for you to select the scene of
the image from the follow options:
( ) Auto Mode
( ) Sport Mode
( ) Night Mode
( ) Portrait Mode
( ) Landscape
( ) Backlight
6.2.5 Effect (Default: Normal)
SEPIA
Under the strong light environment
6.2.7 Scene Mode (Default: Auto Mode)
High
Normal
Low
NEGATIVE
Adjusting the white balance automatically
Daylight
Cloudy
Under the cloudy light environment
Tungsten
Under the tungsten light environment
Fluorescent Under the fluorescent light environment
6.2.4 Saturation(Default: Normal)
NORMAL
9.1 Playback of Still Image
Auto
Operation Steps
1. Playback Button
2. or
) on the top left of the LCD Monitor represents a Movie clip, not a still image.
9.3 Thumbnail Display(Small Images)
START:SH
00:00:00
7.2 Movie Size
The video size options are
provided as follows:
1.VGA : 640 x 480
2.QVGA:320 x 240
Menu
Size
W.Balance
Setup
Back
Menu
VGA
Auto
Next Menu
100-0021
Size
VGA
VGA
W.Balance
Auto
Setup QVGA Next Menu
Execute : OK
Back
100-0002
1
2
4
5
3
Execute : OK
8.0 Voice Recording Mode
1. Press Mode Button and select Voice Recording Mode (
).
2. Press Shutter Button to start the recording and press Shutter Button to stop the recording.
3. Press Play/Pause Button (
)
00:28:27
00:28:51
during recording can put
the recording on hold and
press the Play/Pause Button
PAUSE
RECORDING
STANDBY
again to continue the recording.
START : SH
00 : 00 : 00
7
STOP : SH
00 : 00 : 24
00:28:27
Thumbnail Display is a convenient tool for you to find the image you took from
the list. You can press WIDE Button to have Thumbnail Display.
STOP : SH
00 : 00 : 24
8
9.0 Playback Mode
9.0 Playback Mode
9.4 Exploring an Image
9.7 Delete
100-0021
100-0021
100-0021
X 1.6
X 1.6
Menu
Slide
Protect
Delete
Copy to Card
DPOF
Delete Single Image
1.Select the image you'd like to delete and
press the Delete Button (
).
2.Press OK/Menu Button to proceed or press
left button to cancel the request.
Back
Delete All Image(s)
1.Select “ALL" & “Execute” and press the OK/Menu
Button.
2.Press OK/Menu Button to confirm the request
or press left button to cancel the request.
1. Press the TELE Button and you can see the enlargement of the image.
2. Use the TELE/WIDE Button to zoom in or to zoom out.
3. Use the UP/DOWN/LEFT/RIGHT Button to locate the position you would like to
review.
4. Press down the WIDE Button to return to the original Playback Mode.
1. This option enables you to view your photos
with slide show.
2. There are 3 interval options available.
(a) 3 sec.
(b) 5 sec.
(c) 10 sec.
Back
Menu
Operation
Steps
Slide
3 sec.
Protect
3 sec. Next Menu
Delete5 sec. Next Menu
Copy to Card
10 sec.
DPOF
Back
1.Menu
2. or
3.OK
Set All Images With Protection
1 . Press the OK/Menu Button and select
"PROTECT".
2. Select "ALL" & “Execute” and press OK/Menu
Button to confirm the request.
Back
This function can only be used when a memory card
is inserted.
This option allows you to put the print quantity
(MAX.30 pcs) on your memory card.
[SINGLE] - specifies the number of copies for a
selected image.
[ALL ] - specifies the number of copies for all
pict ures apart from movie clips and voice
recording files.
Note: You cannot see the "PRINT" function on the
LCD Monitor if a memory card is not inserted.
Operation
Steps
Protect
Single
ALL
Select
1. MENU
2. or
3. OK
4.
or
5. OK
3 sec.
Next Menu
Next Menu
Operation
Steps
1.OK
2. or
3. or OK
Execute : OK
Menu
Slide
Protect
Delete
Copy to Card
DPOF
Back
3 sec.
Next Menu
Next Menu
Operation
Steps
1.OK
2. or
3. or OK
Execute : OK
Execute : OK
DPOF
100-0066
100-0066
1
2
3
1
2
3
4
5
6
4
5
6
SINGLE
ALL
Back
9
Menu
9.9 DPOF
Execute : OK
Back
Execute : OK
Slide
Protect
Delete
Copy to Card
DPOF
100-0066
9.6 Protect
Set Selected Image(s) With Protection
1.Press the OK/Menu Button and select
"PROTECT".
2.Press OK/Menu Button.
3.Select one image and press OK/Menu Button.
4.(
) will show on the LCD Monitor when the
protection is set.
5.Press OK/Menu Button to confirm the request for
the protection of the selected image(s).
6.To cancel the protection, press OK/Menu Button.
Execute : OK
Single
ALL
Select
Delete Selected Image
1.Choose "Select" and press OK/Menu Button.
2.Select the image you'd like to delete and press
OK/Menu Button.
This function allows you to copy the images
stored in the internal flash memory into the
memory card.
1.OK
2. or
3. or OK
Delete
9.8 Copy To Card
9.5 Slide
Operation
Steps
3 sec.
Next Menu
Next Menu
Execute : OK
Operation
Steps
Print Enable
Cancel
Execute
1. MENU
2. or
3.
4.OK
Single
Operation
Steps
Print Nun
Print
1. or
2.OK
0
Back
Execute : OK
10
Back
Execute : OK
Operation
Steps
1. or
2.OK
10.0 SETUP Mode
10.0 SETUP Mode
You can enter SETUP Mode by press the OK/Menu Button and select SETUP.
Setup
Operation
Steps
Setup
Auto
Language
Format
Date Input
Imprint
3.Min.
English
Net Menu
Net Menu
off
Beep
Light Freq.
Q.View
Sys. Reset
USB
On
60Hz
On
Net Menu
Printer
Back
Execute : OK
Back
Execute : OK
1. MENU
2. or
3. OK
4.
or
5. OK
Note:
1.Auto Off
2.Language
3.Format
4.Date Input
5.Imprint
6.Beep
7.Light Freq.
8.Q. View
9.Sys. Reset
10.USB
10.8 Q. View
10.5 Imprint
If you select Q. View “On”, you can view the
captured image on the LCD Monitor.
Q. View is possible only with still image.
This function allows you to print the date
or date & time on the captured image.
Setup
Auto Off
3.Min.
Off
Language
English
Format Date OnlyNet Menu
Date Input
Net Menu
Date & Time
Imprint
off
Back
Operation
Steps
Setup
Beep
Light Freq.On
Q.View Off
Sys. Reset
USB
1. MENU
2. or
3.OK
4.
or
5. OK
Back
Execute : OK
Operation
Steps
Setup
To set up the power saving time.
1. Press OK/Menu Button and select "SETUP".
2. Select "AUTO".
3. Select the time you prefer and press
OK/Menu Button to confirm the setting.
4. You can select "OFF" to cancel.
Note:
If set "OFF", the camera will not turn off automatically.
The battery may get drained if the camera is power on for
a long time.
Auto Off
3.Min.
Language1 Min.
English
Format 3 Min. Net Menu
Date Input
5 Min. Net Menu
Imprint Off
off
Back
Execute : OK
Auto Off
Language
Format
Date Input
Imprint
There are 12 languages available to select:
1.English
2.French
3.German
4.Italian
5.Spanish
6.Portuguese
7.Traditional Chinese
8.Simplified Chinese
9.Japanese
10.Thai
11.Turkish
12. Russian
Back
3.Min.
English
Net Menu
Net Menu
off
1. MENU
2. or
3. OK
4.
or
5. OK
Operation
Steps
English 3.Min.
Auto
LanguageFrancais English
Deutsch
Format
Net Menu
Date InputItalionoNet Menu
Imprint Espanol
off
1. MENU
or
2. or
2.OK
3.
4.
or
5. OK
10.4 Date Input
This function allows you to set up the type of
date & time.
Auto Off
3.Min.
LanguageCancel English
Format Execute Net Menu
Date Input
Net Menu
Imprint
off
Back
Setup
Auto Off
3.Min.
Language
English
Off
Format
Net Menu
Execute Net Menu
Date Input
Imprint
off
1. MENU
2. or
3.OK
4.
or
5. OK
Back
Execute : OK
11
Setup
1. MENU
2. or
3.OK
or
4.
5. OK
Beep
On
Light Freq.
50Hz
Q.View Cancel
On
Sys. Reset
Net Menu
Execute
USB
Disk Drive
Back
The Light Frequency setting is for Anti-flicker.
50Hz: UK, Germany, Italy, Spain, France,
Netherlands, China, Japan, Portugal.
60Hz: U.S.A., Taiwan, Korea, Japan.
Beep
Light Freq.
Q.View 6OHz
Sys. Reset
50Hz
USB
On
50Hz
On
Net Menu
Disk Drive
Operation
Steps
Execute : OK
Operation
Steps
1. MENU
2. or
3.OK
or
4.
5. OK
10.10 USB
You can select an external device to
which you want to connect the camera
by using USB Cable.
Setup
Back
Back
Operation
Steps
Execute: OK
Beep
On
Light Freq.
50Hz
PC Cam
Q.View
On
Disk
Drive
Sys. Reset
Net Menu
Printer Disk Drive
USB
1. MENU
2. or
3.OK
or
4.
5. OK
Operation
Steps
1. MENU
2. or
3.OK
4.
or
5. OK
Execute : OK
Execute : OK
10.10.1 PC Cam:
a. Install the PC Cam Driver on your
computer.
b. Select USB setting as PC Cam.
c. You can start PC Cam function after you
set up the MSN messenger or AMCAP.
Set: :OK
OK
Execute
This function allows you to format the
memory card or the built-in flash memory.
Operation
Steps
Operation
Steps
Execute : OK
Setup
10.3 Format
Setup
On
50Hz
On
Net Menu
Disk Drive
10.7 Light Freq.
Execute
Set: :OK
OK
Language
Setup
Back
Setup
Beep
Light Freq.
On
Q.View
Off
Sys. Reset
USB
Execute : OK
This function is to recall all default values
except the Date, Time and Language.
This function allows you to switch on/off
button sound.
Back
Operation
Steps
Setup
10.2 Language
1. MENU
2. or
3. OK
4.
or
5. OK
6. Or
7.OK
1. MENU
2. or
3.OK
4.
or
5. OK
10.9 Sys. Reset
10.6 Beep
10.1 Auto Off
On
50Hz
On
Net Menu
Disk Drive
Operation
Steps
Note: The horizontal flicker in
artificial light source environment
occurred if select the wrong
frequency.
10.10.2 Disk Drive:
When Disk Drive is selected, the camera
will automatically go to the connected Disk
Drive and turn off LCD Monitor. You can
have a new movable disk to download
images to your computer.
1. MENU
2. or
3.OK
or
4.
5. OK
10.10.3 Printer:
Connect with printer and select Printer via
PictBrdge function, you can select the
detailed options of printer.
1. YYYY/MM/DD
2. DD/MM/YYYY
3. MM/DD/YYYY
12
12.0 Software Application
11.0 PictBridge Mode
11.1 Connecting the Camera to a PictBridge-supported Printer
12.1 ArcSoft MediaImpression™
1. Power On both the camera and the printer.
2. Press the MENU Button to go to SETUP Mode.
3. Go to USB and select PRINTER for printer
connection.
4. Use the supplied USB Cable to connect the camera
to the PictBridge-supported printer as shown above
to print out the stored images.
11.2 Select Pictures to Print
PictBridge
Images
Size
Layout
Print
Next Menu
Default
Default
Execute : OK
Operation
Steps
Next Menu
Next Menu
Back
Operation
Steps
1. or
2.OK
All
Select
Images
Select
All
Print Num
Execute : OK
00
Print Num
00
Execute : OK
Execute : OK
1. or
2.OK
3.OK
[SELECT]: The PictBridge function will be applied only to the picture currently
displayed on LCD Monitor.
: The PictBridge function will be applied to all pictures .
!ArcSoft MediaImpression™ manages your media for you, and gives you
tons of fun and exciting ways to create and share projects featuring your
photo, video, and music files. Edit, enhance and add creative effects to
your photos.
!Create your own movies or photo slide shows,complete with soundtrack.
!Upload your files easily to YouTube™!
!Or share them through simple email attachments or popular photo printing.
!For more information click to http://www.arcsoft.com/ .
12.2 Easy Link With YouTube by Arcsoft
[ALL ]
Click “ Extra ”
Setting the Number of Copies to Print
1.Select [SELECT] or [ALL] where you can set the number of copies to print.
2.Press the Up/Down Button to select the number of print out copies. Maximum 30 prints.
3.Use the Left/Right Button to select images and select the number of prints for another picture.
4.Press OK Button to save.
5.Go back to PictBridge main menu and select PRINT to start printing.
11.3 Custom Set
You can select the Paper Size and Layout before print out the images.
PictBridge
Images
Next Menu
Default
Size
Default
2L Format
Layout
Default
4X6
Print
Execute : OK
SIZE
LAYOUT
PictBridge
Images
A4
Size
Layout
Print
PictBridge
Next Menu
Default
Default
Images
Next Menu
Default
Size
Default
Index
Layout
Default
Borderless
Print
Execute : OK
Execute : OK
Setting the size of the printing paper. The size formats will depends on the printer
supported function.
Setting the number of pictures to be printed on a sheet of paper.
13
Operation
Steps
1. or
2.OK
!Be a Movie Maker by login & upload with Legal and Safety Software.
!Browse & Upload in YouTube with ArcSoft MediaImpression by follow the steps
below:
1. Select “YouTube Account Setup”.
2. Select “Step 1” to login YouTube account.
3. Select “YouTube Account” or “Google Account” to login.
4. Select “Step2” to get authorization.
5. Click “Allow” to get permission.
6. User will see “User Name” after login.
7. Select the file you want to upload and click “Upload to YouTube”
14
13.0 Appendix
14.0 Specification
Error Message Table
Messages
CARD FULL
MEMORY FULL
Image
Causes
Solutions
There is insufficient card memory capacity
for storing an image.
There is insufficient internal memory
capacity for storing an image.
CARD LOCKED
(ICON BLINKING)
The memory card is under protection.
LOCK
The Image can not be deleted under
protection.
Type
1/2.3″ 9M CMOS Sensor
Sensor
Effective Pixels
Approx. 9.12 Mega Pixels (3,488 x 2,616)
Lens
Lens Type
Fixed Focus
F No.
F3.25
Digital Zoom
Still Image mode: 1.0X ~ 8.0X
Delete the stored image(s) in the memory card or
insert a new memory card.
Delete the stored image(s) in the flash memory.
Play mode: 1.0X ~ 8.0X
LCD Display
Set the card protection switch at non-protection
position.
Focusing
Unlock the protected image.
Shutter
2.4" Color TFT LCD
Type
MF (manual focus)
Range
Normal: 1.2M ~ infinity
Type
Electronic Shutter
Speed
Normal: 1/4 sec. - 1/4000 sec., Night Scene: 4 sec. - 1/8 sec.
Macro: 20cm
NO IMAGE
There is no image stored in the memory
card or built-in flash memory.
Exposure
Control
Program AE
ISO Equivalent
Auto, 100, 200, 400, 800
FILE ERROR
File format error.
Insert a new memory card or format the built-in
flash memory.
Flash
Modes
Auto, Fill-in Flash, Flash Off
Effect
Normal, Sepia, Negative, B&W
MEMORY ERROR
Memory is damaged or fails.
Format the memory card or built-in flash memory.
Sharpness
Soft, Normal, Vivid
White Balance
Auto, Daylight, Cloudy, Fluorescent, Tungsten
Voice Recording (depends on capacity)
CARD ERROR
Card is damaged or fails.
Insert a new memory card.
Voice recording
LOW BATTERY !
(ICON BLINKING)
Battery power is drained.
Insert a new battery.
Date Imprinting
LOW LIGHT!
The environment is too dark in Flash off or
"Night Scene''.
Voice Memo in Still Image (max. 10 sec.)
HAND SHAKE ICON
The environment is too dark in Flash off or
"Night Scene''.
Avoid shake.Set the flash mode at Auto Flash or Fill -in
Flash.
NO PAPER!
Paper has run out.
Please put more paper in the paper tray of the Printer.
Shooting
Set the flash mode at Auto Flash or Fill-in Flash.
1. Remove the battery.2. Reload the battery.
3. Switch on the camera.
Storage
Camera Hangs
Date, Date & Time, Off (user selectable)
Still
Mode
Image
Image Size
[16M]: 4608 X 3456 pixels (by interpolation),
Image Quality
Super Fine, Fine, Normal
Single Image, Continuous Shooting (VGA, 3M, 5M, 9M with 3 shots)
[9M] : 3488 X 2616 pixels
[5M]: 2560 X 1920 pixels, [3M]: 2048 X 1536 pixels, [VGA]: 640 X 480 pixels
10 sec. , 2 sec.
Self-Timer
Scene mode
Auto, Sport, Night, Portrait, Landscape, Backlight
Movie
Movie Size
QVGA (320x240),VGA (640x480)
Clip
Frame Rate
QVGA (25~30fps),VGA (15~20fps)
Zoom
Digital Zoom: 1.0X ~ 8.0X
Internal memory: 16MB Nand Flash
Media
External memory: supporting SDHC card (up to 8GB)
File
Still Image
JPEG (DCF), EXIF 2.2, DPOF 1.1, PictBridge 1.0
Format
Movie Clip
MJPEG, 320x240 (QVGA), 640x480(VGA), with audio
Audio
Audio for Voice Recording and Memo: WAV
PictBridge (Direct Printing)
Yes
Image Play
Single Image, Thumbnails, Slide Show, Movie Clip
Type
Digital output connector: USB 1.1, TV output: N/A
Interface
Other interface: MIC-in, Buzzer Out (No Speaker)
2 pcs of AA alkaline, Ni-MH Battery
Power Source
Dimensions (WxHxD)
87.8 x 60.8 X 30.4 mm
Weight
Approx.85g (without battery and card)
Software
Camera Driver
Storage Driver (2000, ME, XP, Vista32/64) & (Mac OS:10.0 or later)
PC Cam Driver (2000, ME, XP, Vista32)
Application
Arcsoft MediaImpression(Windows: 2000/XP/Vista)
System Requirements
For Windows
PC with processor better than MMX Pentium 233MHz
(XP: Pentium II 300MHz)
Windows 2000 Professional (SP4)/Windows ME/
Windows XP (SP2)/Window Vista
Minimum 64MB RAM (XP: 128MB)
140MB of available hard-disk space
USB port (1.1 or 2.0 standard interface)
CD-ROM drive
800×600 pixels, 16-bit color display compatible monitor
(24-bit color display recommended)
For Macintosh
Power Mac G3 or later
Mac OS 10.0 or later
Minimum 64MB RAM
110MB of available hard-disk space
USB port,
CD-ROM Drive
QuickTime 6.0 or Later for MPEG4 Movie Clip
“Specifications and product design are subject to change without any notice for further improvement”
15
16