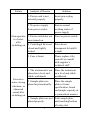
1
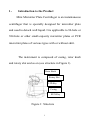
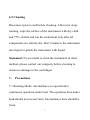
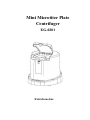
Mini Microtiter Plate
Centrifuger
EG-0201
ExtraGene,Inc.
1.
.
Introduction to the Product
Mini Microtiter Plate Centrifuger is an instantaneous
centrifuger that is specially designed for microtiter plate
and used to detach wall liquid. It is applicable to 96-hole or
384-hole or other small-capacity microtiter plates or PCR
microtiter plates of various types with or without skirt.
The instrument is composed of casing, rotor knob
and rotary slot and so on (see structure in Figure 1).
Rotor Knob
Rotary Slot
LID Key
Casing
RUN Key
Figure 1: Structure
1
2.
.Specification and Model
EG-0201
3.
Basic Parameters
Please properly
Size (mm)
222*220*190
Power
use the voltage
to meet local
charge
Max
Rotating
Speed
2500r/min
Max
Capacity
Two pieces
of
microtiter
plates
Max
Centrifugal
Force
500g
Weight
2.3kg
≤70dB
Relative
Deviation
of Rotating
Speed
≤10%
Noise
4.
. Installation
4.1 Requirement on Installation Area
a) It should be installed on a stable workbench within a
dry and clean room and be away from direct sunshine.
2
b) Separated ground wire should be equipped in the room
to ensure safety while using electricity.
4.2 Installation of Main Machine
a) It should be installed on a stable workbench which
surface shall be arranged to be level through inspection
with a level gauge to ensure that all of its feet contact the
workbench surface.
b) The gap between any side of the instrument and wall
should be more than 10Cm to guarantee well ventilation.
c) No foreign matters may be left around the instrument.
The instrument should not be placed at a location where
switching-off is difficult to realize.
5.
. Normal Working Conditions
a) Ambient Temperature: 5℃~40℃
b) Relative Humidity: ≤85%
3
c) Atmospheric Pressure: 860hPa-1060hPa
d) Power Supply: Please properly use the voltage to meet
local charge
e) No conductive dust, explosive gas or corrosive gas is
allowed in the room.
6.
. Utilization Methods
6.1 Operation
Mini-p25 Mini Microtiter Plate Centrifuger should be
placed on a clean and stable workbench and well
ventilation should be maintained. Insert a plug of power
cord in shape of “Mickey Mouse” into the power socket
behind the instrument, and connect the other end of the
cord with power socket. When using this instrument, adjust
power switch to “I”, which indicates the power supply is
on. To avoid spill of sample while a sample plate is put into,
4
or taken out of rotary slot, please properly seal sample with
plate sealing film.
Firstly, open centrifugal lid (if centrifugal lid is in
locked state, please press “LID” Key to unlock it), then
adjust rotor knob by hand to make rotary slot aligned with
the inlet of the instrument. Afterwards, vertically put sealed
sample plate into rotary slot, then put the second sample
plate into rotary slot in the same manner. If there is only
one piece of sample plate when using this instrument, it is
necessary to fetch another sample plate of the same
specification, and add solution of the same weight (water is
allowed) and place the plate into the second rotary slot
after properly sealing so as to ensure balance of the two
rotary slots. Close centrifugal lid, and press down “RUN”
Key to run this instrument. The instrument will not work if
5
“RUN” Key is pressed down before the lid is closed. In
general, the centrifugal effect of experiment can be
basically achieved after “RUN” Key has been pressed
down for 15 seconds. After your hand is loosened, the rotor
will run at a speed lower and lower. Press down “LID” Key
to open centrifugal lid after the rotor entirely stops, then
adjust rotor knob by hand to make rotary slot aligned with
the outlet of the instrument; take out the sample plate, then
take out the second sample plate in the same manner.
6
6.2 Cleaning
Disconnect power cord before cleaning. After rotor stops
running, wipe the surface of the instrument with dry cloth
and 75% alcohol and run the instrument only after all
components are entirely dry. Don’t immerse the instrument
into liquid or splash the instrument with liquid.
Statement: If you intend to clean the instrument in other
method, please contact our company before cleaning to
ensure no damage to the centrifuger.
7.
. Precautions
7.1 Running Mode: intermittence is required after
continuous operation under load. The operation time under
load should not exceed 1min. Intermittence time should be
3min.
7
7.2 Do not touch rotor by hand or move this instrument
before rotor stops running.
7.3 Unsealed sample plate shall not be used to prevent
liquid from leaking into the instrument.
7.4 Please ensure that the sealed surface of microtiter plate
faces the middle of rotor, and plate bottom is placed toward
outside of rotor.
7.5 Please ensure that microtiter plate is entirely pushed
until reaching the bottom of rotary slot before running this
instrument.
7.6 The instrument should be placed on a level and stable
workbench.
7.7 Do not move this instrument when centrifuger is
running.
2
7.8 Do not run the centrifuger with use of flammable,
explosive, hazardous or volatile materials, or the materials
prone to chemical reaction and production of a large
quantity of hazardous gas or harmful microbe.
7.9 Operator is forbidden to lean on the centrifuger or leave
it when it is working.
7.10 During utilization, be careful while handling. Do not
use it in an environment with high level ultraviolet.
7.11 During utilization, it is forbidden to use strong acid,
strong alkali and corrosive materials to prevent its
protective casing and other parts from corrosion.
7.12 Please carefully read the instructions before use. The
protection provided for the instrument might be damaged if
the instrument is used in a method that is not
3
specified herein.
7.13 When the instrument reaches the highest rotating
speed, it will probably have slight vibration. If the
vibration is excessive, it indicates that the two loads of
rotor are not balanced; at this time, please stop running the
instrument. Please use the microtiter plate of the same
brand, specification and sample capacity, and run this
instrument only after the two loads are balanced.
7.14 Only our company or designated agency may inspect
the instrument or replace its parts.
7.15 Check protective casing and rotor before operation.
7.16 If obvious displacement occurs due to imbalance of
the instrument, please loose the key to stop running.
8.
. Simple Troubleshooting
4
Failure
Analysis of Reason
Solution
1. Power cord is not
inserted properly.
Insert power plug
properly.
2. No power supply
from power socket.
Ensure normal
working status of
power supply.
Non-operatio 3. Power switch has not
n of rotor
been turned on.
after
switching on 4. Centrifugal lid is not
closed and tightly
locked.
5. Fuse is burnt.
Turn on power switch.
Press down
transparent lid until it
is tight.
Please replace it by
yourself or consult
with supplier’s
technical staff.
1. The instrument is not Place the instrument
placed on a level and
on a level and stable
stable workbench.
workbench.
Excessive
noise, strong
vibration, or
abnormal
sound after
switching on
2. Sample plates are
placed asymmetrically.
Place the sample
plates of same
specification, brand
and sample capacity in
a symmetrical manner.
3. Sample plates are not Push sample plate
placed properly.
until reaching bottom
of rotary slot.
5
6