1
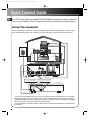
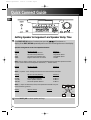
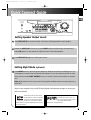
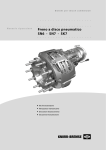
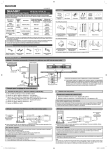
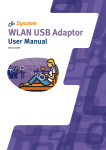
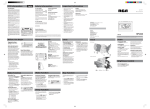
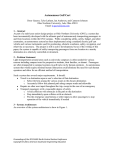
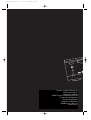
RT2500-quickstart 5/26/00 2:54 PM Page 2
Y
STANDB
MUTE
PHONES
Thomson Consumer Electronics
10030 N. Meridian St.
Indianapolis, IN46290
©2000 Thomson Consumer Electronics
Trademark(s) ® Registered
Marca(s) Registrada(s)
Marque(s) ® Deposée(s)
55094650 (Rev 0 EN/ F/ E)
www.rca.com
RT2500-quickstart 5/26/00 2:54 PM Page 3
q u i c k
c o n n e c t
VOLUME
al
HT
OFF
DSP
CONCERT
STADIUM
H
CHURC
THEATER
DE
P.SCAN
I
I
I
I
SURR. MO
E
TR
CLUB
BL
E
A
AREN
6 CH
UP
TEST/ SET
EQ
PRESET
BYPASS
S-VIDEO
SET
DEMO
G
VCR-2
TUNIN
VCR-1
VCR 2
VIDEO
L
AUDIO
R
g u i d e
BASS
NIG
LEV E L
Digitd
Sounessor
Proc
SAT
DVD
TAPE
TV
MULTI
JOG
FM/ AM
CD
R
R AUDIO
HOME
VIDEO
RECEIVE
THEATE
RT2500/RT2500R
Audio/Video Receiver
RT2500-quickstart 5/26/00 2:54 PM Page 4
Quick Connect Guide
EN Your DTS/ Dolby Digital equipped RT-2500/ RT-2500R can reproduce realistic theater-like
sound in your listening room. For fast results, follow the quickstart procedures below:
Connect the components
Connect the speakers, TV and video component equipped with DTS/ Dolby Digital system, for example, DVD
player with DTS/ Dolby Digital. (For connections of other audio/video components, refer to user manual.)
TV
To video input
To S-video input
Centre Speaker
Front Speaker
POWER/STANDB
Y
Audio Video
Integrated
Receiver
Digital
Sound
Processo
D I G I TA L
r
ATE
R
AM/F
M
T
V
SOUND PROCESS
OR
NA
AR E
OFF
LEVE
L
MULTI JOG
CHUR
CH
M
VCR 2
TAPE
ITAL
THE
VCR 1
DIG
CERT
CON
CD
TREBL
E
TUNIN
G
ODE / SE
P.SCA
N
SURR.MOD
E
DEM O
TEST / SET
UP
PRESET EQ
T
DV
D
HT
PHONE
S
DS
S
NIG
Optional
powered
subwoofer
VCR 2
SVIDEO
VIDE
O
L AUDIO R
BASS
Front Speaker
Subwoofer
Rear
Speaker
Rear Speaker
Digital Optical cable (not supplied)
between digital optical terminals
Digital coaxial cable (not supplied)
between digital coaxial terminals
e.g.: DVD PLAYER
VIDEO OUT
VIDEO S VIDEO
DIGITAL
PCM/DOLBY
DIGITAL COAXIAL
To video output
or
To S-video output
- You can connect the DVD player to the receiver via coaxial, optical or analog cables, but to enjoy DTS/
Dolby Digital sound, coaxial or optical cable connection is necessary. We recommend the following connections when SDET is ON - CD to Coaxial, SAT to Optical 1 and DVD to Optical 2. Otherwise, turn SDET to
OFF to match with your own favourable connections (see p.3).
- Tip: For RT2500 that comes with speakers, make sure the colors of suppied speaker wires and terminals
are matched.
1
RT2500-quickstart 5/26/00 2:54 PM Page 5
Quick Connect Guide
EN
Digital
Sound
Processor
VOLUME
STANDBY
STADIU
M
CONCERT
THEATER
CHURCH
ARENA
DSP OFF
CLUB
NIGHT
I
3
P.SCAN
SURR. MODE
6 CH
LE
EB
TR
I
TUNING
I
MUTE
I
LE V
EL
BASS
2
TEST/ SET UP PRESET EQ BYPASS
DVD
SAT
VCR-1
VCR-2
CD
FM/ AM
TV
TAPE
SET
DEMO
PHONES
HOME THEATER AUDIO VIDEO RECEIVER
5
VCR 2
S-VIDEO
VIDEO
L
AUDIO
R
MULTI JOG
Turning on the Power
1
Plug the AC power cord into a standard
household 120V AC outlet. Right after you
plugged in the power, a demo message
TV
ON OFF
VCR1
2
DVD•6 CH VCR2 AM•FM SAT•CABLE
3
CD
TAPE
CH +
will appear on the display.
CH -
ID
GU E•
MUTE
RDM•P
INFO•RDS
TY
ON/ OFF button on the remote to turn on the receiver.
O BAC
G
Press the POWER/ STANDBY Button on the receiver or the
K•
DISK
VOL
VOL
2
OK
3
4
Press DVD button.
Turn on your DVD player to play a Dolby Digital DVD.
MENU
CLEAR
1
2
3
4
5
6
7
8
9
INPUT•SEEK
ANT•FMS
0
REVERSE PLAY FORWARD
RECORD
Digital Input Setting
5
The receiver has defaulted the digital input to Optical. If you
STOP
PAUSE
AUDIO DIGITALLEVEL SURR
5
u n i v e r s a l
are not using optical input, press SET/DEMO and rotate the
MULTI JOG to change to Coaxial or Analog to match your connection.
Note: to check the connected digital input, press the appropriate source button (e.g. DVD) on the receiver.
The receiver will now automatically shift to Dolby Digital surround mode.
2
RT2500-quickstart 5/26/00 2:54 PM Page 6
Quick Connect Guide
EN
Digital
Sound
Processor
VOLUME
STANDBY
STADIU
M
CONCERT
THEATRE
CHURCH
ARENA
CLUB
DSP OFF
NIGHT
LE V
EL
BASS
I
I
P.SCAN
SURR. MODE
6 CH
DVD
CD
VCR-1
DSS
AM/FM
AM/FM
TEST TONE
6
P.EQ
LE
EB
TR
I
TUNING
I
POWER
SPKR IQ
VCR-2
SET
DEMO
7
PHONES
TV
S-VIDEO
VIDEO
L
AUDIO
R
MULTI JOG
HOME THEATRE AUDIO VIDEO RECEIVER
Setting Speaker Arrangement and Speaker Delay Time
6
Press TEST/ SET UP button for about two seconds. L/R SML will be shown on
display. Press TEST/ SET UP repeatedly until one of the followings shows on the display:
Speaker Arrangement Control and Speaker Distance
Display
L/R
C ch
SURR
SUBW
What to choose
Choose front speaker size
Choose center speaker size
Choose surround speaker size
Register subwoofer connection
Selection
Large/Small*
Large/Small*/None
Large/Small*/None
Yes*/No
Note: You can skip the above part if you purchase RT2500 that supplied with speakers and subwoofer as the receiver has already been calibrated. ( * - default values )
Display
PHASE
What to choose
Subwoofer phase
Selection
+ / -**
Note: ** Try both + and - settings and select the one that has better bass effect.
Display
L/R 15ft
Cch 15ft
SUR 15ft
What to choose (distance
between listener & speakers)
Front speakers distance
Center speaker distance
Surround speaker distance
Selection
0-40ft***
0-40ft***
0-40ft***
Note: *** input the distances (in feet) of the speakers measured from your
favourite listening position.
Main
Left
What to choose
Smart detect
Selection
On/off
SUR
Rear
Left
7
3
Rotate MULTI JOG to select speaker settings.
Main
Right
C ch
L/R
Display
SDET
Center
L/R
SUR
Rear
Right
RT2500-quickstart 5/26/00 2:54 PM Page 7
Quick Connect Guide
EN
Digital
Sound
Processor
VOLUME
STANDBY
STADIU
M
THEATER
CHURCH
CLUB
ARENA
DSP OFF
NIGHT
11
BASS
8 10
I
P.SCAN
SURR. MODE
6 CH
LE
EB
TR
I
TUNING
I
MUTE
I
LE V
EL
CONCERT
TEST/ SET UP PRESET EQ BYPASS
DVD
SAT
VCR-1
VCR-2
CD
FM/ AM
TV
TAPE
VCR 2
SET
DEMO
PHONES
9
S-VIDEO
VIDEO
L
AUDIO
R
MULTI JOG
HOME THEATER AUDIO VIDEO RECEIVER
Setting Speaker Output Levels
8
Press TEST/ SET UP on receiver briefly. A test tone will be generated in each speaker.
9
Rotate the MULTI JOG on the unit or press LEVEL and then left and rigth arrow buttons
beside OK button on the remote to adjust the level of individual speaker.
10
Press TEST/ SET UP again to confirm your choice.
Setting Night Mode (optional)
11
Press NIGHT button to set the Dynamic Range of different sound (like the difference in volume between normal voices and sounds like explosion) if you are watching a DVD at night.
There are two modes (SOFT, SOFTER) for you to choose in terms of the extend of compression.
Note: Night mode functions only when Dolby Digital enabled components are playing (e.g.
DVD, SAT).
Setup is now complete. Enjoy the DTS/ Dolby Digital entertainment brought to you by your
RCA home theater.
Manufactured under License from Digital
Dolby Digital Manufactured under license
Theater Systems, Inc. US Pat. No. 5,451,942
from Dolby Laboratories. “Dolby”, “Pro
and other world-wide patents issued and
Logic” and the double-D symbol are trade-
pending. “DTS Digital Surround”, are trademarks of Digital
marks of Dolby Laboratories. Copyright 1992-1997 Dolby
Theater Systems, Inc. Copyright 1996 Digital Theater Systems,
Laboratories, Inc. All Rights Reserved.
Inc. All rights reserved.
4