1
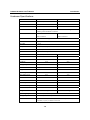
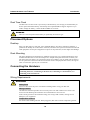
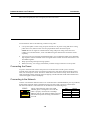
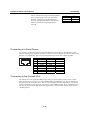
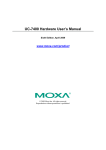
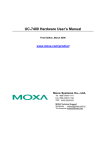
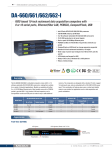
DA-660 Hardware User’s Manual Fourth Edition, December 2009 www.moxa.com/product © 2009 Moxa Inc. All rights reserved. Reproduction without permission is prohibited. DA-660 Hardware User’s Manual The Hardware described in this manual is furnished under a license agreement and may be used only in accordance with the terms of that agreement. Copyright Notice Copyright © 2009 Moxa Inc. All rights reserved. Reproduction without permission is prohibited. Trademarks MOXA is a registered trademark of Moxa Inc. All other trademarks or registered marks in this manual belong to their respective manufacturers. Disclaimer Information in this document is subject to change without notice and does not represent a commitment on the part of Moxa. Moxa provides this document “as is,” without warranty of any kind, either expressed or implied, including, but not limited to, its particular purpose. Moxa reserves the right to make improvements and/or changes to this manual, or to the products and/or the programs described in this manual, at any time. Information provided in this manual is intended to be accurate and reliable. However, Moxa Technologies assumes no responsibility for its use, or for any infringements on the rights of third parties that may result from its use. This product might include unintentional technical or typographical errors. Changes are periodically made to the information herein to correct such errors, and these changes are incorporated into new editions of the publication. Technical Support Contact Information www.moxa.com/support Moxa Americas: Toll-free: 1-888-669-2872 Tel: +1-714-528-6777 Fax: +1-714-528-6778 Moxa China (Shanghai office): Toll-free: 800-820-5036 Tel: +86-21-5258-9955 Fax: +86-10-6872-3958 Moxa Europe: Tel: +49-89-3 70 03 99-0 Fax: +49-89-3 70 03 99-99 Moxa Asia-Pacific: Tel: +886-2-8919-1230 Fax: +886-2-8919-1231 Table of Contents Chapter 1 Introduction ..................................................................................................1-1 Overview.................................................................................................................................. 1-2 Package Checklist....................................................................................................... 1-2 Product Features ......................................................................................................... 1-2 Hardware Specifications............................................................................................. 1-3 Hardware Introduction ............................................................................................................. 1-4 Appearance and Dimensions ...................................................................................... 1-4 Hardware Block Diagram........................................................................................... 1-6 LED Indicators ........................................................................................................... 1-6 Reset-type Buttons ..................................................................................................... 1-7 LCM Screen ............................................................................................................... 1-7 Push Buttons............................................................................................................... 1-7 Real Time Clock......................................................................................................... 1-8 Placement Options ................................................................................................................... 1-8 Desktop....................................................................................................................... 1-8 Rack Mounting ........................................................................................................... 1-8 Connecting the Hardware ........................................................................................................ 1-8 Wiring Requirements ................................................................................................. 1-8 Connecting the Power ................................................................................................ 1-9 Connecting to the Network......................................................................................... 1-9 Connecting to a Serial Device .................................................................................. 1-10 Connecting to the Console Port ................................................................................ 1-10 1 Chapter 1 Introduction Thank you for purchasing the Moxa DA-660 RISC-based ready-to-run embedded computer. The product’s features include 8/16 RS-232/422/485 serial ports, and dual 10/100 Mbps Ethernet ports based on the Intel XScale IXP422 communication processor, which are packed into a standard 1U, 19-inch wide rack-mounted rugged enclosure. These features make DA-660 ideal for industrial environment applications, and let users easily install DA-660 on a standard 19-inch rack. This manual introduces the features and functions of the hardware of the DA-660 series embedded computers. After a brief introduction of the hardware features, the manual focuses on installation and hardware configuration with device interfaces. The following topics are covered in this chapter: Overview ¾ Package Checklist ¾ Product Features ¾ Hardware Specifications Hardware Introduction ¾ Appearance and Dimensions ¾ Hardware Block Diagram ¾ LED Indicators ¾ Reset-type Buttons ¾ LCM Screen ¾ Push Buttons ¾ Real Time Clock Placement Options ¾ Desktop ¾ Rack Mounting Connecting the Hardware ¾ Wiring Requirements ¾ Connecting the Power ¾ Connecting to the Network ¾ Connecting to a Serial Device ¾ Connecting to the Console Port DA-660 Hardware User’s Manual Introduction Overview DA-660 products are RISC-based ready-to-run embedded computers designed for industrial data applications. DA-660 products feature 8 or 16 RS-232/422/485 serial ports and dual Ethernet ports based on the Intel XScale IXP422 communication processor, all packed into a standard 1U, 19-inch wide rack-mounted rugged enclosure. This robust, rack-mountable design provides the hardened protection needed for industrial environment applications, and lets users easily install DA-660 on a standard 19-inch rack. DA-660 products are not only suitable for the IT machine control room, but also for the critical assets found in the control and automation system of industrial plant floors, and even in the electric power utility substation. In order to satisfy diverse industrial applications, DA-660 products provide a wide range of power inputs from 100 to 240V, suitable for both AC and DC power lines. Due to the no hard disk, fan-less and energy efficient design, DA-660 products minimize heat generation, are able to operate 365/7/24 in heavy duty, harsh industrial environments to deliver strongly reliable, powerful computing, and provide the high performance expected of multifunctional controller usage. Choose a pre-installed open standard Linux OS or the commonly used WinCE OS for your software program development. It is very easy to develop your control program with the built-in SDK and follow the common programming procedures used on a standard PC. All the software you develop for your own applications can be stored on the onboard Flash memory. Using DA-660 products, you can easily build a control system with distributed architecture on embedded technologies such as SCADA systems, plant floor automation, and power electricity monitoring applications. Package Checklist Before installing DA-660, verify that the package contains the following items: • • • • • • • • • 1 DA-660 Embedded Computer 19-inch Rack-Mount Kit Quick Installation Guide Document & Software CD Ethernet Cable: RJ45 to RJ45 cross-over cable, 100 cm CBL-RJ45M9-150: RJ45 to DB9 male serial port cable, 150 cm CBL-RJ45F9-150: RJ45 to DB9 female console port cable, 150 cm Power Cord Product Warranty Booklet NOTE: Notify your sales representative if any of the above items is missing or damaged. Product Features • • • • • • • • • Intel XScale IXP422 266 MHz Processor On-board 128 MB RAM, 32 MB Flash ROM 8/16 RS-232/422/485 serial ports Dual 10/100 Mbps Ethernet Standard 19-inch rack-mount installation, 1U height Wide range of power input voltages from 100 to 240V, both AC and DC LCM display and keypad for HMI Ready-to-run Linux/WinCE 5.0 .NET platform Robust, fanless design 1-2 DA-660 Hardware User’s Manual Introduction Hardware Specifications CPU DA-660-16 Intel Xscale, IXP422 266 MHz DA-660-8 Intel Xscale, IXP422 266 MHz RAM 128 MB 128 MB Flash 32 MB 32 MB LAN Auto-sensing 10/100 Mbps × 2 with built-in 1.5 KV magnetic isolation protection RJ45 Connector Serial Port RS-232/422/485 × 16 RS-232/422/485 × 8 RJ45 Connector RJ45 Connector Serial Protection 15 KV ESD for all signals Data Bits 5, 6, 7, 8 Stop Bits 1, 1.5, 2 Parity none, even, odd, space, mark Flow Control RTC/CTS, XON/XOFF, RS-485 ADDC™ Speed 50 bps to 921.6 Kbps Serial Console RS-232 × 1, RJ45 Connector RS-232 × 1, RJ45 Connector USB 2.0 Hosts N/A N/A USB 1.1 Client N/A N/A PCMCIA N/A N/A Storage Expansion N/A N/A 2 × 16 Text Mode 2 × 16 Text Mode Keypad Buttons 4 4 Watchdog Timer Yes Yes Real Time Clock Yes Yes Buzzer Yes Yes Reset Button Reset to Default × 1 Reset to Default × 1 Power Input 100 to 240 VAC/VDC 100 to 240 VAC/VDC 15W 15W 197 × 125 × 44 mm 197 × 125 × 44 mm 2.7 kg 2.5 kg LCM Power Consumption Dimensions (W × D × H) Weight Operating temperature -10 to 60°C (14 to 140°F), 5 to 95% RH Storage temperature -20 to 70°C (-4 to 176°F), 5 to 95% RH Anti-Vibration 1 g @ IEC-68-2-6, sine wave (resonance search), 5-500 Hz, 1 Oct/min, 1 cycle, 13 mins 17 sec axis 1-3 DA-660 Hardware User’s Manual Introduction Regulatory Approvals EMC: CE Class A, FCC Class A Safety: UL, cUL, TÜV 5 years Warranty Hardware Introduction Appearance and Dimensions Appearance DA-660-16 Front View LED Indicators System Status, LAN, Serial Tx/Rx LCM Display Panel 19-inch Rackmount Ear Reset Button Push Buttons DA-660-16 Rear View Power Input RS-232 Console Port 100-240 VAC/VDC RS-232/422/485 1 2 3 4 5 6 7 8 9 10 11 12 13 14 15 16 LAN2 Power Input LAN1 100-240 VAC/VDC Console RS-232/422/485 Serial Ports x 8 (or 16) 10/100 Mbps Ethernet RJ45, 50 bps to 921.6 Kbps RJ45 x 2 ON/OFF Switch DA-660-8 Front View LED Indicators System Status, LAN, Serial Tx/Rx LCM Display Panel 19-inch Rackmount Ear Reset Button Push Buttons DA-660-8 Rear View Power Input RS-232 Console Port 100-240 VAC/VDC RS-232/422/485 1 2 3 4 5 6 7 8 9 10 11 12 13 14 15 16 LAN2 Power Input LAN1 100-240 VAC/VDC Console RS-232/422/485 Serial Ports x 8 (or 16) 10/100 Mbps Ethernet RJ45, 50 bps to 921.6 Kbps RJ45 x 2 1-4 ON/OFF Switch DA-660 Hardware User’s Manual Introduction Dimensions DA-660-8 198 mm (7.8") DA-660-16 DA-660-8 LAN2 2 3 4 5 6 7 8 Console LAN1 DA-660-16 LAN2 1 2 3 4 5 6 7 8 9 10 11 12 13 14 15 16 Console 440 mm (17.3") 480 mm (19") 1-5 LAN1 45 mm (1.77") 1 DA-660 Hardware User’s Manual Introduction Hardware Block Diagram The following block diagram shows the layout of the DA-660’s internal components. The only difference between DA-660-16 and DA-660-8 is in the number of serial ports. DA-660-16 has 16 serial ports and DA-660-8 has 8 serial ports. RS-232/422/485 2 3 4 5 6 7 8 Console LAN2 LAN1 RS-232 1 Ethernet Moxa UART ASIC PHY Moxa UART ASIC 1 2 3 4 5 PHY XScale IXP422 266 MHz 32 MB Flash 128 MB SDRAM PCI Bus 6 Power Power circuit RTC LCM Display & Keypad 7 8 RS-232/422/485 LED Indicators LED indicators are located on the front panel of DA-660. DA-660-16 has 35 LED indicators and DA-660-8 has 19 LED indicators. The only difference between these two products lies in the serial port indicators. Refer to the following table for information about each LED. LED Name Color Description Ready Red Power is ON, and system is ready (after booting up) Orange 10 Mbps Ethernet connection Green 100 Mbps Ethernet connection Green Serial port is transmitting TX data to the serial device. Off Serial port is not transmitting TX data to the serial device. Orange Serial port is receiving RX data from the serial device. Off Serial port is not receiving RX data from the serial device. LAN1, LAN2 P1-P16 (Tx) P1-P16 (Rx) 1-6 DA-660 Hardware User’s Manual Introduction Reset-type Buttons The DA-660 has a reset-type button. The button labeled Reset returns DA-660 to the factory default parameter configuration. Reset Button Press the Reset button on the front panel continuously for at least 5 seconds to load the factory default configuration. After the factory default configuration has been loaded, the system will reboot automatically. The Ready LED will blink on and off for the first 5 seconds, and then maintain a steady glow once the system has rebooted. We recommend that you only use this function if the software is not working properly and you want to load factory default settings. To reset an embedded Linux system, always use the software reboot command />reboot to protect the integrity of data being transmitted or processed. The Reset button is not designed to hard reboot the DA-660. ATTENTION Linux OS: DA-660-8/16-LX Pressing the Reset button will only load the configuration file. All files in the /etc directory will revert to their factory defaults, and all user data in the Flash ROM will be wiped out. WinCE OS: DA-660-8/16-CE Pressing the Reset button will only load the default settings (i.e., the default registry values). All user data NOT in the Flash ROM will be wiped out. LCM Screen The DA-660 has an LCM screen on the front panel. The LCM can display 16 columns and 2 rows of text. After the DA-660 successfully boots up, the LCM will display the model name and firmware version as below: D V A E R 6 . 6 1 0 . 0 1 6 Push Buttons There are four push buttons on the DA-660’s front panel. These buttons are used to operate the LCM. Going from left to right, the buttons are: Button MENU ︽ ︾ SEL Action Activates the main menu, or returns to main menu anytime. Scrolls up through a list of items shown on the LCM screen’s second line Scrolls down through a list of items shown on the LCM screen’s second line Selects the option listed on the LCM screen. 1-7 DA-660 Hardware User’s Manual Introduction Real Time Clock The DA-660’s real time clock is powered by a lithium battery. We strongly recommend that you do not replace the lithium battery without help from a qualified Moxa support engineer. If you need to change the battery, contact the Moxa RMA service team. WARNING There is a risk of explosion if the battery is replaced by an incorrect type. Placement Options Desktop Place your DA-660 on a clean, flat, well-ventilated desktop. For better ventilation, attach the 4 pads from the desktop kit to the bottom of the unit, and leave some space between the DA-660 and other equipment. Do not place equipment or objects on top of the unit, as this might cause damage. Rack Mounting DA-660 is designed to be mounted on a standard 19-inch rack. Two L-shaped metal plates come standard with DA-660. Use the enclosed pair of L-shaped metal plates and screws to fasten your DA-660 to the rack cabinet. Two placement options are available. You can either lock the front or the rear panel of the DA-660 to the front of the rack. Each L-shaped plate has 6 holes, leaving two outer or inner holes open for your convenience. Connecting the Hardware This section describes how to connect DA-660 to serial devices. We cover Wiring Requirements, Connecting the Power, Connecting to the Network, Connecting to a Serial Device, and Connecting to the Console Port. Wiring Requirements ATTENTION Safety First! Be sure to disconnect the power cord before installing and/or wiring your DA-660. Wiring Caution! Calculate the maximum possible current in each power wire and common wire. Observe all electrical codes dictating the maximum current allowable for each wire size. If the current goes above the maximum ratings, the wiring could overheat, causing serious damage to your equipment. Temperature Caution! Be careful when handling DA-660. When plugged in, DA-660’s internal components generate 1-8 DA-660 Hardware User’s Manual Introduction heat, and consequently the outer casing may feel hot to the touch. You should also observe the following common wiring rules: y Use separate paths to route wiring for power and devices. If power wiring and device wiring paths must cross, make sure the wires are perpendicular at the intersection point. NOTE: Do not run signal or communication wiring and power wiring in the same wire conduit. To avoid interference, wires with different signal characteristics should be routed separately. y y y You can use the type of signal transmitted through a wire to determine which wires should be kept separate. The rule of thumb is that wiring that shares similar electrical characteristics can be bundled together. Keep input wiring and output wiring separate. Where necessary, it is strongly advised that you label wiring to all devices in the system. Connecting the Power To power on the DA-660 connect the power line to the DA-660’s AC/DC power connector (located on the right side of the rear panel) using the power cord that is shipped with the product. Then, turn on the power switch. The device takes about 30 seconds to boot up. Once the device is ready, the Ready LED on the front panel will light up, and the DA-660 model name and firmware version will appear on the LCM display. Connecting to the Network Connect one end of the Ethernet cable to one of the DA-660’s 10/100M Ethernet ports (8-pin RJ45) and the other end of the cable to the Ethernet network. If the cable is properly connected, the DA-660 will indicate a valid connection to the Ethernet in the following ways: LAN 2 8 1 1 8 The top right and lower right corner LED indicator glows a solid green color when the cable is properly connected to a 100 Mbps Ethernet network. The LED will flash on and off when Ethernet packets are being transmitted or received. 1-9 Pin 1 2 3 4 Signal ETx+ ETxERx+ --- DA-660 Hardware User’s Manual Introduction The top left and lower left corner LED indicator glows a solid orange color when the cable is properly connected to a 10 Mbps Ethernet network. The LED will flash on and off when Ethernet packets are being transmitted or received. 5 6 7 8 --ERx----- Connecting to a Serial Device Use properly wired serial cables to connect the DA-660 to serial devices. The DA-660’s serial ports (P1 to P16) use 8-pin RJ45 connectors. The ports can be configured by software for RS-232, RS-422, or 2-wire RS-485. The precise pin assignments are shown in the following table: 1 8 Pin 1 2 3 4 5 6 7 8 RS-232 DSR RTS GND TXD RXD DCD CTS DTR RS-422 --TXD+ GND TXDRXD+ RXD----- RS-485 ----GND --Data+ Data----- Connecting to the Console Port The console port is an 8-pin RJ45 RS-232 port. The port can be used to connect to the console utility from a remote console via a V90 or GPRS modem with PPP protocol. The pin definition is the same as for the serial ports (P1 to P16). For normal data acquisition applications, you should connect to DA-660’s serial ports (P1 to P16) via a V90 or GPRS modem. If you would like to use the console port for normal data acquisition applications, you can set the console port to start up via PPP protocol. 1-10