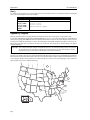
1
PhoneBill
MOTEL
Installation/User Manual
0200-0050
Rev. B
About ESI
ESI (Estech Systems, Inc.) is a privately held corporation based in Plano, Texas, in the internationally known
“Telecom Corridor.” Founded in 1987, ESI designs and builds innovative telecommunications products for
businesses like yours. Because of their powerful combination of value and features, ESI products are consistently recognized by industry publications and leaders. In fact, ESI also creates telecommunications products
for major companies to market under their well-known brand names.
Copyright © 2000 ESI (Estech Systems, Inc.).
Visit ESI on the Web at http://www.esi-estech.com.
ESI is an ISO 9001-certified company.
Table of Contents
...................................................................................... 1.1
.................................................................................. 2.1
.................................................................................................. 3.1
.......................................................................................... 4.1
............................................................................................. 5.1
............................................................................................................... 6.1
.............................................................................................7.1
...................................................................................................... 8.1
(Warranty on opposite side of this page)
WARRANTY
In the event that this product proves to be defective in workmanship or
materials within a period of one year from date of shipment, Estech
Systems, Inc. (hereafter referred to as “ESI”) shall repair or replace the same
at its option. Transportation will be the responsibility of the user/reseller. In
no event shall ESI be liable for consequential or special damages, lost
revenue, or user/reseller expenses arising out of or in connection with the
use or performance of the product, whether based on contract, tort, or any
other legal theory. The following shall void the above warranty: malfunctions resulting from fire, accident, neglect, abuse, or acts of God; use of
improper electrical power; or repair of, tampering with or alteration of the
products by anyone other than ESI-authorized personnel.
Note: Failure to properly ground the system will void the warranty.
PhoneBill Motel
General Description
PhoneBill is a small, inexpensive call accounting system that provides telephone call billing for the lodging industry. The
system uses a combination of customer defined rates and call bands to determine the guest's charges. It prints all call
records as occurred and/or on a room-by-room basis as guests check out.
PhoneBill has record storage capacity ranging from 1,300 call records to 9,000 call records.
The system is housed in a compact case designed for front desk use. It is powered by an external wall mount transformer.
An on-board battery backs up all stored information and a grounding lug provides for static protection.
The system has a serial inbound SMDR port, a parallel outbound printer port, a serial outbound printer port, and a 4 x 4
keypad for programming and attendant intervention. Up to 100 call records can be buffered if the printer is not available,
is turned off, is out of paper, etc.
PhoneBill receives serial call records from the PBX and based on the 1/0 prefix, length of the called numbers, and area
code, will recognize the record as falling into one of 42 customer-defined bands. PhoneBill will apply the call duration
against the corresponding customer programmed rate and bill the call. The resulting record is printed as completed
and/or stored by room number for billing as guests check out.
A credit limit per guest stay can be set individually or on a system-wide default basis to alarm the attendant and print a
notice that a guest has exceeded his or her limit. Additionally, with the optional Toll Control feature, trunk access can
automatically be allowed or denied on the Mitel SX20 or SX50 PBX.
Five activity reports are available:
Call Record: Prints each call as completed.
Check Out/Guest Activity: Summary of all calls by guest.
Credit Limit Notice: Alerts desk to guest exceeding credit limit.
Guest Summary: Summary totals for all guests with active call records.
Room Audit: Shows totals for guests checked-out plus grand total since last printed.
Band Summary: Totals by band for number of calls, duration and amount for each band, plus grand total.
System Costing Procedure
PhoneBill's costing technique is based on the basic premise that long distance billing = distance × duration × rate. By
dividing North America into groups or bands of area codes, and setting a billing rate for each band, PhoneBill can then
calculate the billing of any call.
PhoneBill has pre-defined bands for local calls, long distance within the home area code, 800 (including 888), 900,
information, 976, and 0+; in addition to 14 undefined bands for 1+ long distance. At installation, the customer determines
the number of long distance bands to be used and assigns the appropriate area codes to each.
The bands are numbered 1 through 42. Each has a name (such as LD, LC, OPR), which may be preceded by a prefix (such
as 1, 0, or 011), and can be further differentiated by the digits that make up the telephone number. Generally the bands in
plain type in the following chart are pre-defined and only the bands shown below in bold type need to be programmed
with area codes or exchanges.
Bd
Type
1
2
3
4-16
17
18
19
20
21
22
LC
LD
LC
LD
LD
OPR
INF
800
900
976
23
24-31
32
33-42
OPI
INT
INT
SPL
Prefix
1
1
1
0
1
1
01
011
011
Definition
all 7 digit calls
1+7 digit long distance
10 digit local; list area codes:
1+10 digit long distance; list area codes:
any 1 + 10 digit call not in above
all 0+ calls
411, 1411, 15551212, 1XXX 5551212 [supersedes other fields]
any 800 number (including 888)
any 900 number
976, 1976, 1XXX976XXXX [supersedes other fields]
(List additional special service exchanges)
Operator-assisted international calls
International calls beginning with 011
any 011 not listed above
any combination of digits, area codes, exchanges per band
1.1
General Description
PhoneBill Motel
Establishing Long Distance Charges
Use a standard North American area code map, as found in the front of most telephone directories, to help group U.S.
area codes into common LD bands (4 through 17). By drawing in circular rings radiating out from your home city, you can
easily group together the area codes with similar distances from your home city. See Band Programming Hints, page 1.4.
Note: Previous versions of this manual included area codes with the map. However, with frequent area code changes and
additions, this inclusion was no longer practical. Up-to-date area code information is available on the Web at
http://www.555-1212.com (this Web location is subject to change; consult your preferred Web search engine if the
location is no longer valid).
Example: In Phoenix, the installer would call his long distance provider’s Customer Support and get costs for the first
minute and each additional minute for calls to, say, these cities: Salt Lake City, Denver, Little Rock, Chicago, Honolulu, etc. The provider will need to know area codes and exchanges for each city; use past
telephone bills to get this information, if necessary. Possible bands, then, for Phoenix might include
(again, this is just an example):
Band 1: local calls (not shown)
Band 2: 1+ 7 digit long distance (not shown)
Band 4: Long-distance calls within Arizona.
Bands 5–8: Area codes for other states as shown.
Area codes in Canada, Alaska, Bermuda, Hawaii, etc. would be grouped into several additional bands,
depending on the rates to each area.
Setting Rates
Once the bands are defined, the customer decides the “rates” (including a mark-up) to apply to each band. For example,
use $1.50 for the first minute, and 40¢ for each additional minute for Band 4, $1.65 and 45¢ for Band 5, and so on. Local,
800, 900, information bands, etc. are also rated. For local calls (Band 1), $.50 would be input for the first minute and 0¢
for each additional minute.
The band definitions and rates can be changed at any time by the owner, who can input the password and add, delete or
change any area codes, exchanges or rates.
Modes of Operation
The system software is divided into two sections; The Operating Mode and the System Programming Mode.
• The Operating Mode is the day-to-day operations such as checking a guest out of the motel or changing a credit limit.
• The System Programming Mode requires a password to enter and is the area of the software where the system program
values are set or changed. Once set, these values will rarely need to be changed.
1.2
PhoneBill Motel
General Description
Keyboard Methodology
Operating Mode
When in the Operating Mode, the key combinations are as follows:
Each operation begins with a function key (CHECK OUT, PRINT, CR
LMT), followed by numeric keys (room number, report number or
credit amount), followed by ENTER.
A short beep indicates that the input has been accepted. A long beep
indicates an input error. DELETE will return to the last time ENTER was
input. Therefore, if a digit of a room number was input in error, touch
DELETE, and begin again with the function key CHECK OUT.
Programming Mode
To access the System Programming Mode, the attendant keys-in
ENTER, ENTER. The printer prompts that a password is needed.
In the System Programming Mode, programming of the functions will
begin with digits 71 and above, band definitions begin with a *, and Rate settings begin with a #. ENTER will confirm the
input of a string of data. ENTER, ENTER will signify completion of programming in a particular function if it has more than
one value entered.
DELETE returns to the point where ENTER was last touched. ENTER, ENTER, ENTER will exit the programming section.
One short beep indicates that an entry has been accepted, two short beeps signifies that a function or band section
has been completed.
Special Features
Call Completion (Grace Period)
PhoneBill (as other call accounting systems) assumes that a call has been completed when it has lasted for a certain
period of time (the grace period). The grace periods preprogrammed are 75 seconds for international calls, 45 seconds for
local/long distance calls and 15 seconds for information calls. These values can be changed in the programming mode.
Shortening these values will assure that more “short” calls get counted, but will increase the chance that a call allowed to
ring for a long period will be counted as a completed call. Lengthening the grace period will have the opposite effect.
A policy should be considered that will forgive guest calls that are close to the periods indicated if the guest complains
that he did not make a certain call.
Even though PhoneBill gets precise durations on each call from the PBX, it rounds these up to the nearest minute for
billing calculations and report totals.
976 Calls
It is recommended that 976-type calls be blocked by the PBX. However, Band 22 is reserved for 976-type calls should this
not be possible. Note that the charges for these calls may vary greatly depending on the type of 976 call. This band was
included only to provide the information about the call so that, if not blocked by the PBX, it can be decided on a case-bycase basis how to bill for a 976 call.
International Calls
International calls are treated as a group in the same manner as long distance calls. Several bands can be set up in which
countries with similar charges can be grouped together. Since International calls from anywhere in the U.S. to a particular
country cost the same, seven International bands have been preprogrammed for country codes with similar costs. These
are listed in Appendix 6. Band 32 is reserved for all 011 calls not assigned in Bands 23 through 31.
Special Call Bands
Though rarely needed, 10 Bands (33 through 42) are reserved for other special type calls to specific numbers, exchanges,
area codes, or country/city codes. Each band can be programmed to handle a call that begins with a particular character
string entered. Any special call such as a 950 call or 1 + 700 can be programmed into one of these bands and the appropriate rate assigned in Rate Programming will be applied.
1.3
General Description
PhoneBill Motel
911 Emergency Calls
If a record is provided by the PBX, 911 emergency calls generated by any extension will automatically print (for example):
911 EMERGENCY CALL FROM EXTENSION 101 AT 10:23PM.
This record will print regardless of whether print real time is turned off or that particular extension was programmed not
to print.
Date and Time
PhoneBill's internal clock is maintained by the date and time received from the PBX therefore it never needs to be set.
Care should be taken to assure that the time and date on the PBX is always correct. If power outages affect the PBX clock
or calendar, be sure to reset the date and time after power loss.
Time-of-Day Rates
Long distance carriers may have two or more rate structures based on the time of day. In PhoneBill, a 2nd (or evening) rate
can be programmed as a percentage of the regular rate along with the period of time and the bands to which it is to apply.
Band Programming Hints
To save time during initial programming, regions of North America have been pre-grouped to allow groups of area codes to
be “pasted” into bands. The area codes in the home region might be programmed individually with band 5 being the
home area code, Band 6 the home state area codes, Band 7 the area codes for the rest of the home region, and Bands 8
through 16 assigned by region.
Since there is little difference in long distance rates within the Continental US, another shortcut method of programming
long distance rates is to assign the home state area codes to a band, area codes in Canada, Puerto Rico, Hawaii, Alaska,
etc. grouped into one or more bands depending on their relative charges, and then allow all other area codes in the
Continental US to fall to Band 17.
Optional Toll Control Feature
Toll Control is an optional upgrade feature that automatically denies trunk access when a room is vacant or when the
guest exceeds his individual credit limit. When a guest checks in and a credit limit is set, that phone is automatically
allowed to make outside calls.
If you have an SX20 or SX50 and have purchased the Toll Control feature, see Appendix 9 for details.
1.4
PhoneBill Motel
Hardware Installation
PhoneBill is installed near the front desk for easy access as guests
check out. The system printer may be either parallel or serial and is
connected via either the parallel or serial cable provided. The SMDR
port on the PBX is connected to PhoneBill via a serial cable. The
wall mount power supply plugs in to a standard 110 outlet. A system ground from the case to an appropriate ground should be
completed before power-up. Always disconnect the power to
PhoneBill whenever connecting or disconnecting either the printer
or PBX cable.
See Appendix 9 for installation of the optional Toll Control line cord.
See Appendix 10 for installing the optional Property Management
(PMS) interface feature through the serial port.
Ground
Connect a 14 (or higher)-gauge ground wire to the screw connecting the case halves at the right side of the system (viewed
from the rear) to a good earth ground, such as a cold water pipe or ground rod.
Warning: Failure to ground the unit properly will void the warranty.
Printer Connections
IMPORTANT: It is not possible to operate printers from both ports.
Parallel Printer Connection
Connect PhoneBill to a standard parallel printer using the cable provided. Connect from the Printer Port (right hand DB25
plug on the back of PhoneBill) to the Centronics parallel port of the printer.
Serial Printer Connection
The serial port provides a standard serial printer output.
Note: If the Property Management System option has been purchased, only the parallel printer port can be used for
printing. See PMS Option, Appendix 10.
If the PMS option has not been purchased, then the serial port can be used to connect a standard serial printer to PhoneBill. Connect from the Serial Port (DB9 plug on the back of PhoneBill) to the serial port of the printer. The cable provided is
a standard Null Modem cable Female DB9 to Male DB25.
Pin #
1
2
3
4
5
6
7
8
TD
RD
DSR
ground
DTR
CTS
RTS
PhoneBill is preprogrammed for initial set-up purposes to output to the serial printer port at 1200 baud, 8 data bits,
1 stop bit, 0 parity. Set the printer for the same (however, it may need to be changed later). Connect the printer to 110 VAC
power. To check the printer, check the printer manual and run the printer self-test.
PBX Connection
Connect the PBX to the left hand DB25 connector on the back of PhoneBill. Use shielded cable no longer than 50 ft. From
the PBX, connect TD (transmit data) to RD (receive data) on PhoneBill. Be sure the PBX ground pin (usually pin 7) connects
to pin 7 on the PhoneBill PBX port. Some PBX's may require additional control signals to be connected such as CTS or DTR.
Note: Some PBXs have TD from pin 2 while others (such as Mitel) have TD from pin 3. Pin configuration for PBX (lefthand) port:
Pin #
1
2
3
4
5
6
7
20
TD
RD
RTS
CTS
DSR
ground
DTR
2.1
Hardware Installation
PhoneBill Motel
Connection LEDs
Several LEDs located on the PhoneBill circuit board are designed to aid in port trouble shooting. Should difficulties arise
during port connections, see Troubleshooting, Section 7 for further details.
Powering Up
Connect the power transformer to PhoneBill and plug into a standard 110 VAC outlet. PhoneBill will beep three times and
print a log-on message (a series of error beeps indicates that the printer is not properly connected to PhoneBill).
2.2
PhoneBill Motel
Programming
Initial Programming
Initial programming is divided into four sections:
1. Initialization: Resets components and software before programming.
2. System Programming: Sets system parameters (these programming functions are numbered 71 and above).
3. Band Programming: Bands are numbered 1 through 42 and for programming purposes are preceded with an asterisk
(*). Most bands are pre-defined such as local, information, international, etc. Usually only long distance bands need
to be defined by programming area codes into the appropriate bands.
4. Rate Programming: Rates correspond to the bands, but are preceded with a pound sign (#). Assign a rate to all
bands not excluded in Function 81.
The System Worksheet (Appendix 7) is provided for penciling in the values to program before actually inputting them
into the system. A report showing the system programming can be printed and compared with the worksheet to
assure accuracy.
Entering Programming Mode
Once all hardware connections are made and the printer has been run through its self-test, enter the programming mode
by touching ENTER two times. The system will beep three times and the printer will print: ENTER PASSWORD. The preset
password is 1234 ENTER.
Enter on Keypad:
Printer Responds:
ENTER, ENTER
ENTER PASSWORD:
1234, ENTER
PASSWORD = 1234
ENTER FUNCTION NUMBER
Initialization
INITIALIZE THE SYSTEM BEFORE PROCEEDING. This function will reset all components and software to their initial state.
The system will beep three times after the initialization has been completed. Once you have initialized the system,
re-enter Programming Mode.
Enter on Keypad:
Printer Responds:
99, ENTER
MASTER INITIALIZATION
CAUTION: ALL DATA WILL BE ERASED
PRESS 99, ENTER TO CONFIRM, PRESS DELETE TO CANCEL
99, ENTER
(PhoneBill will beep three times.)
Function 71: New Password
The password can be changed to one more meaningful to the user. A new password can be any four digits. Be sure to
write down the new password.
Default: 1234.
Enter on Keypad:
Printer Responds:
71, ENTER
71,
5678, ENTER
NEW PASSWORD = 5678
ENTER FUNCTION NUMBER
ENTER NEW PASSWORD
3.1
Programming
PhoneBill Motel
Functions 72 and 73: Serial Input and Serial Printer Format
PhoneBill's serial input and output formats must be set to match the PBX SMDR port format and, if used, the serial
printer’s format. To make future testing easier, it is recommended that the printerÕs format be set the same as the PBX
input format set in Function 72. If the PBX settings aren’t known, enter 0 (zero) in Function 72 and turn to Appendix 1 to
determine the correct settings. Both Function 72 & 73 are programmed in the same manner. If a parallel printer is used,
skip Function 73 and Function 90.
The values inputted are baud rate, number of bits, number of stop bits, and parity. Select the appropriate 4 digits from the
table below:
1st Digit
2nd Digit
3rd Digit
4th Digit
0 = 150 Bd
7 = 7 Data Bits
1 = 1 Stop Bit
0 = No Parity
1 = 300 Bd
8 = 8 Data Bits
2 = 2 Stop Bits
2 = 600 Bd
1 = Odd Parity
2 = Even Parity
3 = 1200 Bd
4 = 2400 Bd
5 = 4800 Bd
6 = 9600 Bd
Default: 3810.
In the example below, the PBX output is 1200 baud, 8 bits, 1 stop bit and no parity.
Enter on Keypad:
Printer Responds:
72, ENTER
72, INPUT (PBX) FORMAT
3810, ENTER
3810 INPUT (PBX) FORMAT = 1200 BD, 8 DATA BITS, 1
STOP BIT, NO PARITY
ENTER FUNCTION NUMBER
Function 74: Telephone System Type.
Because the location of the information within call records coming from the PBX varies among telephone systems,
PhoneBill must be programmed to recognize the telephone system to which it is connected. To determine the correct type
for your telephone system, refer to Appendix 2, Telephone System Type. If the preset type is not listed for your telephone
system, or it does not work, or you are unsure of the system type, input a "0" (zero) here and turn to Appendix 3 to input
this information manually.
Default: None.
Enter on Keypad:
Printer Responds:
74, ENTER
74, ENTER TELEPHONE SYSTEM TYPE
1, ENTER
TELEPHONE SYSTEM TYPE = 1
ENTER FUNCTION NUMBER
To confirm that the parameters programmed so far are correct, place a local call and a long distance call to verify that
records are being printed. If no record prints, carefully check the PBX programming to assure that it is outputting the
correct data format, recheck all of the above and retry the test calls. If, on the second attempt, no record prints, turn to
Section 7, Troubleshooting. If a call record printed, return to the Programming Mode and continue.
3.2
PhoneBill Motel
Programming
Function 75: “1+” Required?
Some telephone companies do not require the entry of a “1” before some or all long distance calls. PhoneBill needs to
know which type of LD is affected. “0” indicates that 1+ is not required to make any long distance call; “1” indicates that
“1+” is required for all LD; and “2” indicates “1+” is required for 10-digit LD only (e. g.: a 7-digit call can be either local or
long distance).
Enter on Keypad:
Printer Responds:
75, ENTER
75, IS 1+ REQUIRED FOR LD?__
1, ENTER
1 REQUIRED: 1, YES, ALL LD CALLS
ENTER FUNCTION NUMBER
Function 76: Print Call Records
Call records for billing the customer can be: (1) printed as they occur (in real time), (2) Accumulated for printing when a
guest checks out; or (3) both.
Default: 3.
Enter on Keypad:
Printer Responds:
76, ENTER
76,
PRINT CALL RECORDS?____ (1=PRINT CALL RECORDS IN REAL TIME ONLY;
2= ACCUMULATE CALL
RECORDS CHECK OUT ONLY; 3 = BOTH)
2, ACCUMULATE CALL RECORDS FOR CHECK OUT ONLY
ENTER FUNCTION NUMBER
1, ENTER
Function 77: Printout Options
Call records printed in real time can have a header printed above each record. The number of blank lines inserted after
information is printed can be set to have lines advance above a tear bar or into view. Real time call records or Check Out
reports can be programmed to print more than one time. All three choices are input at one time as chosen from the
table below.
1st Digit
2nd Digit
3rd Digit
Print header
1 = Yes
o = No
Number of
blank lines
Number of
times print
each line
Default: 051.
Enter on Keypad:
Printer Responds:
77, ENTER
77, PRINT OPTIONS:
031, ENTER
PRINT HEADER: NO;
BLANK LINES AFTER EACH RECORD
= 3; NUMBER OF TIMES TO PRINT EACH RECORD = 1
ENTER FUNCTION NUMBER
3.3
Programming
PhoneBill Motel
Function 78: Credit Limit
A credit limit value can be set to be automatically assigned to each guest if call records are accumulated for guest check
out. This preset credit limit can then be changed on a guest-by-guest basis as each checks in. Entering 0 (zero) as the
default below will indicate that no preset credit limit is to be used (however, a guest-by-guest credit limit can be entered
from the Operating Mode.) The credit limit value must be in whole dollars. (If the optional Toll Control feature is installed,
program Function 781, Appendix 9, instead of 78).
Default: 0.
Enter on Keypad:
Printer Responds:
78, ENTER
78,
20, ENTER
CREDIT LIMIT FOR ALL ROOMS= $20
ENTER FUNCTION NUMBER
CREDIT LIMIT FOR ALL ROOMS?
Function 79: Don’t Print Extension Calls
Calls from certain extensions such as office phones can be listed to not print in real time. Totals from these extensions will
be accumulated in the reports unless turned off in Function 80 (to prevent excessive call records being stored, extensions
listed here but not turned off in Function 80 will automatically be checked out each time an audit report is printed). List
each extension separated by ENTER. ENTER, ENTER will complete this function.
Default: None.
Enter on Keypad:
Printer Responds:
79, ENTER
79,
215, ENTER
216, ENTER
202, ENTER
ENTER
DON'T PRINT CALLS FROM EXTENSIONS:
ENTER FUNCTION NUMBER
DON'T PRINT CALLS FROM EXTENSIONS: (LIST)
215, 216, 202
Function 80: Don’t Count Extension Calls
Calls from certain extensions such as office phones can be listed so that they won't be stored or included in report totals.
List each extension separated by ENTER. ENTER, ENTER will complete this function.
Default: None.
Enter on Keypad:
Printer Responds:
80, ENTER
80,
215, ENTER
216, ENTER
202, ENTER
ENTER
DON'T COUNT CALLS FROM EXTENSIONS:
ENTER FUNCTION NUMBER
DON'T COUNT CALLS FROM EXTENSIONS: (LIST)
215, 216, 202
Function 81: Don’t Print Calls to Bands
Calls to certain bands for which you choose not to bill (such as local or 800 numbers) may also be selected to not print in
real time. Totals of calls to these bands will be accumulated in the reports unless turned off in Function 82.
Default: None.
3.4
Enter on Keypad:
Printer Responds:
81, ENTER
81,
1, ENTER
18, ENTER
ENTER
DON'T PRINT CALLS TO BANDS:
ENTER FUNCTION NUMBER
DON'T PRINT CALLS TO BANDS: (LIST)
1,
18
PhoneBill Motel
Programming
Function 82: Don’t Count Calls to Bands
Calls to certain bands for which you choose not to bill may be excluded from report totals. List each band separated by
ENTER. ENTER, ENTER will complete this function.
Default: None.
Enter on Keypad:
Printer Responds:
82, ENTER
82,
1, ENTER
20, ENTER
ENTER
DON'T COUNT CALLS TO BANDS: 1,
ENTER FUNCTION NUMBER
DON'T COUNT CALLS TO BANDS: (LIST)
20
Function 83: Grace Periods
To set the number of seconds to elapse before a call is considered to have answered [see “Call Completion (Grace Period),”
page 1.3], enter the number of seconds for Information calls, Local/Long Distance calls, and International calls separated
by ENTER.
Default: 15, 45, 75.
Enter on Keypad:
Printer Responds:
83, ENTER
83, INFO GRACE PERIOD IN SECONDS?
LC/LD GRACE PERIOD IN SECONDS?
INT GRACE PERIOD IN SECONDS?
INFO GRACE PERIOD = 20
LC/LD GRACE PERIOD = 45
INT GRACE PERIOD = 85
ENTER FUNCTION NUMBER
20, ENTER
45, ENTER
85, ENTER
Function 84: Normal Extension Rates
Extensions can be listed in this function that will be included in all reports, etc. but can have their calls rated without the
markup set in the rate programming section. Therefore, if the normal markup is about 30%, setting 75% here will result in
the admin phones listed being charged at near normal costs. List all extensions, then the percentage of the marked-up rate.
Enter on Keypad:
Printer Responds:
84, ENTER
84, NORMAL EXTENSIONS: NONE
221, ENTER
245, ENTER
185, ENTER
ENTER
NORMAL EXTENSIONS: 221, 245, 185
NORMAL EXT PERCENTAGE?
75, ENTER
NORMAL EXT RATE: 75%
ENTER FUNCTION NUMBER
3.5
Programming
PhoneBill Motel
Function 85: Print Non-Call Record Data
Some PBXs will output wake-up information or other announcements to the SMDR port or may occasionally not transmit
an entire call record. If you want information that is not recognized as a complete call record printed anyway, program YES
below. If on, “INVALID CALL RECORD FOLLOWS” will print above each invalid line unless turned off. Leaving this
feature turned-on, at least for a period after installation, ensures that all call records are recognized by PhoneBill.
Default: 1.
Enter on Keypad:
Printer Responds:
85, ENTER
85, PRINT NON-CALL RECORD INFORMATION?__ (1=YES,
0=NO)
PRINT NON-CALL RECORD INFORMATION: 1,YES OUTPUT
THE " INVALID SMDR MESSAGE" 1=YES, 0 = NO
INVALID SMDR MESSAGE IS ENABLED
ENTER FUNCTION NUMBER
1, ENTER
1, ENTER
Function 86: Report Pass-Through
Some PBX systems allow for printed reports of programming parameters or other information stored by the PBX. In order
for PhoneBill to pass this information through to the printer without trying to interpret it as call records, when turned-on,
Function 86 will temporarily allow large amounts of information to be passed through to the printer. This feature will
automatically turn off if it does not see any data for at least 60 seconds. Therefore, be ready to print the data from the
PBX when you first turn this feature on.
Default: 0.
Enter on Keypad:
Printer Responds:
86, ENTER
86,
1, ENTER
PBX PASS-THROUGH IS TURNED ON.
ENTER FUNCTION NUMBER
PBX PASS-THROUGH ___? (1=ON, 0=OFF)
Function 87: Evening/Weekend Rate
Since long distance carriers have two or more rate tiers (i.e. day, evening, night, etc.) that are usually directly related to the
day rate, an evening rate can be programmed that is a fixed percentage of the day rate to be set for each individual band.
Additionally, the start time and the end time for the evening rate is programmable as well as the bands (in Function 88) to
which that rate applies. Calls begun during the evening rate time period will be rated at the evening rate. Input three values:
the start time and end time (both in military time), and the percentage of the day rate (0 [zero] indicates no Evening/
Weekend rate). A prompt will ask if this rate is also applies to all day Saturday and Sunday.
Default: 0.
Enter on Keypad:
Printer Responds:
87, ENTER
87, ENTER START TIME, END TIME AND PERCENTAGE
SEPARATED BY ENTER.
EVENING RATE STARTS AT 17:00, ENDS AT 8:00, AND IS
80% OF DAY RATE
APPLY THIS RATE TO WEEKENDS?___ (1 =YES, 0= NO)
1700, ENTER
0800, ENTER
80, ENTER
1, ENTER
3.6
WEEKEND RATE = 1, YES
ENTER FUNCTION NUMBER
PhoneBill Motel
Programming
Function 88: Evening/Weekend Bands
The evening rate usually applies to long distance and international calls. Input the band numbers, separated by ENTER
that are to have the evening rates applied. Complete the list with ENTER, ENTER.
Default: None.
Enter on Keypad:
Printer Responds:
88, ENTER
88, EVENING RATE BANDS ARE:
4, ENTER
5, ENTER
6, ENTER
7, ENTER
8, ENTER
17, ENTER
ENTER
EVENING RATE BANDS: 4, 5, 6, 7, 8, 17
ENTER FUNCTION NUMBER
Function 89: Current Year Setting
The system gets the current time and date from the PBX (except for the year). In order for PhoneBill to apply the weekend
rates and run automatic reports accurately, it must know the current year in order to calculate the current day of the week.
Once set, the year automatically advances each January 1st.
Default: 1995 (PhoneBill knows years as four-digit numbers, and has no problem with the years 2000 and beyond).
Enter on Keypad:
Printer Responds:
89, ENTER
89, THE CURRENT YEAR IS 1995
ENTER THE CURRENT YEAR____
2000, ENTER
THE CURRENT YEAR IS 2000
ENTER FUNCTION NUMBER
Function 90: Slow Printer Adjustment
Important: If using a parallel printer, skip this function.
Some serial printers do not have the capability to send clear-to-send information to PhoneBill resulting in PhoneBill
sending information faster than the printer can keep up. This may show up as multiple lines in reports that are garbled
after a few correct lines have printed. If this function is turned on, extra time will be inserted after each carriage return sent
to the printer. Turn this function on only if a problem exists.
Default: 0.
Enter on Keypad:
Printer Responds:
90, ENTER
90,
1, ENTER
SLOWER OUTPUT REQUIRED: 1, YES
ENTER FUNCTION NUMBER
IS SLOWER OUTPUT REQUIRED?___
(1=YES, 0=NO)
3.7
Programming
PhoneBill Motel
Function 91: Primary/Alternate Extensions
The Primary/Alternate Extension, Function 91, allows one guest to be billed for two different rooms at check out. ENTER,
ENTER ends this Function. The following procedure shows how to enable Primary/Alternate Extensions.
Default: 0.
Enter on Keypad:
Printer Responds:
91, ENTER
91, PRIM./ALT EXT. NUMBERS, INPUT PRIM . EXT #,
INPUT ALT. EXT
ENTER ASSIGNED PRIMARY EXTENSION 101, ASSIGNED
ALTERNATE EXTENSION 102
ENTER FUNCTION NUMBER
101, ENTER
102, ENTER
Function 92: Automatic Reports
Reports can be programmed to print automatically at a pre-set time. These reports are programmed just as if being
requested from the keypad, one after the other (see Operating Mode, Section 5). Each report is separated by ENTER.
ENTER, ENTER will complete this function.
Automatic reports can be printed:
• Daily, at the time specified (limited to on-the-hour in military time)
• Weekly, at the time and day specified
• Monthly, at the time of the day of the month specified (to print reports at the end of a month, program the day of the
month for the 1st).
Default: 0.
In this example, we set an Audit Report and Band Summary Report to print each day at 11:00PM:
Enter on Keypad:
Printer Responds:
92, ENTER
92, ENTER
PRINT, *, 2, ENTER
PRINT, *, 3, ENTER
ENTER
INPUT FREQUENCY__ (1=DAILY, 2 = WEEKLY, 3 =
MONTHLY)
1, ENTER
ENTER HOUR ONLY IN MILITARY TIME
23, ENTER
AUTOMATIC REPORT DAILY AT 11:00PM
PRINT * 2 (Audit Report) ENTER,
PRINT * 3 (Band Summary) ENTER ENTER
ENTER FUNCTION NUMBER
REPORT KEYSTROKES
(17 = 5:00PM)
Function 93: Print Program Reports
Two reports are printed from the Programming Mode. (See Reports section for an explanation of the Area Code Rate
Report.) The program report prints a record of all function, band and rate values programmed. This report should be used
to verify that all programming is correct and a final copy kept for future reference.
Default: 0.
Enter on Keypad:
Printer Responds:
93, ENTER
93, PRINT REPORTS?__ (1=PROGRAM REPORT, 2=AREA
CODES RATE REPORT, 3= BOTH)
PRINT REPORTS: 3, BOTH
ENTER FUNCTION NUMBER
3, ENTER
3.8
PhoneBill Motel
Programming
Function 94: Print Access Codes
If this function is turned on, access codes (10XXX or 101XXXX) will print in reports along with the digits dialed. If off, only
the dailed number will print in reports.
Default: 1.
Enter on Keypad:
Printer Responds:
94, ENTER
94,
1, ENTER
PRINT ACCESS CODES: 1, YES
ENTER FUNCTION NUMBER
PRINT ACCESS CODES?___
(1=YES, 0=NO)
Band Programming
Note: When programming, Bands are preceded with a *.
The Bands are numbered 1 through 42 and each has a name such as LD, LC, OPR. The Bands shown in bold type below are
defined on-site while those in plain type are pre-defined and usually only need rates programmed.
Bd
Type
1
2
3
4-16
17
18
19
20
21
22
LC
LD
LC
LD
LD
OPR
INF
800
900
976
23
24-31
32
33-42
OPI
INT
INT
SPL
Prefix
1
1
1
0
1
1
01
011
011
Definition
all 7 digit calls
1+7 digit long distance
10 digit local; list area codes:
1+10 digit long distance; list area codes:
any 1 + 10 digit call not in above
all 0+ calls
411, 1411, 15551212, 1XXX 5551212 [supersedes other fields]
any 800 number (including 888)
any 900 number
976, 1976, 1XXX976XXXX [supersedes other fields]
(List additional special service exchanges)
Operator-assisted international calls
International calls beginning with 011
any 011 not listed above
any combination of digits, area codes, exchanges per band
Bands *1 and *2: LC and LD
In an area where 1 must be dialed before a long distance call, then Band 1 is automatically 7-digit local calls and Band 2 is
automatically 1+ 7-digit long distance (if allowed in your area). These bands will require only rate programming in the
next section.
If you are in one of the areas where a long distance call can be made without dialing 1 first, you must program into
PhoneBill the precise exchanges for the local or long distance calls. Refer to Appendix 4 for special instructions on programming Bands 1, 2 and 3.
Band *3: LC
In a few areas, some of the local calls consist of 10 digits. If you are in such an area, then you must list the area codes for
each area that allows 10-digit local calls. For programming purposes, bands are preceded with an * and lists are completed with two ENTERs.
Enter on Keypad:
Printer Responds:
*3, ENTER
BAND 3 LC (LIST AREA CODES)
*817, ENTER
ENTER
BAND 3 LC AREA CODES: 817
ENTER FUNCTION NUMBER
3.9
Programming
PhoneBill Motel
Bands *4 through *16: LD
Fourteen (14) bands have been allocated for long distance calls. Most likely only a few of these will be needed.
Generally, the home area code will be placed in Band 4, area codes within the state in Band 5, adjacent state area codes
in Band 6 and so on. A map (Appendix 5) will help assign area codes to the remaining bands (you may also consult
http://www.555-1212.com, although that location may change). Area codes in Canada, Puerto Rico, Hawaii, Alaska, etc.,
can be grouped into one or more bands depending or their relative charges from the long distance carrier (see Establishing Long Distance Charges and Band Programming Hints in Section 1).
The input storage buffer is limited; therefore, if a large number of area codes are to be input into a single band, break the
input entries up into several sections of about 35 area codes each.
Enter on Keypad:
Printer Responds:
*4, ENTER
214, ENTER
ENTER
BAND 4 LD (LIST AREA CODES)
BAND 4 LD AREA CODES: 214
ENTER FUNCTION NUMBER
*5, ENTER
BAND 5 LD (LIST AREA CODES)
409, ENTER
817, ENTER
806, ENTER
915, ENTER
512, ENTER
713, ENTER
ENTER
BAND 5 LD AREA CODES: 409, 817, 806, 915, 512, 713
ENTER FUNCTION NUMBER
Shortcut: For your convenience in programming, PhoneBill comes from the factory with certain Regions, each of which
has long-established area codes already assigned. Rather than key in individual area codes, it saves time to
choose the pre-grouped regions shown in Appendix 5. Here’s an example.
Enter on Keypad:
Printer Responds:
*4, ENTER
BAND 4 LD: NONE
1, ENTER
BAND 4 LD: [Lists all area codes programmed in Region 1.]
Note: When a region’s area codes change, to make updates, see Program Changes, Section 4. New area codes automatically default to Band 17.
Band *17: Default LD (Preprogrammed)
Any 1+ 10 digit call to an area code not listed in Bands 4 through 16 will fall to Band 17. If you listed all of the Area Codes in
the long distance bands, Band 17 will bill a call placed to an area code you may have missed or will help identify a new
area code which can then be added to the appropriate band. Band 17 can also help define all US and Canada long distance calls (see Band Programming Hints, Section 1).
Bands *18 through *21: OPR, INF, 800, 900 (Preprogrammed)
Bands 18,19, 20, & 21 are pre-defined and need not be programmed. You may wish to assign rates (in the rates section)
for calls to these bands if you are charging for 800-number calls, 0+ calls, etc.
Band *22: 976 (Preprogrammed)
Band 22 is reserved for special exchanges that charge for additional services such as 976. Using the same procedures to
add band numbers as above, Band 22 can have additional exchanges added if your area has special billing numbers in
addition to 976.
Bands *23 through *32: INT (Preprogrammed)
International calls are programmed in the same fashion as Long Distance. Bands 23 through 31 are programmed by listing
country codes for each band. Any country code not listed will automatically be placed in Band 32. Help with setting International rates has been included with this manual (Appendix 7). Since any International call from anywhere in the US to a
particular country costs the same, all country codes have been preprogrammed into bands of similar costs. These can be
changed to any band structure desired using the same programming method as for any other band. Refer to Appendix 6
for the list of preprogrammed bands and country codes.
3.10
PhoneBill Motel
Programming
Bands *33 through 42: Special
These bands are designed to allow any exceptions to the above programming. A digit string of any length can be input
into each of these bands. The system will look for any call record beginning with or matching this particular digit string.
Example: Input of 950 will result in any call beginning with 950 being assigned to that band. Input of 9503331234 will
result in only a call to 950 333-1234 being assigned to that band. These bands are programmed in the same manner as
the other bands.
Rate Programming
Note: Rates correspond to band numbers, but are preceeded by #.
Rates are assigned to each band in the form of a charge for the first minute and each additional minute. Since all call
durations are rounded up to the next minute, the first minute charge can also serve as a flat charge for local calls, etc. The
first minute and each additional minute rates are input for a band separated by ENTER.
Rate #1: LC
Important: If you don’t charge for local calls, skip this band.
To set the rate at 50¢ for each local call:
Enter on Keypad:
Printer Responds:
#1, ENTER
BAND 1 LC FIRST MINUTE CHARGE?___, ENTER;
EACH ADDITIONAL MINUTE CHARGE?___, ENTER
BAND 1 LC FIRST MINUTE CHARGE = $0.50
EACH ADDITIONAL MINUTE CHARGE = $0.00
ENTER FUNCTION NUMBER
50, ENTER
0, ENTER
Rate #2: LD
The rate for Band 2, 1+7 digit long distance is based on the average of the cost of long distance calls to these exchanges,
multiplied by a mark-up. To obtain the cost of some typical calls in this band, check through past phone bills, call the local
telephone company or check in the front of the phone book. If this band is not required, simply skip to the next band.
To set a rate of $1.50 for the first minute and $ .45 for each additional minute:
Enter on Keypad:
Printer Responds:
#2, ENTER
BAND 2 LC FIRST MINUTE CHARGE?___, ENTER;
EACH ADDITIONAL MINUTE CHARGE?___, ENTER
BAND 1 LC FIRST MINUTE CHARGE = $1.50
EACH ADDITIONAL MINUTE CHARGE = $0.45
ENTER FUNCTION NUMBER
150, ENTER
45, ENTER
3.11
Programming
PhoneBill Motel
Rate #3: LC
The rate for Band 3, 10-digit local calls, is usally a flat rate or no charge. Sometimes normal 7-digit local calls appear as 10
or more digits to PhoneBill because they require additional digits, such as dialing an extension, a pager or a voice mailbox. Therefore, it is best to rate Band 3 even though your area may not allow true 10-digit local calls. To set a 50¢ rate for
each local call:
Enter on Keypad:
Printer Responds:
#3, ENTER
BAND 3 LC FIRST MINUTE CHARGE?___, ENTER;
EACH ADDITIONAL MINUTE CHARGE?___, ENTER
BAND 1 LC FIRST MINUTE CHARGE = $0.50
EACH ADDITIONAL MINUTE CHARGE = $0.00
ENTER FUNCTION NUMBER
50, ENTER
0, ENTER
Rates #4 through #16: LD
Rates for these bands should correspond to the costs for calls to each band multiplied by your mark-up. You can obtain
costs for calls to the area codes listed in each band by calling your long distance carrier's customer support department.
Get costs for the first minute and each additional minute for calls to representative cities in each long distance band
programmed. The carrier will need to know area codes and exchanges for each city (use old phone bills to get these numbers). For example, to set the rate for Band 4 for $1.50 for the first minute and $. 60 for each additional minute:
Enter on Keypad:
Printer Responds:
#4, ENTER
BAND 4 LC FIRST MINUTE CHARGE?___, ENTER;
EACH ADDITIONAL MINUTE CHARGE?___, ENTER
BAND 1 LC FIRST MINUTE CHARGE = $1.50
EACH ADDITIONAL MINUTE CHARGE = $0.60
ENTER FUNCTION NUMBER
150, ENTER
60, ENTER
Rate #17: Default LD
Band 17 is designed to “catch” any calls not programmed into the long distance bands 4 through 16. If you listed all of the
Area Codes in the long distance bands, Band 17 will bill a call placed to an area code you may have missed or will help
identify a new area code which can then be added to the appropriate band.
If you are using Band 17 to handle the majority of calls in the US, set the rate accordingly and enter it in the same manner
as the previous rates.
Rates #18 through #23: OPR, INF. 800, 900, 976, OPI
These bands may or may not be billed based on your desires. 976 call costs may vary greatly and a band is provided for it
as a means of identifying these calls if made. It is recommended that 976 (and similar special exchanges) calls be blocked
by the PBX. The charges for these bands are set in the same manner as the previous rates.
Rates #23 through #32: INT
These bands are for International calls. See Appendix 5 for the cost basis used in preprogramming these bands. All carriers have international customer support departments than can quote international rates. Charges are set for these bands
in the same manner as the long distance bands.
Rates #33 through #42: Special
These bands correspond to a single type of special call.
Input a rate for each in the same manner as above.
To Begin Record Storage
To begin storing calls with no previous calls in the system, input PRINT, * 98, ENTER from the Operating Mode. This will
check out all extensions with calls and clear all totals by printing an Audit and Band Summary Report.
3.12
PhoneBill Motel
Program Changes
To enter the Programming Mode, press ENTER two times. The system will ask for the password. Enter the password followed by ENTER and the printer will print: ENTER FUNCTION NUMBER. You can go directly to any function, band or rate.
All programming functions are numbered 71 and above. Bands are numbered 1 through 42 and for programming purposes
are preceded with an *. Rates correspond to the bands but are preceded with a #.
To Change a Program Function
After entering the function number, re-enter all values for that function as if programming it for the first time. (Functions 79
through 82 are lists and are programmed like bands. To change Functions 79-82, follow the directions below.) Refer to
Section 3, Initial Programming for a complete description of each program function.
To Add an Area Code or Exchange to a Band
To add an area code to a band, enter the band and input the new area code. It will automatically be added to the existing
list for that band. To add area code 303 to Band 5:
Enter on Keypad: Printer Responds:
Enter on Keypad:
Printer Responds:
*5, ENTER
BAND 5 LD 409, 817, 806, 915, 512, 713
303, ENTER
ENTER
BAND 5 LD 409, 817, 806, 915, 512, 713, 303
ENTER FUNCTION NUMBER
To Delete an Area Code or Exchange From a Band
To delete an area code from a band, enter the band, press DELETE, then input the area codes to delete in the usual
manor. (To delete an entire list of area codes or exchanges, open the band, and press DELETE, *) To delete two area
codes, 409 and 512 from Band 5:
Enter on Keypad:
Printer Responds:
*5, ENTER
BAND 5 LD
DELETE
409, ENTER
512, ENTER
ENTER
BAND 5 LD 817, 806, 915, 713, 303
ENTER FUNCTION NUMBER
409, 817, 806, 915, 512, 713, 303
To Change a Band Rate
To change the rate for Band 2 from $1.50 for the first minute and $.45 for each additional minute to $1.50 and $.50 (both
values must be input):
Enter on Keypad:
Printer Responds:
*2, ENTER
BAND 2 LD FIRST MINUTE
EACH ADDITIONAL MINUTE
BAND 2 LD FIRST MINUTE
EACH ADDITIONAL MINUTE
ENTER FUNCTION NUMBER
DELETE
409, ENTER
512, ENTER
ENTER
CHARGE___, ENTER,
CHARGE ___ ENTER
CHARGE = $ 1.50
CHARGE = $ .50
To Exit Programming
To exit the programming mode and return to the Operating Mode, press ENTER three times.
4.1
Program Changes
PhoneBill Motel
(This page included for pagination purposes only.)
4.2
PhoneBill Motel
Operating Mode
Guest Activities
Guest activities, printing of reports and system self-tests are all performed from the Operating Mode. The self-test is rarely
used and is covered in the Troubleshooting section, Page 7.1. Guest activities and report printing will be used on a regular
basis. Directions for these activities are also printed on the PhoneBill case:
Guest Check-Out
Touch:
CHECK OUT
Room Number
Enter
Print Guest Summary
Touch:
PRINT
*1
ENTER
Print a Guest's Activity
Touch:
PRINT
Room Number
Enter
Print & Clear Audit Report
Touch:
PRINT
*2
ENTER
Credit Limit Change
Touch:
CR LMT
Room Number
ENTER
New Credit Limit (in dollars)
ENTER
Print & Clear Band Summary
Touch:
PRINT
*3
ENTER
To Check Out a Guest
CHECK OUT prints and clears an individual guest’s call records accumulated to that extension number from the point
when the last guest was checked out of that room. This guest's call records are cleared, but the accumulated totals are
maintained for later reports such as the Audit Report.
Press CHECK OUT, 101 (room number), or other . The printer prints the guest’s activity and clears his records.
To Print a Guest’s Activity
The guest’s call records can be printed but not cleared by printing thr guest’s Activity Report.
Press PRINT, 101 (room number), ENTER. The printer prints the guest’s activity but does not clear his records.
To Change a Credit Limit for a Particular Guest
A credit limit set in the system programming will automatically be assigned to each guest unless a different credit limit is
set here. This limit for any guest can be changed as often as necessary.
Press CR LMT, 105 (extension number), ENTER. The printer prints:
EXTENSION 105 CURRENT CREDIT LIMIT IS $10
Press 25 (new limit in even dollars), ENTER. The printer prints:
NEW CREDIT LIMIT FOR EXTENSION 105 IS $25
To be alerted when a guest makes his first billable call, input $1 as his credit limit.
Input o (zero) as the credit limit for no limit on a guest’s charges.
5.1
Operating Mode
PhoneBill Motel
Important: A complete explanation of each report is contained in the Reports section, beginning on page 6.1.
To Print a Guest Summary
Press PRINT, *1, ENTER. Printer prints report and buffers call activity until completed.
To Print an Audit Report
Press PRINT, *2, ENTER. Printer prints report, clears totals and buffers call activity until completed.
To Print a Band Summary
Press PRINT, *3, ENTER. Printer prints report, clears totals and buffers call activity until completed.
Printer Malfunction
Should the printer be out of paper, turned off or otherwise not responding (and is capable of alerting PhoneBill), PhoneBill
will beep several times whenever a check out or print request is made and continue to beep periodically until the problem
is corrected. The beeping can be halted by touching ## on the keypad. If printing in real time, the system will buffer up to
100 call records sent to the printer. When the printer malfunction is corrected, the system then resumes printing.
Power Failure
PhoneBill has a battery built into the circuit board that maintains the memory for an extended period. This includes the
system program, call records and reports.
When power is restored, PhoneBill will return to the operating mode and continue to process calls. Guests who have
checked out of the hotel during this period should have their call records printed and cleared by using the usual
checkout procedure.
Low Memory
Depending on the model, PhoneBill stores between 1,300 and 9,000 call records. Under normal conditions of constantly
checking guests in and out, the call record storage requirements will remain relatively constant. Occasionally, more call
records than usual will be accumulated and may exceed the capacity of PhoneBill's memory. In order to prevent any loss
of records, PhoneBill is designed to automatically print all call records to the printer if its memory usage reaches 100% of
capacity and start the storage process over again. A warning at 95% of memory capacity is printed so that this process can
be avoided by manually checking out some guests with large numbers of records or admin. phones.
When 100% of capacity is reached, PhoneBill will immediately check out all guests (in room number order) to the printer
followed by an Audit Report as of that point. This automatic download can also be requested at any time by pressing
PRINT *99 ENTER.
A guest who had calls during this period should be checked out in the normal fashion. However, the call records printed
will be only those accumulated since the download. Calls made by the guest prior to the download should be pulled from
the download printout and added to the current list of calls.
The next regular Audit Report will show activity since the download and should be added to the Audit Report created at
the end of the download. This will provide the true totals since the last regular Audit Report.
5.2
PhoneBill Motel
Reports
Call records are stored by room number until a guest checks out. At that time, the call records themselves are printed and
erased. Various totals are accumulated for use in reports and are maintained until the Audit and Band Reports are printed,
at which time the totals are cleared or reset. The reports are serially numbered as an additional audit feature.
Two reports, Area Code Report and System Program, are printed from the programming mode. All other reports are printed
from the operating mode and can be initiated by anyone. Bands or extensions that were set to “not count” in the system
program are not included in report totals. If printing in real time only, the band summary report will be the only report
available.
Call Record as Printed in Real Time
If the system is set to print in real time and a header is to print for each record, the output to the printer is :
EXT DATE
TIME
MIN
BAND
TYPE
DIALED
AMOUNT
101 11/26
12:16AM
4
5
LD
1 214 555-1250
$ 4.36
Credit Limit Notice
A line like the one below will be printed and the system will beep when a guest exceeds their credit limit for the first time:
*******ROOM 112 HAS EXCEEDED ITS $20 CREDIT LIMIT WITH A TOTAL OF $24.18********
Check Out or Guest Activity
This report is printed when either the Check Out or Guest Activity report is requested. Guest Check Out will print and erase
the individual call records for that guest. Guest Activity will print the active call records but not erase them.
ROOM 101
DATE
TIME
MIN
BAND
TYPE
DIALED
AMOUNT
11/26
12:16AM
4
5
LD
1 214 985-1250
$
4.36
11/26
3:18PM
7
9
LD
1 309 444-2134
$
11.40
________________________________________________________________________________
11
$
15.76
Guest Summaries Report
If records are accumulated for check out, this report shows totals for all rooms with active call records (records for each
guest who has not checked out). This report can be printed as often as needed since it provides a “snapshot” of current
activity and does not clear totals when printed. **** will print beside the guests who have exceeded their credit limits.
LC column includes bands 1 and 3, LD column includes bands 2, and 4 through 18, OTH column includes bands 19
through 42.
GUEST SUMMARY
#47
EXT
FIRST CALL:
LAST CALL:
#LC MIN
#LD MIN #OTH MIN
TOTAL CR LMT
101 11/12 12:16AM 11/14 08:16AM
4
24
2
37
1
2
$ 17.36 $15
****
102 11/13 12:24PM 11/15 03:26AM
5
30
3
44
0
0
$ 12.33 $15
____________________________________________________________________________
9
54
5
81
1
2
$29.69
6.1
Reports
PhoneBill Motel
Audit Report
This report shows the totals for all guests who have checked out since last printed. A room may appear more than once
indicating that the room has been occupied more than once since this report was last printed. Ideally this report should
be printed daily. If this report is not printed on a regular basis (at least weekly), accumulated totals will eventually become
meaningless. When printed, the totals in this report will be cleared.
FIRST CALL:
11/12 12:16AM
AUDIT REPORT
# 18
LAST CALL:
11/14 08:16AM
EXT #LC
MIN
#LD
MIN #OTHER MIN
TOTAL
101
4
24
2
37
1
2 $ 14.36
102
5
30
3
44
0
0 $ 12.33
____________________________________________________
9
54
5
81
1
2 $ 26.69
Band Summary
This report will provide totals for each band and the grand total for all call records generated since the last time this report
was printed. When printed, the totals in this report will be reset.
FIRST CALL:
11/10 12:16AM
BAND SUMMARY
# 5
LAST CALL:
11:25 08:10PM
BAND TYPE
# OF CALLS
MIN
TOTAL
1
LC
16
44
$12.60
2
LD
22
87
$31.30
_____________________________________________
38
131
$43.90
Rates by Area Code and International Code
This report is printed from the programming mode and shows the rates for each area code programmed into bands 4
through 17 and country codes programmed into bands 24 through 32. It can serve as a reference when guests request
information on the rates for a particular long distance call.
RATES BY AREA CODE & INTERNATIONAL CODE
A/C
201
202
203
BAND
5
7
9
TYPE
LD
LD
LD
1ST MIN
1.50
1.65
1.80
ADDL MIN
.40
.45
.60
Auto Check-Out
From the Operating Mode, pressing PRINT, * 99, ENTER will automatically check out all guests in room number order and
print an Audit Report. PRINT, * 98, ENTER will automatically check out all guests, print an Audit Report and Band Summary
Report thus clearing all calls and totals from the system.
6.2
PhoneBill Motel
Troubleshooting
The following test procedures are designed to isolate a failed component such as the printer, the PBX, PhoneBill, or the
cabling. PhoneBill, along with the cables, was thoroughly tested before leaving our factory. If additional cable runs are
necessary, a careful continuity check should be performed to verify the wiring integrity. A wiring diagram is provided in the
Hardware Installation section. These self-tests can be run from either the Operating or Programming Mode.
Important: Before performing any of the PhoneBill system tests, double check that the power source is functioning
properly and is not overloaded, and that the PhoneBill case is properly grounded.
General
If nothing prints from PhoneBill to the printer, check the obvious first: cables connected properly, power plugged in and
printer turned on.
If the printer is working correctly with PhoneBill, but nothing will pass from the PBX, then the problem is probably either
the wiring from the PBX to PhoneBill; or the settings for the baud rate, data bits, stop bits or parity are not set properly so
that the characters from the PBX are not recognized by PhoneBill.
If the call record is legible but is shown as an invalid call record, then PhoneBill is reading the characters correctly but they
are not in the proper fields. Check that the Telephone System Type (Function 74) is set correctly or a custom type may need
to be set (Appendix 3).
If a call record occasionally shows as Invalid, then the baud rate, data bits, stop bits or parity may not match from the PBX
to PhoneBill resulting in characters being read incorrectly from the PBX.
Power Up
Upon power up, PhoneBill runs a series of internal tests to verify many of the hardware and software components. When
completed, PhoneBill will beep three times to confirm that the hardware and software are working correctly, and send a
log-on message to the printer to verify correct communication between PhoneBill and the printer.
If the printer does not print, but PhoneBill has beeped three times, the problem probably lies with the printer, cable, or
PhoneBill output port. Double check the cable connections to the printer, and run the printer self- test. Consult the printer
manual to run this test.
If PhoneBill did not beep three times following power up, initialize the system (see page 3.1). If it fails to beep three times
after initialization, consult the factory.
Parallel Printer Port
To verify that the printer is printing correctly, run the printer self-test. Most printers have a
self-test mode which will usually print their character set.
Two LEDs located on the lower left side of the circuit board (as viewed from the bottom with the case
open) are designed to help diagnose parallel port problems. Under normal conditions, the display
shows only the SEL LED illuminated.
SEL LED illuminated — indicates that the printer is ready to receive data.
SEL LED off — indicates that the printer is off-line, or for some other reason cannot receive data. Check
the printer manual for help.
BUSY LED illuminated — indicates that the printer cannot receive data. This could include printer offline, out of paper, or other printer error. Check the printer manual for help.
7.1
Troubleshooting
PhoneBill Motel
Serial Printer Port
To verify that the printer is printing correctly, run the printer self-test. Most printers have a self-test mode that will usually
print their character set.
Note: The printer self- test may not test its serial port. Consult the printer manual to run this test.
Three LEDs located on the center left side of the circuit board (as viewed from the bottom with the case
open) are designed to help diagnose problems with the serial printer port. Normal condition should
show the PRN LED illuminated and flickering as data is passed to the serial printer, the top DSR LED off,
and the bottom DSR LED illuminated.
If the PRN LED is illuminated and flickers as data is transmitted, but the printer
does not print...
(1) Double check the cable connections to verify that:
— Pin 2 of PhoneBill’s serial port is connected to “Receive Data” (usually Pin 3) of
the printer.
— Pin 5 connects to the printer signal ground (usually Pin 7)
— Pin 4 is connected to the printer DTR (usually Pin 20).
(2) Confirm that Function 73 is set to match the printer.
If the PRN LED is illuminated but does not flicker as data is transmitted, check
the DSR LEDs as follows...
Top DSR LED illuminated — Indicates wrong polarity on DTR of printer. Verify Pin 4 is connected to the
printer DTR (usually Pin 20) and that the printer is programmed to perform hardware handshaking at the DTR Pin and the
proper polarity is set.
Bottom DSR LED illuminated — Indicates handshaking between PhoneBill and the printer is correct.
Bottom DSR LED Off — Indicates no handshaking. Verify Pin 4 is connected to the printer DTR (usually Pin 20) and that the
printer is programmed to perform hardware handshaking at the DTR Pin.
PRN LED Off — Indicates a cable problem or malfunction in PhoneBill.
Note: If you have the PMS option and the PRN LED is off, check the JP24 on the PhoneBill circuit board for correct positioning. For example: At the PMS interface, jumpers should be on pins 1 & 2. For basic serial printer port operation,
jumpers should be on pins 2 & 3.
Serial Printer Port Test
To test that PhoneBill is communicating with a serial printer, if used, run the Output Test by pressing PRINT, PRINT, ENTER.
The Output Test will send several lines of information to the printer using a different combination of baud rate/data bits/
stop bits/ parity for each line. One or more of these lines should print.
If nothing prints, verify that the printer is working properly by running the printer self test and verify that the cable is
correct and run this test again. If one or more lines print, then the proper format can be determined and set correctly in
either the printer and/or PhoneBill.
7.2
PhoneBill Motel
Troubleshooting
PBX Serial Port
The PBX LED is located on the top center of the circuit board (as viewed from the bottom through the case opening) between the two right hand printer ports and is designed to confirm that data is received from the PBX. Normal condition is
the LED illuminated and flickering as data is passed from the PBX to PhoneBill.
If the PBX LED does not flicker, confirm that TD of the PBX (usually Pin 2 [Mitel Pin 3]) is connected to Pin 3 of PhoneBill
and that the PBX signal ground (usually Pin 7) is connected to Pin 7 of PhoneBill. Additionally, if the PBX requires handshaking, consult the PBX manual.
Note: PhoneBill does not require handshaking.
To verify that the PBX is sending data, connect a break-out box or RS232 monitor directly to the PBX port to verify that it is
indeed transmitting data. A multi-meter can also be used by connecting TD of the PBX or Pin 3 of PhoneBill to the positive
lead of the meter and negative lead of the meter to Pin 7. Before data is transmitted, the meter should read between -2
and -12 VDC. During data transmission, the meter should read between +2 and +15 VDC.
“INVALID SMDR RECORD FOLLOWS” printed indicates that data has been received from the PBX, but PhoneBill is
unable to decipher it. Check Function 74 for correct Telephone Type.
If the PBX LED does flicker and incorrect data is printed, check Function 72 for correct programming. Verify by using the test
in Appendix 1.
Keyboard Test
To test that all of the keys on the PhoneBill keyboard are being recognized by PhoneBill, perform this self-test:
1. Press CHECK OUT, CHECK OUT.
2. Press each key in order from left to right, ending with ENTER.
The printer should print each key in the order pressed.
Optional Property Management System
Troubleshooting installation of the optional Property Management System interface is covered in Appendix 10.
7.3
Troubleshooting
PhoneBill Motel
(This page included for pagination purposes only.)
7.4
PhoneBill Motel
Appendices
Appendix 1: PBX Input Setup Test
The serial input from the PBX consists of Baud Rate, Data Bits, Stop Bits and Parity. If these values are known or can be
programmed in the PBX, do so and set the matching values in Function 72 accordingly. If you do not know these values,
PhoneBill will help you determine them through a process of trial and error in this test.
By placing several calls to a number that PhoneBill is programmed to recognize, the correct settings will be identified.
Therefore place an outside call to the number 1234567890 (a central office intercept may announce that this is an invalid
telephone number, but just ignore this message). PhoneBill will have no grace period during this test; however, you must
stay off hook on each call for at least as long as the PBX grace period, if it has one.
The system will print that it is trying various combinations until it finds the correct setting and print. For example:
PBX SETUP: 1200 BAUD, 8 DATA BITS, 1 STOP BIT, 0 PARITY
Function 72 will automatically program with these values. You can exit this test at any time by touching any key.
Appendix 2: Telephone System Type
Type
0
1
2
3
4
5
6
7
8
9
10
11
12
13
14
15
16
17
18
19
20
21
22
23
24
25
26
27
28
29
30
31
32
33
34
35
36
37
38
39
40
Manufacturer
None (See Appendix 3, Telephone System SMDR Settings)
Mitel (Time field in normal AM/PM mode)
Candela Cardinal, Comdial Cardinal or Innplace, Estech (ESI) 803/515
Panasonic (some systems may not match)
Comdial Executech (3 digit extension number)
Mitel SMART One Dialer
Mitel (Time field in Military time)
Type Manufacturer
NEC (NEAX) (primary)
41 TIE Onyx III
SST, Henriksen PBXtra
42 ITT 3100
Siemens
43 Macro Tel MT-80D
Premier ESP
44 Atlas II KSX 32
Tadex
45 Bitronic
OKI Discovery III
46 Inter-Tel GMX 152D
Toshiba
47 Inter-Tel GMX 120
Jistel
48 Toshiba DK
Dimension (primary)
49 Siemens Saturn IIe
Memorex Telex
50 Bell UCX 2000
Isoetec
51 Entel SDX375
Comdial Executech (2 digit ext #)
52 AT&T Omni
NEC (NEAX) alternate
53 Macrotel MT 1236ME
Comdial InnTouch
54 Macrotel 16H
Toshiba II, Perception
55 NT Option 11
Panasonic DBS
56 Panasonic DBS
Toshiba Strata 20
57 Toshiba P4000
TIE TCX-128
58 Siemens SD-80
NEC 16/48
59 Siemens SD-192
Telrad Symphony II
60 Siemens 192MX
Dimension 400
61 Vodavi 1428
NEX NEAX 2400 IMS
62 Fairchild Lexar
NEC MARK II
63 Samsung Prostar 56/120
ROLM Redwood 9722
64 Macrotel MTH128/MTH32
STC Prostar Rev 1
65 Transtel
STC Prostar Rev 2
66 Tadiran Coral
SouthBell VCX3000
67 Sprint Protege 48/72
ISOTEC System 66
68 Sprint Flatpack 32
Premier DX
69 NEC Pro II & IIA (one-line SMDR)
Executech 2000
70 Samsung DCS
Panasonic KX-TD1232
71 BBS 308
Panasonic 336
72 NEC Pro II & IIA (two-line SMDR)
Rolm CBX
73 Toshiba Strata DK 280
Merlin 3070
8.1
Appendices
PhoneBill Motel
Appendix 3: Telephone System SMDR Settings
The SMDR output from most PBX systems is 80 columns. PhoneBill looks to the specific positions within that 80 columns
to find the data it needs to calculate the call records. The most common PBX formats have been included in our programming tables, however, telephone system specifications are constantly changing, even from model to model for the same
manufacturer. Therefore, the SMDR format from your PBX may need to be input manually.
If you chose Telephone System Type 0 (zero) in Function 74, PhoneBill will prompt for the specific character locations of
the pertinent fields of the SMDR output. PhoneBill will print a location header to aid you in defining the locations of the
particular fields. PhoneBill needs the start position of the date, time, duration, extension number, and number dialed
fields. In addition, it will need to know what the date, time and duration “look like.” (There will be additional information
in the SMDR output that PhoneBill doesn't need — just ignore it.) You can determine the locations of these fields by making a long distance call that will print just after the location header has printed. This long distance test call should be at
least 30 digits long — e.g., 123456789012345678901234567890 to help determine the exact length of the “number
dialed” field (be sure to stay off hook for at least 1 minute to exceed the grace period).
Some phone systems print the date once a day or periodically rather than including it in each call record. If so, use the
appropriate periodic date style below. Indicate the start column for the date as it appears when printed and the start
columns for the other data from the actual call records when printed. As each new periodic date is received from the PBX,
PhoneBill will use that date for the call records that follow until the next periodic date is received.
After the test call has printed, fill in the worksheet on the following page and input the 16-digit entry. Be sure to use a
leading zero where two digits are required but the value consists of only a single digit. To change one of the values later,
input the entire line of information.
Enter on
Keypad:
Printer
Responds:
74, ENTER
74,
0, ENTER
TELEPHONE SYSTEM TYPE = 0
CURRENT TYPE 0 SETUP: 00000000000000
DATE STYLES:
1. MM/DD & MM/DD/YY
2. DD/MM & DD/MM/YY
3. MM/DD & MM/DD/YY (PERIODIC)
4. DD/MM & DD/MM/YY (PERIODIC)
5. JULIAN (NUMBER OF DAYS IN YEAR)
6. MMDD & MMDDYY
7. MM DD & MM DD YY
8. DD MMM (PERIODIC, MONTH FORMAT: JAN, FEB, ETC.)
9. MM-DD & MM-DD-YY (PERIODIC)
TIME STYLES:
1. HH:MMP (P=PM)
2. HH:MM (MILITARY)
3. HHMM (MILITARY)
4. HH:MM:SS PM
5. HH:MM PM
6. HHMMSS (MILITARY), CALL START TIME
7. HH MM P
DURATION
1. HH:MM:SS
STYLES:
2. HH:MM
3. MMM.T or MMM
4. HH:MM.T
5. MMMT
6. HHMMT (MILITARY)
7. MM:SS
8. HHMMSS (MILITARY), CALL COMPLETION TIME
9. MMMM
ENTER 20-DIGIT ENTRY, 'AABCCDEEFGGHIIJJKKLL', AS DESCRIBED BELOW:
|----|-----|----|-----|--------|-----|----|----|------|----|
|DATE|DATE |TIME|TIME |DURATION|DUR. |EXT.|EXT.|NUMBER|NUM.|
|COL.|STYLE|COL.|STYLE| COLUMN |STYLE|COL.|LEN.|COLUMN|LEN.|
|----|-----|----|-----|--------|-----|----|----|------|----|
| AA | B | CC | D |
EE
| F | GG | H | II | JJ |
|----|-----|----|-----|--------|-----|----|----|------|----|
80 COLUMN RULER FOLLOWS:
00000000011111111112222222222333333333344444444445555555555566666666677777777778
12345678901234567890123456789012345678901234567890123456789012345678901234567890
ENTER TELEPHONE SYSTEM TYPE
(procedure continues on page 8.3)
8.2
PhoneBill Motel
Appendices
(Procedure continued from page 8.2.)
Printer
Responds:
Enter on Keypad:
0210811512443426
ENTER
|----|-----|----|-----|--------|-----|----|----|------|----|
|DATE|DATE |TIME|TIME |DURATION|DUR. |EXT.|EXT.|NUMBER|NUM.|
|COL.|STYLE|COL.|STYLE| COLUMN |STYLE|COL.|LEN.|COLUMN|LEN.|
|----|-----|----|-----|--------|-----|----|----|------|----|
| 02 | 1 | 08 | 1 |
15
| 1 | 24 | 4 | 34 | 26 |
|----|-----|----|-----|--------|-----|----|----|------|----|
ENTER FUNCTION NUMBER
Worksheet:
DATE
COL.
DATE
STYLE
AA
B
02
1
TIME
COL.
TIME
STYLE
DURATION
COLUMN
DUR.
STYLE
CC
D
EE
F
08
1
15
1
EXT.
COL.
EXT.
LENGTH
NUMBER
COLUMN
NUM.
LEN.
GG
H
II
JJ
24
4
34
26
Appendix 4: 1+ Not Required Programming
If you are in an area where a long distance call can be made without dialing a 1 first, then Bands 1, 2 and 3 require additional programming.
Bands 1 and 2
Bands 1 and 2 are for 7-digit numbers that will include local calls and 7-digit long distance calls (calls within the home
area code where the area code is not dialed).
Important: If you are in an area where 1 must be dialed before a long distance call, then Band 1 is automatically local
and Band 2 is 1+ 7 digit long distance. You need not program these bands.
If you are in an area where a long distance call can be made without dialing 1 first, then you must program into PhoneBill
the precise exchanges for the local or long distance calls. You can get a list of the long distance or local exchanges from
your telephone company, or in most cases from the front of the phone book.
Input each exchange into the appropriate band separated by ENTER. You only need to input the list of exchanges for either
Band 1 or Band 2 whichever list is the shortest (when a call record is received from the PBX, PhoneBill looks first for a
match with the band with the list and assumes if it is not there, then the call must belong to the other band).
For programming purposes, always begin a band number with an *.
If 1+ is not required for a long-distance call...
Enter on Keypad:
Printer Responds:
*1, ENTER
or
*2, ENTER
BAND 1 LC (LOCAL CALLS)(LIST)
ENTER FUNCTION NUMBER
or
BAND 2 LD (7 DIGIT LD ONLY)
(LIST EXCHANGES)
BAND 2 EXCHANGES: 596, 423, 345, 449
ENTER FUNCTION NUMBER
596, ENTER
423, ENTER
345, ENTER
449, ENTER
ENTER
8.3
Appendices
PhoneBill Motel
Band 3
In some areas, a local call can consist of 10 digits. If you are in such an area and 1+ is not required, then you must list the
area code and exchange for each such exchange.
Enter on Keypad:
Printer Responds:
*3, ENTER
BAND 3 LC (LIST AREA CODES)
817596, ENTER
817423, ENTER
817345, ENTER
817449, ENTER
ENTER
BAND 3 LC:
817596, 817423,
817345, 817449
ENTER FUNCTION NUMBER
Appendix 5: Regions
The long distance bands can be programmed with individual area codes selected from a long distance map.
To save time during initial programming, some long-time area codes (i.e., none added in recent years) of North America
have been pre-grouped into Regions. Instead of entering individual area codes into the bands, Regions of area codes can
be entered. You might program the area codes in the home Region individually, with Band 4 being the home area code,
Band 5 the home state area codes, Band 6 the area codes for the rest of the home region, and then Bands 7 through 16
assigned by Region.
Important: The continual and rapid changes in North American area codes has made it impossible for us to provide
an accurate area code map. Ask your telephone service provider for an up-to-date listing or consult
http://www.555-1212.com (location may change) for the latest information.
The Regions shown on this map are to simplify initial programming only. Enter Region number(s) 1 through 10 into a band
just as you would enter an area code. The system will automatically "paste" the area codes for that Region into the band.
Once entered into the bands in this fashion, the area codes can then only be added or deleted as individual area codes,
not as a Region. (Another shortcut method is to place the home area code in a band, Canada [Region 10] in a band and
allow all other area codes to default to Band 17.)
10
7
5
1
4513
8
2
6
3
AK
AL
HI
HI
907
9
808
8.4
(Region 3 includes
Bermuda, Puerto Rico,
Virgin Islands)
PhoneBill Motel
Appendices
Appendix 6: Predefined International Bands
Because International calls are charged the same from any point in the U.S., it is possible to group these country codes
in advance. Below are the country codes that have been pre-assigned to the first seven International Bands. While the
rates vary from country to country and based on time of day, those grouped together below have rates that are relatively
close together.
If the motel has a particular ethnic tie to a certain country, that country code can be broken out to a separate International
band and costed more precisely.
Country codes (but not the rates) are preprogrammed as a convenience.
You can change the band structure exactly as you would change any other band. Because International calls are charged
the same from any point in the U.S., it is possible to group these country codes in advance. Below are the country codes
that have been pre-assigned to the first seven International Bands. While the rates vary from country to country and based
on time of day, those grouped together below have rates that are relatively close together.
If the motel has a particular ethnic tie to a certain country, that country code can be broken out to a separate
International band.
Country codes (but not the rates) are preprogrammed as a convenience. You can change the band structure exactly as you
would change any other band.
Band
Country Codes
24
27, 31, 32, 33, 34, 39, 41, 43, 44, 45, 46, 47, 49, 58, 234, 264, 297, 298,
353, 501, 502, 503, 504, 505, 506, 507, 508, 509, 590, 596, 599, 5399
25
30, 36, 37, 38, 40, 42, 48, 51, 54, 55, 56, 57, 90, 299, 350, 351, 352, 354,
356, 357, 358, 359, 591, 593, 594, 595, 597, 598
26
20, 212, 213, 216, 218, 220, 221, 225, 228, 229, 231, 237, 241, 243, 247,
254, 255, 256, 260, 263, 265, 266, 267, 268, 592, 965, 966, 971
27
61, 65, 81, 98, 251, 851, 962, 967, 968, 972, 973, 974
28
52, 60, 62, 63, 64, 66, 82, 227, 238, 670, 671, 673, 675, 679, 684, 687,
689, 691, 692, 853, 886
29
86, 92, 94, 880, 977
30
91
8.5
Appendices
PhoneBill Motel
Appendix 7: Worksheet
Location ______________________________________
Date _________________
Function 71. Password = _____ _____ _____ _____
Function 72. Input Format = _____ _____ _____ _____
Function 73. Output Format = _____ _____ _____ _____
Function 74. Telephone System Type = _____ _____
Function 75. 1+ Required = _____
Function 76. Print Call Records = _____
Function 77. Print Out Options= _____ _____ _____
Function 78. Credit Limit = _____ _____ _____
Function 79. Don’t Print Extension Calls =_______________________________________________
Function 80. Don’t Count Extension Calls = ______________________________________________
Function 81. Don’t Print Calls to Bands =___________________________________________________
Function 82. Don’t Count Calls to Bands = _________________________________________________
Function 83. Grace Periods = _____ _____ _____ _____ _____ _____
Function 84. Normal Extension Rates =______________________________________
_____ _____ %
Function 85. Print Non-Call Record Data = _____
Function 86. Report Pass Through = _____
Function 87. Evening Rate Start time, End time, and Percentage =
_____ _____ _____ _____ _____ _____ _____ _____ _____ _____ _____
Apply to Weekends = _____
Function 88. Evening/Weekend Bands =_______________________________________________________
Function 89. Current Year Setting = _____ _____ _____ _____
Function 90. Slower Printer Adjustment = _____
Function 91. Enable Primary/Alternate Extensions = _____
Function 92. Automatic Reports = _____ _______________________________________________________
Function 93. Program Reports = ________________________________
Function 94. Print Access Codes = _____________________________
List below (or on a separate sheet) each Band programmed with Area Codes (or Regions) and/or Rates:
Band
8.6
ACs and/or Rates
PhoneBill Motel
Appendices
Appendix 8: Master Password
A Master Password allows entry into the Programming Mode if the regular password is forgotten or lost.
The Master Password is entered in the same manner as the regular password: Press ENTER two times (the system beeps
three times) and press PRINT, 6, 7, ENTER. The printer responds: ENTER FUNCTION NUMBER.
Caution!
With the Master Password, anyone can gain access to the programming mode. Remove this page from
the manual and store in a safe place if you do not want those with access to this manual to be able to enter the Programming Mode. We have purposely left the other side of this page blank so that, if you
choose to store this page, you will still have other the rest of the manual conveniently available.
8.7
Appendices
PhoneBill Motel
(Continue to the next page for more of the Appendices.)
8.8
PhoneBill Motel
Appendices
Appendix 9: Toll Control Option
The optional Toll Control feature is available for interface to the Mitel SX20 and SX50 only. If PhoneBill has Toll Control, the
log-on message will indicate: PHONEBILL (model number) with TOLL CONTROL Motel (software version)...
Hardware Installation
With Toll Control, PhoneBill will have a standard telephone line cord extending from the back of the case. This should be
connected to the test port of the SX20 or SX50. The test port is always port one on the SX20 and its position is programmable on the SX50.
The test port must be a dedicated port and must be activated as such from the Mitel console. Once programmed at the
Mitel console, confirm by connecting a standard 2500 set to the test port and then deny or allow calls for a convenient
extension by dialing *22 XXX 9 (XXX being the extension number to block) and *22 XXX 0 to allow trunk calls. Next, connect PhoneBill to the test port and generate the deny and allow signals by setting a credit limit of "0" to allow and "#" to
deny for an extension.
Programming Mode
Function 781: Toll Control Option
With Toll Control, Function 781 will supersede the normal Function 78 Credit Limit feature. The Toll Control feature can be
turned off in Function 781 so Function 78 becomes operational again. Toll Control is further programmed as follows:
If call records are accumulated for guest check out, a default can be set to automatically assign each guest a Credit Limit. A
default Credit Limit of any whole dollar amount or 0 (no credit limit) will allow trunk access from all vacant room phones.
Entering a # as the default will deny trunk access to all vacant room phones by sending the deny message to the PBX as
each guest checks out.
Default: 1, #.
Enter on Keypad:
Printer Responds:
781, ENTER
781,
1, ENTER
TOLL CONTROL ENABLED: 1, YES
CREDIT LIMIT FOR ALL ROOMS?
CREDIT LIMIT FOR ALL ROOMS = #, RESTRICTED
ENTER FUNCTION NUMBER
#, ENTER
ENABLE TOLL CONTROL?
(1=YES, 0= NO)
Operating Mode
The Credit LImit (and corresponding restriction) can be changed from the operating mode on a guest-by-guest basis as
each guest checks in. If # (deny) is the default, as a guest checks in, setting a credit limit (or a 0 [zero] setting) will then
allow trunk access. At any time, entering # as the credit limit will deny trunk access.
When a credit limit is surpassed, PhoneBill will beep, print a notice to the printer and deny trunk access to that room.
Raising the credit limit or setting 0 as the credit limit will again allow trunk access.
Note: A room phone is denied access after completion of the call that exceeds the credit limit.
8.9
Appendices
PhoneBill Motel
Appendix 10: PMS Interface
The Property Management System (PMS) interface is an optional feature of PhoneBill for Motels. If PhoneBill has PMS, the
log-on message will indicate: PHONEBILL (model number)
Motel (software version) PMS...
The PMS interface allows PhoneBill to be connected to most Property Management Systems via the 9 pin serial port
located on the back of PhoneBill. Once connected to the PMS, PhoneBill will automatically send each costed call record to
the PMS as generated. In addition, PhoneBill will store and print in real time call records to the parallel printer set up with
PhoneBill if the PMS is off-line or disabled.
Note: A parallel printer is the only kind that can be used with the PMS feature.
Hardware Installation
PhoneBill is connected to the PMS via the third port (right hand port on the back of PhoneBill). This port is a male DB9
plug and is connected to the PMS using the cable provided or wired per the following pin-out:
Pin #
Tip:
1
2
3
4
5
6
7
8
TD
RD
DSR
GND
DTR
CTS
RTS
9
Some PMS systems may require a hardware handshake by jumpering pins 4 and 5 together and
pins 6, 8 and 20 together.
Programming Mode
With the PMS feature, PhoneBill is programmed in the normal fashion with the addition of the three new functions. These
functions control the output format such as baud rate, data bits, stop bits and parity, the PMS type and enabling PMS mode.
Function 171: PMS Mode Enabled
The PMS feature can be enabled or disabled with Function 171. With the PMS feature enabled, all valid call records (those
that pass the grace period, those not in “Don’t Count Extension Calls” and those not in “Don’t Count Band Calls”) are sent
to the PMS port. With the PMS feature disabled, PhoneBill performs as a regular system without the PMS feature installed.
Default: 1.
Function 172: PMS Output Format
PhoneBill's output format to the PMS serial port must be set to match the PMS requirements. Function 172 performs and
is programmed exactly as Function 72. Turn to Function 72 and follow the instructions shown.
Default: 6810.
Note: The default for the PMS port is 9600 Bd, 8 Data Bits, 1 Stop Bit, No Parity.
Function 173: PMS Output Style
PhoneBill must also be programmed to output to the PMS the style needed to process the information. PhoneBill has
preset styles that match virtually all existing PMS (including the popular Micros - Preset Protocol Type 2, and Encore and
Holidex - Preset Protocol Type 3).
Protocol Type
8.10
Description
1
HB: EECO, New Systems Inc
2
MR: Automatic Records Master, ESP, Image, Innkeepers, IPCS, Jonas and Erickson, Marlboro Computer,
Micros, Pacific Coast, Property Manager, Quantel, Stendig, Sunburst
3
HX: Amstar, CLS, Compass, Compu-solve, Dehan PMS, Encore, Fabco, HIS, Holidex, HRGAS, IHS, Inn
Solutions, Inn-Star, Lodgemate, Logistix, Omron, Otto Clerk, Reserve 5, Resort Computer, Resort Data
Processing, Springer Miller, Star, Stuart Information Systems, 21 Century Motel
4
MR Alternate: Same as Type 2 listed above except that the ACK is a HEX 06 instead of a HEX 79 and the
NAK is a HEX 15 instead of a HEX 6E.
PhoneBill Motel
Appendices
Installation Troubleshooting Protocols
Note: If the system is up and running successfully, skip this section and proceed directly to PMS Operating Mode
(Page 8.16).
Type 1: HB Protocol
If your PMS programming screen shows the following string, your PhoneBill should be functioning properly (this is an
example; the actual characters will vary depending on specific PhoneBill programming):
FIELDS
1
2
001
A
3
TEL
4
08/27
5
102
6
15:00
7
0002
8
$004.50
9
543-7654
10
L
Field Descriptions
Field 1 = 3 characters: Sequence number which increments to 999 followed by 000. This number is cleared every day at
1 AM, 7 AM, 1 PM and 7 PM (every 6 hours)
Field 2 = 1 character: The letter that follows the sequence number with no separating space. Starts with the letter A and
increments (B, C, D ... ) when Field 1 wraps around to 000. This field is set to an A every day at 1AM, 7AM, 1PM and 7PM
(every 6 hours).
Field 3 = 3 characters: Three character identifier that is always TEL.
Field 4 = 5 characters: Date of call. Leading zeros are sent in both the month and day fields separated by a slash.
Field 5 = 5 characters: Room or extension number that placed the call. Leading zeros are not used.
Field 6 = 5 characters: Time of call. Leading zeros are sent in both the hour and minute fields, which are separated by a colon.
Field 7 = 4 characters: Call duration in minutes. Leading zeros are included.
Field 8 = 7 characters: Call cost in dollars and cents, preceded by the dollar sign. Leading zeros are sent in both the dollars
and cents fields, which are separated by a decimal point.
Field 9 = 12 characters: Called number. Normally consists of the Area Code, Exchange and the last four digits of the number dialed, separated by dashes. No embedded spaces are sent.
Field 10 = 1 character: Local/Foreign indicator. L means Local, F means international, and space means anything else
(typically long distance).
Important: If you have selected Type 1 and don’t see all the fields shown above, troubleshoot the 9-pin port by
changing Function 173 to Type 2 and check Type 2 (MR #1) Protocol.
Responses
PHONEBILL
EXTERNAL PMS
Normal Delivery of a Message to the PMS
SOM (text) EOM
ACK
Busy Response by the PMS
SOM (text) EOM
NAK
WAIT 3 SECONDS AND REPEAT
WAIT 3 SECONDS AND REPEAT
PMS responds, but cannot accept data at this time. PhoneBill re-transmits data after 3 seconds until the PMS accepts the
message, or until 3 NAK responses are received, at which time the PMS message dumps to the printer.
No Response from the PMS
SOM (text) EOM
No Response
WAIT 5 SECONDS
If there is no response to the data message, PhoneBill prints the PMS data message.
8.11
Appendices
PhoneBill Motel
Specification Link Control Characters
ACK: A HEX 06 is used for the ACK. An ACK is used to represent a positive acknowledgment by the PMS. An ACK will be
sent in response to data transfer indicating successful reception of the data by the PMS.
NAK: A HEX 15 is used for the NAK. An NAK is used to represent a negative acknowledgment by the PMS. NAK will be sent
in response to a data transfer indicating unsuccessful reception of the data by the PMS and requests that the data be retransmitted.
SOM: A HEX 0A (line feed) is used for the Start of Message.
EOM: A HEX 0D (carriage return) is used for the End of Message.
Type 2: MR #1 Protocol
When using Type 2, MR #1 Protocol to test a 9-pin port:
1. Place test call to a valid number.
2. Once connected, wait 5 seconds and disconnect.
3. Press the lower-case y on the keyboard to verify the FIELD string shown below.
4. If the four-field string shows properly, the 9-pin port is functioning properly.
If your PMS programming screen shows the following string, your PhoneBill should be functioning properly (this is an
example; the actual characters will vary depending on specific PhoneBill programming):
FIELDS
1
ac01
2
0102
3
000450
4
0005437654
Field Descriptions
Field 1 = 4 characters: Start of message, which is always ac01.
Field 2 = 4 characters: Room or extension that placed the call.
Field 3 = 6 characters: Call charge which is represented in cents (no decimal point)
Field 4 = 10 characters: Called number. The telephone number field always contains 10 digits.
Responses
PHONEBILL
EXTERNAL PMS
Normal Delivery of a Message to the PMS
(Text) plus carriage return
ACK
Busy Response by the PMS
(Text) plus carriage return
NAK
WAIT 3 SECONDS
(Text) plus carriage return
NAK
PMS responds, but cannot accept data at this time. PhoneBill re-transmits data after 3 seconds, or until 2 NAK responses
are received, at which time the PMS data message will be dumped to the printer.
No Response from the PMS
(Text) plus carriage return
No Response
WAIT 5 SECONDS
If there is no response to the data message, PhoneBill prints the PMS data message.
Specification Link Control Characters
ACK: A HEX 79 (y) is used for the ACK. An ACK is used to represent a positive acknowledgment by the PMS. An ACK will be
sent in response to a data transfer indicating successful reception of the data by the PMS.
NAK: A HEX 6E (n) is used for the NAK. An NAK is used to represent a negative acknowledgment by the PMS. NAK will be sent
in response to a data transfer indicating unsuccessful reception of the data by the PMS and requests that data be re-transmitted.
8.12
PhoneBill Motel
Appendices
Type 3: HX Protocol
If your PMS programming screen shows the following string, your PhoneBill should be functioning properly (this is an
example; the actual characters will vary depending on specific PhoneBill programming):
FIELDS
1
2
001 A
3
TEL
4
08/27
5
102
6
15:00
7
0002
8
$004.50
9
543-7654
10
L
Field Descriptions
Field 1 = 3 characters: Sequence number which increments to 999 followed by 000. This number is cleared to 001 every
day at 1 AM, 7 AM, 1 PM and 7 PM (every 6 hours)
Field 2 = 1 character: The letter that follows the sequence number with no separating space. Starts with the letter A and
increments (B, C, D ... ) when Field 1 wraps around to 000. This field is set to an A every day at 1 AM, 7 AM, 1 PM and 7 PM
(every 6 hours).
Field 3 = 3 characters: Three character identifier that is always TEL.
Field 4 = 5 characters: Date of call. Leading zeros are sent in both the month and day fields separated by a slash.
Field 5 = 5 characters: Room or extension number that placed the call. Leading zeros are not used.
Field 6 = 5 characters: Time of the call. Leading zeros are sent in both the hour and minute fields, which are separated by
a colon.
Field 7 = 4 characters: Call duration in minutes. Leading zeros are included.
Field 8 = 7 characters: Call cost in dollars and cents, preceded by the dollar sign. Leading zeros are sent in both the dollars
and cents fields, which are separated by a decimal point.
Field 9 = 12 characters: Called number. Normally consists of the Area Code, Exchange and the last four digits of the number dialed, separated by dashes. No embedded spaces are sent.
Field 10 = 1 character: Local/Foreign indicator. L means Local, F means international, and space means anything else
(typically long distance).
Important: If you have selected Type 3 and don’t see the fields shown above, troubleshoot the 9-pin port by changing Function 173 to Type 2 and check Type 2 (MR #1) Protocol.
Responses
PHONEBILL
EXTERNAL PMS
Normal Delivery of a Message to the PMS
ENQ
ACK
STX (text) ETX BCC
ACK
Busy Response by the PMS
ENQ
NAK
WAIT 5 SECONDS
ENQ
NAK
WAIT 5 SECONDS AND REPEAT
WAIT 5 SECONDS AND REPEAT
PMS responds, but cannot accept data at this time. PhoneBill re-transmits an ENQ after 5 seconds until the PMS accepts
the message, or until 4 NAK responses are received, at which time the PMS data message will be dumped to the printer.
8.13
Appendices
PhoneBill Motel
No Response from the PMS
ENQ
No Response
WAIT 5 SECONDS
ENQ
No Response
WAIT 5 SECONDS AND REPEAT
WAIT 5 SECONDS AND REPEAT
PhoneBill will re-transmit an ENQ every 5 seconds until the PMS accepts the message, or until 4 successful ENQ responses
have been sent, at which time the PMS data message is dumped to the printer.
Negative Response to the Data Transfer
ENQ
ACK
STX (text) ETX BCC
NAK
STX (text) ETX BCC
NAK
REPEAT LAST STEP
If the data message is not transmitted successfully after 3 tries, PhoneBill will print the PMS data message.
No Response to the Data Transfer
ENQ
ACK
STX (text) ETX BCC
No Response
ENQ
ACK
STX (text) ETX BCC
No Response
ENQ
ACK
STX (text) ETX BCC
No Response
In the event of no response to the data message, PhoneBill will reinitiate the ENQ sequence. If the message is still not
successfully transmitted after 3 tries, PhoneBill wil print the PMS message.
Specification Link Control Characters
ENQ: A HEX 05 is used to request the status of the PMS.
ACK: A HEX 06 is used for the ACK. An ACK is used to represent a positive acknowledgment by the PMS. ACK will be sent
in response to an ENQ to indicate that the communication link is established and the PMS Is ready to receive data. ACK
will also be sent in response to a data transfer indicating successful reception of the data by the PMS.
NAK: A HEX 15 is used for NAK. An NAK is used to represent a negative acknowledgment by the PMS. A NAK will be sent in
response to an ENQ to indicate that the PMS is not ready to receive data. A NAK will also be sent in response to a data
transfer indicating unsuccessful reception of the data by the PMS and requests that the data be re-transmitted.
8.14
PhoneBill Motel
Appendices
STX: A HEX 02 is used for the STX. This is the beginning frame character during the transfer of data between PhoneBill and
the PMS. The STX also starts the accumulation of the BCC.
ETX: A HEX 03 is used for the ETX. This is the last data character and is followed immediately by the BCC.
BCC: A HEX value representing the Block Check Character used to verify the successful transfer of data between systems.
The BCC is calculated by processing each character by an exclusive-or operation. The BCC process will start with the character after the STX character and includes and ends with the ETX character. The BCC character will follow the ETX character.
Type 4 - MR Protocol #2
If your PMS programming screen shows the following string, your PhoneBill should be functioning properly (this is an
example; the actual characters will vary depending on specific PhoneBill programming):
FIELDS
1
ac01
2
0102
3
000450
4
0005437654
Field Descriptions
Field 1 = 4 characters: Start of message, which is always ac01.
Field 2 = 4 characters: Room or extension that placed the call.
Field 3 = 6 characters: Call charge which is represented in cents (no decimal point)
Field 4 = 10 characters: Called number. The telephone number field always contains 10 digits.
Important: If you have selected Type 4 and don’t see the fields shown above, troubleshoot the 9-pin port by changing Function 173 to Type 2 and check Type 2 (MR #1) Protocol.
Responses
PHONEBILL
EXTERNAL PMS
Normal Delivery of a Message to the PMS
(Text) plus carriage return
ACK
Busy Response by the PMS
(Text) plus carriage return
NAK
WAIT 3 SECONDS
(Text) plus carriage return
NAK
PMS responds, but cannot accept data at this time. PhoneBill will re-transmit data after 3 seconds until the PMS accepts
the message, or until 2 NAK responses are received, at which time the PMS data message is dumped to the printer.
No Response from the PMS
(Text) plus carriage return
No Response
WAIT 5 SECONDS
In the event of no response to the data message, PhoneBill will print the PMS data message.
The Property Management System (PMS) interface is an optional feature of PhoneBill for Motels. If PhoneBill has PMS, the
log-on message will indicate: PHONEBILL (model number)
Motel (software version)
PMS...
Specification Link Control Characters
ACK: A HEX 06 is used for the ACK. An ACK is used to represent a positive acknowledgment by the PMS. An ACK will be
sent in response to a data transfer indicating successful reception of the data by the PMS.
NAK: A HEX 15 is used for the NAK. An NAK is used to represent a negative acknowledgment by the PMS. NAK will be
sent in response to a data transfer indicating unsuccessful reception of the data by the PMS and requests that the data
be re-transmitted.
8.15
Appendices
PhoneBill Motel
PMS Handshaking Protocol
This protocol uses hardware handshaking and/or the XON/XOFF software handshaking. The hardware handshaking can
be disabled leaving only the XON/XOFF handshaking, which cannot be disabled at this time. While using the handshaking
protocol, until the PMS buffer reaches about 3/4 full, call records will be sent to the output buffer for transmission to the
PMS. When the buffer is near capacity, any more call records received will be stored only if Function 76 is set to 2 or 3. The
output format for this protocol is set using Function 173. If no handshaking is used, then the call records are sent to the
PMS as they are received. It is then up to the PMS to be able to receive all the call records as they are sent.
PMS Operating Mode
Once programmed, PhoneBill operates virtually unattended. Calls received from the PBX will be costed and passed to the
PMS. If the PMS goes off-line for any reason, PhoneBill prints a notice to the printer that the PMS is off-line and will print
an on-line notice when PMS comes back on-line.
During the period that PMS is off-line, PhoneBill prints each call in real time to its printer and stores the records. These
calls can be printed and erased in a normal check-out as needed and the remaining calls automatically downloaded to the
PMS when it comes back on-line.
If the PMS is off-line for an extended period, guests can be manually checked out, reports run, etc. just as if PhoneBill
were operating without the PMS feature installed. Call records associated with a manual guest check-out will not be
passed to PMS when it goes on-line.
Example #1: PhoneBill is processing calls to the PMS on a regular basis when the PMS goes off-line. A notice is printed —
“PMS offline -- 6/22/2000 8:15 AM” — and calls are printed to the printer and stored in PhoneBill. In a few
minutes, PMS goes back on-line. PhoneBill prints a notice to the printer and downloads all stored calls. An Audit Report
and Guest Summary Report will show no calls in PhoneBill.
Example #2: PMS goes off-line for an extended period or as guests are to check out. Calls stored while the PMS is off-line
can be processed as a normal PhoneBill. If a guest is checked-out, the calls for that room were stored while the PMS was
off-line will be printed, erased and the totals stored for an Audit Report. Later when the PMS goes back on-line, calls in
storage (for guests not checked out on PhoneBill) will be downloaded to the PMS. An Audit Report shows activity only for
the guests who were checked out while PMS was off-line.
8.16