1
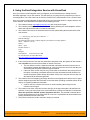
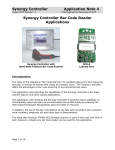
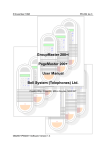
KronoDesk™ Email Integration Guide
Inflectra Corporation
Date: October 19th, 2012
Contents
1. Introduction
1. Introduction
1
2. Installing the Email Integration
Service
2
3. Configuring the Email Integration
Service
4
3.1. Connecting to the KronoDesk
Server
4
3.2. Connecting to the POP3 Mail
Server
6
3.3. Configuring the Advanced
Settings
7
4. Using the Email Integration Service
with KronoDesk
10
Legal Notices
11
KronoDesk™ is an integrated customer support
system that includes help desk ticketing,
customer support forums and an online
knowledge base in a single user interface.
KronoDesk™ includes a powerful and flexible
help desk ticketing system that can be quickly
and easily tailored to meet your support needs.
With support for custom fields and workflows
you can create different support processes for
your different products.
KronoDesk™ provides a knowledge base and
online support forums. making your customers
more self-sufficient with routine issues so that
your support personnel can focus their time on
the critical issues and complex enquiries.
This guide describes how to setup the
integration between KronoDesk and your
company’s email system so that support emails
can be processed by KronoDesk and
automatically converted into either new help
desk tickets or replies to existing help desk
tickets.
For information on how to use the features of
KronoDesk™, please refer to the KronoDesk™
User Manual instead.
© Copyright 2006-2012, Inflectra Corporation
Page 1 of 12
This document contains Inflectra proprietary information
2. Installing the Email Integration Service
This section outlines how to install the KronoDesk email integration service onto your environment.
Depending on your environment you can install the email integration service on:
1. Your KronoDesk application server
2. Your corporate mail server
3. A separate workstation that can connect to both KronoDesk and your mail server
If your KronoDesk installation is installed on-premise, then you can use options (1), (2) or (3), if your
KronoDesk installation is hosted by Inflectra as a Software as a Service (SaaS) subscription then you’d
need to use either option (2) or (3).
Once you have downloaded the KronoDesk email integration installation package
(InflectraEmailIntegration.msi) from the Inflectra website you should download it onto the
appropriate computer and double-click on it to run the Windows installer package:
You should click on the “Next” button, read the End User License Agreement, check the box that you
agree with its terms and then click the “Next” button. This brings up the installation location page:
© Copyright 2006-2012, Inflectra Corporation
Page 2 of 3
This document contains Inflectra proprietary information
You should choose the appropriate place to install the email integration service and then click “Next”. On
the next screen click the “Install” button and it will complete the software installation.
Once the installation has completed, you will see the following new service listed in the Control Panel >
Administrative Tools > Windows Services section:
The service should be listed to run in Automatic mode and should already be started.
Note: This email integration service is able to integrate with both SpiraTeam and KronoDesk from
Inflectra, however the focus of this guide is the integration with KronoDesk only.
© Copyright 2006-2012, Inflectra Corporation
Page 3 of 3
This document contains Inflectra proprietary information
3. Configuring the Email Integration Service
Once you have completed the installation, you can configure the email integration service by going to
Start > Program Files > Inflectra SpiraTeam > Tools > Email Integration which will bring up the
management interface.
3.1. Connecting to the KronoDesk Server
The first tab lets you specify the KronoDesk instances that the email integration service will connect to. To
add a new KronoDesk server, click on the green Add (+) icon to switch the screen to allow you to enter a
new KronoDesk server:
© Copyright 2006-2012, Inflectra Corporation
Page 4 of 3
This document contains Inflectra proprietary information
You need to enter the following information:
•
•
•
Server URL - The URL to KronoDesk server
Account Login - The account login that will be used to connect to KronoDesk. It needs to be a
user with the “administrator” role.
Account Password - This is the password for the account
Click the “Test” button to verify the connection. Once it has passed, click the Save icon to save the new
KronoDesk server information.
To modify an existing KronoDesk server instance, just click on its name in the server list. To delete a
server, select its name in the server list and click the Delete icon (X).
Once you have entered all the KronoDesk instances that you will be connecting to, click the “Next” button
to move to the next tab and configure the mail server integration.
© Copyright 2006-2012, Inflectra Corporation
Page 5 of 3
This document contains Inflectra proprietary information
3.2. Connecting to the POP3 Mail Server
The “POP3 Accounts” tab displays a list of all the configured mail servers:
Initially it will be empty, so just click the Add (+) icon to add a new mail server:
You need to enter the following information:
•
•
•
Account Email – This should be the email address that will be polled for new support emails.
Mail Server – This should be the fully-qualified name or IP address of your POP3 mail server.
Port – This is the port that your mail server expects incoming POP3 requests to use. The default
for unencrypted POP3 requests is 110 and the default for SSL encrypted POP3 requests is 995.
© Copyright 2006-2012, Inflectra Corporation
Page 6 of 3
This document contains Inflectra proprietary information
•
•
•
•
•
•
•
Use SSL – You should check this option if your mail server requires a secure SSL connection.
Login/Password – You should enter the login/password for the mail server that allows reading of
inbound messages for the email address specified above.
Remove Messages – Checking this option will make the email integration service remove the
email messages from in the Inbox of the user’s email account. We recommend leaving this
unchecked when first using the service. Once you are happy that the integration is correctly
handling spam and not ignoring correct messages, you can check this option to prevent the email
inbox getting too large.
Attach Message – Checking this option will attach the original email message to the new help
desk ticket created in KronoDesk as well as populating the ticket with the contents of the
message. This is useful when debugging a new installation but typically would be unchecked
during normal operation.
Application Server – You should specify the instance of KronoDesk that this email account will
be linked to.
Default Product – KronoDesk requires that all new help desk tickets be submitted with a
selected product. If the inbound emails have a product name specified in one of the email
headers it will be automatically routed to the correct product. In other cases, the system will route
the new help desk ticket to the default product chosen in this setting.
RegEx Match Content – Checking this option will allow the email integration service to do a
name match in the body of the email for possible product names instead of just relying on the
“default product”. For example if your email contains “Product1” in the message text it will be
routed to Product1 in KronoDesk.
3.3. Configuring the Advanced Settings
Once you have finished configuring the KronoDesk server instances and POP3 mail accounts, you can
click on the “Advanced Settings” tab to setup special rules that prevent emails from specific accounts
being processed as well as allow the email integration service to look for special mail headers and subject
tokens that might indicate bulk / spam messages that should be ignored.
You can configure the following settings:
© Copyright 2006-2012, Inflectra Corporation
Page 7 of 3
This document contains Inflectra proprietary information
•
Enable Trace Logging – When this option is checked, the email integration service will log
information messages to the Windows Application Event Log on the machine running the
integration service. This is useful when first deploying the system or when you are encountering
issues and Inflectra support personnel have asked you switch on trace logging to aid in support.
For normal use we recommend turning this setting off to avoid too many messages being logged
in the Event Log.
•
Minutes Between Polls – This setting specifies the interval (in minutes) between each time the
email integration service attempts to retrieve new email messages from the email server.
•
Ignore Addresses – In this section you can add a list of any email addresses that you want to
ignore and not use for creating new KronoDesk help desk tickets. If there are any known senders
or internal email accounts, you should add them in this section.
In addition, there are two other sub-tabs to the Advanced Settings tab that provide configuration options:
The “Ignore Headers” section allows you to specify any email message headers that if present in an email
message will be ignored by the email integration service.
© Copyright 2006-2012, Inflectra Corporation
Page 8 of 3
This document contains Inflectra proprietary information
The “Ignore Keywords” section allows you to specify any keywords that if present in the subject-line or
body of an email message will be ignored by the email integration service. Some mail servers that have
built-in SPAM detection systems will automatically add SPAM-HIGH, SPAM-MEDIUM, SPAM-LOW to the
subject line (for example).
© Copyright 2006-2012, Inflectra Corporation
Page 9 of 3
This document contains Inflectra proprietary information
4. Using the Email Integration Service with KronoDesk
Once you have the email integration service configured, we recommend that you initially clear the
Windows Application Log on the machine. This will allow you to quickly see any errors that occur due to
misconfiguration. The event viewer can be found in Control Panel > Administrative Tools > Event Viewer.
Once you have the email integration enabled and running, any users that email in a support ticket to one
of the “watched” email addresses will experience the following process:
1. The customer emails [email protected] with a help desk request.
2. The contents (including attachments) of the email will be parsed by the email integration service
and a new help desk ticket will be created in KronoDesk.
3. The customer will receive an automated email from the system letting them know that the ticket
was received:
------=> Please keep your reply above this line. <=Hello Fred Bloggs
The following ticket in My Company support system has been recently updated:
Name: #TK438 - test 123
Priority:
Status: Open
Product: Product 1
Type:
Assignee:
Last Updated:
10/19/2012 4:29:37 PM
To view the ticket, click the URL below:
http://mycompany.kronodesk.net/Ticket/438.aspx
4. If this is the first time the user has ever submitted a help desk ticket, the system will also create a
new unverified user account in KronoDesk on behalf of this user.
• The user will then receive a separate email with information about their new account. It
will provide a hyperlink that allows them to “verify” this new user account so that they can
view/modify their help desk tickets through the website.
• If the user clicks on this verify link, they will be taken to KronoDesk, where they will have
the option of providing a password and other security information that will allow them to
access the support system through the website. If they don’t verify the account, they can
still respond to the ticket through email.
5. The customer service manager(s) will assign the ticket to the appropriate customer service agent
and the assigned agent will add information to the ticket either providing a possible solution to the
enquiry or requesting additional information.
• In either case, the customer will receive an email containing the note(s) from the
customer service agent.
6. The customer can either verify their account and reply to the agent through the KronoDesk web
interface, or they can simply reply to the email notifications, making sure that their comments are
above the special line marked “please reply above this line”. Any text that is entered above
this line will be added to the help desk ticket as a new note. Any attachments will be added to the
existing attachments linked to the ticket
7. This process continues until the customer’s enquiry is resolved.
© Copyright 2006-2012, Inflectra Corporation
Page 10 of 3
This document contains Inflectra proprietary information
Legal Notices
This publication is provided as is without warranty of any kind, either express or implied, including, but not
limited to, the implied warranties of merchantability, fitness for a particular purpose, or non-infringement.
This publication could include technical inaccuracies or typographical errors. Changes are periodically
added to the information contained herein; these changes will be incorporated in new editions of the
®
publication. Inflectra Corporation may make improvements and/or changes in the product(s) and/or
program(s) and/or service(s) described in this publication at any time.
The sections in this guide that discuss internet web security are provided as suggestions and guidelines.
Internet security is constantly evolving field, and our suggestions are no substitute for an up-to-date
®
understanding of the vulnerabilities inherent in deploying internet or web applications, and Inflectra
cannot be held liable for any losses due to breaches of security, compromise of data or other cyberattacks that may result from following our recommendations.
The section of the manual that describes modifying the Windows System Registry (“Registry”) should only
be attempted by experienced Windows administrators who are familiar with its organization and contents.
®
Inflectra cannot be held liable for any losses due to damage to the system registry made by
inexperienced personnel.
®
KronoDesk™ and Inflectra are either trademarks or registered trademarks of Inflectra Corporation in the
United States of America and other countries. Microsoft®, Windows®, Explorer® and Microsoft Project®
are registered trademarks of Microsoft Corporation. All other trademarks and product names are property
of their respective holders.
Please send comments and questions to:
Technical Publications
Inflectra Corporation
8121 Georgia Ave
Suite 504
Silver Spring, MD 20910
U.S.A.
[email protected]
© Copyright 2006-2012, Inflectra Corporation
Page 11 of 3
This document contains Inflectra proprietary information