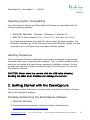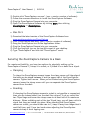
1
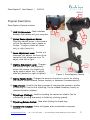
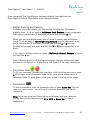
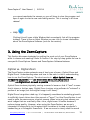
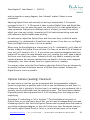
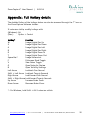
ZoomCapture User Manual Revision Date: 043014 Enabling Individuals with Limited Vision to Succeed in Education and Business Developed by Essistive Technologies, LLC www.perkinsproducts.org | tel: +1-617-972-7308 | 175 North Beacon Street Watertown, MA USA 02472 ZoomCapture™ User Manual | 043014 Table of Contents 1. About the ZoomCapture ........................................................... 4 Features: ................................................................................................. 4 Kit Contents: ........................................................................................... 4 Physical Description ................................................................................... 5 Operating System Compatibility .................................................................. 6 Microsoft Windows ............................................................................. 6 Mac OS X ......................................................................................... 6 Handling Precautions ................................................................................. 6 2. Getting Started with the ZoomCapture ....................................... 6 Installing and Running the ZoomCapture Software ......................................... 6 Microsoft Windows ............................................................................. 6 Mac OS X ......................................................................................... 7 Securing the ZoomCapture Camera to a Desk ................................................ 7 Clamping ......................................................................................... 7 Standing .......................................................................................... 7 Connecting the ZoomCapture Camera to Your Computer ................................. 8 Physically Adjusting the ZoomCapture Camera ............................................... 8 Focus ............................................................................................... 8 Optical Zoom .................................................................................... 8 Aiming ............................................................................................. 9 The ZoomCapture Software ........................................................................ 9 Digital Zooming and Panning ............................................................. 10 Full screen Mode .............................................................................. 10 Screenshots .................................................................................... 10 Record Audio .................................................................................. 11 Lookback ........................................................................................ 11 Image Visibility ............................................................................... 11 Toggle Notes View ........................................................................... 12 www.perkinsproducts.org | tel: +1-617-972-7308 | 175 North Beacon Street Watertown, MA USA 02472 2 ZoomCapture™ User Manual | 043014 Review Notes .................................................................................. 12 Help .............................................................................................. 13 3. Using the ZoomCapture ......................................................... 13 Optical vs. Digital Zoom ........................................................................... 13 Optimal Camera (Seating) Placement ......................................................... 14 Camera Placement .................................................................................. 15 Image Flicker ......................................................................................... 15 Battery Life ............................................................................................ 16 Social Aspects: Dignity ............................................................................ 16 Social Aspects: Privacy............................................................................. 16 4. Troubleshooting .................................................................... 17 Frequently Asked Questions ...................................................................... 17 5. Support and Service Information ............................................. 19 Technical Support ................................................................................... 19 Limited Warranty .................................................................................... 19 Appendix: Full Hotkey details ...................................................... 20 www.perkinsproducts.org | tel: +1-617-972-7308 | 175 North Beacon Street Watertown, MA USA 02472 3 ZoomCapture™ User Manual | 043014 1. About the ZoomCapture Welcome to the ZoomCapture, a discreet and effective assistive technology designed by and for students and professionals with limited vision. Using the ZoomCapture, you will be able to view presentations in class and at work, without relying on others. Features: Small, Discreet Design—The ZoomCapture weighs less than a can of soda so you can take it everywhere. Optical + Digital Zoom—The ZoomCapture uses two types of zoom: Optical and Digital. For efficient presentation viewing and note-taking, it is important to learn how and when to use each. See Section 3 for more information. High-Resolution Imaging—The ZoomCapture captures at greater than 720p resolution meaning that you can view a full whiteboard or projection without constantly changing the ZoomCapture camera’s Optical Zoom. Time stamped Screenshots—Take screenshots that can be inserted into your notes, saved to your computer and sorted by date and time. Kit Contents: The ZoomCapture kit includes the following: The ZoomCapture Camera with attached mounting accessory USB Cable Quick Install Guide (including a link to download the ZoomCapture Software) www.perkinsproducts.org | tel: +1-617-972-7308 | 175 North Beacon Street Watertown, MA USA 02472 4 ZoomCapture™ User Manual | 043014 3 Physical Description ZoomCapture Camera contains: 1) USB 2.0 Connector: Cable interface between the camera and your computer. 1 9 2 2) Optical Zoom Adjustment Barrel: Physically adjusts lenses in the camera so that the camera’s view is nearer or further. To adjust, rotate left (zoom out), or right (zoom in). 5 4 3) Focus Adjustment Lever: Similar to a telescope, this adjusts the focus of the camera so that images are crisp. To adjust, slide left or right. 4) Lighting Adjustment Lever: Changes the amount of light that physically enters the camera. You should only rarely need to adjust this. To adjust, slide left (darken) or right (brighten). 6 7 8 Figure 1: ZoomCapture Camera 5) Aiming Tension Knob: Changes the amount of tension in mount for aiming the camera. Rotate forward (reduce tension) or backward (increase tension). 6) Clamp Screw: Used for the dual purposes of clamping the camera to a table, or standing on it as the 3rd tripod leg. Can be rotated clockwise (loosen) or counter-clockwise (tighten). 7) Tripod Legs (Folding): Used for standing the camera on a table. Can be unfolded by pivoting downward, or folded by pivoting upward. 8) Tripod Leg Release Switch: Used when folding the tripod legs. 9) Camera LED Indicator: shines solid green when connected to computer correctly. www.perkinsproducts.org | tel: +1-617-972-7308 | 175 North Beacon Street Watertown, MA USA 02472 5 ZoomCapture™ User Manual | 043014 Operating System Compatibility Your ZoomCapture Camera and ZoomCapture Software are compatible with the following operating systems: Microsoft Windows: Windows 7/ Windows 8 / Windows 8.1 Mac OS X:Snow Leopard (10.6) / Lion (10.7) / Mountain Lion (10.8) For Highest performance and reliability, always install the latest updates. For Windows computers, go to the Start menu and select Windows Update. For Mac computers, go to the Apple menu and select Software Update. Handling Precautions The ZoomCapture Camera is designed to be stored in a backpack or laptop case alongside other books, computers and notepads. Still, it contains precision optics and must be handled with care during unpacking, installation, and use. Use the provided lens cap and consider an accessory bag. Do not drop, jolt, or crush the ZoomCapture Camera. CAUTION: Never store the camera with the USB cable attached, bending the cable when attached can damage the camera. 2. Getting Started with the ZoomCapture This section provides directions for installing and using the ZoomCapture Camera and the ZoomCapture Software. Installing and Running the ZoomCapture Software Microsoft Windows 1) Download the latest version of the ZoomCapture Software from www.perkinsproducts.org/ZoomCapture www.perkinsproducts.org | tel: +1-617-972-7308 | 175 North Beacon Street Watertown, MA USA 02472 6 ZoomCapture™ User Manual 2) 3) 4) 5) | 043014 Double-click ‘ZoomCapture-xxx.exe’ (xxx = version number of software) Follow the onscreen directions to install the ZoomCapture Software. Plug the ZoomCapture Camera into your computer. Open The ZoomCapture Software by clicking Start, then clicking ZoomCapture -> ZoomCapture Mac OS X 1) Download the latest version of the ZoomCapture Software from www.perkinsproducts.org/ZoomCapture 2) Click ‘ZoomCapture-xxx.dmg’ (xxx = version number of software) 3) Drag the ZoomCapture icon to the Applications folder. 4) Plug the ZoomCapture Camera into your computer. 5) Click the Spotlight icon on the top-left corner of your desktop. 6) Type “ZoomCapture” and click the “ZoomCapture” result. Securing the ZoomCapture Camera to a Desk For maximum flexibility, you have two options for physically setting up the ZoomCapture Camera: 1) clamp it to a desk, or 2) stand it on a desk like a tripod. Clamping To clamp the ZoomCapture camera, loosen the clamp screw until the edge of the table can be placed between it and the upper-half of the ZoomCapture camera. Tighten until secure. When you’re finished using the ZoomCapture camera, loosen the clamp screw until you can separate the ZoomCapture camera from the desk. Standing If clamping the ZoomCapture camera to a desk is not possible or convenient, then you can instead stand it on the desk like a tripod. To do so, unfold the two Tripod Legs and loosen the clamp screw to at least half of its maximum distance. When unfolding each of the two Tripod Legs, you will hear a click to signal that they are locked into place. When standing the ZoomCapture camera on a desk, you should take care to 1) keep it away from ledges that it could fall from, and 2) use two hands when adjusting the ZoomCapture camera to keep it from tipping over. www.perkinsproducts.org | tel: +1-617-972-7308 | 175 North Beacon Street Watertown, MA USA 02472 7 ZoomCapture™ User Manual | 043014 When you are finished using the ZoomCapture camera, slide the tripod leg release switch towards the clamp screw with a thumb (holding it there), and use your other hand to fold the tripod legs by first gently moving them downward about one inch, then upward until they are folded. If you feel a large amount of resistance from either Tripod Leg, then you need to slide the Tripod Leg Release Switch further. Connecting the ZoomCapture Camera to Your Computer To connect the ZoomCapture camera to your computer: 1. 2. 3. 4. 5. Turn on your computer. Secure the ZoomCapture camera to your desk. Install the ZoomCapture Software (only necessary the first time). Connect the ZoomCapture camera to your computer using the USB cable. Run the ZoomCapture software. Physically Adjusting the ZoomCapture Camera Focus Shortly after connecting the ZoomCapture Camera and running the ZoomCapture software, you will see live video. Do not panic if the video starts out looking like a defocused blur of color—this is normal! Much like a telescope, the ZoomCapture Camera must be manually focused. To do so, slide the ZoomCapture Camera’s Focus Adjustment Lever left or right until the image is sharp. This will take a few tries to get used to, but it will soon become reflexive. Optical Zoom If you are viewing a presentation that is primarily centered on a whiteboard or projection screen, then you will want to adjust the Optical Zoom so that the entire board or projection screen fills your view. Doing so will provide you with the sharpest image. To adjust, rotate the ZoomCapture camera’s Optical Zoom Adjustment Barrel left (zoom out) or right (zoom in). Once you’ve adjusted www.perkinsproducts.org | tel: +1-617-972-7308 | 175 North Beacon Street Watertown, MA USA 02472 8 ZoomCapture™ User Manual | 043014 the Optical Zoom, you’ll need to readjust the Focus. Note: Effective use of the ZoomCapture requires that you understand when and how to use Optical and Digital Zoom. See Section 3 for more information. Aiming The ZoomCapture camera can be manually aimed left and right, up and down, and side to side. You will typically aim it left, right, up or down when you are not centered with the presentation you are viewing. You will typically roll it side to side when the ZoomCapture Camera is not on a completely level surface. Grasp the ZoomCapture Camera at the top and aim it. If there is significant resistance, or if the camera does not maintain its position (e.g. it slumps), then you need to adjust the tension. To do so, rotate the ZoomCapture Camera’s Aiming Tension Knob by rotating it forward (more tension) or backward (less tension). The tension should be set so that 1) the ZoomCapture Camera does not slump and 2) you can easily aim the camera without needing to adjust the tension. The ZoomCapture Software When you start the ZoomCapture Software, you will be presented with a screen similar to that in Figure 2. This signifies that it is either connecting to the ZoomCapture Camera, or that the ZoomCapture Camera is not plugged in. If you have not already plugged the camera in, do so now. Figure 2: ZoomCapture Software Initial Screen www.perkinsproducts.org | tel: +1-617-972-7308 | 175 North Beacon Street Watertown, MA USA 02472 9 ZoomCapture™ User Manual | 043014 Once connected, The ZoomCapture Software displays live video from the ZoomCapture Camera. Major features are discussed below. Digital Zooming and Panning To better view small details, you can use the ZoomCapture Software to digitally zoom. To do so, apply a Multitouch Pinch Gesture on your computer’s track pad or touchscreen (if available), or press and hold the R key. When you are using digital zoom, you will need to quickly pan around the image. To do so, apply a Two-Finger Drag Gesture on your computer’s track pad or touchscreen (if available), or press and hold the A or D keys for panning left or right, and press and hold the W or S keys for panning up or down. If you wish to digitally zoom out, apply a Multitouch Unpinch Gesture, or press and hold the T key. Note: Effective use of the ZoomCapture requires that you understand when and how to use Optical vs. Digital Zoom. See Section 3 for more information. Full screen Mode To fill your computer’s screen with live video, click the Fullscreen icon or press F. Do so again to exit Fullscreen Mode. Note: icons will be hidden while in Fullscreen Mode. To show them, move your mouse to the top of the screen. Screenshots To take a screenshot, click the Screenshot Icon or press Space Bar. This will save it for later review. You will see a brief flash whenever you take a screenshot. Note: If you are using the ZoomCapture on Windows and your notes are visible, then you will need to press Alt + Shift + Space Bar to take a screenshot.| www.perkinsproducts.org | tel: +1-617-972-7308 | 175 North Beacon Street Watertown, MA USA 02472 10 ZoomCapture™ User Manual | 043014 Record Audio To record audio of your lectures, click the Microphone Icon. It will glow red while actively recording. To end audio recording click it again or close the program. Lookback You may find that a professor or lecturer sometimes walks in front of the ZoomCapture Camera while you’re trying to read something. When this happens, you can temporarily “delete” them by rewinding the video. To do so, click the Lookback icon or by press Left Arrow. The more you click the icon or press Left Arrow, the further back in time you will go. When you’re ready to return to live video, click the Look forward icon, repeatedly press Right Arrow, or press Shift+Right Arrow once. Note: you will see a blue number in the top-left corner of the ZoomCapture window whenever you are using this feature. Image Visibility Occasionally, you may find that the video is too dark or bright, or that a projection surface (e.g. overhead projector or TV) exhibits a distracting flicker. When this happens, click the Visibility Icon, or press B. This will open a window where you can adjust video brightness and flicker. To tell the ZoomCapture Software that you wish to manually adjust, click the “Manual” radio button. Note: adjustments to these settings will only affect live video. o Brightness To adjust video brightness, adjust the Gain Slider left (darken) or right (brighten) until suitable. If you are viewing a very bright projection surface in a dark room, it may be necessary to also adjust the camera’s Lighting Adjustment Lever. o Adjusting Flicker If your camera is pointed at a projection surface that “draws” a different number of times per second than the ZoomCapture Camera “looks,” then you will see a distracting flicker. You can fix this in the software by manually adjusting the Shutter Slider until the flicker is gone. Note, www.perkinsproducts.org | tel: +1-617-972-7308 | 175 North Beacon Street Watertown, MA USA 02472 11 ZoomCapture™ User Manual | 043014 adjusting the Shutter will alter Video Brightness. If it becomes too dark or too bright, then you can compensate by adjusting the Gain Slider. If you would like for the ZoomCapture Software to return to automatically handling Video Brightness and Video Flicker, click the “Auto” radio button. Toggle Notes View Clicking this once will vertically split the ZoomCapture Window into two sections—one for viewing video, and one for taking typed notes. Clicking it again will change it so that the video and notes are horizontally split. Clicking it a third time will hide the notes (but they are still there!). To adjust the size of the notes, move your mouse to the notes section of the window and apply a multitouch pinch gesture or hold Alt and press Up Arrow (Windows) or Option and press Up Arrow (Mac). Any time you take notes, they are automatically saved as part of a session file (session.nts) contained in your Documents/ZoomCapture/Session folder. Note: Whenever your notes are visible, you will need to need to hold Alt (Windows) or Option (Mac) to use the hotkeys of other features. Review Notes Click the Review Notes Icon to open a window containing all note-taking sessions where you typed notes, took screenshots, or recorded audio. Doubleclicking a session will open it for review. Sessions can be sorted by date, day, or time of day by clicking the appropriate header. While reviewing notes, you can cycle through screenshots in the same way you would use Lookback. If audio was recorded, you will be able to play that audio using standard playback controls. Notes-Sync Feature: Right-click on a selection of notes to replay the audio or view screenshots that were recorded when you typed that note. Note: You can freely modify your notes while reviewing them, but at this time, www.perkinsproducts.org | tel: +1-617-972-7308 | 175 North Beacon Street Watertown, MA USA 02472 12 ZoomCapture™ User Manual | 043014 you cannot reactivate the camera, so you will have to close the program and open it again to start a new note-taking session. This is coming in a future release! Help Clicking this will open a Help Window that conveniently lists all the program hotkeys. There is also an About Window you can click on to see information about the ZoomCapture Software (such as the version). 3. Using the ZoomCapture This Section discusses strategies for getting the most out of your ZoomCapture while in classes and meetings. Refer to Section 2 for step-by-step guides on how to use specific ZoomCapture Camera and ZoomCapture Software features. Optical vs. Digital Zoom The ZoomCapture makes extensive use of two types of zoom—Optical Zoom and Digital Zoom. Understanding when and how to use each is vital to understanding how to use the ZoomCapture. The short version is: adjust Optical Zoom as infrequently as possible, and use the smallest amount of Optical Zoom needed. Instead, use Digital Zoom as much as possible to save time and effort. Optical Zoom involves physically moving a camera’s lenses so that it “sees” a scene that is closer or further away. Digital Zoom involves using software to “enhance” a portion of an image (but the original image is still there). Digital Zoom has gotten a bad rap, it is frequently considered a marketing gimmick to artificially boost claims about the amount of “zoom”, but the ZoomCapture is not used in quite the same way as a typical camera. When using a typical camera, we want images that are maximally clear—thus, digital zoom is useless because it reduces image quality. However, when using the ZoomCapture, we are only interested in image clarity to the extent that it enables us to read a professor’s handwriting or a colleague’s PowerPoint. If we can zoom to clearly read the words www.perkinsproducts.org | tel: +1-617-972-7308 | 175 North Beacon Street Watertown, MA USA 02472 13 ZoomCapture™ User Manual | 043014 and the legends on every diagram, then it doesn't matter if there is some pixelization. Adjusting Optical Zoom and manually re-aiming a camera takes 2-10 seconds compared to the 0.1 – 0.25 seconds it takes to adjust Digital Zoom and Digital Pan. The difference may not seem like much, but when you’re in a fast-paced lecture, or have a presenter that points to different parts of a board, you want to be able to adjust your view very quickly, otherwise you’ll fall behind when taking notes and miss references he/she makes when pointing. For best results, adjust the Optical Zoom and Focus one time, so that the entire presentation (i.e. whiteboard or PowerPoint) can be seen. From then on, use Digital Zoom and Digital Pan to zoom in or out as needed. When using the ZoomCapture in a large room (e.g. 3+ chalkboards), you’ll often still be able to adjust the Optical Zoom one time. You may not be able to fit all boards at once, but you’ll be able to fit 1-2. If you choose your seating arrangement well, the boards will be nearly the same distance from you, meaning you won’t need to adjust the Focus more than once, either. Instead, you will only have to manually aim the camera whenever the lecturer switches from one board to the next, which happens infrequently—less than a dozen times in a typical lecture or meeting. In summary, when using the ZoomCapture, adjust the Optical Zoom as infrequently as possible, and use the smallest amount of Optical Zoom needed. Instead, use Digital Zoom as much as possible. Optimal Camera (Seating) Placement For best results, sit so that you are as centered with the presentation materials (board or projection) as possible, and so that no one sits between you and them. In a classroom, this is typically in the front row. In a meeting or at a conference, this is typically one of several seats near the projection screen. The ZoomCapture camera is generally works best anywhere from 5 to 40 feet away from the image you are magnifying. Sometimes it’s refreshing to “sit in the back.” The ZoomCapture has plenty of Optical Zoom so you are free to do so! But, you will need to independently purchase a standing tripod so that the ZoomCapture Camera can be placed above the heads of your fellow students/colleagues, so they don’t block your view. Remember that you will need to adjust Optical Zoom or Focus, or re-aim, at least once, so the tripod www.perkinsproducts.org | tel: +1-617-972-7308 | 175 North Beacon Street Watertown, MA USA 02472 14 ZoomCapture™ User Manual | 043014 should be next to your desk. You’ll also need a longer USB cable (6’ should be fine). Both can be found online or at a local electronics retailer. Camera Placement You should clamp the ZoomCapture Camera to a desk whenever possible because: You You you The can be sure that you or other people won’t accidentally knock it down. will be able to make adjustments to the camera with one hand. will have a more stable view of the board ZoomCapture Camera will take less room on your desk. Still, there are times when it makes more sense to stand it on a desk. The two most common scenarios are when there is no edge that can be clamped to, and when clamping to the edge of a table will cause you to have a non-optimal view of presentation materials (e.g. when sitting at a circular table). When standing it on a desk, use two hands for all adjustments, and keep it away from ledges. Image Flicker If The ZoomCapture Camera is pointed at a projection surface that “draws” a different number of times per second than the ZoomCapture Camera “looks,” then you will see a distracting flicker. You can change this in the software by opening the Image Visibility icon and clicking the ‘Manual’ radio button. Next, adjust the Shutter Slider left or right until the flicker is gone. Note, adjusting Shutter will physically alter Video Brightness. If it becomes too dark or too bright, then you can compensate by adjusting the Gain Slider. In the rare event that it is still too dark or too bright, then physically adjust the camera’s Lighting Adjustment Lever. www.perkinsproducts.org | tel: +1-617-972-7308 | 175 North Beacon Street Watertown, MA USA 02472 15 ZoomCapture™ User Manual | 043014 Battery Life The ZoomCapture uses the graphics card on your computer to efficiently display video on your screen. Unfortunately, displaying live, high-definition video from a camera is taxing on the battery—more so than even displaying a movie. Expect that your laptop will have around 40% of the battery life that the manufacturer claims, and possibly less if it is aged. If you would like more battery life, consider purchasing a spare battery for your computer. Social Aspects: Dignity One of the reasons that the ZoomCapture was created was because existing assistive technologies and accommodations call too much attention to their users—they make them stand out, and not in a good way. The ZoomCapture was designed to be as small as possible so that it doesn’t look like “typical” assistive technology. Still, the first few times that you use the ZoomCapture in a class or presentation, you may feel a bit awkward. This is normal and will subside after you use it a couple times. In most cases, it has been our experience that people are too busy with their own situation to take much notice. Social Aspects: Privacy In some settings, recording screenshots, audio or video without explicit approval is either legally or socially unacceptable without explicit approval. So long as you don’t take screenshots, you should be fine to use it. If confronted, cordially inform them that the ZoomCapture is an assistive technology that helps you view the board, and that you are not recording any materials. Sometimes, it is a nice gesture to volunteer this information—after all, no one wants their ten seconds of fame to come from an embarrassing YouTube video! www.perkinsproducts.org | tel: +1-617-972-7308 | 175 North Beacon Street Watertown, MA USA 02472 16 ZoomCapture™ User Manual | 043014 4. Troubleshooting This Section addresses common challenges that users might face when using the ZoomCapture. If you feel that something is not here that should be, please send an email to [email protected]. Frequently Asked Questions Q: It takes too long to change the ZoomCapture Camera’s Optical Zoom and Focus. A: In most cases, you should only need to adjust the Optical Zoom and Focus one time, when you first take it out. Because the ZoomCapture is a high-definition camera, you can subsequently use Digital Zoom for reading text, handwriting, and diagrams. Please read the discussion in Section 3 for more information. Q: I’ve plugged the ZoomCapture Camera in and am running the ZoomCapture Software, but video display on the ZoomCapture Software is completely black. A: Is the lens cap still on? You may have adjusted the camera’s Lighting Adjustment Lever so far that no light is entering the camera. To remedy, move the Lighting Adjustment Lever to the right. Normally, you will want to keep it as far to the right (maximum light) as possible. Q: I’m seeing flicker on a PowerPoint projection. It’s very distracting. A: This will happen when you come across a projector that “draws” a different number of times each second than the ZoomCapture Camera “sees.” To fix, adjust the Flicker control in Visibility settings. See Section 2 for how to do so. Q: The camera’s video has frozen or is completely dark. I’m not using Lookback, and the camera’s Lighting Adjustment Lever is all the way to the right. A: In rare cases, you may need to unplug the camera and plug it back in. If it still doesn’t work, restart the program. www.perkinsproducts.org | tel: +1-617-972-7308 | 175 North Beacon Street Watertown, MA USA 02472 17 ZoomCapture™ User Manual | 043014 Q: My notes are open but whenever I try to use a hotkey it just inserts text into my notes. A: Whenever your notes are visible you will need to hold Alt (Windows) or Control (Mac) while using any hotkeys. Q: My ZoomCapture Camera does not maintain its position when I manually aim it. A: First, ensure that you have adjusted the Aiming Tension Knob (Section 2). If it still does not maintain it’s position, then unplug the ZoomCapture Camera and grasp it with one hand like you’re going to aim it. With your other hand, grasp the disk just below the Camera’s USB Port. Now, rotate clockwise with your aiming hand until the camera is tightly secured. Q: Isn’t it illegal to record in some settings? Will I have to get permission to use the ZoomCapture? A: So long as you don’t take screenshots, the ZoomCapture is not recording anything. See the discussion on privacy in Section 3 for more information. www.perkinsproducts.org | tel: +1-617-972-7308 | 175 North Beacon Street Watertown, MA USA 02472 18 ZoomCapture™ User Manual | 043014 5. Support and Service Information Technical Support If there is a problem using the ZoomCapture, you can review more information online, including training videos and Frequently Asked Questions (FAQs) at www.perkinsproducts.org/ZoomCapture . Please review this information first as it may help solve the issues you are experiencing. For any remaining issues, please reach us Perkins Products Customer Service 175 North Beacon St. Watertown, Massachusetts, USA 02472 Telephone: +1 617 972 7308 Email: [email protected] Staff will assist you to either solve the problem or make arrangements for returning your device. Please contact Perkins Products before returning the product in order to receive a Return Material Authorization (RMA) number. An unauthorized return (i.e. one for which an RMA number has not been issued) will be returned to you at your expense. Authorized returns must be shipped in an approved shipping container, prepaid and insured, to the address provided on your return paperwork. Your original box and packaging materials should be kept for storing or shipping the Product. To conclusively establish the period of warranty, consult the invoice provided to you by email. Limited Warranty Perkins Products warrants that the Product, in the course of its normal use, will be free from defects in material and workmanship and shall be in conformity with the specifications, drawings, samples, and descriptions for a term of 1 year. The term of the limited warranty shall commence on the date of purchase. The sole and exclusive warranty shall be, during the period of warranty specified above and at Perkins Products option, the repair or replacement of the Product. www.perkinsproducts.org | tel: +1-617-972-7308 | 175 North Beacon Street Watertown, MA USA 02472 19 ZoomCapture™ User Manual | 043014 Appendix: Full Hotkey details The detailed listing of the hotkeys below can also be accessed through the ‘?’ icon on the ZoomCapture software toolbar. If notes are visible, modify hotkeys with (Windows): Alt (Mac): Option + Control Hotkey* Function W Image Digital Pan Up S Image Digital Pan Down A Image Digital Pan Left D Image Digital Pan Right R Image Digital Zoom In T Image Digital Zoom Out Space Bar* Image Screenshot F Fullscreen Mode Toggle V View Notes Toggle O Open Notes for Review B Open Visibility Settings Left Arrow Lookback One Second Shift + Left Arrow Lookback Twenty Seconds Right Arrow LookForward One Second Shift + Right Arrow LookForward Twenty Seconds Up Arrow Increase Notes Zoom Down Arrow Decrease Notes Zoom *: On Windows, hold Shift + Alt if notes are visible www.perkinsproducts.org | tel: +1-617-972-7308 | 175 North Beacon Street Watertown, MA USA 02472 20