1
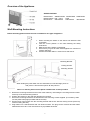
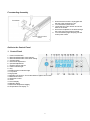
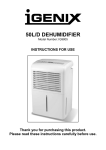
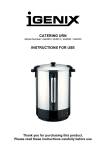
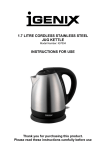
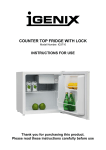
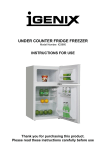
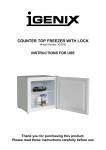
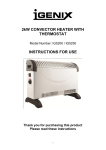
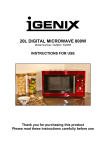
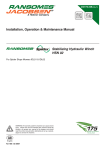
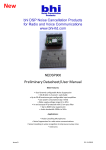
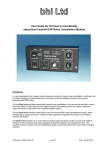
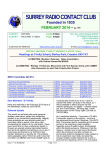
PANEL CONVECTOR HEATER WITH TIMER
Model Number: IG9101 IG9151 IG9220
INSTRUCTIONS FOR USE
Thank you for purchasing this product
Please read these instructions
1
SAFETY INSTRUCTIONS
Read and follow all of the instructions even if you feel you are familiar with the product, and find a place to keep
this manual handy for future reference.
For your convenience record the complete model number, beginning with „IG‟, and batch number beginning
with „5‟ along with the date that you purchased the product and the original receipt and attaché to this manual.
Retain in the event that the warranty service may be required.
Important: This appliance is not intended for use by persons including children with reduced physical, sensory or
mental capabilities, or lack of experience and knowledge, unless they have been given supervision or instruction
concerning use of the appliances by a person responsible for their safety.
This product is intended for domestic use only.
This product is for indoor use only. Do not use the heater outdoors.
Ensure that the electricity supply in your home is rated at 220 -240 volts before operating the appliance.
If the mains lead of this appliance becomes damaged then it must be replaced by the manufacturer‟s service
agent or a suitably qualified person using the same rated cable in order to avoid a hazard.
Children should be supervised to ensure that they do not play with the appliance.
Always turn off and unplug the appliance before attempting to move.
Always turn off and unplug the appliance when not in use.
Do not use the heater unless it has been wall mounted or the feet are attached correctly.
Do not use the heater in the immediate surroundings of a bath, shower or swimming pool.
Do not reach for an appliance that has fallen into water. Switch of at supply and unplug immediately
Never place the heater where it may fall into water, or stand on a damp floor.
Do not cover or obstruct any of the heat outlet grilles or air intake openings of the heater.
Do not place the heater on carpets with a deep pile.
Always ensure that the heater is placed on a firm flat surface.
Always operate upright.
This appliance heats up when in use. To avoid burns, do not touch the hot surface. Switch off and let the
appliance cool before moving or touching.
Ensure that the heater is not positioned close to curtains or furniture as this may create a fire hazard.
Do not place the heater in front of, or immediately below a wall socket.
Do not insert any objects through the heat outlet of air intakes grilles.
Do not use the heater in areas where flammable liquids are stored or flammable fumes may be present.
To protect against fire, electric shock or injury do not immerse the heater, power cord or plug in water or any
other liquid.
Do not twist, kink or wrap the cord around the appliance, this may cause the insulation to weaken and split
Do not run the cord under carpeting, rugs or runners. Arrange cord away from traffic so that it will not be
tripped over. The use of an extension cord with this appliance is not recommended.
Do not operate with the cord coiled as a build up of heat could be sufficient to become a hazard.
Do not place the appliance close to a radiant heat source.
Do not store the appliance while it is still hot.
Do not remove plug from power socket by pulling the supply cord. Always grip the plug.
Do not remove the plug from the power socket until the appliance is switched off.
Do not use the appliance to dry clothes.
Do not operate appliance with wet hands.
The most common cause of overheating is deposits of dust or fluff in the appliance. Ensure these deposits
are removed regularly by unplugging the appliance and vacuum cleaning the grilles.
All covers on this appliance are intended to prevent direct access to the heating elements and must be in
place when the appliance is in use.
The fireguard does not give full protection for young children and for infirm persons.
In order to avoid a hazard due to inadvertent resetting of the thermal cutout, this appliance must not be
supplied through an external switching device, such as a timer, or connected to a circuit that is regularly
switched on and off by the utility.
Use this appliance only as described in the manual. Any other use is not reccomended by the manufacturer
and may cause fire, electric shock or injury.
WARNING: In order to avoid overheating, do not cover the heater.
2
Overview of the Appliance
SPECIFICATIONS
Rated Power: 2000W/1000W 1500W/750W 100W/500W
Rated Voltage: 220 – 240 V
50Hz
Dimensions:
830x76x400
595x76x400
460x76x400
Wall Mounting Instructions
Before mounting please ensure the wall is suitable for this type of appliance.
1. When mounting the heater on the wall do not attach the feet
to the base.
2. Find the correct position on the wall following the safety
instructions.
3. Make sure that the heater is unplugged.
4. Ensure that you give all sides of this appliance a minimum of
150mm clearance.
5. Position the heater within 1 metre from a wall socket.
Mounting Bracket
Locking Screws
Mounting Screws
When slotting the panel hater onto the wall bracket, locate and align points ‟A‟
with points „a‟ first and then points „B‟ with points „b‟
Note: For masonry walls use the plastic sheaths with screws provided.
5. Detach the mounting bracket from the back of the heater by unscrewing the 2 locking screws located
at the top of the wall mounting bracket.
6. Position the bracket on the wall and drill holes as required.
7. Secure the mounting bracket to the wall with the four mounting screws supplied. (For masonry walls
use the plastic wall plugs provided with the screws)
8. Slot the back of the heater onto the mounting bracket and secure with two locking screws (at the top
of the mounting bracket).
9. Plug heater into a standard 220~240 volt electrical outlet. The plug can be removed and the heater
hardwired to the mains. This must be done by a qualified electrician.
3
Freestanding Assembly
Foot Plate
1. Ensure that the heater is unplugged and
that the power switches are off.
2. Turn the heater upside down.
3. Locate the four holes at each end of the
base of the heater.
4. Secure the footplates to the base through
the holes using the screws provided.
5. Turn the heater upright and plug into the
mains power outlet.
Affix foot plates and attach
castors
Guide to the Control Panel
1. Control Panel
1 Power On/Off button
2 Mechanical/automatic mode selector
3 Mechanical/automatic mode timer setting.
4 Confirm button
5 Downwards adjustment
6 Upwards adjustment
7 High/low power selector
8 Power indicator light
9 Day
10 Heating element indicator light
11 Low power
12 High power
13 Negative ion function--This model without negative ion function
14 Mechanical control
15 Automatic control
16 Timer
17 Hours display
18 Minutes display
19 Real time temperature display
o
20 Temperature unit display C
4
2. Operation Guide
Power on/off
Plug in the unit with a short buzz, the red power indictor “8” will always light up.
The LCD display will show for 12 seconds then turn off if no buttons are pressed.
Press the power on/off button “1” to turn on the device with a short buzz, the day, time, room
temperature and temperature unit is displayed. One of the power (“HI” or “”LO”) and the model (“M” or
“A”) will be on.
o
The temperature is factory set at 24 C. This temperature is held in memory in the event of power
interruption.
To turn the heater off press the power ON/OFF button “1”
Temperature Setting (mechanical mode is the same as the automatic mode): temperature unit is oC .
When the device is switched on, press the downwards adjustment “5” or upwards adjustment “6” which
will make the temperature display “19” flash.
Press the downwards adjustment “6” or upwards adjustment “5”again to set the desired temperature.
The highest setting temperature is 30℃ lowest temperature is 5℃.
Press the OK button “4” to finish temperature setting.
When the set temperature stops flashing the room temperature will show on the LCD screen.
Time Setting
When using the device for the first time, the time on screen may not be the same as the actual time, so please
set the correct date and time
Day:
When the power is on, press the SET “3” and OK “4” at the same time for 3 seconds
The day “9” will flash
Then press the downwards adjustment “5” or upwards adjustment “6” to choose the right day.
Press SET “3” to finish.
The day ”9” will stop flashing.
Hour:
After setting the right day, the hour “17” will flash.
Then press the downwards adjustment “5” or upwards adjustment “6” to set the right hour
Press SET “3” to finish
The hour “17” will stop flashing.
Minute:
After setting the right hour, the minute “18” will flash,
Then press the downwards adjustment “5” or upwards adjustment “6” to set the right minute
Press SET “3” to finish
The hour “18” will stop flashing
Second:
After setting the right minute, the second “19” will flash,
Then press the downwards adjustment “5” or upwards adjustment “6” to set the right minute
Press SET “3” to finish
The hour “19” will stop flashing
After setting the right second press SET “3” again to finish time setting. All the symbols will stop
flashing
Automatic “A” mode timer setting (7 days timer)
When in automatic mode, the timer icon “16” will not display.
Day setting:
Press M/A “2” choose automatic mode, LCD screen will display “A”,
Press SET “3” and the current day on the screen “9” will flash
Press the downwards adjustment “5” or upwards adjustment “6” to set the day which needs to be set
with the timer
The Hour “17” and Minute “18” will display the timer for last setting.
Press SET “3” to finish day setting,
The Day ”9” will stop flashing.
5
Timer setting:
The temperature display “19” will display
The first number is 1, this means the heater is on the first running time, 2 for the second running time
and so on. The maximum number of running times you can set is 4.
The hour “17” and minute “18” will display the last setting time, and the “17” will flash.
Press the downwards adjustment “5” or upwards adjustment “6” to set the desired time you wish for the
heater to start to work (E.g. 07 = 07:00am)
Press SET “3” to finish the setting time
Then the minute display “18” will begin to flash
Press the downwards adjustment “5” or upwards adjustment “6” to set the desired time you wish for the
heater to stop working (E.g. 11 = 11:00am)
Press SET ”3” to finish the setting time
Please note the timer can be set in hour intervals only
This would mean the heater was programmed to run between 07.00am and 11.00am
Then the “19” display shows 2, you are now on the second running time and you can repeat your
settings for this time frame and so on.
Then press OK “4” to finish the timer setting completely.
Please note that the setting program will only save once you press the OK “4” button.
Factory pre-setting running time is running between 07.00am -11:00am; then switch off and will resume
running again between 13.00pm and 18.00pm.
To set the running time in one week:
After you have set the first day, you can press OK “4” for 3 seconds to copy and save the data to the
following days.
Please note that the timer setting will only copy for the following days, (eg, when you are setting the
Wednesday running time and press OK “4” for 3 seconds, the Thursday to Sunday would be in the
same running time, but Monday and Tuesday could not copy the data.)
After you have set the first day, it can go onto the following day setting, you can set the different
running time according to the method above
After setting the running program:
Press OK “4” to save and the heater will operate in accordance to those on and off times that have
been set
If it is not in the pre set running time, the device will turn off after 10 seconds.
Mechanical “M” mode timer setting (the timer just for that current day)
Press M/A “2” and select the mechanical mode, LCD display “M”
This will turn the heater on and it will remain on until the power button is pressed to switch off, or a time
period is set for the heater to run and then switch off at the end.
To set the time period for the heater to be on Press SET “3”.
The Hour display “17” will flash,
Press the downwards adjustment “5” or upwards adjustment “6” to set the desired amount of hours you
wish for the heater to be running (eg 09 ).
Press SET “3” again to set the minute
Press the downwards adjustment “5” or upwards adjustment “6” to set the desired amount of minutes
you wish for the heater to be running (eg 15)
For example; if you set the time to 09:15 the heater will run for 9 hours and 15 minutes and then switch
off.
Press OK “4” to confirm the time period.
The Timer symbol ”16” will light up,
If you press SET “3” when setting the minute this will cancel the timer setting.
Negative Ion Function
This model does not have a negative ion function, but the “ION” “13” will display on the screen as it is a
factory setting,
To remove the “ION” display, press the high/low power selector “7” for 3 seconds to make it disappear.
6
High / Low Power Select
Press the high/low power selector “7” to choose high/low power.
When high power is chosen ”12” will light up,
When low power is chosen “11” will light up.
The memory function after shutting down by hand
After being turned off by hand or automatically by the end of a designated set time, the setting program
that will resume when switched back on is the one set last.
The memory function after shutting down suddenly
If no electric is supplied or the heater is improperly shutdown, the device will start to work automatically
on the last setting that was programmed in
If the heater was shut down whilst during a timed period it will resume its remaining time once switched
on again.
Electronic locking
When the device power is on, press button “6 +”and “5 -”at the same time for 3 seconds,
All the control function are now locked. A Square will display for 5 seconds in the “19” space.
It will then disappear and the general display will return.
If any button is pressed during this locked period, the square will show for 5 seconds again then
change to the real temperature display.
Press “6+”and “5-”at the same time for 3 seconds to unlock the control panel.
Overheat Protection
This appliance is fitted with a safeguard that will automatically shut the power off should any part of the heater
begin to overheat. The heater will automatically come back on when it has cooled down. The heater will work
again as normal once it has cooled down. Check for anything surrounding the heater that may have caused it to
overheat such as clothing or curtains covering the air inlet of outlet grille.
Cleaning
Always unplug the heater from the wall and allow it to cool. Clean the outside by wiping with a damp cloth (not
wet). Do not use detergents or abrasives materials. Do not allow for any water to enter the heater. You can use
a vacuum cleaner to remove dust from the inlet and outlet grille.
To clean behind the heater when wall mounted, unfasten the two hooks at the top of the mounting bracket and
tilt the heater forward. This will allow you to clean behind the heater. It is important the heater is returned to its
original position and the hooks are fastened again. Ensure that the heater and plug are dry before being
plugged in again.
Storing the Heater
When the heater is not used for long periods of time, it should be protected from dust and stored in a clean dry
place. The original packaging box can be saved and used to store the heater away.
7
Troubleshooting Guide
Please refer to the trouble shooting guide when experiencing an issue with your heater. If you still cannot
determine the fault then please call our Customer Service number 01473 271272.
Problem
Possible Cause
Solution
1. Not properly plugged into the
mains wall socket.
2. Not switched on
3. No electricity in the mains wall
socket.
1. Plug in firmly.
2. Make sure appliance is
switched on.
3. Check fuse or breaker.
The heater is getting too hot.
1. Inadequate air flow
2. Heat setting too high
3. Vents are blocked
1. Make sure there is circulating
air in the room
2. Adjust heat settings
accordingly
3. Make sure all vents are clear
and free from obstruction.
The heater is not heating up.
1. Timer has not been set
The heater does not work.
1.
Set the timer accordingly or
switch to manual setting.
Mains Plug Replacement
To replace the plug:
1. Cut off the existing fitted plug and dispose of it.
2. The wires in the mains lead supplied with this appliance are coloured in
accordance with the following code:
GREEN/YELLOW = EARTH (E)
BLUE = NEUTRAL (N)
BROWN = LIVE (L)
This product MUST be earthed.
As the colours of the wires in the mains lead may not correspond with the colour markings identifying the
terminals in your new plug, proceed as follows:
The wire which is coloured GREEN or YELLOW/GREEN must be connected to the terminal which is marked
with the letter E or
symbol or a coloured GREEN or YELLOW/GREEN.
The wire which is coloured BLUE must be connected to the terminal in the plug which is marked with the letter
N or coloured BLACK or BLUE.
The wire which is coloured BROWN must be connected to the terminal which is marked with the letter L or
coloured RED or BROWN.
Ensure that the connections are tight and that no loose strands are left out of the terminals.
8
IF IN DOUBT CONSULT A QUALIFIED ELECTRICIAN – DO NOT ATTEMPT TO CHANGE THE PLUG
YOURSELF
If the mains lead becomes damaged consult a qualified electrician.
Guarantee Information
This product is guaranteed for a period of 12 months from the date of purchase against mechanical and
electrical defects.
You can extend your warranty for a further 12 months by registering your product online. Visit
www.igenix.co.uk to register your extended warranty. (Product must be registered within 30 days of purchase)
The warranty does not cover consumable parts that require replacement under normal use or accessories.
If your appliance becomes faulty within the guarantee period please contact our customer service department
on 01473 271 272 or write to us at the address detailed below.
Please quote the model number which begins IG, the „Batch Number‟ beginning „5‟ and give details of the exact
fault.
We will then decide whether to repair or replace the item.
You will be required to return a copy of your proof of purchase. Please retain your original.
If an item is replaced within the guarantee period, the guarantee for the replacement item will be calculated
from the purchase date of the original.
Before calling the Customer Service number please ensure you have checked the Troubleshooting
guide on Page 9.
This product is for domestic household use only. To qualify for the guarantee the product must have
been used according to the instructions in the User Manual. Any misuse of the product will result in the
warranty being void.
Tel: 01473 271 272
Email: [email protected]
Fax: 01473 270 733
Website: www.igenix.co.uk
Postal Address:
Customer Service Department
Pik-a-Pak Electrical Distributors
38 Bluestem Road,
Ransomes Europark,
Ipswich, IP3 9RR
When writing or emailing us to report a fault please ensure you attach a copy of your proof of purchase.
Please retain your original
Disclaimer
Updates to hardware components are made regularly. Therefore some of the instructions, specifications and
pictures in this documentation may differ slightly from your particular situation. All items described in this guide
are for illustration purposes only and may not apply to your particular situation. No legal right or entitlements
may be obtained from the description made in this manual.
Disposal of Old Electrical Appliances
The European Directive 2002/96/EC on Waste Electrical and Electronic Equipment (WEEE), requires
that old household electrical appliances must not be disposed of in normal unsorted municipal waste.
Old appliances must be collected separately in order to optimise the recovery and recycling of the
materials they contain and reduce the impact on human health and the environment. The crossed out
“wheeled bin” symbol on the product reminds you of your obligation, that when you dispose of the appliance it
must be separately collected. Consumers should contact their local authority or retailer for information
concerning the correct disposal of their old appliance.
9
View the range online at www.igenix.co.uk
Follow us on Twitter
@Igenix_Products
10