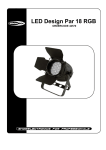
1
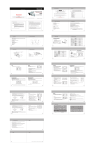
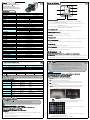
Features
1
Set up and Function
2
④
■ 1/3" SONY SuperHAD CCD Ⅱ (Min. Illumination)
■ Privacy Masking(8 Zone Selectable)
■ 3 Digital Noise Reduction (3-DNR) / D - WDR
⑤
■ Multi Language (Korean,English,chinese,Japanese)
①
⑥
Specification
Item
IC805-WDR
Imaging Sensor
1/3" SONY Super HAD CCD Ⅱ
Signal System
NTSC : 525 Lines
②
⑦
③
⑧
PAL : 625 Lines
2:1 Interlace
Scanning System
H:15.734 ㎑ / V:59.94 ㎐
Scanning Frequency
S/N Ratio
H:15.625 ㎑ / V:50 ㎐
More than 52㏈ (AGC Off)
Horizontal Resolution
① Function Set Up Button
Horizontal : 600 TV-Line (Color)[Min] / 700 TV-Line (B/W)[Min]
Video Output Level
- SET Button : Displays the menu on the screen. Press the button to confirm status or
1.0 Vp-p (75Ω, Composite)
after changing a selected item.
C / CS MOUNT
Lens
- Up and Down Button : Used to move the cursor up or down in the menu screen to select
Color : 0.03Lux([email protected]) , 0.00019(Sens-up.256x)
Min. Illumination
Sync System
Internal / Line Lock(Dual Option)
O.S.D
Built-in(Multi-Language Support)
Electronic Shutter Speed
a desired menu item.
- Left and Right Button : Used to move the cursor left or right in the menu screen or to
change the value of the selected item.
Auto / Flk
(NTSC : 1/60sec ~ 1/100,000sec)
White Balance
② Day & Night Input Port
(PAL : 1/50sec ~ 1/100,000sec)
AWB / AWC-SET / MANUAL / INDOOR / OUTDOOR/ATW
BLC / HS.BLC / Off
Backlight Compensation
D - WDR
- Motion Detection signals are output through this port
INDOOR / OUTDOOR / Off
④ Power Led
Low / Middle / High / Off
Gain Control
Adjust
- When power is properly connected, this LED comes on.
CONTRAST/SHARPNESS/CB_GAIN/CR_GAIN (Level Adjustable)
Language
⑤ Video Output Port
Korean / English / Chinese / Japanese (Selectable)
Camera Title
- Video signals are output through this port. Connect this port to the Video IN port of a monitor
On / Off (Selectable)
Day & Night
⑥ Auto Iris Lens Connector
Auto / B.W / Color (Selectable) / EXT
M/D(Alarm) Output
- You can switch to Day & Night mode by connecting an external signal to this port.
③ Motion Detection Output port
- Used to connect Auto Iris Lens Plug. You can change the Lens type (DC / Video) on
There is no motion 0VThere is motion 5V Less than10㎃
OSD Menu
On / Off(0x ~ 32x)
⑦ Power Input Port
Digital Zoom
Privacy Masking
On / Off (8 Zone Selectable)
3D Noise Filter(3D-NR)
- Connect the power as specified for each model.
On / Off(Selectable)
Sens - up(Frame Integration)
⑧ RS-485 Control Port
On / Off(Selectable limit ~ 256x)
D - EFFECT
- You can control SETUP Menu through this port by using external controllers like a remote
Freeze / Mirror / D-Zoom / Gamma / NEG.IMAGE
controller that RS-485 Communication is supported.
Pelco - D
Protocol
Communication
RS-485 Interface
RS - 485[ Baud Rate : 2400 ~ 57600 ]
DC12 ±10%
Supplied Voltage
The camera can be controlled by using external controllers like a reomote controller.
Power Consumption
Max. 2.0W[140mA]
Dimension(WxHxD)
65(W)*60(H)*119.6(D)mm
Weight
1. To control by PC
- Connect the RS-485 control port of the camera and the serial cable through an RS-485 converter
Approx. 250g
EX) PC Serial Port (COM1)→Serial Cable→RS-485 Converter→Camera RS-485 Converter Port
2. To Control by DVR or System Controller
Շըխ՞լ
3
- Connect the RS-485 cable(TRX+, TRX-) to the port of RS-485 cotrol board that is
connected with DVR or System controller
485 Control Board Connection Port
RS-485 Control Port
(+) CONNCTION TERMINAL (TRX+)
485 +
(-) CONNCTION TERMINAL (TRX-)
485 -
4
⊙ Some lenses may not work properly, depending on the setting of the Brightness Level.
⊙ When using a video-type Auto Iris Lens
① Adjust the ALC adjustment terminal on the lens appropriately. In general, set it to AV.
② It may not work properly depending on the installed lens. Set the Level VR of the lens
to the optimal value.
③ Set the AGC to OFF and adjust the lens VR to an appropriate brightness.
④ Adjust the Lens VR, adjust the BRIGHTNESS, and then check if the screen brightness
changes properly. Otherwise, adjust the Lens VR again.
*RS-485 Communication establishment initial value
Item
Camera ID
BAUD RATE
UART MODE
PET PKT
Initial value
1
9600
8 - NONE - 1
Enable
EXPOSURE
1. When the SETUP menu screen is displayed, select 'EXPOSURE' by using Up and
Down buttons. So that the arrow indicates the 'EXPOSURE'.
Շըխ՞լ
⊙ To control the camera by constructing an additional controller, use Pelco-D portocol.
2. Select a desired mode using the Up and Down buttons.
▶ SHUTTER : You can select either auto or manual shutter.
㐁#Ixqfwlrq#Phqx#Vwuxfwxuh
- A.FLK : Select this when you experience picture flicker
Function Menu
LENS
EXPOSURE
WHITE BAL
▶ AGC : You can adjust it Low, Middle and High level.
■ DC
■ VIDEO
■ MANUAL
■ SHUTTER
■ BRIGHTNESS
■ AGC
■ SENSE-UP
■ BLC/HSBLC
■ D-WDR
■ AWB
■ AWC→SET
■ MANUAL
The higher the gain level, the brighter the screen but the higher the noise.
▶ BLC : Enables a user to directly select a desired area from a picture, and to view the
area more clearly
▶ HS-BLC : If there is a high light installed in a limited environment such as an apartment
■ INDOOR
■ OUTDOOR
■ ATW
DAY NIGHT
■ COLOR
■ AUTO
■ EXT
■ B/W
3 DNR
■ ON
■ OFF
■ CAM TITLE
■ D-EFFECT
■ RS485
■ MOTION
■ PRIVACY
■ SYNC
■ LANGUAGE
ADJUST
■ SHARPNESS
■ BLUE
■ RED
RESET
■ FACTORY
SPECIAL
parking garage or gas station entrance, removing the hight light makes
it possible to view car license plates efficiently.
EXIT
How to use the camera
Շըխ՞լ
⊙ An item with the
, you can move to sub menu pressing SET button
⊙ An item with the - - -, icon is unavailable due to function settings.
HS BLC OFF
HS-BLC ON
- DAY
: Even in normal daylight conditions, the HS-BLC is activated.
- NIGHT
: If a high light that is larger than certain size is present on the screen
remove the high light to see car license plates clearly.
LENS
● Using this function, you can control screen brightness
1. When the SETUP menu screen is displayed, select 'LENS' by using the Up and
Down buttons so that the arrow indicates 'LENS'.
- Enable a user to select a mask of high light area
from a picture.
2. Select the connected type by using Left and Right buttons
▶ DC/VIDEO : Select Auto Iris Lens
- When DC is selected, you can control screen brightness. The range of brightness control
is between 1 and 100.
Adjust the brightness appropriately for optimal screen brightness.
- MANUAL : Select Manual Lens
▶ WDR : If there are bright area and dark area on the screen at the same time, this function
makes both areas to be in clear image
- WDR can be selected 3 steps OFF / INDOOR / OUTDOOR
5
3 Digital Noise Reduction(3DNR)
6
● This function reduces the background noise in a low luminance environment
1. When the SETUP menu screen is displayed, select 3DNR by using the Up and
Down buttons so that the arrow indicates 3DNR.
2. Select a desired mode using the Left and Right buttons.
WDR ON
WHITE BALANCE (White Bal.)
▶ OFF : Deactivates 3DNR. Noise is not reduced.
WDR OFF
▶ ON : Activates 3DN so that noise is reduced.
1. When SETUP menu screen is displayed, select 'White Bal.' by using Up and
3. Set the 3DNR mode to 'ON' andpress the SET button. Then you can adjust the
Down buttons so that the arrow indicates White Bal.
Noise reduction level.
※ Select one of the following 6 modes, as appropriate for your purpose
Շըխ՞լ
▶ AWB : Select this when the color temperature is between 2,000ºK and 18,000ºK.
⊙ You cannot set the 3DNR to 'ON' or 'OFF' when the AGC mode of the EXPOSURE menu is 'OFF'.
⊙ When adjusting the noise reduction level of the 3DNR mdoe, the higher the level set ,
the more the noise level will be reduced but that after image may also occur.
▶ AWC-> SET : To find the optimal setting for the current luminance environment in this
mode, set the point the camera towards a sheet of white paper and press
the SET button. If the environment changes, readjust it.
▶ MANUAL : Select this to fine-tune White Balance manually. Set White Balance first by using
SPECIAL
the ATW or AWC mode. After that switch to MANUAL mode.
Adjust the [BLUE] and [RED], according to the changing of color on the screen
1. When the SETUP menu screen is displayed, select 'SPECIAL' by using Up and
▶ INDOOR : Select this when the color temperature is around 3,100ºK.
Down buttons so that the arrow indicates 'SPECIAL'
▶ OUTDOOR : Select this when the color temperature is around 5,100ºK.
2. Select a desired mode using the Up and Down buttons
▶ ATW : Select this when the color temperature is between 2,500ºK and 9,800ºK.
▶ CAM TITLE : If you enter a title, the title will be appear on the monitor.
① If the SPECIAL menu screen is displayed, use the Up and Down buttons so that the arrow
Շըխ՞լ
indicates 'CAM TITLE'
⊙ White balance may not work properly under the following conditions.
In this case, select the AWC mode.
① When color temperature of environment surrounding the subject is out of the control range
② If the camera towards a fluorescent, the White Balance operation may become unstable
② Set it to 'On' by using Left and Right buttons.
Շըխ՞լ
⊙ When the CAM TITLE menu is 'OFF', no title will be displayed on the monitor screen even if you
enter one.
DAY/NIGHT
● You can display pictures in Color or Black and White.
③ Press the SET button.
1. When the SETUP menu screen is displayed, select 'DAY/NIGHT' by using the Up
④ Use the 4 direction buttons to move to a desired letter and select the letter by pressing the
and Down buttons so that the arrow indicates 'DAY/NIGHT'
SET button. Repeat this to enter multiple letters. You can enter up 15 letters.
Շըխ՞լ
⊙ If you entered wrong letter……
If you move the cursor to CLR and press the SET button, all the letters are deleted. To edit a leeter,
change the cursor to the bottom left arrow and press the SET button. Move the curson over the
letter to be edited, move the cursor to the letter to be inserted and then press SET button.
▶ COLOR : The picture is always displayed in color.
▶ AUTO : The mode is switched to color in a normal environment, but switches to B/W mode
when ambient illumination is low. To set up the switching time or speed
for auto mode, press the SET button
- Delay : You can select the duration time about changing the day/night mode.
⑤ Enter a title, move the cursor to 'POS' and press the SET button. The entered title appears
- S / E - Level : You can select brightness of illumination about changing the day/night mode.
on the screen. Select the position to display the title on the screen by using the 4 directoin
-> The brightness of illumination is changeable by installed environment.
buttons and press the SET button. When the position is determined, select 'END' and press
▶ EXT : This mode allows you to apply a desired filter to external signals.
the SET button to return to the SPECIAL menu.
▶ D-EFFECT
Շըխ՞լ
① When the SPECIAL menu screen is displayed, press the Up and down buttons so that the
⊙ When using a Video Auto Iris Lens, if you set the lens level to low , automatic
switching between Color and Black and White may not occur.
⊙ You cannot control the DAY/NIGHT menu when AGC in the EXPOSURE menu is 'OFF'
At this time, the exchange between DAY mode and NIGHT mode operates as COLOR mode
arrow indicates "D-EFFECT".
② Press the SET button for Sub menu.
* Freeze : You can stop the image or reactivate it.
* Mirror
arrow indecates 'PRIVACY'.
7
8
- Mirror : you can flip the image vertically on the screen.
② Press SET button for Sub Menu.
- Rotate : you can flip the imate horizontally on the screen.
③ Set up the mode by using 4 direction buttons.
- V-Flip : you can flip the image vertically and horizontally both.
* AREA SELECT : You can select up to 8 privacy areas.
* Digital Zoom : You can use a digital zoom of x1.0 ~ X32
* AREA DISPLAY : Determines whether to use the area selected in the AREA SELECT.
* Gamma : Standard value is 0.45. You can adjust the value between 0.05 ~ 1.00
* LEFT / RIGHT : Determines the coordinate of the vertical axis for Area.
* NEG IMAGE : you can flip the color on screen.
* WIDTH : adjust the selected vertical area.
▶ RS 485 : This function sets up the camera communication status when controlling
* TOP / BOTTOM : Determines the coordinate of the horizontal axis for area.
the camera through an external device.
* HEIGHT : adjust the selected horizontal area.
① When the SPECIAL menu is displayed, press the Up and Down buttons so that the arrow
indicates 'RS 485'.
* COLOR : Determine area color. You can select 0 ~ 15.
▶ SYNC : In areas where the supply is at 60Hz, you can synchronize the output phase of
② Press SET button for sub menu.
multiple cameras using the power synchronization function (Line-Lock) without
③ Set up the mode using 4 direction buttons.
using a synchronization signal generator
* CAM ID : Determines the camera's ID number (0~255)
- INT : Internal SYNC type
- L/L[Line-Lock] : Power SYNC type
Շըխ՞լ
⊙ When using AC power at 60Hz frequency, you can use the L/L type SYNC
⊙ When the power is DC 12V, the SYNC menu is fixed to the INT mode.
* ID DISPLAY : Display camera title on the screen.
* BAUDRATE : You can select 2400/4800/9600/19200/38400/57600bps.
▶ MOTION : If you connect an alarm device to this camera, you can monitor activity
because a signal is generated by the camera whenever motion is detected. The
▶ Language : You can select the menu language according to your requirement.
motion detection signal is output through the MD OUT port.
① When the SPECIAL menu is displayed, press the
Up and Down buttons so that arrow indicates
MOTION.
- Supplied Language : English, Chinese, Japanese
ADJUST
1. When the SETUP menu screen is displayed, select ADJUST by using Up and
Down buttons so that arrow indicates ADJUST.
② Press SET button for sub menu.
▶ Sharpness : As you increase this value, the picture outline becomes stronger and clearer
③ Set up the mode using 4 direction buttons.
* AREA SELECT : Determines which 4 vertices of
Adjust this value appropriately depending on the sharpness of the picture.
▶ BLUE : You can adjust the color on the monitor in BLUE mode by controlling between
each MD area is to be used
* AREA DIPLAY : Determines whetehr to use the MD area selected in Sensitivity.
1 and 100
▶ RED : You can adjust the color on the monitor in RED mode by controlling between
* LEFT / RIGHT : Determines the coordinate of the vertical axis for Area.
1 and 100
* WIDTH : Adjust the selected vertical area.
* TOP / BOTTOM : Determines the coordinate of the horizontal axis for area.
RESET
* HEIGHT : Adjust the selected horizontal area.
1. When the SETUP menu screen is displayed, select RESET by using Up and
* Sensitivity : You can select up to 4 areas. When sensitivity number is high,
motion detection sensitivity is increased to recognize even small movement
Down buttons so that arrow indicates RESET.
2. Select a mode by using Up and Down buttons.
▶ FACTORY : Resets the camera settings to the factory defaults.
* Motion View : If you make it ON by using LEFT and RIGHT buttons, selected
Communication status and language is not initialized
value of color is filled on the screen
Շըխ՞լ
⊙ MD areas show only MOTION menu. Therefore, MD areas don't display on the monitor screen.
⊙ BUT if you select the motion view function ON, MD areas are displayed on the monitor
▶ PRIVACY : Hide an area you want to hide on the screen.
① When the SPECIAL menu screen is displayed, press the Up and Down buttons so that the
EXIT
Press the SET button in the Exit menu to save the current settings and exit the Main SETUP
menu.