1
Eurit 4000
ISDN & WAP
Brief Operating
Instructions
Attention: Operating
instructions contain safety
precautions!
Please read before putting
into operation, and store
in a safe place.
Safety instructions
Follow these instructions to avoid physical injury:
➭ Never take the telephone apart yourself.
➭ Never touch electrical contacts with pointed or metallic objects.
➭ Never lay the connecting leads in such a way that they might cause someone to trip
over.
Be sure to follow these instructions when installing, connecting and using the
telephone:
➭ The Eurit 4000 is for voice communication via the ISDN telephone network as well as
for information access on the Internet via WAP. The device must not be used for any
other purpose.
➭ The telephone is intended only for normal use in dry areas of the home or office. Do
not install or use the telephone in wet areas (e.g. bathroom) or in explosionendangered rooms.
➭ Install the telephone away from sources of heat, direct sunlight and other electrical
appliances. Operate the telephone only in the temperature range from +5 °C to +45 °C.
➭ Connect the connecting leads only to the designated sockets. Do not install or use
the telephone with damaged connecting leads. If you discover damage, have it
repaired by authorized service centers.
➭ Use only genuine accessories.
➭ Protect the telephone from wet, excessive dust, aggressive liquids and vapors.
➭ Clean the telephone with a soft, damp cloth or antistatic cloth. Do not use a dry cloth
or cleaning or scouring agents. Strong cleaning agents or solvents are not suitable.
➭ The telephone may be repaired only by authorized service personnel.
➭ Do not carry the telephone by the connecting leads.
➭ Do not drop the telephone.
➭ Place the telephone on a non-slip surface.
➭ The feet of the telephone may leave marks.
I
203247441en_ba_d0
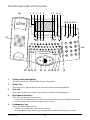
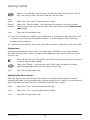
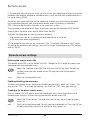
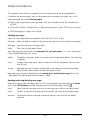
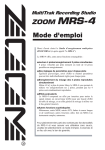
Overall view and control panel
28
1
2
3
4 5
67
8
9
10 11 12 13 14
27
15
26 25 24 23
22
21
20 19 18 17
16
1
Display with backlighting
for menu functions, information, texts and graphics
2
Minus key
Press the minus key to reduce the volume (handset and loudspeaker).
3
Plus key
Press the plus key to increase the volume (handset and loudspeaker).
4
Microphone mute key
Press the microphone mute key to
– switch the microphone on or off (handset microphone, handsfree microphone).
– withhold your own phone number when calling.
5
Loudspeaker key
Press the loudspeaker key to
– follow the connection status when dialing.
– activate/deactivate listening by loudspeaker/handsfree talking during a call.
203247441en_ba_d0
II
Overall view and control panel
6
key
Press the key to
– launch the WAP browser, establish an Internet connection and go to the WAP
home page.
– terminate the Internet connection (if the WAP browser has already been
launched) and restore the telephone to default mode.
7
Fox key
The available functions are shown on the bottom line of the display and are
activated by pressing the Fox key directly below the corresponding text.
8
User key
Press the user key to change the user profile on the telephone.
9
LED
The LED tells you the status of your telephone.
LED off
– telephone answering machine off
LED lit
– telephone answering machine on
– call forwarding unconditional
– if there is a call with volume = 0 or do not disturb
LED flashing slowly
– at least one message received
LED flashing quickly
– capacity of telephone answering machine exhausted
10
Telephone answering machine key
Press the telephone answering machine key to switch your telephone answering
machine on or off.
11
Redial key
Press the redial key to open the redial memory. The redial memory stores the phone
numbers which were last dialed (up to 1000 entries).
12
LOG key
Press the LOG key to open the LOG memory. The LOG memory stores all incoming
and outgoing calls, SMSs, UUSs, incoming voice messages for the telephone
answering machine, info messages as well as WAP addresses entered using the
keypad (1000 entries).
13
PARK key
Press the PARK key to park the existing call.
14
key
Key, freely assignable for each user, for phone numbers, e-mail addresses, WAP
addresses or functions.
15
Dial keypad
Use the dial keypad to enter numbers and the characters * and #.
16
Alphanumeric keypad
Use the alphanumeric keypad to enter letters as well as special characters such as
full stop (period), comma, brackets etc. (by simultaneously pressing the CONTROL
key and letter key).
III
203247441en_ba_d0
Overall view and control panel
17
Backspace key
Press the backspace key to delete letters, special characters, digits etc. you have entered.
18
RETURN key
Press the return key to
– move to the next line.
– enter corresponding menus.
– confirm or execute functions.
19
Arrow keys
Press an arrow key to
– move the cursor horizontally or vertically for entering text.
– scroll up/down the display.
– scroll up/down the menu and select the corresponding menu.
– select WAP pages.
20
BACK key
Press the BACK key to return from a submenu to the associated menu. When
surfing, press the BACK key to go back one level to the previous WAP page. Hold
down the BACK key to reload the home page of the WAP browser or to restore
the telephone to default mode.
21
Wheel navigator
Turn the wheel navigator to
– move the cursor vertically for entering text.
– scroll up/down the display.
– scroll up/down the menu and select the corresponding menu.
22
OK key
Press the OK key to
– enter corresponding menus.
– confirm or execute functions.
– scroll up/down the menu and select the corresponding menu.
– dial WAP links.
23
Space key
Press the space key to enter spaces.
24
CONTROL key
The keys of the alphanumeric display can also be used to enter special characters.
To enter special characters, simultaneously press the CONTROL key with a
corresponding key on the alphanumeric keypad.
25
SHIFT key
Simultaneously press the Shift key to enter letters in upper case.
26
Special character key
Press the special character key to display a one-line list with special characters, which
you can select with the wheel navigator, the arrow keys or the alphanumeric keypad.
27
Loudspeaker
28
Handset cradle
203247441en_ba_d0
IV
Contents
Safety instructions ........................................................................................................ I
Overall view and control panel .................................................................................. II
Introduction ................................................................................................................. 4
The telephone .......................................................................................................... 4
Operating instructions .............................................................................................. 5
Getting started ............................................................................................................ 7
Unpacking ................................................................................................................ 7
Choosing a location .................................................................................................. 8
Connecting the telephone ........................................................................................ 8
The display ............................................................................................................. 10
Key assignment ...................................................................................................... 12
First steps (brief instructions) ................................................................................... 13
WAP ............................................................................................................................ 16
Definitions .............................................................................................................. 16
Status symbols in the WAP browser ........................................................................ 19
Launching the WAP browser (going online) ............................................................. 19
Quitting the WAP browser (going offline) ................................................................ 19
Surfing the Internet (surfing through WAP pages) ................................................... 20
Surfing and making a phone call at the same time .................................................. 22
Saving WAP pages .................................................................................................. 23
Settings for WAP access .......................................................................................... 25
Error messages ........................................................................................................ 27
Phone calls ................................................................................................................. 28
User concept .......................................................................................................... 28
Handsfree talking .................................................................................................... 29
Listening by loudspeaker ......................................................................................... 30
Mute ...................................................................................................................... 30
Adjusting the volume .............................................................................................. 30
Manual dialing ........................................................................................................ 31
Withholding your phone number (making an anonymous call) ................................ 32
Callback on busy/no answer ................................................................................... 33
Automatic redial on busy ........................................................................................ 34
Scheduled call (reminder to call back) ...................................................................... 34
Dialing from the phonebook ................................................................................... 35
Dialing from the redial memory ............................................................................... 36
1
203247441en_ba_d0
Contents
Dialing from the LOG memory ................................................................................ 36
Dialing from the inbox ............................................................................................ 37
Dialing from the VIP display .................................................................................... 37
Incoming calls ......................................................................................................... 38
Anonymous callers .................................................................................................. 39
While making a phone call ...................................................................................... 40
Sending keypad information ................................................................................... 42
Sending DTMF ........................................................................................................ 42
Phonebook ................................................................................................................. 43
Creating a new entry .............................................................................................. 43
Changing an entry .................................................................................................. 46
Deleting an entry .................................................................................................... 46
Checking the phonebook capacity .......................................................................... 46
Telephone answering machine ................................................................................. 47
Switching the telephone answering machine on/off ................................................ 47
Accepting a call in mid-recording ............................................................................ 48
Recording/playing back/changing/deleting a greeting .............................................. 48
Assigning greeting to a user .................................................................................... 50
Setting the recording length ................................................................................... 51
Switching call screening on/off ................................................................................ 51
Number of rings before answer/remote access toll save function ............................. 52
Recording quality .................................................................................................... 52
Playing back/deleting voice messages ...................................................................... 53
Remote access ............................................................................................................ 54
Remote access settings ........................................................................................... 54
Operating the telephone remotely .......................................................................... 56
Operation on a PBX ................................................................................................... 62
Switching on/off operation on a PBX ....................................................................... 62
Trunk access code (TAC) for outgoing calls .............................................................. 62
Trunk access code (TAC) for incoming calls .............................................................. 63
Length of internal phone numbers .......................................................................... 63
On-hook transfer .................................................................................................... 64
Setting the method of transfer ................................................................................ 65
Automatically sending keypad information ............................................................. 65
203247441en_ba_d0
2
Contents
Advanced features .................................................................................................... 66
Timers .................................................................................................................... 66
ETV® Online ............................................................................................................ 68
Messages (SMS, UUS, info message) ....................................................................... 70
Message waiting notification .................................................................................. 74
Call forwarding ....................................................................................................... 76
Call charges ............................................................................................................ 76
Do not disturb ........................................................................................................ 77
Providers ................................................................................................................. 79
Ringing tone ........................................................................................................... 81
Games .................................................................................................................... 82
Locking the telephone with security PIN .................................................................. 82
key .................................................................................................................... 84
Appendix .................................................................................................................... 85
Renumbering (prefix) .............................................................................................. 85
Headset .................................................................................................................. 86
Reset ...................................................................................................................... 86
Software update ..................................................................................................... 87
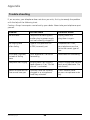
Trouble shooting ..................................................................................................... 88
Care ....................................................................................................................... 89
Function list ............................................................................................................ 89
Eurit Office Tool ...................................................................................................... 90
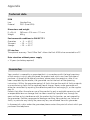
Technical data ......................................................................................................... 91
Warranty Conditions ............................................................................................... 91
Disposal .................................................................................................................. 92
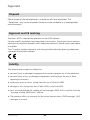
Approval and CE marking ....................................................................................... 92
Liability ................................................................................................................... 92
Declaration of conformity ....................................................................................... 93
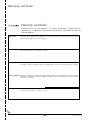
Warranty certificate .................................................................................................. 95
Key words .................................................................................................................. 97
3
203247441en_ba_d0
Introduction
Thank you for the confidence you have shown in us by choosing our product.
This product is intended for office or home use.
The telephone
Type of line
Your telephone is intended for an ISDN standard line (protocol DSS1, Euro ISDN) and can
be connected to the ISDN bus (S0). The power supply is via the plug-in power supply unit.
WAP
Your telephone has an integrated WAP browser. Press the key to access information on
the Internet via WAP. With ISDN you have two telephone lines at your disposal, which
means you can surf and phone at the same time.
User profiles
Your Eurit 4000 can be used to set up 10 user profiles. All users can define their own
settings, such as ringing melodies, call forwarding, do not disturb etc. Press the user key
to switch from one user to the next.
Details about the user concept can be found in the section entitled "Phone calls - User
concept".
Phonebook
The phonebook has space for up to 800 entries for names and addresses. Each individual
entry can hold up to 5 different phone numbers (home, office, mobile, fax, pager), e-mail
addresses (home email, office email) or WAP addresses (URLs).
Telephone answering machine
The built-in digital telephone answering machine has a total capacity of around 28
minutes. A total of 10 greetings, 5 end messages and 2 "memory full" messages can be
recorded. The recording length is adjustable. The telephone answering machine can be
remotely accessed and configured using a PIN code.
➭ The abbreviation TAM (Telephone Answering Machine) is often used in the operating
instructions and in the text on the display.
203247441en_ba_d0
4
Introduction
Scope of functions
The Eurit 4000 provides you with virtually all ISDN advanced functions. For a detailed
overview, refer to the table of contents.
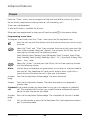
Operating instructions
These operating instructions will familiarize you with all the functions and features of your
telephone. Use the table of contents or the extensive index to find quick answers to any
questions you may have.
Online help is available from the Eurit 4000 WAP home page (wap.eurit.com), where the
operating instructions can be accessed in electronic form.
Structure of the operating instructions
Normally, the functions are described in full in the individual chapters. First, you are given
some general information about the function. Next, you are guided step by step through
the procedure. The left-hand column shows the keys you need to press or the information
in the display under which you need to press the Fox key. On the right you will find
information on what to do and you will be told what the display means.
The following, additional information panels may appear in the text:
This draws your attention to hazards or risks which may result in serious
damage to your telephone.
➭ This provides you with general information or tips and tricks which will make
operating your phone even easier.
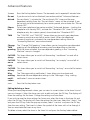
Picture symbols (pictograms)
Normally, the instructions show the keys you need to press or the symbol under which
you need to press the Fox key. In the case of actions for which there are no keys or in
cases where the key covers two or more functions, use is made of the following
pictograms:
This symbol means you should use the alphanumeric keypad to enter
characters.
5
203247441en_ba_d0
Introduction
1
2
3
4
5
6
7
This symbol means you should use the dial keypad to enter digits.
9
0
This symbol means you should pick up the handset.
This symbol means you should replace the handset.
This symbol means you should press either the OK key or the BACK key or turn
the wheel navigator.
Or …
You will see this if there are alternatives for what to do next.
…
You will see this after an alternative action to indicate that the procedure
continue should be continued from this point.
How to proceed
First read the section entitled "Getting started".
If you intend to operate your telephone as part of a PBX, you should read the section
entitled "Operation on a PBX".
Otherwise you can look up the required action or function in the table of contents or
index.
And now we hope enjoy getting to know your Eurit 4000!
203247441en_ba_d0
6
Getting started
Your Eurit 4000 can only deliver satisfactory results if you have met all the requirements
for setting up your telephone.
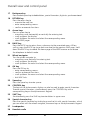
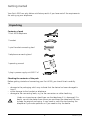
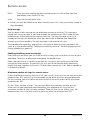
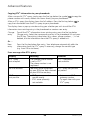
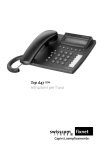
Unpacking
Contents of pack
1 Eurit 4000 telephone
1 handset
1 spiral handset connecting lead
1 telephone connecting lead
Eurit
4000
ISDN
& WAP
om
at h
ructions
g Inst
free
e!
tions!
precau store
ratin
safety ion, and
contain operat
tions
into
ion:
Attent ing instruc putting
Operat read before
Please place.
in a safe
Ope
feel
1 operating manual
1 plug-in power supply unit SNG 7 af
Checking the contents of the pack
Before getting started and connecting your Eurit 4000, you should check carefully
for
– damage to the packaging which may indicate that the device has been damaged in
transit.
– visible damage to the handset or telephone.
– damage to the connecting leads, e.g. to the connectors or cable sheathing.
Under no circumstances should you use the telephone if it is damaged. If in
doubt, consult the dealer from whom you purchased the telephone. Be sure
to keep the original packaging. It may come in useful for transporting the
telephone if you move premises or if you need to ship the device.
7
203247441en_ba_d0
Getting started
Choosing a location
Choose a flat, dry location in which to set up your Eurit 4000.
This telephone is intended for normal conditions of use. Modern furniture is coated with
a wide variety of different paints, lacquers and plastics and is treated with a variety of care
products. Some of these agents may contain substances that corrode or soften the plastic
feet of your telephone. If this happens, it may leave undesirable marks on the surface of
furniture. For understandable reasons, the manufacturer cannot accept liability for such
damage.
Never lay connecting leads in such a way that they might cause someone to
trip over.
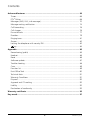
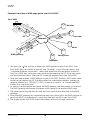
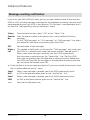
Connecting the telephone
The connecting sockets for the handset and telephone connecting lead are on the base
of your telephone. First connect the handset and then connect the telephone to the
telephone network.
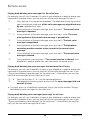
Connecting the handset
First of all, plug the connector at the end of the
longer, straight part of the lead into the socket
on the base of the telephone ➊ which is marked
with a handset symbol.
Press the cable into the cable groove in order to
relieve the strain on the connector ➋. Use a thin,
flat object to press the cable under the retaining
lugs.
Plug the connector at the other end of the spiral
lead into the socket on the handset ➌.
203247441en_ba_d0
8
➊
➋
➌
Getting started
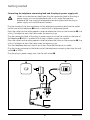
Connecting the telephone connecting lead and the plug-in power supply unit
Under no circumstances should you plug the connecting lead of the plug-in
power supply unit into the telephone jack as this might damage the
telephone. Be sure to plug the telephone connecting lead and the plug-in
power supply unit into the correct sockets.
Plug the shorter of the two connectors on the telephone connecting lead into the socket
on the base of the telephone ➊ which is marked with a telephone symbol.
Press the cable into the cable groove in order to relieve the strain on the connector ➋. Use
a thin, flat object to press the cable under the retaining lugs.
Plug the connecting lead of the plug-in power supply unit into the socket on the base of
the telephone ➍ which is marked with a plug-in power supply unit symbol.
Press the cable into the cable groove in order to relieve the strain on the connector ➎. Use
a thin, flat object to press the cable under the retaining lugs.
Turn the telephone over and stand it on its feet. Place the handset on its cradle.
Plug the larger connector at the other end of the telephone connecting lead into the wall
socket ➌ or NTBA.
Plug the plug-in power supply unit into the wall socket ➏.
➌
➏
➎
➍
9
➋
➊
203247441en_ba_d0
Getting started
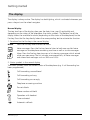
The display
The display is always active. The display has backlighting, which is activated whenever you
press a key or turn the wheel navigator.
Normal display
The top two lines of the display show you the date, time, user (if applicable) and,
depending on the status of the telephone, the status symbols. The bottom line of the
display shows the available functions (depending on the status of the telephone) for the
Fox key. Press the Fox key directly below the corresponding text to activate the function.
1. Functions for the Fox key in the normal display
Menu
Press the Fox key here to enter the menu.
Voice messages: Press the Fox key here to listen to both new and old voice
messages on the telephone answering machine as well as to info messages.
Inbox: Press the Fox key here to access a list showing messages which arrived
while you were away. The list includes unanswered calls, all voice messages
and unread text messages such as SMSs and UUSs.
2. Status symbols in the normal display
The status symbols show the current status of the telephone (e.g. if call forwarding has
been programmed).
Call forwarding unconditional
Call forwarding on busy
Call forwarding on no reply
Telephone answering machine
Do not disturb
Phone number withheld
Operation with headset
Timer activated
Automatic callback
203247441en_ba_d0
10
Getting started
Callback on no answer
Ringing tone volume = 0 (mute)
Phone lock
Message waiting notification
Reject anonymous callers/forward directly to telephone answering machine
Automatic provider selection activated
VIP display
If the phonebook contains entries you frequenty call, you can have them displayed on
the VIP display. Once an entry has been selected for the VIP display, the VIP display
appears instead of the normal display. Entries in the VIP display can be selected with the
wheel navigator and dialed with the OK key.
Functions for the Fox key when dialing
1. On-hook dialing (dialing with handset on cradle)
Add entry to phonebook
Read entry from phonebook
ETV
ETV® Online (if supported by network operator)
Attribute Number attributes (see section entitled "Phonebook – Creating a new entry")
2. Off-hook dialing (manual dialing)
Menu
Activate available menus when manual dialing
disconnect Abort connection
Keypad
Send keypad information (see section entitled "Phone calls – Sending keypad
information")
WAP
1. Functions for the Fox key
Menu
Menu
Reload current WAP page (refresh)
Stop
Save current WAP page as bookmark
Options Options (further interactive commands for a WAP page)
11
203247441en_ba_d0
Getting started
2. Status symbols
Display for loading a WAP page (animated)
Connection to ISP active
Connection to ISP interrupted
Key assignment
General
The Fox key is the wide key directly below the display. The function of the Fox key is
dependent on the bottom line of the display, which contains functions for the Fox key.
The functions differ depending on the current status of your telephone. To select such a
function, press the Fox key below the available function.
Text is entered using the alphanumeric keypad. Letters can be typed in upper case by
pressing the Shift key simultaneously with the corresponding letter key. The keypad can
also be used to enter the most important special characters. The special characters on
the letter keys can be obtained by pressing the CONTROL key simultaneously with the
corresponding letter key. Additional special characters and umlauts can be obtained by
pressing the special character key. If, for example, you wish to type the umlaut
character "ü", first press the special character key, then the letter key "u" (the cursor is
already on the umlaut for "u") and press the special character key once again.
Wheel navigator
The wheel navigator with OK and BACK keys makes it extremely easy for you to use the
telephone or to surf through WAP pages:
Wheel
Turn the wheel navigator for optimum speed in viewing menus, positioning
navigator the cursor or surfing the Internet with the WAP browser activated.
OK key
The OK key is the confirmation key for executing commands and functions,
calling up menus, accessing WAP links, confirming entries you have made or
selecting an option from a pop-up window.
BACK key Press the BACK key briefly to make the telephone skip back one level
(e.g. from a submenu to the menu). If you press the BACK key and hold it
down, the display changes to the normal display.
key
Press the key to activate the WAP browser and load the WAP home page. To exit the
WAP browser, press the key once again. Your Internet connection will be terminated.
203247441en_ba_d0
12
Getting started
User key
Press the user key to access the user profiles which have been programmed in the
telephone. The telephone settings (ringing melodies, greetings for the telephone answering
machine, etc.) also change depending on the selected user (the current user name is
always shown at the top right of the display).
Dial keypad
Use the dial keypad to dial phone numbers or to send keypad information.
Function keys
The function keys are located directly above the dial keypad. By simply pressing a key you
can:
–
–
–
–
–
switch the telephone answering machine on or off.
call up the redial memory.
call up the LOG memory.
park calls with the PARK key.
select the function you have programmed on the key.
First steps (brief instructions)
Selecting the language
When you purchase your Eurit 4000 the display language has already been set to your
national language. However, you can select a different language from the "Installation/
Location" menu:
Select the "Language" line and press the OK key. From the pop-up window,
choose the required language and press the OK key.
save
Press the Fox key below save.
Creating multiple subscriber numbers (MSNs) for the first time
When you applied for your ISDN line, your network operator issued you with several
phone numbers. You can assign these phone numbers to different devices or you can
define separate phone numbers (MSNs) on your Eurit 4000 for different users
(see section entitled "Phone calls – User concept").
Change the user on the telephone by pressing the user key. To make use of the full
potential of your Eurit 4000, you must define at least two users in the "Installation/Define
user" menu:
13
203247441en_ba_d0
Getting started
Select a "not defined" line and press the Fox key below edit (or press the OK
key). The display shows the entry fields for the user data.
User
name
Select the "User name" line and enter a name.
Phone
number
Select the "Phone number" line and enter the multiple subscriber number
(MSN) you wish to assign to that user. Enter the phone number without area
code (prefix).
save
Press the Fox key below save.
➭ If you do not define any MSN on your telephone, the telephone will ring when a call
is made to any of the possible phone numbers. If connecting to a PBX, enter the
number of the extension.
➭ If you have not entered a user name, the phone number is regarded as the user name.
Ringing tone
When you have defined several users, give them each a different ringing tone melody
from the "Ringing tone" menu. As soon as the telephone rings, you can tell which user
the call is for.
Press the user key until the display shows the user to whom you wish to assign
a specific ringing tone melody.
Select the "Melody" line and press the OK key. From the pop-up window,
select the required melody and then press the OK key.
save
Press the Fox key below save.
Adjusting the date and time
Normally, you do not need to adjust the date or time, because the date and time are
automatically reset via the network every time an outgoing call is made. You can manually
adjust the date and time from the "Installation/Date and time" menu:
Date
Select the "Date" line and overwrite the digits.
Time
Select the "Time" line and overwrite the digits.
save
Press the Fox key below save.
203247441en_ba_d0
14
Getting started
Display contrast
From the "Installation/Hardware" menu, you can set the display contrast as well as the
two display colors, light gray and dark gray, in 32 different levels.
Select the line "Display contrast", "Display light gray" or "Display dark gray"
and press the OK key. To adjust the current settings, use the wheel navigator
or press the Fox key below "–" or "+". Press the OK key.
save
Press the Fox key below save.
➭ First set the two display colors light gray and dark gray to level 0. Then adjust the
level on the display contrast so that the display is completely black, but not
overmodulated. Select your preferred values for the two display colors light gray and
dark gray.
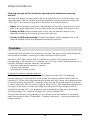
Display illumination
The display illumination is automatically activated (default setting) as soon as you press a
key on the telephone, pick up the handset or turn the wheel navigator. However, from
the "Installation/Hardware" menu you can set the illumination to always on or always off.
Select the "Display illumination" line and press the OK key. You will see the
pop-up window with the options "OFF", "Auto" and "ON". Select your
preferred setting and press the OK key.
save
Press the Fox key below save.
Confirmation beeps
Whenever you enter a wrong command or confirm a setting, you are made aware of this
by a short beep. This confirmation beep is set to ON as the default. However, if you find
the beep disturbing, you can switch it off from the "Installation/Hardware" menu.
Select the "Confirmation beeps" line and press the OK key. From the pop-up
window, select "OFF" and press the OK key.
save
Press the Fox key below save.
Key sound
Key sound is a tone which is heard every time you press a key on your Eurit 4000. Your
phone is delivered with the key sound activated. If this disturbs you, you can deactivate it
under "Installation/Hardware".
Select the "Key sound" line and press the OK key. In the popup window, select
"OFF" and press the OK key.
save
Press the Fox key below save.
15
203247441en_ba_d0
WAP
Definitions
What is WAP?
The abbreviation WAP stands for "Wireless Application Protocol". WAP is a transmission
standard for terminal devices of limited capability and display power (size of the display).
WAP enables such terminal devices to access and display information from the Internet.
Your Eurit 4000 has an integrated WAP browser. A WAP browser is a program which is
capable of using your Eurit 4000 to display any WAP pages you load while surfing the
Internet.
This means that your Eurit 4000 has Internet capability, enabling you, for example, to
send and receive e-mails or access all sorts of information such as the latest news,
weather, lottery numbers, share prices, sports results, public transport timetables or arrival
and departure times at the airport, etc.
To access the Internet, simply press the key and ISDN will establish your Internet
connection in just a few seconds. With ISDN you have two channels, which means that
you can surf the Internet and make a phone call at the same time. While you are surfing,
ISDN transfers the data at a rapid rate of 64 kbit/s so that any WAP pages you request will
appear within just a few seconds on the display.
What is an Internet Service Provider (ISP)?
An ISP has a connection to the worldwide data network (Internet) and makes that access
available to private individuals, educational establishments, companies etc. When you
request a page from the Internet, your request goes to the ISP, who forwards your request
and then sends you back the data.
Some ISPs require you to register and identify yourself by a user name and password
(depending on ISP) every time you wish to enter the Internet. Your Eurit 4000 is delivered
preprogrammed for an ISP so that you can immediately use the Internet. However, you
can change to a different ISP at any time. Be aware of the different rates (cost per unit of
time) of the different ISPs.
What is a WAP gateway?
Whenever your Eurit 4000 requests information from the Internet, it does this through
the ISP. Because the data are WAP data, the ISP forwards the data to a so-called WAP
gateway. The WAP gateway then searches for the page you have requested. Having
received the page, the WAP gateway converts it into a form the WAP browser can
understand and then sends the page via the ISP to your Eurit 4000.
203247441en_ba_d0
16
WAP
What is a server?
A server is a special computer which is connected to the Internet and makes services
available to users. A server contains files (e.g. WAP pages) which can be accessed from
there throughout the entire Internet.
What are WAP addresses (URLs)?
Every WAP page on the Internet has a given address. This address is called an URL
(Universal Resource Locator).
What is a hyperlink?
Hyperlinks are usually underlined words or texts on WAP pages. A hyperlink is a direct
connection to another WAP page which can be accessed via that link (without knowledge
of the address).
What are bookmarks?
Bookmarks are memory aids stored in the browser. For example, a WAP address can be
saved under a name. Once you have created a bookmark, you can return to the
corresponding WAP page at any time simply by clicking on the bookmark.
The wap.eurit.com homepage
Your Eurit 4000 has been set up so that the homepage (wap.eurit.com/...) appears
whenever you launch your WAP browser by pressing the i key. What you see on the
homepage will vary depending on the country in which you purchased your Eurit 4000.
Basically, you should find the following information on the Eurit WAP homepage:
–
–
–
–
–
–
collection of WAP links
online operating instructions
FAQ (frequently asked questions)
information on current software
information on other Eurit telephones
contact & feedback options via e-mail
17
203247441en_ba_d0
WAP
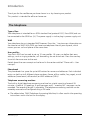
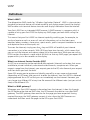
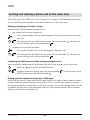
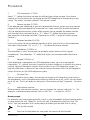
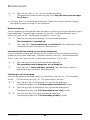
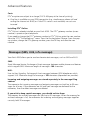
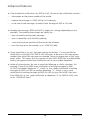
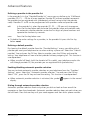
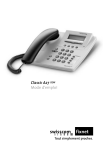
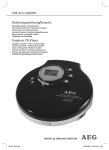
Example: How does a WAP page get to your Eurit 4000?
Eurit 4000
Ga
ISP
te w
a
U s c c es 1
Pa er n s nu
s sw a m m
or e ber
d
ay
11
00
1…
ad
dre
s
2 s/ w
Weather
5
ap
.e u
rit.
co m
3
4
ISP
"W
?"
om
t.c
uri
e
is
re 3
2
he
eurit.com
Internet
4
News
5
11
0
…
01
WAP gateway
Share prices
Timetable
key and this activates the WAP browser on your Eurit 4000. Your
1. You press the
Eurit 4000 dials the number of your ISP (see "Number" in the ISP access data in the
"Installation/Internet connections" menu) and establishes the connection to the ISP.
Your Eurit 4000 then sends your user name and password to the ISP. If the user name
and password are correct, then the ISP is ready for requests from your Eurit 4000.
2. After you have entered a WAP address on your Eurit 4000, the Eurit 4000 sends a data
packet to the Internet via ISP. The data packet has a destination address, namely the
gateway address (e.g. 195.058.110.201), as well as a content, i.e. the required WAP
address (e.g. wap.eurit.com).
3. As soon as the data packet has found the WAP gateway, the data packet is unpacked.
The WAP gateway next locates the server which contains the required WAP page.
4. The server containing the data for wap.eurit.com sends those data back to the WAP
gateway.
5. Once the WAP gateway has converted the data into a form which the WAP browser of
your Eurit 4000 can understand, it sends the data back via ISP to your Eurit 4000.
6. The display of your Eurit 4000 shows the contents of the WAP page "eurit.com".
203247441en_ba_d0
18
WAP
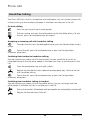
Status symbols in the WAP browser
The animated " " means that the WAP browser is searching for a WAP page
in the Internet and will download the data to the telephone once it has found
the page.
Your telephone is online, i.e. the connection to the Internet is active.
Your telephone is offline, i.e. the connection to the Internet is interrupted.
Launching the WAP browser (going online)
Press the
key to launch the WAP browser. If you have not yet defined a
WAP homepage, then (in offline mode) you will first see a menu with the
selection for the Eurit WAP homepage or a WAP demo. Once you have defined
your own WAP homepage (see section entitled "WAP – Surfing the Internet –
Defining a new WAP homepage"), that homepage will always be loaded when
you activate the WAP browser in future.
➭ If you have saved WAP addresses in the phonebook, on the VIP display or on the key,
then the WAP browser is launched automatically after dialing the WAP address, and
the corresponding WAP page is loaded. If there are WAP addresses in the LOG
memory, then you can dial them, too.
Quitting the WAP browser (going offline)
There are several ways to quit the WAP browser and to disconnect your Eurit 4000 from
the Internet (e.g. to save costs):
Quitting the WAP browser
With the WAP browser activated, press the
and disconnect from the Internet.
key to quit the WAP browser
Or …
With the WAP browser activated, press the Fox key below Menu. Select the
WAP menu "Exit browser" and press the OK key.
19
203247441en_ba_d0
WAP
Disconnecting from the Internet (going offline)
With the WAP browser activated, press the Fox key below Menu. Select the
WAP menu "Offline" and press the OK key. Your Eurit 4000 disconnects from
tells you that you are offline.
the Internet. The status symbol
➭ Your Eurit 4000 disconnects automatically from the Internet (goes offline) if two
minutes have elapsed since you last requested new data from the Internet. You can
change this timeout from the "Installation/Internet connections" menu. Select your
ISP from the list and adjust the value in the "Timeout" line.
Surfing the Internet (surfing through WAP pages)
Surfing with the navigation unit
Wheel
Use the wheel navigator for optimum convenience when surfing, to be able to
navigator scroll quickly through WAP pages, and also for selecting hyperlinks.
OK key
Select a hyperlink and press the OK key.
BACK key Press the BACK key briefly and the WAP browser jumps back to the previous
WAP page. Press the BACK key and hold it down, and the WAP browser
reloads the WAP homepage.
Loading the WAP homepage
The WAP homepage is the WAP page which appears on your display when you press the
key. If the WAP browser is already activated, then press the BACK key and hold it
down, or select the "Homepage/Load homepage" menu, and the WAP homepage will be
reloaded.
Defining a new WAP homepage
You can define a different WAP page as the WAP homepage at any time. Keep surfing
until the display shows the WAP page you would like as your WAP homepage. Then select
the WAP menu "Homepage/Use current page" and press the OK key.
Entering WAP addresses manually
Using the alphanumeric keypad on your Eurit 4000, you can enter WAP addresses directly:
203247441en_ba_d0
20
WAP
Enter
URL
With the WAP browser activated, press the Fox key below Menu. Select the
WAP menu "Enter URL" and press the OK key. Enter the address in the pop-up
window (e.g. wap.eurit.com) and press the OK key.
Loading WAP pages from memory
WAP pages can be retrieved from the following memories and can be downloaded from
there:
–
–
–
–
–
–
–
Bookmark
Homepage
History
Phonebook
VIP display
LOG memory
key
(WAP menu)
(WAP menu)
(WAP menu)
(see section entitled "Phone calls – Dialing from the phonebook")
(see section entitled "Phone calls – Dialing from the VIP display")
(see section entitled "Phone calls – Dialing from the LOG memory")
(see section entitled "Advanced features – key")
Choose the appropriate memory, select the WAP page you would to download to your
Eurit 4000 and press the OK key.
If you would like to save WAP addresses, you can save them to the WAP menu
"Bookmark" or add them to the phonebook. Select a bookmark from the WAP menu
"Bookmark", press the OK key and the WAP page is downloaded to your Eurit 4000.
To find out how to download WAP pages using the phonebook, read the section entitled
"Phone calls – Dialing from the phonebook".
Surfing
In addition to the navigation aids such as the wheel navigator, the OK key and the BACK
key, the WAP browser offers additional useful functions for surfing:
Much of the data and information available on the Internet (e.g. stock market
prices) can change very quickly. If you have been on a WAP page for a long
time, then press the Fox key below Refresh . The data for the current WAP
page will be updated.
After you have pressed the Fox key below Refresh , the display for the Fox
key shows the stop symbol . Press the Fox key below
to stop the page
from reloading.
Options
When you download a WAP page to your Eurit 4000, commands (hyperlinks)
such as send e-mail, logout, back, main menu, etc. are often also sent.
Depending on the type of programming, these commands do not appear
directly as hyperlinks on the display. In this case, the commands are behind the
Options key (press the Fox key below Options).
21
203247441en_ba_d0
WAP
Surfing and making a phone call at the same time
With ISDN, your Eurit 4000 has two B-channels at its disposal. ISDN therefore allows you
to surf (WAP browser activated) and make a phone call at the same time.
Making a telephone call while surfing
You are surfing (WAP browser activated) and ...
– ... you would like to make a phone call.
Pick up the handset. The call display appears. Dial a phone number and make
your call.
/
To switch back to the WAP browser, press the Fox key below
the call display, press the Fox key below .
. To return to
– ... someone calls you on the phone.
Pick up the handset. The call display appears. Take your call.
/
To switch back to the WAP browser, press the Fox key below
the call display, press the Fox key below .
. To return to
Launching the WAP browser while making a telephone call
You are making a telephone call and would like to surf the Internet at the same time.
Press the
/
key to launch the WAP browser.
To return to the call display, press the Fox key below
WAP browser, press the Fox key below .
. To switch back to the
Dialing a phone number directly from a WAP page
While surfing, you will come across WAP pages from which you can dial a phone number
directly. Select the phone number and press the OK key. You will see a pop-up window
asking you whether you would like to dial that number. Pick up the handset, press the Fox
key below Yes and you will be connected directly to that phone number. (For handsfree
talking, press the Fox key below Yes.)
203247441en_ba_d0
22
WAP
Saving WAP pages
WAP memories are not user-specific.
Bookmarks
WAP pages which are of interest to you can be saved as bookmarks. With your Eurit 4000
you can save up to 50 bookmarks:
. The display shows the entry field for the name
Press the Fox key below
and address of the bookmark. The line for the name may already contain a
name for the bookmark. To choose a different name for the bookmark, simply
delete or edit the existing name.
save
Press the Fox key below save. The bookmark is added to the list of bookmarks.
➭ You can edit bookmarks i.e. provide them with a different name or change the WAP
address. From the WAP menu "Bookmark", select the bookmark you wish to edit and
press the Fox key below edit.
➭ To delete a bookmark, from the WAP menu "Bookmark" use the wheel navigator to
select the bookmark you wish to delete and then press the Fox key below delete.
➭ To download the bookmarked WAP address from the WAP menu "Bookmark", use
the wheel navigator to select the bookmark and press the OK key.
23
203247441en_ba_d0
WAP
Saving as an entry in the phonebook
Your Eurit 4000 has a phonebook in which you can save not only phone numbers but also
WAP addresses.
There are two possible ways to add a WAP address to the phonebook:
– directly from the "Phonebook" menu (see section entitled "Phonebook – Creating a
new entry")
– while surfing (with the WAP browser activated), using bookmarks
If you wish to save a WAP address by creating a new entry from the "Phonebook"
menu, then you must already know the WAP address you wish to save.
To add a WAP address to the phonebook with the WAP browser activated, you must
first save the WAP address as a bookmark (see section entitled "WAP – Saving WAP
pages – Bookmarks):
. The display shows the entry field for the name
Press the Fox key below
and address of the bookmark. Select the "Address" line with the wheel
navigator.
. You will see a pop-up window asking you
Press the Fox key below
whether you want to edit an existing entry or create a new entry.
New
entry
Press the Fox key below New entry. The WAP address is already included in the
contacts as an URL. Now add the remaining information and save the entry.
Or …
Change
entry
Press the Fox key below Change entry and you will see the phonebook list.
Using the wheel navigator, select the entry to which you wish to add the WAP
address and press the OK key. The WAP address is added under the next free
contact. Save the entry.
203247441en_ba_d0
24
WAP
History
The history contains those WAP addresses you last entered manually (see WAP menu
"Enter URL"). You can select those addresses directly from the WAP menu "History" and
download them to your Eurit 4000 by pressing the OK key.
The history contains up to 1000 WAP addresses.
➭ To delete WAP addresses from the history, select the entry you wish to delete and
press the Fox key below delete.
➭ Even if the WAP address you entered manually was incorrect (e.g. because of a
typing error), the address will still appear in the history. You can attempt to go to
that WAP address, but the WAP browser will return an error message. Select the
incorrect WAP address and correct it by pressing the Fox key below open.
Settings for WAP access
Before you can surf the Internet with your Eurit 4000, you must enter the access details
of the ISP and WAP gateway. Your Eurit 4000 is delivered preprogrammed with access
details.
➭ If you would like to surf using your own ISP, you must link your ISP to the WAP
gateway (see "Editing WAP gateway details").
Internet connections (ISP)
Set up your own ISP from the "Installation/Internet connections" menu:
edit
The list of Internet connections already contains at least one ISP with access
details. Select an Internet connection from the list and change the access
details or create your own Internet connection. Enter the name of the ISP and
the access number as well as the user name and password.
save
Press the Fox key below save.
Or …
reset
If, for example, you make a mistake and delete a preprogrammed ISP or
change some ISP details, then select the ISP in question and press the Fox key
below reset. The original access details of the ISP will be restored.
25
203247441en_ba_d0
WAP
➭ In the access details for the ISP you can set the timeout in the "Timeout" line. Your
Eurit 4000 will automatically disconnect from the Internet (go offline) if the set time
has elapsed since you last requested new data from the Internet.
Editing WAP gateway details
To set up your own WAP gateway or edit an existing WAP gateway, select the
corresponding WAP gateway from the "Installation/WAP gateway/Gateway list" menu:
edit
The gateway list already contains at least one WAP gateway. Select a WAP
gateway from the gateway list and change the settings or create your own
WAP gateway with name, address and user name and password (if applicable).
Port
Choose Connection-less if you want your Eurit 4000 to establish a fast, but
less reliable, connection to the Internet. Choose Connection-oriented if you
require a more reliable connection to the Internet. (In the case of Connectionoriented, the WAP gateway acknowledges the request from your Eurit 4000
for a WAP page from the Internet.)
Dial-up
This is where you define the Internet connection (ISP) you wish to use for
dialing into the Internet (and to whom you must pay the connection charges).
Homepage This is where you enter the WAP address of the WAP page you want to
appear on your Eurit 4000 whenever you launch the WAP browser (by
key).
pressing the
Or …
reset
If, for example, you make a mistake and delete a preprogrammed WAP
gateway or change its details, select the WAP gateway in question from the
gateway list and press the Fox key below reset. The original access details of
the WAP gateway will be restored.
➭ You can also change your WAP access settings while the WAP browser is activated.
To do this, select the WAP menu "WAP gateway".
Changing the current WAP gateway
To change the current WAP gateway, select another WAP gateway from the "Installation/
WAP gateway/Settings" menu. Save the settings.
203247441en_ba_d0
26
WAP
Error messages
Errors may sometimes occur when you attempt to load a WAP page from the Internet
onto your Eurit 4000. Your Eurit 4000 will inform you about such errors in a pop-up
window. In such cases, follow the text on the display and try once again to download
the required WAP page.
However, depending on the type of error, the current WAP protocol (WAP definition)
will send back a WAP page describing the technical error. For example, "Charset
conversion from cp 1252 is not supported." Error messages of this kind cannot be
intercepted by your Eurit 4000 and be displayed to you in readily understandable
language (using a pop-up window).
Depending on the volume of traffic on the Internet or gateway, a request from your
Eurit 4000 may get lost or may not be answered. One of the reasons for this lies in
the definition of the WAP protocol. In the Internet, WAP-related data requests and data
transfers are less well protected against error or fault. In such cases, the display will
remain blank.
WAP data also have a lower priority in the Internet than data requested, for example,
from a PC. This is indicated by the different speed at which WAP pages are downloaded
to your Eurit 4000.
Should one of the above-described errors occur, ...
(or first press below Stop ) and the WAP page
… press the Fox key below Refresh
will be requested once again.
… change the setting from Connection-less to Connection-oriented (see section entitled
"WAP – Settings for WAP access – Editing WAP gateway details").
… try to load the WAP address from one of the memories (bookmarks, history,
phonebook or LOG memory).
… re-enter the WAP address (from the WAP menu "Enter URL").
27
203247441en_ba_d0
Phone calls
This section describes the various options available to you while making a phone call on
your Eurit 4000. Everything described below applies to each of the users you have defined
for your telephone.
Your Eurit 4000 can also be operated on an ISDN telecommunications system and will
provide the same options as those listed here. Additional available features and how you
use them, depends on the telecommunications system.
➭ It is assumed in the following that at least one phone number (MSN, multiple
subscriber number) and one user have been defined (see section entitled "Getting
started – First steps (brief instructions)").
User concept
The Eurit 4000 allows you to define up to 10 users on the same telephone. If you are
using the telephone at home, you can define, for example, one user called "Mother",
another user called "Father" and additional users such as "Son", "Daughter" etc.
Conversely, if you are using the telephone for business, you can define one user as
"Company", another user as "Private" and additional users such as "Club1", "Club2"
to switch from one user to the next. The display always shows
etc. Press the user key
the current user with name.
Once you have defined the required settings for each user, your Eurit 4000 will
personalize many of the functions depending on which user is currently selected.
Whenever a call is made, the phone number of the current user is notified to the person
being called. The telephone charges are calculated separately for each user. Incoming
messages are treated differently, i.e. depending on whether call forwarding has been set,
whether the call is to be sent directly to the telephone answering machine, or whether Do
not disturb has been activated, etc.
➭ When you make a setting (e.g. from the "Answering Machine" menu), the current
settings apply to the user whose name appears at the top right of the display.
203247441en_ba_d0
28
Phone calls
Handsfree talking
Your Eurit 4000 has a built-in microphone and loudspeaker. You can conduct phone calls
without picking up the handset and people in the room can take part in the call.
On hook dialing
Press the user key until your name appears.
1
2
3
4
5
6
7
9
0
Dial the number and press the loudspeaker key for handsfree talking. To end
the call, press the loudspeaker key once again.
Accepting an incoming call with handsfree talking
/
accept
To accept the call, press the loudspeaker key or press the Fox key below accept.
/
To end the call, press the loudspeaker key or press the Fox key below
disconnect disconnect.
Switching from handset to handsfree talking
You are conducting a phone call with the handset, but you would like to switch to
handsfree talking so that the other people in the room can listen in and take part in the
call:
Press the loudspeaker key and hold it down.
Replace the handset and then release the loudspeaker key. Continue the call
with handsfree talking.
/
To end the call, press the loudspeaker key or press the Fox key below
disconnect disconnect.
Switching from handsfree talking to handset
You are conducting a phone call with handsfree talking, but you no longer want the
other people in the room to listen in or take part in the call:
Pick up the handset. Microphone and loudspeaker are immediately switched off.
Replace the handset to end the call.
29
203247441en_ba_d0
Phone calls
Listening by loudspeaker
In contrast to handsfree talking, the microphone is not on during listening by loudspeaker. Although the people in the room are able to follow what is said, the person at
the other end cannot hear what is said in the room.
You are conducting a phone call with the handset and you want the people in the room
to hear what is said:
Press the loudspeaker key to switch on the loudspeaker. Press the loudspeaker
key again to switch the loudspeaker back off.
Mute
If you do not want the person at the other end to hear, e.g. if you need to ask or discuss
something at your end, you can switch off the handset microphone or the built-in
microphone on your telephone. You can still hear the person at the other end.
You are conducting a phone call (with the handset or with handsfree talking):
Press the microphone mute key to switch off the microphone.
Press the microphone mute key again to switch the microphone back on.
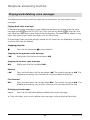
Adjusting the volume
You can adjust the volume for both the earpiece and the loudspeaker.
+
Press the plus key. Each press increases the volume.
Press the Fox key below save.
–
Press the minus key. Each press reduces the volume.
Press the Fox key below save.
➭ If you do not confirm the volume setting with save, the setting will apply to the
current phone call only.
203247441en_ba_d0
30
Phone calls
Manual dialing
➭ If only one user has been defined on your Eurit 4000 or if your user profile is the
one already displayed, you do not need to press the user key before making a call.
Off-hook dialing (direct dialing)
Press the user key until your name appears.
Pick up the handset.
1
2
3
4
5
6
7
9
0
Enter the phone number and the telephone will dial immediately. Wait to be
connected and then speak.
Replace the handset to end the call.
On-hook dialing (dialing with handset still on cradle)
Press the user key until your name appears.
1
2
3
4
5
6
7
Dial the number. Use the backspace key to delete any mistakes.
9
0
Pick up the handset. The telephone dials the number you entered.
Replace the handset to end the call.
➭ Applies to either method: If you dial while the display shows a user profile other than
your own, your call will be made with the features and at the expense of the user
whose name is displayed.
➭ Applies to either method: If, instead of picking up the handset, you press the
loudspeaker key, you can make your call with handsfree talking. To end the call,
press the loudspeaker key again.
➭ PBX Operation: To dial an external number manually (direct dial or dialling
preparation), the exchange access code must be entered before the number.
31
203247441en_ba_d0
Phone calls
Withholding your phone number (making an anonymous call)
When you make a call, your phone number is notified to the person you are calling,
provided that person's telephone supports this function. However, you can withhold your
phone number either for the current outgoing call or for every outgoing call.
Withholding your phone number for the current outgoing call
Press the user key until your name appears.
Press the microphone mute key and the status symbol
display.
will appear in the
Pick up the handset and enter the phone number.
Or …
1
2
3
4
5
6
7
9
0
Dial the phone number on hook and pick up the handset. Your phone number
will not be sent with this call.
Or …
Dial the phone number on hook and press the loudspeaker key for handsfree
talking.
Withholding your phone number for every outgoing call
The setting for anonymous calling is user-dependent and can be found in the "User
settings" menu.
Press the user key until your name appears.
Select the "Call anonymous" line and press the OK key.
Select "ON" from the pop-up window and press the OK key.
save
Press the Fox key below save.
➭ You have activated anonymous calling from the "User settings" menu, but you would
like to send your phone number with the next outgoing call. To do this, press the
in the display disappears.
microphone mute key. The symbol
203247441en_ba_d0
32
Phone calls
Callback on busy/no answer
If the number you have dialed is engaged, you can activate automatic "Callback on busy".
Once this function has been activated, you will hear a special ringing tone as soon as the
person you tried to contact has replaced their handset.
Callback on busy
If the number you have dialed is engaged, then press the Fox key below Callback. Replace
the handset. As soon as the person you tried to contact has replaced their handset, you
will hear a special ringing tone. Pick up the handset and you will be connected.
Callback on no answer
If there is no answer from the number you dialed, then press the Fox key below Callback.
Replace the handset. As soon as the person you tried to contact has made a call from
their phone, you will hear a special ringing tone. Pick up the handset and you will be
connected.
Canceling callback on busy/callback on no answer
Press the redial key and select the callback you have activated.
delete
callback
Press the Fox key below delete callback.
➭ Callback on busy/callback on no answer remains activated for around 45 minutes,
after which time it is automatically canceled.
➭ Up to 10 callbacks on busy/callbacks on no answer can be activated for all users
together.
➭ To abort callback, do not pick up the handset or press the Fox key below reject.
➭ Callback on busy/callback on no answer must be supported by your network
operator.
33
203247441en_ba_d0
Phone calls
Automatic redial on busy
If the number you have dialed is busy, press the Fox key below Autocall. Replace the
handset. The display shows the remaining number of dial attempts as well as the waiting
time before the next dial attempt. The telephone uses a special ringing tone to tell you
that autocall has been successful. Pick up the handset and you will be connected.
Defining the waiting time and number of redial attempts
The default setting for the waiting time is 60 seconds and the default setting for the
number of redial attempts is 10. You can change these settings from the "Installation/
Automatic redial" menu:
Interval
Select the "Interval" line and change the setting.
Number
of tries
Select the "Number of tries" line and change the setting.
save
Press the Fox key below save.
➭ The waiting time can be set between 5 and 240 seconds. The number of redial
attempts can be set between 1 and 99.
Canceling automatic redial
end
Press the Fox key below end.
Scheduled call (reminder to call back)
A scheduled call is a timer feature. If the number you have dialed is busy or if the person
you called does not answer, you can activate Scheduled call. Your telephone will then use a
special ringing tone to remind you to call that person again. Pick up the handset and you
will be connected.
Scheduled Press the Fox key below Scheduled call. You will see the menu for a timer
call
entry. The menu already has the settings for a scheduled call.
Date,
time
Set the "Date" and "Time" for the scheduled call.
Repeat
Select "Repeat". You have the following options:
None, Daily (Mon. – Sun.), Saturday & Sunday, Weekdays (Mon. – Fri.),
Every Sunday, Every Saturday, Every Friday, Every Thursday, Every Wednesday,
Every Tuesday, Every Monday.
203247441en_ba_d0
34
Phone calls
Action
The "Action" for the timer is already preset to Scheduled call. Do not change
this setting.
Phone
number
The phone number for the scheduled call is already entered.
save
Press the Fox key below save.
Once Scheduled call has been activated, you have several options:
Acknow- Press the Fox key below Acknowledge to cancel Scheduled call.
ledge
Dial
Press the Fox key below Dial to instruct your telephone to connect you through
in handsfree talking mode.
Snooze
Press the Fox key below Snooze. The special ringing tone is canceled and
sounds again 5 minutes later.
Dialing from the phonebook
Your Eurit 4000 contains a phonebook for up to 800 entries which you can create with
names and addresses. The phonebook is available to all users. The section entitled
"Phonebook – Creating a new entry" explains how to set up the phonebook.
Finding a phone number using the alphanumeric keypad (with the handset on its
cradle)
Press the user key until your name appears.
Using the alphanumeric keypad, type in the name of the person you wish to
phone. The display shows the phonebook list.
When the name you are looking for has been selected on the display, press the
OK key to view the list of contacts.
Select the contact and pick up the handset.
35
203247441en_ba_d0
Phone calls
Dialing from the redial memory
The redial memory contains the phone numbers which were last dialed.
The redial memory can hold up to 1000 entries. To view those entries, press the redial key.
Press the redial key.
Scroll through the list to see which numbers have been dialed.
Select an entry from the list and pick up the handset. Your telephone
automatically dials the number.
➭ To remove an entry from the redial list, select the entry and press the Fox key below
delete.
➭ To copy a phone number from the redial list directly to the phonebook, select the
.
number and press the Fox key below the symbol
Dialing from the LOG memory
The LOG memory contains all incoming and outgoing calls, SMSs, UUSs, incoming voice
messages for the telephone answering machine, info messages as well as all WAP
addresses entered on the alphanumeric keypad. The LOG memory can hold 1000 entries.
Press the LOG key to view those entries.
Press the user key until your name appears.
LOG
Press the LOG key.
Scroll through the list to see the entries in the LOG memory. Select an entry
from the list and pick up the handset or, in the case of WAP addresses, press
the OK key.
➭ To remove an entry from the LOG list, select the entry and press the Fox key below
delete.
➭ To copy a phone number from the LOG list directly to the phonebook, select the
.
number and press the Fox key below the symbol
203247441en_ba_d0
36
Phone calls
Dialing from the inbox
If you have received calls, SMSs, UUSs, info messages or answering machine messages
while you were out, they are collected and saved to the inbox. The inbox can hold up to
.
1000 entries. To view those entries, press the Fox key below the inbox
Press the user key until your name appears.
Press the Fox key below the inbox.
Scroll through the list to view the entries in the inbox. Select an entry from the
list and pick up the handset to call back.
➭ To remove an entry from the inbox list, select the entry and press the Fox key below
delete. Press the Fox key below done if you do not wish to delete the entry but
would like to remove it from inbox. The entry is still in the LOG memory.
➭ To copy a phone number from the inbox list directly to the phonebook, select the
.
number and press the Fox key below the symbol
Dialing from the VIP display
If there are entries in the phonebook which you frequently call, you can save them as VIPs
(see section entitled "Phonebook – Creating a new entry – VIP").
Once an entry has been selected as a VIP, the VIP display replaces the normal display. The
VIP display can show up to 800 entries.
➭ To remove an entry from the VIP display, select the corresponding entry and
press the Fox key below edit. You can now edit the entry. Select the "VIP" line,
choose "No" and press the Fox key below save.
37
203247441en_ba_d0
Phone calls
Incoming calls
If you have not entered a multiple subscriber number (MSN) and have therefore not
defined a user, your telephone will ring each time it receives a call on one of your MSNs.
If you have defined a number of users and have assigned an MSN to each user, then the
display will tell you who the incoming call is for.
Your Eurit 4000 will also tell you the phone number of the caller and that person's name,
provided the caller is stored in your phonebook.
Accepting a call
Pick up the handset and speak through the handset.
Or …
accept
Press the Fox key below accept to accept the call with handsfree talking. To end
the call, press the Fox key below disconnect.
Rejecting a call
You can reject callers if you do not wish to speak to them:
>>
Press the Fox key below >> until reject appears.
reject
Press the Fox key below reject. The caller is disconnected and hears either the
busy tone or a message saying that the person called is temporarily
unavailable.
Diverting a call to the telephone answering machine
You do not wish to speak now to the caller shown on the display, but you wish to give
the caller an opportunity to leave a message. In this case, divert the call immediately to
the telephone answering machine.
>>
Press the Fox key below >> until
to
Press the Fox key below to
203247441en_ba_d0
appears.
.
38
Phone calls
Forwarding a call
You do not wish to speak now to the caller shown on the display, but you wish to
forward the call immediately to another phone:
>>
Press the Fox key below >> until divert appears.
divert
Press the Fox key below divert.
1
2
3
4
5
6
7
9
0
Do
You will see an entry field for entering the phone number. Enter the phone
number to which you wish to forward the call.
Press the Fox key below Do.
➭ If you have already forwarded a call previously to another phone number, that phone
number is shown on the display.
Anonymous callers
Your telephone provides you with a variety of options for handling callers who do not
send you their phone number:
– Accept: No setting. You accept anonymous callers.
– Reject: The caller hears a message saying that the person called is temporarily
unavailable.
– Directly to TAM: The caller is diverted directly to the telephone answering machine
(with the current greeting).
– Directly to TAM with greeting: The caller is diverted directly to the telephone
answering machine (with the greeting you choose).
The settings are user-dependent and can be found in the "User settings" menu:
Press the user key until your name appears.
Select the "Anonymous caller" line and press the OK key.
From the pop-up window, choose how you want anonymous callers to be
handled and press the OK key.
save
Press the Fox key below save.
➭ If an anonymous caller is diverted to the telephone answering machine, call screening
is deactivated.
39
203247441en_ba_d0
Phone calls
While making a phone call
Call waiting/accepting another call
You are conducting a phone call and someone else phones you. The second call is
indicated by a call waiting tone.
accept
Press the Fox key below accept. The existing call is put on hold and you can accept
the call from the second caller. Since the first caller, who has now been put on
hold, will hear nothing during this time, it is a good idea to tell that person that
you are need to make another quick call.
disconnect Press the Fox key below disconnect to end the call. You will now be
reconnected with the first caller.
➭ You need not accept a waiting caller. Other options are: divert the waiting caller to
the telephone answering machine, forward to another phone, or reject (see section
entitled "Phone calls – Incoming calls").
Suppressing call waiting
You can suppress call waiting from the "User settings" menu. In this case, the caller will
hear a busy tone. This setting is user-dependent.
Press the user key until you see the name of the user for whom you wish to
suppress call waiting.
Select the "Allow call waiting" line and press the OK key.
From the pop-up window choose "OFF" and press the OK key.
save
Press the OK key below save.
Additional call/enquiry call
You are conducting a phone call and would like to call someone else, in order, for
example, to ask something or switch between calls.
new
Press the Fox key below new. The current call is put on hold.
Enter the phone number of the person you wish to call.
disconnect Press the Fox key below disconnect to end the call. You will now be
reconnected with the first caller.
203247441en_ba_d0
40
Phone calls
Switching between calls
This function allows you to conduct two calls simultaneously and switch between them.
Select the person you wish to call. Press the OK key to be connected. The
other call is put on hold.
disconnect Press the Fox key below disconnect to end the call. You will now be
reconnected with the first caller.
Parking a call
You are conducting a phone call and would like to continue the call on another ISDN
telephone connected to the same S0-bus:
PARK
Press the PARK key and go to the other telephone.
PARK
Once at the other telephone, press the PARK key again to resume the call.
➭ If you have several telephones on the same S0-bus and if there is the possibility that
those telephones need to be parked simultaneously, then you must define different
park codes. From the "User settings" menu, you can change the park code on the
"Parkcode" line.
Transferring a call
You are switching between two calls and would like to set up a call between those two
people:
>>
Press the Fox key below >> until transfer appears.
transfer
Press the Fox key below transfer. You have now set up a call between the two
people you were speaking to and you now hear the busy tone.
➭ Your Eurit 4000 is set up for call transfer. However, call transfer is not supported by
all network operators.
Three-party conference
You are making a phone call and would like to include a third person:
new
1
2
3
4
5
6
7
9
0
Press the Fox key below new. The current call is put on hold.
Enter the phone number of the third person you wish to include and you will
be connected.
>>
Press the Fox key below >> until 3-PTY appears.
3-PTY
Press the Fox key below 3-PTY. All calls are connected together.
Everyone can listen and speak.
41
203247441en_ba_d0
Phone calls
end
3-PTY
Press the Fox key below end 3-PTY. You will be connected with the
person you were last connected with; the other person will be put on hold.
Tracing a call (registering malicious calls)
You must apply for this service. Tracing a call means that, when you receive a call, the
details of that call are recorded. Those details are registered even if the call was from an
anonymous caller.
>>
Press the Fox key below >> until Call trace appears.
Call trace Press the Fox key below Call trace.
Sending keypad information
Keypad information is data sent to either the exchange, your telecommunications system
or Centrex in order to activate certain features (e.g. call forwarding). Usually, the star
key (*) or hash key (#) is used to switch to this mode.
Sending the keypad information before dialing
1
2
3
4
5
6
7
9
0
Press the star or hash key, enter the required keypad function and pick up the
handset.
Or …
Keypad
Pick up the handset and press the Fox key below Keypad (or, during a call,
press the Fox key below >> until Keypad appears) and enter the required
keypad function.
➭ To ensure that "send keypad" is activated by pressing the star or hash key, you must
set "Automatically send keypad" to "ON" in the "Installation/PBX" menu.
Sending DTMF
Once a call has been set up, the telephone switches automatically to tone signaling
(DTMF). This enables you to activate certain functions by tone signaling (e.g. an automatic
greeting asking you to press "1" for information X, "2" for information Y, etc.).
>> / DTMF
203247441en_ba_d0
Press the Fox key below >> until DTMF appears. Press the Fox key below
DTMF and enter the digits.
42
Phonebook
Your Eurit 4000 allows you to create a phonebook with up to 800 entries for names and
addresses. Each entry in the phonebook can be associated with up to 5 contacts. Each
contact can be used for a phone number (home, office, mobile, fax, pager), for an e-mail
address (home e-mail, office e-mail), for a WAP address (URL) or as a special entry (other).
The phonebook is available to all users.
Creating a new entry
Selecting a blank entry
Menu
Press the Fox key below Menu.
Select the "Phonebook/Open phonebook" menu. The display shows the
phonebook list.
new
Press the Fox key below new.
Entering names and addresses
Complete the name and address fields using the alphanumeric keypad.
Entering contacts
The contacts are between the entry fields for the name and address. Five contacts have
already been predefined, but can be changed at any time. Position the cursor on the
relevant line and press the Fox key below Contact type or press the OK key. You will see
the pop-up window with the list of all available contacts:
Contact for phone numbers:
Contact for email addresses:
Contact for WAP addresses:
Contact for a user-definable entry:
Home, office, mobile, fax, pager
E-mail home, e-mail office
URL
Other
Select the contact you require and press the OK key.
➭ Always enter phone numbers with area code (prefix).
Entering attributes for phone numbers
Attributes are used by your Eurit 4000 to control certain functions, e.g. in order to
withhold your phone number, in order to make a call using a certain provider, etc. The
respective attributes are added before or after the phone number.
Press the Fox key below Attribute and select the required attribute from the pop-up
window for number attributes.
43
203247441en_ba_d0
Phonebook
C
Call anonymous (C1234)
Select "C" before the phone number to withhold your phone number. Your phone
number will not be shown on the display of the ISDN telephone of the person you are
calling. The words "Number withheld" will appear instead.
X
External number (X1234)
If you operate your telephone as part of a telecommunications system, you may have to
program the digit you require for an outside line. If you would like to make an external
call, the telecommunications system often requires you to precede the phone number
with the digit for an outside line (e.g. "0"). Select "X" before the phone number.
(See example in the section entitled "Operation on a PBX – Length of internal phone
number")
P
Preferred provider (Px1234)
If you wish always to use a preferred provider to dial a specific entry in the phonebook,
then select the provider "Px" (x = 0, 1, 2, ... 9) before the phone number.
Z
Subaddress (1234Zxx..x)
The subaddress is used, for example, to remotely control devices which support
subaddresses. The subaddress "Z" (additional digits) can be entered after the phone
number.
K
Keypad (1234Kxx..x)
If the telephone is operated on an ISDN telephone system, you can enter keypad
information "K" (control functions) instead of a phone number or in addition to a phone
number. Keypad information controls the functions on an ISDN telephone system, i.e.
keypad information is data which are used to convert characters from the dial keypad to
certain functions on the ISDN telephone system.
F
Function (Fxx)
You can use the function codes, for example, to program call forwarding via an entry in
the phonebook, switch the telephone answering machine on or off, switch Do not disturb
on or off, etc. The list of codes can be found in the section entitled "Appendix – Function
list".
+
International number
When entering international numbers, you can shorten the country code with "+". For
example, a Japanese phone number such as 0081 92 ... is written as +81 92 ...
Name prompt
For example, you have programmed Mr. Smith in your phonebook and you have recorded
a name prompt for him. When Mr. Smith calls you, the telephone plays back the "Mr.
Smith" text you recorded. With name prompt activated, you are told who is calling.
Pick up the handset.
rec
Press the Fox key below rec and speak the name into the handset.
203247441en_ba_d0
44
Phonebook
■
After you have finished recording, press the Stop key ■ and replace the handset.
왘
To check what you recorded, press the Play key 왘.
➭ To ensure that name prompt is activated when the telephone rings, name prompt
must be set to Playback in the "Ringing tone" menu.
➭ Since the telephone answering machine and name prompt share the same memory,
the recording capacity is divided between them. If you are unable to record any more
name prompts, you need to delete some messages from the telephone answering
machine.
Reaction
Each entry can be assigned a reaction. The reactions are "Reject", "Indicate busy", "Call
forward", "Special TAM greeting", "Directly to TAM", "Directly to TAM with greeting",
"Special ringing melody" and "No ringing tone".
reject
The caller hears a message saying that the person called is temporarily
unavailable.
Indicate
busy
The caller hears the busy tone.
Call
forward
To forward the caller to another telephone, choose "Call forward". You can
enter the phone number to which you wish the caller to be forwarded.
Special
TAM
greeting
To divert the caller directly to the telephone answering machine with a special
greeting, choose "Special TAM greeting". You can choose the greeting you
wish the caller to hear.
➭ The reaction "Special TAM greeting" requires the telephone answering machine to be on.
Directly
to TAM
To divert the caller directly to the telephone answering machine, choose
"Directly to TAM". The caller will hear the greeting which is currently set for
the telephone answering machine.
➭ The reaction "Directly to TAM" does not require the telephone answering machine to
be on.
Directly to To divert the caller directly to the telephone answering machine with a special
TAM with greeting, choose "Directly to TAM with greeting". You can choose the
greeting greeting you wish the caller to hear.
➭ The reaction "Directly to TAM with greeting" does not require the telephone
answering machine to be on.
Special
ringing
melody
To associate the caller with a special ringer melody, choose "Special ring melody"
You can choose which melody you wish to hear from your telephone when
that caller calls.
No ringing To stop your telephone from ringing when a certain caller calls (Do not disturb),
tone
choose "No ringing tone". When that person calls, the call is indicated on the
display only.
45
203247441en_ba_d0
Phonebook
VIP
If there are entries which you frequently call, you can save them as VIPs. VIP entries
appear on the VIP display.
Note
Each entry can be provided with a note (any text).
Saving an entry
To include your entry in the phonebook list, press the Fox key below save. If you press the
BACK key by mistake, you will be asked again whether you wish to save the entry.
Changing an entry
From the phonebook list, select the entry you wish to change. Press the Fox key below
open. The display shows the detailed entry. Press the Fox key below edit and change the
entry. Press the Fox key below save to add the changed entry to the phonebook list.
Deleting an entry
Any entry can be deleted. From the phonebook list, select the entry you wish to delete.
Press the Fox key below delete. For safety's sake you will be asked once again whether
you really wish to delete the entry. Press the Fox key below Yes to delete the entry.
Checking the phonebook capacity
From the "Phonebook/Phonebook info" menu, you can check how much space is still
available in the phonebook.
The phonebook has capacity for a maximum of 800 entries and 2000 contacts (for all
users). The bar chart next to "Memory" shows the absolute value of space available.
203247441en_ba_d0
46
Telephone answering machine
Your Eurit 4000 is equipped with a digital telephone answering machine with a total
capacity for greetings and messages of up to 28 minutes, depending on the selected
recording quality.
The telephone answering machine can be used separately by each user.
Incoming messages are indicated separately for each user.
The telephone answering machine provides you with the following options for greetings:
– a prerecorded male-voice greeting: "Unfortunately, no-one is available right now, but if
you wish you can leave a message after the tone. Thank you."
– two types of greeting: with and without option for recording a message.
– up to 10 personal greetings which can be used individually by the users.
In its default setting, the telephone answering machine is set to "with recording".
When the telephone answering machine is on, the LED is illuminated. If there is a new
message on the telephone answering machine, the LED blinks and so too does the
symbol for voice messages on the display. Above the voice message symbol, the display
indicates the number of new messages.
Switching the telephone answering machine on/off
The telephone answering machine can be switched on or off either generally for all users or
separately for each individual user.
Switching the telephone answering machine on/off for all users
When switching the telephone answering machine on/off for all users, it does
not matter which user is set as the current user. Press and hold down the
telephone answering machine key to switch the telephone answering machine
on. The LED illuminates. Press and hold down the telephone answering
machine key again to switch the telephone answering machine off.
➭ For users who have not set any personal greeting or function, the default greeting
set to "with record" is used.
➭ After the telephone answering machine has been switched on for all users, the
machine plays back the current greetings for all users one by one. Press the Fox key
or BACK key to stop playback.
47
203247441en_ba_d0
Telephone answering machine
Switching the telephone answering machine on/off separately for individual users
Press the user key until the display shows the user for whom you wish to
switch the telephone answering machine on/off.
Briefly press the telephone answering machine key to switch on the telephone
answering machine. The LED illuminates. Press the telephone answering
machine key again to switch off the telephone answering machine.
Or …
From the "Answering Machine" menu, select the "Status" line and press the
OK key. From the pop-up window, select "ON" and press the OK key.
save
Press the Fox key below save.
Accepting a call in mid-recording
Pick up the handset while the greeting is being played back or while the caller is leaving a
message.
➭ If you accept a call when the caller is in the middle of leaving a message, that portion
of the message will be stored.
Recording/playing back/changing/deleting a greeting
Your Eurit 4000 allows you to record up to 10 personal greetings. The total capacity of
the telephone answering machine including greetings is around 28 minutes for standard
recording quality and around 14 minutes for top recording quality.
The recorded greetings are available to all users.
All users decide individually whether they wish to have an end message and/or a memoryfull message.
➭ For security reasons, never give precise details of the nature or duration of your
absence (e.g. "We shall be away on vacation from ... until ....").
➭ For as long as you are making settings on your telephone answering machine, callers
to your telephone will hear the busy tone.
203247441en_ba_d0
48
Telephone answering machine
Recording a greeting
Greetings are recorded generally for all users. Specific greetings are associated with
specific users in a later operation. For each greeting, you decide on the type of greeting;
that is, whether you want it to be "with recording" (the caller is able to leave a message)
or "without recording" (the caller just hears the greeting).
From the "Answering Machine" menu, select the "Greeting" line and press
the OK key. From the pop-up window, select a new greeting and press the OK
key.
Pick up the handset.
rec
Press the Fox key below rec and speak your greeting into the handset. To stop
recording, press the Fox key again.
>>
If you want callers just to listen to the greeting without leaving a message,
press the Fox key below >> until without rec appears.
without
rec
Press the Fox key below without rec.
>>
To give the greeting a name, press the Fox key below >> until Name appears.
Name
Press the Fox key below Name. Enter a name from the pop-up window.
save
Press the Fox key below save.
Playing back/changing a greeting
You can play back greetings you have recorded or you can change them by speaking
again into the handset. For how to change the name or type of a greeting ("with
recording" or "without recording") see "Recording a greeting".
From the "Answering Machine" menu, select the "Greeting" line and press
the OK key. From the pop-up window, select the greeting you wish to play
back or change and press the OK key.
왘
Press the Fox key below 왘 to play back the greeting through the loudspeaker.
Or …
To change the greeting, pick up the handset. Press the Fox key below rec and
speak your greeting into the handset. To stop recording, press the Fox key
again.
… continue
save
Press the Fox key below save.
49
203247441en_ba_d0
Telephone answering machine
Deleting a greeting
From the "Answering Machine" menu, select the "Greeting" line and press
the OK key. From the pop-up window, select the greeting you wish to delete
and press the OK key.
>>
Press the Fox key below >> until delete appears.
delete
Press the Fox key below delete to delete the greeting.
save
Press the Fox key below save.
➭ The greeting you have deleted will also have been deleted for any other users who
may have used that greeting. The greeting is replaced by the default greeting.
End message/memory-full message
If you record an "end message", this will be played back to the caller when the maximum
recording length has been reached.
When the capacity of your telephone answering machine has been used up, the caller will
automatically hear the "memory-full message" instead of the normal message. The LED
will flash quickly.
To record/play back/change/delete the "end message" or "memory-full message", follow
the corresponding steps in the section entitled "Telephone answering machine –
Recording/playing back/changing/deleting a greeting".
The settings are user-dependent.
Assigning greeting to a user
Each user can assign one of the 10 possible greetings to his/her telephone line. The same
greeting may be used by several users.
Press the user key until the display shows the user to whom the greeting is to
be assigned.
From the "Answering Machine" menu, select the "Greeting" line and press
the OK key. From the pop-up window, select the greeting you wish to
associate with the user and press the OK key.
save
Press the Fox key below save.
203247441en_ba_d0
50
Telephone answering machine
Setting the recording length
In order to accept as many messages as possible on your telephone answering machine,
you can set the maximum recording length (length of voice message) available to each
caller:
– each caller has 30, 60, 90 or 180 seconds in which to leave their message.
– infinite. Callers have the entire remaining capacity of the telephone answering machine
at their disposal.
The setting is user-dependent.
The default setting for the recording length is 60 seconds.
From the "Answering Machine" menu, press the user key until the display
shows the user for whom you wish to set the recording length.
Select the "Recording length" line and press the OK key. From the pop-up
window, select the recording length and press the OK key.
save
Press the Fox key below save.
Switching call screening on/off
You can set the telephone answering machine so that you can screen incoming calls; that
is, you can listen to a message while it is being recorded by the caller. This allows you to
decide whether or not you wish to accept the call. This setting is user-dependent.
The telephone answering machine is set by default to allow call screening. To switch off
call screening, proceed as follows:
From the "Answering Machine" menu, press the user key until the display
shows the user for whom you wish to switch off call screening.
Select the "Call screening" line and press the OK key. From the pop-up
window, select "ON" and press the OK key.
save
Press the Fox key below save.
51
203247441en_ba_d0
Telephone answering machine
Number of rings before answer/remote access toll save function
Your telephone answering machine will answer calls
– after a specified number of rings.
– whenever you divert certain calls directly (manually) to the telephone answering
machine.
The number of rings after which the telephone answering machine answers a call can be
set between 0 (immediate answer) and 9. The default setting is 5 rings.
Your telephone answering machine features a toll save function when in remote access
mode (see section entitled "Remote access"): if there are new voice messages on your
telephone answering machine, will answer calls two rings earlier than the normal setting.
Any additional rings mean that you have no new messages and can hang up without
incurring call charges.
Press the user key until the display shows the user for whom you wish to set
the number of rings before the telephone answering machine answers.
From the "Answering Machine" menu, select the "Immediate answer"/"Rings
before answer"/"Toll save" line and press the OK key.
– "Immediate answer ": Choose "ON" if you want your telephone answering machine
to answer callers immediately.
– "Rings before answer": Choose a number between 1 and 9.
– "Toll save":
Choose "ON" to activate the toll save function.
save
Press the Fox key below save.
Recording quality
You can decide the recording quality of the telephone answering machine when it records
greetings or messages. If you frequently receive calls from telephone networks of inferior
quality (e.g. from distant countries), you should choose high recording quality. High
recording quality reduces the recording capacity:
– normal:
– high:
around 28 minutes recording capacity
around 14 minutes recording capacity
The recording quality is the same for all users.
From the "Answering Machine" menu, select the "Recording quality" line and
press the OK key. From the pop-up window, select the recording quality and
press the OK key.
save
Press the Fox key below save.
203247441en_ba_d0
52
Telephone answering machine
Playing back/deleting voice messages
The telephone answering machine need not be switched on for playing back voice
messages.
Playing back voice messages
If there are new voice messages on your telephone answering machine, both the voice
and the LED will flash. Press the Fox key below
to play back the
message symbol
new voice messages one by one through the loudspeaker. To prevent other people in the
room from hearing your voice messages, pick up the handset.
Old messages (ones you have already listened to) will remain on the telephone answering
machine until they are deleted.
Stopping playback
■
Press the Fox key below ■ to stop playback
Jumping to the previous voice message
I왗왗
Briefly press the Fox key twice below I왗왗.
Jumping to the next voice message
왘왘I
Briefly press the Fox key below 왘왘I.
Rewind
I왗왗
Press and hold down the Fox key below I왗왗. The symbol changes to 왗왗. The
telephone answering machine rewinds until you release the Fox key.
Fast forward
왘왘I
Press and hold down the Fox key below 왘왘I. The symbol changes to 왘왘. The
telephone answering machine fast forwards until you release the Fox key.
Deleting voice messages
delete
Press the Fox key below delete to delete the current message.
➭ From the inbox, you can also delete voice messages without playing them back.
53
203247441en_ba_d0
Remote access
If, for example, you are away on a trip, you can access your telephone answering machine
remotely from another telephone. Remote access is only possible from a telephone which
has tone dialing (DTMF).
To prevent your voice messages on the telephone answering machine being retrieved
by unauthorized persons, you must enable remote access by entering a password
(PIN = Personal Identification Number) of no more than 4 digits.
The password is the same for all users. If one user changes the password (PIN), he/she
should inform the other users and let them know the PIN.
To access the telephone answering machine remotely,
– the handset must be on its cradle and handsfree talking must be off.
– a PIN must have been programmed.
All the remote access settings are contained in the "Installation / Remote access" menu.
To change the remote access settings, you must first enter the remote access PIN (default
setting "0000").
Remote access settings
Defining the remote access PIN
The remote access PIN is set by default to 0000. Change the PIN in order to protect your
telephone from unauthorized access.
Select the "Remote access PIN" line and press the OK key. From the pop-up
window, enter the new remote access PIN and press the Fox key below
Continue.
save
Press the Fox key below save.
Enabling/disabling remote access
To retain your remote access settings but disable remote access, select the "Status" line
and set it to "OFF". To activate the settings, set it back to "ON". Save your settings.
Creating a list for direct remote access
You can create a list with entries from the phonebook which have direct access to all
remote access functions without having to enter the remote access PIN.
Select the "Direct access" line and press the OK key. You will see the direct
access list.
add
Press the Fox key below add. You will see the phonebook list. Press the OK key
to select the entries you wish to add to the direct access list.
203247441en_ba_d0
54
Remote access
BACK
Once you have created the direct remote access list with entries from the
phonebook, press the BACK key.
save
Press the Fox key below save.
➭ Entries can only be added to the direct remote access list if they are already stored in
the phonebook.
Help message
You can leave a help message on the telephone answering machine. This message is
played back to you as soon as you have entered the remote access PIN in order to gain
remote access to the telephone answering machine. The help message can act as a
memory aid to help you remember what you need to do to operate your telephone
answering machine remotely. The help message is the same for all users.
The procedure for recording, playing back, changing or deleting a help message is the
same as in the section entitled "Telephone answering machine – Recording/playing back/
changing/deleting a greeting".
Enabling/disabling room monitoring
Even when you are away, you can listen to what is being said in the direct vicinity of your
telephone. To do this, enable room monitoring via remote access.
Room monitoring may, in certain circumstances, intrude on your privacy and could be
misused by other persons. To avoid this risk or if you do not require room monitoring,
disable the room monitoring function ("Enable room monitoring" line). Room monitoring
is disabled by default.
Maximum number of rings for remote access
If your telephone answering machine is off, you can still switch it on at any time using the
remote access PIN, and you can also remotely control other functions of your telephone.
For this purpose, you must define the point at which you must enter the PIN to activate
remote access PIN.
On the "Max. number of rings" line, you can define the maximum number of rings.
When you call your telephone from elsewhere, your telephone will ring until the
maximum number of rings has been reached. There will then be no further rings. For
remote access, this is the time at which you must enter the remote access PIN.
55
203247441en_ba_d0
Remote access
Operating the telephone remotely
Remote access to your telephone provides you with many functions. It is therefore a good
idea to include the most important remote access functions in your help message.
Remote access functions are executed directly from the dial keypad. Normally, the actions
you execute will be identified as correct with a beep.
All entries are acknowledged by tones:
– entry correct: two short and high-pitched consecutive tones
– entry incorrect: one long, deep tone
During remote access, all functions can be aborted by pressing the "2" key. Your
telephone is now once again ready to receive your new commands via remote access.
Remote access is terminated when the handset is replaced.
Establishing remote access
Remote access differs depending on the status and settings of the telephone:
1. Telephone answering machine on, caller not registered in direct remote access list:
Enter the remote access PIN as soon as the greeting is played. If you have recorded a
help message, this will be played back to you immediately after you have entered the
remote access PIN. If there are voice messages on your telephone answering
machine, these will be played back to you one by one. Your telephone is now ready to
receive your commands via remote access.
2. Telephone answering machine on, caller registered in direct remote access list:
If you have not recorded a help message but there are voice messages on your
telephone answering machine, these will be played back to you one by one instead of
the message. If you have recorded a help message, this will be played back to you.
Your telephone is now ready to receive your commands via remote access.
3. Telephone answering machine off, caller not registered in direct remote access list:
Your telephone will ring until the maximum number of rings has been reached. Now
enter the remote access PIN. If you have recorded a help message, this will be played
back to you. If there are voice messages on your telephone answering machine,
these will be played back to you one by one. Your telephone is now ready to receive
your commands via remote access.
203247441en_ba_d0
56
Remote access
4. Telephone answering machine off, caller registered in direct remote access list:
Your telephone will ring until the maximum number of rings has been reached. If you
have not recorded a help message but there are voice messages on your
telephone answering machine, these will be played back to you one by one. If you
have recorded a help message, this will be played back to you. Your telephone is
now ready to receive your commands via remote access.
Switching the telephone answering machine on/off remotely
If your telephone answering machine is off, you can still switch it on at any time using the
remote access PIN and a code. Call your telephone and wait until you hear no more rings.
Enter the remote access PIN. If there are voice messages on your telephone answering
machine, these will now be played back to you. Your telephone is now ready to receive
your commands via remote access:
"4"
Press digit key 4 on the remote telephone. The telephone answering
machine is switched on for the user who has been called. You hear the
greeting.
"6"
Press digit key 6 on the remote telephone. The telephone answering
machine is switched off for the user who has been called.
"2" "#"
"4"
Press the digit keys on the remote telephone in the sequence
2 - # - 4. The telephone answering machine is switched on for all users.
"2" "#"
"6"
Press the digit keys on the remote telephone in the sequence
2 - # - 6. The telephone answering machine is switched off for all users.
Playing back the greeting
"7"
Press digit key 7 on the remote telephone. All greetings are played back
one by one (from 1 to 10). If, for example, you have not recorded a personal
greeting under greeting 4, the default greeting will be played back at that
point.
"1"
During playback, press digit key 1 on the remote telephone. The current
greeting is repeated.
"1" "1"
During playback, press digit key 1 twice. The previous greeting is played
back.
"3"
During playback, press digit key 3. The next greeting is played back.
"2"
During playback, press digit key 2. The current function is aborted. Your
telephone is now ready to receive your new commands via remote access.
57
203247441en_ba_d0
Remote access
Recording a new greeting
To enable you to record a new greeting or record over existing greeting, you must enter
"greeting playback" mode. The greetings are played back one by one (from 1 to 10). This
allows you to keep track of the greetings. To record over the currently played greeting,
proceed as follows:
"5"
During playback of the current greeting, press digit key 5. After you hear the
confirmation beep, record the new greeting; the old greeting will be deleted.
"2"
After you have finished recording the greeting, press digit key 2 to save the
greeting. Your telephone is now ready to receive your new commands via
remote access.
Remote access also allows you to set the telephone answering machine so that callers can
hear the greeting but not leave a message. Alternatively, you can set the machine so that
callers can also leave a voice message:
"7" "4"
During playback of the current greeting, press digit key 7 and then digit key 4.
After playing back the greeting, the telephone answering machine also records
voice messages.
"7" "6"
During playback of the current greeting, press digit key 7 and then digit key 6.
Now, callers just hear the greeting and are unable to leave voice messages.
Assigning a greeting to a user
The greetings are played back one by one (from 1 to 10) ("greeting playback" mode). This
allows you to keep track of the greetings. To assign the currently played greeting to the
current user (the user you have called remotely), proceed as follows:
"4"
During playback of the current greeting, press digit key 4. The greeting is
assigned to the current user.
Switching users
You can switch remotely to a specific user. Your telephone is now ready to receive your
commands via remote access:
"*"
Press the star key * on the dial keypad of the remote telephone.
"1", ...
Press the digit key corresponding to the required user.
"9", "0" (e.g. digit key 3 for user number three). For user number ten, press digit key 0.
203247441en_ba_d0
58
Remote access
Playing back/deleting voice messages for the called user
For example, you call user A remotely. As soon as your telephone is ready to receive your
commands via remote access, you can play back all the voice messages for user A:
"3"
Press digit key 3 on the remote telephone. The telephone answering machine
goes into playback mode and all the voice messages are played back one
by one, separated by a tone.
"1"
During playback of the voice message, press digit key 1. The current voice
message is repeated.
"1" "1"
During playback of the voice message, press digit key 1 twice. The voice
message before the current voice message is played back.
"3"
During playback of the voice message, press digit key 3. The next voice
message is played back.
"4"
During playback of the voice message, press digit key 4. The telephone
answering machine rewinds a few seconds in the current voice
message.
"0"
During playback of the voice message, press digit key 0. The current voice
message is deleted.
"2"
During playback, press digit key 2. The current function is aborted. Your
telephone is ready to receive your new commands via remote access.
Playing back/deleting the voice messages (old and new) for all users
For example, you call user A remotely. As soon as your telephone is ready to receive your
commands via remote access, you can play back all the voice messages for user A (see
"Playing back/deleting voice messages for the called user"). Alternatively, you can play
back the voice messages (old and new) for all users:
"2" "#"
"3"
Press the digit keys 2 - # - 3 on the remote telephone.
The telephone answering machine plays back the voice messages (old and
new) of all users.
➭ You have access to all additional commands listet in the section entitled "Playing
back/deleting voice messages for the called user".
Playing back/deleting voice messages (new only) for all users
For example, you call user A remotely. As soon as your telephone is ready to receive your
commands via remote access, you can play back all the voice messages for user A (see
"Playing back/deleting voice messages for the called user"). Alternatively, you can play
back just the new voice messages for all users:
59
203247441en_ba_d0
Remote access
"2" "#"
"1"
Press the digit keys 2 - # - 1 on the remote telephone.
The telephone answering machine plays back only the new voice messages
for all users.
➭ You have access to all additional commands listed in the section entitled "Playing
back/deleting voice messages of the called user".
Room monitoring
You can remotely activate remote room monitoring (switching on the microphone on your
home telephone). To enable room monitoring, from the "Installation/Remote access"
menu, you must set the "Enable room monitoring" line to "Yes":
"8" "7"
Press the digit keys 8 followed by 7 on the remote telephone.
The microphone is switched on.
"2"
Press digit key 2. Room monitoring is switched off. Your telephone is ready
to receive your new commands via remote access.
Intercom (handsfree talking on your home telephone)
You can remotely activate the intercom function (switch on the microphone and loudspeaker on your home telephone). To enable intercom, from the "Installation/Remote
access" menu, you must set the "Enable room monitoring" line to "Yes":
"8" "8"
Press the digit keys 8 twice on the remote telephone.
The microphone and loudspeaker are switched on.
"2"
Press digit key 2. Room talking is switched. Your telephone is ready to
receive your new commands via remote access.
Switching on call forwarding
You have the option of remotely setting call forwarding. You can set "Call forwarding
always", "Call forwarding on busy" or "Call forwarding on no reply":
"9" "7"
Press the digit keys 9 followed by 7 on the remote telephone.
The telephone goes into "Call forwarding unconditional" mode.
"9" "8"
Press the digit keys 9 followed by 8 on the remote telephone 8.
The telephone goes into "Call forwarding on no reply" mode.
"9" "9"
Press the digit keys 9 twice on the remote telephone.
The telephone goes into "Call forwarding on busy" mode.
203247441en_ba_d0
60
Remote access
Having selected the type of call forwarding (unconditional, on busy, on no reply), enter
the phone number to which you want calls to be forwarded:
"4"..."#" Press digit key 4 and enter the phone number to which you want calls to be
forwarded. Confirm the phone number with the hash key # on the remote
telephone.
Switching off call forwarding
To be able to switch off call forwarding remotely, you must call a user whose calls are
not being forwarded.
"*"
Press the star key * on the dial keypad of the remote telephone.
"1", …
Press the digit key corresponding to the user for whom you wish to switch off
"9", "0" call forwarding (e.g. digit key 3 for user number three). For user number ten,
press digit key 0.
"9" "6"
Press the digit keys 9 followed by 6 on the remote telephone.
Call forwarding is switched off.
Terminating remote access
Replace the handset to terminate remote access.
61
203247441en_ba_d0
Operation on a PBX
You can also connect your Eurit 4000 to an ISDN PBX (private branch exchange) via the
S0 bus. However, some functions very depending on the telecommunications system you
are using. Therefore, before connecting your Eurit 4000 to the network of the telecommunications system, read the instructions for use of the system and be aware of its
capabilities.
In order to ensure the satisfactory operation of your Eurit 4000 on a telecommunications
system, you may have to make some settings. Although your telephone is already
preconfigured by default for most telecommunications systems, there can be no
guarantee that these default settings are right for your telecommunications system.
Therefore, follow these steps in order to avoid mistakes when setting up your telephone.
➭ The settings described below are contained in the "Installation/PBX" menu.
Switching on/off operation on a PBX
Operation on a PBX is the same for all users.
Select the "PBX" line and press the OK key.
From the pop-up window, select "Yes" and press the OK key.
save
Press the Fox key below save.
Trunk access code (TAC) for outgoing calls
In order to phone an external number (one not connected to your telecommunications
system), it is necessary in the majority of systems to precede the phone number with the
TAC (Trunk Access Code). The TAC tells the telecommunications system that this is an
external call.
The majority of telecommunications systems use "0" as the TAC. Your Eurit 4000 is
therefore preset to use "0". However, if your telecommunications system requires a
different TAC or none, then replace "0" with the TAC required by your telecommunications system.
Select the "TAC outgoing" line and enter the TAC required by your
telecommunications system.
save
Press the Fox key below save.
203247441en_ba_d0
62
Operation on a PBX
Trunk access code (TAC) for incoming calls
External calls routed via a telecommunications system to your telephone are saved to the
inbox and the LOG memory. To be able to use such phone numbers in conjunction with
the callback function, they must be preceded by the TAC.
A good way of finding out whether your PBX adds a TAC or not is to make an external
call (e.g. from your mobile phone) to your Eurit 4000. The display of your telephone will
show your (mobile) phone number. If there is a code before your phone number, then
that code is the TAC for incoming calls.
The majority of telecommunications systems use "0" as the incoming TAC. Your
Eurit 4000 is therefore preset to use "0". However, if your telecommunications
system requires a different TAC or none, then replace "0" with the TAC required by
your telecommunications system.
Select the "TAC incoming" line and enter the TAC required by your
telecommunications system.
save
Press the Fox key below save.
➭ Once you have set the TAC, incoming internal and external calls will automatically be
differentiated by different melodies in the ringing tone. External calls have a shorter
melody; that is, only the first tones of the melody are played.
Length of internal phone numbers
The definition of the length of internal phone numbers tells your telephone whether a
phone number contained in the phonebook is an internal or external phone number.
By default, the length of internal phone numbers is set to a value of 4. However, if your
telecommunications system uses shorter or longer internal phone numbers, then you
should change the preset value.
Select the "Length of internal number" line and enter the length of internal
phone numbers on your telecommunications system.
save
Press the Fox key below save.
➭ If you are using your telephone on a telecommunications system and you have set a
TAC outgoing, then entries in your phonebook must not include a TAC before phone
numbers for external calls. However, if, for example, you have set the length of
internal phone numbers to a value of 4, then any entries in your phonebook for
external phone numbers less than 4 digits (emergency, directory inquiry numbers,
etc.) must be preceded by the TAC (select attribute "X").
63
203247441en_ba_d0
Operation on a PBX
Example of an external phone number in the phonebook:
Length of internal number = 4
TAC outgoing
=0
X 079 123 45 67
079 123 45 67
wrong
correct; is interpreted by your telephone as an external phone
number and the TAC is automatically added before the phone
number.
X 117
117
correct
wrong; is interpreted by your telephone as an internal phone
number.
➭ This setting is only effective if the national prefix is not a zero.
On-hook transfer
You can transfer a call to a phone within your telecommunications system or to an
external phone by pressing the Fox key below Transfer or by going on-hook, i.e. by
replacing the handset (provided this feature is supported by your provider).
To transfer a call using the Fox key, first make a new call (press the Fox key below new)
and then press the Fox key below transfer.
The default for on-hook transfer is set to OFF. "On-hook transfer: OFF" means that when
you replace your handset, the current call is ended and the call which is on hold is
resumed. "On-hook transfer: ON" means that when you replace your handset, the
current call is transferred to the call which is on hold.
Select the "On-hook transfer" line and press the OK key. From the pop-up
window, select "ON" and press the OK key.
save
Press the Fox key below save.
203247441en_ba_d0
64
Operation on a PBX
Setting the method of transfer
If you are using your Eurit 4000 on a telecommunications system, you can use the transfer
function to set up a call between two other phones. Depending on the telecommunications
system on which you are operating your telephone, you must set the method of transfer.
Most telecommunications systems support the functional method of transfer. This is the
default setting on your telephone.
If your telecommunications system does not support the functional method of transfer,
select the transfer with disconnect method.
Select the "Transfer with disconnect" line and press the OK key. From the popup window, select "ON" and press the OK key.
save
Press the Fox key below save.
➭ You can perform a test to find out whether your telecommunications system
supports the "functional" or "disconnect" method of transfer. While making a call,
make a second call. Try to connect the two people you are calling by pressing the Fox
key below transfer. If you are unsuccessful, you need to change the method of
transfer.
Automatically sending keypad information
Keypad information is data in which characters from the dial keypad are converted into
certain functions on the telecommunications system. Usually, the star key (*) or hash key
(#) is used to switch to this mode.
Read the operating instructions of your telecommunications system to find out which
keypad functions are possible.
Before dialing, press the star key or hash key to switch automatically to "keypad
signaling" mode. With some PBXs, e.g. those in which automatic trunk seizure is
activated, you need to disable the automatic sending of keypad information, so that an
internal call can be initiated with the star key. The default setting for automatic sending of
keypad information is "ON".
Select the "Automatically send keypad" line and press the OK key. From the
pop-up window, select "OFF" and press the OK key.
save
Press the Fox key below save.
65
203247441en_ba_d0
Advanced features
Timers
From the "Timer" menu, you can program set the time and date for actions (e.g. alarm,
do not disturb, telephone answering machine, call forwarding, etc.).
Timers are user-dependent.
A total of 50 timers is available for all users.
When you have programmed a timer, you will see the symbol
in the normal display.
Programming a new timer
To program a new timer, from the "Timer" menu press the Fox key below new.
Press the user key until the display shows the user to whom you wish to assign
the timer.
Select the "Date" and "Time" lines and enter the time at which you want the
timer to be activated. Select the "Repeat" line and press the OK key. You will
see a pop-up window with the following choices:
Every Monday, Every Tuesday, Every Wednesday, Every Thursday, Every Friday,
Every Saturday, Every Sunday, Weekdays (Mon. – Fri.), Saturday & Sunday, Daily
(Mon. – Sun.), none.
Select the "Action" line and press the OK key. You will see a pop-up window
with the following choices:
Alarm
Use the alarm to remember an appointment, an occasion or a job you need to
take care of. Your telephone will send you an acoustic alarm signal with a
special tone and the alarm text will inform you of the event:
Acknow- Press the Fox key below Acknowledge. The alarm tone ends.
ledge
Snooze
Press the Fox key below Snooze. The alarm tone ends and is repeated 5
minutes later.
Scheduled If the phone number you have dialed is busy, you can program a scheduled
call
call. The scheduled call function uses a special tone to automatically remind
you to call back the person you dialed:
Acknow- Press the Fox key below Acknowledge. The scheduled call function is ended.
ledge
Dial
Pick up the handset or press the Fox key below Dial. Your telephone connects
you in handsfree mode.
203247441en_ba_d0
66
Advanced features
Snooze
Press the Fox key below Snooze. The tone ends and is repeated 5 minutes later.
Do not
disturb
If you do not wish to be disturbed (see section entitled "Advanced features –
Do not disturb"), activate the "Do not disturb ON" timer and the userdependent settings from the "Do not disturb" menu will be activated. If you
do not wish to be disturbed only for a certain period, also activate the "Do not
disturb OFF".
To lock your telephone (see section entitled "Advanced features – Locking the
telephone with security PIN"), activate the "Phonelock ON" timer. To lock your
telephone only for a certain period, also activate the "Phonelock OFF".
Phonelock
TAM
The "TAM ON" and "TAM OFF" timers allow you to switch your telephone
answering machine on and off at certain times. When the telephone
answering machine is activated, the user-dependent settings from the
"Answering Machine" menu are activated.
Change The "Change TAM greeting" timer allows you to change the user-dependent
TAM
greetings on the telephone answering machine depending on the time.
greeting With the timer activated, the user-dependent greeting in the "Answering
Machine" menu is changed.
Call FWD This timer allows you to switch call forwarding "conditional" on and off at
always
certain times.
Call FWD This timer allows you to switch call forwarding "on no reply" on and off at
on no
certain times.
reply
Call FWD This timer allows you to switch call forwarding "on busy" on and off at certain
on busy
times.
Msg.
waiting
notification
The "Message waiting notification" timer allows you to activate and
deactivate the user-dependent settings in the "Messages – Msg. waiting
notification" menu at certain times.
save
Press the Fox key below save.
Editing/deleting a timer
When you have programmed a timer, you can view its current status in the timer list and
you can change it. Select the timer you wish to edit and press the OK key. The display will
show the settings for the timer. Change the settings and save them.
If you wish to save the timer settings for future use, select the timer in the timer list and
press the OK key. The display will show the settings for the timer. Select the "Status" line
and press the OK key. From the pop-up window, select "inactive" and press the OK key.
Save the new setting. The timer list shows the symbol of the timer with a line through it.
You can reactivate the timer at any time.
To delete a timer, select the timer in the timer list and press the Fox key below delete.
67
203247441en_ba_d0
Advanced features
ETV® Online
Introduction
ETV® Online is a feature of your Eurit 4000 which allows you direct access to the ETV®
(Electronic Subscriber Directory of Swisscom Directories AG). When you see an unknown
phone number on your display, ETV® enables you within just a few seconds to view the
name, address and town of the incoming call.
➭ ETV ® Online is currently supported only in Switzerland.
ETV® Online can be consulted:
– for incoming calls while you hear the ringing tone
– during a call
– during on-hook dialing (dialing with handset on cradle)
ETV® Online can also be consulted from the following memories:
– inbox
– LOG memory
– redial memory
Using ETV® Online
1. ETV® Online for incoming calls
You receive a call. Press the Fox key below ETV.
2. ETV® Online during a call
During the call, press the Fox key below ETV.
3. ETV® Online during on-hook dialing (dialing with handset on cradle)
Enter the required phone number (with handset on its cradle). Press the Fox key below
ETV.
4. ETV® Online from inbox, redial memory or LOG memory
You can also use ETV® from the inbox, redial memory or LOG memory. Select the
phone number from the relevant memory. Press the Fox key below ETV.
5. ETV® Online from the "ETV® Online" menu
From the "ETV® Online/ETV Online query" menu, enter the phone number and press
the Fox key below Do.
➭ From the "ETV® Online/Show last query" menu, you can view the last ETV® query.
203247441en_ba_d0
68
Advanced features
Copying ETV® information to your phonebook
After a successful ETV® query, simply press the Fox key below the symbol
phone number with name, address and town directly to your phonebook.
to copy the
After an ETV® query, the display shows the full address. Press the Fox key below
copy the information from the ETV® query to your phonebook.
to
The display shows a pop-up window asking you whether you wish to add the ETV®
information to an existing entry in the phonebook or create a new entry.
Change
entry
To add the ETV® information to an existing entry, press the Fox key below
Change entry. Select the corresponding entry in the phonebook list and press
the OK key. The existing information (e.g. names, phone numbers, ...) is not
deleted, but the information from the ETV® query is added to it.
Or …
New
entry
Press the Fox key below New entry. Your telephone automatically adds the
information from the ETV® query. If necessary, change the contact type
(e.g. from Office to Home).
Error message after ETV® query
Display
Meaning
Remarks
ETV® query
not accepted.
The queried phone number
is not in ETV®.
The phone number is not
registered.
Too many active connections
on your ISDN line. Both channels
of your ISDN line are busy.
ETV® information
not available.
– ETV® gateway number
may be wrong.
– ETV® server presently
not available.
– Enter correct ETV®
gateway number.
– Try again later with your
ETV® query.
No line available.
ETV® access
not possible.
69
ETV® query not possible
at present.
203247441en_ba_d0
Advanced features
Costs
ETV® enquiries are subject to a charge (CHF 0.40/query at the time of printing).
➭ If no line is available on your ISDN connection (e.g. simultaneous phone call and
surfing the Internet via WAP) or if the ETV® server is not available, no costs are
incurred.
Installing ETV® Online
ETV® Online is already installed on your Eurit 4000. The ETV® gateway number (access
number) is preset on your telephone.
If you need to change the ETV® gateway number to ETV® Online, enter the new number
from the "ETV® Online/Settings" menu. Press the Fox key below Change. From the popup window, change the ETV gateway number, press the OK key and save the new
number.
Messages (SMS, UUS, info message)
Your Eurit 4000 allows you to send and receive text messages, such as SMS and UUS.
SMS:
Short Message Service. Exchange of short messages between mobile phones and devices
which support SMS. Maximum length of message = 160 characters.
UUS:
User to User Signaling. Exchange of short messages between ISDN telephones which
support UUS. Maximum length of message = 128 characters (dependent on provider).
Incoming and outgoing messages are stored separately in the message filing
cabinet.
The memories for incoming messages and outgoing messages can hold up to 50 messages for all users. If the memories are full and new messages are delivered to the
memories, then the oldest messages are deleted.
If you wish to keep special messages, you should archive them.
The memory for archived messages can hold up to 20 messages. When the memory for
archived messages is full, the memories for incoming and outgoing messages together
can only hold 30 messages.
203247441en_ba_d0
70
Advanced features
The memories for incoming, outgoing and archived messages are user-dependent.
In addition to text messages, you can also leave voice messages for other users. Such
voice messages are called info messages.
➭ SMS is not supported by every provider. Ask your provider about the introduction
of SMS.
➭ If your Eurit 4000 is connected to a telecommunications system, SMS may not work!
➭ SMS messaging is subject to a charge.
Sending messages
From the "Messages/New message/Send SMS (or) Send UUS" menu:
Receiver
Enter the phone number of the person to whom you wish to send a message.
Message Type the message in the text field.
Send
Press the Fox key below Send.
Sent messages are contained in the memory for sent messages, i.e. in the "Messages/
Filing cabinet/Messages out" menu:
delete
To delete a message, select it and press the Fox key below delete. The message
is deleted.
read
To read a message again, select it and press the Fox key below read (or press
the OK key).
archive
Messages you wish to keep can be saved in the memory for archived messages.
Select the message and press the Fox key below archive.
Messages can be read or deleted from the memory for archived messages (from the
"Messages/Filing cabinet/Archived messages" menu).
Reading/archiving/deleting messages
When you receive text messages (SMS or UUS), the messages are collected in the inbox
and in the LOG memory and are displayed with the flashing letter symbol :
read
Select the text message you wish to read and press the Fox key below read.
reply
To reply to the text message from the sender, press the Fox key below reply.
forward
To forward the text message to another person, press the Fox key below
forward.
71
203247441en_ba_d0
Advanced features
Once you have read a message, the message is no longer in the inbox, but in the
memory for received messages (in the "Messages/Filing cabinet/Messages in" menu).
This memory has the same functionalities as the memory for sent messages.
Sending SMS from the mobile network to the fixed network
To send an SMS from a mobile phone to a fixed-network phone, go to the
"Messages / New message/Send SMS" menu and proceed as follows:
a) Switzerland
Receiver
Always send the message to the fixed number "225".
Message
Always enter the receiver's number first in the text field, followed by a
space and then the actual message text. Example: "0313506125 Hi Dad,
I'm on my way home."
b) Germany
To receive and send an SMS as a text message via the SMS service of Deutsche Telekom,
you must register your number with Deutsche Telekom's SMS service. This can be done
by sending a free-of-charge SMS to "8888" with the text "ANMELD" (register). To deregister, send a free-of-charge SMS to "8888" with the text "ABMELD" (de-register).
➭ Requirements
– To send and receive SMS messages, your telephone line must have active
"Calling Line Identification Presentation (CLIP)".
– Make sure this service is activated on your line. Your network provider will gladly
advise you on the availability of the SMS service.
– To send an SMS, the number of an SMS gateway must be activated on your Eurit
4000. Your Eurit 4000 is delivered with the SMS gateway already programmed
and activated, so that you can immediately begin SMS messaging.
➭ Your service provider will advise you on
– the rates for sending and receiving SMS messages.
– the mobile providers you can use to send and receive SMS messages.
– and the functions your SMS service offers.
203247441en_ba_d0
72
Advanced features
SMS gateway number
All SMSs are always sent via a gateway. The gateway number is already programmed in
your telephone.
If you need to change the SMS gateway number, enter the new number in the
"Messages/Settings" menu on the "SMS gateway number" line. Press the Fox key below
Change. From the pop-up window, change the SMS gateway number, press the OK key
and save the new number.
➭ Germany: SMS Gateway 2
Gateway number of another service provider, for receiving SMS messages from the
fixed network. This number can only be used to receive SMS messages.
Recording an info message
You can record info messages from the "Messages/New message/Record memo" menu:
Define who the info message is for. From the pop-up window, select the user
and press the OK key.
rec
Pick up the handset and press the Fox key below rec. Record the info message
and replace the handset.
Playing back/deleting an info message
When there is an info message on the telephone for one of the users, the LED emits an
acoustic the voice message symbol on the display flash. An info message is a voice message.
For how to play back and delete voice messages, read the section entitled "Telephone
answering machine – Playing back/deleting voice messages".
Enabling/disabling the signaling of new messages
The telephone emits an acoustic signal to tell you that a new message has been received.
However, you can disable this function from the "Messages/Settings" menu.
The setting is valid for all users.
Select the "Signal receipt of message" line and press the OK key. From the popup window, select "OFF" and press the OK key.
save
Press the Fox key below save.
73
203247441en_ba_d0
Advanced features
Message waiting notification
If you wish, your Eurit 4000 will notify you (e.g. on your mobile phone) of any new text
(SMS or UUS) and voice messages (messages on the telephone answering machine) which
were received on your Eurit 4000 in your absence. This function is user-dependent and is
set from the "Messages/Msg. waiting notification" menu:
Status
To activate the function, select "ON" on the "Status" line.
Send to
No.
Enter the phone number of the person who is to be notified of waiting
messages.
On the "TAM messages" or "UUS messages" or "SMS messages" line, select
the method of notification to be used by your Eurit 4000:
OFF
No notification of new messages.
Make a
call
This method of notification can be used for "TAM messages" only, when your
Eurit 4000 is in remote access mode (see section entitled "Remote access").
When a new voice message is received, your Eurit 4000 automatically
dials the phone number given on the "Send to No." line. The Eurit 4000
then plays the greeting from the telephone answering machine. Before your
Eurit 4000 can play back the messages on the telephone answering machine,
you must enter the remote access PIN.
➭ To be notified of voice messages by phone call, you must enable remote access from
the "Installation/Remote access" menu.
Send
UUS
When a new message is received, your Eurit 4000 automatically sends
a UUS to the phone number given on the "Send to No." line.
Send
SMS
When a new message is received, your Eurit 4000 automatically sends
an SMS to the phone number given on the "Send to No." line.
save
Press the Fox key below save.
203247441en_ba_d0
74
Advanced features
➭ If the method of notification is by SMS or UUS, the text of the notification contains ...
– ... information on the phone number of the sender,
– ... whether the message is a TAM, SMS or UUS message,
– ... in the case of text messages, an extract from the original SMS or UUS text.
➭ Sending text messages (SMS and UUS) is subject to a charge (depending on the
provider). The manufacturer accepts no liability for ...
– ... costs incurred by sending text messages,
– ... costs in connection with the SMS gateway,
– ... costs resulting from possible malfunction of the software,
– ... costs that may arise, for example, in an "SMS/UUS loop".
➭ If you would like to try out "message waiting notification" it is not possible for
notification of waiting TAM, SMS or UUS messages to be sent to the same phone
number from which the message was received, owing to suppression of the "pingpong" effect. This means that you cannot call your Eurit 4000 from a mobile phone,
leave a message and then have notification sent to your mobile telephone.
➭ Under all circumstances, be sure to avoid the following or similar situations: For
example, if your Eurit 4000 sends notification of waiting messages by SMS
(or UUS) to another telephone "X", which, in turn, sends notification of waiting
messages by SMS (or UUS) to another telephone "Y", which, in turn, sends
notification of waiting messages by SMS (or UUS) to your Eurit 4000, then your
Eurit 4000 will, in turn, send notification to telephone "X" by SMS (or UUS), and
so on. ("SMS/UUS loop").
75
203247441en_ba_d0
Advanced features
Call forwarding
Call forwarding is user-dependent and allows you to have incoming calls forwarded to
another telephone. The following types of call forwarding are provided:
– Unconditional: An incoming call for the user is forwarded immediately to the specified
phone number. The telephone does not ring. The symbol appears in the normal display.
– On busy: If the phone number of the user is busy, the call is forwarded to the specified
appears in the normal display.
phone number. There is no call waiting tone. The symbol
– No answer: If the call is not answered by the user and the call signaling time has
elapsed, the call is forwarded to the specified phone number. The symbol appears in
the normal display.
➭ The caller pays only those charges incurred for the call between his/her telephone
and yours. You are charged the cost of the forwarded call.
Enabling call forwarding
You can enable call forwarding from the "Call forwarding" menu. Press the user key until
the display shows the user for whom you wish to enable call forwarding. Select the type
of call forwarding and set call forwarding to "ON". Enter the phone number to which
calls are to be forwarded and press the Fox key below Send to network.
Disabling call forwarding
Press the user key until the display shows the user for whom you wish to disable call
forwarding. Select the type of call forwarding you wish to disable and set it to "OFF".
Press the Fox key below Send to network.
Call charges
The call charge reading on your Eurit 4000 uses the call charge units of your provider.
To obtain a correct reading, you must set the value per unit (factor) and the currency.
Note that, for technical reasons, the indicated charges may differ from the actual amount
on your telephone bill. The amount stated on your telephone bill is binding.
203247441en_ba_d0
76
Advanced features
If you are phoning via a provider, call charge information may not be available.
The information on call charges and call duration is contained in the "Call charge
information" or "Call charges/Call charge information" menu.
Per user
The values in the "Charges" and "Call duration" lines refer to the current user.
For all users
The values in the "Total charges" and "Total duration" lines are for all users.
Setting the currency and factor
Changes to the settings for currency and factor are valid for all users. These settings are
contained in the "Call charges/Settings" menu. Select the "Currency" and/or "Factor"
line(s) and overwrite the present values with the correct values. Save the new settings.
➭ In some countries the settings cannot be programmed.
Resetting the call charges and call duration
To reset the values for call charges and call duration, from the "Call charge information"
or "Call charges/Call charge information" menu press the Fox key below reset. All values
(per user and for all users together) are reset to 0.
Do not disturb
From the "Do not disturb" menu, you can either reject incoming calls or divert them
directly to the telephone answering machine.
A filter list can be created for all users. The filter list defines the persons to whom Do not
disturb applies:
– Do not disturb for all callers.
– Do not disturb for all callers not included on the filter list.
As soon as Do not disturb has been activated for a user, the LED illuminates and the
appears in the normal display.
symbol
Do not disturb is user-dependent.
77
203247441en_ba_d0
Advanced features
Enabling/disabling Do not disturb
Press the user key until the display shows the user for whom you wish to
enable/disable Do not disturb.
Select the "Status" line and press the OK key. From the pop-up window, select
"ON" or "OFF" and press the OK key.
save
Press the Fox key below save.
Creating a filter list
The filter list relates to entries in the phonebook. Only existing entries in the phonebook
can be copied to the filter list. To open the filter list, from the "Filter list" line press the
Fox key below open:
add
Press the Fox key below add. You will see the phonebook list. Select the entries
you wish to add to the filter list and press the OK key.
BACK
Having created the filter list, return to the "Do not disturb" menu by pressing
the BACK key.
save
Press the Fox key below save.
➭ To remove entries from the filter list, select the entries and from the filter list press
the Fox key below delete.
➭ To be able to create the filter list, on the "DND for whom?" line you must select
"Filter list callers are excluded" from the pop-up window.
Do not disturb for all callers
If you do not wish to be disturbed by anyone, you should enable Do not disturb for all
callers:
Select the "DND for whom?" line and press the OK key. From the pop-up
window, select "DND all callers" and press the OK key.
save
Press the Fox key below save.
Do not disturb for selected callers
If you do not wish to be disturbed and wish to remain available only to those callers
included in the filter list:
Select the "DND for whom?" line and press the OK key. From the pop-up
window, select "Filter list callers are excluded" and press the OK key.
save
Press the Fox key below save.
203247441en_ba_d0
78
Advanced features
Choosing the type of Do not disturb: reject/divert to telephone answering
machine
You have two options for how to tell callers that you do not wish to be disturbed. You
can either reject callers or divert them to the telephone answering machine. Select the
"DND type" line, choose the type of Do not disturb and save the setting:
– Reject: When someone tries to call, they are told that the user is temporarily unavailable, unless other telephones with the same MSN are connected to the same S0 bus.
– Directly to TAM: When someone tries to call, they are diverted directly to the
telephone answering machine (with the current settings).
– Directly to TAM with greeting: Choose the greeting. When someone tries to call,
they are diverted directly to the telephone answering machine.
Providers
Irrespective of the provider from whom you rent your line, you can also make phone calls
through other providers, assuming you have subscribed to their service.
Your Eurit 4000 allows you to define 10 different providers with provider name and
provider code in the provider list. In addition, you can assign certain phone numbers to a
provider (automatic provider selection), for example:
– Local area code (prefix) numbers in general
– Country code numbers
– First digits of a phone number
Example of automatic provider selection:
Normally, you always make your phone calls through provider ABC. For automatic
provider selection, in the provider list you assign the country code for Japan (0081) to
provider XYZ. When you phone someone who does not live in Japan, your telephone dials
as normal through provider ABC. However, when you dial the phone number of a person
in Japan, beginning with the country code for Japan (0081), your telephone compares the
first digits of the phone number you dialed and sees that the digit sequence (0081) is
assigned to provider XYZ. Your telephone now automatically makes your call to Japan
through provider XYZ, instead of through your normal provider ABC.
The providers defined in the provider list can be linked with the contacts in the phonebook (see section entitled "Phonebook – Creating a new entry – Entering attributes for
phone numbers").
79
203247441en_ba_d0
Advanced features
Defining a provider in the provider list
In the provider list in the "Provider/Provider list" menu you can define up to 10 different
providers (P0, P1, ... P9) for all users together. Provider P0 (without provider) represents
the provider you are registered with (preselected, without having to dial the provider
code). Providers P1 to P9 can be programmed with provider name and provider code.
edit
In the provider list, select the provider (P1, P2, ..., P9) you wish to program.
Press the Fox key below edit and enter the provider name and provider code.
For automatic provider selection, enter the first digits of phone numbers and
separate the numbers by commas.
save
Press the Fox key below save.
➭ To delete the entire settings for a provider, in the provider list press the Fox key
below reset.
Defining a default provider
By choosing the default provider from the "Provider/Settings" menu, you define which
provider you want your telephone to use when making a phone call. Select the "Default
provider" line and press the OK key. Select a provider, press the OK key and save the
setting. Your telephone will now use that provider for every outgoing call. This function is
user-dependent.
➭ When you dial off-hook (with the handset off its cradle), your telephone makes the
call through provider P0, the provider you are registered with (preselection).
Enabling/disabling automatic provider selection
You must activate automatic provider selection on your telephone from the "Provider/
Settings" menu. Select the "Automatic provider selection" line and press the OK key.
Select "ON", press the OK key and save the setting. This function is user-dependent.
➭ When automatic provider selection is activated, the symbol
display.
appears in the normal
Dialing through automatic provider selection
Automatic provider selection works only when you dial on-hook or from one of the
memories or from the phonebook. Automatic provider selection does not work when you
dial off-hook. Press the user key until your name appears and then dial a phone number.
203247441en_ba_d0
80
Advanced features
Ringing tone
Your Eurit 4000 has a wide range of different ringing tone melodies. The volume can
be individually adjusted. The increasing option can be linked with the volume, in which
case the ringing tone starts at the quietest level and increases as far as the set volume.
A user prompt can be recorded for each user. Record your own user prompt. Whenever
there is a call for you, you will hear not only the ringing tone melody but also your user
prompt (your name spoken out loud) telling you that the incoming call is for you.
If you have provided entries in the phonebook with name prompt (see section entitled
"Phonebook – Creating a new entry – Name prompt"), you can integrate the name
prompt into the ringing tone sequence. The ringing tone sequence is melody – user
prompt – name prompt. You can define whether or not you want your telephone to
play, for example, just the ringing tone melody and the name prompt whenever there is a
call.
The settings in the "Ringing tone" menu are user-dependent.
Setting the ringing tone melody and ringing tone volume
Press the user key until your name appears.
Melody
Select the "Melody" line and press the OK key. Select a melody from the list of
ringing tone melodies and press the OK key.
Volume
Select the "Volume" line and press the OK key. Select the volume by pressing the
Fox key below "–" or "+" and press the OK key.
Increasing Select the "Increasing" line and press the OK key.
From the pop-up window, select "ON" and press the OK key.
save
Press the Fox key below save.
➭ If the volume is set to "0" (mute), the symbol
the LED illuminates.
appears in the normal display and
➭ Make sure that a different melody is selected for each user. This makes it possible to
distinguish audibly between incoming calls.
➭ Whenever there is an incoming call, you can change the volume of the ringing tone
using the plus or minus key.
81
203247441en_ba_d0
Advanced features
Recording a user prompt
Press the user key until your name appears.
User
prompt
Select the "User prompt" line, pick up the handset and press the Fox key
below rec. Record your user prompt and replace the handset.
save
Press the Fox key below save.
➭ If a user prompt already exists, press the Fox key below 왘 to play back the user
prompt. To delete an existing user prompt, press the Fox key below delete.
Defining the ringing tone sequence
Press the user key until your name appears. Choose your own ringing tone sequence by
selecting the bottom lines "Melody", "User prompt" and "Name prompt" and setting
them to "ON" or "OFF". Save the settings.
➭ If, for example, you have set the melody, user prompt and name prompt to "OFF"
and there is a call for you, the telephone will still play the melody.
Games
The "Games" menu contains games. Read the rules of the game and follow the onscreen prompts. For help, press the Fox key below Help. Use the wheel navigator as well
as the OK and BACK keys.
To play games while you are on the phone, press the Fox key below Menu.
➭ You can still be called when you are playing a game.
Locking the telephone with security PIN
From the "Installation/Security" menu, you can use the security PIN to protect your
telephone against unauthorized access. The telephone is then locked, i. e. no more calls can
be made and access to the menu or to WAP is denied. Re-enter the security PIN to unlock
the telephone.
203247441en_ba_d0
82
Advanced features
While the telephone is locked, it is still possible for important phone numbers (emergency
calls) to be called.
The security PIN is set by default to "0000". Activation of phonelock applies to all users
together.
➭ Do not forget the security PIN. If this happens, contact the dealer from whom you
purchased the telephone.
Locking the telephone
When you select the "Security" menu, you are asked for the security PIN. Enter the
security PIN and press the OK key.
Change
To change the security PIN, select the "Security PIN" line and press the OK key.
From the pop-up window, change the security PIN and press the OK key.
Phone lock To lock your telephone, select the "Phone lock" line and press the OK key.
From the pop-up window, select "ON" and press the OK key.
Lock
mode
Select "complete" to disable all the functions of your telephone. Select "with
emergency call" to disable all the functions of your telephone, but still allow
emergency calls.
save
Press the Fox key below save to activate the phonelock. The normal display
shows the symbol for the phonelock.
Emergency calls
The telephone is locked and you wish to dial an emergency call number. Press any key on
the telephone and the display asks you to enter the security PIN:
Emergency Press the Fox key below Emergency call. From the pop-up window, select an
call
emergency call number and pick up the handset.
Unlocking the telephone
To unlock your telephone, first press any key and then enter the security PIN in the pop-up
window. Confirm your entry by pressing the OK key.
83
203247441en_ba_d0
Advanced features
key
From the "User – Settings" menu, you can assign the
options:
–
–
–
–
key to one of the following
phone number
e-mail address
WAP address
function from the function list (Fxx)
The section entitled "Appendix – Function list" contains an overview of all the available
functions for the key. Assignment of the key is user-dependent. However, some of
the functions in the function list apply to all users.
Assigning the
key
Press the user key until the display shows the user for whom you wish to
assign the key.
Using the wheel navigator, select the " key" line and enter the phone
number, email address, WAP address or function from the function list (Fxx).
save
Press the Fox key below save.
203247441en_ba_d0
84
Appendix
Renumbering (prefix)
If renumbering takes place (change of country code), you can preprogram the national
prefix for your country and the international prefix for international calls:
Setting the national/international prefix
The national prefix is the first digit of a national area code number (in Switzerland, for
example, it is presently "0"). The international prefix is the access code you need to dial
before the country code (in Switzerland, for example, it is presently "00"). The current
national and international prefixes for your country have been preset by default with the
corresponding digits. However, if the national/international prefix change, you can change
the setting in the "Installation/Location" menu:
Select the "National prefix" or "International prefix" line and overwrite the
digits with the new ones.
save
Press the Fox key below save.
Country code
If you want to use your Eurit 4000 to telephone abroad, you need to dial the country
code after the prefix. For example the country code for Switzerland is 41. If you are
connected within a network, you do not need to dial the country code.
The default setting is the code currently set for your country. Country codes may be
changed at some time in the future. If this happens, make the changes in the
"Installation/Location" menu:
Select the "Country code" line and overwrite it with the new number.
save
Press the Fox key below save.
85
203247441en_ba_d0
Appendix
Headset
Instead of the handset, you can equip your telephone with a headset (optional accessory:
headset with microphone).
The headset is available from your dealer. If you purchase the headset from a dealer, make
sure that it is compatible with your Eurit 4000.
Read the instructions supplied with this accessory in order to find out how to connect and
operate the headset.
To be able to operate your telephone with a headset, make the following settings in the
"Installation/Hardware" menu:
Select the "Headset" line and press the OK key. From the pop-up window,
select "Yes" and press the OK key.
save
Press the Fox key below save to save the setting. The normal display shows the
for the headset.
status symbol
➭ To accept a call with the headset, press the loudspeaker key on your telephone. To
make a call, first dial the phone number and then press the loudspeaker key. Refer
also to the headset instructions.
Reset
A full reset allows you to restore your telephone to its default (factory) settings. All your
settings and entries in all memories will be deleted.
If you forget your remote access PIN, carry out a remote access reset. The remote access
PIN is reset to "0000".
From the normal display, press the Fox key below Menu, position the black cursor to the
"Installation" menu and press digit key "1" to enter the service menu:
– Select the "Full reset" line and press the OK key. A full reset is carried out.
– Select the "Reset remote-access PIN" line and press the OK key.
203247441en_ba_d0
86
Appendix
Software update
Software version, feature and checksum
From the "Installation/Software" menu, you can view the current software version,
feature and checksum of your Eurit 4000. The checksum is a value which is calculated on
the basis of the size of the software.
Version
The "Version" line indicates the current software version installed on your
Eurit 4000.
Feature
The value on the "Feature" line represents the features which are
implemented in your Eurit 4000.
Checksum
Select the "Checksum" line and press the Fox key below Calculate. The
telephone calculates the checksum and displays it.
➭ State the software version, the feature value and the checksum if you need to
contact the service hotline, for example, because of problems.
Remote software update
The software for your Eurit 4000 is being constantly improved. From the "Installation/
Software" menu, you can download the latest software to your Eurit 4000 in just a few
minutes directly over the phone line (calls subject to charge). The access number is already
stored in the telephone.
Select the "Host number" line and press the Fox key below Start update.
Remote software update is started. The display shows the current progress in
percent.
Continue When the remote software update has been successfully completed, press the
Fox key below Continue. The display reverts to the normal display. Your
telephone now has the latest software installed.
➭ A remote software update does not change or delete any of your settings or
phonebook entries.
➭ You can remote-download software to add new functions and/or change existing
functions. To ensure that your operating instructions match the latest software
version, we recommend that you download the current instructions from our home
page at www.swissvoice.net.
87
203247441en_ba_d0
Appendix
Trouble shooting
If, on occasion, your telephone does not do as you wish, first try to remedy the problem
with the help of the following chart.
Caution: Always have repairs carried out by your dealer. Never take your telephone apart
yourself.
Problem
Possible cause
Corrective action
No dial tone.
Telephone connecting lead
and/or plug-in power supply
unit not correctly plugged in.
Unplug them and
plug them in again.
No ringing tone
after dialing.
Type of line (operation on
a PBX) incorrectly set.
If operated on a PBX,
your telephone must be
set to the correct type of
line.
Dual tone (high/low)
instead of dialing
tone
Your telephone is set to call
forwarding.
Deactivate call forwarding.
Telephone not ringing.
Ringing tone is off (ringing
tone volume = 0) or "Do not
disturb" is activated.
Switch ringing tone volume
back on or deactivate "Do
not disturb".
Person at other end of
line cannot hear you.
Handset cable not correctly
plugged in or microphone
mute key activated.
Check handset cable
or press microphone mute
key.
203247441en_ba_d0
88
Appendix
Care
Your telephone has been designed for continuous maintenance-free operation.
Clean the exterior of the telephone at regular intervals. Use a damp, lint-free cloth.
Strong cleaning agents or solvents are not suitable as they may damage the surface of the
telephone. When cleaning, make sure that no liquids of any kind get inside the
telephone.
Function list
The following function list is required for entries in the phonebook (define as contact with
attribute) and for defining the key:
F00
F02 dd...d
F03 kk...k
F21 xx...x
F22 xx...x
F23 xx...x
F24
F26
F27
F44
F46
F47
F50
F51
F70
F71
No function
Send DTMF
Send keypad
Call forwarding unconditional ON/OFF (user-dependent)
Call forwarding on no reply ON/OFF (user-dependent)
Call forwarding on busy ON/OFF (user-dependent)
Do not disturb ON/OFF (user-dependent)
Telephone answering machine ON/OFF (user-dependent)
Message waiting notification ON/OFF (user-dependent)
Do not disturb ON/OFF (for all users)
Telephone answering machine ON/OFF (for all users)
Message waiting notification ON/OFF (for all users)
ETV® Online query
Send SMS (template for entering number and text)
Headset ON/OFF (for all users)
Activate phonelock without password prompt
➭ "xx...x" = Phone number for call forwarding
89
203247441en_ba_d0
Appendix
Eurit Office Tool
Available as an optional accessory for the Eurit 4000, the Eurit Office Tool enables
computer-aided telephoning (CTI).
The software supplied with the Eurit Office Tool contains a TAPI driver as well as a program
with which you can configure and operate your Eurit 4000 via a PC. Calls are then
displayed automatically on the screen. If the caller is included in your database, all the
important data of the caller are displayed. This means that you have detailed information
on your caller even before you accept the call. This option makes it considerably easier to
use the telephone in a working environment. No office should be without it.
The TAPI driver allows you to link certain database programs directly to the Eurit 4000.
The Eurit Office Tool software is constantly undergoing improvements, and these cannot
always be included on the CD-ROM supplied. To ensure that your software is always upto-date, visit www.estos.de/euritelpro/ for free updates of the version you have
purchased. From this Web page, click on Download Updates and start your download
by clicking on EuriTel Pro Version X.Y. Information on which points have been updated
is likewise available on the same homepage under EuriTel Pro Releasenotes.
How to install updates on your computer
Download the update file from the homepage to your computer and execute. A setup
process is started which automatically detects a previously installed version and updates it.
➭ Caution: PC-Dialer II, the predecessor of Eurit Office Tool, is not compatible with the
Eurit 4000.
203247441en_ba_d0
90
Appendix
Technical data
ISDN
Line
Protocol
Standard line
DSS1 (Euro-ISDN)
Dimensions and weight
DxWxH
Weight
289 mm x 214 mm x 111 mm
808 g
Environmental conditions to DIN IEC 721
Operation
Transport
Storage
+ 5 ... + 45 °C
– 25 ... + 70 °C
– 25 ... + 55 °C
PC interface
The optional accessory "Eurit Office Tool" allows the Eurit 4000 to be connected to a PC.
Data retention without power supply
> 10 years (no battery required)
Guarantee
Your product is covered by a guarantee that is in accordance with the legal provisions
of the country in which you purchased the product and which runs from the date of
purchase. As proof of the date of purchase, please retain the receipt or, after it has
been completed by the retailer, the guarantee card at the back of the operating
instructions. Within the guarantee period, all faults that are the result of faulty materials
or manufacturing faults will be repaired free-of-charge. Repair under guarantee will
either be carried out by repairing the defective product or exchanging it, as the supplier
sees fit.
Defects that affect the value or use of the product by only a negligible amount as well
as expendable items or damage that has been caused by improper use, through fair
wear and tear or by interference with the product by third parties, are not covered by
the guarantee. Possible consequential damages resulting from product use, failure or
faults, in particular any liability for pecuniary loss, are excluded from this guarantee.
In the event of a claim under the guarantee please contact the point of sale at which you
purchased the telephone.
91
203247441en_ba_d0
Appendix
Disposal
Please dispose of the old telephone in accordance with local regulations. The
"PaperFoam" inlay can be disposed of either as waste cardboard or as biodegradable
waste (compost).
Approval and CE marking
Your Eurit 4000 is intended for operation on the ISDN network.
Country-specific regulations have been taken into account. Should you have a question
relating to discrepancies between public telephone networks, please contact your dealer
or provider.
The CE symbol signifies conformity with the applicable directives governing telephones
connected to the public network.
Liability
The manufacturer accepts no liability for:
➭ personal injury or damage to equipment caused by improper use of the telephone.
➭ personal injury or loss or damage to equipment resulting from the use of these
operating instructions.
➭ third-party losses or claims arising from the use of the Eurit 4000.
➭ damage or loss arising from loss of data (SMS, e-mail and UUS).
➭ costs incurred through the sending of text messages (SMS, UUS, e-mail) or with the
"message waiting notification" feature.
➭ The producer offers no warranty for the actual transmission of SMS messages, UUS
messages or e-mails.
203247441en_ba_d0
92
Appendix
Declaration of conformity
Konformitätserklärung
Declaration of Conformity
Déclaration de Conformité
Wir:
We:
Nous:
Adresse:
Address:
Adresse:
Swissvoice AG
Eichtal
Postfach 111
CH-8634 Hombrechtikon
erklären, dass das Produkt / declare that the product / déclarons que le produit:
Type:
Model:
ISDN-Telephone
Eurit 4000 (Abraxas K40i-A)
die grundlegenden Anforderungen gemäss Artikel 3 der nachstehenden EU-Richtlinie erfüllt:
meets the essential requirements according to article 3 of the following EC-Directive:
est conforme aux exigences essentielles de l’article 3 de la Directive CE:
Richtlinie 1999/5/EG des Europäischen Parlaments und des Rates vom 9. März 1999 über
Funkanlagen und Telekommunikationsendeinrichtungen und die gegenseitige Anerkennung ihrer
Konformität
Directive 1999/5/EC of the European Parliament and of the Council of 9 March 1999 on radio
equipment and telecommunications terminal equipment and the mutual recognition of their conformity
Directive 1999/5/CE du Parlement Européen et du Conseil du 9 mars 1999 concernant les
équipements hertziens et les équipements terminaux de télécommunications et la reconnaissance
mutuelle de leur conformité
und dass die folgenden harmonisierten Normen angewandt wurden:
and that the following harmonised standards have been applied:
et que les standards harmonisés suivants ont été appliqués:
EN 60950/1997
EN 55022/1998, EN 55024/1998
Hombrechtikon, 27.02.2002
T. Frei
93
i.V. F. Ryser
203247441en_ba_d0
Appendix
203247441en_ba_d0
94
Warranty certificate
Warranty Certificate
Garantieschein, Bon de garantie, Certificato di garanzia, Garantiebewijs,
Takuutodistus, Garantibevis, Garantisedel, Garantibevis, Certificado de Garantía,
Talão de garantia
device type:
(Gerätetyp, type d’appareil, tipo di apparecchio, toesteltype, laitetyyppi, maskintype, apparattyp, apparattype, modelo del aparato, modelo do aparelho):
serial number:
(Seriennummer, numéro de série, numero di serie, serienummer, sarjanumero, serienummer, serienummer,
serienummer, número de serie, número de série):
dealer’s stamp:
(Händlerstempel, sceau du vendeur, timbro del rivenditore, stempel van de dealer, kauppiaan leima,
forhandlerens stempel, försäljarens stämpel, forhandlerstempel, sello del comerciante. carimbo do vendedor):
dealer’s signature: (Unterschrift des Händlers, signature du vendeur, firma del rivenditore, handtekening van de dealer, kauppiaan
allekirjoitus, forhandlerens underskrift, försäljarens underskrift, forhandlers underskrift, firma del comerciante,
assinatura do vendedor):
date of purchase: (Kaufdatum, date d’achat, data d’acquisto, datum van aankoop, ostopäiväys, kjøpsdato, datum för köpet,
salgsdato, fecha de adquisición, data de compra):
95
203247441en_ba_d0
✄
203247441en_ba_d0
96
Key words
A
Accepting a call ................................ 38
Acknowledge ............................ 35, 66
Action .............................................. 66
Add entry to phonebook ................. 11
Alarm ............................................... 66
Alphanumeric keypad .................. III, 12
Alternating ...................................... 41
Always ............................................ 76
Anonymous call ................................ 32
Anonymous callers ......................... 39
Approval and CE marking ................ 92
Archive ............................................. 71
Archived messages ......................... 71
Arrow keys ........................................ IV
Attribute ................................... 11, 43
Automatic provider selection .... 79, 80
Automatic redial on busy ................ 34
Automatically send keypad .............. 65
Change TAM greeting ......................
Checksum .......................................
Computer-aided telephoning (CTI) ..
Confirmation beeps ..........................
Connection-less .......................... 26,
Connection-oriented ................. 26,
Contact type ..................................
CONTROL key .............................. IV,
Country code ..................................
Currency .........................................
D
Date ................................................. 14
Declaration of conformity ................ 93
Default provider ............................... 80
Deleting a greeting ......................... 50
Dial keypad ....................................... I II
Dial-up ........................................... 26
Dialing from the inbox .................... 37
Dialing from the LOG memory .......... 36
Dialing from the phonebook ........... 35
Dialing from the redial memory ........ 36
Dialing from the VIP display ............ 37
Directly to TAM .................. 39, 45, 79
Directly to TAM with
greeting ........................... 39, 45, 79
Disconnect ..................................... 11
Display ....................................... II, 10
Display contrast ................................ 15
Display illumination ........................ 15
Disposal ............................................ 92
Diverting a call to the telephone
answering machine ....................... 38
DND all callers .................................. 78
DND for whom? .............................. 78
Do not disturb ............................ 67, 77
Do not disturb OFF .......................... 67
Do not disturb ON ........................... 67
DTMF ............................................. 42
B
BACK key ................................... IV, 12
Backspace key .................................. IV
Bookmark ........................... 17, 21, 23
C
Call anonymous ..............................
Call charges ......................................
Call forward .....................................
Call forwarding ......................... 60,
Call FWD always ..............................
Call FWD on busy ............................
Call FWD on no reply ........................
Call screening .................................
Call trace .........................................
Call waiting/accepting a further call
Callback on busy ..............................
Callback on no answer ...................
Care .................................................
Change entry ...................................
67
87
90
15
27
27
43
12
85
77
44
76
45
76
67
67
67
51
42
40
33
33
89
69
97
203247441en_ba_d0
Key words
E
Emergency calls ................................
End message ...................................
Error messages ................................
ETV® Online ........................ 11, 68,
Eurit Office Tool ...............................
Eurit.com .........................................
Exit browser ...................................
External number .............................
83
50
27
89
90
18
19
44
F
Factor .............................................
FAQ (frequently asked questions) ....
Feature ............................................
Filing cabinet ....................................
Filter list ..........................................
Filter list callers are excluded ............
Forwarding a call .............................
Fox key ................................. III, 11,
Function ..........................................
Function list ......................................
77
17
87
72
78
78
39
12
44
89
International prefix .......................... 85
Internet connections (ISP) ............... 25
Internet Service Provider (ISP) ........... 16
Interval ............................................ 34
ISDN ..................................... 4, 16, 91
ISP .............................................. 16, 25
K
key i ........................... II, 4, 12, 16,
key z ....................... II, 13, 21, 84,
Key sound ........................................
Keypad ...........................................
Keypad ............................................
Keypad information .........................
L
Language ......................................... 13
LED ............................................ III, 47
Length of internal numbers ............. 63
Liability ............................................. 92
List for direct remote access .............. 54
Load homepage ............................... 20
Loading WAP pages ....................... 21
Lock mode ....................................... 82
Locking the telephone ..................... 83
LOG key .............................................. II
LOG memory .............................. 21, 68
Loudspeaker .................................... IV
Loudspeaker key ......................... III, 30
G
Games .............................................. 82
Gateway list ..................................... 26
Guarantee ....................................... 91
H
Handset cradle ................................
Handsfree talking ...........................
Headset ..........................................
Help message ..................................
History ...................................... 21,
Homepage ................................ 21,
Host number ...................................
Hyperlink .........................................
IV
29
86
55
25
26
87
17
I
Immediate answer ............................
Inbox ................................... 10, 37,
Increasing ........................................
Indicate busy ..................................
Info message ...................................
International number .......................
52
68
81
45
70
44
203247441en_ba_d0
19
89
15
11
44
42
M
Manual dialing .................................
Maximum number of rings ...............
Melody ...........................................
Memory-full message .....................
Menu ...............................................
Message .................................... 70,
Message waiting notification .... 67,
Messages in ......................................
Messages out .................................
Microphone mute key ................. II,
Minus key ................................... II,
Multiple subscriber numbers (MSNs)
Mute ................................................
98
31
55
82
50
10
71
74
72
71
30
30
13
30
Key words
N
Name prompt ........................... 44,
National prefix .................................
New entry ........................................
No answer ......................................
Note .................................................
Number of tries ...............................
82
85
69
76
46
34
O
Offline ............................................
OK key ....................................... IV,
On busy ...........................................
On-hook transfer .............................
Online operating instructions ...........
Open listening ..................................
Options ...................................... 11,
20
12
76
64
17
30
21
Redial key .......................................... III
Redial memory ................................. 68
Refresh ...................................... 21, 27
Rejecting a call ................................ 38
Reload current WAP page (refresh) .. 11
Remote access PIN .......................... 54
Remote access reset ....................... 86
Remote software update ................. 87
Renumbering (prefix) ....................... 85
Reset ............................................... 86
RETURN key ...................................... IV
Ringing tone .............................. 14, 82
Ringing tone sequence ................... 82
Rings before answer ....................... 52
Room monitoring ...................... 55, 60
Room talking ................................... 60
P
PARK key .......................................... III
Parking a call ................................... 41
PBX ................................................. 62
PC-Dialer II ..................................... 90
Phone lock ...................................... 83
Phonebook ................... 4, 21, 24, 43
Phonebook info ................................ 46
Phonelock OFF .................................. 67
Phonelock ON ................................. 67
PIN ................................................. 83
Playing back voice messages ............. 53
Playing back/changing a greeting .... 49
Plus key ....................................... II, 30
Port ................................................. 26
Power supply ..................................... 7
Preferred provider ............................ 44
Providers ........................................ 80
S
Safety instructions ............................... I
Save current WAP page .................. 11
Saving WAP pages ........................... 23
Scheduled call ........................... 34, 66
Security .......................................... 82
Security PIN ..................................... 82
Self-help ........................................... 88
Send SMS ........................................ 71
Send UUS ....................................... 71
Server ............................................... 17
SHIFT key .................................... IV, 12
Signal receipt of message ................. 72
Silence ringer ................................... 45
SMS .................................... 70, 89, 92
SMS gateway number ...................... 73
SMS/UUS loop ................................. 75
Snooze ....................................... 35, 66
Software update ............................... 87
Space key ......................................... IV
Special character key .................. IV, 12
Special ring melody ......................... 45
Special TAM greeting ....................... 45
Status symbols ................... 10, 12, 19
Stop ......................................... 11, 27
Stop symbol .................................... 21
Subaddress ...................................... 44
Surfing and making a phone call ..... 22
Q
Quitting the WAP browser
(going offline) .............................. 19
R
Reaction .........................................
Read entry from phonebook ...........
Receiver ...........................................
Recording a greeting ......................
Recording length ............................
Recording quality ..............................
45
11
72
49
51
52
99
203247441en_ba_d0
Key words
T
TAC (Trunk Access Code) ................. 62
TAC incoming ................................... 63
TAC outgoing ................................... 62
TAM (Telephone Answering Machine) 4
TAM OFF .......................................... 67
TAM ON .......................................... 67
TAPI driver ........................................ 90
Telephone answering machine ...... 4, 47
Telephone answering machine key .... III
Telephone answering machine
on/off remotely ............................. 57
Terms of guarantee ........................... 89
Three-party conference ..................... 41
3-PTY ............................................... 41
Time ................................................. 14
Timeout .......................................... 26
Timer ............................................. 66
Toll save ........................................... 52
Transfer with disconnect .................. 65
Transferring a call ........................... 41
W
WAP ........................................... 4, 16
WAP addresses (URLs) ................. 17, 82
WAP browser ................................... III
WAP gateway ............................ 16, 26
WAP links ........................................ 17
wap.eurit.com .................................. 17
Warranty certificate ........................ 95
Wheel navigator ........................ IV, 12
Without rec ...................................... 49
U
Upper case ..................................... 12
URL (Universal Resource Locator) . 7, 43
Use current page ............................. 20
User concept .................................. 28
User key ............................. III, 13, 28
User profiles ...................................... 4
User prompt .................................... 82
UUS ................................................. 70
V
Version ............................................. 87
VIP ..................................................... 6
VIP display ................................ 11, 21
Voice messages ......................... 10, 53
Volume ....................................... 30, 81
203247441en_ba_d0
100
Internet:
www.swissvoice.net
© Swissvoice AG 2003
All rights reserved. Subject to change without notice.
203247441en_ba_d0
SV 203247441 E.099