1
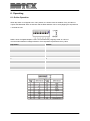
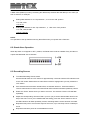
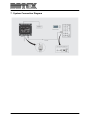
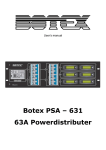
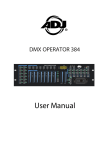
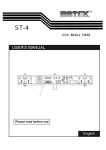
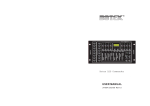
User manual
Botex X-Fade-6 II
Table of contents
1.
Safety instructions ............................................................................................................................ 3
1.1.
FOR SAFE AND EFFICIENT OPERATION ............................................................................ 3
2.
Introduction ....................................................................................................................................... 4
3.
Key features ..................................................................................................................................... 4
4.
Technical data .................................................................................................................................. 4
5.
Control Panel View ........................................................................................................................... 5
6.
Operating .......................................................................................................................................... 6
7.
6.1.
Online Operation ..................................................................................................................... 6
6.2.
Stand Alone Operation ............................................................................................................ 7
6.3.
Recording Scenes ................................................................................................................... 7
6.4.
Assigning Scenes Fade Time .................................................................................................. 8
6.5.
Setting OFF Fade Time ........................................................................................................... 8
6.6.
Setting The Total Number Of Controllable Channels .............................................................. 9
6.7.
Playing Back Scenes ............................................................................................................... 9
6.8.
Restoring Scenes .................................................................................................................... 9
System Connection Diagram ......................................................................................................... 10
2 / 11
1. Safety instructions
This device is suitable for indoor use only.
All modifications to the device will void the warranty.
Repairs are to carry out by skilled personnel only.
Use only fuses of the same type and original parts as spare parts.
Protect the unit from rain and humidity to avoid fire and electric shocks.
Make sure to unplug the power supply before opening the housing.
1.1. FOR SAFE AND EFFICIENT OPERATION
Be careful with heat and extreme temperature
Avoid exposing it to direct rays of the sun or near a heating appliance.
Not put it in a temperature bellow 41°F /5°C, or exceeding 95°F /35°C.
Keep away from humidity, water and dust
Do not place the set in a location with high humidity or lots of dust.
Containers with water should not be placed on the set.
Keep away from sources of hum and noise
Such as transformer motor, tuner, TV set and amplifier.
To avoid placing on un-stable location
Select a level and stable location to avoid vibration.
Do not use chemicals or volatile liquids for cleaning
Use a clean dry cloth to wipe off the dust, or a wet soft cloth for stubborn dirt.
If out of work, contact sales agency immediately
Any troubles arose, remove the power plug soon, and contact with an engineer for repairing,
do not open the cabinet by yourself, it might result a danger of electric shock.
Take care with the power cable
Never pull the power cable to remove the plug from the receptacle, be sure to hold the plug.
When not using the device for an extended period of time, be sure to disconnect the plug
from the receptacle.
3 / 11
Important:
Damages caused by the disregard of this user manual are not subject to
warranty. The dealer will not accept liability for any resulting defects or
problems. Make sure the electrical connection is carried out by qualified
personnel. All electrical and mechanical connections have to be carried out
according to the European safety standards.
2. Introduction
Thank you for purchasing our digital product X-Fade-6 II. You now have a premiere, hybrid 6 channel
DMX controller combining with 6 channel faders. Its compact and portable design is convenient to
mount and easy to operate.
3. Key features
USITT DMX 512 (1990) Multiplex Digital Control
Up to 6 DMX channels and 6 channel control faders
6 programmable scenes, up to 100 steps per scene possible
Fade time setting separately assignable and Master control
One preset pattern available per scene
Infrared remote control function
LED indicator on the panel to indicate the current operation
With a Junction Box 1 as power supply and DMX signal converter
4. Technical data
Powered by
Junction Box 1 (Black/White for option)
Connection
RJ45 interface
Ingress Protection Rating
IP20
Control Protocol
DMX 512 (1990)
Listing
CE certified
Operation temperature
5°C to +35°C
Dimensions (L x W x H)
85 x 85 x 15.5 mm
Weight
Approx. 630 g (Full Packing)
Packing
1 X-Fade-6 II, 1 Junction Box, 1 Remote Control, 1 User Manual
4 / 11
5. Control Panel View
Channel faders (1~6):
Used to control the output level of each corresponding fixture channel.
Master Control fader:
Used to control the overall output level for all channels 1~6 or control the master level for all scenes.
Scene buttons (1~6):
To select the corresponding programmed scene for playback.
Scene LED indicators (1~6):
These 6 LEDs detail the current fader level for scenes 1-6. The LED indicators will reflect the fader
level changes in real time.
O/P button:
To close all channels’ 1-6 output or enter/exit Recording Scene Mode.
O/P LED indicators:
To indicate if the output state is turned on or off.
Infrared sensor:
To receive signals from Infrared Remote Control.
RJ45 Interface:
To link with the Junction Box 1 via LAN cable for getting the tension and DMX output.
5 / 11
6. Operating
6.1. Online Operation
When dip switch 10 is flipped to the “ON” position, the Online mode is enabled. Every X-Fade-6 II
outputs the DMX data within 6 channels and the DMX address can be set by flipping the dip switches
1-9 inside the unit.
DMX is short for Digital Multiplex. This is a universal binary language used as a form of
communication between intelligent fixtures. Each dip switch represents a binary value.
Dip Switch
Address
1
1
2
2
3
4
4
8
5
16
6
32
7
64
8
128
9
256
6 / 11
A DMX value (address) is set by combining the different dip switches that will add up to the value you
wish to achieve, for example:
Setting DMX address for 21. Flip switches 1, 3 & 5 to the “ON” position.
1=1, 3=4, 5=16
1+4+16=21
Setting DMX address for 201. Flip switches 1, 4, 7 & 8 to the “ON” position.
1=1, 4=8, 7=64, 8=128
1+8+64+128=201
NOTE:
The operation of the dip switches will only take effect when you repower the X-Fade-6 II.
6.2. Stand Alone Operation
When dip switch 10 is flipped to “OFF” position, the Stand Alone mode is enabled. Every X-Fade-6 II
outputs the DMX data of 512 channels.
6.3. Recording Scenes
To enable Recording Scenes mode:
Press and hold down the “O/P” button for approximately 3 seconds until the LED indicator next
to the “O/P” button flashes with red. Now Record mode is engaged and you may release the
“O/P” button.
If the selected scene has been stored before, its indicator will be on. Press and hold the
“Scene” button down for about 2 seconds and all LED indicators will flash repeatedly 3 times.
Select the “Scene” button where you wish to record to. The selected “Scene” LED will flash
repeatedly.
Adjust the corresponding “Channel Fader” up to ten (10) to set the desired fader level for the
step of the scene. Once you’re satisfied with the setting, press the “Scene” button to save it.
All LED indicators will flash repeatedly 3 times, indicating that the scene has been recorded.
Repeat the last point to record more steps for the scene, up to 100 steps can be created per
scene.
Repeat the last three points to record additional scenes.
7 / 11
Once you’ve stored all of your scenes, press and hold the “O/P” button to exit. A blue LED
next to the “O/P” button illuminates to indicate that you are out of the Recording Scenes mode.
NOTE:
If 2 continuous steps have the same data, they will merge into one step automatically. The fade
time now is twice as long as before.
In Online mode you can input external DMX data to create scenes.
6.4. Assigning Scenes Fade Time
Press and hold the “Scene” button to select the scene where you wish to assign fade time to,
until its indicator is flashing.
Keep on holding the selected “Scene” button and adjust simultaneously the “Master Control
fader” up to 600s to set desired fader level.
Once you’re satisfied with the setting, release the selected “Scene” button to save it. All LED
indicators flash repeatedly 3 times.
To assign fade time for additional scenes, repeat the last three points.
NOTE:
Once you’ve saved fade time for all your scenes, please move back the “Master Control fader” to
the initial position.
6.5. Setting OFF Fade Time
Enable Recording Scene mode.
Adjust the “Master Control fader” up to 600s to set the desired level.
Once you’re satisfied with the setting, tap the “O/P” button to save it. All LED indicators will
flash repeatedly 3 times.
Exit the Recording Scene mode.
8 / 11
6.6. Setting The Total Number Of Controllable Channels
Disconnect the main power of X-Fade-6 II.
Select the channel total number which you wish to control. When using the “Channel fader 1”
the channel total which you wish to control is “1”, when using the “Channel fader 2”, the
channel total which you wish to control is “2”, the rest can be deduced and in the function, the
channel total which you can control is “6”.
Adjust the “Master Control fade” to the maximum when selecting the channel number.
Keep and hold the “O/P” button and power on the X-Fade-6 II, all LED indicators will turn on.
Release the “O/P” button and all LED indicators will flash repeatedly 3 times.
6.7. Playing Back Scenes
Only the stored scenes can be played back.
Directly tap the “Scene” button to select the scene which you wish to play back.
The Infrared Remote Control can be used to operate the X-fade-6 II.
6.8. Restoring Scenes
Power off the X-Fade-6 II
Keep and hold down the “Scene 1” button which you wish to restore and power on the main
power of X-Fade-6 II until all scenes’ LED indicators will illuminate. Then release the “Scene”
button to restore and all scenes’ LED indicators will flash repeatedly 3 times.
9 / 11
7. System Connection Diagram
10 / 11
Importer:
B & K Braun GmbH
Industriestraße 1
D-76307 Karlsbad
www.bkbraun.com
[email protected]
11 / 11