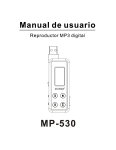
1
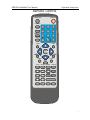
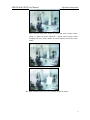
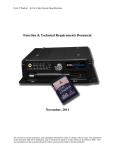
MPEG4 Mobile DVR
User Manual
1
MPEG4 Embedded User Manual
Installation Guideline
A.
Installation Environment
In order to ensure the safety with the DVR product and maximize product performance,
keep DVR product in normal condition, please notice the following remark while/ before
install the product:
a)
Please use DC12V ONLY. (DO NOT PLUG INTO HIGH VOLTAGE SUPPLY!)
b)
Away from humidly place or exposure with rain
c)
DVR should be install with horizontal position
d)
DVR should be avoid to locate in shocking place
e)
Avoid to expose DVR with direct sunshine, and away from high temperature;
f)
For the heat transfer and ventilation purpose, require at least 15cm space distance
between DVR and other object (such as wall) while install the device
B.
g)
Correct grounding for the DVR device while operating
h)
Check with the connection with other equipment while DVR operating
Other notice
a)
Do not operate the device with wet hands
b)
Away from any web place, fire hazard occur by short circuit damage by any liquid drop
to device
c)
Do not place anything on the top of device
d)
Use soft cleaner to clean the device, no chemical cleaner use here
e)
Live voltage does exist while the device is being connected with power supply, even
device off.
f)
Please disconnect the power supply while long time not using
g)
If the DVR does not operate correctly, do not disassemble it without authorization.
Contact your local agency for after sales service. The warranty will become invalid if it
is disassembled without authorization.
Remark: This device had been certified with the international safety standard.
※ HDD Size Required: Must use 40G or higher for primary Hard
Disk.
2
MPEG4 Embedded User Manual
Product Functions/ Features
l
High speed embedded CPU and real time embedded control operation system
are adapted with the product, it provide operation stability, no hang-up error,
more reliability and easy for maintain
l
Operation with front panel and remote control, security with double password
lock. System management require for authority code in order to provide safety
system
l
Using with hardware MPEG-4 encode to provide better streaming quality, it
support Full D1, 1/2D1, CIF resolution, as well as adjustable frame rate and
provide space efficiency with compact video size
l
Storage used with FAT32 format, suitable for 1IDE hard drive connections,
l
Provide multi-channels operation, such as:
u
4 channels video input capture
u
2 channel video (monitor and reply)
u
1 channel VGA output
u
2 channels audio input
u
1 channels audio output
l
4 channels alarm input with programmable setting
l
With kinds of surveillance display screen (1/4 windows per screen)
l
Time setting to activate recording system with auto switching, system
re-activate after power shut down. Alert system for any video signal loss or
disturb
l
Available for manual, time setting, alert playing, this will make the unit more
effectively and hard space efficiency. Also for the motion detect function
available with setting for 16X12(192) detect region area, with adjustable
sensitivity detect level
l
Pre-setting record function and extend alert function, in order to ensure alert
information 100% capture with user requirement
l
Available for x2 and x4 fast forward/ backward function and slow motion rate at
x1/2, x1/4 and x1/8 as well as pause and frame-by-frame function
l
PAL/ NTSC system available
l
Individual setting for each capture channel for brightness, contrast, color,
motion detect setting
l
Complete daily report for alarm record and operation record, good for monitor
record and analysis
l
RJ-45 network inlet/ outlet available for the internet function for ADSL, ISDN,
intranet, etc, setting with local IP and hosting address
l
Using IE browser for internet explorer
l
RS-485 connection for the platform decoder, available for difference frequency
setting and decoder parameter, as well as extendable function for the decode
function
l
VGA output provide better video quality and progressive scan option as well
l
Support Compact Flash card storage and IBM Microdrive disk
3
MPEG4 Embedded User Manual
l
Upgradeable with latest firmware and backup file system provide reliable
storage solution
4
MPEG4 Embedded User Manual
Back Panel
Back panel and connection outlet:
l
l
l
l
l
l
l
l
l
Audio input: provide 2 channels audio input
Audio output: 2 channels for stereo audio out.
Video input: Channel 1~4 for video signal input
Video output: 2 channels for video signal output
Alarm signal in/ out/ RS-485: 4 channels input/ output
VGA: output with external computer monitor
Internet interface
Ventilation fan for main unit
Power connection
5
MPEG4 Embedded User Manual
MPEG4 Alarm connector pin definition:
1, Pin definition:
Pin
DEF
1
IN0
2
IN1
3
IN2
4
IN3
5
IN4
6
Function
Pin
DEF
16
5COM
17
5NO
18
5NC
19
6COM
unavailability
20
6NO
IN5
unavailability
21
6NC
7
IN6
unavailability
22
7COM
8
IN7
unavailability
23
7NO
9
OUT0
unavailability
24
7NC
10
OUT1
unavailability
25
485A
485A
11
OUT2
unavailability
26
485B
485B
12
OUT3
unavailability
27
485GND
Ground
13
4COM
28-38
GND
Ground
14
4NO
39-44
+12V
+12V
15
4NC
Channel 1 Alarm
input
Channel 2 Alarm
input
Channel 3 Alarm
input
Channel 4 Alarm
input
Channel 4 Alarm
output
Function
unavailability
Power fault report
output
Fault report output
6
MPEG4 Embedded User Manual
Operation Instruction
Remote Control
LOGI N/ LOCK
POWER ON
PLAYBACK
1
2
3
4
5
6
7
8
9
+
0
QUAD
PARAMETER
ANALOG
ZOOM+
ZOOM-
FOCUS-
FOCUS+
EXI T
AUTO
RECALL PRESET SWI TCH
PLAY
SLOW
CF
FWD
REV
NET
RECORD
STOP
F1
F2
SET UP
F3
F4
7
MPEG4 Mobil DVR User Manual
Operation Instruction
Remote Control Key Definition/ Function:
1, Numeric Key
[0-9] Keys: Numeric, for number key-in or video swapping. For non-menu screen, 1, 2, 3
and 4 represent for the video channel 1, 2, 3 and 4 respectively;
[+], [-]Keys : Use for volume control, or while checking can play as next/pervious page,
even changing some parameters for configuration;
2, Menu Operation
,
: Up, Down directional keys;
,
: Left, Right directional keys;
[ENTER] Key: Confirm OR Time display while in monitor mode;
3, P/T/Z Control Key
Key
[Zoom In +], [Zoom Out -]
[Brightness +], [Brightness -]
[Focus +], [Focus -]
[Auto]
[Manual]
[Default]
[Window Wiper/Lighting]
Definition
Zooming adjustment
Brightness adjustment
Image Sharpness adjustment
Auto Mode activate
Manual Adjustment Platform
Use with Default configuration
Control with window rain wiper and lighting
5, Other Key Definition:
[POWER ON]
System turn on and off (Standby and Start)
[LOGIN/
Login to enter to operate mode with require password and lock
LOCK]
KEY
current setting activate.
[CHECK]
Checking with record information store inside of hard drive;
[QUAD]
Stop recording to swap between 1-4 screen
[PARAMETER]
Display the parameter for each channels (ONLY APPLY FOR TEXT
BASED UI) [NOT FOR THE GUI]
[ANALOG]
Stop the recording and while in signal channel screen, press this
button to adjust the color, brightness. Contrast, Hue, sensitivity
level, follow with: color → brightness → contrast → Hue → MD
(Motion detection) sensitivity.
[ using “+” and “–“ make the adjustment]
[EXIT]
Goes to the previous step in the menu
[PLAY]
Starts and pauses playback (still image is displayed)
[SLOW]
Plays slower than normal speed
[PAUSE/STEP]
Stops the playback mode/Frame playback
[CF]
While CF Card inserted, this button can activate for the CF function,
[FWD]
Fast forward, X2, X4 speed available, [play] for resume at normal
play
[REV]
Fast backward, X2, X4 speed available, [play] for resume at normal
play
[LANGUAGE]
Spared button , no use
[NET]
Spared button, no use
[RECORD]
Login with Administrator first , press this button to activate 4 manual
8
MPEG4 Mobil DVR User Manual
Operation Instruction
record, or for single channel monitor system, can activate 1 manual
record
[STOP]
Login with Administrator first, press this button to stop manual
recording
[SETUP]
Setup with system configuration and parameters
[F1]
Time select while in playback mode
[F2]
P/T/Z control function
[F3]
Press this button to setup the Mask area while in surveillance mode
[F4]
While in monitor system, swap with BNC/ VGA output
9
MPEG4 Mobil DVR User Manual
Operation Instruction
System Start-up/ Shut down
1, System Start up
Connect with DC power with 12V.
After the system in standby mode, press the [ON/OFF] button in remote control, the red light
will be turn off, then monitor will be activate to show as 4-channel windows status, there will
be channel number to indicate each input signal. Also on the top of screen will show the
system time, number of hard disk and CF card status also show in center of the screen (there
would be alert warning for no hard disk install), all of the information only shown on the
screen for 5~6 seconds; There will be count down from 100 to 0 second (shown in red color
font), the system will be locked up after the count down to 0 second.
Notice: If the device being set for timer record function, there are no need for standby status
after the system turn on, the system will go to multi-channel screen;
2, System Login
While the system being lock-in status, require to press [Login/Logoff] button in front panel or
remote control, then the screen will have pop-up window “Unit ID: *****, Unit ID: 000” (the
sub-menu will shown as bellow) then user need to select desire unit ID, there will be
“Password required:” then user required key in login password to enter into system; (Only
accept for User password or Administrator password)
1)
While user password key is correctly, there will be shown as message “USER
PASSWORD CORRECT”, then user can enter into restrict functional / feature level with
the device. (Default password is: 00000000)
2)
While Administrator password key is correctly, there will be shown as message “ADMIN
PASSWORD CORRECT”, then administrator can enter into all functional / feature level
with the device. (Default password is: 88888888)
Remark: There will be difference with administrator and user level authorization:
-
User can only playback all exist file, however, can not stop with the recording,
neither to getting record setup or changing; While administrator can use with all
10
MPEG4 Mobil DVR User Manual
Operation Instruction
those setup features;
-
While password key is correctly, the count down timing (shown in top right corner)
will change from red to green color; this would indicate access with difference
operation. There will be 100 seconds operation time allow after every key-in button
being pressed before system locked; User will be require to re-enter password to
back to operation level once the “LOCK” indicator shown in top right corner;
-
Must key-in unit ID and password to enter into operation system while in LOCK
status;
3.
System Logoff
Press [Login/Logoff] button in front panel or remote control after the record stop, the
system will go into standby mode.
Remark: Please make sure the system status is in standby mode before power off. Avoid
any improper operation in here; please do not power off the machine while recording/
playback/ system setting;
11
MPEG4 Mobil DVR User Manual
Operation Instruction
Operation Instruction
I. Administrator Operation Instruction
I. Setup Operation Instruction
When the administrator enters into the setup manual, the screen will show following
menu selections: System; Quick Setup; Schedule; Event Setup; PTZ;
[Left], [Right] navigates the items and choose item by pressing the [Enter] or [Menu]
button.
[ESC] takes back to the Channel Monitor screen.
i.
“System”: Enter into this item, and the screen will show as below:
1.
Date/ Time: highlight with this item and enter into it:
u
Date: DD/MM/YYYY; => (DD=Date; MM=Month; YYYY=Year)
u
Time: HH/MM/SS; => (HH=Hour; MM= Minutes; SS= Second);
u
Date Mode: in two options: dd/mm/yyyy or yyyy/mm/yy. Just moves
the cursor on it and press [ENTER] button to change.
u
Weekend Start: From Sunday to Monday;
u
Weekend End: From Sunday to Monday;
u
Press [Apply] or [ENTER] button when exiting to the NORMAL
RECORDING screen to save current selections.
2.
Unit ID: changing the ID from 000 to 999, this ID used for the login
identification, while user operate more than 1 unit at the same time, so that
this ID good for using remote control with many DVR;
3.
Video Type: select this into two options: “PAL” and “NTSC”, then press [Apply]
to confirm,
the video type is depend on your local country format, and it can not be
changed while record is being proceed.
12
MPEG4 Mobil DVR User Manual
4.
Operation Instruction
Audio Record: sets whether or not to record audio. It can not be changed
while record is being proceeding.
5.
HDD O/W: select this into two options: “ON” and “OFF”, When “ON” being
selected, this will allow recording continuously even the hard disk space full up,
and the video will be recording into FIFO (“First-In-First-Out”) format; when
“OFF” selected, which disable the recording function while the hard disk space
full up;
6.
HDD Format( This function only can be used in host machine): this will
allow to format the hard disk drive while non-recording status, while this option
being selected, selected with [STAR] and press [Apply] to confirm this function;
WARNING: ONCE THE HARD DISK FORMAT BEING PROCEED, ALL DATA
WILL LOST FOR THIS HD!!! AND THE FILES CANNOT BE RECOVERING.
PLEASE BE SURE BEFORE PROCEED.
7.
Network: highlight and select with “Network” to login setup, then select the
required area:
When using the Internet, you connect to servers in other locations, receive
information and exchange emails using an IP address. You can’t get access to
the Internet without an IP address.
u
Setup “IP address”: enter the Host ID, which ranges from 0 to 255.
Setup “Mask”: subdivides the local network and makes each subnet
into a different network (remote network). It defines the size of one
network (number of IPs included). The address assigned as the Subnet
Mask address is limited.
u
Setup “Gateway”: is the IP address that is assigned to a router
connection the Internet and local network. It is a channel to connect a
local network with an assigned network ID to the Internet. In general,
the next number of the local network is assigned.
u
Setup “ MAC Address”: set the default MAC address of your internet
IP address;
8.
“Security”: Select this into two options: “YES” and “NO”, when “NO” being
selected, this will allow to enter into “SETUP” function directly. When “YES”
being selected, there will be “password required” then user required key in
login password to enter into system; (Only accept for User password or
Administrator password)
u
User Password: The User authorities can only access monitoring and
playback. The default is “000000”. When the user password is set to
“YES”, the screen is locked, and users can only access monitoring and
playback.
u
Admin Password: The Administrator authority can access all
functions. The default is “88888888”.
9.
Default Setup: select this item, select this into two options: “Cancel” and
“Apply”, when “Cancel” being selected, this will allow canceling to recover
default settings. When “Apply” being selected, this will sure to recover default
settings.
ii.
“Quick Setup”: Enter into this item, and the screen will show as below:
13
MPEG4 Mobil DVR User Manual
1.
Operation Instruction
Name: select this and press “enter”, then the screen will show as below. Using
the remote control to move the cursor to “Back space” and press “enter” to
delete the before name, then move the cursor to select and press “enter” to
key-in the name. Finish to key-in and press “Apply” to confirm to setup the
company name. And press the “Exit” key to back previous manual. (On Internet:
directly use your PC keyboard to setup it)
2.
Quality (Image Quality): From 1 to 8 levels, 1 is the best quality. Using the
cursor to select and press [APPLY] to confirm this function,
3.
Camera Num: Setup how many camera (1-4) to record.
4.
Rate (fps): Setup the recording frame rate.
5.
Time Insert: to setup whether to display the time in the screen. “Off”: no
display, “Upper”: to display the time on the top of the screen, “Bottom”: to
display the time at the bottom of the screen.
6.
Mask Enable:
”ON”: allow to setup the mask area.
”OFF”: not to setup the mask area.
u
Once Mask enable, you will enter into Mask area setup screen, and you
can see that there are white block (as start point) appear in screen:
14
MPEG4 Mobil DVR User Manual
Operation Instruction
Then you can move your cursor to select the cover section (Press
“Enter” to place the point; Minimum 3 points need to place, after
complete the cover areas, double –press the “Enter” to form the cover
areas)
u
Mask setting can be into other irregular shape as shown:
15
MPEG4 Mobil DVR User Manual
7.
Operation Instruction
One-Step Schedule, Period1, Period2:
setup the “Date”, “Zone 1”, and “Zone 2”, after confirm to setup [Quick Setup]
and the DVR will auto-record follow this setup.
8.
Time Schedule Record: Select this into two options: “ON” and “OFF”, “ON”:
to record by schedule, “OFF”: not to record by schedule. then press [APPLY] to
confirm,
9.
Alarm Record: Setup whether to record, at the same time “Event Schedule” in
[Schedule] menu will changed.
iii.
“Schedule”: Enter into this item, and the screen will show as below:
1.
Schedule Record: This menu is to set the recording conditions by channel and
time schedule. When you set the Schedule Record in “Quick Setup” and change
the setting value in this menu, the new setting replaces the previous setting.
2.
Event Record: This menu is to set the detailed event recording conditions. It
is necessary to set the “Event Record” menu to “YES” in “Quick Setup” to
enable the DVR to record events, after the recording conditions are set.
iv.
“Event Setup”: Enter into this item, and the screen will show as below:
16
MPEG4 Mobil DVR User Manual
1.
Operation Instruction
Sensor: This menu is to set the presence and types of input sensor. The
sensors support two types: Normal Open (N.O) and Normal Close (N.C.). This
indicates the status of recording conditions. If you set the recording conditions
only to All Ch, “Macro Setup” is displayed. If you change any one of the
individual sensor settings, “Customer Setup” is displayed.
ALL CH: Sets all sensors to the same conditions. Select from Off/ N.O./ N.C.
and press the “Apply” button.
2.
Motion Detection:
Sets all cameras to the same conditions. Select from OFF/ NR/ AR.
Sets the CH MD Area: You can directly set the MD Area on the screen. Press the
“AREA” button, and a setup window divided into 64 cells (8 by 8) is displayed.
Select the desired MD Areas using the arrow buttons, and sets MD sensitivities
from 1 to 16 levels. (1 is the highest sensitivities.).
The area set the MD is red
out and press the “Submit” button. After setting, press the “CLOSE” button,
and you go to the previous menu.
3.
Timing Setup: Setup the “Post Record Time”, “Post Alarm Time” and “Buzzer
Alarm Time”.
v.
“PTZ”: Enter into this item, and the screen will show as below:
17
MPEG4 Mobil DVR User Manual
1.
Operation Instruction
All CH: When move to this Item, setup the Protocol, Baud Rate, PTZ ID and
press [Apply] button. It’ll set all channels into the same PTZ.
Protocol: select difference protocol at: Fast Dome; PIH016-017; Dscp; Pelco-P;
Pelco-D; Pelco06-15.
u
BaudRate: select difference protocol at: 1200; 2400; 4800; 9600.
u
PTZ ID: select difference ID at: 00-64.
u
Select [Test] button and the screen will in a single play mode, the
[House control] also show at upper of the screen. Using the remote
control or front panel to control the platform:
: For up direction;
For Right direction;
: For down direction;
, For Left direction;
:
Zoom +; Zoom -: For Zooming adjustment;
Brightness +; Brightness -: For brightness adjustment;
Auto: Auto Mode activates;
CH1 (1-4): when move to this item, it can only setup the PTZ ID of the
1CH.
Remark: The parameter of “Protocol”; “BaudRate”; “PTZ ID” must the
same as the setting of connection P/T/Z.
II. Playback Function Instruction:
After administrator login and press [Check] button
of the remote control and the screen will show following menu selections: Playback;
Event Log; System Info:
1.
Playback: Select this item and press [Enter], the screen will show as below:
18
MPEG4 Mobil DVR User Manual
u
Operation Instruction
All Record: Select the date and time, press [Start], the right screen
will show as below:
For example:
“Date”: show the date you select;
Date highlight with Yellow color: express there are recording data
in these days;
Date with Blue color: the cursor location to allow to select;
“1”; the channel number
“Streamin”: the channel name:
“00:00-00:30”: the record data start and end time;
“M”; the record mode :( M: manual record; A: Alarm record; R: Timing
record.)
“HD1”: the picture resolution. (HD1, CIF);
“30”: the framerate;
19
MPEG4 Mobil DVR User Manual
n
Operation Instruction
For playback selected record data, simply press “Enter” in select
sections, and it will playback the video data;
n
While in playback, press [F1] button of the remote control, the
screen will show following selection:
Time 00:00-00:00
n
Start
Return
This menu is for searching time and playing the data of a specified
time. (From the starting time of the data saved. To the closing time
of the data saved.)
n
u
Press [Exit] button to close search mode.
Alarm Record: Select this item then the right screen will show the
alarm record data. Select one of these events and press [Start] to
playback.
u
Event Log: Select this item and press [Enter], the screen will show as
below:
Alarm Log: record the recently alarm information
Operate Log: record the recently operation setting information.
u
System Info:
20
MPEG4 Mobil DVR User Manual
Operation Instruction
n
Channel Info: it’ll show all channels status in this manual
n
Hard Disk Info: it’ll show all HD information in this manual
n
Machine Info: it’ll show the machine’s ID No.; Serial No.; and the
software version No...
III.
Operator Operation Instruction
when the operator enters into the device, there are only “playback” view available,
Section Ⅱ in this manual.
IV. Compact Flash Card Upgrade and Operation Instruction
i.
Compact Flash Card Upgrade:
1.
Using the PC to make the Compact Flash card format into FAT32 format;
2.
Then copy the upgrade firmware directly into CF Card root directly.
3.
Insert the Compact Flash card into CF Slot before device power on;
4.
Press [ON/OFF] button without release while switch on the power;(the ON/OFF
button is inside of the unit as below , if you need to upgrade the DVR, you must
open the cover of the unit).
21
MPEG4 Mobil DVR User Manual
5.
Operation Instruction
Within 2~3 seconds the LED light (SYS and POWER) flashing and that mean
upgrading in progress; (While the LED light flashing, release the [ON/OFF]
button.)
6.
Upgrading would take approx. 1 minute and both LED will stop flashing once
upgrading completed;
7.
ii.
Turn off the device and then remove the Compact Flash card from the slot;
8. Restart the device and the new software should be operated;
Compact Flash Card Backup:
In order to copy the data from hard disk into Compact Flash card, please follow the
procedures as:
1.
Insert the Compact Flash card into CF Slot before device power on;
2.
Power on the device and stop all recording activity;
3.
Pressing [CF card] button in remote control or front panel, this will allow to
copying all require information and data into Compact Flash card;
4.
Re-Pressing [CF card] button in remote control or front panel, this will stop
copying;
iii.
[F1] operation instruction:
The menu is for time select while in playback mode.
iv.
[F2] operation instruction:
In the main surveillance mode, change it into a single play mode, and press [F2]
button into the platform control menu:
v.
1.
,
Up, Down directional keys;
, : Left, Right directional keys; press
[Enter] button to back to the normal status.
2.
[Zoom +]; [Zoom -]: for zooming adjustment.
3.
[Brightness +]: [Brightness -]: for brightness adjustment.
4.
[Auto]: for auto mode activates.
[F3] “Mask area setting” operation instruction: this function is for mask area
22
MPEG4 Mobil DVR User Manual
Operation Instruction
setting. After login then changed the main screen into a single play mode. Press [F3]
button to startup the mask setting, press [Enter] button, there is a piece of White
Square on the screen, using the directional key to move it and press [Enter] button,
when 4 points of white square being produce there will be made up the region for
the coverage setting area. Press [Enter] button to confirm the setup and press [ESC]
to back to surveillance mode.
vi.
[F4] VGA function operation instruction:
In surveillance mode, press the [F4] button of remote control to swap with BNC /
VGA output: follow with Video output → VGA1 → VGA2 → VGA3. There are three
types of VGA output to apply to different VGA standard.
23
MPEG4 Mobil DVR User Manual
vii.
Item
System
Technical specification data:
Device
Parameter
UI Language
User
Interface
Security
Video Input
Video Output
Video
Audio
Digital
Processing
and
Storing
Alarm
Video
Display
Video
Standard
System
Resource
Audio Input
Audio Output
Basic output
S/N
Recording
Format
Compression
Encoding
Image
Resolution
Video
Standard
Audio
Standard
Video Freq.
Audio Freq.
Audio Size
Rate
Video Size
Rate
Storage
Image
Quality
Max Frame
Rate
Data capture
Motion
Detect
Input
Output
Com port
Operation Instruction
Alarm mode
Serial Port
Serial Port
Network port
Internet
Protocol
Specification / Details
English
Icon operation interface (OSD menu)
User level password, administrator password
4 channels independent input with 1.0Vp-p,75Ω BNC
2 PAL/NTSC output with 1.0Vp-p,75Ω BNC; composite video signal
1 VGA output
1/2/4 windows per screen
PAL:
25 frames per second CCIR625 lines 50 Hz
NTSC: 30 frames per second CCIR525 lines 60 Hz
Real time recording with 1/4 channel playback and surveillance
1/4 channel online real time surveillance
2 channel input,L, R Channels 600Ω RCA
2 channel output, 600Ω RCA
1.0—2.2V
≤-30dB
Synchronous with video
MPEG1 LAYER2
MPEG-4/H.264 Variable encode rate \ Fixed encode rate
D1: 704x576 pixels for PAL
CIF: 352x288 pixels for PAL
D1: 704x480 pixels for NTSC
CIF: 352x240 pixels for NTSC
ISO14496
ISO11172
6.25K-350Kbyte/s
24Kbyte/s
6.25K-250Kbyte/s
28.8Mbyte/hour
22.5M-1260Mbyte/hour
22.5M-900Mbyte/hour
1IDE hard disk,support 200G or larger
8 Adjustable levels
25 frames/ sec/ channel
Bi-directional
Independent setting with each channel, with 192 detect region for
each channel and adjustable motion sensitivity
4 independent input channels
4 independent alarm output (2 voltage output,2 open switch with
output at 12VDC,500MA)
Open / Short
RS485,extendable with external modem
RS232,common serial port
RJ-45 10M/100M broadband port
Support TCP/IP, UDP/IP
24
MPEG4 Mobil DVR User Manual
Others
Transfer
mode
Brower
Power
Consumption
Working
Temperature
Working
Humidity
Mechanical
Dimension
Weight
Clock
Operation Instruction
Dial-up, ADSL, ISDN, internet, intranet
IE browser
DC 12V±20%,
3A, 15W(without hard disk)
0~50℃
≤80%
180(L)x265(w)x125(H)
2.9KG(Without hard disk)
Build-in system clock and calendar
25