1
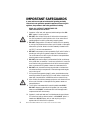
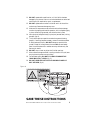
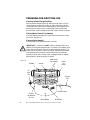
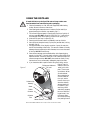
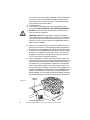
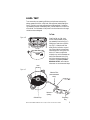
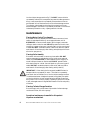
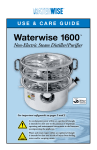
USE & CARE GUIDE
Waterwise 1600
™
Non-Electric Steam Distiller/Purifier
See important safeguards on pages 2 and 3
An exclamation point within an equilateral triangle
is intended to alert user to the presence of important
operating and maintenance instructions in the literature
accompanying the appliance.
Flame and steam vapor within an equilateral triangle
is intended to alert user to risk of injury from boiling
water and/or escaping steam.
IMPORTANT SAFEGUARDS
A person who has not read and understood all operating and safety
instructions is not qualified to operate this appliance. When using this
appliance, always adhere to basic safety precautions including:
READ ALL INSTRUCTIONS BEFORE USE.
FOR HOUSEHOLD USE ONLY.
1. Operate on a flat, level, well-supported, stable heating surface. DO
NOT operate in a moving vehicle.
2. DO NOT allow children to be near Distiller without close supervision. Boiling water will scald if spilled on skin. Warn other users of
possible dangers from boiling water and/or escaping steam.
3. DO NOT change position or location of Distiller while it is operating
or cooling. Wait at least one hour after a cycle is finished or interrupted
before moving Distiller. Water in the boiler assembly is heated to boiling (212° F) and can cause severe burns.
4. DO NOT remove water coolant tray assembly (fig. B) while Distiller is
operating or cooling. Boiling water or steam can cause severe burns.
Let cool at least one hour after a cycle is finished or interrupted before
removing water coolant tray assembly.
5. DO NOT place near the edge of a surface where Distiller can be bumped or pulled down on someone. If continuous collection kit is used, be
sure collection tubing is positioned so that Distiller cannot be pulled
down on someone. Boiling water or steam can cause severe burns.
6. DO NOT touch hot surfaces. Always use potholder or insulated oven
mitt when handling hot components. Collector/storage container gets
very hot during use.
7. During continuous operation (page 6), caution should be taken when
removing the boiler fill spout cap (fig. B) to refill boiler or check boiler
water level. Use potholder or insulated oven mitt to remove this cap.
8. Allow Distiller and collector/storage container to cool at least one hour
after a cycle is finished or interrupted. Boiling water or steam can
cause severe burns.
9. This Distiller is recommended for use with potable water ONLY.
DO NOT attempt to make safe drinking water from non-potable
water sources. DO NOT use salt water as this will damage certain
components and will void warranty.
10. Operate in a well-ventilated area. Provide adequate air space (at least
6-8 inches from walls or cabinets) when in use. DO NOT place in a
heated oven. DO NOT place, store, or stack anything on top or
against sides of Distiller while in operation.
2
Waterwise 1600 Steam Distiller/Purifier Use & Care Guide
11. DO NOT operate after a malfunction, or if the Distiller has been
damaged in any manner. Return to an authorized dealer or authorized
service facility for examination, repair, or replacement.
12. DO NOT operate without water in the boiler and in all three of the
coolant trays. Permanent damage may occur.
13. Make sure all components are secure and that the collector/storage
container is properly positioned for operation, with its dispensing plug
in place, collection plug removed, and collection tube in place.
14. Vent cap should always be loosely in place (not jammed down) during
operation (fig. B).
15. This Distiller requires no special care other than general cleaning
(page 8). If servicing becomes necessary, contact an authorized dealer
or authorized service facility. DO NOT attempt to repair distiller
yourself. Except for boiler grommet, there are NO user serviceable
parts. Unauthorized service or maintenance may void warranty. See
warranty for details.
16. DO NOT drop or insert any object into Distiller openings.
17. When collector/storage container is cooling at the end of a cycle, leave
one plug loose to prevent vacuum buildup.
18. For best water quality, DO NOT FILL BOILER ABOVE THE
“MAXIMUM FILL” LEVEL (fig. C).
19. DO NOT OPERATE DISTILLER IF WARNING LABEL IS
NOT AFFIXED (fig. A).
Figure A
SAVE THESE INSTRUCTIONS
Waterwise 1600 Steam Distiller/Purifier Use & Care Guide
3
PREPARING FOR FIRST TIME USE
Cleaning Collector/Storage Container
Sanitize collector/storage container by adding 6 ounces (180 ml) of 3 percent hydrogen peroxide and filling with hot water. Seal collector/storage
container with both collection and dispensing plugs. Shake vigorously. Let
stand twenty minutes and drain. Rinse thoroughly with purified water.
Wipe outside of collector/storage container with a clean, soft cloth or sponge.
Cleaning Water Coolant Tray Assembly
Rinse tray assembly thoroughly with warm water. Wipe trays with a clean,
soft cloth or sponge to dry.
Cleaning Boiler Assembly
Rinse thoroughly with warm water and dry carefully.
IMPORTANT: Use special care NOT to bend or damage collection cup
assembly or floating stainless steel screen. The collection cup assembly must
remain level so distillate can flow into the collector/storage container. The
screen floats on the water in the boiling chamber, preventing boiling water
from splashing into the collection cup and contaminating the distillate.
Operating Distiller with no screen or with a damaged screen will degrade
effectiveness of Distiller and quality of distillate.
Water Coolant
Tray Assembly
Figure B
Tray Baffle
Vent Cap
Coolant
Tray
Handle
Fill
Spout
Cap
Collection
Tube
Flexible Connector
Fill Spout
and “Maximum
Fill” Level
Boiler Assembly
4
Boiler Handle
Waterwise 1600 Steam Distiller/Purifier Use & Care Guide
USING THE DISTILLER
Discard the first two cycles of purified water as it may contain some
harmless matter from manufacturing and/or packaging.
1. Place boiler assembly on a flat, level, well-supported, stable heating
surface. Be sure to center on heat source.
2. Place floating stainless steel screen in bottom of boiler carefully to
prevent bending the collection cup assembly (fig. C).
3. Fill boiler with approximately 4 liters (slightly more than 1 gallon) of
ordinary water. DO NOT exceed “MAXIMUM FILL” level, the horizontal edge at the top of the opening inside of the fill spout (fig. C).
4. Make sure fill spout cap is in place (fig. B).
5. Securely position water coolant tray assembly onto top of boiler.
6. Vent cap should always be loosely in place (not jammed down) during
operation (fig. B).
7. Pour approximately 1 liter (slightly more than 1 quart) of water into
each of the three water coolant trays. This amount of water will totally
submerge the tray baffles at the outer diameter, but not near the center
of the tray. DO NOT overfill trays.
8. Place collector/storage container beside boiler with dispensing plug
securely in place (fig. F). Securely attach collection tube to boiler using
flexible connector. Collection tube must run at a downward slope into
collector/storage container. DO NOT place container directly on any
heat source or on any surface easily damaged by heat or hot water.
9. If you have other tasks to perform while using the Distiller, use the
Digital Timer (inFill Spout and “Maximum
cluded) to alert you
Fill” Level
when cycle is comFigure C
plete. Timer counts
up and down. When
you activate heat
source at beginning
of the first distillation cycle, set the
timer to count up to
Collection Cup
when the collector/
Assembly
storage container is
full (about 72 minScreen
utes using a 2600
Flexible
watt electric stovetop
Connector
burner or 8900 Btu/
hr gas burner). Use
this time to deterCollection
mine correct starting
Tube
time, setting timer to
Rubber Grommet
Waterwise 1600 Steam Distiller/Purifier Use & Care Guide
5
count down. Distiller will produce distillate for a short time after heat
source is turned off so recommended timer setting is about five minutes less than actual cycle time. See Digital Timer Operating Instructions (packaged with timer) for details.
9. Activate heat source.
10. Close supervision is necessary when this or any appliance is used
near children. BOILING WATER CAN CAUSE SEVERE BURNS.
11. DO NOT touch hot surfaces. Use potholder or insulated oven mitt
when handling hot components.
WARNING: DO NOT change position or location of Distiller or
remove water coolant tray assembly (fig. B) while Distiller is operating
or cooling. Boiling water or steam can cause severe burns. Let cool at
least one hour after a cycle is finished or interrupted before removing
water coolant tray assembly.
12. When timer is correctly set, alarm will sound at completion of cycle. To
prevent vacuum buildup in collector/storage container, place collection
plug loosely into opening while cooling. Insert plug securely after cooling.
13. At the end of the cycle, DO NOT handle Distiller or collector/storage
container until completely cooled (at least one hour). During continuous operation, caution should be taken when removing fill spout cap
(fig. B) to refill boiler or check boiler water level.
14. If continued operation is desired, refill boiler through fill spout, refill
the three water coolant trays, exchange collector/storage container, and
reset timer. Always use potholder or insulated oven mitt when handling
hot components. If no further operation is desired, let cool (at least one
hour). Discard remaining water from coolant trays and boiler. Rinse
and dry carefully prior to storage. This ensures efficient operation and
reduces mineral deposit buildup and possible corrosion. DO NOT remove
collection cup assembly from boiler as this may cause the grommet to
become damaged, or it may cause the collection cup assembly to become
bent so that distillate will not flow into the collector/storage container.
Figure D
Collection
Opening
Collector/Storage Container
6
Timer
Waterwise 1600 Steam Distiller/Purifier Use & Care Guide
LEVEL TEST
To ensure maximum operating efficiency and optimum water quality,
always operate Distiller on a flat, level, well-supported, stable heating surface. If Distiller is not level, performance may be impaired. If collection
cup assembly has been inadvertently bent, purified water will not flow out
of the boiler. Purified water will drip back into the boiler and not through
collection tube as designed.
To Test:
Figure E
Pull Up
Place Distiller on a flat, level
surface. Remove water coolant
tray assembly from boiler (fig. E).
Slowly pour water into collection
cup (fig. F). Water should flow
evenly around collection cup and
out of the collection tube without
overflowing and running into the
boiler. If it does not, adjust the
collection cup so that the water can
easily flow downward out of the
cup to the collection tube (fig. F).
Collection cup assembly MUST
REMAIN LEVEL and collection
tube must run at a downward slope
Level
Figure F
Collection Tube
(ensure downward
slope)
Collection
Opening
Collection Cup
Waterwise 1600 Steam Distiller/Purifier Use & Care Guide
Dispensing
Plug
7
into the collector/storage container (fig. F). DO NOT remove collection
cup assembly. Removal of this component may cause the rubber grommet to
be cut, or may cause collection cup assembly to become bent so that the
purified water will not flow downward into the collector/storage container.
The collection tube is sealed to the boiler with a grommet, which may
become damaged if the collection cup assembly is removed or if the boiler is
inadvertently allowed to run dry. A spare grommet is included.
MAINTENANCE
Cleaning Water Coolant Tray Assembly
Rinse water coolant tray assembly with warm water to remove any loose
residue. As scale deposits build up, use an approved cleaner, such as
KLEENWISE, to remove mineral deposits. White vinegar or automatic
coffee pot cleaner can also be used. DO NOT operate Distiller with cleaning solution in water coolant trays. Use a soft plastic or nylon scouring pad
if needed. DO NOT use abrasive cleaners, caustic acids, steel wool pads or
metal utensils. Rinse thoroughly after cleaning and wipe trays with a clean
soft cloth or sponge to dry.
Cleaning Boiler Assembly
Rinse boiler with warm water to remove any loose residue. DO NOT
remove components. As scale deposits build up inside, use an approved
cleaner, such as KLEENWISE, to remove deposits. White vinegar or automatic coffee pot cleaner can also be used. DO NOT operate Distiller
with cleaning solution in boiler. Use a soft plastic or nylon scouring pad if
needed. DO NOT use abrasive cleaners, caustic acids, steel wool pads or
metal utensils. Rinse thoroughly after cleaning and dry carefully.
IMPORTANT: When cleaning boiler use special care NOT to bend or
damage collection cup assembly or screen. The collection cup assembly
must remain level so distillate can run into the collector/storage container.
The stainless steel screen is designed to prevent boiling water from splashing into the collection cup and contaminating the distillate. Screen must
be in place for unit to function properly. Operating Distiller with no screen
or with a damaged screen will degrade effectiveness of Distiller and quality
of distillate.
Cleaning Collector/Storage Container
Rinse thoroughly with purified water. Wipe outside of collector/storage
container with clean, soft cloth or sponge.
Operational maintenance is essential for this product
to perform as advertised.
8
Waterwise 1600 Steam Distiller/Purifier Use & Care Guide
HEAT SOURCE OPTIONS
NOTE: Altitude and ambient conditions may affect performance of
Distiller on all energy sources. Read all instructions before use. Use this
Distiller only as intended and as described in this Use & Care Guide.
Energy Considerations
In the U.S., the average cost per gallon to operate this Distiller is approximately $0.32 per gallon for electric burners, and $0.10 per gallon for gas
burners. Cost will vary with local energy pricing and depending on the
efficiency of your burner or hot plate.
Electric Stove/Burner/Hot Plate
When operated on a typical large stove burner (2600 watt electric at
240 volts, or 8900 Btu/hr gas burner), the Distiller will produce a 3 liter
(3.18 qt) batch in 72 minutes. When operated continuously, the Distiller
will produce about 60 liters (16 gal) in 24 hours. With lower voltage or
lower gas Btu output, the cycle time will increase accordingly.
Natural/LP Gas
When using an extremely large natural or propane gas burner, it is possible
that a high flame setting may hinder performance or cause an open flame to
come up around the side of the boiler and damage the boiler handles. In
this case, the gas can simply be turned down (see Troubleshooting on
page 11).
Wood/Coal
When operating on a wood, coal or open fire, Distiller must sit on a flat,
level, well-supported, stable surface. Close monitoring is recommended
during operation. Be sure boiler and water coolant tray assembly are properly filled especially during continuous production.
IMPORTANT: Unit WILL NOT perform on induction type heat sources.
WARNING: To prevent personal injury, burn and/or scalding, DO NOT
change position or location of Distiller or remove water coolant tray
assembly (fig. B) while Distiller is operating or cooling. Boiling water or
steam can cause severe burns. Let cool at least one hour after a cycle is
finished or interrupted before removing water coolant tray assembly.
Waterwise 1600 Steam Distiller/Purifier Use & Care Guide
9
HELPFUL TIPS
• Discard the first two cycles of water as they may contain some harmless
matter from manufacturing and/or packaging.
• DO NOT use collector/storage container to store liquids other than purified water. Liquids other than purified water may transfer a taste or odor.
• If you have other tasks to perform while operating Distiller, take the
timer with you so that the alarm at the end of the cycle can be detected.
The boiler, like other cookware, should never be allowed to boil dry.
All cooking safety rules apply to this product and should be observed.
Close supervision is necessary when this or any appliance is used near
children.
• Usually the water coolant trays will have enough water to last a complete
cycle. In some cases, depending on heat source, the lower water coolant
tray(s) may run out of water before the end of the cycle. If that happens,
refill tray(s) as needed.
• When using an electric stovetop with a shiny reflector under the burner,
there is a large loss of energy from the burner if the reflector is soiled or
dull. Keep these reflectors shiny or replace them to save energy and to get
a higher burner output.
• Periodically place the boiler on a flat surface and pour a little water into
the collection cup at a slow rate to simulate distillate flow. Water should
drain downhill out of the collection cup and to the outside of the boiler
without overflowing cup. If it doesn’t, the collection cup assembly has
been inadvertently bent (see Level Test on page 7).
• Periodically check vent cap on top of water coolant tray assembly. Vent
cap should be loose so it can rattle up and down a little; it should not be
jammed down tightly onto the top tray.
• All components, especially the boiler, should dry out when not in
operation. Removal of fill spout cap during storage will allow the entire
machine to dry out.
• This Distiller is a precision built instrument and should be treated as
such. DO NOT stack heavy weights on it, or otherwise bend or distort
any of the components. All parts must be in place for maximum operating efficiency and performance.
10
Waterwise 1600 Steam Distiller/Purifier Use & Care Guide
TROUBLESHOOTING
Problem
Possible Cause
Solution
No water production.
Heat source not activated.
Not on flat, level, wellsupported, stable heating
surface.
Little or no water in boiler.
No downhill slope from
collection cup to collector/
storage container.
Activate heat source.
Stabilize heating surface.
Low/cool heat source.
Turn up heat, or move to
larger burner or heat
source.
Check collection cup and
downward flow (page 7).
Slow water production.
Inadequate downhill slope
from collection cup to collector/storage container.
Slow water production.
(Steam leaks from boiler
or water coolant trays
and/or excessive steam
from collection tube.)
Water has unusual
taste.
Water or steam spurting
from collection tube or
between water coolant
trays.
Too much heat.
Vent cap too tight.
Water coolant tray
assembly not properly
seated on boiler.
One or more water coolant
trays out of water.
Fill boiler (fig. C).
Check collection cup and
downward flow (page 7).
Turn down heat.
Allow unit to cool, loosen
vent cap.
Cool down unit, seat
evenly on boiler.
Fill the water coolant
tray(s).
The boiler has been
overfilled.
Boiler screen not in place.
Boiler not thoroughly
cleaned and rinsed.
Collector/storage container needs cleaning.
DO NOT overfill boiler
(fig. C).
Place screen in boiler.
Clean and rinse (page 8).
Heat source too high/hot.
Vent cap jammed down
tightly onto top of water
coolant tray assembly.
Reduce heat to complete
cycle. When unit has
cooled, remove vent cap
and replace it loosely.
Clean collector/storage
container (page 8).
Contact qualified service personnel for repair if above troubleshooting tips fail.
Waterwise 1600 Steam Distiller/Purifier Use & Care Guide
11
WARRANTY REGISTRATION CARD
Please fill out and return the enclosed registration card or register online at
http://www.waterwise.com/customers/customers.asp
Registration will not affect warranty coverage, but may expedite processing of your
warranty. Registration is the only way to guarantee you will be notified by Waterwise
of any issues that arise concerning this product.
OWNER’S LIMITED WARRANTY
Waterwise warrants, to the original purchaser, all stainless steel parts against defects in
materials and workmanship, for a period of three (3) years from the date of purchase.
Defects or failures due to shipping/handling, improper use or maintenance, including
abuse or neglect, normal wear, water conditions, accidents, alterations or modifications, or unauthorized repair are specifically excluded from this warranty. No dealer,
distributor, agent, representative, or other person is authorized to extend or expand this
warranty.
Waterwise is not responsible or liable for personal injury, property damage, or incidental or consequential damages arising out of, or in connection with, the use or performance of the product or other damages with respect to loss of use, or costs of removal,
installation, or reinstallation.
Waterwise will, at its option, replace or repair the defective part(s) without charge,
provided they are returned, transportation prepaid by owner, to an authorized service
facility or to the address below. Enclose a letter describing the problem, copy of dated
proof of purchase, and your name, address and daytime telephone number.
This limited warranty does not guarantee uninterrupted service. Repair or replacement as provided under this warranty is the exclusive remedy of the purchaser. This
limited warranty is in lieu of all other warranties, expressed or implied, including, but
not limited to, any implied warranty of merchantability or fitness for a particular use
or purpose. This warranty gives you specific legal rights and you may also have other
rights which vary from state to state or province to province.
Outside the United States, a different warranty may apply. For details, please contact
your authorized Waterwise distributor.
3608 Parkway Blvd • Leesburg Florida 34748-9399 • (352) 787-5008 • Fax: (352) 787-8123
www.waterwise.com • E-mail: [email protected]
© 2001 Waterwise Inc
Printed in USA
Form 16801 • Rev 07/06