1
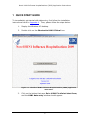
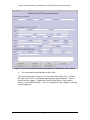
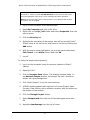
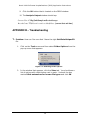
Novel H1N1 Influenza Hospitalizations (2009) Application Instructions
INTRODUCTION
This guide covers the steps necessary to install, enter data, import data, and
export data from the Novel H1N1 Influenza Hospitalizations (2009) application
including Epi InfoTM installation and troubleshooting tips.
INSTALATION REQUIRNMENTS FOR H1N1 APPLICATION:
1. You must have full folder permissions and appropriate administrative
rights (computer administrator) for directories where Epi InfoTM files
are stored.
2. You must have Epi InfoTM 3.5.1 (or later version) installed and
functioning on your workstation. Epi Info™ is a CDC-based disease
outbreak and surveillance tool. If you do not have Epi InfoTM 3.5.1
installed, go to Appendix A for installation instructions.
Installing H1N1 Influenza application, H1N1_Clinical
1. Download the H1N1_Clinical.zip file to your local drive from
phConnect website.
2. Unzip the H1N1_Clinical.zip file to the Epi InfoTM folder,
C:\Epi_Info.
Note: This is usually accomplished by right-click on the Zip
file, and selecting an ‘Extract All…’ option from the pop-up
menu that appears.
3. Open My Computer from the Windows XP desktop.
a. Double-click on the My Computer icon from the Windows XP
desktop to open it.
4. Open the C: drive
a. Click on C: drive to display folders and files
5. Navigate to the H1N1_Clinical folder
a. Click on the C:\Epi_Info folder
b. Click on the H1N1_Clinical folder
6. Send H1N1 Shortcut to desktop
a. Right click on the shortcut, Shortcut to H1N1 Clinical
b. select Send To from the pop-up menu that appears
c. and then select Desktop
1
Novel H1N1 Influenza Hospitalizations (2009) Application Instructions
7. Navigate to Source folder
a. Click on Source folder from C:\Epi_Info\ H1N1_Clinical
\Source
8. Register control GetGlobalUniqueID.WSC in the windows
operating system
a. Right-click on the file GetGlobalUniqueID
b. Select the Register option.
(See Appendix B - Troubleshooting if you have questions).
Figure 1-3: Registering the Global Unique ID WSC control
Note: This file must be registered before the global unique ID
system will work. Failure to register this file may cause serious
problems with the Pandemic Influenza system. If you receive
errors upon attempting registration, you may need a system
administrator to take this step for you.
9. Start the H1N1 Application from Desktop Shortcut
a. Go to Windows XP desktop
b. Double-click on the icon Shortcut to H1N1 Clinical to start the
application
2
Novel H1N1 Influenza Hospitalizations (2009) Application Instructions
1 QUICK START GUIDE
To immediately get started with data entry, first follow the installation
instructions found in Appendix A. Then, please follow the steps below:
1.
Display the Windows XP desktop.
2.
Double-click on the Shortcut to H1N1 Clinical icon.
Figure 2-1: The Novel H1N1 Influenza Hospitalizations (2009) application
main menu.
3.
Click on the button that says Go to H1N1 Flu clinical short form,
and the H1N1 data entry window should appear.
3
Novel H1N1 Influenza Hospitalizations (2009) Application Instructions
Figure 2-2: The Novel H1N1 Influenza Hospitalizations (2009) data entry window.
4.
You may begin entering data at this point.
The screen pictured in figure 2-2 is the main data entry form. On the
left side of the form is a sidebar that displays page numbers. There
should be four pages: Reporting, Medical care facility, Vaccination
History, and Medical history. You may navigate to each page by clicking
on the page title.
4
Novel H1N1 Influenza Hospitalizations (2009) Application Instructions
Figure 2-3: The page navigation window of the Novel H1N1 Influenza Hospitalizations
(2009) data entry screen.
The buttons that are pictured in figure 2-2 take you to separate data entry
forms. These separate forms are linked to the form you see by each record’s
Unique ID. You can see each record’s Unique ID number by looking at the
top right corner of the screen.
To create a new record, click the New button that appears on the middle-left
sidebar of the data entry window. You may also search for existing records by
clicking the Find button on the sidebar, or by navigating to Edit > Find from
the menu bar. The Find and New buttons are both pictured in Figure 2-3.
You do not have to manually save each record. Data is saved as it is entered.
Figure 2-4: The record navigation panel
The user may move forwards and backwards through all the records in the
database by clicking the arrows in the record navigation panel. The record
navigation panel is pictured in figure 2-4, and appears at the lower left corner
of the Enter Data window. The double-arrows take the user to the first or last
record in the database, while the single-arrows move the user one record
forwards or backwards. Alternatively, the user may type a record number into
5
Novel H1N1 Influenza Hospitalizations (2009) Application Instructions
the number box and press the Enter key, which will then take them directly to
the record with that number.
2 EXPORTING THE DATA
The data from the system can be exported into two different formats: One for
the next higher level and one the Centers for Disease Control and Prevention.
The distinction is important, as one format may exclude some data that the
other format does not, and vice versa. Notice that the “higher level” and
“CDC” feed forward option exists for each form – the long form and the short
form.
To access the data export function, open the main menu of the Novel H1N1
Influenza Hospitalizations (2009) application and navigate to Feed
forward/Export from the main navigation menu.
Figure 3-1: The feed forward / export menu
Select Feed forward to next higher level from the menu pictured in figure
3-1. After several seconds, the Analysis module will open and begin executing
a series of pre-written scripts. No user action should be necessary during
processing. After the records processing is complete, a dialog box will appear.
The path and file name of the exported data will be shown as seen in figure 32.
Figure 3-2: The message stating that the data has been exported successfully, along
with the location on the computer where the data can be found.
6
Novel H1N1 Influenza Hospitalizations (2009) Application Instructions
In order to open the file that was just exported, attach the file to an email, or
copy the file to a thumb drive, you will need to navigate to the
FeedForward/STATE folder. This folder can be accessed by navigating to My
Computer, opening the C drive, opening the Epi_Info folder, clicking on the
H1N1_Clinical folder, the FeedForward folder, and then finally the STATE
folder. Inside of this folder, you will find the file you just exported. Figure 3-3
shows the location of the file relative to My Computer.
Figure 3-3: The relative location of the exported data when the ‘Feed forward to state’
option is selected.
The process works identically when selecting the Feed forward to CDC
option shown in figure 3-1, except for the location where the file is exported.
Instead of being placed into the STATE folder, it will be placed in the CDC
folder.
3 IMPORTING DATA
Data is imported into the Novel H1N1 Influenza Hospitalizations (2009)
application by navigating to Merge/Import from the menu bar and selecting
Merge External Data. Make sure to only merge data for the appropriate
form; you shouldn’t attempt to merge a short form with a long form. Upon
7
Novel H1N1 Influenza Hospitalizations (2009) Application Instructions
selecting this option, a window appears asking you to select a file to import.
Select the file you wish to import and click Open. You should only import
data that was exported from the Novel H1N1 Influenza Hospitalizations (2009)
application as part of a feed forward to higher level (see section 2 above).
The import process will copy all records from the file you selected to the Novel
H1N1 Influenza Hospitalizations database. To verify the import process
worked, click the button that says Go to H1N1 Flu clinical short form or Go
to H1N1 Flu clinical long form, depending on the type of import you
conducted. When the Enter module appears, you should see additional
records in the record count, signaling that the import process appended those
records successfully. If the file you imported had 20 records in it, the last 20
records in the Enter module will be those records.
The import process may be run multiple times in order to import as many
external data sets as needed.
APPENDIX A—Installing Epi Info
1. INSTALLATION
Part 1: Installing Epi Info™ 3.5.1
1. Open your web browser and navigate to http://www.cdc.gov/epiinfo,
and follow the links to download Epi Info™ version 3.5.1.
2. When prompted, save the installation file to your desktop.
3. Double-click on the file that you just downloaded to start the Epi
Info™ installation process.
Warning: Do not modify any of the default installation options. Modifying
the installation options, including the installation directory, has been known
to cause errors in Epi Info™.
Note: If you receive error 1720 upon installation, see Appendix B,
problem 2 for trouble-shooting tips.
Part 2: Granting Folder Permissions
After installation is complete, full folder permissions must be set for your
account. If this step is not taken, then you may experience recurring
errors during normal program operation.
8
Novel H1N1 Influenza Hospitalizations (2009) Application Instructions
Note: System administrators should be familiar with the concept of folder
permissions. Failure to grant Full Permissions to each account that will be
using the application may cause in error messages and other problems.
Note: If the account that will be using Epi Info™ is an administrator account,
then Part 2 may be skipped.
1. Log in to the computer as an administrator
2. Open My Computer and click on C: drive
3. Right-click on the Epi_Info folder and select Properties from the
pop-up menu
4. Click the Security tab
5. Highlight the username of the person who will be using Epi Info™.
If their name is not on the list, add them to the list by clicking the
Add button
6. With the user's name highlighted, put a check mark underneath
Full Control in the Allow column and click OK
7. Log off
To verify the steps worked properly,
1. Log in to the computer using the account selected in Step 5
(above)
2. Open Epi Info™
3. Click the Analyze Data button. The Analysis module loads. In
the Analysis Output window, the phrase "Epi Info" should be
written on a gray background.
4. Click 'Read (Import)' from the command tree.
5. A READ window appears with options for Current Project, Data
Formats, Data Source, and a selection window, with six buttons at
the bottom of the window.
6. Click the Change Project button
7. Select Sample.mdb from the list of files that appears and click
OK
8. Highlight viewOswego from the list of views
9
Novel H1N1 Influenza Hospitalizations (2009) Application Instructions
9. Click the OK button that is located on the READ window.
10. The Analysis Output window should say:
Current View: C:\Epi_Info\Sample.mdb:viewOswego
Record Count: 75 (Deleted records excluded) Date: [current date and time]
APPENDIX B – Troubleshooting
1.
Problem: How can I be sure that I have the right GetGlobalUniqueID
file
1. Click on the Tools menu and then select Folder Options from the
pop-up menu that appears.
Figure 1-1: Selecting Folder Options
2. In the window that appears, click the View tab. You should see a
list of options with check boxes next to each. Uncheck the box
marked Hide extensions for known file types and click OK.
10
Novel H1N1 Influenza Hospitalizations (2009) Application Instructions
Figure 1-2: Turning on file extensions
3. From the My Computer window, double-click on C: to open the C
drive of the computer.
4. Navigate to the Source folder,
C:\Epi_Info\H1N1_Clinical\Source.
5. You should see the file GetGlobalUniqueID.WSC.
11
Novel H1N1 Influenza Hospitalizations (2009) Application Instructions
Figure 1-3: Registering the Global Unique ID WSC File
2.
Problem: I am receiving ‘Error 1720’ when I attempt to install Epi Info™.
My computer meets all of the system requirements, and I have Windows
XP Service Pack 3. What is happening, and what can I do to fix this
problem?
Solution: This is a somewhat common installation error that is the result
of an installer script not being packaged with the newest Epi Info™ 3.5.1
installer. To fix this, you must take the following steps:
1. Uninstall any existing copies of Epi Info™ by navigating to the
Windows Control Panel and selecting the Add/Remove Programs
tool
2. Download and install Epi Info™ version 3.3.2 from
ftp://ftp.cdc.gov/pub/software/epi_info/epiinfo332/Setup.exe
3. Uninstall Epi Info™ 3.3.2 by going to the Windows Control Panel
and selecting the Add/Remove Programs tool
4. Install Epi Info™ version 3.5.1
3.
Problem: I cannot complete Step 1 of the installation because the Epi
Info™ installation file will not download to my computer.
12
Novel H1N1 Influenza Hospitalizations (2009) Application Instructions
Solution: In some cases, corporate or government firewalls prohibit
access to the File Transfer Protocol (FTP), which is the protocol used to
download the Epi Info™ installer. In other cases, the CDC’s file server
may be experiencing problems.
Several solutions exist:
1. Try downloading the file again at a later time.
2. Try downloading Epi Info™ from the WHO website. The WHO
website does not use FTP, but rather the more popular and wellsupported HTTP protocol. See
http://www.who.int/chp/steps/resources/EpiInfo/en/index.html
for a download link. Note: The version of Epi Info™ offered at this
URL is a slightly older version.
3. Try the web installation of Epi Info™ by downloading
ftp://ftp.cdc.gov/pub/Software/epi_info/epiinfo343/SetupWeb.exe
. Note: The version of Epi Info™ offered at this URL is a slightly
older version.
4. Users may order an Epi Info™ 3.5.1 CD-ROM from a list of
vendors at http://www.cdc.gov/epiinfo/vendors.htm.
5. Talk to your network administrator about allowing Internet access
to the File Transfer Protocol.
4.
Problem: I am receiving a “Not a valid Win32 application” when trying to
install Epi Info™.
Solution: This error is displayed when the Epi Info™ download failed to
complete or was terminated prematurely (for example, the computer lost
power during the download). Please try downloading the file again. If the
problem repeats itself, please try several of the solutions listed for problem
#3.
APPENDIX C – General Questions
1)
Question: Can I run Epi Info™ on Linux or a Macintosh computer?
Answer: Not directly. At this time, Linux and Macintosh are not
supported by Epi Info™ 3.5.1. A full list of supported operating systems
for the latest supported version of Epi Info™ can be found at
13
Novel H1N1 Influenza Hospitalizations (2009) Application Instructions
http://www.cdc.gov/epiinfo. Note that using emulators or “virtual PCs”,
users may be able to run Epi Info™ on other operating systems, but this
practice is not officially supported by the CDC.
2)
Question: I want to learn more about how to use Epi Info™. Where
can I go for additional training and instructions?
Answer: Several excellent resources exist to help users become
familiar with the Epi Info™ suite of tools.
Built-in Tutorials: Two tutorials come with every copy of Epi Info™.
They can be accessed by navigating to Help > Tutorials from the main
Epi Info™ menu screen.
Comprehensive Tutorials: In addition to the built-in tutorials, Epi Info™
has two comprehensive tutorials available for download at
http://www.cdc.gov/epiinfo/tutorials.htm. These are offered in both
PDF and DOC format and cover almost every aspect of the program.
User Manual / Help File: The Epi Info™ help file acts as the program’s
user manual. It contains information on every function of the
application. It can be accessed two different ways: First, by navigating
to Help > Contents from the main Epi Info™ menu screen, or clicking
the Help button on any dialog box or window.
Community Discussion Forum: Many how-to questions can be answered
at the Epi Info™ Community of Users discussion forum. Please see
http://forums.myepi.info. Note: This website is not administered by the
CDC or the US Federal Government.
3)
Question: Our office has several Spanish-speaking personnel who are
conducting data entry for the Pandemic Influenza form. Is there a way
to translate the Epi Info™ user interface to Spanish?
Answer: Yes. Epi Info™ is available in Italian, Russian, Spanish and
English. Please see http://www.cdc.gov/epiinfo/translations.htm for the
translation files and instructions on how to install those files.
4)
Question: Does our office need a license to install or use Epi Info™?
Are there any restrictions on how many copies we can install? Are there
any legal issues we should be aware of before using Epi Info™?
Answer: Although “Epi Info™” is a CDC trademark, the programs,
documentation, and teaching materials are in the public domain and
14
Novel H1N1 Influenza Hospitalizations (2009) Application Instructions
may be freely copied, distributed, and translated. There is no license
required to download, install or use Epi Info™.
15