1
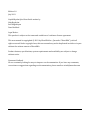
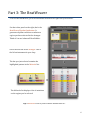
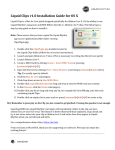
LIQUID RHYTHM Quick Start Guide v1.0 Edition 1.0 July 2013 Liquid Rhythm Quick Start Guide written by Haig Beylerian Saro Migirdicyan Dave Beckford Legal Notices This product is subject to the terms and conditions of a software license agreement. This user manual is copyrighted © 2013 by WaveDNA Inc., (hereafter “WaveDNA”), with all rights reserved. Under copyright laws, this user manual may not be duplicated in whole or in part without the written consent of WaveDNA. Product features, specifications, system requirements and availability are subject to change without notice. Document Feedback We are constantly looking for ways to improve our documentation. If you have any comments, corrections or suggestions regarding our documentation, please email us at [email protected] From everyone at WaveDNA, welcome to Liquid Rhythm and thank you for supporting our software. To get started quickly, click Help > Load Demo Beat in Liquid Rhythm’s menu bar to load a demo beat in Liquid Rhythm (be sure to save any work you already have open). Tip: Please consult the information on this page before reading on. It will help you proceed with clarity. Introductory Liquid Rhythm Notation Crash-‐course These diamonds are notes. These bars show a note’s velocity level. These shapes are called BeatForms. The notes above them dictate their color and number of subdivisions. This larger layer is called a BarForm. It consists of groupings of two or three. A Color Map of Liquid Rhythm Use this as a reference if you have difficulty locating any of the panels discussed in this guide. 2 Part 1: The ReGroover We’ve loaded a beat so let’s get right into some of the fun features. We’ll start with the ReGroover, a powerful midi remixer – it instantly rearranges the patterns in your music. Press the [spacebar] to play the beat in the Arranger. Press it again to stop playback. Make sure to playback the beat before and after you apply ReGroover to hear the effects. The panel that runs along the bottom contains the Molecule Tools. Access the ReGroover tool by clicking the Molecule Tools’ title bars to hide them… … Or click-‐and-‐drag the scroll bar to navigate to it. Make sure the ReGroover is active (indicated by an ‘x’). In the Arranger, select any region by clicking on it, or multiple regions by holding [command]/[ctrl] while clicking. Then, press the Up and Down arrows or the Red and Blue patterned images to apply the ReGroover. Try selecting different combinations of instruments in your arrangement – for example, ReGroove the snares on their own, or the kick drums, or a combination of hi-‐hats, kicks, and snares, and so on. 3 Part 2: The Beat Builder See that panel on the right? That’s the Beat Builder. Click any region in the Arranger to activate it. Use it to quickly insert one bar rhythm patterns into the Arranger. Try clicking any pattern in the BarForm List to swap it into the region(s) you have selected in the Arranger. TIP: You can right-‐click any pattern on this list and add it to the Favorites list. Click Similar to show results in the BarForm List closely related to the region you have selected. 4 The BeatForm Tumbler contains a list of potential variations on each beat in the pattern selected in the above BarForm List. When a region(s) is empty, all the tumblers will be greyed as in the image to the right. Click a pattern to activate it, and note how your selections here appear in the region(s) you’ve selected in the Arranger. TIP: Double-‐click a pattern to deselect it. By default, the purple (8th note), dark and light blue (two 16th), and three shades of red (16th note triplets) patterns populate this list. Click any to insert it into the pattern above. 8th 16th 16th triplet Click any of the arrows on the left side of the BeatForm Tumbler to quickly assign the adjacent pattern across the entire bar. 5 Part 3: The BeatWeaver To access the BeatWeaver, press the BW button located on the right side of the tool bar. See that other panel on the right, that’s the BeatWeaver Rhythm Synthesizer. It generates rhythm variations on whatever region you have selected in the Arranger. Think of it as an ‘advanced’ Beat Builder. Select the first bar in the Arranger. This is the hi-‐hat instrument in your loop. The bar you just selected contains the highlighted pattern in the Molecule list. = The Molecule list displays a list of variations on the region you’ve selected. Tip: A Molecule is one 4/4 bar of music divided into 8ths. 6 Click the Molecule below the currently highlighted one insert it into the selected region. Press the [spacebar] to hear the difference. to = Use this technique to quickly swap a rhythm pattern with a single click. Let’s suppose you really want triplets ( ) on the 6th space in the molecule. Click the arrows above the Molecule list to cycle through note groupings in those spaces. Click this arrow… … to select the Molecule with a triplet on the 6th eight note in the bar. Experiment by selecting different bars in the Arranger, and use the BeatWeaver to explore different patterns for the instruments in your loop. Tip: To show or hide the BeatWeaver panel, press the [Tab] key. 7 Part 4: Accent Modifiers The Accent Modifiers are located on the far left of the Molecule Tools panel. Use them to make Velocity and Groove adjustments to multiple notes within multiple regions in the Arranger simultaneously. Now, select multiple regions in the arranger by holding [command]/[ctrl] and clicking on them. The vertical sliders affect velocity. The horizontal sliders affect groove. Hover your mouse over a slider and notice how both the slider and the affected notes in the selected regions turn bright yellow. Use this visual aid to keep track of what notes you’re affecting the velocity and/or groove of. Click-‐and-‐drag any handle to resize a slider. Velocity and groove values will be humanized accordingly. 8 Thank you for working through our Quick Start Guide. If you’d like any more information on the topics covered in this document, please consult the Liquid Rhythm User Manual. -‐WaveDNA 9