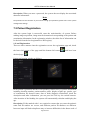
1
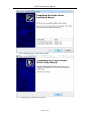
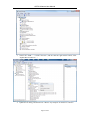
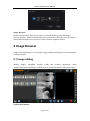
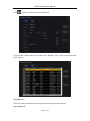
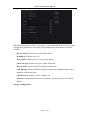
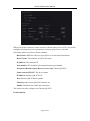
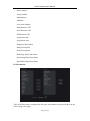
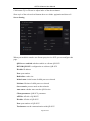
User Manual F100 ORFC Software V2.0 Version 1.0 About this Manual P/N: 11.54.0008 Release Date: July 2013 © Copyright Fussen Technology Co., Ltd. 2013. All rights reserved. Authorized Representatives: Well Kang Limited Statement The User Guide for F100 includes information on the devices as well as their usage. We recommend that you thoroughly familiarize yourself with this Guide in order to make the most effective use of your system. User’s operation failing to comply with this manual may result in malfunction or accident for which Fussen Technology Co., Ltd. (hereinafter called Fussen) can not be held liable. Fussen owns the copyrights of this manual. Without prior written consent of Fussen, any materials contained in this manual shall not be photocopied, reproduced or translated into other languages. Materials protected by the copyright law, including but not limited to confidential information such as technical information and patent information are contained in this manual, the user shall not disclose such information to any irrelevant third party. The user shall understand that nothing in this manual grants him, expressly or implicitly, any right or license to use any of the intellectual properties of Fussen. Fussen holds the rights to modify, update, and ultimately explain this manual. Responsibility of the Manufacturer Fussen only considers itself responsible for any effect on safety, reliability and performance of the equipment if: Assembly operations, extensions, re-adjustments, modifications or repairs are carried out by persons authorized by Fussen, and The electrical installation of the relevant room complies with national standards, and The instrument is used in accordance with the instructions for use. Upon request, Fussen may provide, with compensation, necessary circuit diagrams, and other information to help qualified technician to maintain and repair some parts, which Fussen may define as user serviceable. I Terms Used in this Manual This guide is designed to give key concepts on safety precautions. WARNING A WARNING label advises against certain actions or situations that could result in personal injury or death. CAUTION A CAUTION label advises against actions or situations that could damage equipment, produce inaccurate data, or invalidate a procedure. NOTE A NOTE provides useful information regarding a function or a procedure. II Table of Contents 1 Safety Guidance.......................................................................................................................... 1 1.1 Intended Use .................................................................................................................... 1 1.2 Warnings and Cautions................................................................................................... 1 1.2.1 Safety Warnings.................................................................................................... 2 1.2.2 General Cautions.................................................................................................. 2 1.3 List of Symbols ................................................................................................................. 3 2 About the Manual ........................................................................................................................ 4 2.1 Application of the Manual ............................................................................................... 4 2.2 Applicable Object ............................................................................................................. 4 2.3 Legend and Name ........................................................................................................... 4 3 Summary ...................................................................................................................................... 5 3.1 System Feature Overview .............................................................................................. 5 3.2 Work conditions (suggestion)......................................................................................... 6 4 Installation .................................................................................................................................... 6 5 Install the driver by manual ................................................................................................. 16 6 Disable driver signature enforcement on Win 8 ................................................................... 20 7 Basic check operation .............................................................................................................. 25 7.1 Boot and login system ................................................................................................ 26 7.2 Patient Registration ....................................................................................................... 28 7.3 Capture images .............................................................................................................. 30 7.4 Exit ................................................................................................................................... 31 8 Examination management ....................................................................................................... 32 8.1 work list ........................................................................................................................... 32 8.2 Registration..................................................................................................................... 35 8.3 Study list .......................................................................................................................... 36 8.4 Remote List..................................................................................................................... 39 9 Image Browser ............................................................................................................................. 40 9.1 Image editing .................................................................................................................. 40 9.2 Image Browse ................................................................................................................ 46 10 Image acquisition ....................................................................................................................... 47 11 System Management ................................................................................................................. 48 11.1 System Management .................................................................................................. 49 11.2 study management ...................................................................................................... 57 11.3 User Management ....................................................................................................... 59 12 Maintenance ............................................................................................................................ 60 13 Warranty and Service ............................................................................................................. 61 13.1 Warranty........................................................................................................................ 61 13.2 Contact information ..................................................................................................... 61 I ORFC Software User Manual 1 Safety Guidance This chapter provides important safety information related to the use of ORFC Software. 1.1 Intended Use Digital intraoral x-ray imaging system is intended for dental radiographic examination and diagnosis of diseases of the teeth, jaw, and oral structures. The device is to be operated and used by dentists and other legally qualified professionals. The system is intended to be used in hospitals and clinics by trained personnel under the direction of doctors. The system is intended for adult patients,but paediatric and pregnant women with caution。 1.2 Warnings and Cautions In order to use the software safely and effectively, and avoid the possibility of system failure, firstly be familiar with the operation method of Windows, and read the user manual in detail and be sure to be familiar with the proper operation method of ORFC Software and sensor. The following WARNING and CAUTION precautions during the operation of the system must be paid more attention to. NOTE: 1. This system is not intended for home use. 2. The pictures and windows in this manual are for reference only. Page 1 of 62 ORFC Software User Manual 1.2.1 Safety Warnings WARNING 1. Failure to follow the safety instructions for operating the instrument and system could endanger the patient. The manufacturer accepts no liability for damages resulting from improper use. 2. The system should be installed by qualified service engineers. Do not switch on the power until all cables have been properly connected and verified. 3. The user should get professional training and read this manual in detail before using the system. 4. This system is not intended for treatment. 5. Do not move the main unit or the monitor while working. 6. Only accessories supplied or recommended by the manufacturer can be connected to the system. 1.2.2 General Cautions CAUTION 1. Do not bend or press the CD. 2. Keep the CD away from direct sunlight and high temperature. Otherwise, the CD may become deformed. 3. Do not touch the disk surface of the recorded side. If the surface becomes contaminated with any foreign substance such as fingerprints, reading data may be impossible. 4. Clean the CD with a disk cleaner. Do not use organic solvents such as acetone. 5. This CD-ROM disk is not an audio CD, and can not be played with an audio CD player. 6. Avoid liquid splash and excessive temperature. The temperature must be kept between 5 ºC and 40 ºC during operation. 7. Do not use the system in a dusty environment with bad ventilation or in the presence of corrosive. Avoid vibration. 8. Do not handle the CD while smoking or eating. 9. Do not get the CD wet. Page 2 of 62 ORFC Software User Manual 1.3 List of Symbols Caution Consult Instructions for Use Type BF Device The sensor is a Type BF device. Recycle Part Number Serial Number Date of Manufacture Manufacturer The symbol indicates that the device complies with the European Council Directive 93/42/EEC concerning medical devices. Authorized Representative in the European Community The symbol indicates that the device should be sent to the special agencies according to local regulations for separate collection after its useful life Page 3 of 62 ORFC Software User Manual 2 About the Manual 2.1 Application of the Manual The manual mainly introduces functions of the ORFC Software and the way to operate it. Before the use of this software, please read the manual of the devices that connected to this software carefully. This manual is designed for the clinics that using ORFC Software. It provides work-flow of a patient study. Mostly, it’ll introduce the operation steps, system structure and features. Attention, there’s no guideline and assistant for clinic diagnosis. 2.2 Applicable Object The manual is applicable to clinical professionals and other authorized users. 2.3 Legend and Name All legends provided in the manual are just for examples. All names shown in examples and legends are imaginary. It is coincidence if somebody happens to have the same name with that in the manual. Page 4 of 61 ORFC Software User Manual 3 Summary 3.1 System Feature Overview ORFC Software consists of several modules, each of the different modules perform specific functions which enabling patients to check the process and provide an effective diagnostic imaging data: Patient management: to be checked, registration, have been checked, mainly for patient information management; Check: film, tooth marks, mainly for photographic examination; Image View: processing, display, layout, tools, mainly for image viewing and processing; Remote List: View the remote client has checked the patient's image, mainly for browsing remote terminal patient images; Configuration: system management, inspection management, user management, password changes, mainly for system configuration. Software features case management 1) Case management functions: including patient information, check information and image management; 2) DICOM3.0 standard Work list inquiry service available from HIS/PACS clinical data query and download. 1) 2) 3) 4) 5) 6) 7) 8) 1) 2) 3) 4) image acquisition digital photography functions; sensor configuration parameters; Restart sensor-driven; Real-time automatic window width and position adjustment; real edge enhancement; Select the mirror and rotate depending on the placement; to display patient information/check information/device information/image information. The number of images that can be stored in the system in real time tips. image processing window width and position adjustment; positive and negative film conversion, image scaling, translation, mirroring, rotation, magnifying glass display; to select a region of interest of the original display, full screen display, histogram display , window width and position adjustment; image annotation features, including orientation and text. Page 5 of 61 ORFC Software User Manual image output 1) DICOM3.0 standard archiving service, the image archive to the server, support background automatically sent; 2) image backup, the backup image to CD/DVD, the disc comes with a backup browser automatically play back images. 3) image export, you can export the patient examination to the specified location, supporting DCM, DCMDIR, JPG and BMP, supports standard formats and compression formats. 3.2 Work conditions (suggestion) Environmental Conditions 1> Ambient temperature: 5℃~40℃ 2> Relative humidity: ≤80% 3> Atmospheric pressure: 700hPa~1060hPa Supply conditions 1> Voltage: AC 220V ± 22V 2> Frequency: 50Hz ± 1Hz 3> resistance: ≤ 0.3Ω 4> Power: not less than 0.6 (1 +10%) kVA PC operation platform 1> CPU: Intel central processor, ≥ 2.0GHz 2> Memory: ≥ 2G 3> Hard disk:≥ 500G, (according to the specific circumstances of storage space expansion) 4> Display: Resolution 1280X1024, aspect ratio: 4:3 5> Operating System: Window XP, Window NT, Win7 4 Installation 1. Unzip the file “Fussen_ORFC_Setup.zip”. 2. Run the “Fussen_ORFC_Setup3.3.0.1.exe”. A warning dialog will show if you run on windows 7. If that please choose “yes”. 2.1 Choose the setup language, and then click “OK”. Page 6 of 61 ORFC Software User Manual 2.2 Welcome page, please click “Next >” 2.3 Select destination location, and then click “Next >” Page 7 of 61 ORFC Software User Manual 2.4 Select start menu folder, and then click “Next >” 2.5 Select additional tasks, and then click “Next >” Page 8 of 61 ORFC Software User Manual 2.6 Ready to install, and then click “Install” 2.7 Installing the DTFC Page 9 of 61 ORFC Software User Manual 2.8 At the end of Installation of DTFC, the sensor driver will be installed. 2.8.1 Choose setup language, and then click “OK” 2.8.2 Welcome page, and then click “Next >” Page 10 of 61 ORFC Software User Manual 2.8.3 Select destination location, and then click “Next>” 2.8.4 Select start menu folder, and then click “Next >” Page 11 of 61 ORFC Software User Manual 2.8.5 Ready to install, and then click “Install” 2.8.6 Installing the Fussen sersor driver Page 12 of 61 ORFC Software User Manual 2.8.7 Welcome page of device driver install, and then click “Next >” 2.8.8 Install page, please do not click “Cancel” Page 13 of 61 ORFC Software User Manual 2.8.9 If install the sensor driver on windows 7, a dialog about windows security will show up, please choose “Install this driver software anyway”. PS: The dialog windows security will show up twice. 2.8.10 Completing page, and then click “Finish”. If installed successfully, the completing page looks like next picture. Otherwise the driver installed unsuccessfully. Page 14 of 61 ORFC Software User Manual 2.8.11 Completing page, and the click “Finish”. 2.9 Completing page, and the click “Finish”. Page 15 of 61 ORFC Software User Manual 5 Install the driver by manual If the sensor driver install unsuccessfully, then a manual installation should be needed. How to install the sensor driver by manually? Please follow next steps: 1. Press the key “win” and the key “R” at the same time, Run dialog will show up. 2. Input “devmgmt.msc”, and then press key “Enter” or click “OK”. Then the device manager window will show up. Page 16 of 61 ORFC Software User Manual 3. Choose the “USB < - > Serial Converter”, and the click the right mouse button, select “Update Driver Software…” 4. Update driver dialog, and then choose “Browse my computer for the driver software”. Page 17 of 61 ORFC Software User Manual 5. Choose the location of the driver file, and then click “Next” If install the sensor driver on windows 7, a dialog about windows security will show up, please choose “Install this driver software anyway”. Page 18 of 61 ORFC Software User Manual 6. Completing page 7. Choose another “USB < - > Serial Converter”, and do step 3 - 6 again. 8. After install “USB < - > Serial Converter”, there are two “USB Serial Port”. You should Choose them and do step 3 - 6 to install. If successes, there are two “Dental X-Ray Sensor Port(COMXX)” in the Ports(Com &LPT) and two “FUSSEN USB Serial Converter X” in Universal Serial Bus controllers of the device manager. Page 19 of 61 ORFC Software User Manual 6 Disable driver signature enforcement on Win 8 If install the sensor driver in windows 8, you should disable driver signature enforcement first, then you can install it like in widows 7. https://learn.sparkfun.com/tutorials/disabling-driver-signature-on-windows-8/disabling-signe d-driver-enforcement-on-windows-8 How to disable driver signature enforcement? Please follow next steps: 1. Hold down the Windows key on your keyboard and press the letter C to open the Charm menu, then click the gear icon (Settings). Page 20 of 61 ORFC Software User Manual 2. Click More PC Settings. 3. Click General. 4. Under Advanced Startup, click Restart Now. Page 21 of 61 ORFC Software User Manual NOTE: In Windows 8.1, the ‘Restart Now’ button has moved to ‘PC Setting -> Update & Recovery -> Recovery.’ 5. After restarting, click Troubleshoot. 6. Click Advanced Options. Page 22 of 61 ORFC Software User Manual 7. Click Windows Startup Settings. 8. Click Restart. Page 23 of 61 ORFC Software User Manual 9. After restarting your computer a second time, choose Disable driver signature enforcement from the list by typing the number 7 on your keyboard. Your computer will restart automatically. 10. After restarting, you will be able to install the Arduino drivers normally; however, Windows will display a warning message. When the warning appears, click Install this driver software anyway. If you are unfamiliar with installing Arduino drivers, check out ourInstalling Arduino tutorial for a step by step guide. Page 24 of 61 ORFC Software User Manual Note: The next time you restart your computer, driver signature enforcement will be in effect again. You will have to repeat this process for any new boards. If you have multiple boards to use with the same computer, we recommend installing the drivers for each one before you shut down or restart your computer. 7 Basic check operation Part 4 describes how the main console to check on the implementation of a patient. Basic checking operation before confirmation sensors are connected to a computer is good and commissioning. Console is the main part of the digital X-ray imaging system to interact with users. Console can: Login system. Locally incorporated, add a new patient, edit existing patient information for this patient. Sensor parameter adjustment. Restart sensor-driven. Exposure to obtain X-ray images. Browse images, delete, save or export. After finish filming a check of all images turn off this check. Select the output destination image. Get the task list from RIS / HIS Page 25 of 61 ORFC Software User Manual Access to patient images from the remote server for diagnostics. Modify the patient information of the image. 7.1 Boot and login system Boot and login system is mainly completed by the following steps: 1 Turn on UPS power supply that will power the computer console. 2 Turn on the high voltage generator. 3 Turn on the console host and login system. 4 Start the console software and log in. NOTE Console host best shut down once a day to make the system fully reset, otherwise the performance of the system may decline. The following detailed description of each step: Step One: Open the UPS The uninterruptible power supply switch key to "on" state, turn on the power supply to the computer console. After the power is turned on, need to wait for a minute or two before the second step. Step two: Open the high-voltage generator Typically, the high voltage generator will electrify the other components of the electrical system of the X-ray. Press the control cabinet key to open the high voltage generator. NOTE The high-voltage generator power on approach with specific hardware-related. WARNING Take improper precautions or not strictly follow the practices of the X-ray system will cause harm to the patient and operator. Third step: Open the Control Panel Host Description: Before you turn on the console, make sure the detector is fully activated, high-voltage generator is turned on. First, open the monitor's power switch. Then, press the button to power on the host, display starts with the host operating system to start a series of related information. A few minutes later, the host to complete the boot process. Page 26 of 61 ORFC Software User Manual When the operating system starts, the login window is displayed. Enter the correct interface on the system to access including username and password. Step Four: login Console software Start Console software (this software system can also be set to start automatically) and login dialog will pop up as shown: Only one factory default user admin, user password(both admin) After a successful login, the console software's main screen appears, as shown: Page 27 of 61 ORFC Software User Manual Description: When you enter a password, the system does not display the associated character information. Note The password is case-sensitive. If you need to change your password, please refer to the system management settings. 7.2 Patient Registration After the system login is successful, enter the main interface of system. Before making image acquisition, image must be determined corresponding to the patient and examination information .In the registration window, check the list of information can be derived from the local registration or RIS registry. 1>Local Registration There are three entrance into the registration screen: the registration page tab, check the lower left corner of the page until the bottom left corner checked page and have been . Patient registration window as follows: In the patient registration interface corresponding column entry of patient information, including checking number, patient number, name, height, weight, age, gender, type of examination, the doctor's name, date of birth, diagnosis instructions, check the description and other information, you can press the Tab key the switch between. After insertion of the birthday, the system will automatically calculate and display the age. Description: Fields marked with * are required to ensure that you enter the patient's name and ID number are correct, and different patient ID numbers are different. Incorrect input will lead to duplicate entry or increase difficulties in the future work of Page 28 of 61 ORFC Software User Manual the same patient. After the entry of patient information above, if you find a typographical error, you can modify, delete information can also click button to clear information. After confirming entry information is accurate, click button, then enter the check image acquisition interface to start image acquisition. Please refer to the "image capture" step acquisition operations. 2> RIS Register After properly setting up RIS work list services (how to set up can refer to the "System Management", "Work List" section of the set), the inspection window can be automatically or manually refresh RIS registered patient information, and receive patient information over the network. As shown below: Click [Start] button to enter the check image acquisition interface to 确认录入 信 息 准 确 后 start image acquisition, please refer to the "image capture" step acquisition operations. 3> Quick Query All patients registered on the RIS and local registration if not checked, will be listed in the to be inspected, so you can choose to modify the information , and to start checking and other operations. Query patients: patient registered locally and RIS could be index query, you can enter the patient ID or patient name Click to a certain time period. button to query patient data that belongs Page 29 of 61 ORFC Software User Manual The system supports precise and fuzzy query: When exact query, enter the full standard patient number or name in the query text box and press the Enter key or click to a time period. , you can find all patient information belongs 7.3 Capture images There are three ways to enter the image acquisition interface: click the to be checked interface, click button in button in the registration interface and click in the have been checked interface. in the have been checked For patients who have previously checked, click interface to enter the image acquisition interface, no need to register patient information. Select the patient from the to be checked interface, click the image acquisition interface, as shown: 1 Select teeth template and the desired shooting teeth. Page 30 of 61 button to enter ORFC Software User Manual 2 Click [collection] button and wait for the status bar tips to exposure. 3 Exposure: press high-pressure remote button and release after the first alarm, which means x-ray generation, while a second time rang is on behalf of the end of the x-ray.If not ring twice, check the pressure and the remote control. 4 After exposure ends, image display area(right side) will display the image you have just taken. 5 To continue shooting, repeat 1-3. 6 Click [Save] button to complete examination. 7.4 Exit Exit Description: When a study is capturing, the user can not be cancelled unless close the capture. In the console main interface, if you want to change user, logout current interface by clicking "Exit" button and then the user login window appears, If you added a new user to log in, you need to restart the console software. Shut down the system: Typically, the constituent components of the system are maintained in working condition. Console host, monitor, and detector, will go to "sleep" state in order to save energy if not used within a period of time Recommended shutdown procedures: 1 Turn off the console computer. 2 Turn off the X-ray generator. In general, the other components in the X-ray system. are turned off 3 Close the console of an uninterruptible power supply, and the same time turn off the detector. Note 1 Console host should shut down every day to ensure that the complete system reset process, otherwise, the system performance may be declined. 2 Powering detectors every day to an hour and a half, until the probe reaches a steady state, and then to film the operation. If conditions allow, do not turn off detector power in any case , which can guarantee the stability of the detector temperature and other aspects. Page 31 of 61 ORFC Software User Manual WARNING If proper protective measures or practices are not strictly followed, the X-ray system will cause harm to the patient and operator! 8 Examination management This part of the patient examination management, including work list, study list and remote list. 8.1 work list In the management interface, click the "work list" button to enter work list. This list includes patients who have been registered but have not yet studied. Page 32 of 61 ORFC Software User Manual List information: The work list includes: patient ID, name, sex, age, birthday, modality, description and button to so on. All information can be configured to display by clicking configure. In the configuration dialog, you can add optional patient information in optional fields column to selected column which stands for current patient information, by clicking button ">", "<", ">>", "<<"and other buttons to configure the patient information. Meanwhile in the list alignment can select "Align left", "Align middle", "Align right", etc., and click "Up" and "Down" button to sort. After configuration is complete click "OK" button to confirm, or the “Cancel” button to abandon configuration. Refresh the work list: Click button to refresh the list, in order to obtain real-time information of patients who have been registered but no examination. Note: Work list can be automatically refreshed according to the setting on the automatic setting, please refer to the system management section. Search a patient in the work list: The management interface provides a series of search function by modifying related parameters in the query field, and click button to refresh the display list. The search conditions include patient registration time, patient ID and name. Page 33 of 61 ORFC Software User Manual Registration time can be quickly selected by the buttons, including "today", "two days", "three days", "week" and "Custom" time range. NOTE If the patient ID and name is blank, said any condition. Deleting a record in work list: Select a record in work list, click the button dialog will pops up. to delete, and then a confirmation Start study: Select a patient in the work list, double-click the or click the button the acquisition and control interface. , then enter Update the patient information: In the lower left corner of working list, click modification interface Page 34 of 61 button to enter information ORFC Software User Manual After modification, click on the "OK" button to save your changes or click the "Cancel" button to exit. 8.2 Registration Click button or button to enter registration interface. In the patient registration interface, you can entry of patient information, including date checking number, patient number, name, sex, age, height, weight, birth, doctor's name , diagnostic instructions and other information. After insertion of the birthday, the system will automatically calculate and display the age. Page 35 of 61 ORFC Software User Manual Description: Fields marked with * are required to ensure that the patient's name and ID number you entered are correct. Incorrect input will lead to duplicate entry or increase difficulties in the future work. After the entry of patient information above, if you find a typographical error, you can modify or delete all the information by clicking button . After confirming entry information is accurate, click [Start] button to enter image acquisition interface to start image acquisition, please refer to "4.3 image capture" steps. 8.3 Study list Study list is similar with working list. In the management interface click the "study list" to enter the list where patients have been checked. List information: The list includes information of patients who have been examined: patient number, name, sex, age, height, weight, date of birth, check number, working position, description, number of images, the archive identification, marking, etc. All information can be configured to display by clicking button to configure. If the currently selected patient list, as shown: Page 36 of 61 ORFC Software User Manual If the currently selected study list, as shown: In the configuration dialog, you can add optional patient information in optional fields column to selected column which stands for current patient information, by clicking button ">", "<", ">>", "<<"and other buttons to configure the patient information. Meanwhile in the list alignment can select "Align left", "Align middle", "Align right", etc., and click "Up" and "Down" button to sort. After configuration is complete click "OK" button to confirm or the “Cancel” button to abandon configuration. Search a patient in study list The management interface provides a series of search function by modifying related parameters in the query field, and click button to refresh the display list. The search conditions include patient registration time, patient ID and name. Registration time can be quickly selected by the buttons, including "today", "two Page 37 of 61 ORFC Software User Manual days", "three days", "week" and "Custom" time range. NOTE: If the patient ID and name is blank, said any condition. Delete study/patient button, delete confirmation dialog Select one patient in the study list and click box pops up. If you confirm the deletion, click "OK", or "Cancel." Browse images: In the study list, select a patient, double click, or click image browser interface. e button to enter the Supplementary examination: If the patient is on the study list, click interface, without the need to register. button to enter the image acquisition Image Review: If you need to modify the images ,like: window width , position and teeth markings, click button to enter the image browsing interface. Picture Archiving: If you need to archive images, click click on the "send" button. button to select the specified server, and Page 38 of 61 ORFC Software User Manual Burn / Export: Click button to enter export interface, as follows: Select "create ISO", will generate the ISO file in the specified location and data can be used for recording. If the computer itself supports recording, you can select the "Burn Disc", and insert a blank disc. The following section is used to export data, supported formats include: DICOM, DICOMDIR, BMP, and JPG. 8.4 Remote List Remote list configuration is familiar with study list. Select Server: Click button to bring up the server selection dialog box, select the appropriate server and click "OK" to connect the corresponding server aiming to refresh the display list. Page 39 of 61 ORFC Software User Manual Image Browser: Double-click to check the list of records, or click the button to enter the image browser interface. And has checked into the picture from a different view, the image is downloaded from the server needs to wait to load the complete display. 9 Image Browser Image browsing interface of two modes: image editing and image browser (mentioned in study list part). 9.1 Image editing Modify images, including: window width and position adjustment, tooth modifications, marked changes, modification of patient information and replacement. Update information: Page 40 of 61 ORFC Software User Manual Click button to update patient's information. If you need to replace the study, switch to the "Replace" page, select a record in study list to replace. Teeth Review: Select the image, and then select the desired tooth marks in the template. Layout Review: Page 41 of 61 ORFC Software User Manual Click button to enter selection window, move the mouse to select the desired layout and press the left mouse button to achieve the layout switching. In non-1x1 layout, you can double-click on the image to maximize, double-click again to restore. Hidden teeth template: Click button to hide and display tooth template part. page turning: If the images cannot be showed in a page layout, you can [Next] to turn the page. Save image as BMP/JPG: Click button to save the image, which supports BMP, JPG. Page 42 of 61 [Previous] and ORFC Software User Manual Save the current image: Click the button to save current image. The end of view: Click button to return to the studying list. Save Changes: Click button to complete image save and record refresh, and return to study list. Toolbar: Toolbar buttons can operate and manage the image: Delete the current image ROI transfer window, press the left mouse button to convert into ROI window width and position adjustment functions. The default window width Window width, click to pop-up window width interface. Page 43 of 61 ORFC Software User Manual Adaptive size Text annotation, click the left mouse button to convert text annotation capabilities. 90 degrees clockwise Upside down Flip around Reduction Angle Measurement Linear measurement Delete the current tools, including labeling, angle, distance, cutting boxes, etc. Show or hide patient information, tagging, angle, distance, etc. Pseudo-color Organization lens, magnifying the local Single point of gray value Page 44 of 61 ORFC Software User Manual Image display adjustment, click to pop-up image adjustment interface. Advanced processing, reprocess images if you are not satisfied with current treatment(original image should exist). Anti-color Enlarge Narrow Page 45 of 61 ORFC Software User Manual Actual Size Adjust the window width Cropped. Image aside Zoom. Move. 9.2 Image Browse Image browse can view all images of a patient within a course. When entering the image browsing interface, tooth template will mark filmed teeth of the current patient , as shown below: From the template we can see that teeth 26 is filmed tooth, click on the filmed image of teeth, the tooth that contains all of the images, and thumbnail image will be displayed below the template which arranged in reverse chronological order. Page 46 of 61 ORFC Software User Manual 10 Image acquisition This section describes some of the operations and precautions during image acquisition: Click button to start the acquisition. The countdown screen will display a total of 90 seconds to wait for X-ray. When the status bar displays "Ready to acquire image, please expose", press the high-pressure remote control to produce X-rays. whenX-rays received, the sensor will generate an image and pass to the console. If you need to modify the sensor parameters, click button to display the parameter settings and restart the sensor-driven. Click button to hidden parameter settings and restart the sensor-driven Page 47 of 61 ORFC Software User Manual If the sensor driver failed to load, you can restart the drive here, or modify the settings in this reboot. Information of restart process will be displayed at the bottom teeth template. After sensor parameter setting, click "OK" button to hide the column after restart. and then restart the driver. Be sure 11 System Management This section describes the system configuration management and related control functions. System main menu provides system control and management functions in addition to the inspection process. Including: System Management check management User Management Password Management NOTE: Different user permissions have different system management operations .Administrator-level users can perform system management functions of all the permissions while granted user depending on their privileges level . [Management] from the status bar button to enter management options: Page 48 of 61 ORFC Software User Manual 11.1 System Management Click the button to enter the System Management including the machine configuration, working listings, storage configuration, remote configuration, IO information, IO tools, service settings. The machine configuration 1> System parameters: Including detectors drive ,storage directory and detectors files. Detector drive: Select FUSSEN2D/FUSSEN2E/FUSSEN2F, select TEST under simulated conditions as the experimental simulation-driven collection. Main storage directory: Specify the patient check image path on the local computer storage space. Detector File: Fussen sensor configuration file. 2> The machine parameters Page 49 of 61 ORFC Software User Manual Hospital Name: The current system hospital name, which will be stored in the DICOM attributes of the image. Hospital Prefix: as a local registration number prefix. Such as hospitals prefix DX, then automatically generated number is DXxxxxxxx registration form, such as Device Name: corresponding DICOM standard of AETitle this device, used to identify the device. IP Address: The IP address of the machine. Delay Time: network connection time. Record time: check the records to identify locally saved time and after this time will automatically clean up. Minimum space: When the system detects the storage space is less than this threshold, then began to organize hard disk space, delete the earlier inspection information. 3> log level The level of detail of the recording process, detail level followed by normal mode, common mode, a detailed model and full model. 4> Other Language: Support switch between Chinese and English. 5> Type: The default check type (IO). Character Set: Character set in the machine has been used. Virtual Keyboard: Enable / do not enable the virtual keyboard. Notation: Tooth notation, including: FDI/Universal/Both Work List Page 50 of 61 ORFC Software User Manual When RIS through Work list service requires registration and Work list server in this configuration parameters, refer to the relevant knowledge about Work list Dicom standard. Device Name: Work list Server DICOM AETitle. IP Address: Worklist server IP. Port number: Worklist Server service port number. Check the type: whether the type of filter inspection. Device Name: whether AETitle consistency identified. Auto Refresh: whether Worklist refresh automatically, eliminating the need to manually refresh each time. Character Set: WorkList server character set Protocol: Communication protocol, including: “Private protocol” and “Stand Dicom” Storage Configuration Page 51 of 61 ORFC Software User Manual When archiving, PACS server in this configuration parameters are stored on DICOM knowledge which can refer to DICOM standard. Device Name: PACS server DICOM AETitle. IP Address: PACS server IP. Port number: PACS server service port number. Syntax: DICOM transfer syntax is stored. Send Mode: After collecting images, click Save Dicom whether automatic archiving, eliminating the need to manually archive each. Protocol: Communication protocol, including: “Private protocol” and “Stand Dicom” The system can be configured 2 Dicom storage servers simultaneously and only 1 private protocol storage. Remote configuration Page 52 of 61 ORFC Software User Manual When you need to connect a remote console or dicom query/receive SCP, you need to configure dicom query/receive parameters on dicom query/receive relevant knowledge which can refer to dicom standard. Dicom Store SCU: the unit as a Query/Receive client-related parameters Device Name: The machine in Q/R in the name IP Address: This machine IP. Port number: The machine Q/R communications port number. Parameters Remote Query/Receive service side: Dicom Q/R SCP Name remote Q/R SCP: The device name IP Address: Remote Q/R SCP's IP Port: Remote Q/R SCP port number Character set: remote Q/R SCP character set Enable: Enable/do not enable the connection The system can also configure two Dicom Q/R SCP. IO information Page 53 of 61 ORFC Software User Manual IO information for the four corners of the image display overlay information related to the display configuration. Choose one corner , such as the upper left corner, and then select the comment was never configured to display the information, click the Add button to add to the angular position , or select from the angle configuration information click remove button to remove . Information also can be moved up and down each corner location . The information displayed can be configured by the : Hospital name Patient name Patient ID Patient age Body Part Examined Study date Study time Series date Series time Patient sex Patient size Patient weight Patient birthday Exam number Page 54 of 61 ORFC Software User Manual Series number Image number Manufacturer Modality Accession Number StudyInstance UID SeriesInstance UID SOPInstance UID Acquisition date Acquisition time Diagnoses Description Study Description Series Description Referrings Physicians Name Performing Physicians Name Read Study Physicians Name IO information Tools in toolbar can be configured in this page: the buttons selected will show on the left in image view page. Page 55 of 61 ORFC Software User Manual Click button 'Up' or 'Down' to adjust index of the chosen button. Show style of the selected tool buttons have two kinds: pagination and show all Server Setting When you need this console as a dicom query/receive SCP, you can configure this page. Q/R Server enabled: whether enable as a dicom Q/R SCP. DICOM Q/R SCP: configuration as a dicom Q/R SCP IPAddr: IP address Port: port number BufferSize: cache size Initial count: initial count of child process or thread. Lifetime: lifetime of child process or thread Server mode: process mode or thread mode Auto start: whether auto start the Q/R Service Client parameter: Q/R SCU parameter. AETitle: AE title of Q/R SCU IPAddr: AE title of Q/R SCU Port: port number of Q/R SCU Test button: test the communication with Q/R SCU Page 56 of 61 ORFC Software User Manual Add button: add a Q/R SCU Update button: update the selected Q/R SCU Delete button: delete the selected Q/R SCU 11.2 study management Click the study button to enter the examination management interface, including pre-processing, post-processing and orientation. 1> Pre-processing Speckle: for speckle noise filtering done by nuclear size. Sensor Type: 600 and 900. 2> post-processing Image dynamic range adjustment, multi-scale enhancement, noise reduction. There two methods: Musica and Picasso. Muisca parameters: Page 57 of 61 ORFC Software User Manual Dynamic Range: The dynamic range of the output image. Enhancement factor: the high-frequency part of the enhancement factor USM. Equalizer coefficients: USM low-frequency part of equalizer coefficients. Levels of detail: multi-scale enhancement layers. Detail Enhancement: multiscale enhancement factor. Filter Type: multi-scale enhancement, filtering type. Picasso parameters: Contrast: parameter about the contrast of the enhance image Thin edge: parameter about the enhancement of thin edge Medium edge: parameter about the enhancement of medium edge Thick edge: parameter about the enhancement of thick edge Page 58 of 61 ORFC Software User Manual Noise of global: parameter about suppression of global noise Noise of bright: parameter about suppression of noise in bright area Gamma: parameter about gamma transform 3> Orientation Rotate: rotate the image after processing. Flip: Whether flipped upside down , left or right flip images after processing. 11.3 User Management Click "management" button to manage user information. A user with administrator permissions may carry on the management to other users including users to add, modify, license rights and other control. 11.4 Password Click the "Password" button to modify the password. Page 59 of 61 ORFC Software User Manual 12 Maintenance You should be familiar with all the operation methods of this system. Read this user manual in detail, and don't use this system before understanding the whole operation process. ORFC Software just needs simple maintenance during the operation process. But only the right operation method can guarantee the system's long-time and steady working. So you must comply with the notice and maintenance presented by the manufacturer strictly. Maintenance of the CD 1) Do not bend or press the CD. 2) Clean the CD with a disk cleaner. Do not use organic solvents such as acetone. 3) Do not handle the CD while smoking or eating. 4) Keep the CD away from direct sunlight and high temperature. Otherwise, the CD may become deformed. 5) Do not get the CD wet. Do not touch the disk surface of the recorded side. If the surface becomes contaminated with any foreign substance such as fingerprints, reading data may be impossible. Page 60 of 61 ORFC Software User Manual 13 Warranty and Service 13.1 Warranty Fussen warrants that Fussen’s products meet the labeled specifications of the products and are free from defects in materials and workmanship that occur within warranty period. The warranty period begins on the date the products are shipped to distributors, for 1year. The warranty is void in the case of: a) Damage caused by handling during shipping. b) Subsequent damage caused by improper use or maintenance. c) Damage caused by alteration or repair by anyone not authorized by Fussen. d) Damage caused by accidents. e) Replacement or removal of serial number label and manufacture label. If a product covered by this warranty is found to be defective because of defective materials, components, or workmanship, and the warranty claim is made within the warranty period, Fussen will, at its discretion, repair or replace the defective part(s) free of charge. Fussen will not provide a substitute product for use when the defective product is being repaired. 13.2 Contact information If you have any question about maintenance, technical specifications or malfunctions of devices, contact your local distributor. Alternatively, you can send an email to Fussen service department at: [email protected]. Page 61 of 61 P/N: 11.54.0009 EC REPRESENTATIVE Well Kang Limited The Black Church, St. Mary's Place, Dublin 7, Ireland TEL: +353(1)4433560 FAX: +353(1)6864856 E-mail: [email protected] MANUFACTURE Fussen Technology Co.,Ltd. 3F,10# Building, Tongfuyu Industrial Zone, Taoyuan Street, Nanshan District, Shenzhen, China TEL: + 86 755-21670890 FAX: + 86 755-21670890 E-mail: [email protected] www.fussenct.com