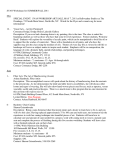
1
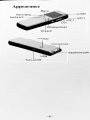
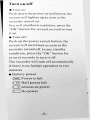
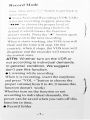
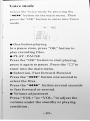
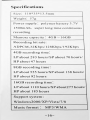
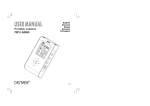
Contents
Precautions .......................................................
Function O verview ...........................................
A ppearance.........................................................
4
T u rn on /off ........................................................ ^
Record M o d e ................................................6
Voice Mode ............................................... 10
Music M ode............................................... 12
FM R a d io ..................................................... 13
Time se ttin g ......................................
14
Connect to PC.............................................. 15
Technical S p ecificatio n s...........................16
Precautions
In order to avoid accidents, please read the
User's manual carefully before operations.
1. Please charge the recorder frequently
when you do not use it for a long time.
2. Please keep it away from the high
temperature, moisture or dusty places.
3. The recorder should be handled with
great care .Do not drop or crash it.
4. Please do not turn off the power during
recording and playing. Otherwise it may
cause file corruption or information loss.
5. Please backup data regularly on your
computer to avoid information loss
which may be caused by wrong
operations or machine breakdown.
6. We're not responsible for the failures of
recording which caused by wrong
operations or machine breakdown.
7. Please do not disassemble and repair the
recorder by yourself .Please backup
your data before sending it for repair
service .We're not responsible for the
data loss which caused by maintenance
or other reasons.
t
8. We are not responsible for dispute
issues which caused by recording voice
without permission, because it is no
connection with products
9. We will endeavor to ensure the integrity
of the User's manual. But if the contents
of the User's manual do not match for
the product itself completely due to
technique or production batches, please
take the product as standard.
Function overview
1. Wireless recording remotely
2. Super long time continuous recording
3. One button recording& playing
4. Four recording modes:
LP: Long-time recording
SP: Standard recording
HP: High quality recording
Wireless recording
5. Voice Activated Recording
(VOR/VAR)
6. Listening while recording
7. Time setting
8. FM radio: Frequency response 87.0108MHz
9. Automatic section-break
10. A-B repeat
11. Mp3 player
12. Intelligent power monitoring
13. With built-in high power loudspeaker
14. With built-in high capacity polymer
battery
A p p earan ce
speaker
m icrophone
e arphone jack
Turn on/off
• Turn on:
Push down the power switch button, the
screen will lighten up as soon as the
recorder turned on.
In a soft shutdown condition, press the
“OK” button for several seconds to turn
it on.
• Turn o f f :
Push up the power switch button, the
screen will turn black as soon as the
recorder turned off. In any standby
condition, press the “OK” button for
several seconds to turn it off.
The recorder w ill turn off automatically
if there is no further operation in two
m inutes
• Battery power
£■«■! Power is full
C ■■! Half power left
£ ■! Almost no power
C ] No power
Select the record mode by pressing the
button on the main menu. Then
press the “®” button to enter into Record
M ode.
f
u»
fo M f *
<be' (
v
S ) j
hp '< n ii (
m
*
« }
hp
| so;
j|
BSi
[* «
i| o§i
*
f«N »
««£
« i£ )
j j 00!
JflJOJ j i 00to I i JOJOjj 00to I I
LP: long-time recording, ADPCM format,
32Kbps
SP! standard recording, ADPCM format,
128Kbps
H P! high quality recording, ADPCM
format, 192Kbps
of : wireless recording,ADPCM format,
128Kbps
• One button recording
Press “®” button in any pause or stop
condition could start recording
• Recording Pause /Save/Exit
Press “OK” button to pause the recording
under the state o f recording. Press the
“OK” button again to continue.Press the
“®” button to stop and save the recording
data. Then press “Q ” button to get back to
main menu.
• Voice Activated Recording (VOR/VAR)
After the recording stopped, press the
to choose the proper level o f
voice activated recording (from 0-10,
default 0 which means the function
doesn't work). Press the
button again
to move on to the next recording.
When it starts working, the VOS icon will
flash and the time w ill stop. On the
contrary, when it stops, the VOS icon w ill
disappear and the recorder w ill return to
the normal state.
ATTN: Whether turn on the VOR or
not according to individual demands.
In general condition, We suggest
don't use this function.
• Listening while recording
When it is recording, insert the earphone
and press “VOL +”button to choose the
proper volume(from 0 to 40, 0 means this
function doesn't work)
Whether turn on the function or not
according to individual demands, the
power can be saved when you turn off this
function in time.
• Record folder
The recording files w ill be saved
automatically in the folder which
Matches to the corresponding mode.
• Automatic section break
The recorder w ill save 4 hours o f
continuous recording voice automatically
and m ove on to the next recording
• Auto save in low power
When the power is not enough to keep
working, the recorder w ill save files and
turn o ff autom atically.
• Wireless recording
Step 1:pull the antenna out from the
wireless microphone, push down the
power switch, the blue indicator light
keep lighting.
Step 2: insert the earphone into the
recorder, press “<</►►” button to choose
the mode o f wireless recording, and then
press “<§>” button to start wireless
recording remotely. Under this state ,you
can hear the voice when you press the
“vol +”button., You can change the
distance and position o f the two devices
to et the best audio effect.
Charging: W hen the w ireless
m icrophone is out o f power, it can be
charging w ith the included charger or by
Insert earphone
to receive signal
Indicator
light ^
Wireless
Mic
U SB ,
plug
> Microphone
II
I
r
, Power switch
uosiacie-iree
Obstacle-free distance
aisianc
from 5 to 100 meters
connecting to the PC. When the recorder
is charging the red indicator light w ill be
tw inkle, when it is done, the red light
w ill disappear, he w ireless microphone
can continuous working about 3 hours
with full power.
Attn: The wireless microphone
should be kept one to five meters
away from the position of the source
of the sound which will make the
recording to get a best effect. In
order to improve the effect, please
keep the antenna vertically .Insert
the earphone when you use wireless
recording mode. The speaker could
be opened by long time pressing the
“DEL” button.
S e le c t the V o ice m ode by p ressin g the
button on the m ain m en u. T hen
p ress the “O K ” bu tton to en ter in to V o ice
m o d e.
~«p ~ ^
• One button playing
In a pause state, press “OK” button to
play recording files.
• PLAY/PAUSE
Press the “OK” button to start playing,
press it again to pause .Press the “□ ’’to
enter into the main menu.
• Selection, Fast forward /Rewind
Press the “^/►►” button one second to
select the files.
Press the
button several seconds
to fast forward or rewind.
• Volume adjustment
Press “VOL+”or “VOL-”to adjust the
volume under the standby or playing
condition.
• A-B repeat
W hen playing the recording files, press
“(§)” to choose the starting point “A”,
press it again to determ ine the ending
point ”B ” . then recorder w ill start to
repeat from A to B.
The record er w ill autom atically stop
repeating after three tim es. You can press
“<§)” button to cancel it too.
• D elete
W hen the play in g -reco rd stops or pauses,
p ress “D E L ” b utton for three seconds
and then p ress the “O K ” b utton to
confirm it.
Select the Music mode by pressing the
“44>K* button on the main menu. Then
press the “OK” button to enter into
Music mode.
OH I f f I
Other operations are sam e as the
operations o f the Voice mode.
FM Radio:Frequency 87.0-108MHz
Sclcct the Radio mode by pressing the
button on the main menu. Then press
the “OK” button to enter into Radio mode.
m
m
• Scan/Save channel:
Short time press the
button for
manual scanning and press the“®” button
to save the channel.
Long time press the “^►►’’button for
autom atic scanning,the recorder w ill
autom atically save the channel.
You can change the channel by pressing
the “OK” button.
• D elete the saved channels
Press the “D E L ” button for three seconds
,you can d elete the current c h a n n e l.
Attention: Please use earphone
accompanying with the recorder when
you listen to the FM Radio. Press the
“DEL” button for a long time to open
the loudspeaker then listen to the FM
radio.
T im e setting
S c l c c t the Time setting mode by pressing
the **«<►►” but ton on the main menu as
below.
Press the “OK” button to enter into the
Time setting mode ,Then press“^ 0 ^ ” to
select the part you want to adjust ,the
selecting part w ill w inkle continuously.
Press “V O L+”or “V O L -”button to adjust
it to the current tim e as below .
gw
1nm
an
flint
j
!! n iu
m i
< nn«fi o
L_ih b j _ j L_yy»yj _ j
After complete the adjustments, press
“OK” button to save and return to the
main menu.
Connect to PC
With an included USB cable to connect it
to the computer, it can be used as a USB
flash disk and charging automatically.
After finish i t ,Right click on the pop-up
icon appeared on the right bottom o f
desktop..A fter disconnecting the
com puter ,you can unplug the recorder.
You can charge the recorder im m ediately
when connect it to a charger with an
included USB cable.
Hint: please turn on the recorder at first
and then charge it, in that case ,it's clear
to know how m uch the pow er left. The
icon o f the battery w ill flash during the
charging tim e, and it w ill stop w hen it is
fully charged. It w ill take 5.5 hours to
finish the charging w hen u sing charger.
Specifications
Size: 110*35*13.5mm
Weight: 57g
Power supply: polymer battery 3.7V
1500mAh, super long time continuous
recording
Memory capacity: 4G B ~16G B
Recording bit rate:
A D PCM ,32K bps/128K bps/l 92Kbps
4GB recording time!
LP about 283 hours/SP about 70 hours/
HP about 47 hours
8GB recording time*.
LP about 555 hours/SP about 138 hours/
HP about 92 hours
16GB recording tim e ’.
LP about 1110 hours/SP about277 hours/
HP about 185 hours
Support system*.
Windows2000/XP/Vista/7/8
Music format I MP3/WMA