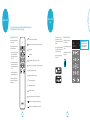
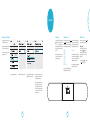
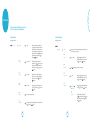
1
English
Handbook Sound bar
English
welcome...
contents
… and thank you for purchasing the Arcam Solo bar.
Arcam has been producing specialist audio equipment of remarkable quality
for over three decades and the new Solo bar is the latest in a long line of
award winning Hi-Fi and home cinema products.
We hope that the care and effort we have put into building this product will
be amply demonstrated in its superior performance and reliability, ensuring
that you enjoy many years of ownership.
This handbook is a guide to installing and using the Solo bar. Use the
contents list on the next page to guide you to the section of interest.
We hope that your Solo bar will give you years of trouble-free operation. In
the unlikely event of any fault, or if you simply require further information
about Arcam products, our network of dealers will be happy to help
you. Further information can also be found on the Arcam website at
www.arcam.co.uk.
The Solo bar development team.
E-2
important safety instructions
E-4
overviewE-5
Buttons and display
E-5
ConnectionsE-6
quick start
E-7
What’s in the box?
E-7
Placing the unit E-7
Connecting devices
E-7
Connecting a TV
E-7
Connecting digital devices via HDMI
E-8
Connecting analogue devices
E-9
Connecting audio devices via digital input
E-9
Connecting a subwoofer
E-9
Plug in and turn on
E-10
Connecting a Solo sub
E-10
Connecting Bluetooth® devices
E-11
Using headphones
E-11
remote control
E-12
Using the remote control
E-12
remote control app
E-13
Download instructions
E-13
Pairing your mobile device
E-14
operationE-15
Switching on
E-15
Selecting a source
E-15
Volume control
E-15
Selecting an audio mode
E-16
Sound from your TV
E-16
Sound from Bluetooth® devices
E-16
IR repeater
E-16
CEC control via HDMI
E-16
Auto setup
E-17
E-3
system setup
E-18
System setup menu
E-18
Speaker/EQ setup menu
E-19
HDMI setup menu
E-20
firmware update
E-21
Download an update file
E-21
Performing the update
E-21
specificationsE-22
troubleshootingE-23
fixing instructions
E-24
You will need
E-24
Fixing procedure
E-24
product guarantee
E-25
CopyrightE-25
Worldwide guarantee
E-25
Claims under guarantee
E-25
On-line registration
E-25
Problems?E-25
technology licensing
E-26
English
important safety
instructions
overview
1. Read these instructions
All the safety and operating instructions
should be read before this product is
operated.
2. Keep these instructions
The safety and operating instructions
should be retained for future reference.
3. Heed all warnings
All warnings on the appliance and in
the operating instructions should be
adhered to.
4. Follow all instructions
All operating and use instructions should
be followed.
5. Do not use this apparatus near water
The appliance should not be used near
water or moisture – for example, in a wet
basement or near a swimming pool.
6. Clean only with dry cloth.
7. Do not block any ventilation openings.
Install in accordance with the
manufacturer’s instructions.
8. Do not install near any heat sources such
as radiators, heat registers, stoves, or
other apparatus (including amplifiers)
that produce heat.
9. Do not defeat the safety purpose of
the polarized or grounding-type plug.
A polarized plug has two blades with
one wider than the other. A grounding
type plug has two blades and a third
grounding prong. The wide blade or the
third prong are provided for your safety.
If the provided plug does not fit into
your outlet, consult an electrician for
replacement of the obsolete outlet.
10.Protect the power cord from being
walked on or pinched particularly at
plugs, convenience receptacles, and the
point where they exit from the apparatus.
11.Only use attachments/accessories
specified by the manufacturer.
12.Use only with the cart, stand, tripod,
bracket, or table specified by the
manufacturer, or sold with the
apparatus. When a cart is used, use
caution when moving the cart/apparatus
combination to avoid injury from
tip‑over.
13.Unplug this apparatus during lightning
storms or when unused for long periods
of time.
14.Refer all servicing to qualified service
personnel. Servicing is required when
the apparatus has been damaged in any
way, such as power-supply cord or plug
is damaged, liquid has been spilled or
objects have fallen into the apparatus,
the apparatus has been exposed to rain
or moisture, does not operate normally,
or has been dropped.
15.Please keep the unit in a well-ventilated
environment.
WARNING: To reduce the risk of fire or electric shock,
do not expose this apparatus to rain, moisture,
dripping or splashing. Objects filled with liquids,
such as vases should not be placed on the apparatus.
WARNING: The mains plug or appliance coupler is
used as a disconnect device, the disconnect device
shall remain readily operable.
Input selection
Standby
Volume control
IN- backwards through input sources.
IN+ forwards through input sources.
The display indicates selected source.
Switches the Solo bar in
and out of standby.
- decreases sound output.
+ increases sound output.
Volume shown on display.
This lightning flash with arrowhead symbol within
an equilateral triangle is intended to alert the
user to the presence of non-insulated ‘dangerous
voltage’ within the product’s enclosure that may
be of sufficient magnitude to constitute a risk of
electric shock.
Warning: To reduce the risk of electric shock,
do not remove cover (or back) as there are no
user-serviceable parts inside. Refer servicing to
qualified personnel.
The exclamation point within an equilateral triangle
is intended to alert the user to the presence of
important operating and maintenance instructions
in the literature accompanying the appliance.
This equipment is a Class II or double insulated
electrical appliance. It has been designed in
such a way that it does not require a safety
connection to electrical earth.
Correct disposal of
this product
This product contains electrical
or electronic materials. The
presence of these materials may,
if not disposed of properly, have
potential adverse effects on the
environment and human health.
Presence of this label on the product means it
should not be disposed of as unsorted waste and
must be collected separately. As a consumer, you
are responsible for ensuring that this product is
disposed of properly.
E-4
Buttons and display
Selected input source
Audio mode
Automatic Loudness Control
Volume setting
Note: changes to menu
level during setup,
see page 18 for more
information.
Note: changes to menu
option during setup,
see page 18 for more
information.
Use the remote control to turn
ALC on and off.
Note: changes to value
for selected menu option
during setup, see page 18
for more information.
E-5
English
quick start
Connections
What’s in the box?
USB
COAX
Used for service and
firmware updates only
See page 21 for
information about
firmware updates.
RCA socket, used
to connect a digital
audio source.
MIC
3.5mm mini jack,
used to connect mic
supplied during auto
speaker setup.
See page 17 for more
information.
HDMI OUT
POWER INLET
Used to connect a
TV and as the Audio
Return Channel (ARC).
See page 7 for more
information.
Used to connect to
mains power supply.
<<
<<
<<
<<
<<
<<
<<
<<
Solo bar soundbar
Power cord
Remote control
Batteries (2 x AAA)
Microphone
Wall mount bracket
User manual
Registration card
Placing the unit
Connecting devices
Connecting a TV
The Solo bar is an incredibly versatile
product. Place it on a table top, cabinet
or shelf, making sure that it sits level and
securely. Position it below a TV set, either
free standing on a flat level surface or
mounted to a wall.
Once the Solo bar is positioned correctly,
connect it to your devices as shown in the
following illustrations.
Connect your TV to HDMI OUT using an
HDMI cable. If your TV supports ARC, the
audio can be played through the Solo bar
for better sound performance – see page 20
for setup information. If your TV does not
support ARC, connect an audio cable to
OPTICAL or COAX input on the Solo bar.
For the best listening experience, we
recommend wall mounting . Use the
custom-designed wall bracket supplied.
See page 24 for fixing and mounting
instructions.
Make sure that none of the cables are kinked
or stretched.
WARNING: Do not connect your Solo bar to the
mains until you have connected all of your audio
and video devices.
Position the Solo bar away from direct
sunlight and sources of heat or damp.
Audio cable
if not ARC
AUX
SUB
OPTICAL
HDMI 1 – 4
3.5mm stereo
mini-jack, used
to connect an
analogue audio
source.
RCA LFE output,
used to connect a
subwoofer.
See page 10 for
information about
connecting a Solo sub
via a wireless link.
TOSLINK socket, used
to connect a digital
audio source.
Used to connect up
to four digital devices
providing 1080p and
3D pass through.
E-6
E-7
English
Connecting digital devices via HDMI
Connecting analogue devices
Connecting audio devices via digital input
Connecting a subwoofer
Many digital devices including set-top
boxes, Blu-ray players, DVD players, games
consoles and camcorders can be connected
using an HDMI connection.
Connect any analogue audio device to the Solo
bar’s AUX input using a 3.5mm mini-jack lead.
Audio devices can also be connected to the Solo bar using the Coaxial
and Optical inputs.
The Solo bar comes with a built-in
subwoofer output (see page 19 for setup).
Use a subwoofer lead with an RCA LFE jack
to connect your equipment to the Solo bar.
Note that when using this method of
connection, the image will be displayed
by your TV and the sound will be played
through the Solo bar. No other audio
connections are needed.
Blu-ray dics player
Note: If you have an Arcam Solo sub, please
see the next page.
Games console
Games console
CD player
MP3 player
Camcorder
Set-top box
E-8
Subwoofer
E-9
English
Plug in and turn on
Connecting a Solo sub
The Solo bar is supplied with a moulded
mains plug already fitted to the cable. Check
that the plug supplied fits your supply. If
your mains supply voltage or mains plug is
different, please contact your Arcam dealer
immediately.
Being part of the Arcam Solo range means
your Solo sub can communicate wirelessly
with the Solo bar.
First, connect the mains cable to the power
socket on the back of the Solo bar, making
sure that it is pushed in firmly. Now push
the plug into your mains socket and switch
the socket on. The unit is now in standby,
indicated by a red LED on the front panel.
Make sure the Solo sub is turned on at its
power switch.
1. Press the
button on the remote
control unit of the Solo bar followed
by
until Speaker/EQ Setup appears
on the front display panel. Press
followed by
again, until Sub Pairing
appears.
2.Press
to start the pairing procedure.
The display will change to In Progress.
3. Position the INPUT selector on the rear
of the Solo sub to WIRELESS.
WIRELESS
LINE
WIRELESS
PAIRING
LFE
INPUT
PWR
WIRELESS
5. If the pairing procedure was successful, the
4. Press and hold the WIRELESS button
WIRELESS LED will glow a constant blue
on the rear of the Solo sub for about five
and the Solo bar will display Linked.
seconds. The WIRELESS LED will start
flashing blue, signalling that the Solo
sub is in sync mode and searching for a 6. Once the pairing procedure is finished, the
Solo sub will always reconnect whenever it
source to connect with.
is powered on or receives an audio signal.
Connecting Bluetooth® devices
Using headphones
The Solo bar has built in Bluetooth wireless
technology for seamless integration with any
Bluetooth enabled device.
The Solo bar comes with a Bluetooth
transmitter so that it can connect to a set of
Bluetooth headphones.
If no devices are found, press
again to
start another search. You might want to
make sure there are no obstacles in the way.
Pairing with Bluetooth devices
Note: Transmitting via Bluetooth is different
to receiving. Up to four devices can be paired
but only one device can be connected at a
time on a first-come-first-served basis.
When the search is finished, available
devices will be displayed in a list. Use the
and
buttons to select the correct
device and press
to finish the pairing
procedure. The Solo bar will display a
message to indicate that the connection has
been successfully completed.
Follow the advice provided in the operation
instructions for your Bluetooth device. Select
Arcam Solo bar from the list of Bluetooth devices
to complete the pairing. Once the pairing procedure
is finished, it does not need to be performed again.
Connecting Bluetooth headphones
Press the
button on the remote
control followed by
until Speaker/
EQ Setup appears on the front display
panel. Press
followed by
again,
until Headphone Out appears. Press
to
select it.
If the unit is left unused for an extended
period of time it will go into standby to
reduce power consumption.
By default, the Bluetooth transmitter is
turned off so Disable is shown on the display
panel. Press
to change the display to
Enabled. The Bluetooth transmitter is now
on and the Device Search menu option is
activated.
Now follow the advice supplied with your
Bluetooth headphones to put them in
pairing mode.
Bluetooth® devices
Solo sub
E-10
Make sure that Device Search is still
displayed and press . The Solo bar will
search for available devices for one minute.
Note: Sync mode lasts for about 30 seconds.
If no source is detected during this time, the
Solo bar will stop searching and the process
will need to be repeated.
E-11
Using your headphones
Make sure both the Solo bar and your
headphones are turned on. Select an audio
source and enjoy listening to sound through
your headphones.
Note: If your headphones are turned off,
audio is automatically played using the Solo
bar speakers.
WARNING: Turning the Bluetooth transmitter on
temporarily disables the Bluetooth input. This
means you will not be able to stream sound from
a Bluetooth device to the Solo bar and listen via
headphones at the same time.
English
remote control
app
remote control
The Solo bar can be set up and controlled using either the remote control
unit supplied or the Solo bar remote control app.
Using the remote control
Switches the Solo bar between stand-by and on.
The remote control unit is programmed for
use with the Solo bar.
Press once to mute the Solo bar. Press again (or adjust the volume) to unmute.
Before use, make sure the two AAA batteries
supplied are correctly installed.
Increase volume.
1. With the remote face-down, press down
on the non-slip indentations of the
battery compartment cover and slide
the cover off.
Decrease volume.
2. Insert the two ‘AAA’ batteries supplied.
Take care to insert the batteries in the
right direction by following the ‘+’ and
‘–’ marks.
Press to enter the set-up menu (see pages 18 - 20). Press again to exit the menu.
The Arcam Solo bar remote control
app enables you to use an Apple iOS or
Android™ device to control the Solo bar via
Bluetooth.
Download instructions
Use the app to configure menu settings and
control playback in exactly the same way as
the remote control unit supplied.
Follow the download prompts displayed on
your device.
Minimum OS requirements for the app:
iOS 6, Android 4.0
Download the app from either the App
Store or Google Play™.
SM
Once installed, tap the app icon to launch
the application.
Automatic Loudness Control - switches between on and off.
Navigate upwards through menu settings.
3. Slide the battery compartment cover
back and lock it in place with a click.
Navigate downwards through menu settings.
To ensure reliable operation, the remote
requires a clear line of sight to the Solo bar
front panel display.
Navigate back through menu levels.
Navigate right through menu levels.
Press to select menu setting.
Switches through stereo, movie and concert audio output modes.
Input source selector - switches forwards through connected sources.
Input source selector - switches backwards through connected sources.
E-12
E-13
HDMI 1
DIGITAL ST
20
App mirrors the display of the Solo bar
Display shows input source, volume and
audio format during normal operation or
menu options when configuring set up.
English
operation
Pairing your mobile device
The app requires your device to be paired
with the Solo bar via Bluetooth.
HDMI
HDMI
HDMI
HDMI 1111
DIGITAL
DIGITAL
DIGITAL
DIGITAL ST
ST
ST
ST
20
20
20
20
Make sure your device has Bluetooth turned
on. For iOS devices follow these steps:
For Android devices, follow the instructions
supplied with your device.
Switching on
Selecting a source
To wake the Solo bar from standby, press the
button on the front panel or the remote.
ARCAM Solo bar appears briefly on the
front panel display followed by the currently
selected input source, volume setting and
audio mode.
To select a particular source, press the
or
buttons on the front panel or remote
until that source is shown on the front panel
display. The following sources are available:
If your TV is connected using ARC and
you have followed the setup procedure on
page 16 the display panel will show the
following message when watching TV.
HDMI 1
HDMI 2
HDMI 3
HDMI 4
OPTICAL
COAX
AUX
BLUETOOTH
TV/ARC
Note: If the unit is to be left unused for an
extended period, disconnect it from the
mains supply to save power.
Audio Return Channel (ARC) is a feature
built into the latest version of HDMI which
allows your TV to send audio back down to
the HDMI cable to the soundbar.
Note: This is displayed automatically when
an ARC enabled TV is connected.
Note: If supported, some HDMI devices may
identify themselves by their device name.
Open Settings then tap Bluetooth.
Slide Bluetooth switch to on position.
Wait for Arcam Solo bar to appear under
DEVICES and then tap to Connect.
Should you need to unpair your device, tap
the information icon next to Connected
and then tap Forget this Device.
Note: A maximum of four Bluetooth source
devices can be paired to the Solo bar with
each device being available on a first-comefirst-served basis. Occasionally, if more than
one person wants use the Solo bar you may
need to unpair a device.
E-14
Volume control
E-15
Adjust the volume by pressing the
or
buttons on the front panel or remote.
Muting output
The sound output of the Solo bar can be
silenced by pressing
on the remote
control. If the unit is muted, the volume
setting changes to MUTE on the front
display panel.
To cancel mute, press
for a second time
or / to change the volume.
English
Selecting an audio mode
Sound from your TV
The Solo bar has three pre-configured audio
modes – STEREO, MOVIE and CONCERT.
Press the
button on the remote to
switch through and make a selection.
If your TV is connected to the Solo bar
using ARC, select the appropriate source on
your TV and enjoy superb sound from the
Solo bar using your TVs remote to control
volume.
Note: Stereo is the default mode and means
audio is played as it was recorded.
When used in this way, the Solo bar front
display panel automatically shows TV/ARC.
Sound from Bluetooth®
devices
To enjoy listening to music wirelessly from
any Bluetooth device, first make sure your
device is paired with the Solo bar - see
page 11 for more information.
Once your device is paired, simply follow
the instructions provided with your device.
IR repeater
CEC control via HDMI
Auto setup
When the Solo bar is positioned in front
of a TV it may (depending on the model)
obscure the remote control sensor on the
TV so that operation is no longer possible.
Consumer Electronics Control (CEC) is a
feature that allows you to connect up to 15
CEC-enabled devices to your Solo bar via
HDMI and control them simultaneously
using a single remote control unit.
There is a proprietary automatic setup
function built into the Solo bar which
attempts to set the essential speaker settings
for your system (including a subwoofer if
present). It also calculates room equalisation
(Room EQ) filter values to remove some of
the worst effects of resonant frequencies in
the listening room.
If this happens, use the IR repeater function
on the Solo bar to relay the signals through
to your TV. Note: This will work even when
the Solo bar is on standby.
See page 18 for setup information.
E-16
By default, CEC is enabled. See page 20 for
setup information.
Typical examples of system control using
CEC include:
<< Simultaneous power on or standby of
every connected device.
<< Volume control.
<< Input source selection.
To help the system be as accurate as
possible, follow these guidance rules:
<< Minimise any background sounds in
the listening room and nearby rooms.
<< Close all windows and doors in the
listening room.
<< Turn off all fans including airconditioning systems.
<< If holding the microphone in the hand,
keep your hand and fingers still to avoid
generating any ‘handling noise’.
<< Position the microphone pointing
upwards at roughly head height in the
normal listening position with a direct
unobstructed view of the speakers. It is
not necessary to point the microphone
directly at the speakers.
<< If your system includes an active
subwoofer, start by setting its output
level/gain control to a value halfway
between minimum and maximum.
Using the calibration microphone supplied,
insert the jack into the MIC socket on the
rear panel and place the microphone at the
main listening position.
This microphone picks up the special
calibration tones generated by the speakers
(and subwoofer) when Auto Setup is run.
The Solo bar then analyses the signal and
computes:
<< speaker level,
<< crossover frequency to the subwoofer,
<< problem resonant frequencies in the
room which need control by filtering.
Microphone
Place at head height in
listening position with
mic pointing upwards.
E-17
To run Auto Setup, press
on the
remote control followed by
until
Speaker/EQ Setup is displayed on the Solo
bar front panel. Now press
and notive
the display changes to Auto Setup. Press
again to start the procedure.
The process will generate test tones from the
speakers and typically takes less than two
minutes. The test tone generator will cycle
round each speaker twice. Between each
cycle, Analysing will be displayed briefly.
After the second cycle the display will show
Calculating followed shortly by Complete.
Should any errors occur during auto setup,
follow the instructions provided on the
display panel.
Auto Setup is normally quite accurate but
occasionally false results can be generated.
Problems may be as a result of:
<< external sounds or rumbling/handling
noises picked up by the microphone
<< sound reflections off hard surfaces (e.g.
windows or walls) close to the listening
position,
<< very strong acoustic resonances within
the room,
<< obstacles (such as a sofa) between
speakers and the microphone.
<
Using a subwoofer
If your system includes an active subwoofer
you may need to re-run Auto Setup with the
subwoofer output level/gain control set to a
medium value.
Auto Setup will attempt to select a crossover
frequency that allows the smoothest low
frequency transition from the main speakers
to the subwoofer. However if this does not
produce pleasing results we recommend
manually trying other crossover frequencies
to find something more to your preference.
When Auto Setup is run it also calculates
Room EQ values to remove some of the
worst effects of resonant frequencies in the
listening room.
By default, Room EQ is disabled. You should
enable Room EQ on inputs you think
benefit from this feature, as required, by
listening to typical source material through
each input.
While room equalisation can help to reduce
problems with listening room acoustics,
it is usually far better to try to solve these
problems with the room directly. To enable
Room EQ see page 19 in system setup.
English
system setup
Use the remote control and follow these steps to ensure
your Solo bar is set up for maximum enjoyment.
System setup menu
Speaker/EQ setup menu
Default settings are shown in Blue.
Default settings are shown in Blue.
System Setup
Lipsync Delay
0 to 200ms
Display Level
Dim g Bright g Off
Delays may be introduced into the video signal by video
processing which causes a mismatch between the audio and
video timing. You will notice this by speech sound being out
of synch with lip movements. To compensate for this, you can
adjust the lip sync delay. Use the
and
buttons to adjust
synchronisation between sound and vision. Press to go
back a level or
to exit setup.
The LED display levels can be adjusted to suit your
requirements. Use the
and
buttons to switch between
settings. When set to Off, the display illuminates briefly
whenever it receives a command. Press to go back a level or
to exit setup.
App Control
Enable g Disable
Enables the Solo bar to be woken from standby using the
optional remote control app. Use the
and
buttons to
switch app control on or off. Press to go back a level or
to exit setup.
IR Repeater
Enable g Disable
Use the
and
buttons to switch IR repeater on or off.
See page 16 for more information. Press to go back a level or
to exit setup.
System Info
Press OK to view the system software version.
Factory Defaults
Press OK to reset the Solo bar to factory defualts. Note: Paired or connected devices will be lost.
Press to go back a level or
to exit setup.
E-18
Speaker/EQ Setup
Auto Setup
Auto setup configures your Solo bar for optimum listening experience Press OK to start setup
procedure. See page 17 for more information.
Room EQ
Enable g Disable
Sub Pairing
Press
Subwoofer Level
0 to -12dB
Use the
and
buttons to select a subwoofer level.
Note: Only available after Sub Pairing has been completed.
Press to go back a level or
to exit setup.
Headphone out
BT Transmitter
Enable g Disable
Use the
and
buttons to switch Bluetooth® transmitter
on or off. Press to go back a level or
to exit setup.
Device search
Note: Only available if headphone out is enabled.
Press
to start searching for headphones. Use
and
buttons to select headphone from list. Press to go back a
level or
to exit setup.
E-19
Use the
and
buttons to switch EQ on or off.
Note: Only available after Auto setup has been completed.
Press to go back a level or
to exit setup.
to start pairing procedure. See page 10 for more information.
English
firmware update
HDMI setup menu
Download an update file
Performing the update
Default settings are shown in Blue.
To perform a firmware update, you’ll need
to download an update file from the Arcam
web site.
Make sure the soundbar is turned on at the
plug and in standby mode.
HDMI Setup
HDMI Audio Out
Disable g Passthrough
CEC / ARC
Enable g Disable
Use the
and
buttons to switch HDMI Passthrough on
and off. HDMI passthrough passes the video and audio signal
from any HD source to your Solo bar via an HDMI cable.
The Solo bar splits the signal, playing the audio from the HD
source through its own speakers and sending the unaltered
video signal to a TV using an HDMI OUT cable. Press to
go back a level or
to exit setup.
Use the
and
buttons to switch CEC/ARC on or off.
See page 16 for more information. Press to go back a level or
to exit setup.
Check the availablity of firmware updates by
typing www.arcam.co.uk into your browser
and navigating to the Solo bar page.
Press and hold the
and
buttons
simultaneously for about five seconds.
Note: Make sure you download the file to the
root of your USB, do not put it inside a folder
or the update will fail.
The Solo bar will turn on and display the
following information:
ARCAM SB M:V024
B:40526 D:30304
Note: M = Main software version,
B = Bluetooth software version and
D = DSP software version.
Press the
button to go to the software
update screen.
The display will change to:
System Update
Insert USB...
If the update was successful, the display will
show the following information for about
three seconds, after which the Solo bar will
turn itself off.
Note: Pressing IN- again will cycle between
this and the software version screen.
System Update
Complete
Insert the USB drive containing the update
file into the UPGRADE socket on the rear
panel of the Solo bar.
If the update was not successful, the display
will show the following information for
about three seconds, after which the
Solo bar will turn itself off and the whole
procedure will need to be performed again.
The firmware update will
start automatically once
the USB drive has been
detected and the display
will change accordingly:
System Update
Updating...
If 30 seconds have elapsed before the USB
was inserted, the display will timeout and
change to:
System Update
USB Not Detected
This message will be displayed for about
three seconds, after which the Solo bar will
turn itself off and the entire procedure will
need to be repeated.
E-20
E-21
System Update
Error
English
specifications
troubleshooting
General
Weight (Packed)
Dimensions (H x W x D)
Power consumption
10kg
130mm x 1100mm x 110mm
Operating mode: 150W (max)
Standby mode: <0.5W
100 – 240V, 50/60Hz
Here are some simple checks you can do if
you are experiencing problems with your
Solo bar.
Power requirements
Inputs/Outputs
HDMI In
Type A receptacle x 4
HDMI Out
Type A receptacle, with ARC/CEC support
Digital In (Optical)
S/PDIF Optical receptacle
Digital In (Coaxial)
RCA jack
Auxiliary In
3.5mm stereo jack
Bluetooth Audio
Ver. 3.0, Compliant with A2DP standard
Subwoofer Out
RCA LFE jack
Wireless Subwoofer Output
Frequency
2.4GHz
Transmission range
Approx. 20m (without interference)
Amplifier
Rated power output:
Woofer (0.5% THD)
40W per channel
Tweeter (0.5% THD)
10W per channel
Nominal Amplifier Output Level (20Hz-20kHz)
100 W
Speakers
Woofer 1
2 x 4in Cone
Woofer 2
2 x 4in Cone
Tweeter
2 x 1in Cone
Woofer frequency response
170Hz – 20kHz ± 3dB
Tweeter frequency response
3.8kHz – 14kHz ± 3dB
Rated impedance
6Ω
E&OE
NOTE: All specification values are typical unless otherwise stated.
Power
<< Check that the power cord is plugged in
and connected properly.
<< Make sure the power and mains
switches are turned on.
Remote control
<< Check the batteries are inserted
correctly.
<< Batteries may need replacing.
<< Are you too far away from the unit or is
there an obstruction?
Picture
<< If there is no picture or it is displaying
badly, check the HDMI cables are
connected properly.
<< Check that the right input source is
selected.
Bluetooth
<< Check your Bluetooth device is paired
correctly.
<< Is your Bluetooth device too far away
from the unit?
Sound
<< Make sure the cables are connected
properly.
<< Check that the right input source is
selected.
<< If the sound is noisy or distorted during
playback from a Bluetooth device, try
turning the volume down on the device
and up on the Solo bar.
Continual improvement policy
Arcam has a policy of continual
improvement for its products. This
means that designs and specifications
are subject to change without notice.
E-22
E-23
FCC Notice
This product contains FCC ID: VNH-IKCSRBC05/QEC-GWNO
This equiment has been tested and found to
comply with the limits for a Class B digital
device, pursuant to Part 15 of the FCC
Rules. These limits are designed to provide
reasonable protection against harmful
inteference in a residential installation.
This equipment generates, uses and can
radiate radio energy and, if not installed and
used in accordance with the instructions,
may cause harmful interference to radio
communications. However, there is no
guarantee that interference will not occur in
a praticular installation. If this equipment
does cause harmful interference to radio
or television reception, which can be
determined by turning the equipment off
and on, the user is encouraged to correct the
interference by one or more of the following
measures:
<< Reorient or relocate the receiveng
antenna.
<< Increase the separation between the
equipment and the receiver.
<< Connect the equipment to an outlet on
a circuit different from that to which
the reciver is connected.
<< Consult the dealer or an experienced
radio/TV technician for help.
This device complies with part 15 of the
FCC Rules. Operation is subject to the
following two conditions:
(a) This device may not cause harmful
interference, and
(b) This device must accept any interference
recieved, including interference that may
cause undesired operation.
(FCC Part 15.21) Caution: changes or
modifications not expressly approved by
the party responsible for compliance could
void the user’s authority to operate the
equipment.
Canada ICES-003 statement
This product contains IC
10581A-IKCSRBC05/10581A-GWK5NO
This product complies with RSS-210 of
industry Canada.
Operation is subject to the following two
conditions:
(1) this product may not cause harmful
interence, and (2) this product must
accpet any inteference received, including
interference that may cause undesired
operation.
This Class B digital apparatus complies with
Canadia ICES-003.
English
fixing
instructions
product
guarantee
Use the custom-designed wall mount accessory to
attach the Solo bar safely and securely to a wall.
You will need
<< Power drill
<< Drill bit, wall plugs and fixings suitable
for the type of wall you are fixing to.
<< Screw driver
<< Spirit level
<< Pencil
<< Tape measure
Fixing procedure
1. Make sure the wall bracket is horizontal
by placing a spirit level underneath it.
2. Mark the holes with a pencil, taking
care to trace the outlines accurately.
3. Carefully drill four holes, using a drill
bit and plugs suitable for the type of
wall you are fixing to.
4. Attach the wall mount to the wall using
four robust screws (the screw should
have a minimum diameter of 5.5mm),
making sure they fit the wall plugs
correctly and are done up tight and
evenly.
Caution: Do not mount the unit on
plywood or any soft surface walls. If you
are uncertain of the wall quality, consult
a professional for advice.
Copyright
Worldwide guarantee
Claims under guarantee
Problems?
June 2014, © 2014 A&R Cambridge Ltd.
Arcam warrants that the products
described in this guide shall conform to
their published specification in all material
respects for a period of two years from the
date of purchase. This entitles you to have
the unit repaired free of charge, provided
that it was purchased from an authorised
Arcam dealer.
This equipment should be packed in the
original packaging and returned to the
dealer from whom it was purchased.
It should be sent carriage prepaid by a
reputable carrier – not by post.
If your Arcam dealer is unable to answer
any query regarding this or any other Arcam
product please contact Arcam Customer
Support at the address below and we will do
our best to help you.
No responsibility can be accepted for
the unit whilst in transit to the dealer or
distributor and customers are therefore
advised to insure the unit against loss or
damage whilst in transit.
Arcam Customer Support Department,
Unit 15, Pembroke Avenue,
Waterbeach, CAMBRIDGE,
CB25 9QP, England or via
www.arcam.co.uk.
A & R Cambridge Limited (Arcam)
reserves the right to make changes to the
specifications of the products detailed in
this document at any time without notice
or obligation to notify any person of such
changes.
5. Finally, attach the Solo bar to the wall
mount by carefully guiding it onto the
two protruding supports. It should sit
firmly and securely against the wall.
All third-party trademarks are
acknowledged and observed. Mention of
third-party products does not constitute an
endorsement or a recommendation.
Arcam takes every precaution to ensure that
all information contained in this publication
is factually correct but accepts no liability
for any error or omission.
The Arcam dealer is responsible for all
after-sales service. The manufacturer can
take no responsibility for defects arising
from accident, misuse, abuse, wear and tear,
neglect or through unauthorised adjustment
and/or repair, neither can they accept
responsibility for damage or loss occurring
during transit to or from the person
claiming under the guarantee.
The warranty covers:
24.0
15.0
Parts and labour costs for two years from
the purchase date. After two years you must
pay for both parts and labour costs. The
warranty does not cover transportation
costs at any time.
200.0
Make sure the screws are tight and flush
before guiding the Solo bar down onto the
two protruding supports. It should sit
securely against the wall.
E-24
24.0
15.0
Make sure the wall mount is horizontal.
E-25
On-line registration
You can register your product on-line at
www.arcam.co.uk.
technology
licensing
Manufactured under license from Dolby
Laboratories. Dolby and the double-D
symbol are trademarks of Dolby
Laboratories.
© 2013 CSR plc and its group companies.
The aptX® mark and the aptX logo are
trade marks of CSR plc or one of its group
companies and may be registered in one or
more jurisdictions.
®
The terms HDMI and HDMI HighDefinition Multimedia Interface, and the
HDMI Logo are trademarks or registered
trademarks of HDMI Licensing LLC in the
United States and other countries.
The Bluetooth® word mark and logos are
registered trademarks owned by Bluetooth
SIG, Inc. and any use of such marks by
Arcam is under license. Other trademarks
and trade names are those of their respective
owners.
“Made for iPod,” “Made for iPhone,” and
“Made for iPad” mean that an electronic
accessory has been designed to connect
specifically to iPod, iPhone, or iPad,
respectively, and has been certified by the
developer to meet Apple performance
standards. Apple is not responsible for the
operation of this device or its compliance
with safety and regulatory standards. Please
note that the use of this accessory with
iPod, iPhone, or iPad may affect wireless
performance.
Bluetooth technology works with iPhone
5s, iPhone 5c, iPhone 5, iPhone 4s, iPhone
4, iPhone 3GS, iPad Air, iPad (3rd and 4th
generation), iPad 2, iPad mini with Retina
display, iPad mini, and iPod touch (4th and
5th generation).
iOS, iTunes, iPad, iPhone and iPod are
trademarks of Apple Inc., registered in the
U.S. and other countries. App Store is a
service mark of Apple Inc.
SM
For DTS patents, see http://patents.dts.
com. Manufactured under license from
DTS Licensing Limited. DTS, DTS-HD, the
Symbol, & DTS and the Symbol together are
registered trademarks, and DTS-HD Master
Audio is a trademark of DTS, Inc. © DTS,
Inc. All Rights Reserved.
E-26
Made for:
• iPhone 5s
• iPhone 5c
• iPhone 5
• iPhone 4s
• iPhone 4
• iPhone 3GS
• iPad Air
• iPad mini with Retina display
• iPad (4th generation)
• iPad mini
• iPad (3rd generation)
• iPad 2
• iPod touch (5th generation)
• iPod touch (4th generation)
Google Play™ is a trademark of Google Inc.
Android™ is a trademark of Google Inc.