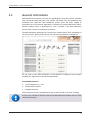
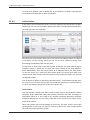
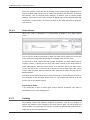
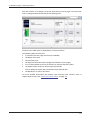
1
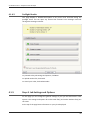
Web Submission User Manual uniFLOW V5.2 SR9 Disclaimer All rights reserved. No parts of this work may be reproduced in any form or by any means - graphic, electronic, or mechanical, including photocopying, recording, taping, or information storage and retrieval systems - without the prior written permission of NT-WARE Systemprogrammierungs-GmbH (hereinafter also referred to as NT-ware). Company and product names mentioned herein are registered or unregistered trademarks of their respective companies. Mention of third-party products is for information purposes only and constitutes neither an endorsement nor a recommendation. NT-ware assumes no responsibility with regard to the performance or use of these products. Also, NT-ware makes no claim to these trademarks. Any use of trademarks, logo, service marks, trade names, and product names is prohibited without the written permission of the respective owners. Adlib, Express and Express Server are either registered trademarks or trademarks of Adlib Publishing Systems Inc.; Adobe®, Adobe® Reader®, Acrobat®, Distiller®, PostScript® and products of the CREATIVE SUITE(S) are either registered trademarks or trademarks of Adobe Systems Incorporated in the United States and/or other countries; Android is a trademark of Google Inc.; Apple®, the Apple® logo, Mac®, Mac OS®, Macintosh®, iPhone®, iPad® and AirPrint™ are trademarks of Apple Inc. registered in the U.S. and other countries; Box of Box Inc.; Blackboard Transact™ of Blackboard Inc.; CANON, imageRUNNER, imageRUNNER ADVANCE, MEAP, CPCA, AMS, iW AMS, iW Desktop, iSend, iW SAM are trademarks or registered trademarks of Canon Inc.; CardSmith® is a trademark of CardSmith LLC; CBORD CS Gold® of the CBORD Group Inc.; Crystal Reports and other Business Objects products and services mentioned herein as well as their respective logos are trademarks or registered trademarks of Business Objects Software Ltd. Business Objects is an SAP company; Dropbox of Dropbox Inc.; eCopy™, eCopy ShareScan® and eCopy ScanStation™ are marks or trademarks of Nuance Communications, Inc.; Evernote® of Evernote Corporation; FileNet® of IBM Corporation; Foxit®SDK and Foxit® Reader of Foxit Corporation; Google Docs of Google Inc.; Google Cloud Print™ web printing service is a trademark of Google Inc.; Helix™ Production Workflow is a trademark of NT-WARE Systemprogrammierungs-GmbH; HP, HEWLETT-PACKARD, PCL and LASERJET are registered trademarks that belong to Hewlett-Packard Development Company; KONICA MINOLTA is a registered trademark of KONICA MINOLTA Inc.; iOS® of Cisco Technology Inc.; iDRS™ SDK and IRISConnect™ are unregistered trademarks of I.R.I.S. Group S.A.; JAWS pdf courier™ are trademarks of Global Graphics SA.; Microsoft®, Windows®, Windows Server®, Internet Explorer®, Internet Information Services, Microsoft® Word, Microsoft® Excel, Microsoft SharePoint®, Microsoft SharePoint® Online, OneDrive®, One Drive® for Business, SQL Server®, Active Directory® are either registered trademarks or trademarks of Microsoft Corporation in the United States and/or other countries of Microsoft Corporation; Neevia Document Converter Pro™ of Neevia Technology; NetWare®, Novell®, Novell eDirectory™ of Novell Inc. are registered/unregistered trademarks of Novell Inc. in the United States and other countries; MobileIron® of Mobile Iron Inc., Océ, Océ PlotWave®, Océ ColorWave® and PRISMA are trademarks or registered trademarks of Océ Holding B.V., OpenOffice.org™ of Oracle Corporation; PAS™ is a trademark of Equitrac Corp.; PosterJet is copyrighted and an internationally registered trademark of Eisfeld Datentechnik GmbH & Co. KG; RedTitan EscapeE of RedTitan Limited; NETAPHOR®, SiteAudit™ are trademarks of NETAPHOR SOFTWARE Inc.; SAMSUNG is a trademark of SAMSUNG in the United States or other countries; Therefore™, Therefore™ Online of Therefore; UNIX® is a registered trademark of The Open Group; uniFLOW®, uniFLOW Serverless Secure Printing®, Helix Production Workflow®, MIND®, microMIND®, and MiCard® are registered trademarks of NT-WARE Systemprogrammierungs-GmbH; pcProx®, AIR ID® are registered trademarks of RFIdeas Inc.Readers; CASI-RUSCO® is a registered trademark of ID Card Group; Radio Key® is a registered trademark of Secura Key; GProx™ II is an unregistered trademark of Guardall; HID® ProxHID is a registered trademark of HID Global Corporation; Indala® is a registered trademark of Motorola; ioProx™ is an unregistered trademark of Kantech; Xerox, Xerox and Design, as well as Fuji Xerox and Design are registered trademarks or trademarks of Xerox Corporation in Japan and/or other countries. All other trademarks, trade names, product names, service marks are property of their respective owners and are hereby acknowledged. While every precaution has been taken in the preparation of this document, NT-ware assumes no responsibility for errors or omissions, or for damages resulting from the use of information contained in this document or from the use of programs and source code that may accompany it. NT-ware does not assume any responsibility or liability for any malfunctions or loss of data caused by the combination of at least one NT-ware product and the used operation system and/or third-party products. In no event shall NT-ware be liable for any loss of profit or any other commercial damage caused or alleged to have been caused directly or indirectly by this document. In addition, this manual provides links to the sites of affiliated or independent companies and certain other businesses. NT-ware is not responsible for examining or evaluating, and NT-ware does not warrant the offerings of, any of these businesses or individuals or the content of their websites. NT-ware does not assume any responsibility or liability for the actions, product, and content of all these and any other third parties. You should carefully review their privacy statements and other conditions of use. Tuesday, November 03, 2015, Bad Iburg (Germany) Important Note Serious problems might occur if you modify the registry of your Windows operating system incorrectly. These problems might require that you reinstall the operating system. We strongly recommend to always back up the registry of your Windows operating system before applying changes to it, just in case you do something wrong. NT-ware does not assume any responsibility or liability for any impact on the operating system after changing the registry. You understand and accept that you use this information and modify the registry of your Windows operating system at your own risk. Copyright and Contact NT-WARE Systemprogrammierungs-GmbH Niedersachsenstraße 6 49186 Bad Iburg Germany www.nt-ware.com Should you come across any relevant errors or have any suggestions please contact [email protected] or use the Send feedback here button of the uniFLOW Online Help. ©1998-2015 NT-WARE Systemprogrammierungs-GmbH. Symbols Text Styles This style is used for text that is displayed on screen. This style is used for text the user has to type in. This style is used for hyperlinks to web pages, internal links to other pages in this manual. This style is used for code examples: XML code, variables or regular expressions. Pictograms Important Note: Information that is crucial for the correct functioning of the uniFLOW software. External Manual: Pointer to additional manuals for third party hardware or third party software. Region Specific Feature: Indicator for uniFLOW features that are not available worldwide. External Link: Link to an external web page. Settings: Detailed explanation of configuration settings or operational procedures. Compass: Path to the menu or configuration page in the software. Screenshots and Diagrams This manual contains screenshots of the software, diagrams explaining relations and pictures of products. Even though all visuals are up-to-date at the time of writing, they are subject to change. Send Feedback Should you come across any relevant errors or have any suggestions please contact [email protected] or use the Send feedback here button of the uniFLOW Online Help. Web Submission User Manual Contents Contents 1 Introduction ............................................................................................... 1 1.1 General Information ..................................................................................................... 2 2 Web Shop Pages ......................................................................................... 3 2.1 Web Shop Sections........................................................................................................ 4 2.1.1 2.1.2 2.1.3 Login & Registration....................................................................................................................... 4 Information Box ............................................................................................................................. 6 User Info......................................................................................................................................... 6 2.1.3.1 General Settings ..................................................................................................................................... 6 2.1.3.2 Change Password ................................................................................................................................... 7 2.1.3.3 Personal Data ......................................................................................................................................... 7 2.1.3.4 Addresses ............................................................................................................................................... 8 2.1.3.5 Budget .................................................................................................................................................... 9 2.1.4 My Menu ......................................................................................................................................10 2.1.4.1 Documents ........................................................................................................................................... 10 2.1.4.2 Active Orders ........................................................................................................................................ 12 2.1.4.3 Order History ........................................................................................................................................ 13 2.1.5 2.1.6 2.1.7 Catalog .........................................................................................................................................13 Shopping Cart...............................................................................................................................15 Search Function ...........................................................................................................................16 3 Upload of Files .......................................................................................... 17 3.1 Available Options ........................................................................................................ 18 3.1.1 3.1.2 3.1.3 Documents Menu ........................................................................................................................18 During Order Creation .................................................................................................................18 Web Submission Printer Driver....................................................................................................19 4 Order Process ........................................................................................... 23 4.1 Sequence of Order Steps ............................................................................................. 24 4.1.1 4.1.2 4.1.3 4.1.3.1 4.1.4 Step 1: Job Profile Selection.........................................................................................................24 Step 2: Type of Order ...................................................................................................................25 Step 3: Order without File(s) ........................................................................................................26 File Selection and Sorting ..................................................................................................................... 26 Step 3: Order with File(s) .............................................................................................................27 4.1.4.1 File Selection and Sorting ..................................................................................................................... 28 4.1.4.2 Preflight Check ..................................................................................................................................... 29 4.1.4.3 Preflight Results.................................................................................................................................... 30 4.1.5 Step 4: Job Settings and Options .................................................................................................30 4.1.5.1 Job Profile Brochure ............................................................................................................................. 33 4.1.5.2 Authorization ........................................................................................................................................ 34 4.1.5.3 Quotation ............................................................................................................................................. 37 4.1.6 Step 5: Confirmation ....................................................................................................................39 I Web Submission User Manual 4.1.7 Contents Variable Data Print Jobs ...............................................................................................................39 4.1.7.1 Examples............................................................................................................................................... 40 4.1.7.2 VDP Order Steps ................................................................................................................................... 43 4.1.8 Fixed Products..............................................................................................................................46 5 Payment Process ...................................................................................... 49 5.1 Check-Out Steps .......................................................................................................... 50 5.1.1 5.1.2 5.1.3 5.1.4 5.1.5 6 Overview ......................................................................................................................................50 Addresses .....................................................................................................................................51 Payment Type ..............................................................................................................................51 Summary ......................................................................................................................................52 Confirmation ................................................................................................................................52 Index ........................................................................................................ 53 II Introduction 1 1.1 Introduction > General Information 1.1 General Information Web Submission provides an easy way for uploading files using the internet. Uploaded files can then be printed by your print provider. By default, you can upload PDF and PostScript files. With the Web Submission printer driver the direct upload of documents out of all common applications is possible (for example Microsoft® Office, Adobe® Creative Suite® or QuarkXpress®). This is possible as the web submission printer driver converts any document into a PDF. The Web Submission web page has a central main communication area. Depending on the chosen menu, different information and interaction possibilities are displayed. All you need on your client computer is a web browser. Provided you have cookies enabled, your login data can be stored automatically. Compatible Browsers Internet Explorer 7.0 - 11.0 Mozilla Firefox 8 and 9 Google Chrome 16 Newer browsers may be compatible but have not been tested at the time of writing. Contact your provider to obtain the URL of the Web Submission website and any other relevant information. 2 Web Shop Pages 2 2.1 Web Shop Pages > Web Shop Sections 2.1 Web Shop Sections The web shop of Web Submission is assembled from multiple sections. Before you login to Web Submission, the following sections are available: Login & Registration (on page 4) Search (see "Search Function" on page 16) Catalog (on page 13) After successful login to Web Submission, the following additional sections are displayed: User info (on page 6) Shopping cart (on page 15) My menu (on page 10) The Catalog might provide additional items for logged-in users. 2.1.1 Login & Registration Login On the Web Submission homepage you can log in or register. 4 2.1 Web Shop Pages > Web Shop Sections If you have already registered, just type in your User Name and Password to log in. Registration To register, click on Registration and enter your user details. The user name must consist of at least five characters. Only numbers (0-9), letters (a-z, A-Z) and the characters ".", "_", "-" and "@" can be used. Mandatory fields are marked with an asterisk. Your provider determines which data is mandatory. Type in the Verification Code that is displayed in the field below and click on Send. After a successful registration you will be sent a corresponding email, likewise if your registration data still needs to be checked by the administrator. After a successful registration, you will receive an email with a random password to login to Web Submission. Depending on your provider's settings, you can either login immediately, or you will have to wait until your new registration data has been 5 2.1 Web Shop Pages > Web Shop Sections accepted by your provider. Then, you can login with your chosen User Name and the Password that has been sent to you. Reset Password If you forgot your password you can click on Forgot Password to reset it. Enter your User Name and Email Address to obtain a new password by email. 2.1.2 Information Box The information box provides further information possibilities. : The Home icon allows to go back to the homepage. : Click the Manual icon to open and/or download the Web Submission User Manual. A new browser window with the Web Submission PDF manual will be opened. A PDF reader add-on for the browser is required. : The Install icon allows the download of the Web Submission printer driver. This icon might not be available in some configurations. : The Budget icon provides a link to the Budget (on page 9) menu if your provider enabled online payment. The available budget is shown next to the icon. 2.1.3 User Info 2.1.3.1 General Settings Language: Select the desired display language. Delivery Address: Choose a Delivery Address that has been created under Addresses (on page 8). Invoice Address: Choose an Invoice Address that has been created under Addresses (on page 8). Cost Center: Choose a Cost Center, if applicable. Document Overview: Enter the number of rows to be displayed on one page of the Document Overview. 6 2.1 Web Shop Pages > Web Shop Sections Order Overview: Enter the number of rows to be displayed on one page of the Order Overview. Click on Save to save your settings. 2.1.3.2 Change Password 1. 2. 3. 4. 5. 2.1.3.3 Enter your old password in the first field. Enter your new password in the second field. Re-enter your new password in the third field. Click on Change Password. Click on Save to save your settings. Personal Data 1. Enter or modify your personal data, for example Name, Department, Street/No, Zip, City, State, Country, Email, Phone, and Fax. 7 2.1 Web Shop Pages > Web Shop Sections 2. 2.1.3.4 Click on Save to save your new settings. Addresses You can create new addresses and modify or delete existing ones. Creating Addresses 1. 2. 3. 4. Start with selecting an address type. Choose either Delivery Address or Invoice Address. Fill in the appropriate information. Click on Save to save your settings. To add another address, click on Click here to display the fields for another address. Modifying Addresses 1. 2. 3. Click in the line that needs to be modified. Overwrite the content with the new data. Click on Save to save your settings. Deleting Addresses 1. Click on the in the Delete column of the corresponding table line. 8 2.1 Web Shop Pages > Web Shop Sections 2. 2.1.3.5 Click on Save to save your settings. Budget The Budget menu is only enabled if Online Payment has been enabled by your provider. To use this way of payment, you need to have your own account with the appropriate online payment provider. With Web Submission it is possible to use PayPal and WorldPay. Depending on your print provider none, one of them or both are made available for you. Budget Info: Displays your Current Balance and the last time a Budget Change has taken place. Click the Refresh button to update the data. Last Budget Recharges: Displays a list with the latest Budget Recharges, including the Date, Provider/Operator and the Amount that was recharged to your budget. Budget Recharge: Click this button to recharge your budget. Next, enter a Cash Amount. The minimum amount and maximum amount (per day) are determined by your provider. If more than one online payment provider is available, you can choose which one you would like to use. 9 2.1 Web Shop Pages > Web Shop Sections Click Next to proceed. The next step directs you to the payment web pages of your online payment provider. Here you have to login to have your budget recharged. After completion of the budget recharge you will be redirected back to Web Submission. 2.1.4 My Menu 2.1.4.1 Documents In this menu you will find all the documents you have already uploaded. all the files used in one of your completed orders that were sent to the operator by email, FTP, delivery service or personal delivery. In the first box of the My Documents section you will find some general information: 10 2.1 Web Shop Pages > Web Shop Sections The percentage of Used Space in relation to the max. allowed space for file upload is displayed. The Maximum Allowed File Size The Allowed File Types that is to say the file formats you can upload in the My Documents menu. Below you will find the Upload button. Uploading Documents 1. 2. 3. Click the Upload button to browse for the desired file. Select the desired file. In the file selection window, click on Open to automatically start the upload. The second box holds a table that lists all uploaded files. These files are automatically available when you create a new order. The uploaded documents are listed with the following information: Name of the document, a Preview (if available), Size, No. of Pages and Color Pages, and the Upload Date. You can sort the table via the select box in the header. For each sorting option you can use the arrow symbol to change from descending to ascending order and vice versa. With a click on the Name of a document which is provided as a hyperlink, you can either open or store the corresponding document. To select a document click on the column it is displayed in. To unselect a document click on it again. To delete a document, first select it, then click on the Delete button. After you have clicked on Delete, a pop-up window opens. This window displays the File Name and the File Size. You can choose now whether you would like to delete the Original File, the PDF Preview, the Original File and the PDF Preview or opt for a Permanent deletion (files and database record). Your provider can decide to display these files in the Catalog, so that you can still add them to new orders. However, you can no longer download or open the deleted files in your Documents menu. 11 2.1 Web Shop Pages > Web Shop Sections To confirm the deletion, click on Delete File. If you decide not to delete anything, click on Go Back to the Overview to abort the deletion. 2.1.4.2 Active Orders In this menu you will find all the orders you have submitted, but which have not been finished yet. You can see the Orders' Name, Order Status and the Date and time when the order was sent to the operator. The select box in the header allows you to sort the list according to Name, the Status or the Date. For each sorting option you can use the arrow symbol to change from descending to ascending order and vice versa. To search for an order click on the filter symbol. Thereafter, the Filter options pop-up window is shown, in which you can enter your search criteria for the order Name or Date. Subsequently, select the search option Or or And and click on the Filter button to start the search. As a result only those Active Orders are shown that match your search criteria. Clear the filter with the Remove Filter symbol and refresh the list with the Refresh symbol. Click on Delete to delete (a) previously selected order(s). A confirmation window pops up in which you can either confirm that you would like to delete the selected order(s) or cancel the deletion and go back to the Active Orders list. Order Status Until the operator receives your order, the first order status is usually Order Creation Complete, Order Unchecked. When the operator processes the order he assigns an appropriate status to it. This could be for example, Received, Reviewed, Accepted, Printed, In Delivery etc. You can always check the current status of your orders in your Active Orders menu. When the operator has to make changes to your order, the order status is set to Sign off Requested. In that case, you have to confirm or decline the order changes before the order will be processed any further. 12 2.1 Web Shop Pages > Web Shop Sections Send your decision to the operator by clicking on the hyperlink Sign off Requested. A pop-up window opens where you can make and comment your decision. To confirm the changes, click on Confirm Order Changes; to decline, click on Decline Order Changes. The status of your order changes to Signed off or Client Rejected Sign Off, respectively. A third option is to click on Go back to the Order Overview to postpone your decision. 2.1.4.3 Order History When your order is completed, it is automatically available in your Order History menu. You can sort the orders by job Name or Date. For each sorting option you can use the arrow symbol to change from descending to ascending order and vice versa. To search for an order click on the filter symbol. Thereafter, the Filter options pop-up window is shown, in which you can enter your search criteria for the order Name or Date. Subsequently, select the search option Or or And and click on the Filter button to start the search. As a result only those Orders are shown that match your search criteria. Clear the filter with the Remove Filter symbol and refresh the list with the Refresh symbol. The PDF Preview symbol allows you to open the file and or store it wherever you like. If you would like to see the Order Details that is to say the data you entered in the job profile, click on the Details symbol. Reprinting an Order If you would like to print an order again click on Reprint. Thereafter, your order is immediately sent to your Shopping Cart. 2.1.5 Catalog The Catalog contains the different categories of products. Click on any category to display the products of this category in the main section. Here, you can browse and select products you would like to purchase. A product is selected and unselected by a single click on the corresponding line. 13 2.1 Web Shop Pages > Web Shop Sections Sort the contents of a category using the select box on the top right. Use the arrow icon to change between descending and ascending order. The data in the table varies in dependence on the the product. The following data can be shown: a preview of the first page of the item (if available). the Name of the item. the purchase price. the Page Count (total number of pages and number of color pages). an icon that indicates the print job format, for example the PDF symbol. the details of the product or the print job respectively. Click on details to display the price details of the selected item. the Buy button to start a new order. For more detailed information the product types and the order creation, refer to chapter How to order (see "Sequence of Order Steps" on page 24). 14 2.1 Web Shop Pages > Web Shop Sections 2.1.6 Shopping Cart In the heading of the Shopping Cart the total number of contained orders is displayed. Furthermore, the Shopping Cart lists each order with its name, the number of copies, the individual price and the Total of all items. Two buttons allow you to either empty the cart or to proceed to check out. Click on Empty Cart to cancel all your orders. Click on Check Out to finish your order. After the Check Out, the payment procedure starts with an overview of all orders. If you wish to remove an item from the shopping cart, click on the red-white X symbol in the first column of the order in question. 15 2.1 Web Shop Pages > Web Shop Sections 2.1.7 Search Function You can either search for items in one of the sections: Orders, Documents, Catalog or in All sections. Enter your search criteria in: Saved After: displays only items that have been saved after the selected date Saved Before: displays only items that have been saved before the selected date Job Name: displays only items that match the name, you enter in the corresponding field Search in: via this select box you can define where the search shall take place. Available options are Catalog, Documents, Orders or All. It is also possible to use the * (asterisk) for a wildcard search. By default your search is carried out using the search operator OR. If you would like to apply the search operator And click in the radio button next to AND. With a click on Filter your search is carried out. The results are displayed in the main section. 16 Upload of Files 3 3.1 Upload of Files > Available Options 3.1 Available Options There are three ways for uploading files to the Web Submission server: 1. Upload of PDF or PostScript (PS) files To create these files, you either need Adobe® Acrobat or another suitable application. 2. Upload of native files Note that the upload of native files is only possible if enabled by your provider. Otherwise, it is only possible to upload PDF or PostScript files. 3. Using the Web Submission Printer Driver This allows the direct printing out of an application. The files are automatically converted to PDF. Password encrypted PDFs are not supported! When uploading mixed media PDF documents containing Landscape oriented PDF documents via the Web Submission printer driver, please ensure that the two PDF options Auto-Rotate and Center and Choose paper source by PDF page size in the Adobe Print Dialog are activated! 3.1.1 Documents Menu In the menu Documents you can upload files from your local disc, USB flash drive, etc. Depending on the Allowed File Types you can either upload All native Documents, only PDF-/ PostScript-Files or Large Format Printing Documents (a list of the allowed file types defined by the provider). 1. Choose your Documents menu. 2. Click on the Upload button to select the desired file. 3. Locate the file and click on Open. 4. If the file type is allowed, the file will automatically be uploaded to your list of documents. If your provider has not allowed the upload of the file type, an error will be shown. The uploaded file will automatically be available when you create a new order using a Job Profile. 3.1.2 During Order Creation In the first step of a Job Profile you can upload files from your local disc, USB flash drive, etc. 1. Click on the Job Profiles menu of the Catalog to display all available Job Profiles. 18 3.1 Upload of Files > Available Options 2. 3. 4. 5. 6. 7. Click on Start to choose a Job Profile. This opens the first page of the appropriate job ticket. Select the option Order with files as Type of order. Enter an Order Name in the section File Selection and Sorting. Click on the Upload button and browse to the desired file. Choose the desired file and click on Open. The file will automatically be uploaded. A message confirms that the File Upload was successful. The file is displayed in the list below, so that you can Add it to your order. Additionally, this file is now automatically available in your Documents list. 3.1.3 Web Submission Printer Driver The Web Submission printer driver allows the uploading and processing of common document formats. These can for instance be Microsoft Office, Adobe® Creative Suite, or QuarkXpress® documents. The Web Submission printer driver converts the different file formats to a compressed PDF file and automatically uploads the converted document to the Web Submission server. Either your provider distributes the printer driver by email, or you can simply download the driver using a hyperlink (if provided and enabled by the Web Submission provider/administrator): 1. Login to the Web Submission web page and navigate to Documents. 2. 3. 4. Click on the hyperlink (Download the Web Submission Printer Driver). Save the MSI driver installation file to your local hard disk and run it. Follow the instructions during the installation routine for installing the Web Submission Printer Driver. After a successful installation, the printer driver will be available in the Windows printers menu. You can use this printer from your applications for printing documents to the Web Submission server. Proceed as follows for converting and uploading a file to the Web Submission server: 1. Open the file you wish to upload with its associated application (for example, open a *.doc file with MS Word or Open Office Writer). 2. Start the printing process as usual in the relevant application. 3. Choose the Web Submission Printer for printing the file. When you print a document with the Web Submission Printer a window opens, showing the progress of the PDF creation. The printer driver generates a preview of the document in the background. Later, you can review and accept the PDF preview, proceed with, or delete the created file. When you print for the first time after installation of the Web Submission Printer Driver and Web Submission Configuration > Main Settings > Upload Settings > Enable enhanced security for the uniFLOW Port is set to Yes (default), a pop-up window appears stating that the driver is being registered with Web Submission. In this case, 19 3.1 Upload of Files > Available Options your upload is cancelled. You have to close the window and print again. This is only necessary the first time you print after installation of a new Web Submission Printer Driver. Afterwards, the login screen of the Web Submission will be displayed if you are not already logged in. In that case, enter your credentials. Once you have logged in, the uploaded file is displayed. You can now either Create a New Order immediately, go to your Documents menu, or Delete the file. Here, you can also open the preview of the document Preflight Depending on the configuration on the provider's side, you might be shown a Preflight result, either while using the Web Submission Printer or while creating a new order from the Web Submission web page. If this Preflight check detects any problems (for example with fonts, colors or graphics), the possible issues will be shown in the following pop-up window. This might also happen if your document exceeds the maximum or minimum page count your provider allows. Depending on your provider's settings, you may choose to proceed with the uploaded the document anyway, or cancel the job until you have made the required changes. 20 3.1 Upload of Files > Available Options In the following example, preflight errors are shown after the upload on the Web Submission page. 21 Order Process 4 4.1 Order Process > Sequence of Order Steps 4.1 Sequence of Order Steps For starting a new order you can choose one of the following categories from the Catalog: Job Profiles Job profiles are used for the usual print job orders. Job Profiles with job ticket and document submission. Job Profiles with job ticket without document submission. VDP Jobs (Variable Data Print Jobs) In this category you can choose a template that is to be filled with your own data. The data for each data record can be put in manually or provided in a data file. Variable Data Jobs with job ticket and data fields are jobs where you manually put in your data during the order creation. Variable Data Jobs with job ticket and a data file are jobs for which you provide a file that contains your data for instance a .csv file with address data of several customers. Fixed Products As the name implies, these products cannot be customized. You can only add them to an order in the quantity you like. Fixed Products, like pre-defined books with fixed settings. Any other Fixed Products (Non-Print Items) like for instance coffee mugs. Reprint of Orders Additionally, you can create new orders in your Order History (on page 13) menu: Reprints of previously ordered print jobs. The availability and content of the above mentioned categories VDP and Fixed Products depends on your provider. This user manual describes all categories that can be made available by your provider. 4.1.1 Step 1: Job Profile Selection Job Profiles simplify the order creation. If you use a Job Profile, the necessary finishing options for the selected type of print job are already preset in the job ticket. There are the following standard Job Profiles: Advanced Job 24 4.1 Order Process > Sequence of Order Steps Brochure Duplex Simplex LFP (Large Format Printing) The Job Profile Advanced Job is intended for jobs that cannot be processed with the standard Job Profiles. In the Advanced Job Profile you have access to all job ticket options that are available for the Web Submission. The LFP (Large Format Printing) profile can be used for large format prints using special media types and sizes other than the standard sizes like A4, A3, letter, etc. Job Tickets can be customized by your provider. However, this manual describes all options that can be made available in a job ticket. Mandatory fields are marked with an asterisk. Your provider decides which data fields are mandatory Ordering with Job Profiles Select Job Profiles in the Catalog menu to display all available Job Profiles. Click on the Start button of your desired Job Profile. The appropriate job ticket opens immediately if you are already logged in. Otherwise, you will be prompted to enter your user name and password before you can proceed. 4.1.2 Step 2: Type of Order Once you have selected a job profile, you will be asked if you want to place an order with file or an order without file. Read more about the different order types in the 25 4.1 Order Process > Sequence of Order Steps following chapters Step 3: Order with File(s) (on page 27) and Step 3: Order without File(s) (on page 26). To create an order with file(s), click Yes. To create an order without file(s), click No. 4.1.3 Step 3: Order without File(s) An order without file is an order where you do not deliver your file(s) together with your job. Instead, you deliver your file(s) independently from your job order via email, FTP, or by other means. You only provide the name and particulars of your file. With the help of these particulars your provider will be able to identify your file(s) correctly and establish a preliminary price calculation. 4.1.3.1 File Selection and Sorting On this page, fill in the following: Print Job Name: Under this name your job will be handled. It is advantageous to choose an unmistakable job name. This name does not need to be identical with the file name you provide further below. Delivery Type: Because you do not deliver any files with your order, you need to inform the operator, how you would like to deliver the file. o Email o FTP o Personally o Delivery Service Comment: Use this field for providing further information. File Name: The name of the file you want to be printed. Make sure to enter the exact file name so that your service provider will be able to clearly assign your file to the corresponding order. Paper Size: Select the paper size for your job. Please contact your provider if the size you need is not available. Page Count: (Total/Color): Enter the number of total pages of your job, and the number of pages to be printed in color. This allows your provider to print the non-colored pages in B/W 26 4.1 Order Process > Sequence of Order Steps mode, for cost-saving reasons. Make sure to enter the correct numbers to avoid follow-up inquiries from your provider. Click Add to add the file to your order. After you have added a file, a table will be displayed showing the name and page counts for each file that has been added. To remove one file from the list, click the Delete button in the right column. The following parameters are configured by your provider. o Allowed File Types: The file types you can use for your order. o Maximum Allowed Files per Order: The number of files to be provided with one single order can be unlimited or restricted to one file only. To proceed to the job settings and options, click Next. To go back to the previous step, click Back. To cancel your order, click Delete Order. 4.1.4 Step 3: Order with File(s) An order with file(s) is an order where you attach the relevant file(s) when creating the order. The file(s) can either be uploaded when creating the order or added from the already uploaded files of the My Documents (see "My Menu" on page 10) section. 27 4.1 Order Process > Sequence of Order Steps 4.1.4.1 File Selection and Sorting On this page, fill in the following: Print Job Name: Under this name your job will be handled. It is advantageous to choose an unmistakable job name. This name does not need to be identical with the file name you provide further below. The following restrictions are configured by your provider. o Used Space: The used and maximum space you can use for file upload. o Maximum Allowed File Size: The maximum size that is allowed per file to be uploaded. o Allowed File Types: The file types you can use for your order. Upload: Click Upload to open an explorer window and browse for the file you want to upload. The file you select will be added to the table below. When the upload is completed, a thumbnail of the document's first page will be displayed. The table further below displays details of all documents that have been uploaded by you. Use the select box to sort the documents by Name, Preview, Size or Pages. You can open, view or save any file that is displayed as a hyperlink. o Click the Add button to select a file and add it to your order. You can add multiple files to one order, if this option has been enabled by your provider. o Click the Remove button to remove a file from your order. To go to the next step, click Next. To go back to the previous step, click Back. To cancel your order, click Delete Order. Upload with the Web Submission Printer This printer driver allows the upload and processing of common document formats. These document formats are for instance Microsoft Office, Adobe® Creative Suite or QuarkXpress® documents. The printer driver converts the different file formats into a compressed PDF file and automatically uploads it to the Web Submission server. If enabled by your provider, you can download the Web Submission Printer driver in the menu Documents (on page 10). To use the Web Submission Printer driver, open the file you would like to upload with its associated application. Use the print option of the application and choose the Web Submission Printer Driver for printing. The file is then automatically converted to PDF and uploaded to your documents list. This process is explained in detail in the chapter Upload Possibilities (see "Available Options" on page 18). 28 4.1 Order Process > Sequence of Order Steps 4.1.4.2 Preflight Check If enabled by your provider, a Preflight Check will be executed on the uploaded file(s). Your provider determines the requirements each file has to meet. During the Preflight Check every file is checked as to the fulfillment of the requirements for layout, compression, resolution and so on. Finally, a PDF is generated as a print preview of the uploaded file. In case of deviations from the requirements specified by your provider a message will be displayed. There are two types of messages. Warning: You can choose if you would like to upload another file, or if you would like to discard the message and continue with the order process. Error: An error message is displayed if errors make it impossible to print the file. In case of serious errors you are asked to upload another file. To go to the Preflight Result, click Yes. To go back to file selection, click No. 29 4.1 Order Process > Sequence of Order Steps 4.1.4.3 Preflight Results This page displays a detailed description of any errors that occurred during the preflight check. You can open any section that contains error messages and look through the messages in detail. To proceed to the job settings and options, click Next. To upload another file, click Back. To cancel your order, click Delete Order. 4.1.5 Step 4: Job Settings and Options On this page you can change the general settings of your job and add further order options. The settings and options for orders with file(s) and orders without file(s) are the same. At the top of the page basic information on your job is displayed. 30 4.1 Order Process > Sequence of Order Steps Copy Count: Displays the number of copies that shall be printed. You can change this value according to your needs. Total/Color Pages: Displays the number of total pages of your file, and the number of pages to be printed in color. If you have entered the names of multiple files the total for all files is displayed. These values are updated automatically. Cost: From the page count and the settings you select on this page, the total price of your order is calculated and displayed here. This value is updated automatically. Click this button to display the detailed cost information of your order The page is divided into several sections: General Job Settings Printer Options Finishing Options Additional Services Personal Data In the following, the sections are described in detail. General Job Settings Standard Cost Center: The cost center under which your jobs will usually be accounted. This feature may be disabled by your provider. Folder in the Repository\-: Here you can specify where your file shall be stored in the Library. Printer Options The chosen settings are valid for: Select the file the settings are valid for. If you select All, the settings will be valid for all files. This setting is only shown if you have added multiple files. Duplex: o Simplex: prints one-sided on each sheet of paper. o Long Edge: prints double-sided on each sheet of paper, the page will be flipped over the long edge. o Short Edge: prints double-sided on each sheet of paper, the page will be flipped over the short edge. Staple: Select where you want your job to be stapled. 31 4.1 Order Process > Sequence of Order Steps Hole Punch: Select where you want your job to be hole-punched. Color Print: o Automatically: The pages to be printed in color or in B/W will be determined automatically. o Only B/W: All pages including color pages will be printed in B/W mode only. o Only Color: All pages including color pages will be printed in color mode only. Paper Catalog: o File: Lists the file names and sums up the page count and color page count. o Media Type: The properties of the type of media your job will be printed on. Default is Normal, 80g, and White, you can change these settings separately. o Range: The page range of your file(s) that will be printed with the selected media type. Default is the whole document. You can add more page ranges if you want parts of your document to be printed on a different media. To add another page range, click the + button. Finishing Options: Possible are Collate, Cut, Fold, Perforate, Glue Binding, and Ring Binding. Not each of these options is always available. The options are configured by your provider. Comment: You can add an additional comment for further information, if necessary. Additional Services: Select additional services or articles. All the items you select are displayed in the 32 4.1 Order Process > Sequence of Order Steps small list below the Add/Change button. For each item, you can change the quantity. To delete one item from the list, click its Delete button. o Article: Select an article or service from the drop-down list. The articles and services available are configured by your provider. o Cost per unit: Displays the price of the item selected. o Add/Change: To add a selected item to your order click this button. Personal Data: The fields in this section are pre-filled with the personal details you supplied under User Info - Personal Data (see "User Info" on page 6). You can apply changes or add missing information. To send your order to the Shopping Cart, click Finish. To go back to the previous step, click Back. To cancel your order, click Delete Order. 4.1.5.1 Job Profile Brochure The job profile Brochure allows you to create booklets. With the following printer options you can define the layout of the finished booklet: Finished Booklet Size: This option refers to the page size of the finished booklet. It allows two settings: Normal A4/Ltr, which is the default setting and Reduced A5/Stmt. Leave the default setting, if the page size shall not be reduced. With the default setting a booklet job with A4/Ltr pages will be printed on A3/Tabloid paper sheets in order to achieve a finished booklet size of A4/Ltr. Select Reduced A5/Stmt. if the page size shall be reduced to A5/Stmt. With the setting Reduced A5/Stmt the pages of a A4/Ltr print job will be converted to A5/Stmt and printed on A4/Ltr paper sheets in order to achieve a finished booklet size of A5/Stmt. Print on Cover: By default this option is set to Yes. If you do not want to print on the cover, change this setting to No. Blank Page Insertion: For booklet jobs the number of pages has to be a multitude of four. In case the number of pages in your document does not fit this requirement, the relevant number of blank ages that are necessary to make your document's number of pages a multitude of four is automatically added to the document. A maximum of three blank pages will be added to the document. With the following settings from the select box you can specify where the blank pages shall be added: 33 4.1 Order Process > Sequence of Order Steps o o o o Back: This is the default setting, if blank pages have to be added, they will be added at the end of the document. Front: If you prefer to have the blank pages added at the beginning of the document, select this setting. Even from Back: If you select this setting, the blank page insertion will be as follows: the 1st blank page will be added at the end of the document, if a 2nd blank page has to be added, it will be added at the beginning of the document, and if a 3rd blank page has to be added, if will be added at the end of the document. Even from Front: If you select this option, the blank page insertion will be as follows: the 1st blank page will be added at the beginning of the document, if a 2nd blank page has to be added, it will be added at the end of the document, and if a 3rd blank page has to be added, it will be added at the beginning of the document. If the setting Print on cover is set to No four further blank pages are added to the document: two blank pages for the front cover sheet and two blank pages for the back cover sheet. 4.1.5.2 Staple: By default this option is set to none. If you would like to have your booklet stapled, select Saddle Stitch here. Authorization If an authorization is required, the print job is analysed as to the price and/or the copy count. If any value equals or exceeds the relevant threshold, an authorization request is generated and sent to the person(s) specified as authorizer(s). If within a defined period of time the job is not authorized, the job is either deleted or the job processing resumed, depending on the configuration. For further information on the exact settings in your environment please contact your provider. 34 4.1 Order Process > Sequence of Order Steps The End User's View In the following example a print job with 19 pages has been submitted to Web Submission. The threshold is 15 pages, so after acknowledging the job settings the user is informed that an authorization is required in order to proceed. The user can change the job settings or request a job approval. By clicking Yes the approval request is sent to the authorizing user and the "owner" of the print job is informed that the job is paused. The paused job can be found under Active Orders now. 35 4.1 Order Process > Sequence of Order Steps As soon as the job has been authorized, the status under Active Orders will change. At the same time an email will inform the user of the authorization. If the job has been denied, the job will be deleted and the user will likewise be informed via email. If the user clicks on Continue in the Active Orders list, the job will be sent to the Shopping Cart and can be checked out as usual. The Authorizer's view If a job has to be authorized, the assigned authorizer is informed either by a client pop-up or, if not logged in, by an email with links to the authorization page. The authorizer has three choices here, Authorize, Decide later and Deny. Authorize and Deny do the obvious and allow or disallow the job. Decide later pauses the print job and keeps it in the authorizer's Unauthorized Jobs list in the Client Web Interface until it is re-examined by the authorizer who then can authorize or deny it. 36 4.1 Order Process > Sequence of Order Steps 4.1.5.3 Quotation You can request a quotation from the Web Submission operator. The operator can then decide whether to offer a quotation or to decline the request. In case of a quotation, you are informed via email, and you can accept or deny the quotation. A request for quotation is done by entering a text in the comment field of the Web Submission job ticket. After acknowledging the job ticket, a message informs you that the job is paused in order to wait for the quotation. Now, the job can be found under Active Orders. 37 4.1 Order Process > Sequence of Order Steps As soon as the operator answers the quotation request, you will receive an email with the details of the quotation. The email also includes two links that open the authorization dialog either from the uniFLOW server or from the Web Submission server. Either one can be used to authorize the order. You should choose the one which is best accessible from the local network. 38 4.1 Order Process > Sequence of Order Steps or With Accept or Deny the order will be accepted ore denied respectively on the basis of the price given in the quotation. With Decide later the window will be closed and you can click on the link later in the email at a later moment in time. After the authorization/acceptance of the order, the job can be resumed under Active Orders. With a click on Continue the job is sent to the shopping cart and can be checked out. 4.1.6 Step 5: Confirmation This step confirms that your order was successfully created and sent to the shopping cart. Your shopping cart is automatically updated. In order to go back to the catalog, click Back to Shopping. 4.1.7 Variable Data Print Jobs Variable Data Printing (VDP) is a form of printing that allows you to provide your own data to be inserted into generic print templates. To make use of variable data jobs you just choose one of the templates made available by your provider and submit your own data to fill the template. Your data will be combined with the template to generate a print job that will then be sent to the printer. By providing your own data you are able to create individualized print jobs that carry your own, personalized content on each and every page. You may even have your body text changed on every page, depending on the contents of the data file you upload. Each of these jobs is configured as a pre-designed template that is connected to a web form, where you can enter your individual data and/or upload a data file. Some examples of these variable data jobs are business cards, forms for travel expenses, personalized calendars, etc. You will find these variable data jobs in the Catalog. There are two ways to order VDP jobs, both are explained below. 39 4.1 Order Process > Sequence of Order Steps Jobs Consisting of One Single Data Set If you want to individualize your print job with one set of data only, it is recommended to supply your data via a web form. This is the best way to have personalized stationery or business cards printed. You manually enter your data in text fields, then submit it. The number of text fields shown for data entry and the labeling of the fields is determined by the contents of the template you choose. Only those text fields are displayed that are required for supplying the necessary variable data. They are labeled according to the name of the data fields in the template. You must fill in each text field displayed, before you are able to proceed with your order. Jobs Consisting of Multiple Data Sets As a second way of providing individual data you can upload a data file containing your data in CSV format. This is suggested, if you want to achieve true print variability where every field can show different content on each page, or in each copy. After you have submitted your data file, the data will be checked for consistency. If errors occur, you will be informed by an appropriate error message. You will then have the possibility to correct and resubmit your data. 4.1.7.1 Examples 4.1.7.1.1 Single Data Set The first example shows how an personalized business card can be created. This business card includes a pre-built design and a number of fields that need to be filled with individual data. All the variable data fields within this document are provided with red frames. The fixed parts of the content are not marked. When you choose a template like this for ordering business cards, you have to provide the following data in addition: 40 4.1 Order Process > Sequence of Order Steps Employee's name Employee's function Company name Street name and street number Postal code, city (and/or state) Country Phone number Fax number E-mail Website address Enter your data in the corresponding text field of the web form. After you have entered the data, you can generate a preview of the job. To cancel the job click on Delete Order, to correct a data entry click on Back. With a click on Next your print job will be sent to the shopping cart. 4.1.7.1.2 Multiple Data Sets In this example we will look at an invitation card that is sent to multiple recipients. This postcard includes a fixed text block, a fixed sender block and a number of fields that need to be filled with individual data. The variable data fields that contain the recipient's personal data are marked with red frames. Of course, the individualization could be extended by also including variable fields for travel time, destination, travel agents name, travel tips, etc. Here, the contents of the address field is organized in a different way than in the previous example. So the variable data needs to be provided in the following form: First name Family name Sal (Salutation) Address (street name and number) City-state-postcode (grouped together in one field) Assuming this card will be sent out to numerous recipients, it would be too time-consuming to manually enter all the data in a web form and generate one print 41 4.1 Order Process > Sequence of Order Steps job for each card. For that reason, you can provide a data file that holds the variable data of all recipients. You might have your data stored in some database or in a spreadsheet. Looking at the way the variable data is arranged in the current example, your spreadsheet probably looks like this: The first line contains the field names that are used within the template (shown in the first picture of this example). This way the variable data will be assigned to the template fields correctly. These field names can only consist of printable characters as defined in the US-ASCII character set. Umlauts or other special characters are not permitted. Please find a listing of all US-ASCII printable characters here: Wikipedia: ASCII printable characters To be usable for the print job, the data needs to be converted into CSV format (CSV = character-separated values). This is done easily from any spreadsheet application by clicking Save As... and then choosing the CSV file format. In CSV format, normally the data fields in every record are separated by commas or tabs. However, there is an extended set of characters you can use to delimit your data fields: Comma , Semicolon ; Dollar sign $ Hash sign # Tab key It might be possible that one or more of your data fields contain the character you defined as the separator character. In this case, the contents of those data fields must be enclosed with double quotes. The following diagram shows the address data from the above spreadsheet transferred into CSV format. The data fields are separated by commas. Note the address in the third line also contains a comma and how this field is enclosed in double quotes. Also note there is no free space behind the commas. 42 4.1 Order Process > Sequence of Order Steps Once the data has been submitted, a print job will be generated that prints five postcards whereby each postcard contains the data of a different data set. The individualization of your print job is not restricted to a few datasets only. There is virtually no restriction to the number of records that can be processed within one VDP print job. 4.1.7.2 VDP Order Steps Ordering variable data print jobs works almost the same way as any other job in the catalog. However, if you select a document for printing that involves variable data, you will be asked to go through a number of extra steps. These steps have the purpose of furnishing the template with your variable data. After you have selected the VDP template to be used for your print, you are offered two ways of providing your data: CSV File Upload Manual Data Input Choose how you want to provide your data, then click Next to go to the appropriate Web Submission form. If the product you want to order requires a minimum order quantity, you will have to enter at least that quantity in the Copy Count field on the next page. Otherwise,in the next step, a message will warn you that you have to adjust the quantity. 43 4.1 Order Process > Sequence of Order Steps CSV File Upload First choose the delimiter for your data. Then, click on Upload and browse for the file that contains your character-separated values. If you have your data available as a spreadsheet or as a database only, you need to convert it into the CSV format first. CSV files can only save the plain text of a spreadsheet. Any special formatting (colors, text fonts etc.) or other features will be lost when converting a spreadsheet to CSV format. So it is not a good idea to delete the original of your spreadsheet after you saved it as a CSV file. However, these features will not be needed with the VDP templates. Once you have uploaded your data together with the template of your choice, it will be validated by the uniFLOW server. This step is necessary to ensure the integrity and completeness of the data submitted. Each piece of the data submitted will be associated with the right data frame in the template, and thus printed in the correct spot. If errors in your data are detected, an error message will be sent. Some of the most common errors are mentioned below: Not all of the fields in a row are filled with data. A separator value is missing. The separator value shows up in some fields of your data without double quotes. The field names in the first line are not entirely correct. To correct an error, correct your CSV file locally, then click on the Upload button to upload the corrected file again. If there is no error in your data, a preview of the first page will be created automatically. Click Next to proceed with your order. 44 4.1 Order Process > Sequence of Order Steps Manual Data Input This form shows all of the variable data fields that have been included in the template. If you want to supply one set of data only, you might as well use these text fields, for example, if you want to order personalized stationery or business cards. Here, you fill in your variable data manually. You need to fill in every text field displayed, to be able to go on with your order. However, only those text fields are shown that are really needed. Depending on the VDP template the fields can be pre-filled with default data. This data can be left as it is or edited during manual input. Thereafter, you will be presented with a preview that shows a subset of your print job in low resolution. After you accepted your preview, click Next. Your order will then be processed like any other order. Subsequently, your print job will be generated from your template and the data you provided, and automatically added to the Shopping Cart. 45 4.1 Order Process > Sequence of Order Steps Image Upload It is possible to have a VDP template where an image upload is defined. In this case, the user interface switches directly to the Manual Data Input page. To upload the image just press the Upload button and select the image file. You can use the Generate preview button to see how the result looks. 4.1.8 Fixed Products Items of all kinds can be Fixed products, for example pre-defined jobs such as books with fixed settings or even non-print items like pens, calendars, mugs or writing pads. 46 4.1 Order Process > Sequence of Order Steps All fixed products can be found in the Catalog. An image and information on the available products are shown in the main section. Click on Buy to send the fixed product in question to the Shopping Cart. After you have sent the fixed product to the Shopping Cart, you can continue shopping or check out. With a click on Check Out in the Shopping Cart you enter the Payment process. For detailed information on the payment possibilities, please refer to the chapter Payment (see "Check-Out Steps" on page 50). The availability of fixed products depends on your provider. 47 Payment Process 5 5.1 Payment Process > Check-Out Steps 5.1 Check-Out Steps The payment process starts after you have clicked on Check Out in your Shopping Cart. This chapter describes all five steps being necessary to complete the payment process. 5.1.1 Overview The Overview displays the items in your Shopping Cart The first column contains a preview of the first page of the individual orders, the date the files were added to the Shopping Cart, the possibility to Delete the individual items from the Shopping Cart. When you confirm the question Do you really want to delete this product? with OK, the selected item is removed from the Shopping Cart. The total costs are refreshed automatically. The second column contains the names of the individual orders the option to review the respective Job Tickets: Open the job ticket with a click on the details icon to review the settings of the print job. Go back to the overview with a click on the Close button in the upper right corner of the job ticket. 50 5.1 Payment Process > Check-Out Steps At this stage you can only review but not change the settings of the job ticket. In the third column you can change the quantity of the individual orders. Click on Refresh Costs to have the changed prices displayed. The Price for each order and the Total are displayed in the fourth column. Click on Next to proceed with the payment. Click on Back to add more items to your shopping cart. Click on Empty Cart to cancel all orders at once. 5.1.2 Addresses General Job Settings: Click on the displayed calendar and select a date to choose the Delivery Date. The first viable date is marked green in the calendar. Click on the arrows on the right of the calendar to select a delivery time. Delivery Address: These fields are pre-filled with the data you supplied under User Info - Addresses, but you can make changes or fill in missing information. Invoice Address: These fields are pre-filled with the data you supplied under User Info - Addresses, but you can make changes or fill in missing information. Click on Next to proceed with the payment. Click on Back to add more items to your shopping cart. Click on Empty Cart to cancel all orders at once. 5.1.3 Payment Type Payment Type Selection: Here you can select the way how you would like to pay: on invoice, deduction from your budget or online payment. If you would like to use online payment, you need to be registered with either PayPal or WorldPay. These are the online payment providers which are supported at present. Click on Next to proceed with the payment. 51 5.1 Payment Process > Check-Out Steps Click on Back to add more items to your shopping cart. Click on Empty Cart to cancel all orders at once. 5.1.4 Summary The list contains the following information: the names of the items to be purchased the quantity of the respective items the price without tax the tax the final price incl. tax of each order the total Additionally, you can review the Delivery Date Settings, Delivery Address, Invoice Address and the selected payment method. Click on the provided link to read the terms and conditions. Tick the checkbox next to I accept the terms and conditions to proceed with your order. Click on Next to proceed with the payment. Click on Back to add more items to your shopping cart. Click on Empty Cart to cancel all orders at once. 5.1.5 Confirmation A message confirms that your payment was successful. You can click on Back to Shopping to create a new order or click on any other menu item. 52 Index Web Submission User Manual Index INDEX### I A Icons ......................................................................6 Active Orders ......................................................12 Addresses ............................................................. 8 Authorization ......................................................34 J Job Profiles......................................................... 24 L B Budget .................................................................. 9 Login .....................................................................4 M C Catalog ................................................................13 My Menu ........................................................... 10 Active Orders .............................................. 12 Change Password ................................................. 7 Documents ................................................. 10 D Documents..........................................................10 O Order History ..................................................... 13 G Overview (Payment) .......................................... 50 General Information ............................................. 2 General Settings ................................................... 6 P Payment ............................................................. 50 H Addresses ................................................... 51 How to Order ......................................................24 Confirmation............................................... 52 Authorization...............................................34 Overview..................................................... 50 Confirmation ...............................................39 Payment Type ............................................. 51 File Selection and Sorting - with File(s) .......28 Preflight Check .....................................29 Preflight Results ...................................30 File Selection and Sorting - without file(s) ..26 Fixed Products .............................................46 Summary..................................................... 52 Payment Type Selection .................................... 51 Personal Data........................................................7 Preflight Check ................................................... 29 Preflight Check Results ...................................... 30 Job Profile Selection ....................................24 Job Settings and Options .............................30 Order with File(s) .........................................27 Q Quotation........................................................... 37 Order without File(s) ...................................26 R Quotation ....................................................37 Registration...........................................................4 Type of Order ..............................................25 Reset Password .....................................................4 How to Order VDP Jobs ......................................43 S Search Function ................................................. 16 Shopping Cart .................................................... 15 55 Web Submission User Manual Index U Upload Documents Menu ........................................18 During Order Creation .................................18 Web Submission Printer Driver ...................19 User Info ............................................................... 6 Addresses ...................................................... 8 Budget ........................................................... 9 Change Password .......................................... 7 General Settings ............................................ 6 Personal Data ................................................ 7 V Variable Data Printing (VDP) ..............................39 Examples......................................................40 Multiple Data Sets .......................................41 Single Data Set.............................................40 VDP Order Steps ..........................................43 W Web Shop Sections ............................................... 4 Catalog.........................................................13 Information Box............................................. 6 Login & Registration ...................................... 4 My Menu .....................................................10 Shopping Cart ..............................................15 User Info ........................................................ 6 56 © NT-ware 2009-2015