1
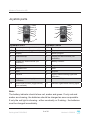
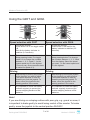
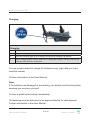
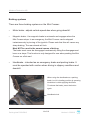
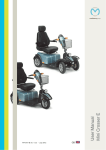
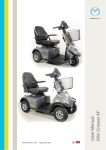
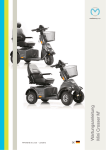
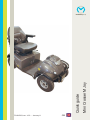
P9-0158-Q ver. 1.0.0 - January 11
GB
Mini Crosser M Joy
Quick guide
medemagroup
Medema Production A/S
Quick guide P9-0158-Q
2 of 16
Version 1.0.0/2011
Medema Production A/S
Content
Introduction................................................................................................ 4
Designations .............................................................................................. 5
Joystick parts ............................................................................................ 6
Using the G90T and G90A ........................................................................ 7
General care and maintenance ................................................................ 8
Charging ................................................................................................. 9
Note: ....................................................................................................... 9
Safety check............................................................................................. 10
Troubleshooting the Dynamic ................................................................ 10
Serial number........................................................................................... 11
Driving the Mini Crosser M Joy .............................................................. 11
Getting in and out ................................................................................. 11
General safety advice........................................................................... 12
When driving in traffic... ........................................................................ 13
Braking systems ................................................................................... 14
Own notes ................................................................................................ 15
Quick guide P9-0158-Q
3 of 16
Version 1.0.0/2011
Medema Production A/S
Introduction
Congratulations on your new Mini Crosser M Joy electric mobility scooter.
You have now taken possession of an electric mobility scooter developed
for outdoor driving by active users. It is what is called a Class C vehicle in
accordance with the European classification of electric scooters.
For optimum enjoyment of this vehicle - and to avoid breakdowns and
accidents - we recommend that you read the User Manual carefully. As a
new user, you should pay particular attention to the section entitled “Driving
the Mini Crosser M Joy”.
Note:
This Quick Guide is to be regarded as a supplement to the User Manual. The
information in the Quick Guide cannot, therefore, be expected to be complete.
NB: Errors and omissions excepted. Specifications subject to change.
We reserve the right to update this guide as required.
Warning!
The vehicle must not be lent to persons who are not completely familiar with it.
The vehicle is designed for one person only.
Max. user weight 150 kg.
Medema Production A/S is not responsible for any damage or injuries
caused by inappropriate or unsafe use of the Mini Crosser.
Quick guide P9-0158-Q
4 of 16
Version 1.0.0/2011
Medema Production A/S
Designations
The following designations refers to the explanation later in the instruction book.
Control panel Joystick
Headrest (not shown)
(Extra)
Charging
socket
Handbrake
Finger screw
Release handle
forw. / backw.
Seat rotation
Indicator
lights
Eye for restraints
Thermal fuse
Eye for
restraints
Serial number on
vehicle.
Quick guide P9-0158-Q
5 of 16
Disengagement lever
Version 1.0.0/2011
Medema Production A/S
Joystick parts
2
4
3
9
5
6
1A
3
7
8
10
1B
5
6
1
2
4
9
11
3
10
7
8
Dynamic G90T
Dynamic G90A
1A
1
Start/stop button (push button)
Start/stop button
1B
Start/stop button (toggle switch)
2
Display
2
Display
3
Select program
3
Gear down/up
4
Display for seat functions (not
available)
4
Display for seat functions (not
available)
5
Battery indicator
5
Battery indicator
6
Magnetic lock
6
Magnetic lock
7
Horn
7
Horn
8
Joystick
8
Joystick
9
Lights, hazard warning lights and
indicators
9
Light, hazard warning lights and
indicators
10
Indicator left/lights
10
Select seat function (toggle switch)
(not available)
11
Indicator right/hazard warning lights.
Note:
The battery indicator should show red, amber and green. If only red and
amber are showing, the batteries should be charged as soon as possible.
If only the red light is showing - either constantly or fl ashing - the batteries
must be charged immediately.
Quick guide P9-0158-Q
6 of 16
Version 1.0.0/2011
Medema Production A/S
Using the G90T and G90A
2
4
3
9
5
6
1A
3
7
8
10
1B
2
4
3
5
6
1
9
11
10
7
8
Speed selection with G90T
Speed selection with G90A
1
To start the scooter:
Press button 1A or use toggle switch
1B
Wait for the battery indicator to
stabilise (3-5 seconds)
1
To start the scooter:
Press button 1 and wait for the
battery indicator to stabilise (3-5
seconds)
2
Select the maximum speed:
Keep pressing button 3 or toggle
switch 10 to change the numbers
between 1, 2, 3, 4 and 5. 1 is the
lowest speed and 5 is the highest.
(This may vary. Some scooters have
a maximum speed of 3).
2
Select the maximum speed:
Keep pressing button 3 to change
the numbers between 1, 2, 3, 4 and
5 on the display. Select the speed
you want. 1 is the lowest speed and
5 is the highest.
Driving
Driving
1
Start driving by moving the joystick
in the direction you want to travel.
The speed depends on how far
forward you push the joystick. To
brake, return the joystick to the
starting position in the centre.
1
Start driving by moving the joystick
in the direction you want to travel.
The speed depends on how far
forward you push the joystick. To
brake, return the joystick to the
starting position in the centre.
2
It is important to check the battery
indicator regularly to prevent the
scooter stopping because of flat
batteries.
2
It is important to check the battery
indicator regularly to prevent the
scooter stopping because of flat
batteries.
Note!
If you are driving on a sloping surface with poor grip, e.g. gravel or snow, it
is important to brake gently to avoid losing control of the scooter. To brake
gently: move the joystick to the central position SLOWLY.
Quick guide P9-0158-Q
7 of 16
Version 1.0.0/2011
Medema Production A/S
General care and maintenance
A Mini Crosser M Joy does not require much maintenance. It should be kept in a
generally good condition, however. The following should be checked regularly:
•
Tyre pressure (if pneumatic tyres are fitted)
•
Tyre wear
•
Keep the control panel, the charging socket and the electronics box under the seat dry.
•
Battery charging
Never wash the Mini Crosser with a high-pressure cleaner or direct water
jet! This could damage the Mini Crosser’s electronics.
To keep the Mini Crosser in good condition safety-wise, we recommend the
following regular checks:
Daily:
•
Test the indicators and driving lights before using the Mini Crosser in the dark
or poor visibility.
Every three months:
•
Test the brake disengagement function. When the brake disengagement lever
is up, the Mini Crosseren must not be able to be pushed.
Further information in the User Manual
Quick guide P9-0158-Q
8 of 16
Version 1.0.0/2011
Medema Production A/S
Charging
Charging
1
Plug the cable into the control box on the scooter
2
Plug the charger into the outlet or switch it on
3
Use the indicator lights on the charger to check that charging has started.
4
When charging has fi nished, switch off or unplug the charger, and then remove the
charger cable from the control box.
You are recommended to charge the batteries every night after you have
used the scooter.
(Further information in the User Manual)
Note:
If the batteries are damaged or are leaking, you should avoid touching them
because you may burn yourself.
Contact a qualifi ed workshop immediately!
Old batteries must be delivered to an approved facility for safe disposal.
Further information in the User Manual.
Quick guide P9-0158-Q
9 of 16
Version 1.0.0/2011
Medema Production A/S
Safety check
See the User Manual
Troubleshooting the Dynamic
Troubleshooting G90T
G90A
Status light fl ashes with 2 fl ashes per cycle
and the scooter runs at half speed.
The scooter may be fi tted with a speed
limiter that halves the speed when the seat
is raised. This is not a fault.
Status light fl ashes with 7 fl ashes per cycle
The batteries need charging.
The scooter runs at half speed or not at all
If the cause is not a raised seat, this may
be a serious fault. Contact a competent
service engineer as soon as possible (HMC
or therapist).
Note:
Mobile phones should not be used very close to the scooter as they
generate electromagnetic fi elds that may affect the electronic system.
The electronic system of the scooter itself also generates some
electromagnetic fi elds, which on rare occasions may affect equipment like
the alarm systems in shops.
Dynamic’s control systems have been tested and meet the requirements of
ISO7176/14 and EN12184
Quick guide P9-0158-Q
10 of 16
Version 1.0.0/2011
Medema Production A/S
Serial number
All scooters have a serial number plate showing the year of production,
month and serial number. The same serial number can also be found on
the front of the User Manual.
Please quote the serial number when making inquiries about
servicing, spare parts, etc.
Driving the Mini Crosser M Joy
Getting in and out
It is important to learn a safe technique for getting in and out of the Mini
Crosser.
In general the following method should be followed:
•
Make sure that the Mini Crosser M Joy is off (switch turned to 0)
•
Make sure that the brake is on. (Lever for disengaging motor in top position.)
•
If necessary, turn the seat through 45° or 90° and make sure that it is locked in
position (clicked into place).
•
If necessary, raise the armrest.
Quick guide P9-0158-Q
11 of 16
Version 1.0.0/2011
Medema Production A/S
General safety advice
•
Make sure that the backrest is upright and the seat is as low as possible.
•
Positioning belts are recommended if the user is unable to maintain a good
driving posture independently.
•
Adjust your driving to road conditions. Take account of light, traffic and weather.
Be particularly careful when driving in the dark or in bad weather, such as rain
or snow. Avoid driving on gradients with poor surfaces, such as: snow, ice, newmown grass, wet grass and wet leaves.
•
Never drive when under the influence. This applies not only to alcohol, but also
to drugs and medicines.
•
Reduce speed immediately if you feel you are losing control.
•
Always use the indicators when changing direction.
•
Check that lights and indicators are working before driving off. Use your lights
when driving after lighting-up time.
ALWAYS switch the scooter off when it is not in use. I/O button.
Note!
Never drive when under the influence. This applies not only to alcohol, but
also to drugs and medicines.
Quick guide P9-0158-Q
12 of 16
Version 1.0.0/2011
Medema Production A/S
When driving in traffic...
Be particularly aware of the following when driving in traffic:
•
The Mini Crosser M Joy is a low vehicle and not always easy for other road
users to see. Make quite sure that other road users have seen you before
driving onto the highway.
•
Keep an eye on traffic behind you. Keep well over to the side of the road when
driving on busy roads.
•
Turning right and left at crossroads. Be aware of cyclists and pedestrians.
Follow the rules of the road for cyclists.
•
How quickly things are happening. How long do the lights stay green? How
quickly are cars approaching? etc.
Quick guide P9-0158-Q
13 of 16
Version 1.0.0/2011
Medema Production A/S
Braking systems
There are three braking systems on the Mini Crosser:
•
Motor brake - adjusts vehicle speed also when going downhill.
•
Magnetic brake - the magnetic brake is automatic and engages when the
Mini Crosser stops. In an emergency, the Mini Crosser can be stopped
instantaneously by turning of the joystick. Please note that this will cause very
sharp braking. The rear wheels will lock.
Must NOT be used in the normal course of driving.
The brake must never be disengaged mechanically using the disengagement
lever on a slope. This function is only designed for use when pushing the Mini
Crosser on a flat road.
•
Handbrake - intended as an emergency brake and parking brake. It
must be operated with caution when driving in slippery conditions and
downhill.
When using the handbrake as a parking
brake, lock it in braking position by pressing
the button in while applying the brake.
To release the brake, press the button
again.
Handbrake lock
Quick guide P9-0158-Q
14 of 16
Version 1.0.0/2011
Medema Production A/S
Own notes
Quick guide P9-0158-Q
15 of 16
Version 1.0.0/2011
medemagroup