1
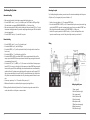
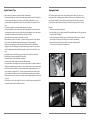
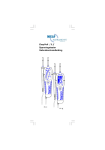
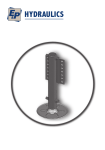
›
Notes
›English - Electronic Levelling System
User Manual
50
51
›
›
Index
Preface
Preface
The system
Using the system
Features and operation
Electronics of the system
Page 53
Important warning
Settings
Setting the zero point
Setting the air suspension
Page 55
Control panel
Operation
Automatic levelling
Manual levelling
Retracting the jacks
Page 57
Wiring (diagram)
Special features of the system
Emergency control
Troubleshooter (incl. error mode)
Maintenance
Warranty
Page 59
Page 60
Page 61
Page 62
Page 64
Page 65
52
Page 54
Page 54
Page 54
Page 56
Page 56
Page 58
Page 58
Page 59
Products must be 100% user friendly and reliable. This is the strategic vision at E&P Hydraulics, the
designer of this levelling system. By purchasing this product you will be permanently relieved from the
trouble of levelling the camper. No longer a camper that moves when you walk through it or when the
wind blows hard, no more doors that open or shut due to differences in height, no more shower water
running the wrong way, and never more the feeling that you are sleeping in a sloping bed. With just one
press of a button, your camper will from now on be levelled fully automatically. Rock-solid, in less than
two minutes.
It is not difficult to operate the E&P Levelling System. It is a lightweight, compact as well as extremely
solid product that is virtually maintenance free. The production is based on quite a few test hours. And,
if in spite of this, faults start to appear in the future, you will always be able to rely on the warranty and
service of E&P Hydraulics. However, no matter how easy to operate, extremely solid and maintenance
friendly our levelling system is, you will always need a user manual. We do not only find it important to
show your the features of this product, but also what you cannot do with it. Therefore, please carefully
read this user manual prior to putting the system in operation. Just like any other system, the E&P
Levelling System has its limitations as well, and it is very important that you are aware of them. When
(partly) lifting campers, great forces are being used, and these must be used carefully and skilfully.
Safety first.
If you observe the warnings and recommendations in this user manual, you will enjoy using our product
for many years.
On behalf of E&P Hydraulics
Eric Klinkenberg & Pierre Blom
53
›
›
E&P’s electronic levelling system is an electrically/hydraulically driven system. A hydraulic pump is
powered by a 12V direct current motor, which will lead fl uid through a system of pipes, control devices
and jacks, so that the camper can be levelled and stabilized.
Not observing the following warnings may lead to damages to the camper and/or serious injuries.
The system
E&P’s jacks have the bearing capacity that your camper requires. Each jack has a 228 mm diameter
fl oor plate on a ball pivot guaranteeing the greatest firmness possible on any surface. The jacks
are controlled by a central 12V direct current motor/pump unit. It contains the oil tank, control valve
distributor and solenoids. E&P’s levelling system is electronically controlled. It can be operated semimanual or fully automatic. The customer can freely choose the location of the switching panel. The
levelling system of E&P is fully integrated in the undercarriage of the camper.
Using the system
• Park the camper on a surface that is as level as possible.
• The HAND BRAKE of the camper must be engaged.
• The transmission must be in a neutral position or in the parking position.
• When the levelling system is operating, persons or animals are not allowed in the camper.
• The ignition of the vehicle must be switched on.
Features and operation
• Automatically extending the jacks from a retracted position.
• Automatically or manually levelling the jacks.
• Automatically retracting the jacks.
• Alarm mode (jacks not retracted and hand brake disengaged).
• Automatic error message jacks and error mode.
• Configuration function for levelling zero point.
Warnings
!! Using the E&P levelling system for other purposes than supporting campers is officially forbidden
according to E&P Hydraulic’s limited warranty. This product is exclusively developed as a levelling
system and may not be used for other work under the camper such as changing the tyres,
maintenance or applying snow chains.
!! When the system is operating, all persons and animals should keep their distance.
!! Hands and other body parts should never come in contact with released fl uids. Oil leaving the
levelling system may be under high pressure and could cause serious injuries to the skin.
!! Never fully lift the camper. If the tyres no longer reach the fl oor, this could lead to unstable and
dangerous situations.
!! The camper should be parked on a solid, level and non-slippery surface. The parking location must
be free of holes and free of waste and surrounding objects.
!! If the camper is parked on very soft soil, you must place a support plate under each jack in order to
distribute the weight.
!! Check if the installation of the system is performed by a skilled mechanic with sufficient practical
experience and technical training. As the installation requires a high level of skill. After all, we are
dealing with equipment that is being integrated in the undercarriage, which will be submitted
to great forces, forces that are often underrated by people with no technical training. At all times,
mechanics will bear sole responsibility for the assembly of the system.
!! In case of repairs/malfunctions: know what you are doing. Never try to repair it yourself, but consult
an expert.
!! Fully read this user manual, before using the levelling system.
54
55
›
›
Setting the zero point
(1) LED message SLOPE TOO STRONG - In this position the camper cannot be levelled (the surface
is not even enough). If necessary, switch over to manual mode.
(2) LED message LOW VOLTAGE - the battery is empty or the voltage is too low to be able to work
safely.
(3) LED message ENGAGE HAND BRAKE - Message indicating that the hand brake is disengaged.
When the hand brake is engaged again, the LED will go out.
(4) LED message JACKS NOT (fully) RETRACTED - One or more jacks are extended or not fully
retracted.
(5) Button ON/OFF - switches the control panel on or off.
(6) Button MANUAL MODE - the switch panel is in manual mode.
(7) button AUTOMATIC MODE ON - indicates that the system is ready for automatic levelling of the
camper.
(8) Button RETRACT ALL JACKS - automatically retracts all jacks.
(9) LED message MANUAL MODE - indicates that the camper can now be brought to the correct
level manually.
(10) Button LEFT SIDE - controls retracting and extending the left jacks.
(11) Button REAR SIDE - controls retracting and extending the rear jacks.
(12) Button FRONT SIDE - controls retracting and extending the front jacks.
(13) Button RIGHT SIDE - controls retracting and extending the right jacks.
(14) LED message LEVEL - indicates that the camper is brought to the required level.
Settings
Before automatic levelling can be activated, you must set the zero point. This is the point to which
the system returns in an automatic cycle. For setting the zero point, you must first perform a manual
levelling, so that the vehicle can be placed on the required level. Only then, you will be able to set the
zero point. Do this by placing a spirit level in the car
Step 1
Step 2
Step 3
Step 4
Step 5
Step 6
For activating this mode, you must follow the next sequence:
Switch off the control panel. Switch on the control panel.
Press the button FRONT (no. 12) five times.
Press the button REAR (no. 11) five times.
All LEDs will be flashing. You are now in the zero mode.
Press button RETRACT ALL (no. 8) three times while in zero mode, in order to set the zero
point. Wait 20 seconds, until the system has saved the zero point.
Programming air suspension mode (when installed)
First bring the vehicle in level position.
Switch off the control panel. Switch on the control panel.
• Press the button FRONT (no. 12) five times.
• Press the button REAR (no. 11) five times.
• All LEDs will be flashing.
• You are now in the zero mode.
• Press button RETRACT ALL (no. 8) three times
• Wait 2 seconds
• Press again button RETRACT ALL (no. 8) three times
Now the airsuspension mode is activated.
Switch of control panel.
Bedienteil
Bedienteil
14
56
(1) LED-Mitteilung ZU STARKES GEFÄLLE – Das Reisemobil kann57in dieser
Position nicht nivelliert werden (der Boden ist nicht eben genug). Schalten
›
Bedienung Des Systems
Automatic levelling
• Make sure that the vehicle’s hand brake is engaged and that the ignition is on.
• Press the ON/OFF switch (1 x on no. 5) on the switch panel. The LED with the E&P logo will light.
If the hand brake is not engaged, ENGAGE HAND BRAKE (no. 3) will start to flash.
• Make sure that everybody has left the vehicle, including you. Now press button AUTO (no. 7) to start
the automatic levelling procedure. Only enter the camper again when the green LED in the middle of
the control panel lights.
• Press the ON/OFF switch (no. 5) to switch off the system.
Manual levelling
58
ground
aarde
D+
!! Warning: Never lift all wheels fully from the fl oor. If the wheels no longer have contact with the
surface, there will be a risk of injuries or serious accidents.
intrekken
Tip: if,Steunen
halfway through
the procedure, you want to cancel the retraction immediately, switch the system
Tip: zit
procedure
wilt uno.
het5).intrekken direct onderbreken, zet
off (button
no.u5)halverwege
and on againde
(also
by means en
of button
dan het systeem uit (knop nr. 5) en weer terug aan (ook via knopje nr. 5).
1. onZet
systeem
5). DeON/OFF
melding
AAN/UIT licht op.
• Switch
thehet
system
(buttonaan
no.(knop
5). Thenr.
message
lights.
2. the
Opbutton
de knop
ALLE
drukken.
u long
in de manu• Press
RETRACT
ALL STEUNEN
JACKS (no. 8). INTREKKEN
If in manual mode,(nr
the8)jacks
are onlyWanneer
retracted as
ele modus
bent,
worden
steunen
slechts
ingetrokken
zolang
de knoponce.
INTREK as the button
RETRACT
is pressed.
In de
automatic
mode,
you only
have to press
buttonuRETRACT
ingedrukt
houdt.
In detheautomatische
modus
de knop INTREKKEN
When allKEN
jacks have
been fully
retracted,
LED JACKS DOWN
(no. 4)hoeft
will gou out.
eenmaal
in teofdrukken.
steunen
volledig
ingetrokken
• Switch offslechts
the system
by means
the ON/OFFWanneer
switch (no.alle
5) on
the switch
panel. After
a short zijn, gaat
dearound
led STEUNEN
4) uit.
inspection
the camper, ONDER
to check if (nr
the jacks
are fully retracted, you can drive off.
3. Zet het systeem uit via de AAN/UIT-schakelaar (nr 5) op het schakelpaneel. Na een
korte inspectie rondom de kampeerwagen, om te controleren of de steunen volledig
ingetrokken zijn, kunt u wegrijden.
Wiring
Bedrading:
handrem
handbrake
• Press the ON/OFF switch (1 x on no. 5) on the switch panel.
• Press button MANUAL (no. 6), until the LED lights.
• Press button FRONT (no. 12), until the jacks reach the floor (first bring the vehicle on level from
front to rear).
• Press button REAR (no. 11), until the jacks reach the fl oor.
• Press button FRONT or REAR: press button FRONT if the arrow points towards the front of the
camper; press button REAR if the arrow points towards the back. Keep pressing the button until it
stops automatically (arrow is off).
• Press button LEFT (no. 10) or RIGHT (no. 13): if the arrow is on the left side of the camper, press
button LEFT; if the arrow is on the right side of the camper, press button RIGHT. Keep pressing the
button, until the green LED in the middle lights (the semi-automatic function in manual mode may
manifest itself now). If you keep pressing the button until the system stops and the green LED 14
lights, you have reached the correct point. If the LED in the middle does not light, it could be that
the cylinders have reached their maximum stroke. The jacks always operate with two at the same
time.
• If necessary, repeat steps 2 to 5. Then switch off the system (no. 5).
• Walk around the vehicle to see whether all jacks are properly reaching the fl oor.
Retracting the jacks
vermogenspower fuses
zekering
14
Cable plug with 9 pens:
Kabelstekker met 9 pennen:
1. Bruin (aarding) B2. Donkerrood (ventiel rechtsvoor)
3. Grijs (pomp rechtsomdraaiend)
4. Groen (ventiel linksvoor)
5. Geel (drukschakelaar)
6.
7.
8.
9.
1. Brown (ground)
2. Dark red (valve front right)
Blauw (ventiel linksachter)
3. Grey (pump extend)
Wit (12V+)
4. Green (valve front left)
Zwart (pomp linksomdraaiend)
5. Yellow (float switch)
Rood (ventiel rechtsachter)
6. Blue (valve rear left)
7. White (drive undercarriage)
8. Black (pump retract)
9. Red (valve rear right)
59
27
Notbedienung
›
Special features / Tips
• After 4 minutes of no operation, the system will switch off automatically.
• The automatic levelling cycle can only be started after all jacks have been retracted. If the jacks are
not retracted when the automatic cycle starts, the system will do this automatically. So it is not
possible to make short adjustments to the jacks; the system will always first completely retract its
jacks.
• At a low battery voltage, the system will automatically switch off completely.
• Jacks are extended and you want to drive: the system will immediately give an alarm and the jacks
are automatically retracted as soon as the hand brake is being disengaged. In case of vehicles with
a pneumatic brake installation, this takes place when the engine is started.
• All normal functions of the system are switched off in error mode.
• Always operate the cylinders 2 at a time at 1 side; when retracting, operate all 4 at the same time.
Only in case of short adjustments afterwards, briefly operate all 4 cylinders separately.
• Swivel chairs: some campers have swivel chairs that do not function when the hand brake is
engaged. As soon as the levelling system is finished and the ignition contact of the car is off, you
are able to disengage the hand brake. Before doing that, you must of course check if the car is in
gear.
• During winter sports: put something (e.g. a piece of carpet) under the jacks to avoid sliding.
• Manual operation is mainly recommended for bad surfaces.
• In manual operation, all jacks should always be extended.
• The system cannot handle all angles, the limit values differ per camper.
• If the system makes a slope angle that is too big and no longer responds to requests for automatic
levelling, we recommend bringing the camper as close as possible to the zero point in manual mode.
• You will notice that the system also has a semi-automatic function. During manual operation, 1 or 2
arrows can light near the green LED 14. In this way, the system indicates where the lowest points
are at that moment. Example: first extend the rear jacks by manual operation (camper is moving).
Wait a moment, then press the arrow for the front jacks. It will stop automatically when the zero point
is reached.
• Another option in case of a slope angle that is too high, is to drive the camper on wedges and to fill
up the jacks (please do take the stability into account).
›
Emergency
Control
Das
elektronische
Nivelliersystem von E&P kann auch mit Hilfsapparaten angetrieben
werden, zum Beispiel mit einem Akkubohrer oder einem Akkuschraubenzieher. Bei
E&P’s
electronic
levellingSie
system
also be so
operated
by means
of auxiliary
tools,wird
such der
as e.g.
a
Störungen
können
diecan
Stützen
manuell
einziehen.
Dazu
mitgelieferte
battery powered drill, or a battery powered screwdriver. In this way, in case of malfunctions, you can
(Sechskant-)Inbusschlüssel benötigt. Drehen Sie erst die vier Ventile im Uhrzeigersinn
retract the jacks manually. For this you will first need the supplied socket head wrench (hexagon).
(siehe Abbildung 5a), da die Notbedienung sonst nicht funktioniert. Folgende Schritte sin
First turn the four valves clockwise (see figure 5a), otherwise the emergency control will not work.
dazu notwendig:
Next steps:
1. Remove
Schutzaufkleber
entfernen
•
the protective label
(see figure(siehe
6). Abbildung 6).
2.
Den
Hilfsapparat
(beispielsweise
mit mitgeliefertem
• Insert the auxiliary tool (e.g. a battery poweredein
drill)Akkubohrer)
with supplied hexagon
bit in the coupling Sechskantbit
under
Verbindung
dem Schutzaufkleber stecken (siehe Abbildung 7).
the die
protective
label (seeunter
figure 7).
•
the drillBohrer
run forwards
or clockwise in order
to extend
the jacks.
or anti-clockwise
to Durch
3. Let Den
im Uhrzeigersinn
drehen
lassen,
um Backwards
die Stützen
auszufahren.
retract
the jacks.
In thisden
way Uhrzeigersinn
you can still fully retract
or extend
the jacks manually.
Drehen
gegen
werden
die Stützen
eingezogen. Auf diese Art und
• AfterWeise
you arekönnen
finished, do
forget tomit
turnder
backHand
the valve
anti-clockwise
(figure
5b).ausgezogen werden.
dienotStützen
vollständig
einoder
4. ThisVergessen
is necessary Sie
to fixnach
the jacks
on
their
new
positions.
Ablauf nicht, das Ventil wieder gegen den Uhrzeigersinn zurück
zudrehen (Abbildung 5b). Dies ist nötig, um die Stützen festzustellen.
Abb. 5a
Turn
clockwise in order todrehen,
open the valve
Im Uhrzeigersinn
um das Ventil zu öffnen
Abb. 7
Run
the drillim
forwards
to retract the drehen,
jacks
Bohrer
Uhrzeigersinn
um Zylinder einzuziehen ...
60
Abb. 6
Remove label in
front
of the emergency
control
Entfernen
des
Aufklebers
für die
Notbedienung
Abb. 5b
and close
the valves
againschließen.
(anti-clockwise).
und
Ventile
wieder
(gegen den Uhrzeigersinn)
61
›
Troubleshooter
In case of an error message, check whether the hand brake is engaged, whether the ignition is
switched on, whether the battery has sufficient voltage, whether the oil level is correct, whether
there is any damage to the cylinders, and check the cables. If this does not lead to a solution for the
malfunction, the malfunction could be located in the drive units. As the drive unit does not have any
repairable parts, the search for malfunctions and the maintenance work to the electronics is limited to
replacing the abovementioned components (also see page 63).
? The system does not switch on (no message on and off).
Possible causes
Ignition of vehicle is not ON.
Hand brake is not engaged.
Control panel switched itself off
(four minute rule).
Solution
Switch on the ignition.
Engage hand brake.
Switch OFF and then ON (button 5).
The error mode
• If the ignition lock is not switched on or the hand brake is not engaged, the complete unit cannot
be switched on, unless the jacks have been lowered and the hand brake is being disengaged, in
which case the ‘park brake’ led will fl ash and the buzzer will beep. You are now able to switch on the
unit with the on/off button.
• If, when retracting the jacks, the pump is running on overpressure for a few seconds, the retracting
action should stop (in both manual and automatic mode).
• If the jacks are retracted and the pressure switch on the pump de-energizes, the unit will retract the
jacks again for a few seconds, if the ignition is switched on.
• A timer will run, which will count up when the pump is running and count down when the pump is not
running. If this timer reaches a value that is too high, the pump will stop running in order to prevent
overheating.
• Under normal circumstances, all LEDs are off and the unit will only respond to the ‘on/off’ button
(switch on).
62
? The led BATTERY lights, but goes out if I do not use the button for the jacks.
Possible causes
Battery almost empty.
Solution
Start camper to load battery.
!! For all other reports and/or not (well) functioning of the system, please contact your dealer!
63
›
›
The electric motor does not have any maintainable parts. If the motor does not work, it will have to be
replaced. The only thing you can do is check the cables and connections.
Once the motor has been taken apart, the warranty will become invalid. The mechanical parts of the
E&P Levelling System can be exchanged. Ask E&P Hydraulics for information, if you need parts.
• Check the oil level every month.
a) Only check the oil when the jacks are fully retracted.
b) When checking the oil level, the level should be about two to five centimetres below the filling
hole.
c) Only fill the tank when the jacks are fully retracted. If this is done with extended jacks, the oil
may overspill when they are retracted again.
• The oil should be replaced every 36 months.
• Annually check the electronic connections of the drive unit.
• Regularly clean the jacks. Dirt, sand, mud and other contaminations that accumulate while driving,
may limit the functionality of the system.
• If the jacks remain extended for a longer period of time, the exposed legs must be protected by
weekly spraying them with a silicon lubricant. Do this every 2 or 3 days, if the camper is located in a
salty environment.
• We recommend injecting the complete cylinders, including hose connections, with an anti-corrosive
agent. This layer (e.g. tectyle) will protect the system against erosion and rust. This should
already have been done during assembly. Annual application of anti-corrosive agent to the system
will significantly increase the product’s life span. Spray when the supports are retracte.
• Annual monitoring of rail tracks and damage to the piston rod.
Repairs to campers must be performed by dealers recognized by E&P Hydraulics. For systems which
are not (or cannot be) changed, installed or repaired by a recognized E&P Hydraulics dealer, the
warranty cannot be used.
Maintenance
!! Warning: Prior to all maintenance work under the camper, you must secure the front and rear axles
by means of blocks. If not, there will be a risk of injuries or serious accidents.
Recommended oils
Warranty
E&P gives guarantees for parts of its Recreational Vehicle Electronic Levelling System (’Product’)
against faults in material and manufacturing for a period of 24 months starting from the date
of purchase. If an E&P product was checked by an official E&P dealer and a fault in material or
manufacturing was discovered within the aforementioned period, E&P is able to choose the following
actions:
• repairing or replacing the faulty part for free in E&P’s factory
(or another location determined by E&P);
• sending a mechanic to the location where the product is at that moment, in order to repair or
replace the product on site;
• or, writing out a credit note for the product.
All warranty claims require a product test and approval by (a dealer of) E&P. All repairs must be
approved by E&P before the work starts. There can be no exceptions to this procedure. Immediately
contact E&P directly before trying to perform a repair or change to your E&P product. Claims for
alleged damages to products are only allowed if E&P has had the opportunity to check the claim.
The warranty will become invalid, if the buyer built items into the system, or if he made settings and in
case of abuse or negligence, included but not limited to improper use, overloading, damage through
accident, incorrect loading or incorrect weight distribution, damage through improper use or improper
maintenance, connection to wrong parts or repair attempts by other persons than the dealer of E&P.
This warranty does not apply to physical damage, damage as a result of force majeure, in case of
commercial use or adaptation of the product or for products that are sold as a special offer and/
or ‘with defects’. This warranty will become invalid, if the product’s identification criteria, which were
attached in the factory, are changed or removed.
Only use transmission oil ‘A’ (Automatic Transmission Fluid - ATF). E&P recommends
ATF with Dexron III or Mercon 5 or a mixture of both. Under freezing point, the jacks
may move slower due to the viscosity of the oil. Under extremely cold weather conditions,
you should use a special type of oil for low temperatures. Consult E&P Hydraulics or a
recognized dealer, before using a different type of oil.
64
65