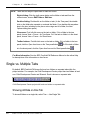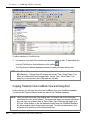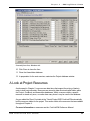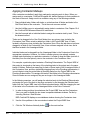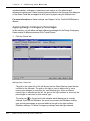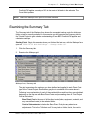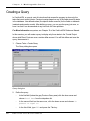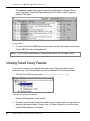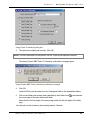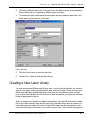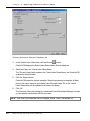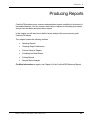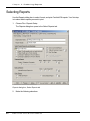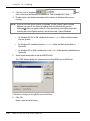
1
User Manual Building Systems Design, Inc. Acknowledgments BSD CostLink®/CM Software 2004 Building Systems Design, Inc. BSD CostLink, BSD SpecLink, and BSD SoftLink are registered trademarks of Building Systems Design, Inc. All other names are trademarks or registered trademarks of their respective owners. BSD CostLink/CM User Manual © 2004 Building Systems Design, Inc. Updated June, 2004. Information in this document is subject to change without notice. Companies, names, and data used in examples herein are fictitious unless otherwise noted. No part of this document may be reproduced or transmitted in any form or by any means, electronic or mechanical, for any purpose, without the express written permission of Building Systems Design, Inc. All rights reserved. Printed in the United States of America. Contents Table of Contents Preface About This Manual................................................... vii Chapter 1 Getting Started ..........................................................1 BSD CostLink/CM Overview............................................................ 2 How Direct Costs are Estimated ......................................... 2 Markup Capabilities ........................................................... 2 Multiple Views................................................................... 3 Queries ............................................................................ 3 Reporting Overview ............................................................ 4 Technical Support .......................................................................... 4 Chapter 2 Guided Tour ...............................................................5 Panels and Windows ..................................................................... 6 Opening an Estimate......................................................... 6 Definitions......................................................................... 7 Expanding and Collapsing the Tree ..................................... 8 Arranging Panels and Windows .......................................... 8 Showing Costs in the Tree Panel ........................................ 9 Item Forms ................................................................................. 10 Folder Item Forms ........................................................... 10 Task Item Forms ............................................................. 11 Single vs. Multiple Tabs................................................................ 12 Showing All Data on One Tab............................................ 12 Views and Queries ...................................................................... 13 Choosing Different Views.................................................. 13 Understanding Queries..................................................... 14 Definitions....................................................................... 15 Databases and Resource Tables ................................................... 15 BSD CostLink/CM Databases........................................... 15 A Look at a CostBook Database....................................... 15 Resources ...................................................................... 17 BSD CostLink/CM User Manual iii Contents A Look at the Project Resources....................................... 17 Chapter 3 Starting an Estimate ................................................19 Creating a New Project Database.................................................. 20 Defining Project Summary Information ........................................... 21 Defining General Information ............................................. 21 Defining Cost Fields......................................................... 22 Adding Project Notes ....................................................... 23 Chapter 4 Adding Direct Costs.................................................25 Building the Project Structure ....................................................... 26 Adding Folders ................................................................ 26 Adding Notes to a Folder.............................................................. 29 Introduction to Adding Tasks......................................................... 30 How to Add Tasks to Estimates ........................................ 30 Adding Tasks From a CostBook Database..................................... 31 Copying Labor and Equipment Items as Tasks ................... 31 Opening a CostBook Database......................................... 31 Copying Tasks from the CostBook View and Using Find...... 32 Adjusting the Quantity of Items......................................... 34 Practice.......................................................................... 35 Adding User Defined Tasks........................................................... 35 About Crews ................................................................... 36 Using Crews in a Project.................................................. 36 Using the CSI Tasks Resource View ................................. 36 About CSI Codes............................................................. 37 Adding a User Defined Task.............................................. 38 Adding a Crew to a User-Defined Task............................... 41 Adding Material Costs To a User Defined Task ................... 45 Calculating Material Costs Using a Vendor Quote............... 45 Copying the User-Defined Tasks to the Project WBS View .. 50 Copying From an Assemblies Database ........................................ 52 Example of Use............................................................... 52 Copying Assemblies as Project Tasks............................... 53 A Look at Project Resources ........................................................ 55 iv BSD CostLink/CM User Manual Contents Chapter 5 Defining Cost Markups ............................................57 Examining the Cost Markup Types ................................................ 58 Applying Sales Tax ...................................................................... 61 Auto-Recalculate Markups ........................................................... 62 Adding Contractors and Assigning Their Costs ............................... 64 Compounded Cost Markups ............................................. 64 Steps in Assigning Contractor Markups ............................. 65 Defining the Prime Contractor ........................................... 65 Defining Subcontractors ................................................... 67 Applying Contractor Markups............................................ 68 Defining and Applying Owner Markups ........................................... 69 Applying Design Contingency Percentages ........................ 70 Applying Escalation......................................................... 72 Examining the Summary Tab........................................................ 73 Chapter 6 Working with Queries ..............................................75 Creating a Query ......................................................................... 76 Viewing Saved Query Results....................................................... 78 Chapter 7 Using the Project CSI View......................................81 Assigning Tasks to the Project CSI View ....................................... 82 Chapter 8 Applying Different Labor Rates ................................85 Opening a Labor Library ............................................................... 86 Creating a New Labor Library ........................................................ 87 Applying New Labor Rates to an Estimate..................................... 93 Chapter 9 Producing Reports...................................................95 Selecting Reports........................................................................ 96 Choosing Report Preferences ....................................................... 97 Column Setup for Reports ............................................................ 98 BSD CostLink/CM User Manual v Contents Previewing and Printing Reports.................................................... 99 Chapter 10 Linking...................................................................105 Quantity Options ....................................................................... 106 Linking to the Parent Quantity .................................................... 106 Linking To Excel........................................................................ 109 Terms............................................................................110 One-Time Set Up In Excel...............................................110 Linking to a Parameter Workbook In Excel .......................115 Linking a CostLink/CM Estimate to Excel.........................115 Overview of Linking to Excel ............................................116 Tips for Linking...............................................................117 Index .....................................................................131 vi BSD CostLink/CM User Manual Preface About This Manual This manual introduces the main features and operations of BSD CostLink/CM. To help you learn CostLink/CM, this manual includes a “Guided Tour” (Chapter 2) and a Tutorial (Chapters 3 – 10) in which you are shown step-by-step how to build a sample estimate. For more information on BSD CostLink/CM, including descriptions of all the components of the software and instructions on using advanced features, see the BSD CostLink/CM Reference Manual and the online Help. NOTE: For installation instructions, directions for moving the software, and system requirements information, see the Installation document available on the Install BSD Products screen of the latest version of the BSD SoftLink CD-ROM or on our website at www.bsdsoftlink.com/downloadcenter/downloadcenter.htm. BSD CostLink/CM User Manual vii Preface viii BSD CostLink/CM User Manual Chapter 1 Getting Started This chapter introduces BSD CostLink/CM and describes how to get started using the software. NOTE: For installation instructions, directions for moving the software, and system requirements information, see the Installation document available on the Install BSD Products screen of the latest version of the BSD SoftLink CD-ROM or on our website at www.bsdsoftlink.com/downloadcenter/downloadcenter.htm. BSD CostLink/CM User Manual 1 Chapter 1 : Getting Started BSD CostLink/CM Overview CostLink®/CM (CM) is Building Systems Design, Inc.’s (BSD) cost engineering system for facility design and construction. CM is a sophisticated tool for modeling and managing design and construction costs. It supports the gamut of construction resources, uses a nonproprietary, query-based data storage and access system, and has a familiar Windows Explorer-style drag-and-drop interface. How Direct Costs are Estimated CostLink/CM supports estimating using any combination of five predefined direct cost types (Labor, Equipment, Material, Shipping, and Unit Cost) and up to five user-defined unit cost types. Costs can be entered manually on each line item, or costs can be stored in cost tasks. Using cost tasks allows you to define a particular task once (for example, all the direct costs involved in laying one square foot of a particular type of carpet), and then use the drag and drop interface, or copy and paste, to use that task multiple times in one estimate, or in multiple estimates. When labor or material costs change, you can easily edit those costs in one place and choose to have all the copies of the task update to the new costs. A task usually includes one or more materials, a crew reference (which contains labor and equipment costs), the crew’s production rate for the task, and additional cost types that may be appropriate to the project. These cost tasks can be combined into groups called assemblies, or a cost task can be as simple as a single unit cost. While labor and equipment resources are normally grouped as a crew that is used to produce or install a cost task, labor and equipment can also be used directly as an estimate line item or assembly member. You can create your own tasks; modify the starter databases of cost tasks, assemblies, labor, and equipment that are provided with the software; and/or purchase additional commercial databases from BSD including the full range of R.S. MeansTM cost databases. Markup Capabilities Just as CostLink/CM is incredibly flexible in how you can define direct costs, CostLink/CM also supports hundreds of markup combinations for applying indirect costs. Cost markups can be selectively applied to individual line items, the whole project, or anywhere in between. Markups can be defined to apply to one, some, or all cost types (labor, equipment, material, etc). Markups can be as simple as a single percentage markup for all estimate items, a flat amount, or in fact, as simple as no markup at all. 2 BSD CostLink/CM User Manual Chapter 1: Getting Started Markups are broken into three indirect cost groups: Adjustments and Taxes, Contractor markups, and Owner markups. The Adjustments and Taxes group is applied to bare direct costs and is comprised of Sales Tax, Escalation, and up to five user-defined markups, any or none of which may be used in a given estimate. For the second group of indirect costs, Contractor markups, CostLink/CM has the flexibility for you to apply no contractor markups, apply contractor markups using a single contractor, or apply the markups by defining the contractors in terms of their hierarchical relationships to each other (using multiple prime contractors, and/or up to 5 levels of subcontractors). Each contractor’s markup can be specified independently of other contractors’. Contractor markups are defined as any of up to five predefined indirect cost types (Overhead, Profit, Bond, PTI, and General Excise Tax) and five user-defined types. In CostLink/CM, contractors are created in a separate Contractor’s View that facilitates work assignment by drag and drop from other project work breakdown views. The third type of indirect costs, Owner markups, are applied to the total of direct and indirect costs using predefined types for Escalation and Contingency, and up to five user-defined owner cost markups. Like indirect cost markups, owner markups can be applied at individual line items, to the whole project, or anywhere in between. Multiple Views CostLink/CM includes the capability to maintain multiple views on a cost estimate. Rather than creating and maintaining separate estimates for each work breakdown structure (WBS) that may be needed, one estimate can be created in CostLink/CM and be reorganized into as many different views as are needed. When the estimate is edited in one view, it is also edited in the other views. Reports can be printed on any view. Predefined views include a Bid Schedule View, Contractors View, Activities View, and Project CSI View. The user can create additional hierarchical views to organize the cost estimate using a client-specific chart of accounts. Queries CM supports user-defined queries with an easy-to-use Query Dialog that allows the user to retrieve information based on the contents of one or more fields in the Project Database. For example, you can query for all items with a total material cost greater than $100,000, or all items installed by a certain type of crew, or all items with a quantity of zero. CM allows you to store queries in the Views Selector and re-use them as needed during estimate development. You can also print a query as a list or export it to a spreadsheet format, as you can with any CostLink/CM report. BSD CostLink/CM User Manual 3 Chapter 1 : Getting Started Reporting Overview CM provides a wide variety of standard report formats for direct cost summary, indirect cost summary, and owner cost summary; and supports easy selection of summary depth (levels of hierarchy to report). Reports can be printed on any view. If you need a bid schedule, print the report on the Bid Schedule view. If you need a summary of costs by contractor, print the report on the Contractors view. If the standard reports are not exactly what you need, you can create your own output formats and reports, and modify some aspects of the built-in reports using Crystal Reports Writer by Seagate Software. You can also use your own choice of ODBC-compliant report writer to output data from CM’s Microsoft Access-formatted Project summary tables. Technical Support For assistance in installing or using BSD CostLink/CM: Call: 404-365-9226 Fax: 404-365-8912 Email: [email protected] See our Internet home page at http://www.bsdsoftlink.com for new product development and other news. 4 BSD CostLink/CM User Manual Chapter 2 Guided Tour This chapter presents a guided tour of BSD CostLink/CM. It uses databases that are delivered with BSD CostLink/CM to show you the various ways you can display and arrange information in BSD CostLink/CM windows, tabs, and forms. With this and later chapters in this manual, you will learn best if you actually follow the steps presented at your computer. This chapter introduces you to the following components of the BSD CostLink/CM interface: • Panels and windows • Tabs • Item forms • Views and queries • Databases and resource tables BSD CostLink/CM User Manual 5 Chapter 2 : Guided Tour Panels and Windows In the steps below you will open an estimate to learn what information displays in different parts of the screen, and how to open forms to view and edit additional information. Opening an Estimate When you first start BSD CostLink/CM, the program is displayed with an empty window. BSD CostLink/CM program window To Open an Estimate 1. Choose File > Open, and select Project Database from the submenu. The Open Database dialog box opens, listing the databases stored in the CostLink CM\Projects folder. 6 BSD CostLink/CM User Manual Chapter 2 Guided Tour 2. Select the Child Development Center sample project and click Open. BSD CostLink/CM opens the project and displays it in its own database window - a window within the BSD CostLink/CM main window. Tree Panel Sheet Panel BSD CostLink/CM main window with project open This is the default window setup for BSD CostLink/CM. The top panel is called the Tree Panel and the panel at the bottom is called the Sheet Panel. Definitions The Tree Panel shows the hierarchical organization of the project (or other database). Expand and collapse the tree to see different levels of folders as described below. The folders shown in the Tree Panel represent different categories of work within the project (or other database). You can define a project with any number of levels of hierarchy, so that a given folder may have many folders (or children) beneath it and folders (parents) above it. The Sheet Panel displays project data. In the project hierarchy, the items listed in the Sheet Panel are always located one level below the folder currently selected in the Tree Panel. BSD CostLink/CM User Manual 7 Chapter 2 : Guided Tour The items in the Sheet Panel can either be folders or tasks. Tasks represent the estimated cost information for pieces of the project. Expanding and Collapsing the Tree To change the display of the panels, use the following commands: ? To arrange the panels side-by-side, choose View > with Vertical Panels. ? To return to the default display, choose View > with Horizontal Panels. Use the following toolbar buttons to change the number of levels shown. Move up one level. Highlights the next folder one level above the current folder. Move down one level. Highlights the next folder one level below the current folder. Visible levels default value. Click the arrows to select the number of project levels you want to show, and then click the check mark. Expand branch. Expands the tree to show all folders below the current folder. Show all folders. Expands the tree to show all folders in the current view of the database. Arranging Panels and Windows Buttons for controlling the display are located on the toolbar at the top of the BSD CostLink/CM window. (Equivalent commands are located on the View menu.) Click on each of the following buttons to change the display of the Tree and Sheet Panels. Orient window panels vertically. Displays the Tree and Sheet Panels side by side. Orient window panels horizontally. Returns the display to the top and bottom arrangement of the two panels. The following toolbar buttons are used to arrange multiple database windows. Tile windows horizontally. Arrange all open windows one atop the other. Tile windows vertically. Arrange the windows side by side. Stack windows in cascade. Arrange the windows in cascade fashion. 8 BSD CostLink/CM User Manual Chapter 2 Guided Tour Showing Costs in the Tree Panel To show summarized costs for all tasks contained in each folder in the Tree Panel, choose Tree > Show Data in Tree. Project with Data showing in Tree Panel NOTE: The columns displayed in the Tree Panel may be modified by clicking on Tools > User Options. See Chapter 2 in the Reference Manual for more information. BSD CostLink/CM User Manual 9 Chapter 2 : Guided Tour Item Forms Detailed information about each folder and task can be viewed and edited on an item form. Folder Item Forms In addition to showing descriptive information about the category that the folder represents, in primary views (primary and resource views are explained later), the folder item form shows the summary of cost information for that category. To view folder item forms: 1. On the toolbar, click Show All Folders 2. In the Tree Panel, right-click on the Roof Construction folder (located below the Superstructure folder) and from the context menu choose Edit Folder. . The folder form opens. Folder Item Form 4. Click the Next button at the bottom of the form. The item form displays information for the next folder, Roof: Structural Steel. 10 BSD CostLink/CM User Manual Chapter 2 Guided Tour 5. Click the Next and Back buttons to move through display of the folder item forms. When you are finished, click Close. Task Item Forms Task item forms show descriptive and detailed cost information about tasks. Use the following steps to view task item forms: 1. In the Tree Panel, click on the Roof: Steel Decking Folder (under the Roof Construction folder). 2. In the Sheet Panel, double click on the task in this folder. The task is called 1-1/2 in deep 22 Ga. Roof Deck. Double-clicking opens the task item form. Task form Notice that the task form has more information than the folder form. This information is arranged on multiple tabs. Click the Members and Accounts tabs to display the additional information for the item. Resize the form by holding your mouse over the edges to get a double-headed arrow and then clicking and dragging. Resize the panels on each tab by holding your mouse over the divider lines and clicking and dragging. When you are done, click Close to close the task form. BSD CostLink/CM User Manual 11 Chapter 2 : Guided Tour NOTE: There are four ways to open folder or task item forms: Right-clicking: Click the right mouse button on the folder or task and from the context menu, choose Edit Folder or Edit Item. Double-clicking: Double-click on the folder or task. (In the Tree panel, the doubleclick on the folder also expands or contracts the folder. If you double-click anywhere else in the tree, including on the plus or minus sign next to a folder, the User Options dialog box opens.) View menu: First, left-click once on the task or folder. If it is a folder in the tree panel, choose View > Forms > for Tree Items. Or if the task or folder is in the sheet panel, choose View > Forms > for Sheet Items. Toolbar buttons: First left -click once on the task or folder. If it is a folder in the tree panel, click the Open item form on the Tree panel button . Or if the task or folder is in the sheet panel, click the Open item form on the Sheet panel button . For More Information: See the BSD CostLink/CM Reference Manual or the online Help for descript ions of the information on item forms. Single vs. Multiple Tabs By default, BSD CostLink/CM shows the level one folders on separate tabs within the project window. For example, the Child Development Center project has two folders at level one: Child Development Center and Sitework. Each is shown on separate tabs. Child Development Center project with level one folders on separate tabs Showing All Data on One Tab To show all folders on a single tab, select Tree > Use Single Tab. 12 BSD CostLink/CM User Manual Chapter 2 Guided Tour Child Development Center project shown on single tab Showing multiple tabs is useful in complex estimates, and is especially important when viewing resources or the supporting databases, as discussed later in this chapter. Use Single Tab is a toggle. Return to the default view by choosing Tree > Use Single Tab. Views and Queries BSD CostLink/CM contains multiple views for locating and editing different kinds of information about the estimate. Queries can be used in each view to locate specific information. Choosing Different Views The field in the upper-left corner of the project window is called the View pulldown. Click on the arrow to the right of the field to display all of the views available for the Child Development Center project. View pulldown open BSD CostLink/CM User Manual 13 Chapter 2 : Guided Tour Estimates have primary and resource views: ? Primary views display the estimate under different hierarchies or work breakdown structures (WBS). For example, the main WBS for the Child Development Center project is the Project WBS View, which is organized by UniFormat. The project has additional primary views for organization by Contractors, Bid Schedule, Activities, and Project CSI hierarchies. ? Resource views display project resources, which are discussed in the next section. Try the following: 1. From the View pulldown, choose Contractors View. The Contractors view displays in the project window. This view organizes the project by contractor. 2. From the View Pulldown, choose Project CSI View. The Project CSI View displays. This view contains a folder for each CSI MasterFormat division. All the tasks in the project are sorted into the appropriate CSI folders. 3. From the View Pulldown, choose Project WBS View. This is the main view of the estimate and is used in almost all estimates. For More Information on views, see the BSD CostLink/CM Reference Manual, the online Help, and Chapter 7 of this manual. Understanding Queries The View Pulldown also lists saved queries. Queries are indicated by question marks. View pulldown showing the Zero Cost Items query Use queries to define and view specific subsets of a project or other database. For example, you may create a query to see all the tasks that have a base cost above or below a certain amount. Define queries on the Query form, accessed from the Tools menu. For step-by-step instructions to create a query see Chapter 6: Working With Queries . 14 BSD CostLink/CM User Manual Chapter 2 Guided Tour Definitions ? View: A presentation of data organized into a specific hierarchy. BSD CostLink/CM databases have both primary and resource views. ? Query: Queries are used to define subsets of data in the estimate or other database. The result set of a query can be saved as another view, and are listed in the View pulldown with question mark icons . Databases and Resource Tables There are three kinds of databases used in CostLink/CM. Each database contains multiple views, some of which are called Resource Tables. BSD CostLink/CM Databases BSD CostLink/CM stores both estimates and supporting cost information in databases. There are three distinct types of CostLink/CM databases: ? The Project Database is where you build cost estimates. ? The CostBook Database stores detail cost items (tasks) along with the materials, crews, labor, equipment, modifiers, and vendors used to define the costs of the tasks. ? The Assemblies Database stores assemblies. An assembly is defined as all of the tasks required to produce one unit of a specific type of work. Use assemblies by copying them into an estimate and then applying the appropriate quantity for your project. For More Information, see Chapter 4 of this manual for instructions on using the CostBook and Assemblies databases to build projects. A Look at a CostBook Database 1. On the BSD CostLink/CM toolbar, click the Open CostBook Database button 2. From the Open Database dialog box, select an available CostBook database. . BSD CostLink/CM opens the database in its own window: BSD CostLink/CM User Manual 15 Chapter 2 : Guided Tour A CostBook open in CostBook View 3. For a better view, click the maximize button in the upper right of the window . By default, CostBook databases are displayed with multiple tabs, one for each of the 16 CSI Divisions, which are used to organize the data. 4. 5. Using the navigation techniques you have learned in this chapter, spend some time exploring this CostBook database. - Click on different tabs to view different parts of the database - Expand and collapse the Tree to view data at different levels of the hierarchy. Examine item forms for both folders and detail tasks. Close any item forms so that only the Tree and Sheet panels are displayed. Now click the Tile windows vertically button on the BSD CostLink/CM toolbar. (If you are still showing the data in the Tree Panel, you may want to turn it off - click the Show Folder Data In Tree button 16 .) BSD CostLink/CM User Manual Chapter 2 Guided Tour BSD CostLink/CM displays the Project and CostBook database windows side-by-side. This arrangement is useful when you are copying tasks from one database to another, especially when using drag-and-drop. 6. To close the CostBook database, click the close button in the upper right corner of the window. Click the maximize button to maximize the Child Development Center Project Database window. Resources In BSD CostLink/CM, resources are data items that support the pricing of tasks or the building of cost estimates. They can include items such as materials, crews, labor items, equipment items, modifiers, materials vendors, and other types of data. Resources are stored in data structures called tables within the Project, CostBook, and Assemblies Databases. (In some cases, resources may also be stored in their own databases, referred to as libraries.) Within a resource table, a specific resource is stored only once, no matter how many times it may be used in the database. For example, a particular equipment item may be used to determine the equipment cost of a dozen tasks in different portions of an estimate. By displaying the one occurrence of this equipment item in the Equipment Resource table, you can change the cost one time and affect the pricing of all of the tasks that use the equipment. A Look at the Project Resources 1. Choose Resources > Labor. BSD CostLink/CM opens a new window showing the Labor Resource table for the Child Development Center Project. This table lists all of the labor items used by all tasks in the estimate. Notice that the window includes the same display structures you have seen elsewhere, including a Tree Panel, Sheet Panel, and tabs. There are also item forms. 2. Click on the Building Workers folder so that labor items will display in the Sheet Panel. Click the right mouse button on a labor item in the Sheet Panel and choose Edit Item. An item form for the selected labor item opens. 3. After viewing the information, close the item form. 4. Choose Tree > Use Single Tab. Note the tabs at the top of the window. 5. Choose Tree > Use Single Tab again. Note there are still multiple tabs at the top of the window. When BSD CostLink/CM is in a Resource view, Use Single Tab means that each res ource is displayed on a single Tab. BSD CostLink/CM User Manual 17 Chapter 2 : Guided Tour 6. If necessary, choose Tree > Use Single Tab again so that the tabs across the top say Labor, Equipment, Materials, etc. 7. Click on the different tabs to explore the different kinds of resource tables. 8. Notice the View pulldown in the upper left corner of the window. It shows the name of whichever resource table you have displayed. Resources are another type of view in a BSD CostLink/CM database. 9. Click the arrow on the View pulldown and select a different view from the list. The window changes to display the resource table you selected. 10. To close both the Resources window and the main project window, choose File > Close. For More Information: See the BSD CostLink/CM Reference Manual for detailed information on Resources in BSD CostLink/CM. 18 BSD CostLink/CM User Manual Chapter 3 Starting an Estimate This chapter gives instructions for starting a new estimate in BSD CostLink/CM. In this and the remaining chapters in this manual, you will be building a sample estimate. This sample will estimate the costs of adding a ramp to an existing structure. By following the instructions, you will learn the most important tasks for using BSD CostLink/CM. In this chapter, you will learn how to: • Start a new estimate in BSD CostLink/CM by creating a new Project Database • Define Project Summary Information BSD CostLink/CM User Manual 19 Chapter 3: Starting an Estimate Creating a New Project Database The first step in starting an estimate is to create the project database. You can use one of the provided templates or copy an existing project to start a new project. For this tutorial, you will use the Generic template. NOTE: You can import projects from CostLink/AE, CostLink-16 or Composer Gold. See the BSD CostLink/CM Reference Manual or the online Help for instructions. Starting Point: Begin this tutorial with CostLink/CM open, but no databases open. 1. Choose File > New, or click the New Database toolbar button . The New dialog box opens, showing the available project templates. New dialog box 2. For a better view of the templates, click the View, Small Icons option. 3. Click the Generic Template (No folders).MPJ template, then click the New button. The Save New Project Database As dialog box opens. 20 BSD CostLink/CM User Manual Chapter 3 : Starting an Estimate 4. Type the following in the File name field: Tutorial Project 5. Click Save. CostLink/CM creates the project. When finished, CostLink/CM opens the Summary Info dialog box. Leave this open for the next step of the tutorial. Defining Project Summary Information The next step in starting an estimate is to define project summary info. In the following steps, you will fill in some of the more important summary info for the Tutorial Project. Defining General Information Starting Point: Begin this procedure with the Tutorial Project’s Summary Info dialog box open from the previous exercise. Summary Information dialog box, General tab BSD CostLink/CM User Manual 21 Chapter 3: Starting an Estimate The General tab is used to display and edit general information about the estimate. 1. Click in the Project Title field and enter the following: BSD Buildings - Change Order #1 Note that the Project Title can be different from the File Name. The Project Title prints in the reports, whereas the File Name does not. 2. Using the Tab key to go from field to field, fill in the following fields: Project No. 2004-05-10 Project Size and UOM 400 SF Project Description: Sample Estimate For Adding Ramp To Building Designed By: Architect's Name Estimated By: Your Name Prepared By: Consulting Firm Name and Location Preparation Date: (Today’s Date) Escalation Index Date: 1/1/2004 Effective Pricing Date 1/1/2004 Estimated Construction Time 30 Days Defining Cost Fields In this exercise, you will define the cost fields that will be used in your estimate. BSD CostLink/CM is extremely flexible in defining and reporting costs. Up to 10 types of Direct Costs (such as labor, equipment, and material) can be specified. In addition, three categories of Cost Markups can be defined - Adjustments & Taxes, Contractor Markups, and Owner Costs. 1. Still on the Summary Information dialog box, click the Select Fields tab. The tab opens. 22 BSD CostLink/CM User Manual Chapter 3 : Starting an Estimate Summary Information dialog box, Select Fields tab 2. In the Select Field Group to Edit control, the Direct Cost Columns option is already selected. Therefore, the Direct Cost types for the estimate are displayed in the grid area below. (By clicking the other Field Groups, you can display the other cost types – Adjustments/Taxes, Contractor Markups and Owner Costs). The Direct Cost types shown have been copied from the Generic Template that you used to start the estimate. No changes are needed for the Tutorial Project. Adding Project Notes Use the Project Notes tab of the Summary Info dialog box to add any global descriptive notes for the estimate. Notes on specific folders or tasks can be added either here or within the estimate. You can also update the notes at different phases of the project as you save different versions of the estimate. 1. Still in the Summary Info dialog box, click the Project Notes tab. BSD CostLink/CM displays the tab. 2. Click in the Notes area and enter the following: Tutorial Project Notes. BSD CostLink/CM User Manual 23 Chapter 3: Starting an Estimate NOTE: In addition to typing notes directly into the Notes area, you can copy text from a word processor, or copy notes from the Notes tab of a different CostLink/CM database. Since CostLink/CM does not have a spell-checking feature, you may copy text to your word processor and use your word processor's spell check. To copy the text, drag across it with your mouse and press CTRL+C on your keyboard. After spell checking, copy the text in the word process, click in the Notes area, and use CTRL+V to paste. 3. Click OK to save all of your changes and close the Summary Info dialog box. NOTE: BSD CostLink/CM will display the view that was last used in a Project Database. If the project opens in a resource view, click on the View pulldown and change it to Project WBS View. 24 BSD CostLink/CM User Manual Chapter 4 Adding Direct Costs This chapter explains how to add folders and tasks to a project. Folders represent different elements of the project hierarchy or work breakdown structure (WBS). Tasks are contained within folders and represent the estimated direct costs for the project. Direct costs are the basic costs of doing the work before any cost markups. NOTE: Cost markups are explained in Chapter 5. To help you build estimates efficiently, BSD CostLink/CM provides varied and powerful options for inputting and computing Direct Costs. Five of these options – CSI Tasks, Crews, Equipment, Labor, and Assemblies – are introduced in this chapter. In this chapter, you will learn how to: • Add folders to define the basic hierarchy of an estimate • Add Notes to provide more information about a folder or task • Copy tasks representing direct costs from the CostBook database • Add your own (user-defined) tasks to an estimate and use a crew to derive the labor and equipment costs for that task • Copy assemblies from the Assemblies database • Examine project resources to see how they accumulate as you add tasks to an estimate BSD CostLink/CM User Manual 25 Chapter 4: Adding Direct Costs Building the Project Structure You build an estimate’s structure by adding a hierarchy of folders and subfolders that represent the different levels of the project’s work breakdown structure (WBS). To accommodate estimates of all sizes and degrees of complexity, BSD CostLink/CM allows you to define as few or as many levels of folders as you need. In many cases you will begin with some folders already defined, since the template that you use to start a project may already have a hierarchy of folders. You may also copy a hierarchy or partial hierarchy of folders from an existing estimate, or from the BSD CostLink/CM Hierarchy Library. In this Tutorial, you will define the folders manually. Adding Folders Tutorial Project Your screen should look like the picture above. To begin this part of the tutorial, you must be in single tab mode and in the Project WBS View. If necessary, see Chapter 2 for directions on using the View selector to change views. If the first folder in the Project WBS View does not say BSD Buildings – Change Order #1, from the Tree menu choose Use Single Tab . If desired, maximize the project window in order to see more of the project. 26 BSD CostLink/CM User Manual Chapter 4 : Adding Direct Costs 1. Click on the (New Folder) in the Tree Panel to select it. 2. From the View menu choose Forms, and then from the flyout menu, choose for Tree Items. (Or right-click on New Folder and choose Edit Folder from the context menu.) NOTE: Throughout the rest of this manual, instructions where you choose commands from a menu will be written as follows: Click View > Forms > for Tree Items. The item form for (New Folder) opens: Folder item form 3. Enter the following information: Folder Tag: 4. A Title: Substructure Click Insert > Child Folder. CostLink/CM inserts a subfolder named New Folder under Substructure. 5. Enter the following information: Folder Tag: 10 Title: BSD CostLink/CM User Manual Foundations 27 Chapter 4: Adding Direct Costs 6. Keeping the item form open, click on BSD Buildings - Change Order #1. The New Folder updates to its new name, Foundations, and the item form updates to show information for BSD Buildings - Change Order #1. 7. Keeping the item form open on BSD Buildings - Change Order #1, add another folder at the same level as Substructure by clicking Insert > Child Folder. CostLink/CM adds another New Folder at the same level as Substructure, and the item form updates to show the New Folder. NOTE: Insert > Child Folder inserts a folder after the last folder that is one level below the current folder. Insert > Folder inserts a folder at the same level as, and before the current folder. If you add a folder in the wrong place, the easiest way to move it to the right place is by dragging it with your right mouse button. Dragging with the right mouse button results in the following options: Move Into Folder, Move Above Folder, Copy All Here, Copy Folders Here, Copy Tasks Here, and Cancel. To make the folder a child of an existing folder, drag it to that folder with the right mouse button and choose Move Into Folder. To move a folder before an existing folder, drag it to that folder with the right mouse button and choose Move Above Folder. Use the Copy options to copy existing folders and/or tasks instead of recreating them. 8. Fill in the following information: Folder Tag: 9. F Title: Special Construction and Demolition Keeping the Item Form open, choose Insert > Child Folder. Fill in the information below. Folder Tag: 20 Title: Demolition 10. Click on the BSD Buildings - Change Order #1 folder in the Tree Panel to select it. 11. Click Insert > Child Folder. Enter the information below. Folder Tag: G Title: Building Sitework 12. Click Insert > Child Folder. Three folders are needed under Building Sitework. When multiple folders are needed at the same level, it is easier to add the folders first and then fill in the information. 13. Add two additional folders at this level by clicking Insert > Folder twice (or click the Insert button on the folder form twice). 14. Use the Next button to move from folder to folder, and enter the following information. 28 Folder Tag: Title: 10 Site Preparation 20 Site Improvements BSD CostLink/CM User Manual Chapter 4 : Adding Direct Costs 40 Site Electrical Utilities 15. Close the item form. 16. Show the folder tags on screen by choosing Tree > Show Folder Tags. Tutorial Project with folders added NOTE: To see the cost data in the Tree Panel, choose Tree > Show Data in Tree. Adding Notes to a Folder Descriptive notes can be added to folders or tasks at any level of an estimate. In this exercise, you will add a note to a folder that you created. 1. Click on the folder 40 Site Electrical Utilities in the Tree Panel. 2. Click View > Form > for Notes. The Notes form opens. BSD CostLink/CM User Manual 29 Chapter 4: Adding Direct Costs Notes form 3. Type the following in the Notes area: Electrical work will be performed by a subcontractor. All other work will be performed by the prime contractor. 4. Click the Close button to exit and save the Notes. The folder icon changes to indicate that there is a note attached to the folder . Introduction to Adding Tasks Tasks represent costs for each small piece of a project. You can begin adding tasks within a folder at any time, starting at any folder level. You might add tasks to Level 2 folders in one part of the project, while adding them to Level 5 folders in another part so that the more complicated portions of a project are broken down to greater depth. How to Add Tasks to Estimates There are several ways to add tasks and their Direct Costs to CostLink/CM estimates: 30 ? Copy individual CostBook tasks from the primary CostBook view of a CostBook database. These tasks typically have labor, equipment, and material unit costs, and derive their labor and equipment costs from crews. ? Copy items from the Labor or Equipment resource tables of a CostBook database. These items can be copied into your estimate as tasks that contain only labor or equipment costs. BSD CostLink/CM User Manual Chapter 4 : Adding Direct Costs ? Copy assemblies from an Assemblies database or copy Crews as Assemblies from the Crews resource table of a CostBook database. These items represent groupings of cost items defined in the estimate as a single task. ? Copy tasks, assemblies, crews, labor, and equipment from another project. ? Create your own tasks and enter the costs directly. Adding Tasks From a CostBook Database CostBook databases store individual tasks. Each task can include unit costs for material, labor, equipment, and a separately defined unit cost (use when a subcontractor provides a quote per unit, as opposed to deriving the unit cost from crews and material). Tasks may also include shipping weight and material backup (vendor price quote) information. Often, the tasks in CostBook databases derive their labor and equipment costs using crews. Crews and adjusting crew output are covered later in the tutorial. Tasks stored in a CostBook database can be used in an Assemblies database or copied directly into a Project database. For more information on CostBook databases, see the CostLink/CM Reference Manual. Copying Labor and Equipment Items as Tasks You can copy labor and equipment tasks from the main CostBook View of a CostBook database, and you can also copy items from the Labor or Equipment resource tables. For more information on resources see Chapter 7 of the CostLink/CM Reference Manual. Opening a CostBook Database The first step in copying tasks is to open a CostBook database. 1. On the main tool bar, click the Use file dialog box to open CostBook button . The Open Database dialog box opens, listing the available databases in the CostLink CM\Data folder. 2. Click on the supplied CostBook database and click Open. The CostBook database opens in a separate window within CostLink/CM. NOTE: The database will open to the last view you used in a CostBook database. If it does not open to CostBook View, use the View pulldown to select CostBook View. BSD CostLink/CM User Manual 31 Chapter 4: Adding Direct Costs CostBook database in CostBook view 3. It is easier to copy tasks if the windows are positioned side-by-side. To accomplish this, click the Tile Windows Vertically button on the toolbar . The Project and CostBook database windows are now positioned side-by-side. NOTE: If the Tutorial Project window is not displaying the folders that you added, click in the BSD Buildings - Change Order #1 window and choose Tree > Show Data in Tree. When you maximize the window again later, choose Tree > Show Data in Tree again so you can see the costs of the tasks you will add. Copying Tasks from the CostBook View and Using Find In this exercise, you will copy items from the CostBook View of the CostBook database. You will use the Find command to locate the tasks in the CostBook database. NOTE: When you have more than one window open, the window with the more brightly colored title bar is the active window. This means that when you choose commands from the menus or toolbars such as Show Folder Tags, folder tags will toggle on or off in the active window. In the first step below make sure your CostBook window is the active window before choosing the command. To make a window active, click anywhere in the window or on the window's title bar. 32 BSD CostLink/CM User Manual Chapter 4 : Adding Direct Costs 1. You may find it easier to navigate the CostBook with the folder tags turned on. Turn on the folder tags by choosing Tree > Show Folder Tags. 2. To search the CostBook database for Backfill tasks to add to the Demolition folder, you will use Find. Choose Edit > Find. The Find dialog box opens. Find dialog box NOTE: Make sure the title bar of the Find dialog box says the name of your CostBook, not the name of your project. Whichever database is active when you choose the Find command is the database Find will search. 3. Type concrete pavement in the Find What field. Make sure the following default selections are set: All Not selected Search Tasks Any Part of Field Selected Match Folders Description Field Click the Find First button. The first folder containing Concrete Pavement in its Description field is selected in the Tree Panel. This should be 021121200 Concrete Pavement. NOTE: Find is not case sensitive. It does search for exactly the characters you type, though. If the database you are searching does not spell the word the same way as you typed it in the Find dialog box, Find will not locate the item. 4. Close the Find dialog box. 5. In the Sheet Panel of the CostBook, scroll if necessary to locate the following task: MIL 021121204 Demo 4"(10cm) Sdewlk/Slab on Gr 6. Drag the task to the Tutorial Project window and drop it on the Demolition folder in the Tree panel. Click OK if BSD CostLink/CM prompts you to confirm copying the task. BSD CostLink/CM User Manual 33 Chapter 4: Adding Direct Costs NOTE: To drag the task, hold your mouse pointer over any part of the task in the Sheet panel. Click and hold the left mouse button while you move your mouse to the Demolition folder. Between the Sheet panel and the folder, the mouse pointer becomes a circle/bar symbol . When the Demolition folder is highlighted, the mouse pointer becomes a hand with a sheet of paper symbol mouse button to drop the task on the folder. 7. . Release the Using Find, or by using the sequence numbers to locate the correct folders, find and drag the following tasks to the Demolition folder: 021141002 Concrete, Including Disposal 021126001 Saw Cut Bituminous Paving Per Linear Inch of Depth NOTE: Select Tasks instead of Folders in the Find dialog box in order to find these tasks by their descriptions. Adjusting the Quantity of Items The CostBook database stores the unit prices of items. After copying tasks into an estimate, enter the quantities. The extended costs are calculated based on the unit cost and quantity. Quantities can be entered in the Sheet Panel or in the Item form. In this exercise, you will edit the items directly on the Sheet panel. 1. Maximize the BSD Buildings - Change Order #1 window by clicking the maximize button in the upper right corner of the window. The window is maximized inside the BSD CostLink/CM main window. 2. Click on the Demolition folder. The three tasks display the Sheet panel. 3. Click in the Quantity field for each item and enter the following values. You can use the down arrow key on your keyboard to move from one quantity field to the next. 021121204 021126001 021141002 4. Demo 4"(10cm) Sdewlk/Slab on Gr Saw Cut Bituminous Paving Per Lin Concrete, Including Disposal If necessary, scroll the Sheet Panel to the right to view the cost data. Cost data on tasks in Sheet panel 34 22.22 SY 40 LF 108 CF BSD CostLink/CM User Manual Chapter 4 : Adding Direct Costs Notice that the Labor, Equip, and Total Unit fields shows the unit cost for the tasks as copied from the CostBook Database, and the Total Bare field now shows the extended cost for the task; that is, the Total Unit cost times each quantity. NOTE: Your costs may be different, depending on the CostBook that you are using. Practice To practice locating tasks and entering quantities, do the following exercise. Starting Point: Begin this exercise where you finished the last one, with the Tutorial Project maximized and the CostBook database open in the background. 1. To display the project and the CostBook database side-by-side again, restore the Tutorial project window by clicking the Restore button . 2. Using whatever method you prefer, locate the following tasks in the CostBook, add them to the following folders, and enter the quantities listed below: To 10 Foundations, add the following: 023181004 13" Butt x 7" Tip Wood Pile 50' 300 LF 20 30 CY CY To 10 Site Preparation, add the following: 022215001 022223403 Backfill Trenches by Hand Without Excavation Around Obstructions To 20 Site Improvements, add the following: 028103001 028203002 028307021 Sod In Place Level On Prepared Sub Furn & Pl Imported Topsoil, 6"Dp Regular Shrubs, 2' to 3' High .2 MSF 11.11 CY 6 EA To 40 Site Electrical Utilities, add the following: 161112141 161207202 165703206 RGS 1-1/2" Conduit w/Couplings #10 AWG 1/c Bare Insul Cu Cable 3"Al Area Lt Pole,Tpr,20'H (6M) 100 .2 2 LF MLF EA Adding User Defined Tasks User defined tasks may contain only one Direct Cost type in the estimate, or they may represent multiple direct costs. The simplest way to create a user-defined task is to use the Insert > Task command in the Project WBS. You can then open the item form for the task and type in the costs. BSD CostLink/CM User Manual 35 Chapter 4: Adding Direct Costs A major drawback to this method is that the task is not stored as a resource in the project database. This means if you will be using the task several times throughout your project, there will not be one central place where you can edit the costs for that task. You will instead have to go to each place where the task exists and edit the costs there. A second drawback is that, as labor or equipment costs change, you will have to manually calculate the different direct costs. To overcome the first drawback, instead of creating the task in the Project WBS, you can create a task in the CSI Tasks resource view of your project or in the CostBook view of a CostBook database, and then drag that task to the Project WBS view. CSI Tasks are resources, so that as costs change, you will only need to edit the task in the resource view, and then each place that task is used in the Project WBS will update to the new costs. To overcome the second drawback, rather than typing in the labor, equipment, and material costs manually, the task can reference a crew and a material item. About Crews A crew is a group of data items representing all the labor and equipment costs required to accomplish a specific kind of work. Crews are stored in Crews resource tables. The individual labor and equipment data items within each crew are referred to as the crew members, and are stored separately in the Labor and Equipment resource tables. Using Crews in a Project BSD CostLink/CM lets you use crews in an estimate in two ways: ? A crew can be referenced by a CSI Task to derive the labor and equipment costs of that task. You can then adjust the crew's hourly output figure for each task to suit your estimate. This adjustment will automatically modify the labor and equipment costs of the task. This method is described later in this section. ? In the second method, the crew itself can be a task in the Project database. When this is done, the crew becomes a different type of task, called an assembly. This method is called ‘using crews as assemblies.’ For More Information on crews, see Chapter 7 of the CostLink/CM Reference Manual. Using the CSI Tasks Resource View User-defined tasks that reference crews must be created in the CSI Tasks resource view of a project, or in the CostBook view of a CostBook. The CSI Tasks resource view lists most of the individual tasks in a Project or Assemblies database. This includes tasks that are copied from the CostBook database, and the individual member tasks for assemblies that are copied from the Assemblies Database. It also includes any user-defined tasks that you add 36 BSD CostLink/CM User Manual Chapter 4 : Adding Direct Costs in the CSI Tasks resource view. Each task is listed only once in the CSI Tasks resource view, no matter how many times it may be used in the database. For more information on CSI Tasks, see Chapter 7 of the CostLink/CM Reference Manual. About CSI Codes When you add your own CSI Tasks, it is necessary to assign them unique Source Tags (or CSI Codes). No task in your CostBook or project should use the same code. When you copy a task from your CostBook to your project, CostLink/CM first checks your CSI Tasks resource view for a task with the same CSI Code. If CostLink/CM finds a matching CSI Code, rather than copying in the cost information for that task from the CostBook, CostLink/CM will use the cost information for the task that is already in your resource view. This method of managing cost information is the reason for resource views. If a project requires altered cost information, such as lower production rates, rather than requiring you to have two CostBooks (one with standard production rates and one with the lowered rates), after you copy the tasks into your project you can alter the production rates in the project's CSI Tasks resource view. The next time you copy a task from your CostBook with a CSI Code that matches one of the altered tasks in the CSI Tasks resource view, the project will use the altered cost information. If you do not want the project to use the cost information for the task with the matching CSI Code in the resource view, create a new task with a unique CSI Code using the steps in the next exercise. To decide what CSI Code to use, search your CostBook for similar tasks and assign your task a similar, yet unique number. CSI Codes can be up to 50 characters long and they can be any combination of letters, numbers, and punctuation. Locating the Source Tag In the Sheet panel, CSI Codes are displayed in the Source Tag column. In addition to CSI Task resource items, all resource items have information displayed in the Source Tag column. For example, the Labor ID is displayed in the Source Tag column for Labor resource items and the Crew Code is displayed in the Source Tag column for Crew resource items. For each resource type the information that displays in the Source Tag column is the unique identifier for that resource. When copying any resource item into a project, CostLink/CM will search that item's resource view for matching information in the Source Tag column. If matching information is found, the project will use the cost data in the resource view rather than using the cost data from the database from which you are copying the resource item. BSD CostLink/CM User Manual 37 Chapter 4: Adding Direct Costs Adding a User Defined Task In this exercise, you will create four user-defined tasks in the CSI Tasks view, some of which reference crews to derive the labor and equipment costs, and two for which you will enter a cost per unit. You will then copy the task to the Project WBS view of your estimate. 1. Maximize the Tutorial Project window . 2. In the upper left corner of the Tutorial Project window, click the arrow beside the View pulldown field. The different views available in the database are shown in the drop-down list. View pulldown listing the project views 3. Under Resource Views, click to select the CSI Tasks view. BSD CostLink/CM displays the CSI Tasks view of the database in the window. This view shows all of the CSI tasks used in the database. 4. In the Tree panel click on the Unassigned folder. The Sheet Panel lists the CSI Tasks that you have already added to the Tutorial Project. (Since they have not been assigned to a particular folder in this view, they are contained in the Unassigned folder.) 38 BSD CostLink/CM User Manual Chapter 4 : Adding Direct Costs CSI Tasks resource view with the Unassigned folder selected 5. To add the new task to the Unassigned folder, click Insert > Task. BSD CostLink/CM adds the new item to the Sheet panel. 6. Click on the new item with your right mouse button to display the context menu for the Sheet panel. Click the Edit Item command on the menu. NOTE: You may also display the item form by double-clicking on the task. BSD CostLink/CM displays the item form for the new task. BSD CostLink/CM User Manual 39 Chapter 4: Adding Direct Costs Item form for new task 7. 8. For this task, you will manually enter a cost per linear foot. Enter the following information into the item form: Task Stainless Steel Railing, 1-1/2" Diameter CSI Code 055207000 UOM LF Unit Cost 38 To add another task, leave the item form open and click the Insert button. The new task appears in the Sheet panel, and the item form displays information for the new task. 9. 40 Enter the following information into the item form: Task Concrete In Place for Walls, 8" Thick, 4' High CSI Code 033102404 UOM CY Unit Cost 272 BSD CostLink/CM User Manual Chapter 4 : Adding Direct Costs 10. Add the following two tasks. To add each task, you can either click the Insert button on the item form, or you can close the item form and use Insert > Task. Task Reinforced Concrete Pavement, 6" Thick CSI Code 027501000 UOM SY Task Concrete Sidewalk, 4" Thick CSI Code 027752750 UOM SF Rather than entering unit costs for these tasks, the labor and equipment costs will be derived from crews that you will assign in the next exercise. 11. Leave the item form open. Adding a Crew to a User-Defined Task This exercise continues from the previous one by copying a crew from the CostBook Database and adding it to the user-defined CSI Task. This process is called ‘referencing a crew.’ 1. Leaving the item form open, scroll through the sheet panel to find the task 027501000 Reinforced Concrete Pavement, 6" Thick, and click on it. NOTE: If the item form is in the way you can move the item form anywhere on the screen by dragging its title bar (the bar across the top of the item form). The item form displays the information you entered for this task. BSD CostLink/CM User Manual 41 Chapter 4: Adding Direct Costs Item form for Reinforced Concrete Pavement, 6" Thick 2. Click on the Members tab of the item form. 3. Click the Lock checkbox on the bottom of the form. (This will keep the item form from disappearing when you drag the crew to it.) 4. Position the Tutorial Project and CostBook database windows side-by-side by clicking the Tile Windows Vertically button on the main tool bar. NOTE: If the item form is in the way you can move the item form anywhere on the screen by dragging its title bar (the bar across the top of the item form). 5. In the CostBook database window, click the View pulldown and choose the Crews resource view. CostLink/CM displays the Crews resource view. NOTE: If the tabs across the top of the screen say 'Architectural Crews,' 'Civil Works Crews,' etc., you are in multi-tab view. Change to single-tab view by choosing Tree > Use Single Tab. 42 6. Click the plus sign next to Outside Crews to expand the folder. 7. In the Tree panel click on Outside Sheepfoot Compaction Crews . BSD CostLink/CM User Manual Chapter 4 : Adding Direct Costs The crew XSGRA, 3 X-eqoprmed + 1 Shpf Roller,Grader,Water Truck displays in the Sheet panel. 8. From the Sheet panel of the CostBook, drag the XSGRA crew to the item form and drop it on the Crew Members grid on the bottom half of the Members tab. (If prompted to confirm assigning the crew, click OK to confirm.) The crew is assigned to the task and the crew members are listed in the Crew Members grid. The Crew field shows the crew code, XSGRA. Item form for Reinforced Concrete Pavement, 6" Thick, Members tab with crew assigned 9. Click the General tab. Click in the Prod Rate field. Enter 375 and press the Tab Key. The Unit Costs reflect the total hourly labor and equipment costs of the crew. BSD CostLink/CM User Manual 43 Chapter 4: Adding Direct Costs Item form with crew assigned and production rate entered 10. Leaving the item form open, click on the task 027752750 Concrete Sidewalk, 4" Thick. The item form updates to show information about the task. 11. Click on the Members tab of the item form. 12. In the CostBook, click on Outside Cement Finishers. The Outside Cement Finisher crews display in the Sheet panel. 13. If necessary, scroll to see the crew XCMAB 1 X-cemtfinr/laborer + Small Tools. 14. From the Sheet panel, drag the XCMAB crew to the item form and drop it on the Crew Members grid. (If prompted to confirm assigning the crew, click OK to confirm.) The crew is assigned to the task and the crew members are listed in the Crew Members grid. The Crew field shows the crew code, XCMAB. 15. Click the General tab. Click in the Prod Rate field. Enter 75 and press the Tab Key. Notice that the Unit Costs now reflect the total hourly labor and equipment costs of the crew. 16. Click Close to close the item form. 44 BSD CostLink/CM User Manual Chapter 4 : Adding Direct Costs 17. Close the CostBook window by clicking the X in the upper right corner of the window. 18. Maximize the Tutorial Project window . Leave the display as it is in preparation for the next exercise. Adding Material Costs To a User Defined Task The simplest way to add material costs to a user-defined task is to type the material cost in on the General tab of the task. However, with this method, if the material cost changes, you have to recalculate the material cost and enter it on each task where that material is used. To alleviate this problem, you can create a material resource in the Material resource view. CostLink/CM allows you to maintain a Material resource view within Project, CostBook, and Assemblies databases. The benefit of this is that you can maintain the cost of one material resource, and use that same resource in multiple CSI Tasks. This makes repricing your Materials much easier and more efficient. In addition to the Material resource view, CostLink/CM has a Vendor resource view. Vendors do not have to be used in order to use materials; however, the option is available to help you further manage your material prices, if desired. Vendors can be assigned to material resource items allowing you to type in each vendor’s quotes for that material. To do this, you must first create your vendors. Calculating Material Costs Using a Vendor Quote This exercise continues from the previous one by first creating a Vendor in the project database and then adding a quote from that Vendor to a Material Resource item. We will then assign that material resource to a CSI Task that we created. 1. Click on the View Selector and choose Vendors. 2. Click on the Unassigned folder. 3. Click on Insert > Task. 4. Open the Item Form for the new Vendor. 5. Input the following data: 404-365-9226 Vendor ID: Building Systems Design, Inc. Name: 3520 Piedmont Road, NE Street/Box: Suite 415 Street2: Atlanta City: GA State/Country: 30305 Zip/Postal: Support Contact: 404-365-9226 Phone: BSD CostLink/CM User Manual 45 Chapter 4: Adding Direct Costs Fax: E-Mail: Last Quote: 404-365-8912 [email protected] 5/13/2003 Vendor item form 6. When complete click Close to close the form. 7. Now that the Vendor has been created, you will create a Material. Change the View Selector to Materials. 8. Click on the Unassigned folder, and then click Insert > Task. 9. Open the Item Form and input the following data: Task Reinforced Concrete, 6"Thick 027501000 CSI Code SY UOM You could type a price into the Price field. Instead, you will assign a vendor. 10. Click on the Lock checkbox to keep the form open. 11. Click on Window > New Window. 12. Position the two project windows side-by-side by clicking Tile Windows Vertically 13. In the new window (the one on the left), change the View Selector to Vendors. 46 BSD CostLink/CM User Manual . Chapter 4 : Adding Direct Costs If necessary, click on the Unassigned folder so that you can see the Building Systems Design, Inc. vendor in the Sheet panel. 14. From the Sheet panel of the Vendors view, drag the Building Systems Design, Inc. vendor to the Material item form and drop it into the Material Price Backup Grid, which is the bottom half of the General tab. 15. Click on the Quote field and input 21. 16. Click on the pulldown arrow on the Use field and choose Average. The Price field fills in with the price of the Quote. Material item form with vendor assigned You could assign more vendors and the software would calculate the Average quote, or you could choose to use the Highest or Lowest quote. 17. Click on the Close button to close this form. 18. In the Vendor Resource window, change the View Selector to CSI Tasks. 19. If necessary, click the Unassigned folder to display the tasks in the Sheet panel. 20. Open the item form for 027501000 Reinforced Concrete Pavement, 6" Thick. 21. Click the Lock checkbox to keep the form open, and click the Materials tab. BSD CostLink/CM User Manual 47 Chapter 4: Adding Direct Costs 22. From the Materials resource view, drag the newly added material Item (Reinforced Concrete Pavement, 6" Thick) to the CSI Task item form and drop it onto the Materials grid, which is the bottom half of the Materials tab. (If prompted to confirm assigning the material, click OK to confirm.) NOTE: You can turn the prompt off by choosing Tools > Prompt before completing Drag. This prompt is turned on by default. We recommend that you leave the prompt on until you are more familiar with how the software works. 23. Click on the General Tab. Your new CSI Task should look like this: CSI Task item form using a crew and a material resource NOTE: Your costs may be different depending on the CostBook you are using. 24. Click on Close to close the Item Form. 25. Now you will create the material for the sidewalk task. In the Materials view, click on the Unassigned folder and Insert > Task. 26. Open the Item Form and input the following data: Task 48 Concrete Sidewalk, 4" Thick BSD CostLink/CM User Manual Chapter 4 : Adding Direct Costs CSI Code UOM 027752750 SF If prompted to convert the unit of measure, click OK. 27. Rather than using a vendor, enter the cost per square foot. Enter 1.15 in the Price field and press Tab. 28. Close the item form. 29. In the CSI Tasks view, open the item form for 027752750 Concrete Sidewalk, 4" Thick. 30. Click the Materials tab. If it is not already checked, click the Lock checkbox to keep the item form open. 31. From the Materials resource view, drag and drop the newly added material Item (Concrete, 4"T) onto the Materials tab of the CSI Task. 32. Click the General Tab. Your new CSI Task should look like this: CSI Task item form using a crew and a material resource NOTE: Your costs may be different depending on the CostBook you are using. 33. Click Close to close the item form. BSD CostLink/CM User Manual 49 Chapter 4: Adding Direct Costs Copying the User-Defined Tasks to the Project WBS View This exercise continues from the previous one by copying the new user defined tasks to the Project WBS primary view of the estimate and applying a Quantity. 1. Change the Materials Resource view to the Project WBS view. 2. In the Project WBS view under G Building Sitework, click on 20 Site Improvements in the Tree Panel. 3. In the Sheet panel of the CSI Tasks view, click the gray box to the left of the task 027501000 Reinforced Concrete Pavement, 6" Thick so that the task turns blue in the background. 4. On your keyboard hold down the CTRL key while you click on the gray box to the left of the other three tasks that have USR in the Source column: 027752750 Concrete Sidewalk, 4" Thick 033102404 Concrete In Place for Walls, 8" Thick, 4' High 055207000 Stainless Steel Railing, 1-1/2" Diameter All four tasks you created in the previous exercises are highlighted. 5. Drag from one of the highlighted tasks to 20 Site Improvements in the Project WBS view. CostLink/CM places the tasks in the folder and displays them in the Sheet Panel. 6. Close the CSI Tasks resource view. 7. Maximize the Project WBS view. 8. Click in the quantity field of each copied task and enter the following quantities: 027501000 027752750 033102404 055207000 Reinforced Concrete Pavement, 6" Thick Concrete Sidewalk, 4" Thick Concrete In Place for Walls, 8" Thick Stainless Steel Railing, 1-1/2" Diameter 150 40 10 100 SY SF CY LF CostLink/CM calculates the costs of each task and updates the data displayed in the Tree panel. NOTE: If you do not see the data displayed in the Tree, choose Tree > Show Data in Tree. If the costs do not update when you enter the new quantities, choose Tools > Recalculate All. 50 BSD CostLink/CM User Manual Chapter 4 : Adding Direct Costs Tutorial project showing current costs Your costs may be different depending on the CostBook you are using. 9. Open the item form for 027501000 Reinforced Concrete Pavement, 6" Thick. BSD CostLink/CM has computed extended costs for the Labor, Equipment, Material, and other totals fields and displays them in the cost grid. BSD CostLink/CM User Manual 51 Chapter 4: Adding Direct Costs Item form showing extended costs 10. Click Close to exit the item form. Leave the display as it is in preparation for the next exercise. Copying From an Assemblies Database Assemblies databases store groups of tasks that represent all costs required to create a larger piece of a project. The groups of tasks can include CSI Tasks, Labor resource items, and Equipment resource items. These can be copied from a CostBook, or they can be user-created. Assemblies can then be copied into the Project database. Using assemblies can greatly reduce the amount of data entry required to build a project. Example of Use An assembly representing 6-inch concrete slab on grade includes all the tasks required to prepare for, form, pour, and finish the slab. The assembly unit of measure is square feet. 52 BSD CostLink/CM User Manual Chapter 4 : Adding Direct Costs The Assemblies database stores the unit costs (Labor, Equipment, Material, and Total) and quantities of each task required to construct one square foot of 6-inch slab. After copying the assembly into the Project database, enter the quantity of square feet of slab needed for the estimate. The total quantities and resulting costs of all items required for slab on grade construction are calculated. For more information on Assemblies databases, see the CostLink/CM Reference Manual. Copying Assemblies as Project Tasks In this exercise you will copy an assembly from an Assemblies database into the Tutorial Project, then enter the Quantity so that CostLink/CM can compute the resulting cost. 1. On the toolbar, click the Use file dialog box to open Assemblies button . The Open Database dialog box opens, listing the available Assemblies databases in the BSD CostLink/CM Data folder. 2. Click on the supplied Assemblies database (not HTRW Assemblies) and click Open. The Assemblies database opens in a separate window within CostLink/CM. 3. Position the windows side-by-side by clicking the Tile Windows Vertically button on the main toolbar. 4. To assist in finding the assemblies you’ll need, choose Tree > Use Single Tab. Then choose Tree > Show Folder Tags. All of the Assembly database folders display on one tab with their folder tags showing. 5. Using the folder tags as a guide, or by using Find (see the “Copying Tasks from the CostBook View and Using Find” section of this chapter if you need to review the instructions for using Find), locate the following assembly in the Sheet panel: 0113001HG Grade Beams Cast In Place 3000 P. 6. Drag this assembly from the Assemblies database window and drop it on the 10 Foundations folder in the Tree Panel of the Project database window. CostLink/CM displays the assembly in the Sheet panel. 7. In the Tutorial Project, open the Item Form for the assembly by double-clicking on the copied assembly in the Sheet panel. 8. If necessary, click on the General tab. Enter a Quantity of 50 FT and press Tab. BSD CostLink/CM computes the extended costs for the task based on the assembly member costs and the Quantity. BSD CostLink/CM User Manual 53 Chapter 4: Adding Direct Costs Assembly item form showing Extended costs 9. Click on the Members tab. The assembly members display in the grid area, with individual quantities and costs. 54 BSD CostLink/CM User Manual Chapter 4 : Adding Direct Costs Assembly item form, Members tab 10. Click Close to close the form. 11. Close the Assemblies database. 12. In preparation for the next exercise, maximize the Project database window. A Look at Project Resources As discussed in Chapter 2, resources are data items that support the pricing of tasks in order to build cost estimates. Resources are stored in data structures called tables within the Project, CostBook, and Assemblies databases. Within a resource table, a specific resource is stored only once, no matter how many times it may be used in the database. As you added the Direct Cost data to the Tutorial Project, BSD CostLink/CM automatically built the resource tables for the project. This section looks at the resources that were added throughout Chapter 4. For more information on resources see the CostLink/CM Reference Manual. BSD CostLink/CM User Manual 55 Chapter 4: Adding Direct Costs 1. Click the View pulldown in the upper left corner of the database window. BSD CostLink/CM displays the available views in the dropdown list. View pulldown displaying available views 2. Click on the Labor resource view, then click the Unassigned folder in the Tree Panel. CostLink/CM displays the Labor resource table in the database window. This view shows all of the individual labor items that are used in the estimate. This includes the individual labor items that are used as tasks in the project, as individual members of Assemblies, and in crews. 3. Click the Equipment tab to open the resource view and look in the Unassigned folder. CostLink/CM displays the Equipment resource table, showing all of the equipment used in the estimate. This includes the equipment items you copied as tasks, as well as the equipment that is used to price crews, CSI tasks, and assemblies. 56 4. Click the other tabs to explore the other Resource views. View the contents of their Unassigned folders. 5. To prepare for the first exercise of the next chapter, click the View pulldown once more to choose the primary Project WBS View. BSD CostLink/CM User Manual Chapter 5 Defining Cost Markups In BSD CostLink/CM, cost markups are defined as all of the percentages and adjustments added to the base Direct Costs in an estimate. Markups can include overtime adjustments, taxes, and price adjustments, as well as contractor and owner cost markups. In this chapter, you will continue to build the Tutorial Project by defining cost markups. You will learn how to: • Examine the cost markup types defined in the Summary Info dialog box and to change the types if necessary • Apply Sales Tax to tasks containing material costs • Add contractors to an estimate and assign costs to them • Define Owner Costs for an estimate For more information on cost markups, see Chapter 8 of the CostLink/CM Reference Manual. BSD CostLink/CM User Manual 57 Chapter 5 : Defining Cost Markups Examining the Cost Markup Types The first step in defining cost markups is to see what markup types are already in the estimate, and to choose whether or not to create additional types and/or change existing types. The markup types for an estimat e are inherited from the project template that is used to create the estimate. You can change the markup types for the estimate at any time. In this exercise, you will examine, but not change, the markup types for the Tutorial Project. 1. Choose File > Summary Info. The Summary Info dialog box opens. 2. Click the Select Fields tab. This tab shows all of the cost types that are defined for the estimate. As mentioned, the ones for the Tutorial Project were inherited from the project template. Select Field Group to Edit lists four options that represent the types of costs you can define in CostLink/CM. The first group is Direct Costs (see Defining Cost Fields in Chapter 4 for more information on Direct Costs). The other three options are cost markup types that can be applied to the Direct Costs. 3. In the Select Field Group to Edit control, click the Adjustments/Taxes option. The cost grid displays the Adjustments and Taxes cost markup types for the estimate. 58 BSD CostLink/CM User Manual Chapter 5 : Defining Cost Markups Summary Information dialog box, Select Fields tab displaying Adjustments/Taxes While all of these markup types can be selected to use in the estimate, the Include column shows that only Sales Tax is selected. The columns on the right part of the grid indicate that this markup is applied only to Material Direct Costs in the estimate. If needed, you would change the information in the grid. You will leave the markups as defined by the project template for this tutorial. 4. Under Select Field Group to Edit, click Contractor Markups. The cost grid displays the Contractor cost markup types for the estimate. These types represent markups for contractors’ costs and are applied to Direct Costs after any Adjustments and Taxes. Notice that four of the available markup types are selected as contractor markups in the estimate and that they are all applied to all of the defined Direct Cost types. BSD CostLink/CM User Manual 59 Chapter 5 : Defining Cost Markups Summary Information dialog box, Select Fields tab displaying Contractor Markups 5. Under Select Field Group to Edit, click Owner Costs. The cost grid displays the Owner markups. These markups represent costs incurred outside of the construction contracts, and are applied after all other markup types. There are two Owner Cost types included in the estimate and again they are applied to all of the Direct Cost types. 60 BSD CostLink/CM User Manual Chapter 5 : Defining Cost Markups Summary Information dialog box, Select Fields tab displaying Owner Costs 6. After examining the markups, click the OK button to close the Summary Information dialog box. Applying Sales Tax As seen in the previous exercise, a markup type for Sales Tax is included for material costs in the Tutorial Project. This markup does not affect the estimate costs until you apply the markup. Before applying the markup, the percent of the sales tax must be entered. Use the Markups form to enter the percent and apply the markup. When you apply the markup, click on the folder that contains the portion of the estimate that you want to have that markup. You can apply it to the entire estimate or to any portion of the estimate. To apply a markup to the entire estimate, select the top folder in the estimate, and when you apply the markup, it will be applied to all the tasks inside all the folders (at this point in time) since all other folders are children of the top folder. BSD CostLink/CM User Manual 61 Chapter 5 : Defining Cost Markups Be aware that when you apply a markup, it applies to the tasks inside the folders, and is not stored in the folder record. This means that tasks you add to folders after you apply markups will not have the markups applied to them. For this reason, BSD CostLink/CM includes a Markups report that will show what markups are applied to each task. For more information on the Markups report, see Chapter 9: Producing Reports. Auto-Recalculate Markups BSD CostLink/CM can display the results of all applied markups immediately if desired. To see the results of the markups immediately, turn on the Auto-Recalculate Markups option on the Tools menu. While creating large estimates, it may not be desirable to have Auto-Recalculate Markups turned on, since each time you add an item to your project, BSD CostLink/CM will recalculate all markups. In larger estimates, adding items and changing quantities can be accomplished more quickly if this option is left off. However, while applying markups, it may be more convenient to turn Auto-Recalculate Markups on. If you choose to leave Auto-Recalculate Markups turned off, you must perform the following steps to see the results of markups: a. Close the Markups form b. Choose Tools > Recalculate c. Reopen the Markups form. Starting Point: Begin this exercise where you finished the last one, with the Tutorial Project window maximized. 1. If it is not already on, turn on Auto-Recalculate Markups (Tools > Auto-Recalculate Markups). 2. For the sales tax to apply to the entire estimate, click in the Tree panel on the 200405-10 BSD Buildings - Change Order #1 folder. 3. Choose View > Forms > for Markups. CostLink/CM opens the Markups form for BSD Buildings - Change Order #1. 4. 62 Click the Adjustments and Taxes tab. This tab shows any Adjustments and Taxes markup types that are included in the estimate. In this case, Sales Tax is the only type listed. BSD CostLink/CM User Manual Chapter 5 : Defining Cost Markups Markups form, Adjustments and Taxes tab 5. In the grid area in the upper right of the tab click in the Percent field. Type 6.5 and press Enter. This defines a Sales Tax percentage of 6.5%. 6. Click the Apply button. CostLink/CM applies a Sales Tax percentage of 6.5% to the Material cost of all tasks in the Project that include materials. 7. Click on the Summary Tab to see the effect of the Sales Tax markup. BSD CostLink/CM User Manual 63 Chapter 5 : Defining Cost Markups Markups form, General tab, showing Sales Tax applied 8. Click Close to exit the Markups form. Adding Contractors and Assigning Their Costs CostLink/CM offers great flexibility in defining and applying contractor markups. Contractors' overhead, profit, and bond costs are figured individually for each contractor involved in the project. These costs are automatically calculated using any of a number of methods that you select. Compounded Cost Markups Commonly in construction practice, contractor markups are compounded, meaning markups are applied to the subcontractors’ direct costs, and then the prime (or general) contractor’s markups are applied on top of the subcontractor markups. To allow for this in CostLink/CM, a parent -child relationship of general and sub-contractors can be defined in the Contractors View. 64 BSD CostLink/CM User Manual Chapter 5 : Defining Cost Markups Steps in Assigning Contractor Markups There are three basic steps to assigning contractor markups: First, create the hierarchy of contractors by inserting folders into the Contractors View. Second, define the cost methods that will be used for each contractor in the item form for each contractor. Third, assign work to the contractors by dragging individual tasks, folders of tasks, or entire branches of folders and tasks to the contractors’ folders. In the following exercises, you will add a prime contractor and a subcontractor to the Tutorial Project, and then assign tasks to them. The Direct Costs associated with those tasks will be marked up with the assigned contractors’ costs. For more information on contractors, see Chapter 8 of the CostLink/CM Reference Manual. Defining the Prime Contractor In this exercise you will define the Prime Contractor for the Tutorial Project and the cost methods to be used for that prime contractor. 1. Use the View Pulldown to select the Contractors View. 2. Click the plus sign next to 01 (Prime Contractor). The following folders display: Contractors View with folders copied from generic template 3. Open the Prime Contractor item form by right-clicking on 01 (Prime Contractor) in the Tree Panel. Then choose Edit Folder from the context menu. BSD CostLink/CM User Manual 65 Chapter 5 : Defining Cost Markups Prime Contractor item form 4. Enter the following information: 400 Quantity: SF Unit of Measure: Prime Contractor Contractor Name Prime Contractor Short Name 01 Folder Tag NOTE: Entering a quantity and unit of measure on a contractor will generate a cost per unit for the contractor from the tasks assigned to that contractor. 5. In the grid at the bottom of the tab, click in the Method field for FIELD OH. An arrow appears in the field. Click the arrow to view the different cost methods available for this contractor cost type. Click the arrow again to collapse the drop-down list and to keep Running Pct selected. Running Percentage means that BSD CostLink/CM calculates the markup based on the percentage you enter in the Own% field times the running total. (The running total is the total of the contractor's Direct Costs plus the values of any Cost fields appearing above the present row in the grid.) For more information on Contractor cost methods, see Chapter 8 of the CostLink/CM Reference Manual. 6. 66 Click in the Own% field for FIELD OH. Type 5.2 and press the Down Arrow key. BSD CostLink/CM User Manual Chapter 5 : Defining Cost Markups BSD CostLink/CM enters 5.20% for both the Own% and Sub% fields. This means that a markup percentage of 5.20% will be applied for Field Overhead expenses, both for the prime contractor’s own work and for work by the prime’s subcontractors. 7. 8. Define the follow markups for the other Contractor cost types: Running Percentage 3.00% HOME OFFICE Running Percentage 6.95% PROFIT Running Percentage 2.50% BOND Click Close to exit the Contractor form and save the Prime Contractor definition. Defining Subcontractors In this exercise, you will add a subcontractor under the Prime Contractor. 1. Click in the Tree panel to select the 01 Primary Contractor folder. Click the right mouse button and choose Insert Child Folder from the context menu. 2. CostLink/CM prompts you to enter a unique Contractor Tag. Enter EL and click OK. CostLink/CM adds the new folder as New Contractor – EL to the tree panel. 3. Click the plus sign to expand the New Contractor – EL folder in the tree panel. CostLink/CM inserted three folders – one for the subcontractor itself where you will define the markups, one for overhead items, and one for the subcontractor’s own work. In a later exercise you will place tasks in these folders. New contractor folders in Contractors view 4. Open the item form for the new contractor by right-clicking on the New Cont ractor – EL folder. Then choose Edit Folder from the context menu. 5. Fill in the following information to define the subcontractor. Electrical Subcontractor EL Contractor Name (Leave as is) Short Name EL Folder Tag 6. Enter the following information to define the cost methods: FIELD OVERHEAD Running Percentage 10.00% Running Percentage 10.00% PROFIT (Home Office and Bond costs do not apply to the subcontractor and can therefore be left set to 0%.) 7. Click Close to complete the definition of the subcontractor. BSD CostLink/CM User Manual 67 Chapter 5 : Defining Cost Markups Applying Contractor Markups After contractors are defined, apply their markups by assigning work to them. When you assign work to a contractor, CostLink/CM applies the defined markups for that contractor to the costs of the work. Assign work to a contractor using any of the following methods: ? Drag individual tasks, folders with tasks, or entire branches of folders and tasks to the Own Work folder of the contractor. This is the most common method. ? Use the LinkMan menu to automatically assign tasks to contractors. See Chapter 10 of the CostLink/CM Reference Manual for instructions. ? Use the Accounts tab on individual tasks to assign the contractor task by task. This is the slowest method. Tasks can be dragged to the Own Work folders from any primary view, including the Contractors View. When a task is added to a folder in the Project WBS View, it is also located in all primary views including the Contractors View. Since the task has not yet been dragged to a folder in the Contractors View, it has not been assigned in that view, and is therefore located in the Unassigned folder. Individual tasks can be dragged from the Unassigned folder in the Contractors View to the appropriate contractors. However, if a folder in another primary view already contains multiple tasks that belong to a particular contractor, it is faster to drag the folder (and with it, the tasks) from the other primary view to the contractor in the Contractors View. For example, a particular project contains a Plumbing Subcontractor. The Project WBS of this project is structured so that many of the plumbing tasks in the project are in the same branch of folders. Rather than searching for each of these tasks in the Unassigned folder of the Contractors View, and then individually dragging them to the Plumbing subcontractor, it is much faster to drag the entire folder of plumbing tasks from the Project WBS to the Plumbing Subcontractor. This assigns the tasks in that folder to the Plumbing subcontractor. Since the tasks are now assigned, they are no longer in the Unassigned folder. In the following exercises, you will assign the electrical work to the Electrical Subcontractor and assign the rest of the work to the prime contractor by first dragging the Electrical work folder from the Project WBS view to the Electrical subcontractor, and then dragging the rest of the tasks in the Contractors view Unassigned folder to the Prime Contractor. 1. In order to drag and drop items between the Project WBS View and the Contractors View, you need to display the two views in separate database windows. Do this by choosing Window > New Window. BSD CostLink/CM displays a new database window showing the Contractors view. 68 2. Use the View pulldown in the new window to select the Project WBS View. 3. Click the Tile Windows Vertically button BSD CostLink/CM User Manual on the main tool bar. C h a p t e r 5 : De f i n i n g C o s t M a r k u p s The two views now appear side-by-side. 4. In the Project WBS view, if necessary, click the plus sign next to G Building Sitework in the tree panel so that you can see 40 Site Electrical Utilities. 5. In the Contractors view, if necessary, click the plus sign next to EL Electrical Subcontractor EL so that you can see Own Work - EL. 6. Drag 40 Site Electrical Utilities to Own Work - EL. CostLink/CM copies 40 Site Electrical Utilities to Own Work - EL, and moves the tasks in that folder from the Contractors View’s Unassigned folder to Own Work - EL. 7. In the Contractors View, click on the Unassigned folder. All tasks in the project except the ones that have been assigned to the Electrical subcontractor are displayed in the Sheet panel. NOTE: The Assembly is not listed in the Unassigned folder. Assembly members are displayed individually in the Contractor and Project CSI views. This allows for assigning individual tasks within an assembly to separate contractors in the Contractors view. 8. Choose Edit > Select All Tasks. All tasks in the Unassigned folder are selected. 9. In the sheet panel of the Contractors View, drag from any one of the highlighted tasks to Own Work - AA under the Prime Contractor. All work in the Tutorial Project that was not assigned to the Electrical subcontractor is now assigned to the Prime Contractor. The Unassigned folder is empty. 10. Close the Contractors View and maximize the Project WBS View. 11. Click on the 2004-05-10 BSD Buildings - Change Order #1 folder in the tree panel and open the Markups form. Look at the Summary Tab to see the contractor markups. NOTE: You can resize the Markups form to view all columns. Leave the display as it is in preparation for the next exercise. Defining and Applying Owner Markups In CostLink/CM, Owner markups are used to estimate costs to the project owner outside of construction contracts. They are applied after all other markups. Owner markups may BSD CostLink/CM User Manual 69 Chapter 5 : Defining Cost Markups include escalation, contingency, supervisory costs, and so on. Like sales tax and adjustment markup types, Owner markup types are defined in the Summary Info dialog box on the Select Fields tab, and applied to all or part of a project using the Markups form. For more information on Owner markups, see Chapter 8 of the CostLink/CM Reference Manual. Applying Design Contingency Percentages In this exercise, you will define and apply different percentages for the Design Contingency Owner markup to different elements of the Tutorial Project. 1. Click the Owner tab. Markups form, Owner tab The grid in the upper left of this tab shows the two Owner Markup types that are included in the estimate. The grid on the right is used to define one or more markup percentages (or amounts) for each Markup type. When a different markup type is selected on the left, the grid on the right updates to show only the percentages or amounts for that markup type. The arrow icon in the grid on the left indicates which Markup type is currently selected. If you click on Escalation, the arrow icon moves to the Escalation markup type, and any percentages or amounts added to the grid on the right would be Escalation markups. To define Contingency markups, leave that type selected. 70 BSD CostLink/CM User Manual Chapter 5 : Defining Cost Markups 2. To define the first Contingency percentage, click in the Description field in the first row in the right -hand grid. Type Design Contingencies – 1% and press the Tab key. As soon as you begin typing, BSD CostLink/CM creates a new, empty row (where you will add a second Contingency once you finish defining this one). When you press Tab, BSD CostLink/CM moves the cursor to the Method field and a down arrow appears. 3. Click the down arrow in the Method field and select Running Pct. from the list. 4. In the Percent field, enter a value of 1.0 (for 1%) and press Enter. 5. Click on the next description field under Design Contingencies, and repeat Steps 4-6 to define the following additional Design Contingency percentages: Description Design Contingencies – 2% Design Contingencies – 3% 6. Method Running Pct Running Pct Percentage 2% 3% To apply a 1% Contingency percentage to the entire estimate, first verify that BSD Buildings - Change Order #1 is the current folder by looking for its name at the top of the markups form. NOTE: Always check the description in the top of the Markups form to be sure that you are applying the markups to the correct folder or task. 7. Click in the first row of the grid on Design Contingencies - 1% to select the percentage you will apply. Then click the Apply button. CostLink/CM applies a contingency markup of 1% to the costs of all tasks in the project. The Count field changes to 30 indicating the number of tasks within the selected folder that now have this markup percentage applied. 8. To apply higher contingencies to individual parts of the job, leave the Markups form open, and in the tree panel click F Special Construction and Demolition. The Markups form changes to display the markups for the folder Special Construction and Demolition. 9. Click on Design Contingencies - 3% to select the percentage that you will apply. Verify that the top of the markups form says Special Construction and Demolition. Click the Apply button. CostLink/CM removes the 1% contingency markup from the tasks in this folder and applies the 3% contingency markup. The Count fields on the 1% and 3% contingency markups update to show this. 10. In the Tree panel click the plus sign next to G Building Sitework and click on 20 Site Improvements. The tasks in 20 Site Improvements are displayed in the sheet panel. BSD CostLink/CM User Manual 71 Chapter 5 : Defining Cost Markups 11. In the sheet panel, click on the task 033102404 Concrete In Place for Walls, 8" Thick, 4' High. The Markups form changes to display the markups for this individual task. 12. Click on Design Contingencies - 2% to select the percentage that you will apply. Verify that the top of the markups form says Concrete In Place for Walls, 8" Thick, 4' High. Click the Apply button. CostLink/CM removes the 1% contingency markup from this task and applies the 2% contingency markup. The Count fields on the 1% and 2% contingency markups update to show this. 13. Click the Summary tab to view the markups for this one task. 14. In the Tree panel click on 2004-05-10 BSD Buildings - Change Order #1. NOTE: You may need to click the folder again so that the Markups form will update. Verify that the top of the Markup form says BSD Buildings - Change Order #1. If it does not, click the folder again. The Markups form updates to summarize the markups for the entire estimate. Click on individual folders to view their markups. 15. When finished, leave the markups form open and click the Owner tab. Applying Escalation In this exercise, you will define an Owner markups percentage for the Escalation markup type and apply it to the entire Tutorial Project. 1. To apply escalation to the entire estimate, click in the Tree panel on 2004-05-10 BSD Buildings - Change Order #1. 2. Make sure that the Markups form is displaying the correct folder. 3. Click the Owner tab (if it is not already displayed). 4. In the grid in the upper left, click on Escalation. 5. To define the first markup percentage, click in the Description field in the first row in the right-hand grid. Type Escalation and press the Tab key. CostLink/CM creates a new row and moves the cursor to the Method field. 72 6. Click the arrow in the Method field and select Running Pct. from the list. 7. In the Perc ent field, enter a value of 6.0 (for 6%) and press Enter. 8. Click the Apply button. BSD CostLink/CM User Manual Chapter 5 : Defining Cost Markups CostLink/CM applies a markup of 6% to the costs of all tasks in the estimate. The Count field updates. NOTE: Leave the Markups form open for the next exercise. Examining the Summary Tab The Summary tab of the Markups form shows the computed markup costs for whichever folder or task is currently selected. In this exercise you will examine the Summary tab for the Tutorial Project to gain a better understanding of how BSD CostLink/CM applies and calculates markups. Starting Point: Begin this exercise where you finished the last one, with the Markups form open on 2004-05-10 BSD Buildings - Change Order #1. 1. Click the Summary tab. 2. Examine the Markups grid. Markups form, Summary tab The grid summarizes the markups you have defined and applied to each Direct Cost type in the Tutorial Project. Each darker gray line is a subtotal of the costs above it. Following is an explanation of each of these subtotal lines and how they are calculated, beginning on the top row with Bare Direct Costs and proceeding down to Total Project Cost at the bottom. Bare Direct Cost is the sum of all the direct costs (labor, equipment, material, and any user-defined costs) in the selected folder. Cost to Subcontractor includes the Bare Direct Cost plus any sales tax or adjustments. This is the "full direct cost" for any task or folder; that is, the cost to BSD CostLink/CM User Manual 73 Chapter 5 : Defining Cost Markups the contractor who performs the work. In this case, Sales Tax is the one markup you have defined, and it is listed above this subtotal. Cost to Prime includes the Cost to Subcontractor plus overhead, profit, and any other subcontractor markups. Subcontractors are listed above by name unless some of the tasks in the selected folder do not have the same subcontractors. Cost to Owner includes the Cost to Prime plus the Prime Contractor's own markups. These markups are listed individually above this subtotal, unless some of the tasks in the selected folder are assigned to a different prime contractor. Project Cost includes the Cost to Owner plus all the Owner markups resulting in the bottom line cost. 3. 74 After examining the grid, click Close to exit the Markups form. BSD CostLink/CM User Manual Chapter 6 Working with Queries This chapter describes how to use queries to find or filter information in a BSD CostLink/CM estimate or other database. In this chapter you will learn: • How to build and execute a query to find information in any BSD CostLink/CM database • How to retrieve query results at a later time BSD CostLink/CM User Manual 75 Chapter 6: Working with Queries Creating a Query In CostLink/CM, a query is a set of instructions that causes the program to show only the tasks that meet certain criteria. Construct queries based on any of the fields stored for tasks in the database. Use defined values (like specific dollar amounts) for the fields or wildcards (asterisks and question marks). After defining a query, you can use the query just once, or save it so that it can be accessed at any time from the View pulldown. For More Information on queries, see Chapter 10 of the CostLink/CM Reference Manual. In this exercise, you will create a query to display only those tasks in the Tutorial Project whose total Direct Costs are over a certain dollar amount. You will first define and save the query, then execute it. 1. Choose Tools > Create Query. The Query dialog box opens. Query dialog box 2. 76 Define the query: - In the first field (below the gray Previous Query area) click the down arrow and choose Total Bare from the dropdown list. - In the second field on the same row, click the down arrow and choose is greater or equal to. - In the third field, type 500 and press the Tab key. BSD CostLink/CM User Manual Chapter 6 : Working with Queries CostLink/CM displays the defined query logic in the Show All Data Where area, and enables the Do Query, Clear Form, and Create buttons at the bottom of the dialog box. Query dialog box displaying query logic 3. To save the query, click the Create button. BSD CostLink/CM opens the Save New Query dialog box. Save New Query dialog box 4. You could enter a different name for the query. For this tutorial, click OK to save the query using the default name, Total Bare Cost >= 500. BSD CostLink/CM saves the query and reopens the Query dialog box. 5. Click the Do Query button. BSD CostLink/CM executes the query. 6. Click Close to close the Query dialog box. BSD CostLink/CM User Manual 77 Chapter 6: Working with Queries The database window shows only the tasks that match the query criteria. When a query is displayed, CostLink/CM automatically uses “All Tasks in Sheet” View and hides the Tree panel. Query results 7. To return to the Project WBS View of the estimate, click the View pulldown and choose Project WBS View from the dropdown list. NOTE: To run a query without saving it, follow the steps above, but skip steps 3 and 4. Viewing Saved Query Results In the previous exercise, you defined and saved a query. Each query that you save becomes a new view of the database, and can be accessed from the View pulldown. 1. Click the View Pulldown and choose =? Total Bare Cost >= 500. View selector listing saved queries CostLink/CM displays the query results. 2. By default, only the Sheet panel shows when you view query results. You can show the tasks with their parent folders. Choose View > All Tasks in Sheet to turn off this option. CostLink/CM displays the Tree panel. 78 BSD CostLink/CM User Manual Chapter 6 : Working with Queries 3. Expand the level one folders and click on the level two folders to see if they contain any tasks. If nothing displays in the sheet panel, then none of the tasks in that folder are included in the query results. 4. Return to the WBS view by clicking the View pulldown and choosing Project WBS View from the dropdown list. NOTE: Delete saved queries by choosing Tools > Delete Query. When viewing query results, keep in mind that since assemblies are tasks they may be included in any query results. BSD CostLink/CM User Manual 79 Chapter 6: Working with Queries 80 BSD CostLink/CM User Manual Chapter 7 Using the Project CSI View A chief advantage of CostLink/CM is the ability to view an estimate using any number of hierarchies or work breakdown structures (WBS) that you choose. Each hierarchy is defined as a separate primary view of the estimate. Certain hierarchies are automatically createddepending on the template or project database you use when you start a new estimate. You can add more hierarchies whenever you need them. In this chapter, you will continue to build the Tutorial Project by automatically assigning tasks to the folders in the Project CSI view. BSD CostLink/CM User Manual 81 Chapter 7: Using the Project C S I View Assigning Tasks to the Project CSI View All CostLink/CM estimates are created with default primary views. One of these is the Project CSI view, which is used to sort tasks by their CSI MasterFormat divisions. The predefined hierarchy for this view typically contains one folder for each of the 16 divisions with a folder tag for the number of that division. Once tasks are sorted into their respective folders, reports can be printed on this view, or markups can be assigned using this view. NOTE: You can add primary views, in addition to the default ones, by choosing Insert > Hierarchy. For more information on views and hierarchies, see Chapter 4 of the CostLink/CM Reference Manual. Assigning Tasks to the Project CSI Folders In this exercise, you will use Assign Tasks To Hierarchy to automatically assign the appropriate tasks to each of the Project CSI folders. 1. Click the View pulldown and choose the Project CSI View. CostLink/CM displays the view, which already contains one folder for each of the 16 CSI MasterFormat divisions. These folders were copied from the Generic Template when you created the project in Chapter 3. All tasks in the project are in the Unassigned folder. NOTE: The tasks were added to the Unassigned folders of every primary view (except for the Project WBS view) as you dragged tasks into the Project WBS. Any assemblies that were added to the Project WBS are broken out into their individual tasks in this view (and in the Contractors view) and assigned to the appropriate CSI folders. 2. Choose LinkMan > Assign Tasks to Hierarchy. The Assign Tasks To Hierarchy dialog box opens. 82 BSD CostLink/CM User Manual Chapter 7 : Using the Project CSI View Assign Tasks To Hierarchy dialog box 3. The options are already set correctly. Click OK. NOTE: For more information on the options, see the CostLink/CM Reference Manual. The Assign Project WBS Tasks To Hierarchy confirmation message opens. Assign Project WBS Tasks to Hierarchy confirmation message 4. Click OK. CostLink/CM moves the tasks from the Unassigned folder to the appropriate folders. 5. Click on the folders that contain tasks (identified by their folder icons the source tags of the tasks within each folder. ) and examine Notice that the first two digits of the source tags match the first two digits of the folder tags. You can now us e this hierarchy when printing reports, if desired. BSD CostLink/CM User Manual 83 Chapter 7: Using the Project C S I View 84 BSD CostLink/CM User Manual Chapter 8 Applying Different Labor Rates CostLink/CM is delivered with Labor and Equipment libraries that are independent of any Project, CostBook, or Assemblies database. These standalone libraries allow you to reprice the labor and equipment costs of a Project, CostBook, or Assemblies database for different time periods or geographic regions. In this chapter you will learn how to: • Open and examine a Labor library • Apply new labor rates to an estimat e BSD CostLink/CM User Manual 85 Chapter 8: Applying Different Labor Rates Opening a Labor Library Many of the same operations that are performed in CostLink/CM databases are also used in the standalone Labor and Equipment libraries. Libraries open in their own database windows. The data can be viewed and edited at the folder and task level (the task level contains individual labor or equipment items). Libraries have Summary Info dialog boxes for viewing and editing general information. Create new labor and equipment libraries using the File > New or File > Copy commands. In this exercise you will open a standalone Labor library to view the data. NOTE: It is not necessary to open a labor or equipment library to reprice an estimate. See the next exercise for instructions on repricing. 1. Choose File > Open > Labor Library. The Recently Used dialog box opens, with the Labor tab displayed. 2. Select the 2000 National Labor Rates labor library and click Open. CostLink/CM displays the labor library in its own window. CostLink/CM with a Labor library open 86 BSD CostLink/CM User Manual Chapter 8 : Applying Different Labor Rates 3. Click on the different tabs in the Tree panel to see the different areas of the standalone library. Notice that is it organized by different types of laborers. 4. To examine the kind of data stored for each labor rate item, display a labor task in the Sheet panel and double-click on the task. Labor item form 5. Click the Close button to close the item form. 6. Choose File > Close to close the Labor library. Creating a New Labor Library You may need several different sets of labor rates - one for each job location, one for each area of a city where trades get paid different rates, and one of each of those for every year. Rather than editing an existing labor library each time you need different rates, you can have multiple labor libraries, one for each set of rates, and reprice your project to whichever library is appropriate for the job. When you reprice your project to a different labor library, CostLink/CM examines the Labor IDs in your Labor resource view and the Labor IDs in the labor library that you choose. For each trade where the Labor IDs match, CostLink/CM copies the rate information for that trade from the library to that trade in your Labor resource view. The next time the project is BSD CostLink/CM User Manual 87 Chapter 8: Applying Different Labor Rates recalculated, the new labor rates are used. For Labor IDs that CostLink/CM finds in your Labor resource view that do not match any Labor IDs in the labor library, CostLink/CM leaves the existing rates in your project. If the IDs do not match, the trade will not be repriced. Rather than starting a new labor library from a blank database, repricing your estimate will be faster if you copy an existing labor library and then edit the rates for each trade. In this exercise, you will copy an existing labor library and edit the rates for several trades. 1. Choose File > Copy…. The Select Unopened file to be copied dialog box opens. 2. From the Files of Type: dropdown list, choose Labor (*.MLA). The dialog box lists only the labor libraries (files that end with .MLA). When there are no labor libraries in the folder currently listed in the Look In: field, no databases are listed. 3. If the Look In: field is currently set to Projects, click the Up One Level button Look In: is not originally set to Projects, see the NOTE below.) Look In: now shows CostLink CM. 4. Double-click on the folder Libraries. The dialog box now lists the labor libraries located in the Libraries folder. NOTE: If the Look In: field was not set to Projects at the beginning of step 3, use the drop-down on the Look In: field to navigate to your CostLink CM \Libraries folder. Select Unopened file to be copied dialog box, set to copy a labor library 88 BSD CostLink/CM User Manual . (If Chapter 8 : Applying Different Labor Rates 5. Select the supplied labor library and click the Open button. The Enter Destination File Name dialog box opens. Enter Destination File Name dialog box 6. In the File name: field, type Tutorial Labor Rates. You could also click the drop-down for the Save In: field to save the new labor database in a different location. For this tutorial, save it in the Libraries folder. 7. Click Save. CostLink/CM copies the database and displays the File Copy Completed message. File Copy Completed message 8. Click OK. 9. Choose File > Open > Recently Used Window (or click the Open database button ). The Recently Used dialog box opens. 10. If necessary, click the Labor Rates tab. BSD CostLink/CM User Manual 89 Chapter 8: Applying Different Labor Rates The Tutorial Labor Rates library is not listed since it has never been opened. 11. Click the Browse button. The Open Library dialog box opens. 12. Select and open the Tutorial Labor Rates library. CostLink/CM opens the new labor library, which is an exact copy of the 2000 National Labor Rates library. The title bar says 2000 National Labor Rates. CostLink/CM title bar displaying current name of open database When CostLink/CM copied the 2000 National Labor Rates library, it not only copied all the trades and their existing rates, but also the data in the Summary Info dialog box. The name that displays in the title bar is the one defined in Summary Info. 13. Choose File > Summary Info. The Summary Info dialog box opens. Summary Info dialog box for labor library 14. Verify that the File Name field says Tutorial Labor Rates.mla. 90 BSD CostLink/CM User Manual Chapter 8 : Applying Different Labor Rates NOTE: If the File Name field does not say Tutorial Labor Rates.mla, then you did not open the correct library in step 12. Close the dialog box and the labor library and go back to step 9. 15. In the Title and Database Description fields, type Tutorial Labor Rates. 16. Click OK. The title bar now says Tutorial Labor Rates. 17. If the library is currently displaying different groups of trades on separate tabs, choose Tree > Use Single Tab. All trades are now displayed on one tab called Tutorial Labor Rates. 18. Click on the folder Building Workers. The Building Workers trades display in the Sheet panel. NOTE: In most cases you would edit every trade in the library to the correct labor rates. For this tutorial, you will edit a few of the trades that are used in the Tutorial Project. 19. In the sheet panel, open the item form for B-CARPNTER Carpenters. 20. Edit the labor rates as follows. Use the arrow keys on your keyboard to navigate through the Rate Computation fields. Be sure to enter the dollar values ($) in the Rate/HR column and percent values (%) in the Percent column. NOTE: When you enter a value in the Percent column, the Rate/HR value is calculated. When you enter a Rate/HR value, the Percent value is calculated. Enter a value in only one of the columns. If a rate type (such as Overtime) is not applicable for a particular trade, set either the Rate/HR value or the Percent value for that type to 0 (zero). Only add Overtime here if you are paying overtime for the entire project. See Chapter 7 of the Reference Manual for more information on this type of overtime. See Chapter 8 of the Reference Manual for information on applying Overtime as a markup to specific parts of an estimate. Basic Rat e Overtime Payroll Tax & Insurance Fringe Benefits Travel or Subsistence $25.00 0.00 40.00% $8.00 0.00 BSD CostLink/CM User Manual 91 Chapter 8: Applying Different Labor Rates NOTE: If you will be navigating to the next item by clicking on it (as opposed to clicking the Next button), after you edit the last value, use an arrow key on your keyboard, the Tab key, or your mouse to move the cursor out of the last field that you edited. If you leave the cursor blinking in the last field you edited when you click on another trade, your last edit may not get saved. (If you use the Next button to move to the next trade, your edits will be saved regardless.) CostLink/CM calculates the new Total Rate/HR. 21. Click the Apply button. The Last Changed field updates to show today's date. NOTE: It is not necessary to click the Apply button in order for the Last Changed field to update. If you make any edits to a trade, as soon as you close the form or display a different trade in the form the Last Changed field updates to the current date. Labor item form with edited rates The Default Rate field displays the original Total Rate/HR for the labor item as a reference. If you want it to display the current rate, then enter the new Total Rate/HR. 22. Leaving the item form open, use the Next button or click in the sheet panel to navigate to the following labor items and edit their rates as follows. Leave Overtime and Travel or Subsistence set to 0 (zero). 92 BSD CostLink/CM User Manual Chapter 8 : Applying Different Labor Rates Labor ID and Description B-CEMTFINR Cement Finishers B-ELECTRN Electricians B-EQOPRCRN Equip. Operators, Crane/Shovel B-LABORER Laborers, (SemiSkilled) Basic Rate ($) Payroll Tax & Fringe Insurance (%) Benefits ($) 23.00 27.00 28.00 23.00 6.00 9.50 24.00 29.00 8.00 16.00 38.00 5.00 23. Close the item form. 24. If necessary, scroll to the right in the sheet panel so you can see the Last or Last Change field. If necessary, resize the column so you can see the date. Scroll through the sheet panel and notice that the current date is displayed for the trades you edited. 25. Close the labor library. Applying New Labor Rates to an Estimate To change the labor rates in a project or database to the labor rates that are defined in a labor library, you reprice the project or database to the new labor library using the Summary Information dialog box. When you do this, CostLink/CM searches the selected labor library for Labor IDs that match the Labor IDs of the labor items in the project's Labor resource view. When it finds a matching Labor ID, CostLink/CM changes the rate information for the labor item in the project's Labor resource view to match the rate information in the labor library. The next time the project is recalculated, the new labor rates will be used. In this exercise you will reprice the Tutorial Project to the Tutorial Labor Rates library that you created and edited in the last exercise. 1. Note the current cost of the Tutorial Project. Then choose File > Summary Info. The Summary Info dialog box opens. 2. Click the Databases tab. BSD CostLink/CM User Manual 93 Chapter 8: Applying Different Labor Rates Summary Information dialog box, Databases tab 3. In the Update Labor Rates area, click the Browse button. CostLink/CM displays the Select Labor Rates Update Source dialog box. 4. Select and Open the Tutorial Labor Rates library. The Title and Library fields update to the Tutorial Labor Rates library, and CostLink/CM enables the Reprice button. 5. Click the Reprice button. CostLink/CM begins the reprice operation. When the processing is complete, all labor items in the Labor resource view whose Labor IDs match Labor IDs in the Tutorial Labor Rates library will be updated to the rates in the library. 6. Click OK. The Summary Information dialog box closes and if Auto-Recalculate Markups is turned on, the estimate recalculates with the new rates. NOTE: If the cost of your estimate has not changed, choose Tools > Recalculate All. 94 BSD CostLink/CM User Manual Chapter 9 Producing Reports CostLink/CM produces many summary and specialized reports in addition to the printout of the detailed estimate. You can choose a wide variety of options for formatting your reports, and you can also define and print custom reports. In this chapter you will learn how to define, format, and print the most commonly used CostLink/CM reports. This chapter includes the following sections: • Selecting Reports • Choosing Report Preferences • Column Setup for Reports • Formatting the Detail Report • Printing Reports • Sample Report Analysis For More Information on reports, see Chapter 9 of the CostLink/CM Reference Manual. BSD CostLink/CM User Manual 95 Chapter 9: Producing Reports Selecting Reports Use the Reports dialog box to select, format, and print CostLink/CM reports. Your first step is to select which reports you want to print. 1. Choose File > Reports Setup. The Reports dialog box opens to the Select Reports tab. Reports dialog box, Select Reports tab 2. 96 Make the following selections: BSD CostLink/CM User Manual Chapter 9 : Producing Reports Organization Name Report Header Select Hierarchy Orientation Direct Cost Detail Report Table of Contents to Level Print Title Page Summary Reports Levels for Summary Backup Reports Other Reports [Your company name] Estimate at 65% Project WBS View Landscape 1 Check Check Check Choose Direct, Indirect, and Owner. Level 2 Nothing selected Nothing selected These selections, when executed by the Print or Preview button, cause CostLink/CM to print or preview the detail estimate plus summary reports showing the Direct, Indirect, and Owner costs. The summary reports will show cost breakdown to the second hierarchy level (Level 2 folders). In preparation for the next exercise, leave the Reports dialog box open. Choosing Report Preferences Report preferences indicate how totals and markups are printed, and what columns are displayed in the reports. You make these selections on the Preferences tab. 1. Click the Preferences tab at the top of the dialog box. The Preferences tab opens. BSD CostLink/CM User Manual 97 Chapter 9: Producing Reports Reports dialog box, Preferences tab 2. Accept the default selections on this tab for this Tutorial. In preparation for the next exercise, leave the Reports dialog box open. Column Setup for Reports In CostLink/CM, the Cost Fields you select for the project are printed as columns on the Detail and Summary Reports. You use the Column Setup tab to choose the column names and descriptions to print and, if you wish, to omit columns from the reports. 1. Click the Column Setup tab at the top of the dialog box. The tab opens. 98 BSD CostLink/CM User Manual Chapter 9 : Producing Reports Reports dialog box, Column Setup tab 2. You can leave the default selections on this tab. In preparation for the next exercise, leave the Reports dialog box open. Previewing and Printing Reports In this exercise you will both previ ew and print reports. 1. Click the Select Reports tab. This tab shows the reports you currently have selected to print. You can either print these reports on the selected Windows printer by clicking the Print button or preview them on your screen by clicking the Preview button. 2. Click the Preview button. CostLink/CM recalculates the estimate, composes the reports, and displays them in a preview window. BSD CostLink/CM User Manual 99 Chapter 9: Producing Reports 3. When the report appears, maximize the Preview window . 4. Use the following buttons to page through the report previews, zoom in or out, and find text on the current page: Click the down arrow and choose a percent to zoom in or out Go to first page Go to previous page Page Number. Type the page number that you would like to view and press Enter. Go to next page Go to last page Search text. Opens a Search dialog box in which you can type text you want to find on the page you are currently viewing. Click Find Next to find the text. If any matching text is found, it will be surrounded by a red box. 5. Click the Print button in the preview window . NOTE: If the Preview window is not maximized, there will be two Print buttons - one in the Preview window, and one on the CostLink/CM toolbar. While previewing a report, only the Print button in the Preview window (the one next to the envelope button) will print the report. The other Print button can be used to print reports without going into Reports Setup. It will print your project with the most recent report settings. The Print dialog box opens. Print dialog box from Preview window 100 BSD CostLink/CM User Manual Chapter 9 : Producing Reports You can use this dialog box to set a specific page range to print or to print multiple copies. 6. Click OK. The Printing Records message box opens as CostLink/CM sends the reports to your printer. Printing Records message box 7. Click the Close button in the upper right to close the preview window. 8. Open the Reports Setup dialog box. (File > Reports Setup) 9. On the Select Reports tab, select Portrait 1 (with quantity, unit cost, and total cost). 10. Click the Preferences tab. Notice that some items that were grayed out earlier are now available, and vice versa. 11. Under Detail and Summary Report Options, select Unit Cost Column. 12. Click the Select Reports tab. Click Preview. Maximize the Preview window and examine the reports. NOTE: For further explanation of the differences between the portrait and landscape reports, and exactly which options are available for each, see Chapter 9 of the CostLink/CM Reference Manual. 13. Click the Export Report button . The Export dialog box opens. BSD CostLink/CM User Manual 101 Chapter 9: Producing Reports Export dialog box 14. Click the dropdown for the Format: field and scroll through the list of available formats. Format field listing some of the available export formats Notice that among other formats you can export your reports to Acrobat Portable Document Format (PDF) format or Rich Text Format (RTF - which can be opened in any word processor). These exports create electronic files that look just like the reports we previewed. These files can be emailed to and vi ewed by people who do not have CostLink/CM. NOTE: If you own Adobe Acrobat 5.0, you can choose File > Print Setup and select Acrobat as your printer. Then Print the reports to Acrobat instead of using the export option in the preview window. 15. Select Acrobat Format (PDF). 16. Click OK. The Export Options dialog box opens. 102 BSD CostLink/CM User Manual Chapter 9 : Producing Reports Export Options dialog box If you only wanted to export a specific range of pages, you could set that here. 17. Click OK. The Choose export file dialog box opens. 18. Click the dropdown arrow on the Save In: field and choose Desktop. NOTE: Desktop is the very first item in the dropdown list. 19. In the File Name: field, delete the current name and type Tutorial Export. 20. Click Save. The Exporting Records message box opens as CostLink/CM creates the .pdf file. Exporting Records message box BSD CostLink/CM User Manual 103 Chapter 9: Producing Reports 21. Click the Close button in the upper right to close the preview window 22. Minimize CostLink/CM by clicking the uppermost Minimize button . Also minimize any other programs you are running so that you can see your Windows desktop. 23. Double-click to open the tutorial export.pdf file . If you have Adobe Acrobat Reader, the exported reports open in Acrobat Reader. NOTE: You must have Adobe Acrobat Reader in order to view .pdf files. Adobe Acrobat Reader can be downloaded for free from Adobe's website: www.adobe.com. 24. Examine the export. Close Acrobat Reader when finished. 25. Bring CostLink/CM back up on screen by clicking its button in the Taskbar . 104 BSD CostLink/CM User Manual Chapter 10 Linking In this chapter, you will link quantities on folders and tasks to the quantities of higher-level folders and to an Excel workbook, so that you can easily change the cost of the estimate based on the size of the project. You will learn to do the following: • Link to parent • Set up Excel for linking • Create a parameter workbook • Link to Excel BSD CostLink/CM User Manual 105 Chapter 10: Linking Quantity Options CostLink/CM has three options for entering the quantity on folders and tasks. Quantity options for folder or task ? Use Quantity Entered: This is the default. Select Use Quantity Entered to enter the quantity for this task in the Item Form or in the Sheet Panel. ? Use MS Excel Value times: This option is selected automatically when you link your quantities to an Excel spreadsheet. You can multiply the value from the Excel spreadsheet by a number or decimal. ? Use Parent Quantity times: Use this option to calculate the quantity for this item based on the quantity of the parent folder. You can multiply the value of the quantity of the parent quantity by a number or decimal. When Use MS Excel Value times or Use Parent Quantity times is selected, the task or folder icon will have a green square Excel symbol in the upper right corner. When the Use MS Excel Quantity times option is selected, the icon will also have a cyan note indicator in the bottom left since the link to Excel automatically adds a note as described later in this chapter. The icons are as follows: , , and . When linked to Excel or the Parent Quantity, the quantity field in the Sheet Panel and in the Item Form will be grayed out. Linking to the Parent Quantity CostLink/CM allows the quantities of folders and tasks to be linked to the quantities of the folders that contain them. The folder that contains a folder or task is considered the parent, and the subfolder or task is the child. On the subfolder or task, enter a value by which to multiply the quantity of the parent folder in order to calculate the quantity of the child. When you change the quantity of the parent, the quantity of the child will change also. Starting Point: Begin this exercise in the Project WBS view of the Tutorial Project, in single tab mode and with the data showing in the Tree panel. 106 1. Open the folder form for Substructure. (Right -click and choose Edit folder.) 2. Select Use Parent Quantity times. BSD CostLink/CM User Manual Chapter 10: Linking The Qty field grays out and shows a quantity of 400. This quantity is the same quantity that is entered on its parent, the project level folder. The field to the right of Use Parent Quantity times has a default value of 1. If you changed this value to 2, Qty would be 800. If you changed the value to .5, Qty would be 200. For this tutorial, leave the value as 1. Substructure folder form, linked to Parent Quantity 3. Click in the UOM field (the field to the right of the Quantity) and type SF. 4. Leaving the folder form open, click on Foundations. You may need to click the plus sign next to Substructure to see Foundations. The folder form updates to Foundations . 5. Select Use Parent Quantity times. Foundations is now linked to its parent, Substructure. 6. Click in the UOM field (the field to the right of the Quantity) and type SF. 7. Click Close. 8. In the Sheet panel, open the item form for Grade Beams Cast in Place 3000 P. (Double-click on the task.) BSD CostLink/CM User Manual 107 Chapter 10: Linking 9. Select Use Parent Quantity times. 10. In the field to the right of the options, enter .125 and press Tab. The Linked Qty is 50. Grade Beams item form, linked to parent 11. Click Next. The item form updates to 13" Butt x 7" Tip Wood Pile 50'(16M) to 59'(19M), Treated. 12. Select Use Parent Quantity Times . 13. Enter a value of .75 and press Tab. The Linked Qty is 300. 14. Click Close. 15. Open the Summary Info dialog box. (From the File menu choose Summary Info). 16. Change the Project Size from 400 to 800. 17. Click OK. 108 BSD CostLink/CM User Manual Chapter 10: Linking The quantities on the linked folders and tasks update. If necessary, from the Tools menu choose Recalculate All to make the costs update. Tutorial project with some folders and tasks linked to project size of 800. NOTE: Your costs may differ depending on the CostBook you are using. 18. Repeat steps 15 through 17, changing the Project Size back to 400. Linking To Excel CostLink/CM can link to Excel 2000 (version 9.0) and higher. You can link a single cell in Excel to multiple items in a CM project, and link a single worksheet to multiple CM projects. When you change cells in a linked worksheet, the corresponding values in CM change. These changes will be made and saved even if the CostLink/CM project is not open. When the project is opened later you can choose whether or not to update the values. NOTE: You must have version 9.0 (Excel 2000) or higher of Microsoft Excel in order to use the linking feature. To check the version of any program, open the program and choose Help > About [the name of the program]. A dialog box listing the version of the program will open. BSD CostLink/CM User Manual 109 Chapter 10: Linking This feature allows you to take advantage of parameter workbooks. A parameter workbook is a spreadsheet where you would enter the overall size of a job, and then list some or all the folders and tasks that you need in an estimate for that type of job. For the folders and tasks you would enter formulas that calculate their quantities based on what you enter for the overall size of the job. In CostLink/CM you create all the folders and drag in all the tasks for your estimate like you did in the previous chapters of this tutorial. However, instead of typing in the quantities for the folders and tasks, you paste links from the corresponding values in Excel. Terms To eliminate some possible confusion, please note the meanings of the following words: workbook - an entire Excel file often consisting of multiple worksheets worksheet - a single tab in a workbook The tabs of three worksheets in an Excel workbook One-Time Set Up In Excel To link CostLink/CM to Excel, you may have to add a COM Add-In to your Excel installation. NOTE: COM stands for Component Object Model. Microsoft Excel's Help defines a COM Add-In as "a supplemental program that extends the capabilities of a Microsoft Office program by adding custom commands and specialized features." The particular COM Add-In that must be added was created by BSD to add a command to the Excel Edit menu (Copy As CostLink Source) that enables linking. You will only need to add this once for each comput er using the Excel linking feature. In the exercises below you will do the following: - Add the COM Add-Ins command to your Excel Tools menu so that you can install the COM Add-In - Install the COM Add-In Adding the COM Add-Ins Command To the Excel Tools menu 110 1. Open Excel 2000 (version 9.0) or higher. 2. Click on the Tools menu. 3. Show all the commands in the Tools menu by clicking the arrows at the bottom of the Tools menu . BSD CostLink/CM User Manual Chapter 10: Linking 4. If you see COM Add-Ins in the Tools menu, skip to the next exercise. NOTE: The command will be listed as COM Add-Ins, not Add-Ins. In a standard installation of Excel, COM Add-Ins is not included on the Tools menu. 5. If you do not see COM Add-Ins in the Tools menu, click Customize. (The Customize command is in the Tools menu.) The Customize dialog box opens. 6. Click the Commands tab. The Commands tab opens. The Customize dialog box, Commands tab 7. In the Categories list, click Tools. The Commands list updates to show all the commands in the Tools category. 8. Scroll through the Commands list to find COM Add-Ins. The COM Add-Ins command in the Commands list BSD CostLink/CM User Manual 111 Chapter 10: Linking NOTE: In the following steps, you will click and hold the left button on your mouse. Do not release it until the directions say 'release the mouse button.' 9. Click and hold on COM Add-Ins and drag it to the Tools menu. (Continue holding down the left mouse button.) Your mouse pointer will look like this: Mouse pointer when dragging a command to a menu or toolbar 10. As you hold the mouse button down over the Tools menu, the Tools menu will open. 11. Continue holding the mouse button down as you drag the command to where you would like it listed in the Tools menu. A black line will appear where the command will go. Continue dragging the mouse until the black line is locat ed where you want the COM Add-Ins command. (You may want to put it near the bottom of the menu since you will probably only use it this one time.) Tools menu showing black line where command will be listed once the mouse is released 12. Once the black line is located where you want COM Add-Ins listed, release the mouse button. COM Add-Ins is added to the Tools menu. 13. Close the Customize dialog box by clicking the Close button. 112 BSD CostLink/CM User Manual Chapter 10: Linking Installing the COM Add-In For Linking To Excel 1. In Excel, choose Tools > COM Add-Ins. The COM Add-Ins dialog box opens. The COM Add-Ins dialog box 2. Click the Add button. The Add Add-In dialog box opens. The Add Add-In dialog box BSD CostLink/CM User Manual 113 Chapter 10: Linking 3. Click the Look In: dropdown click on the drive that Windows is installed on. This is usually the C: drive. 4. Double-click on the folders listed below for the version of Windows that you are running: , and NOTE: If you do not know which version of Windows you are running, open Windows Explorer (you can do this either by holding down the Windows key on your keyboard while you type the letter E, or by right-clicking on the Start menu and choosing any of the Explore options), and choose Help > About Windows. 5. - for Windows 95, 98, or ME, double-click on the Windows folder and then doubleclick on System - for Windows XP, double-click on the Windows folder and then double-click on System32 - for Windows NT or 2000, double-click on the WINNT folder and then double-click on System32 Scroll to and double-click on the file BSDOfcAI.dll. The COM Add-Ins dialog box reopens and now lists BSD Links for MS Excel. COM Add-Ins dialog box listing BSD Links for MS Excel 6. Click OK. Excel is now set up for linking. 114 BSD CostLink/CM User Manual Chapter 10: Linking Linking to a Parameter Workbook In Excel This part of the chapter covers creating a parameter workbook in Excel. No costs will be entered in the parameter workbook. The costs will come from the CostBook you are using in CostLink/CM, or you will enter the costs directly into your CostLink/CM project. The sole purpose of the parameter workbook is to calculate the quantities of each item in the estimate based on the overall size of the job. When creating your own parameter workbooks in Excel, keep the following information in mind: ? The parameter workbook used in this User Manual is completely contained on one worksheet. However, you can link a CostLink/CM estimate to a parameter workbook that spans multiple worksheets and even multiple workbooks. ? If you rename the worksheets in your workbooks from Sheet1, Sheet2, etc. to something more descriptive, do not use any spaces in the sheet names. CostLink/CM cannot link to a cell on a worksheet that has a space in its name. NOTE: Do not rename worksheets if they are already linked to CostLink/CM. Downloading the Parameter Workbook To download the completed parameter workbook from BSD's website: 1. Open your Internet browser and go to www.bsdsoftlink.com. 2. On the left side of the web page, click Download Center. 3. Scroll to the bottom of the page and click on User Manual (in the CostLink/CM column). 5. Scroll down and click tutorialworkbook.zip. 6. At the prompt, save to a directory on your local hard drive. After downloading the workbook, you are ready for the next exercise. Linking a CostLink/CM Estimate to Excel Each time you open CostLink/CM or an Excel workbook that is linked to a CostLink/CM estimate, a program called aecLinkMan launches in the background. While you are running CostLink/CM or an Excel workbook that is linked to a CostLink/CM estimate, you can press CTRL+ALT+Delete to open your Task Manager, and you will see aecLinkMan listed. This is the program that enables linking between CostLink/CM and Excel. Since this program is running in the background, you do not need to have both CM and Excel running in order to edit a linked workbook or a linked estimate. If you edit a linked BSD CostLink/CM User Manual 115 Chapter 10: Linking workbook, the next time you open the estimate that the workbook is linked to, aecLinkMan will prompt you that the workbook has been edited and ask if you want to update the links. Linking aut omatically incorporates the following Excel features: ? Range names: In Excel you can name a cell or a group of cells (called a range), and then use the range name in formulas instead of remembering or looking up the cell reference (B2, D4, etc.). Range names cannot include spaces or punctuation, and they cannot begin with a number. Instead of spaces, you can use underbars (_). You can use a number anywhere within a range name except as the first character. When copying a cell to link to CostLink/CM, you will be required to enter a range name. When you paste the link into the estimate, CostLink/CM identifies the Excel cell by the name and location of the workbook, the name of the worksheet in the workbook, and the range name that you entered for the cell. ? Comments: Comments in Excel have some similarity to notes in CostLink/CM. Comments can be inserted into any cell by clicking on the cell and choosing Insert > Comment. Cells that contain comments are identified by a red triangle in the upper right corner of the cell. Excel cell with a comment Read the comment by holding your mouse over the cell. You can edit the comment by right-clicking on the cell and choosing Edit Comment from the context menu. Editing the comment includes resizing the comment so that you can read the entire comment, and also editing the text in the comment. You can remove the comment by right -clicking on the cell and choosing Delete Comment. When you copy a cell to link to CostLink/CM, a comment is automatically inserted identifying that the cell is linked. Overview of Linking to Excel In general, the following steps are performed to link an Excel workbook to a CostLink/CM estimate. Do not perform these steps for the tutorial. This is an overview of the process. 1. Make sure the workbook is saved. 2. In Excel, click on the cell that you want to link. 3. In Excel, choose Edit > Copy as CostLink Source. The Enter Range Name dialog box will open. 116 BSD CostLink/CM User Manual Chapter 10: Linking 4. Enter a name for the cell. The range name can be as descriptive as you like, but cannot have any spaces. 5. Click OK. 6. Switch to CostLink/CM using one of the following methods: - Windows Taskbar: Click the CostLink/CM button in the gray bar across the bottom of the screen that lists all the programs (tasks) that are currently running. - Alt+Tab: On your keyboard, hold down the Alt key while you press and release the tab key. Continue pressing and releasing tab until the CostLink/CM icon is the selected program and then release the Alt key. - Click on the CostLink/CM window: Size your Excel and CostLink/CM windows so that you can see both, and use your mouse to click on the window you want. 7. In CostLink/CM, locate the folder or task that you want to link. Click on its parent in the tree panel so that the folder or task that you want to link is listed in the sheet panel. 8. Either click in the quantity field for the folder or task in the sheet panel, or open the item form for the folder or task (that is listed in the sheet panel) and click in the quantity field. 9. Choose LinkMan > Manage Links > Paste Link from Source. The quantity field displays the current value in Excel. If you update the Excel workbook, the quantity field will update to the new value. Tips for Linking When creating links from CostLink/CM, keep the following in mind: ? You must have opened CostLink/CM at one time on your computer before you can start linking to Excel. You do not need to keep CostLink/CM open while you are working on the spreadsheet, you just need to have opened it at some point. ? The Excel workbook needs to have a file name before you can link to it. To give it a file name, save the Excel workbook. ? All linking in CM needs to be done in the Project WBS View, not an alternate hierarchy. ? You should only have links to one Excel workbook in any given CostLink/CM project. ? Your links are saved in a database called aecLMDat.mdb. This file will be located in your C:\CostLink CM\System folder if you installed CostLink/CM in the default location. However, if you have installed BSD SpecLink+, BSD PerSpective, or BSD CostLink/AE, aecLMDat.mdb files are also located in the System folders of those programs, and your links may be stored in one of those aecLMDat.mdb files instead. Do not delete the aecLMDat.mdb file. BSD CostLink/CM User Manual 117 Chapter 10: Linking ? You can link one CostLink/CM estimate to cells on as many different worksheets in as many different workbooks as you need to. ? You can link quantity fields of both folders and tasks, but in order to create the link, the folder or task must be showing in the sheet panel. ? Do not use duplicate range names within the same worksheet in Excel. ? It is faster if Auto-Recalculate Markups is turned off in CostLink/CM while you are making and refreshing links. When editing an Excel workbook that is already linked, keep the following in mind: ? Once you have pasted links into CostLink/CM, do not change the sheet name in Excel. ? Excel workbooks that are linked to CostLink/CM projects are automatically saved as you edit them. Linking a CostLink/CM Estimate To an Excel Workbook In the following exercises you will do the following: ? Create a new project based on the Tutorial Project ? Create a new toolbar in CostLink/CM that has buttons for the commands commonly used when linking. ? Link the new project to the Tutorial Parameter Workbook ? Edit the workbook and the estimate to explore different methods of managing the links Create a New Project Based On the Tutorial Project In the following steps, you will create a new project based on the Tutorial Project and link the new project to the parameter workbook. 1. Close any open projects in CostLink/CM, and leave CostLink/CM running. 2. In CostLink/CM choose File > New. The New dialog box opens. 3. Click Browse. The Select Template for New Project dialog box opens to the Template folder. 4. Click the Up One Level button CostLink CM folder. two times to change the Look In field to the 5. Double-click on the Projects folder. 6. Double-click on Tutorial Project.mpj. The Save New Projects Database As dialog box opens. 118 BSD CostLink/CM User Manual Chapter 10: Linking 7. In the File Name field, type Tutorial Project, Linked. 8. Click Save. CostLink/CM copies the existing Tutorial Project to make the new project, opens the new project, and opens the Summary Info dialog box. 9. In the Project Size field, delete the number 400. Once the estimate is linked to the parameter workbook, the project size will change as you edit the workbook, and this field would be reporting the wrong size. 10. Click the Project Notes tab. 11. Add a note that this estimate is linked to the Tutorial Parameter Workbook. 12. Click OK. 13. Choose LinkMan > Manage Links > Remove All Links From Sources. This command will remove the links to parent that were created previously. Note: If Manage Links is not available on the Linkman menu, make sure that you are in the Project WBS View. A confirmation message opens. Rem ove all links confirmation message 14. Click OK. A confirmation message opens. Links removed confirmation message 15. Click OK. The Links are removed. BSD CostLink/CM User Manual 119 Chapter 10: Linking Note: The links are removed, but the local value representing the relationship of the existing quantity to the parent quantity is not set back to 1.0, so you may have to change that if you later decide to link the quantity to something else. Create a Toolbar for Linking In this exercise you will create a new toolbar in CostLink/CM and add the most common linking commands to it. You could also add the buttons to any of the existing toolbars; however, by adding them to a new toolbar, you can turn the toolbar off when you do not need it, and turn it back on when you are working with links. If you do not add the buttons to a toolbar, you will have to choose LinkMan > Manage Links > and then choose the appropriate command each time you need it. NOTE: When you install future updates to CostLink/CM you will have to recreate the toolbar, or re-customize the existing toolbar. 1. In CostLink/CM, choose View > Toolbars > Customize. The Customize dialog box opens. The Customize dialog box 2. Click New. The New Toolbar dialog box opens. 3. 120 In the Toolbar Name field, type Linking. BSD CostLink/CM User Manual Chapter 10: Linking 4. Click OK. A new, empty toolbar is created. NOTE: The new toolbar will probably be located under the existing toolbars. If you do not see it, move the Customize dialog box by dragging the title bar (the brightly colored bar across the top of the dialog box) down so it is not on top of any existing toolbars. Look closely for the new, empty toolbar. Since it is empty, it is easy to miss. A new, empty toolbar 5. In the Customize dialog box, click the Tools tab. 6. In the Categories list, click on LinkMan. The Tools list updates to show the commands in the LinkMan category. 7. Scroll through the Tools list to find the following commands: - Paste Link from Source Delete Link from Source Refresh All Links from Source The Manage Links commands in the Tools list in the Customize dialog box 8. One at a time, drag the three toolbar buttons to the new, empty toolbar. Before you release the mouse button, a dark line will appear where the button will be added, and the mouse pointer will have a plus sign in the bottom right corner. NOTE: If the mouse pointer has an X in the bottom right corner, the pointer is not located in a place where you can drop the button. Move the mouse so the tip of the pointer is on the new toolbar. As you drop each command, a button for the command appears on the toolbar and the toolbar grows to fit the commands. BSD CostLink/CM User Manual 121 Chapter 10: Linking New toolbar with buttons for the three most common linking commands 9. Close the Customize dialog box. 10. Right-click on any button on any toolbar. 11. Click Linking. The new toolbar closes. 12. Right-click on any button on any toolbar. 13. Click Linking. The toolbar opens. 14. Hold your mouse over each of the three buttons on the new toolbar. A description of what each button does appears. NOTE: If you do not see descriptions of what each button does, right -click on any button on any toolbar and choose Customize. Click the Options tab and select the option Show ScreenTips on Toolbars. Close the Customize dialog box and the descriptions should now appear when you hold your mouse over the buttons. Link the New Project to the Tutorial Parameter Workbook To help with navigation in CostLink/CM, if the folder tags are not showing, choose Tree > Show Folder Tags. To see costs changing as you recalculate the estimate, if the data is not already displaying, choose Tree > Show Data in Tree. 1. In CostLink/CM, open the Tools menu. If there is a checkmark beside Auto-Recalculate Markups, click on it to turn it off. If there is not a checkmark, close the Tools menu without clicking on Auto-Recalculate Markups. NOTE: It is faster if Auto-Recalculate Markups is turned off while you are making and refreshing links. 2. Expand the folder A Substructure (by clicking its plus sign). 3. Click on the folder 10 Foundations in the Tree panel. The first task in the Sheet panel, under 10 Foundations, Grade Beams Cast In Place, is the first task we will link to Excel. 122 4. Switch to the Tutorial Parameter Workbook in Excel. 5. Edit cell D5 to read 75 instead of 50. BSD CostLink/CM User Manual Chapter 10: Linking The values in the parameter workbook update. NOTE: This is not a required step in linking. In fact, the cells you link to do not have to contain any information before creating the links. For this tutorial however, since most of the values in the parameter workbook exactly matched the values in the estimate, you would not have seen changes in the values in the estimate when you created the links. Now that the values are different you will see a change when you create the links in the following steps. 6. Click on cell G15. 7. Choose Edit > Copy as CostLink Source. NOTE: If Copy as CostLink Source is not on your Edit menu, do the first two exercises in this chapter to add it to the menu. The Enter Range Name dialog box opens. The Enter Range Name dialog box The Enter Range Name dialog box has a default name already entered that identifies the worksheet, row, and column of the cell. You could accept this default name; however, in this tutorial you will enter something more descriptive. 8. Type Grade_Beams and press Enter (or click OK). NOTE: Range Names cannot have spaces, so an underbar (_) is often used as a substitute for a space. Range Names also cannot have any punctuation other than the underbar (_) and cannot begin with numbers. They can contain numbers, but the first character in a range name cannot be a number. 9. Switch to CostLink/CM. 10. In the Sheet panel, click in the quantity field for the Grade Beams task. 11. Click the Use paste to create a link to this record button on the toolbar BSD CostLink/CM User Manual . 123 Chapter 10: Linking NOTE: If you do not have this button on a toolbar, either perform the previous exercise, or choose LinkMan > Manage Links > Paste Link from Source. The following happens: - The icon for the Assembly changes to indicate that the task is linked and has a note. Assembly icon indicating a link to Excel (green box on the upper right) and a note (cyan rectangle on the lower left) - The quantity updates to the value currently displayed in the parameter workbook. The quantity field grays out so that it will not be accidentally edited from CostLink/CM. If this were allowed, it would break the link. 12. Double click on the assembly to open the Item Form. 13. Change the Local Value to 1.0 so that the quantity is now the same as the quantity on the parent folder. 14. Choose View > Forms > for Notes. The Notes form opens. NOTE: If the note is currently displaying the note for Foundations, click on the Grade Beams task. 124 BSD CostLink/CM User Manual Chapter 10: Linking Notes form for a linked item 15. Close the Notes form. 16. Switch to Excel. 17. Hold your mouse over cell G15. The comment (indicated by the red triangle in the upper right corner of the cell) displays. Unedited comment on linked Excel cell 18. Right-click on cell G15. 19. From the context menu choose Edit Comment. The comment opens in an editable mode. 20. Resize the comment so that you can see all the text. NOTE: You can resize the comment by holding your mouse over any of the white squares on the border of the comment and then dragging your mouse away from the center of the comment. BSD CostLink/CM User Manual 125 Chapter 10: Linking Comment resized to show all the text 21. Click on any cell to close the comment. 22. Hold your mouse over cell G15. The comment displays in its edited size. 23. Click on cell G16. 24. Choose Edit > Copy as CostLink Source. The Enter Range Name dialog box opens. 25. Type Wood_Pile and press Enter (or click OK). 26. Switch to CostLink/CM. 27. In the sheet panel, click in the Quantity field for 13" Butt x 7" Tip Wood Pile. 28. Click the Use paste to create a link to this record button on the toolbar . The link is created. 29. Open the Item Form and change the Local Value to 1.0. 30. In the Tree panel, expand F Special Construction and Demolition (by clicking on its plus sign). 31. In the Tree panel, click on 20 Demolition. 32. Switch to Excel. 33. Click on cell G24. 34. Choose Edit > Copy as CostLink Source. The Enter Range Name dialog box opens. 35. Type Demo_Sidewalk and press Enter (or click OK). 36. Switch to CostLink/CM. 37. Click in the quantity field for Demo 4" (10cm) Sidewalk. 38. Click the Use paste to create a link to this record button on the toolbar 126 BSD CostLink/CM User Manual . Chapter 10: Linking The link is created. 39. Repeat steps 29 through 35 for each of the remaining tasks, clicking on the appropriate cells and quantity fields and assigning appropriate range names to link the rest of the tasks. 40. In CostLink/CM, choose Tools > Recalculate All. The estimate recalculates with the new linked values. Edit the Workbook and the Estimate 1. Close CostLink/CM. 2. Leaving Excel open, close the Tutorial Parameter Workbook. NOTE: You are not prompted to save your changes when you close the workbook. AecLinkman automatically saves edits to linked workbooks. 3. In Excel, reopen the Tutorial Parameter Workbook.xls. An aecLinkMan message opens stating that the workbook is linked to at least one CostLink/CM project, and that aecLinkMan will be monitoring the changes to the workbook. 4. Click OK. 5. Edit cell D5 to read 60 and press Enter. The workbook recalculates and aecLinkMan saves your edit. 6. Close Excel. 7. Open CostLink/CM. 8. Open the Tutorial Project, Linked. A message asking if you want to update the links opens. You would choose Yes if you wanted the links to update before the estimate opens, and choose No if you want the estimate to open with the last values it was linked to. You can manually update the links once the estimate is open. 9. Choose No. A message opens to say that link updating will be disabled until you choose to enable link updating. 10. Click OK. The estimate opens without updating the links. 11. Click the Update all link targets with current link source values button BSD CostLink/CM User Manual . 127 Chapter 10: Linking A message opens stating that linking is currently disabled, but that the command you just clicked on will refresh the links. It then asks if you want to enable automatic link updating. If you click Yes or No, the linked values in the estimate will update to the current values in the Tutorial Parameter Workbook. If you click Yes, and if you open the Tutorial Parameter Workbook, the linked values will update automatically as you edit the values in the workbook. If you click No, and if you open the Tutorial Parameter Workbook, the linked values will not update automatically as you edit the values in the workbook. If you click Cancel, the linked values will not update. 12. Click Yes. The linked values update, and when finished a message opens stating how many links were updated. 13. Click OK. 14. Choose Tools > Recalculate All. The estimate recalculates with the updated values. 15. Choose LinkMan > Manage Links to view the Manage Links submenu. While the Manage Links submenu is open, notice the checkmark next to Disable Updating from Sources, indicating that this option is on. 16. Choose LinkMan > Manage Links to view the Manage Links submenu. The commands that have not been used in this exercise are as follows: 128 - Delete Link from Source: If you no longer want a particular quantity linked, click on the folder or task in the Sheet panel and choose this command. A message will open asking if you are sure you want to delete the link. If you do not want to delete the link, choose Cancel. Click OK to delete the link. Once you click on a different folder in the tree panel and back on the parent of the item you deleted the link to, the quantity field will be white in the background indicating that you can edit the quantity, and the note indicator and the Excel link indicator will be removed from the icon for the folder or task. The value that it was last linked to will still be in the Quantity field, but it will not update if the workbook is edited. - Change Excel Links Source: This command applies to linking to Excel only. Use this command to link the project to a different Excel workbook. The best way to do this is to first create a copy of the workbook that the project is currently linked to. This way the information will be located in the same places in the new workbook. When you choose this command, a Select New Excel Links Source dialog box will open. Navigate to, click on, and open the workbook you want to link to. A message will open asking you to confirm that you actually want to change the links source. (You can click Cancel if you have changed your mind.) When you click OK, if you BSD CostLink/CM User Manual Chapter 10: Linking have the new Excel workbook open, it will automatically update the links and open a message to confirm that the links were updated. Once you open the new Excel workbook, the links will update when you make a change to the Excel workbook. Conclusion This concludes the BSD CostLink/CM Tutorial. By following the chapters of this tutorial, you have created a project, a work breakdown structure, added and created many cost items, explored primary and resource views, applied cost markups, printed reports, and linked an estimate to an Excel workbook. For further details on all of these items, see the CostLink/CM Reference Manual. BSD CostLink/CM User Manual 129 Chapter 10: Linking 130 BSD CostLink/CM User Manual Index Index = =? icon, 14 A active window, 32 adding contractors, 64 adding direct costs, 25 adding folders, 28 adding project notes, 23 adding tasks, 30 entering quantity, 34 equipment items, 31 from a costbook database, 31 from the assemblies database, 52 from the costbook database, 32 source tag, 37 using crews, 41 alternate hierarchy overview of views, 3 applying different labor rates, 85 applying sales tax, 61 arranging panels and windows, 8 arranging panels and windows active window, identifying, 32 assemblies how display in primary views, 69 queries and, 79 assemblies database, 15 adding tasks from, 52 assign tasks to hierarchy, 81 assigning work to contractors, 68 auto-recalculate markups, 62 B building the project structure, 26 C column setup for reports, 98 contractors, 64 applying markups, 68 defining, 65 copy database or library, 87 copying folders, 28 cost fields defining, 22 cost markups, 57 auto recalculation, 62 contractor markups, 64 editing estimate after applying, 62 owner costs, 69 sales tax, 61 summary, 73 costbook database, 15 adding tasks from, 31, 32 CostLink/CM direct cost overview, 2 markups overview, 2 overview, 2 views overview, 3 costs displaying in tree, 50 selecting on reports, 98 create new labor library, 87 creating a query, 76 crew as assembly, 36 crew code, 37 crews, 36 CSI codes, 37 CSI Tasks resource view, 36 D database window, 7 databases, 15 defining cost fields, 22 defining cost markups, 57 defining project summary information, 21 direct costs, 25 overview, 2 choosing report preferences, 97 BSD CostLink/CM User Manual 131 Index E L edit labor rates, 88 equipment ID, 37 equipment items adding as tasks, 31 estimate changing labor rates, 93 creating, 20 Excel linking, 109 change Excel links source, 128 creating links, 122 Excel comments, 116 Excel features used, 116 multiple worksheets, 115 opening linked projects/estimates, 127 opening linked workbooks, 127 overview of steps, 116 range names, 116 setup, 110 tips, 117 worksheet names, 115 expand branch, 8 F find, 32 folder forms, 10 folders, 7 adding notes, 29 copying, 28 creating, 28 moving, 28 forms, 10 G green square Excel icon, 106 guided tour, 5 I importing databases from earlier versions, 20 insert child folder, 28 insert folder, 28 installation instructions where to find, vii, 1 item form lock, 42 item forms, 10 132 BSD CostLink/CM User Manual labor ID, 37, 88 labor library, 86 create new, 87 labor rates changing, 85, 88, 93 libraries, 17 linking linking to parent, 106 delete link from source, 128 identifying linked items, 124 manually updating links, 127 linking to Excel, 109 change Excel links source, 128 creating links, 122 Excel comments, 116 Excel features used, 116 multiple worksheets, 115 opening linked projects/estimates, 127 opening linked workbooks, 127 overview of steps, 116 range names, 116 setup, 110 software requirements, 109 tips, 117 worksheet names, 115 linking to model spreadsheets, 109 LinkMan assign tasks to hierarchy, 82 lock option on item form, 42 M managing cost information, 37 markups overview, 2 applying, 57 materials vendors, 45 adding to a user-defined task, 45 model spreadsheets definition, 110 linking estimate to, 109 move down one level, 8 move up one level, 8 moving folders, 28 moving the software where to find instructions, vii, 1 Index N new database, 20 new labor library create, 87 notes, 23, 29 O open costbook database, 15 opening an estimate, 6 orient window panels horizontally, 8 orient window panels vertically, 8 overview of CostLink/CM, 2 owner costs, 69 P panels and windows, 6 previewing reports, 99 primary views, 14 adding your own, 82 printing reports, 99 producing reports, 95 project csi view using, 81 project database, 15 changing labor rates, 93 creating, 20 resources, 55 project notes, 23 project structure building, 26 project summary information, 21 project title, 22 Q qty quantity field, 106 quantity entering, 34 options for entering or calculating, 106 queries, 14, 75 assemblies and, 79 closing, 78 creating, 76 delete saved, 79 saving, 77 viewing saved, 78 BSD CostLink/CM User Manual R recalculate estimate, 50 recently used dialog box, 89 referencing a crew, 41 reports, 95 choosing preferences, 97 column setup, 98 previewing and printing, 99 selecting, 96 reprice, 94 resource view managing cost information, 37 source tag, 37 resource views, 14 resources, 17, 55 S sales tax, 61 saving queries, 77 selecting reports, 96 sheet panel, 7 show all folders, 8 show data in tree, 9 show folder tags, 33 showing costs in the tree panel, 9 software requirements for linking to Excel, 109 source tag, 37 source tags, 83 stack windows in cascade, 8 subcontractors defining, 67 summary information dialog box databases tab, 93 general tab, 21 project notes tab, 23 select fields tab, 22 system requirements where to find, vii, 1 T tabs, 12 task item forms, 11 tasks, 8 adding, 30 adding assemblies, 52 adding from a costbook database, 31 adding from the CostBook Database, 32 adding user-defined, 35 133 Index copying equipment items, 31 sort by CSI division, 82 technical support, 4 templates, 20 tile windows horizontally, 8 tile windows vertically, 8 tree panel, 7 showing costs, 9 tabs, 12 U unassigned folder, 38, 82 update labor rates, 94 use MS Excel value times, 106 use parent quantity times, 106 use quantity entered, 106 use single tab, 12 user-defined tasks 134 BSD CostLink/CM User Manual adding, 35 copying into project, 50 V vendors, 45 view pulldown, 13 =? icon, 14 viewing s aved query results, 78 views, 13 overview, 3 unassigned folder, 38 visible levels default value, 8 W windows, 6 working with queries, 75