1
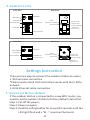
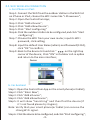
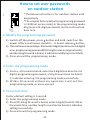
SVT-IP Video Intercom System A/B
User Manual
Please read this user manual prior to installing the system, and keep it well for future use.
Quick Start Guide
1. INSTALLATION
Install outdoor sta on on the wall as shown below and then wire
it up.
Screws
Back case
Plas c wall plug
System
Wiring
Screws
Plas c wall plug
Screws
System
Wiring
Rain Cover
2. CONTROLCAM SETUP
Android users can download ControlCam App from Google Play;
while iOS users can download it from iOS App Store; Complete
the installa on in your smart phone(or tablet).
Tip: Both download and usage for users are free!
*Please make sure the outdoor sta on in the range of your network
*Please keep your app be the latest version. App herein subject to
change without prior no ce.
-1-
3. NOMENCLATURE
Rear View
Front View
LED Light
Speaker
Camera
Name Plate
Call Button
RJ45
Ethernet Cable
Antenna
Keypad
Door bell
Exit Button
Power Supply
Electric
Door Lock
Microphone
Rear View
Front View
LED Light
Speaker
Camera
Name Plate
Call Button
Microphone
RJ45
Ethernet Cable
Antenna
Door bell
Exit Button
Power Supply
Electric
Door Lock
Se ngs Instruc on
There are two ways to connect the outdoor sta on to router,
1. WiFi wireless connec on
*Please kindly noted that ControlCam works with the 2.4Ghz
network.
2. RJ45 Ethernet cable connec on
1. How to set factory default
If the outdoor sta on is connected to a new WiFi router, you
need to set the outdoor sta on to factory default status first.
Step 1: Cut off the power;
Step 2: Power on again;
Step 3: Hold the calling bu on for around 45 seconds un l the
LED light flash and a “Bi...” sound will be heard.
-2-
2.1 WIFI WIRELESS CONNECTION
a. For iPhone or iPad:
Step 1: Connect the WiFi from the outdoor sta on in the WiFi list
on iPhone or iPad; choose the WiFi name like “LIDxxxxxxxx”;
Step 2: Open the ControlCam App;
Step 3: Click “Add a Device”;
Step 4: Click “Add a New Device”;
Step 5: Click “Start configuring”
Step 6: Click the outdoor sta on to be configured,and click “Start
configuring”;
Step 7: Choose the WiFi from your own router, input its WiFi
password, click se ng;
Step 8: Input the default User Name (admin) and Password(1234),
click “OK” to confirm;
Step 9: Back to the device list and click “
” on the right top
corner of the device; Click “ON” in Outdoor call-in op on
and return to the main interface;
b. For Android
Step 1: Open the ControlCam App on the smart phone(or tablet);
Step 2: Click “Enter Now”;
Step 3: Click “Add a Device”;
Step 4: Click “Add a New Device”;
Step 5: It will show “Searching ” and then find the device(if
it ’s not found please try it again);
Note: Verify that your smart phone(or tablet) can receive the
strong W i F i signal.
Step 6: Click the device to be configured, and click “Start configuring”;
-3-
Step 7: Set WiFi informa on;
Input the WiFi password and wait 100 seconds.
Step 8: It will show “Configura on is successful please add the
device to the phone”, then click “OK” to confirm;
Step 9: Input the default User Name (admin) and Password(1234),
click “OK” to confirm;
Step 10: Click “OK” , the device is added successfully;
Step 11: Back to the device list and click “· · · ” on the right top
corner of the device; Click “ON” in Outdoor call-in op on
and return to the main interface;
2.2 RJ45 ETHERNET CABLE CONNECTION
If you want to connect the outdoor sta on with RJ45 Ethernet cable
for longer distance, please follow the below steps,
Note: make sure the outdoor sta on is already connected to your
smart phone by WiFi. Don’t remove the antenna during below
se ngs.
Step 1: Login you router se ng page to find the IP address of the
outdoor unit.
Step2: Enter the above IP address by Internet Explorer to IP Camera
login page. Login with default User Name: admin; Password: 1234.
(Same password as the one in ControlCam applica on).
-4-
Step 3: Click Config – Network Se ngs – L A N– Set I P and
Gateway as the same segment as your LAN network (for example,
if your LAN network gateway is 192.168.0.1, set IP to the same
segment as LAN network gateway, here set as the same as the
found WiFi IP address 192.168.0.88)
Step 4:
A er comple ng the above se ngs, connect your outdoor sta on
with the Ethernet cable to the router. You can remove the antenna.
Then the se ng is OK.
Note: On the page of IP camera configura on, you can do many
advanced se ngs. For example, you can set the date and me
by clicking Config – System – System me; You can ac vate mo on
detec on func on by clicking Config – Alarm Se ng – Mo on
Detec on - Enable. Please note most se ngs need professional
network knowledge. Please do not do any se ng if you are not
sure about.
-5-
3. How to add more smart phones(or tablets) to the
network outdoor sta on
Step 1: Open the ControlCam App on the smart phone (or tablet);
Step 2: Click “Enter Now”;
Step 3: Click “Add a Network Device”;
There are three ways to add the network outdoor sta on:
a . LAN Search
Click “L A N Search”, then click the found device, input the
default User Name and Password. Click “O K”, the device is
added successfully.
b . QR Code Scan
Click “Q R Code Scan”, input the default User Name and
Password. Click “OK”, the outdoor sta on is added successfully.
c . Manually Input
Click “Manually Input”, input the outdoor sta on’ GID, the
default User Name and Password. Click “OK”, the device is added
successfully.
Step 4: Click “·
” on the right top corner;
Step 5: Click “ON” in Outdoor call-in op on and return to the
main interface.
Note:
1). Each outdoor sta on has a unique GID ;
2). The default user name is “admin” ;
3). The default password is “1234”.
User Guide
1. Talking
When the visitor calls, the device will receive the ring alert. The
user can click “Accept” or “decline” on the pop-up call alert.
Press and hold“ ” to start talking and release to listen.
2. Unlocking
Input unlock password while talking or monitoring. (Same
as the user name password ).
-6-
3. Monitoring
Click the image on the main interface to monitor the outside
environment. If you want to talk with the visitor and hear the sound,
click the icon
and
on the screen to start talking.
4. Image Capture
Click the icon
to capture an image.
5. Video Recording
Click the icon
to end it.
to start video recording and then click the icon
6. How to detele the device
Step 1:Click “
”on the right top corner of the device;
Step 2:Click “OFF” in Outdoor call-in op on;
Step 3:Click “Edit”;
Step 4:Click “Delete”;
Step 5:Click “OK” to delete the device.
7. Change unlock passwords
Step 1: Click “
” on the right top corner;
click “OFF” for outdoor Call-in op on;
Step2:click “unlock password se ng ”;
Step3:Input old password and new
password;
Step4: click “Se ng” to finish se ng. (Shown
as the photo at the right side).
-7-
How to set user passwords
on outdoor sta on
1.
*The below instruc on is for outdoor sta on with
keypad only.
*The original factory default programming password
is 1234(not access code).In the programming mode,
40 groups of 4-digit passwords can be set to unlock
door lock.
2. Modify the programming password
1). Switch off the power, press button and hold, switch on the
power. After a continuous sound Di....is heard, release button;
2). The continuous sound stops, then enter 4 digits (can be set as 2-6 digits)
new programming password(the length same as original code);
another long Di sound is heard, it indicates modifying successfully.
3). Press * to exit the programming mode.
3. Enter the programming mode
1). Press * , a Di sound is heard, enter the 4 digits(can be set as 2-6
digits) programming password, a long Di sound can be heard,
It indicates entering the programming mode successfully.
2). Within 30 seconds without any operation it will exit the
programming mode, or press * to exit.
4. Set unlock me
Factory default se ng is 1 second.
1). Enter the programming mode .
2). Press 00, along Di sound is heard, enter 2 digits (from 01-99) as
the unlock me, another long Di sound can be heard, it indicates
se ng successfully.
3). Press * to exit the programming mode.
-8-
5. Add user passwords
1). Enter the programming mode .
2). Enter 2 digits from 01-40 (the digits 31-40 are for normal open
or normal close, these digits are not allowed to set the unlocking
me) , along Di sound is heard.
3). Press 4 digits (can be 2-6 digits) password, another long Di sound
can be heard, it indicates adding successfully.
4). Press * to exit the programming mode.
6. Delete user passwords
1). Enter the programming mode .
2). Enter 2 digits (from 01-40), along Di sound is heard, press *
to confirm, another long Di sound can be heard, it indicates
deleting successfully.
3). Press * to exit the programming mode.
7. Delete user passwords directly
1). Enter the programming mode .
2). Press # , when DiDi sound is heard, enter that 4 digits (can be
set as 2-6 digits) password you want to delete, a long Di sound
can be heard, it indicates deleting successfully.
3). Press * to exit the programming mode.
8. Se ng the length of password
1). Enter the programming mode .
2). Press 99, a long Di sound is heard, then enter 2-6 digits, another
long Di sound can be heard, it indicates se ng successfully.
3). Press * to exit the programming mode.
-9-
9. Delete all settings
1). Enter the programming mode .
2). Press #, when a DiDi sound is heard, press # again, along Di
Sound can be heard, then press # for 7 times, after 3 seconds,
another long Di sound will be heard, it indicates deleting
successfully (The unlock time changes to 1 second and
the programming password does not change).
3). Press * to exit the programming mode.
10. Restore factory mode
Switch off the power, press # and hold, switch on the power. After a
long Di sound is heard, then release #, restoring successfully. (the
system restore factory programming password 1234 and clear
our all the set passwords)
-10-
The design and specifications of this user manual can be changed without any notification
to the user. All copyright and interpretation rights are reserved to SVT Innovations Inc.