1
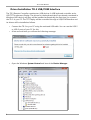
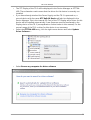
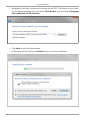
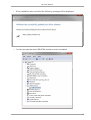
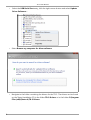
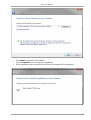
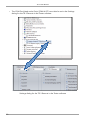
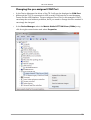
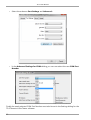
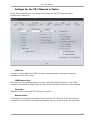
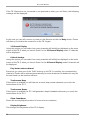
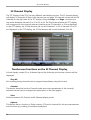
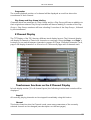
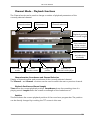
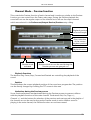
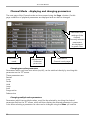
TR-3
Remote Control
User Manual
Teatro Version 4.7.0
8/2015
© 2015 R.O.S. Software
TR-3 User Manual
SOFTWARE LIMITED WARRANTY
To the original customer purchasing this product in the first instance only,
R.O.S. provides the following warranties:
30 Day Satisfaction Guarantee. If you are dissatisfied with the Software for any
reason we will refund your money for a period of 30 days from the date of
original purchase.
R.O.S. warrants that the Software will perform in substantial compliance with the
documentation supplied with the Software. If a material defect in the Software
is found, you may return the Software to us for a refund. In no event will such a
refund exceed the purchase price of the Software. This is your sole and exclusive
remedy for any breach of warranty during this 30 day period.
R.O.S. does not warrant that the Software will meet your requirements, that
operation of the Software will be uninterrupted or error-free, or that all
Software errors will be corrected. R.O.S. is not responsible for problems caused
by changes in the operating characteristics of computer hardware or computer
operating systems which are made after the release of the Software nor for
problems in the interaction of the Software with other software. R.O.S. will have
no responsibility to replace or refund the license fee of media damaged by
accident, abuse or misapplication.
Programming & Distribution:
R.O.S. Software
www.ros-software.de
email: [email protected]
Windows XP/7/8/10 are Trademarks of Microsoft Corporation
1
TR-3 User Manual
2
TR-3 User Manual
Contents
Driver Installation TR-3 USB/COM Interface....................................................................................... 4
Changing the pre-assigned COM Port................................................................................................ 11
Settings for the TR-3 Remote in Teatro............................................................................................... 13
TFT Calibration............................................................................................................................................. 15
Firmware Update......................................................................................................................................... 15
32 Channel Display..................................................................................................................................... 16
8 Channel Display........................................................................................................................................ 17
Preset display and selection.................................................................................................................... 18
Channel Mode - Playback functions.................................................................................................... 19
Channel Mode - Preview function........................................................................................................ 21
Channel Mode - displaying and changing parameters................................................................22
Technical Notes............................................................................................................................................ 24
3
TR-3 User Manual
Driver Installation TR-3 USB/COM Interface
The TR-3 Remote Controller contains two USB devices. A USB keyboard controller and a
USB TFT Touchscreen Display. The drivers for the keyboard device are already contained in
Windows (HID device) and they will be installed automatically the first time you connect
the TR-3 to your PC. The TFT Display will be controlled through a USB/COM Interface and
its drivers will be installed as follows.
•
Connect the TR-3 to your PC using the enclosed USB cable. You can use the USB-2
or USB-3 ports of your PC for this.
A few seconds later you will see the following message:
•
Open the Windows System Control and launch the Device Manager:
•
4
TR-3 User Manual
•
•
•
•
The TFT Display of the TR-3 will be displayed in the Device Manager as GTT70AUSB. The exclamation mark means that the driver for this device is currently not
installed.
If you have already attached the Power Supply and the TR-3 is powered on, a
second device with the name GTT Bulk-IO Device will also be displayed in the
Device Manager. This is the internal SD-Card of the TFT Display and a driver for this
device will be installed automatically if new firmware must be transferred to the
Display device of the TR-3 (see explanation further below in this manual). For the
normal usage of the TR-3 a driver for this device is not necessary.
Select the GTT70A-USB entry, click the right mouse button and select Update
Driver Software…:
Select Browse my computer for driver software
5
TR-3 User Manual
6
•
Navigate to the folder containing the drivers for the TR-3. The drivers can be found
on the Teatro Installation CD in the folder TR-3 Drivers or in the folder C:\Program
Files (x86)\Teatro 4\TR-3 Drivers
•
•
Click Next to start the driver search.
If the driver was found click the Install button to start the installation.
TR-3 User Manual
•
If the installation was successful the following message will be displayed:
•
In the next step the serial USB/COM interface must be installed.
7
TR-3 User Manual
8
•
Select the USB Serial Port entry, click the right mouse button and select Update
Driver Software…:
•
Select Browse my computer for driver software
•
Navigate to the folder containing the drivers for the TR-3. The drivers can be found
on the Teatro Installation CD in the folder TR-3 Drivers or in the folder C:\Program
Files (x86)\Teatro 4\TR-3 Drivers
TR-3 User Manual
•
•
•
Click Next to start the driver search.
Click the Install button to start the installation.
If the installation was successful the following message will be displayed:
9
TR-3 User Manual
•
The COM-Port listed under Ports (COM & LPT) must also be set in the Settings
dialog for the TR-3 Remote in the Teatro software.
Settings dialog for the TR-3 Remote in the Teatro software
10
TR-3 User Manual
Changing the pre-assigned COM Port
•
•
In the Device Manager the driver of the TR-3 will now be displayed as COM Port.
Allthough the TR-3 is connected via USB, a serial COM protocol is used between
Teatro and the USB Interface. The pre-assigned Com-Port (in this example COM7),
can always be used without problems, but if you need to change the Port number it
can simply be changed.
•
In the Device Manager select the Matrix Orbital GTT70A Driver (COMx) entry,
click the right mouse button and select Properties
11
TR-3 User Manual
•
Select the submenu Port Settings and Advanced...
•
In the Advanced Settings for COMx dialog you can now select the new COM Port
Number.
Finally the newly selected COM Port Number must also be set in the Settings dialog for the
TR-3 Remote in the Teatro software.
12
TR-3 User Manual
Settings for the TR-3 Remote in Teatro
In the Teatro software you can change the settings for the TR-3 Remote under
Preferences/TR Remote:
COM Port
Here you need to select the COM Port which was assigned or changed during the
installation of the TR-3 driver.
COM Interval (ms)
On slower PC's it may be necessary to slow down the polling frequency of the COM
interface. Normally the default value of 10ms should be okay and must not be changed.
Controller
Selection of the connected TR-3 Remote Controller.
Remote active
This initiates the connection between Teatro and the TR-3 Remote. If the Remote was
actived here, it will also be actived automatically when you launch Teatro the next time.
13
TR-3 User Manual
If the TR-3 Remote is not connected or not powered on when you run Teatro, the following
message will be displayed:
In this case you can still connect or power on the Remote and hit the Retry button. Teatro
will then try to initiate the connection to the TR-3 again.
32 Channel Display
Using this option you can select how many channels will initially be displayed on the main
screen of the TR-3, when you launch Teatro. In the 32 Channel Display mode 32 channels
will be displayed.
8 Kanal Anzeige
Using this option you can select how many channels will initially be displayed on the main
screen of the TR-3, when you launch Teatro. In the 8 Channel Display mode 8 channels will
be displayed.
Play button selects channel
Everytime you press one of the 'PLAY' buttons on the TR-3 controller, the corresponding
channel in Teatro will be selected automatically. In some situations this behaviour may not
be useful and can be switched off here.
Touchscreen Beep
If this option is enabled you will hear an acoustic beep sound whenever you touch the
touchscreen of the TR-3.
Touchscreen Buzzer
If this option is enabled the TR-3 will generate a haptic feedback whenever you touch the
touchscreen of the TR-3.
Show Countdown
Shows the actual playback position of a sound as a countdown.
Display Brightness
This changes the brightness of the TR-3 display.
14
TR-3 User Manual
Keyboard Backlight
This changes the brightness of the blue keyboard backlight.
TFT Calibration
If one or more of the touchscreen functions will not trigger properly it could be necessary
to calibrate the TR-3 touchscreen.
In this case click the button TFT Calibration and follow the instructions on the TFT display.
The calibration process was successful if a message on the display says „Calibrated!“.
If the message says „Calibration Error“ you must repeat the process.
It is recommended to carry out the calibration process using a dedicated TFT-Stylus pen,
because it will make it possible to select the calibration marks on the TFT screen much
more precisly. Do not use any sharp or spiky objects for the calibration as these can
damage the TFT screen permanently.
Firmware Update
This function will update the internal operating software of the TFT display to a newer
version. If future versions of the Teatro software will offer new features which may need
additional TFT display software, you will be notified after installing and running a new
Teatro version, because Teatro checks the TR-3 firmware revision everytime you launch
Teatro. If a firmware update of the TR-3 is necessary, click the button Firmware Update
and follow the on-screen instructions of the Teatro software.
15
TR-3 User Manual
32 Channel Display
The TFT Display of the TR-3 has two different track display layouts. The 32 channel display
will display 32 channels of Teatro's 64 channels on one page. 16 channels on the left and 16
channels on the right side of the TFT display. Using the Page - and Page + buttons you
can switch between channels 1 to 32 or 33 to 64. The Play buttons below the TFT display
will correspond to the currently selected channel group. If channels 1 to 32 are displayed
on the TFT display, the 32 Play buttons will control channels 1 to 32. If channels 33 to 64
are displayed on the TFT display, the 32 Play buttons will control channels 33 to 64.
Touchscreen functions on the 32 Channel Display
In both display modes (32 or 8 channel layout) the following touchscreen controls will be
displayed.
Stop All
All currently playing channels can be stopped immediately using this button.
Channel
This button branches into the Channel mode, were many parameters of the currently
selected channel can be changed (see description on the next pages).
View
Switches between 32-Channel and 8-Channel display mode.
Options
This button has no function in Teatro version 4.7.0 and is reserved for future enhancements
and functions (e.g. loading of sounds and playlists).
16
TR-3 User Manual
Progressbar
The current playback position of a channel will be displayed as a red line above the
soundname of each channel.
Play Group and Stop Group labeling
Channels which are members of a Stop Group and/or a Play Group will have an addition to
their original soundname. Play Group members will have a leading P<number of the Play
Group>, Stop Group members will have a leading S<number of the Stop Group>, followed
by the soundname.
8 Channel Display
The TFT Display of the TR-3 has two different track display layouts. The 8 channel display
will display 8 channels of Teatro's 64 channels on one page. Using the Page - and Page +
buttons you can switch between channels in groups of 8. Page 1 will show channels 1 to 8,
page 2 will display channels 9 to 16 and so on. There are 8 pages with 8 channels each.
Touchscreen functions on the 8 Channel Display
In both display modes (32 or 8 channel layout) the following touchscreen controls will be
displayed.
Stop All
All currently playing channels can be stopped immediately using this button.
Channel
This button branches into the Channel mode, were many parameters of the currently
selected channel can be changed (see description on the next pages).
17
TR-3 User Manual
View
Switches between 32-Channel and 8-Channel display mode.
Options
This button has no function in Teatro version 4.7.0 and is reserved for future enhancements
and functions (e.g. loading of sounds and playlists).
Progressbar
The current playback position of a channel will be displayed as a red line above the
soundname of each channel.
Play Group and Stop Group labeling
Channels which are members of a Stop Group and/or a Play Group will have an addition to
their original soundname. Play Group members will have a leading P<number of the Play
Group>, Stop Group members will have a leading S<number of the Stop Group>, followed
by the soundname.
Preset display and selection
In both display layout modes (32 or 8 channel mode) the buttons Preset - and Preset +,
which are located in the upper area of the TFT display, can be used to select the Presets of
a loaded Playlist. The name of the currently selected Preset is displayed in bold letters to
the left of the Preset +/- buttons. Following or preceding Presets in the Playlist are
displayed in a smaller font above and below the loaded Preset name.
Display of Preset name and selection of Presets
18
TR-3 User Manual
Channel Mode - Playback functions
The Channel mode can be used to change a number of playback parameters of the
currently selected channel.
Channelnumber
Soundname
Channel selection
Playback position
and sound length
Direct selection
of the current
playback position
Playback buttons
and selection
of sounds
Exit Channel
mode
Activate
Preview mode
Finding Cue
points
Selection of
Channel mode pages
Channelnumber, Soundname and Channel Selection
Display of channelnumber and soundname of the currently selected channel.
The Channel - and Channel + buttons can be used to select the next or previous channel.
Playback Position and Sound Length
Time shows the current playback position. Countdown shows the remaining time of a
playing sound. Length shows the overall soundlength of the loaded sound.
Position
This field shows the current playback position of the sound as a progress bar. The position
can be directly changed by touching the TFT screen in this area.
19
TR-3 User Manual
Playback Functions
The buttons Play, Pause, Stop, Forward and Rewind are controlling the playback of the
sound. The two buttons Previous and Next to the right can be used to select the previous
or the next sound of a channels soundlist.
Preview
Switches to the Preview mode of the channel (see description below).
Cue
This button controls the Cue function of each channel (see full explanation in the Teatro
manual).
Page Selection
The Page +/- buttons are selecting the individual pages of the Channel mode.
Exit
This will let you go back to the 8 or 32 channel display. The current Channel mode page
will be stored, so you can come back to this page from the main display directly.
20
TR-3 User Manual
Channel Mode - Preview function
This controls the Preview function of each channel and it works very similar to the Preview
function you can control from the Teatro main page. During the Preview playback the
sound will not use the regular output of the channel but it will use the output channel
which was selected in the Preferences/Output Devices/Preview setup dialog.
Playback position
and sound length
Direct selection
of the current
playback position
Playback buttons
Preview mode
activated
Buttons which can not be used during the
Preview process are greayed out
Playback Functions
The buttons Play, Pause, Stop, Forward and Rewind are controlling the playback of the
sound.
Position
This field shows the current playback position of the sound as a progress bar. The position
can be directly changed by touching the TFT screen in this area.
Limitations during the Preview process
Some functions/buttons are deactivated during the Preview process to prevent collision
with the playback functions of the main channel. The buttons Exit, Cue, Page +/-,
Channel +/- and the buttons for selection of the previous and next sounds in the playlist of
the channel can not be used as long as the Preview mode is active. While a sound is
playing in the main channel, the Preview function can not be accessed.
21
TR-3 User Manual
Channel Mode - displaying and changing parameters
The next page of the Channel mode can be accessed using the Page + button. On this
page a selection of playback parameters are displayed and can also be changed.
Parameters and
settings of the
channel.
Currently selected
parameters
are displayed
in green color.
Exit Channel
mode
Adjustment of
a selected
parameter
Selection of
Channel mode pages
Changing two-value parameters
Parameters which only have two values (on/off), can be switched directly by touching this
parameter on the TFT screen.
These parameters are:
Restart
Loop
Pause
Hold
Jump
Auto
Range active
Fades active
Changing multiple-value parameters
Parameters which have multiple values, must first be selected by touching the desired
parameter field on the TFT screen, which will then display the selected parameter in green
color. After selecting a parameter its value can be changed using the Value +/- buttons
22
TR-3 User Manual
The following parameters are having multiple values:
Fade-In
Fade-In Curve
Fade-Out
Fade-Out Curve
Play Group
Stop Group
Volume
Panning
Varispeed
Page selection
The Page +/- buttons are selecting the individual pages of the Channel mode.
Exit
This will let you go back to the 8 or 32 channel display. The current Channel mode page
will be stored, so you can come back to this page from the main display directly.
23
TR-3 User Manual
Technical Notes
Power Supply
To operate the TR-3 remote controller it must be connected to a 12Volt / 2Amp. power
supply which comes with your TR-3.
The connector is using a standard XLR type.
Pin 1 = + terminal of the power supply
Pin 5 = - terminal of the power supply
TFT Screen
Do not clean the TFT screen using agressive cleaning liquids.
A soft cloth with cleaning liquid or cleaning wipes for PC monitor screens are
recommended.
USB Cable
The TR-3 should be connected using standard computer USB cables which should not
exceed 2mtrs. in length. A suitable cable comes with your TR-3.
24