1
ScreenBeam Mini
Wireless Display
Receiver
Model#: SBWD50A
User Manual
V1.0
Table of Contents
Chapter One.
Getting Started.......................................................................................................... 1
Introduction .................................................................................................................................. 1
Package Contents.......................................................................................................................... 1
System Requirements ................................................................................................................... 1
Receiver ................................................................................................................................ 1
Compatible Devices .............................................................................................................. 1
Chapter Two.
Installing the Receiver ............................................................................................... 2
Connecting the Receiver to an HDTV ............................................................................................ 2
Chapter Three.
Setting Up for the First Time ................................................................................. 4
Connecting via Intel WiDi App ...................................................................................................... 4
Adjusting the HDTV Picture .................................................................................................. 7
WiDi Software Version Support ............................................................................................ 9
Connecting via Windows 8.1+ .................................................................................................... 10
Connecting via Miracast™ ........................................................................................................... 13
Tips for Optimal Performance..................................................................................................... 13
Chapter Four.
Display and Control Options ................................................................................... 14
Display Mode .............................................................................................................................. 14
Ultra-Low Delay .......................................................................................................................... 15
Intel WiDi 3.5 and higher .................................................................................................... 15
NVIDIA Shield ...................................................................................................................... 16
Restore to Default ....................................................................................................................... 16
Chapter Five.
Configuring and Upgrading ScreenBeam Mini ........................................................ 17
Installing ScreenBeam Configuration Utility ............................................................................... 17
Installation in Windows 8.1 ................................................................................................ 17
Installation in Windows 7/8 ................................................................................................ 19
Preparing Your System ................................................................................................................ 21
Wireless Mode .................................................................................................................... 21
USB Mode ........................................................................................................................... 22
Configuring ScreenBeam Mini .................................................................................................... 23
Wireless Mode .................................................................................................................... 23
USB Mode ........................................................................................................................... 27
Upgrading ScreenBeam Mini ...................................................................................................... 29
Wireless Mode .................................................................................................................... 29
USB Mode ........................................................................................................................... 30
Manual Firmware Upgrade ................................................................................................. 33
Appendix I. Troubleshooting and FAQs .......................................................................................... 34
Troubleshooting .......................................................................................................................... 34
FAQs ............................................................................................................................................ 36
Appendix II. Specifications .............................................................................................................. 42
Appendix III.
Notices .................................................................................................................... 43
Warranty ..................................................................................................................................... 43
GPL Info....................................................................................................................................... 43
EU CE Declaration of Conformity ................................................................................................ 43
Technical Support ....................................................................................................................... 44
Chapter One. Getting Started
Introduction
Congratulations on your purchase of Actiontec’s ScreenBeam Mini Wireless Display
Receiver (hereinafter refer to as “the Receiver”).
The Receiver lets you wirelessly streams what’s on your Intel WiDi or Miracast™ compatible
device to your HDTV, including movies, videos, photos, music, and more. The Receiver
frees your eyes from a tiny screen.
The Receiver boasts some great features, including fast setup, smooth video playback, full
1080p HD support, ultra-low delay, Windows 8.1 optimization, versatile compatibility, low
power consumption, and more.
This user manual will take you through the procedures needed to install, connect to, operate,
configure, and upgrade the Receiver, and also describe a few different possible scenarios
about locating faults.
Package Contents
Contents in the Receiver’s package are listed below:
• ScreenBeam Mini Wireless Display Receiver (1)
• USB Cable (1)
• HDMI® Cable (1)
• AC Power Adapter
• Product documentation
System Requirements
Receiver
To install the Receiver, you must have the following items:
•
A display device with one HDMI port (Type A) and one USB port (USB 2.0) available
Compatible Devices
The Receiver connects with devices that run one of the following operating systems:
•
•
•
•
4th Gen Ultrabook with Intel WiDi 4.0 or higher
Laptop or notebook with Intel WiDi 3.5 or higher
Smartphone, tablet, or laptop running Windows 8.1 or higher
Miracast™-enabled Android device
1
Chapter Two. Installing the
Receiver
This chapter explains how
ow to connect the Receiver to an HDTV. Make sure you have all the
contents from the Receiver’s package available before starting.
Connecting the Receiver to an HDTV
It is quite easy and fast to setup the Receiver
Receiver.. You can complete the connection in just one
on
minute.
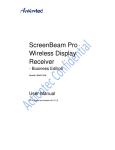
To connect the Receiver to an HDTV:
1. Get the Receiver, USB cable
cable, and HDMI cable from the Receiver’s package.
2. Plug the male connector (smaller end) of the USB cable to the Receiver’s micro USB
port labeled "Power".
3. Plug the Receiver into an available HDMI port on your HDTV.
4. Plug the male connector (larger end) of the USB cable to a USB port on your HDTV.
When Steps 1, 2, 3, and 4 are complete, the hardware should be connected as shown
in the figure below:
5.
6.
Turn on the HDTV and set it to disp
display
lay the input from the correct HDMI port (the one you
have the Receiver plugged into in Step 3).
Verify that the “Ready To Connect
Connect” screen appears on the HDTV.
2
The Receiver is connected to the HDTV, and it is ready for use.
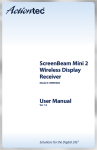
Note:
l If you cannot plug the Receiver into an HDMI port on your HDTV (due to component
interference, or a poorly accessible port), use the supplied HDMI cable to connect the
Receiver. The connection is shown in the figure below:
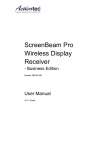
l
If there is no available USB port on your HDTV, you can power the Receiver with an AC
power adapter, as shown below:
3
Chapter Three. Setting Up for the
First Time
This chapter explains how to connect the Receiver for the first time to the source device.
There are three source device options: Intel WiDi, Windows 8.1+, and Miracast™.
Note: The Receiver works in the 2.4 GHz wireless band only. Make sure your device is not
connected to a 5 GHz access point (AP) prior to connecting to the Receiver.
Connecting via Intel WiDi App
This section explains how to connect a device running Intel's WiDi application to the
Receiver.
Note: If the device's operating system is Windows 8.1 or higher, go to the next section in this
manual ("Connecting via Windows 8.1+") for connection instructions.
Follow the procedure below to connect your device to the Receiver:
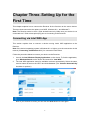
1. Launch the Intel Wireless Display Application on the device. To find the application,
go to Windows Search on the device and search for “Intel WiDi.”
2. The Intel WiDi application scans for available receivers automatically. Select the same
receiver name as seen on the HDTV and click Connect. (The “Connect Automatically”
checkbox is optional.)
Note: If your receiver is found, you can click the Scan button to scan again.
4
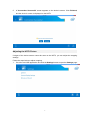
3.
Wait until the Receiver displays a PIN on the HDTV, and a PIN entry box is displayed on
the screen of the WiDi device. Enter the PIN in the PIN entry box on the WiDi device,
and then click Continue.
5
4.
The HDTV displays messages to show the status of the connection.
6
5.
A "Connection Successful" screen appears on the device's screen. Click Finished,
and the device’s screen is displayed on the HDTV.
Adjusting the HDTV Picture
If edges of the device screen cannot be seen on the HDTV, you can adjust the cropping
settings.
Follow the steps below to adjust cropping:
1. Go to the Intel WiDi application and click the Settings button to open the Settings page.
7
2.
Go to the "Picture and Sound" section, and select “Adjust cropping”.
3.
Adjust the HDTV picture by clicking “+” (plus) or “-“ (minus).
8
WiDi Software Version Support
Make sure the device supports Intel Wireless Display (WiDi) software version 3.5 or higher.
To find out which version of Intel WiDi the device is running, launch the Intel WiDi application
and click the Help button, and then navigate to the "About Intel® WiDi" section. To obtain
the latest Intel WiDi software and drivers, go to:
http://www.intel.com/go/wirelessdisplayupdate; or directly click the Check Intel® WiDi
website for updates link on the page.
9
Connecting via Windows 8.1+
This section explains how to connect a device running Windows 8.1 or higher to the
Receiver.
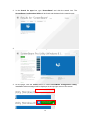
1. From the Windows desktop, go to the Charms menu and select Devices to open the
Devices menu. You can also use the shortcut keys, Windows logo + K.
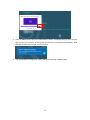
2.
From the Devices menu, click Project.
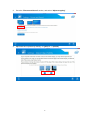
3.
From the Project menu, select Add a wireless display. Windows will search for
available devices.
10
4.
Select an appropriate Receiver from the device list.
5.
Enter the PIN code that is displayed on the television screen, and then click
lick Next to
continue.
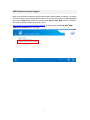
6.
The HDTV displays messages to show the status of the connection.
11
7.
The device has connected to the Receiver. And the device’s screen is displayed on the
HDTV.
Note: If you are running Windows 8.1 and the screens above do not appear, go to
http://www.actiontec.com/widi81 for the latest software update. Or, you can update your
Windows 8.1 via the Windows Update application.
12
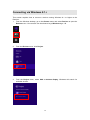
Connecting via Miracast™
This section explains how to connect a Miracast™-enabled Android device, such as a
smartphone, a tablet, or a game console, to the Receiver. For the best performance, the
Miracast™ device should be running the latest software.
1. On a Miracast™-enabled Android device, locate and open the Wireless Display
Application (check for the application under “Settings”).
Note: The name of the Wireless Display Application depends on the device type and model.
Refer to the device's user manual for more details.
2. The Wireless Display Application scans for available devices. Select the Receiver from
the device list. You may be required to enter a PIN code, which is displayed on the
HDTV screen.
3. Wait for the device to pair with the Receiver. When it does, the device's screen will be
displayed on the HDTV.
Tips for Optimal Performance
For optimal performance, you should keep these rules in mind:
•
Keep the Receiver within line-of-sight of the source device. Doing this will help ensure
the Receiver receives the best possible signal.
•
The Receiver's optimal wireless range is within 15 feet of the source device. However,
actual range and effectiveness depends on many factors, including other sources of
interference and the building materials used in the surrounding structure.
13
Chapter Four. Display and
Control Options
This chapter describes the various display modes and control options that are supported by
the Receiver.
Display Mode
The Receiver supports three display modes when connected with a compatible wireless
display application (Intel WiDi or Windows 8.1 Project, for example). In Windows, press the
Windows logo + P keys simultaneously to launch the display options and select the desired
display mode from the options.
l Duplicate
The Duplicate mode is used to display the same content on both the device's screen and
the HDTV simultaneously.
Note: There may be minor delay between the content displayed on the HDTV screen
compared to the device’s screen. This is due to the current state of wireless display
technology.
l Extend
The Extend mode creates a single, extended "screen" between the source device and the
HDTV. When in Extend mode, dragging windows to the right side of the device's screen
displays those windows on the HDTV, while dragging windows to the left of the HDTV
screen displays them back on the device's screen. This mode allows users to display
selected content on the HDTV, while all other windows remain on the device's screen. When
this mode is first selected, the HDTV displays only the Windows desktop.
l Second Screen Only
The Second Screen Only mode causes the HDTV to be the only display for the device.
You’ll see everything on the connected screen, and your device’s screen will be blank.
14
Ultra-Low Delay
The Receiver also supports Ultra-Low Delay mode, which helps reduce end-to-end wireless
display latency. Real-time applications, such as games, can run without noticeable delay
when Ultra-Low Delay mode is enabled on supported devices.
Intel WiDi 3.5 and higher
To activate Ultra-Low Delay on a device running Intel WiDi 3.5 or higher, follow the steps
below:
1. Launch the Intel WiDi application, connect to the Receiver you are using, and then click
the Settings button.
2.
On the "Settings" screen, select Current Display Settings.
3.
Select Prioritize Speed on the "Quality vs. Speed" section and click the Apply
Settings button. Refer to Intel's support documentation for more information.
15
NVIDIA Shield
Follow the steps below to achieve ultra low delay on NVIDIA Shield:
1. Go to "Settings", and then select Miracast.
2. Tap on the toggle switch to turn "Game Mode" on.
Note: The output resolution will reset to 720P once this mode is enabled. Refer to the
device's user manual for more information.
Restore to Default
To restore the Receiver's default factory settings:
1. Power on the Receiver, and wait until the "Ready to Connect" screen appears.
2. Hold down the Receiver's "Reset" button.
3. When the "Reset to Default" screen appears on the HDTV, release the "Reset" button.
The Receiver reboots, and it will be running with its default settings.
16
Chapter Five. Configuring and
Upgrading ScreenBeam Mini
Actiontec’s ScreenBeam Configuration Utility allows the configuration and upgrade of
Actiontec ScreenBeam series receivers, by using either P2P wireless or USB flash drive.
There are two versions available: for Windows 8.1 and for Windows 7/8.
Installing ScreenBeam Configuration Utility
Installation in Windows 8.1
l
System Requirements
Recommended system requirements for installing the ScreenBeam Configuration Utility
(Windows 8.1) are listed below:
•
•
•
•
Operating System: Windows 8.1
CPU: x86, x64, ARM
Wi-Fi and Graphics Card: Compatible with Microsoft Windows 8.1 Project
Internet connectivity
l Installing ScreenBeam Configuration Utility
The ScreenBeam Configuration Utility for Windows 8.1 is available on the Microsoft Store.
Follow the procedure below to install the ScreenBeam Configuration Utility:
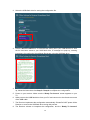
1. Launch the Microsoft Store application in Windows 8.1.
17
2. In the Search for apps box, type “ScreenBeam” and click the search icon. The
ScreenBeam Configuration Utility will be found and displayed in the search result.
3. Click the ScreenBeam Configuration Utility tile to view details.
4. On the page, click the Install button to install ScreenBeam Configuration Utility.
Installation status messages will be displayed in the top right corner of the screen.
18
After the app is installed, you can launch the Utility to configure and upgrade Actiontec’s
ScreenBeam series receivers.
Installation in Windows 7/8
l
System Requirements
Recommended system requirements for installing the ScreenBeam Configuration Utility
(Windows 7/8) are listed below:
• Operating System: Windows 7 or 8
• Intel WiDi enabled system (wireless configuration/upgrade)
• Internet connectivity
l Installing ScreenBeam Configuration Utility
Follow the procedure below to install ScreenBeam Configuration Utility:
1. Download the latest version of ScreenBeam Configuration Utility from Actiontec’s
website (www. actiontec.com).
2. Extract the zip file and locate the SBWD_Utility.exe file in the extracted file folder.
You can double-click the SBWD_Utility.exe file to launch ScreenBeam Configuration Utility
now.
19
l About ScreenBeam Configuration Utility
You can configure the utility’s UI language, download a new version utility, and check
information of the utility through the Options button.
20
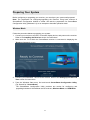
Preparing Your System
Before configuring or upgrading your receiver, you must have your system well prepared.
Note: The preparation for configuring/upgrading the Receiver using both versions of
ScreenBeam Configuration Utilities is similar. We take the preparation for ScreenBeam
Configuration Utility (Windows 8.1) as an example to describe operation detail.
Wireless Mode
Follow the procedure below to preparing your system:
1. Connect your receiver to an HDTV or another display device, and power on the receiver.
Refer to the Installing the Receiver section for instructions.
2. Make sure the TV to which the ScreenBeam receiver is connected is displaying the
"Ready to Connect" screen.
3. Connect your Windows 8.1 device to the receiver. Refer to the Setting Up for the First
Time section for instructions.
4. From the Windows Start menu, find and launch ScreenBeam Configuration Utility.
(Tip: Search for "ScreenBeam")
The ScreenBeam Configuration Utility provides two modes for configuring and
upgrading Actiontec’s ScreenBeam series receivers, Wireless Mode and USB Mode.
21
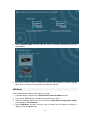
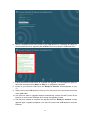
5. Select Wireless Mode, and the utility will scan for available ScreenBeam receivers
automatically.
6. Click the receiver you want to configure to open the configuration or firmware upgrade
page. Now, it is ready for configuration and firmware upgrade.
USB Mode
Follow the procedure below to preparing your system:
1. Complete Steps 1, 2 and 3 in the Preparation for Wireless Mode section.
2. Plug a blank USB flash drive (FAT32 formatted) into your device.
3. From the Windows Start menu, find and launch ScreenBeam Configuration Utility.
(Tip: Search for "ScreenBeam")
4. Select USB Mode, and then select the type of receiver you are going to configure or
upgrade. Click the Next button.
22
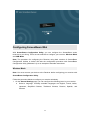
Configuring ScreenBeam Mini
With ScreenBeam Configuration Utility, you can configure the ScreenBeam series
receivers to your liking. There are two methods to configure your receiver: Wireless Mode
and USB Mode.
Note: The procedure for configuring the Receiver using both versions of ScreenBeam
Configuration Utilities is similar. We take the configuration procedure with ScreenBeam
Configuration Utility (Windows 8.1) as an example to describe instructions.
Wireless Mode
Note: You must connect your device to the Receiver before configuring your receiver with
ScreenBeam Configuration Utility.
Follow the procedure below to configure your receiver wirelessly:
1. On the General Settings page, you can configure the following items in your receiver.
a. Select a language. Currently available languages are English, French, Italian,
Japanese, Simplified Chinese, Traditional Chinese, Russian, Spanish, and
German.
23
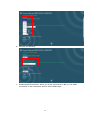
b.
Rename your Receiver.
c.
Enable/disable Screensaver. When you set the screensaver to On, you can select
an idle time for the screensaver and turn off/on HDMI output.
24
d.
Adjust TV screen size. In the TV screen size section, click Overscan settings,
and a TV screen size adjustment window pops up. Drag the black slider to adjust
the size of the output screen.
Note: This function is available when your device has been connected to your
receiver.
25
2. Click the Save button after the configuration is done. A message will pop up in the top
right corner of the screen, showing that the Receiver is configured successfully. New
settings will take effect on the next connection.
3. The ScreenBeam Configuration Utility returns to the mode selection page.
26
USB Mode
Follow the procedure below to configure your receiver by using a USB flash drive:
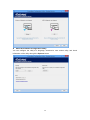
1. On the Offline Settings page, you can configure the following items in your receiver.
a. Select a language. Currently available languages are English, French, Italian,
Japanese, Simplified Chinese, Traditional Chinese, Russian, Spanish, and
German.
b.
Enable/disable Screensaver. When you set the Screensaver to On, you can select
an idle time for the screensaver.
27
2. Select the USB flash drive for saving the configuration file.
3. Click the Save to USB button to download the setting file to your USB flash drive. After
the file has been saved to your USB flash drive, a message box pops up, showing
instructions for configuring ScreenBeam Receivers using the USB flash drive.
4. Follow the onscreen instructions to complete the configuration. If no message box pops
up, follow the instructions from Step 5 to Step 8 to complete the configuration.
5. Power on your receiver. Make sure the “Ready To Connect” screen appears on your
TV.
6. Safely remove the USB flash drive from your PC and connect it to the female connector
of the USB cable.
7. The Receiver implements the configuration automatically. Please DO NOT power off the
Receiver or remove the USB flash drive during this process.
8. The Receiver reboots to complete the configuration, and the “Ready To Connect”
28
screen appears again. Configuration completes. You may now remove the USB flash
drive from the Receiver.
Upgrading ScreenBeam Mini
There are three methods to upgrade your receiver: Wireless Mode, USB Mode, and
Manual Firmware Upgrade.
Note: The procedure for upgrading the Receiver using both versions of ScreenBeam
Configuration Utilities is similar. We take the upgrade procedure with ScreenBeam
Configuration Utility (Windows 8.1) as an example to describe instructions.
Wireless Mode
Note: You must connect your device to the Receiver with the Intel WiDi application before
upgrading your receiver with ScreenBeam Configuration Utility in Windows 7/8.
Follow the procedure to upgrade your receiver wirelessly:
1. Make sure you have an Internet connection.
2. Click Check for Updates to open the Firmware Upgrade page.
3. If there is new firmware available, it will appear on the Firmware Upgrade page. If no
new firmware is detected or the detection fails, you can click the Check Again button to
check again.
4. Click Update Now to download the new firmware and wirelessly upgrade your receiver.
29
Note: If you don’t want to upgrade the Receiver for some reason, click Cancel to abort.
5. The receiver will upgrade its firmware automatically, and then reboot. When the receiver
returns to the Ready to Connect Screen, your receiver has been upgraded.
6. The Utility returns to the mode selection screen.
Note: Do NOT power off your receiver during the upgrade process. The upgrade will
take some time. Please be patient.
USB Mode
Follow the procedure below to upgrade your receiver by using a USB flash drive:
1. Make sure you have an Internet connection.
2. Click Firmware Download.
3. If there is new firmware available, it will appear on the Firmware Download page. If no
new firmware is detected or the detection fails, you can click the Check Again button to
check again.
30
4. Select the USB flash drive for saving the upgrade file.
5. Click Save to USB to download the upgrade file to your USB flash drive.
31
6. After the upgrade file has been saved to your USB flash drive, a message box pops up,
showing instructions for upgrading ScreenBeam Receivers using the USB flash drive.
7. Follow the onscreen instructions to complete the upgrade. If no message box pops up,
follow the instructions from Step 8 to Step 11 to complete the upgrade.
8. Power on your Receiver. Make sure the “Ready To Connect” screen appears on your
TV.
9. Safely remove the USB flash drive from your PC and connect it to the female connector
of the USB cable.
10. The Receiver starts to upgrade firmware automatically. Please DO NOT power off the
Receiver or remove the USB flash drive during the upgrade process.
11. The Receiver reboots to complete the upgrade, and the “Ready To Connect” screen
appears again. Upgrade completes. You may now remove the USB flash drive from the
Receiver.
32
Manual Firmware Upgrade
Follow the procedure below to manually upgrade your receiver:
1. Download and save the new ScreenBeam Mini firmware to your local disk. Check new
firmware from Actiontec’s website (www. actiontec.com).
2. Extract the zip file. You will find one "autorun" folder and one "install.img" file in the
extracted file folder.
3. Insert a USB flash drive to your laptop/PC.
4. Copy the "autorun" folder and the "install.img" file to the root directory of the USB flash
drive. Note: Do not use a portable hard drive. You should use a formatted FAT/FAT32
USB flash drive only.
5. Power on your Receiver. Make sure the "Ready To Connect" screen appears on your
TV.
Note: You must disconnect your device (laptop, ultrabook, smartphone or tablet) from
the receiver before upgrading your receiver.
6. Safely remove your USB flash drive from your PC, and plug it into the female connector
of the USB cable.
7. The Receiver starts to upgrade its firmware automatically. Firmware upgrade status
messages appear on your TV.
Warning! Do not power off the Receiver or remove the USB flash drive while the
upgrade is in progress. Otherwise, firmware upgrade fails.
8. The Receiver reboots to complete the upgrade, and the "Ready To Connect" screen
appears again.
9. Upgrade completes. You may now remove the USB flash drive from the Receiver.
33
Appendix I.
FAQs
Troubleshooting and
This chapter describes some problems you may encounter using the Receiver, and possible
solutions to those problems. Also included are frequently asked questions (FAQs), and
answers to those questions.
Troubleshooting
I'm not seeing anything on my HDTV screen after powering on the Receiver.
Check the cable connections and make sure the TV Input setting is the same as the HDMI
port to which the Receiver is connected.
I am trying to connect to the ScreenBeam Mini Receiver but fails. There is a prompt
says “The connection attempt failed because your PC or mobile device is currently
connecting to a 5GHz wireless access point. …”.
The ScreenBeam Mini Wireless Display Receiver works in 2.4 GHz band only. You most
likely have had your device connected to a 5 GHz access point (AP). You must disconnect
your device from the 5 GHz AP, and connect it to a 2.4 GHz AP. Then, you can retry
connecting your device to the Receiver.
After upgrading from Windows 8 to Windows 8.1, I can no longer connect to
ScreenBeam receiver or I'm having problems with my connection.
Make sure you've followed Intel's instructions after the upgrade. Refer to Intel's WiDi
website (Shortcut URL: http://www.actiontec.com/widi81) for more information.
Intel WiDi does not work after upgrading to Windows 8.1 and I can't connect to
ScreenBeam Mini.
Windows 8.1 provides native Miracast feature. Previous Intel WiDi systems upgraded to
Windows 8.1 must use the Project feature. To connect with ScreenBeam Mini receiver: Go
to Charms > Devices > Project > Add a wireless display > Connect to ScreenBeam Mini
receiver.
In some instances, I can't connect to the Receiver from WiDi after installing antivirus
software.
This is also a known issue with Intel WiDi. To solve the problem, add Intel WiDi to the
antivirus-approved whitelist of applications, and then reconnect.
I'm seeing artifacts and experiencing a choppy, juddering video stream.
In noisy Wi-Fi environments, audio and video freezes may be observed while playing video
34
content, and longer than expected latency may occur when streaming. To ensure you have
an optimal Wi-Fi environment:
•
If your Receiver is directly plugged into the HDMI port on the back of your HDTV,
reconnect the Receiver to the HDTV with the HDMI cable provided and place the
Receiver in front of your HDTV and in direct line of sight with your device.
•
•
Disconnect and reconnect the Receiver.
If the source device is connected to a wireless router, restart the router, or change the
wireless channel on your wireless router/AP. Refer to the wireless router’s user manual
for more information.
I'm seeing choppiness and brief pauses while watching Internet video on my
Miracast™ device.
Wireless interference may cause Internet video playback to be choppy. If this occurs, try the
following:
•
Disconnect the device from the Receiver. Make sure the Internet connection is good
and that the video playing on the phone is smooth.
•
Clear the YouTube cache and try playing the video again.
I'm seeing choppiness and brief pauses while watching local video on my Miracast™
device.
Wireless interference may cause the video playback to be choppy. If this occurs, try the
following:
•
•
•
•
•
Make sure you are in the same room as the Receiver is.
Set the media player to use the H/W decoder, if available.
Reboot the Miracast™ device and Receiver and connect again.
Avoid moving the Miracast™ device around too much.
Change the wireless channel on your wireless router/access point.
NVIDIA Shield does not see ScreenBeam Mini receiver or may see the Receiver as
"unavailable" or "busy" even after a rescan.
Exit out of the NVIDIA's Miracast settings window and go back.
My Windows 8.1 displays to the TV but the four edges are cut off (overscan).
This is expected with some system's supported display resolution. You can adjust Windows
screen resolution settings to fit the PC's screen on your TV display.
When I connect to an access point or wireless router with an active WiDi session, the
WiDi connection drops.
This is a known issue with Intel WiDi. It happens with either 3.5.41.0 or 4.0.1.8 on both
Windows 7 or 8.
Re-connect the WiDi session or connect to the AP first before starting a WiDi session.
35
I encounter connection failure with ScreenBeam Mini and my device can’t connect to
it any more.
l Reboot ScreenBeam Mini and try connection again. Or, reboot your device
(laptop/Ultrabook/tablet/smartphone) and try connection again.
l Reboot both the ScreenBeam Mini and your device and try connection again.
l If you are using a Windows 8.1 operating system, go to Change PC settings > PC and
Devices > Devices > Projectors, remove the profile of ScreenBeam Mini from your
device (PC/laptop/Ultrabook), and try connection again.
I can’t connect to the Receiver with ScreenBeam Configuration Utility on my device.
The Utility can’t find the Receiver.
In Windows 8.1, you must connect your device to the Receiver at least one time. In doing so,
the profile of the Receiver is saved to your device. Then the Utility on your device can
connect to the Receiver.
In Windows 7/8, you must connect your device to the Receiver with Intel WiDi first, and then
Utility on your device can connect to the Receiver.
In Windows 8.1, I can’t adjust the screen size with the ScreenBeam Configuration
Utility. I can’t find the screen size adjustment option.
The screen size adjustment option is not available if your device doesn’t connect to the
receiver. You must connect your device to the Receiver first, and then launch the Utility and
configure the receiver.
My audio changes and sounds a little dull when I play music or video.
ScreenBeam Mini supports the LPCM audio format only. LPCM is a lossless format for
encoding audio data. However, some devices do not provide support for LPCM audio, so the
sound changes.
You can also try upgrading the operating system of your device.
FAQs
Can my device connect to ScreenBeam Mini?
To connect to ScreenBeam Mini, your device must be Intel WiDi compatible or Wi-Fi
Miracast-capable.
For a system to support Intel WiDi 3.5 (or later), it should have most if not all Intel chipsets
(Processor, Graphic Card, and Wireless chipset). Here are some tips on the types of PC
system that can support Intel WiDi.
l If your system is an Ultrabook (4th Gen Intel Core processor), it's most likely to support
and have Intel WiDi 4.x preinstalled.
l If your system is an Ultrabook (3rd Gen Intel Core processor or older), it should have
the required chipsets to support Intel WiDi. Update your drivers and download the Intel
WiDi software at: http://www.intel.com/go/wirelessdisplayupdate.
l If your system is a Laptop or a Notebook, it may support Intel WiDi if it meets the
36
following Processor, Graphics, and Wireless chipset requirements:
•
Processor. One of the following processors is required:
2nd generation Intel® Core™ i3/i5/i7 Mobile Processor
3rd Generation Intel® Core™ i3/i5/i7 Mobile and Desktop Processor
4th Generation Intel® Core™ i3/i5/i7 Mobile and Desktop Processor
•
Graphics. One of the following graphics solutions is required:
Intel® Iris™ Pro Graphics 5200
Intel® Iris™ Graphics 5100
Intel® HD Graphics 5000
Intel® HD Graphics 4600
Intel® HD Graphics 4400
Intel® HD Graphics 4200
Intel® HD Graphics 4000
Intel® HD Graphics 3000 (mobile)
Intel® HD Graphics 2500
Intel® HD Graphics 2000 (mobile)
Wireless Adapter. One of the following wireless adapters is required:
Intel® Centrino® Wireless-N 1000, 1030, 2200, or 2230
Intel® Centrino® Wireless-N 2200 for Desktop
Intel® Centrino® Advanced-N 6200, 6205, 6230, or 6235
Intel® Centrino® Advanced-N 6205 for Desktop
Intel® Centrino® Wireless-N + WiMAX 6150
Intel® Centrino® Advanced-N + WiMAX 6250
Intel® Centrino® Ultimate-N 6300
Intel® Dual Band Wireless-N 7260
Intel® Dual Band Wireless-AC 7260
Intel® Dual Band Wireless-AC 7260 for Desktop
Intel® Dual Band Wireless-AC 3160
Intel® Wireless-N 7260
Broadcom BCM43228
Broadcom BCM43241
Broadcom BCM4352
•
•
l
System requirements for Wi-Fi Miracast™
•
•
l
Operating System. One of the following operating systems is required:
Microsoft Windows 7
Microsoft Windows 8
Microsoft Windows 8.1
Android 4.2
Windows 8.1
ScreenBeam Mini currently is not compatible with Apple devices.
37
How can I tell if my device supports Wi-Fi Miracast?
Look for one of the following Miracast applications on your device. Only some application
names are listed below. Different manufacturers may have different names for the Miracast
apps on their products. But, it should indicate similar meaning.
l Wireless display
l Wireless mirroring
l Screen mirroring
l AllShareCast (Samsung devices only)
l Cast screen
Visit ScreenBeam Mini compatibility page for the recommended Miracast devices.
Do I need to install drivers/apps to use the ScreenBeam Mini Receiver?
l For Windows 7/8, you may need to install the Intel WiDi (3.5 or higher) application.
l For Windows 8.1, you only need to install the latest Windows updates.
l For Android 4.2 or higher, no app is required.
Note: Your device must be Intel® WiDi-compatible or Wi-Fi Miracast™-capable.
How can I improve my video/audio performance?
You can try the following methods to improve the ScreenBeam Mini’s video/audio
performance:
l Move your device closer to the Receiver.
l Connect the Receiver with the HDMI cable provided and place it in front of the HDTV.
l Connect your device to a wireless network that is using a cleaner wireless channel or
change the wireless channel on the current wireless network, and then connect the
device to the Receiver.
l Turn off the Wi-Fi devices that are not in use currently.
What wireless signal range can I expect with the Receiver?
The Receiver is designed to be used in the same room with the source device. For best
performance, the source device should be placed within 4.5 meters to the Receiver.
Do I need an existing wireless network to use the Receiver?
No. Since the Receiver connects directly with the Intel WiDi or Miracast™-enabled device,
no wireless network is needed. However, the source device needs to be connected to an
Internet router or data network to view online content.
How can I upgrade the Receiver’s firmware?
You can upgrade the receiver's firmware by using the ScreenBeam Configuration Utility. For
Windows 7 and Windows 8 systems, you can download the Utility from Actiontec’s website
(www.actiontec.com). For Windows 8.1, you must use the Metro application available on the
Microsoft app store (tip: search for “ScreenBeam”).
38
How do I configure the receiver's general settings, including: changing language,
rename the receiver, enable/disable screensaver, and idling time for screensaver?
You can configure the receiver's general settings by using the ScreenBeam Configuration
Utility. For Windows 7 and Windows 8 systems, you can download the Utility from
Actiontec’s website (www.actiontec.com). For Windows 8.1, you must use the Metro
application available on the Microsoft app store (tip: search for “ScreenBeam”).
How can I adjust the display to fit properly to my TV screen?
Use one of the following methods to adjust the screen size:
l Go to the Intel WiDi application, and then select Settings > Picture and Sound >
Adjust Cropping. Follow the onscreen instructions to adjust the screen.
l In Windows 7/8, launch ScreenBeam Configuration Utility. Click the Wireless button,
and then configure Adjust Screen Size in the General section.
l In Windows 8.1, launch ScreenBeam Configuration Utility. Click Wireless Mode to
open the General Settings page, and then configure Overscan settings in the TV
screen size section.
Can I extend my Windows desktop to the HDTV or Projector from my Intel WiDi
device?
Yes. After the connection to ScreenBeam Mini receiver is established, by default you should
see the laptop screen mirrored to the HDTV or Projector.
To extend your Windows desktop to an HDTV or a Projector, press the Windows key and P
key together, and select "Duplicate", “Extend” or "Second screen only" mode.
Where can I find more information and get support for Intel WiDi?
For more information about Intel Wireless Display, access this page:
http://www.intel.com/p/en_US/support/highlights/wireless/wireless-display.
My device can support Intel WiDi. Where can I find Intel WiDi on my device? And
where can I obtain the latest Intel WiDi application and graphic drivers for my Intel
WiDi device?
In Windows, search for "Intel WiDi" and launch the application if you find it. If Intel WiDi
software
is
not
available
on
your
system,
go
to
http://www.intel.com/go/wirelessdisplayupdate and download the latest Intel WiDi software
for your system. Make sure to also upgrade your system to the latest Graphics and Wireless
drivers for best wireless display experience.
What is Wi-Fi Miracast™?
Wi-Fi Certified Miracast™ is a groundbreaking solution for seamlessly displaying video
between devices, without cables or a network connection. Users can view pictures from a
smartphone on a big screen television, share a laptop screen with the conference room
projector in real-time, and watch live programs from a home cable box on a tablet.
Miracast™ connections are formed using Wi-Fi Certified Wi-Fi Direct™, so access to a
Wi-Fi® network is not needed–the ability to connect is inside Miracast™-certified devices.
39
What is Wi-Fi Direct and can I connect to the Receiver using Wi-Fi Direct?
Wi-Fi Direct is a peer-to-peer technology that Miracast™ connections are formed in. Even
though some newer Android 4.0 and Windows 8.1 devices may detect the Receiver in the
Wi-Fi Direct devices scan list, they will not be able to connect to the Receiver. The device
must support Miracast™ to connect with the Receiver.
Can I connect to the Wi-Fi router and the Receiver simultaneously with my Intel WiDi
laptop?
Yes. Connect the laptop to an available Wi-Fi router first, and then connect to the Receiver.
You can then view online content and beam it to the HDTV.
Can I connect to the Wi-Fi router and the Receiver simultaneously with my Miracast™
device?
Some Miracast™ devices cannot connect to both the Wi-Fi router and the Receiver at the
same time. Refer to the device manufacturer's or carrier's user manual for more information.
Can I connect several Intel WiDi or Miracast devices to the Receiver simultaneously?
No. You can connect one device to the Receiver at a time.
Can I connect to multiple ScreenBeam Mini Receivers simultaneously?
No. You can only connect to one ScreenBeam Mini Receiver at a time.
My TV/Projector does not have an HDMI Input. Can I still use ScreenBeam Mini?
No, you need a TV/Projector with an HDMI port.
Can Microsoft Surface Pro tablet output Intel WiDi?
Originally, Microsoft Surface Pro does not support wireless display. However, it can support
wireless display after you upgrade its operating system to Windows 8.1. The latest Microsoft
Surface 2 and Surface Pro 2 with Windows 8.1 can support wireless display.
Can I use the ScreenBeam Mini to access online content directly?
No. ScreenBeam Mini does not directly connect to the Internet. You must use a source
device (laptop/Utrabook/tablet/smartphone) to wirelessly stream the online content to your
Receiver.
Can I play a video clip by connecting a USB flash drive to the ScreenBeam Mini?
No. The USB port on the USB cable is for system configuration and firmware upgrade
only.
Can ScreenBeam Mini support UoIP?
No, it can’t.
Does ScreenBeam Mini support NVIDIA Shield game console?
Yes. ScreenBeam Mini supports NVIDIA Shield.
40
Can I push media to the Receiver using DLNA?
No. The Receiver is not a DLNA media receiver.
Does the Receiver work with the Apple iPhone, iPad, or iPod?
No. The Receiver does not support Apple devices or the AirPlay protocol.
41
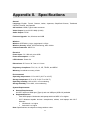
Appendix II. Specifications
General
Language: English, French, German, Italian, Japanese, Simplified Chinese, Traditional
Chinese, Russian, and Spanish
A/V Interface: HDMI, Type-A male connector
Video Output: Up to full HD 1080p (H.264)
Audio Output: LPCM
Firmware Upgrade: Yes, Wireless and USB
Wireless
Wireless: IEEE 802.11 b/g/n, single-band 2.4 GHz
Wireless Security: WPA2, WPS PIN Pairing, AES 128-bit
Content Protection: HDCP 2.x
Electrical
Power Input: 5 V / 500 mA, micro USB
Power Consumption: < 2.5 W
LED Indicator: Power On
Dimensions: 87.5 mm x 30.7 mm x 11.8 mm
Regulatory Compliance: FCC, UL, IC, CE, TELEC, and SRRC
Warranty: Localized to country of sale
Environmental
Operating temperature: 0 ºC to 40 ºC (32 ºF to 104 ºF)
Storage temperature: 0 ºC to 70 ºC (32 ºF to 158 ºF)
Operating humidity: 10% to 85%, non-condensing
Storage humidity: 5% to 90%, non-condensing
System Requirements
l General Requirements
An HDTV with one HDMI port (Type A) and one USB port (USB 2.0) available
l Supported Devices
Intel WiDi laptops: Ultrabooks and laptops with Intel WiDi 3.5 or higher
Wi-Fi Miracast capable devices: smartphones, tablets, and laptops with Wi-Fi
Miracast
·
Windows 8.1 or higher
·
Android 4.2 or higher
Note: Specifications are subject to change without notice.
42
Appendix III. Notices
Warranty
This product has a one-year Limited Hardware Warranty and 90-day free software updates
from the date of purchase.
l Local Law
This Limited Warranty Statement gives the customer specific legal rights. The customer may
also have other rights which vary from state to state in the United States, from province to
province in Canada, and from country to country elsewhere in the world.
To the extent that this Limited Warranty Statement is inconsistent with local law, this
Statement shall be deemed modified to be consistent with such local law. Under such local
law, certain disclaimers and limitations of this Warranty Statement may not apply to the
customer.
Go to http://www.actiontec.com/products/warranty.php for more information.
GPL Info
For GNU General Public License (GPL) related information, go to
http://opensource.actiontec.com.
EU CE Declaration of Conformity
To obtain the complete Declaration of Conformity form in softcopy, go to the Actiontec
Electronics Declarations of Conformity EU/EEA website at
http://international.actiontec.com/support/doc.
The symbol below is placed in accordance with the European Union Directive 2002/96 on
the Waste Electrical and Electronic Equipment (the WEEE Directive). If disposed of within
the European Union, this product should be treated and recycled in accordance with the
laws of your jurisdiction implementing the WEEE Directive.
43
Technical Support
Go to http://international.actiontec.com/support for product support, updates, and more
information including:
•
•
•
•
Firmware updates
Troubleshooting
Registration
FAQs
Technical Support Phone Number
United States: 1-888-436-0657
44