1
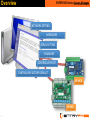
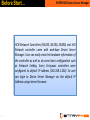
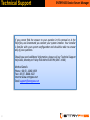
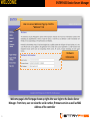
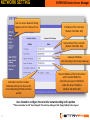
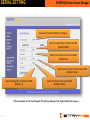
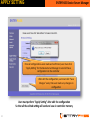
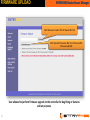
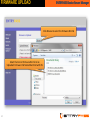
ENTRYPASS Device Server Manager USER GUIDE EP Device Server Manager (For HCB and HIO) User Guide Version: HCB Web Version: HIO Web Version: v1.00 (Last Updated: 16-‐11-‐2010) v3.00.10.08 and Above v1.03.10.08 and Above Table of Content Title ENTRYPASS Device Server Manager Page • Overview 1 • Before Start 2 • Technical Support 3 • Supported Browser 4 • Login 5 • Welcome 6 • Admin 7 • Network SePng 8 • DDNS SePng 10 • Serial SePng 11 • Apply SePng 12 • Firmware Upload 13 • Factory Default 16 • Controller Reset 19 • Sign Out 21 • Appendix 23 Overview ENTRYPASS Device ENTRYPASS Server Mxanager PARSER NETWORK SETTING HARDWARE INFOMATION SERIAL SETTING FIRMWARE UPLOAD CONTROLLER RESET CONTROLLER FACTORY DEFAULT EP.HCB EP.HIO 1 Before Start… ENTRYPASS Device Server Manager HCB Network Controllers (N5100, N5200, N5400) and HIO Network controller come with web-‐base Device Server Manager. User can easily view the hardware informaOon of the controller as well as do some basic configuraOon such as Network SeRng. Every Entrypass controllers were configured to default IP address (192.168.1.100). So user can login to Device Server Manager via this default IP Address using internet browser. 2 Technical Support ENTRYPASS Device Server Manager If you cannot find the answer to your quesOon in this manual or in the Help files, we recommend you contact your system installer. Your installer is familiar with your system configuraOon and should be able to answer any of your quesOons. Should you need addiOonal informaOon, please call our Technical Support Help Desk, Monday to Friday 9:00 AM to 6:00 PM (GMT +8:00) Method Details Phone + 60 (3) -‐ 8068 1929 Fax + 60 (3) -‐ 8068 1922 Internet www.entrypass.net Email [email protected] 3 Supported Browser ENTRYPASS Device Server Manager Supported Browser: 1. Internet Explorer* 2. Mozilla Firefox* 3. Google Chrome 4. Opera 5. Apple Safari *Can Perform Firmware Upgrade 4 LOGIN ENTRYPASS Device Server Manager Default Password: 123456 Click “Reset” to reset the password field Click “Login” to access the device server manager 5 WELCOME ENTRYPASS Device Server Manager User can access Welcome Page by click this “Welcome” link Hardware Informa`on Welcome page is the first page shown up right aRer user login to the Device Server Manager. From here, user can view the serial number, firmware version as well as MAC Address of the controller 6 ADMIN User can access Admin Page by click this “Admin” link Tick the check box to change the user password. ENTRYPASS Device Server Manager Tick the check box to disable service repor`ng. So user will unable to add the controller via Plaaorm1 Wizard Tick the check box to commiPng sePng. Once sePng is commiced, user will not allow to login Device Server Manager un`l next factory default Click Save Changes aeer any changes are made Admin page will allow user to change password, disable service reporUng, and commiVng seVng **Please remember to click “Save Changed” aRer edit any seVng and click “Apply SeVng” before log out 7 NETWORK SETTING User can access Network SePng Page by click this “Network” link ENTRYPASS Device Server Manager IP Address of the controller (Default: 192.168.1.100) Subnet Mask of the controller (Default: 192.168.1.100) Gateway IP Address (Set According to the Router Gateway) Server IP Address of the host machine which installed Plaaorm1 Controller will report to Plaarom1 under this server IP address (Default: 192.168.1.254) Controller Listen Port number Plaarom1 will listen to this port for Service Repor`ng (P1 Add controller wizard) User allowed to configure the controller network seVng in this porUon **Please remember to click “Save Changed” aRer edit any seVng and click “Apply SeVng” before log out 8 NETWORK SETTING ENTRYPASS Device Server Manager User can click this link to re-‐login Device Server Manager using new IP Address The new network seVngs were updated to the controller 9 DDNS SETTING ENTRYPASS Device Server Manager DNS Server IP (Streamyx DNS: 202.188.0.133) Server Ac`ve Engine Port (Default: 2020) Use Hostname for Dynamic WAN IP or Use IP address if WAN IP is sta`c Choose HOST for dynamic IP Choose STATIC for sta`c IP Choose NONE to disable DDNS User allowed to configure the controller DDNS seVng for over internet control **Please remember to click “Save Changed” aRer edit any seVng and click “Apply SeVng” before log out 10 SERIAL SETTING ENTRYPASS Device Server Manager Select which Serial COM to be configure Select the Baud Rate of the Serial COM (Default: 9600) Select the Data Bits of the Serial COM (Default: 8) Select the Flow Control of the Serial COM (Default: None) Select the Stop Bits of the Serial COM (Default: 1) Select the Parity of the Serial COM (Default: None) **Please remember to click “Save Changed” aRer edit any seVng and click “Apply SeVng” before log out 11 APPLY SETTING ENTRYPASS Device Server Manager Once all configura`ons were made and confirmed, user must click “Apply SePng” for the Device Server Manager to send all these configura`ons to the controller Aeer edit the configura`on, user must click “Save Changes” every `me user made any changes on configura`on User must perform “Apply SeVng” aRer edit the configuraUon So that all the edited seVng will send and save in controller memory 12 FIRMWARE UPLOAD ENTRYPASS Device Server Manager Click Browse to select the Firmware Bin File Click Upload Firmware aeer the Firmware Bin File was selected User allowed to perform firmware upgrade to the controller for bug fixing or features add-‐on purposes 13 FIRMWARE UPLOAD ENTRYPASS Device Server Manager Click Browse to select the Firmware Bin File Select the Correct Firmware Bin File to be Uploaded. Firmware File Name Must Start with HS 14 FIRMWARE UPLOAD ENTRYPASS Device Server Manager Firmware Uploaded, Proceed to Reset the Controller User can click this link to re-‐login Device Server Manager Firmware Upload Successfully, Device Server Manager Logout ARer firmware successfully uploaded, the controller will reset and Device Server Manager will logout. It is advisable to perform Factory Default or Cool Start aRer firmware is uploaded. 15 FACTORY DEFAULT ENTRYPASS Device Server Manager Click “OK” if confirm perform factory default Click “Apply Default SePng” to perform controller Factory Default User allow to perform factory default to the controller. ARer factory default, controller IP address will change back to 192.168.1.100 16 FACTORY DEFAULT ENTRYPASS Device Server Manager Controller will buzzer will beep non-‐stop unUl while configuraUon is being validated At the end of the process, controller will reset and apply the default seVng 17 FACTORY DEFAULT ENTRYPASS Device Server Manager User can click this link to re-‐login Device Server Manager Factory Default process completed Controller IP address has being changed to 192.168.1.100 18 CONTROLLER RESET ENTRYPASS Device Server Manager Click “OK” if confirm want to reset controller Click “Reset Device” to perform controller reset User allow to perform controller reset on Device Server Manager 19 CONTROLLER RESET ENTRYPASS Device Server Manager User can click this link to re-‐login Device Server Manager Controller Reset process completed 20 SIGN OUT Click “Sign Out” to log out from the Device Server Manager 21 ENTRYPASS Device Server Manager SIGN OUT ENTRYPASS Device Server Manager Click “OK” if wish to Apply SePng before sign out; or else click “Cancel” and sign out directly If the Device Server Manager found any saved the changes when user click “Sign Out”, a pop-‐up form will appear asking user to save the seVng before sign out. 22 APPENDIX Please ensure that the Ac`ve Engine and P1 Server IP Address is assigned to Host Machine Network IP Address 23 ENTRYPASS Device Server Manager APPENDIX ENTRYPASS Device Server Manager For network controller, user need only change the IP Address (To Avoid IP Conflict) using the Device Server Manager, then Pladorm1 Server will detect them all. So user can add these controller via P1 Wizard and wizard will assign appropriate network port according to AcUve Engine Port SeVng (Default: 44002 – 44011) *For more details about how to add controller via wizard please refer P1 Help File 24 ENTRYPASS Device Server Manager The End Thank You