1
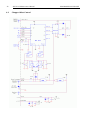
EUROPEAN
SOUTHERN
OBSERVATORY
Organisation Européenne pour des Recherches Astronomiques dans l’Hémisphère Austral
Europäische Organisation für astronomische Forschung in der südlichen Hemisphäre
ESO - LA SILLA
LA SILLA OBSERVATORY
F/35 Cassegrain Adapter and
Top-Unit Hardware
Maintenance Manual
LSO-MAN-ESO-63108-0001
Issue 1.0
December 22, 2001
INTERNAL USE ONLY
Jacques Roucher
01/11/2001
Prepared.......................................................................................................
Name
Approved
Date
Signature
Name
Date
Signature
Name
Date
Signature
U. Weilenmann
Released
ESO - LA SILLA * TELEPHONE: +56 2 698 87 57 * FAX: +56 2 695 42 63
2
F/35 Tech. Maintenance Manual
LSO-MAN-ESO-63108-0001
F/35 Tech. Maintenance Manual
LSO-MAN-ESO-63108-0001
Change Record
Issue/Rev.
Date
Section/Page affected
Reason/Initiation/Document/Remarks
0.9
03/09/2000
all
First preparation
1.0
02/11/2001
all
1st oficial release
3
4
F/35 Tech. Maintenance Manual
LSO-MAN-ESO-63108-0001
F/35 Tech. Maintenance Manual
LSO-MAN-ESO-63108-0001
5
1 INTRODUCTION
1.1
1.2
1.3
1.4
1.5
Purpose . . . . . . . . . . . . . . . . . . . . . . . . . . . . . . . . . . . . . . . . . . . . . . . . . . . . . . . . . . . . . . . . . . . . . . . .
Scope . . . . . . . . . . . . . . . . . . . . . . . . . . . . . . . . . . . . . . . . . . . . . . . . . . . . . . . . . . . . . . . . . . . . . . . . .
Applicable Documents . . . . . . . . . . . . . . . . . . . . . . . . . . . . . . . . . . . . . . . . . . . . . . . . . . . . . . . . . . . .
Reference Documents. . . . . . . . . . . . . . . . . . . . . . . . . . . . . . . . . . . . . . . . . . . . . . . . . . . . . . . . . . . . .
Abbreviations And Acronyms . . . . . . . . . . . . . . . . . . . . . . . . . . . . . . . . . . . . . . . . . . . . . . . . . . . . . .
2 OVERVIEW
3 CASSEGRAIN ADAPTOR
3.1
3.2
3.3
3.4
3.5
3.6
Guide-Probe . . . . . . . . . . . . . . . . . . . . . . . . . . . . . . . . . . . . . . . . . . . . . . . . . . . . . . . . . . . . . . . . . . .
Filters Wheel. . . . . . . . . . . . . . . . . . . . . . . . . . . . . . . . . . . . . . . . . . . . . . . . . . . . . . . . . . . . . . . . . . .
Dichroic Mirror. . . . . . . . . . . . . . . . . . . . . . . . . . . . . . . . . . . . . . . . . . . . . . . . . . . . . . . . . . . . . . . . .
Objectives Changer. . . . . . . . . . . . . . . . . . . . . . . . . . . . . . . . . . . . . . . . . . . . . . . . . . . . . . . . . . . . . .
X-Hair . . . . . . . . . . . . . . . . . . . . . . . . . . . . . . . . . . . . . . . . . . . . . . . . . . . . . . . . . . . . . . . . . . . . . . . .
Tecnical CCD . . . . . . . . . . . . . . . . . . . . . . . . . . . . . . . . . . . . . . . . . . . . . . . . . . . . . . . . . . . . . . . . . .
4 TOP-RING UNIT
4.1
4.2
4.3
9
11
11
11
11
11
12
12
13
15
Setup . . . . . . . . . . . . . . . . . . . . . . . . . . . . . . . . . . . . . . . . . . . . . . . . . . . . . . . . . . . . . . . . . . . . . . . . . 15
Operation . . . . . . . . . . . . . . . . . . . . . . . . . . . . . . . . . . . . . . . . . . . . . . . . . . . . . . . . . . . . . . . . . . . . . 15
Testing in local mode . . . . . . . . . . . . . . . . . . . . . . . . . . . . . . . . . . . . . . . . . . . . . . . . . . . . . . . . . . . . 15
6 FTU Disassembly
6.1
6.2
6.3
7
7
7
7
7
Focus. . . . . . . . . . . . . . . . . . . . . . . . . . . . . . . . . . . . . . . . . . . . . . . . . . . . . . . . . . . . . . . . . . . . . . . . . 13
Rotator . . . . . . . . . . . . . . . . . . . . . . . . . . . . . . . . . . . . . . . . . . . . . . . . . . . . . . . . . . . . . . . . . . . . . . . 13
Chopper . . . . . . . . . . . . . . . . . . . . . . . . . . . . . . . . . . . . . . . . . . . . . . . . . . . . . . . . . . . . . . . . . . . . . . 13
5 SETUP AND OPERATION
5.1
5.2
5.3
7
17
Installation in Test Stand . . . . . . . . . . . . . . . . . . . . . . . . . . . . . . . . . . . . . . . . . . . . . . . . . . . . . . . . . 17
Removing the Rotator Encoder . . . . . . . . . . . . . . . . . . . . . . . . . . . . . . . . . . . . . . . . . . . . . . . . . . . . 17
Removing the Focus Encoder. . . . . . . . . . . . . . . . . . . . . . . . . . . . . . . . . . . . . . . . . . . . . . . . . . . . . . 17
7 FUNCTIONS SPECIFICATIONS
19
8 SCHEMATICS
21
8.1
8.2
8.3
8.4
8.5
8.6
Adaptor Interface Connections. . . . . . . . . . . . . . . . . . . . . . . . . . . . . . . . . . . . . . . . . . . . . . . . . . . . .
Chopper Offset Control . . . . . . . . . . . . . . . . . . . . . . . . . . . . . . . . . . . . . . . . . . . . . . . . . . . . . . . . . .
FTU Brakes Function . . . . . . . . . . . . . . . . . . . . . . . . . . . . . . . . . . . . . . . . . . . . . . . . . . . . . . . . . . . .
FTU to LCU Cabling . . . . . . . . . . . . . . . . . . . . . . . . . . . . . . . . . . . . . . . . . . . . . . . . . . . . . . . . . . . .
Servo Rack Internal Wiring . . . . . . . . . . . . . . . . . . . . . . . . . . . . . . . . . . . . . . . . . . . . . . . . . . . . . . .
Auxiliary Module Components Location . . . . . . . . . . . . . . . . . . . . . . . . . . . . . . . . . . . . . . . . . . . . .
21
22
23
24
25
26
9 MAPPING OF ACROMAG PORT P2
27
10 CABLING OF THE MAIN RACK
29
10.1 Synoptics . . . . . . . . . . . . . . . . . . . . . . . . . . . . . . . . . . . . . . . . . . . . . . . . . . . . . . . . . . . . . . . . . . . . . 29
10.2 Cabling of Main Rack. . . . . . . . . . . . . . . . . . . . . . . . . . . . . . . . . . . . . . . . . . . . . . . . . . . . . . . . . . . . 31
6
F/35 Tech. Maintenance Manual
10.3 Details of Cables
LSO-MAN-ESO-63108-0001
33
F/35 Tech. Maintenance Manual
1
1.1
LSO-MAN-ESO-63108-0001
7
INTRODUCTION
Purpose
This manual describes the setup of the control electronics of the F/35 Focus configuration on the 3.60m telescope. Its goal is to permit the repair and maintenance of its different modules. Installation and service procedures during an observing run are also detailed.
1.2
Scope
This document is aimed to the maintenance staff in charge to install and/or repair the different components of
the F/35 configuration. The documents listed en 1.4 are still the basic source of information for some part of
the hardware and in this document the emphasis is put on the new modules and the connections of the different sub-systems.
1.3
Applicable Documents
LSO-MAN-ESO-80100-0002 Issue 1.0 20/06/00 -- F/35 Adaptor and TCS Software User’s Manual
1.4
Reference Documents
The following documents are referenced in this document.
[1] “Maintenance manual of the Mechanics and Optics of F/35 IR Top unit and F/35 IR Photometer/Adaptor
for 3.6M Telescope" from J.L Lizon/A.van Dijsseldonk, ESO 1986
[2] "Maintenance manual for the F/35 Wobbling Mirror, Electronics and Servo System" from B. Jensen/J.M
Moresmau, ESO 1985.
1.5
Abbreviations And Acronyms
The following abbreviations and acronyms are used in this document::
FTU
Focusing and Turnig Unit
VME
LCU
Local Control Unit
ACROMAG
Digital Input/Output Register from Acromag
TCS
Telecope Control Software
ICS
Instrument Control Software
TCCD
Technical CCD
I/O
Input/Output
GP
Guide-Probe
PID
Proportional Integral and Derivate
WS
Workstation
8
F/35 Tech. Maintenance Manual
LSO-MAN-ESO-63108-0001
F/35 Tech. Maintenance Manual
2
LSO-MAN-ESO-63108-0001
9
OVERVIEW
The F/35 configuration allows the use of a chopping secondary mirror for Infra-red observations with its own
focusing and rotating features. These functions are proper of the so-called FTU (Focusing and Turning Unit)
on the Top-ring, meanwhile at the Cassegrain focus the IR Adaptor permits some functions related with
guiding as guide-probe motion, guiding camera, field width and detectors/instruments swapping.
The former control electronics based on CAMAC/NIM technology (1984) has been almost entirely refurbished to be hardware and software VLT compatible. Some components as the encoders have also been replaced with new types for unavailability reasons (discontinued) or for direct compatibility with the new
control modules.
The mechanical and electronic modules are spread in 3 sub-systems: Electronic Rack and IR Adaptor both
located in the Cassegrain cage and the FTU.
See for the specifications of the different functions and for a synoptics of their relations.
F/35 Tech. Maintenance Manual
LSO-MAN-ESO-63108-0001
FTU
Focus/Rotator/Brakes
Top-Ring
Chopping Mirror
ADAPTOR
Cassegrain Cage
TIMMI2
Dichroic
Guide-Probe
Objectives
Filters
TCCD
Data ACQ.
Field M irror
Maccon/DC Contrl #1
LCU
1-Guide-probe -X
2-Guide-probe -Y
3-Objectives
4-X-hair
1-Filters
2-D ichroic
Maccon/DC Contrl #2
TCCD
Chopping
Synchro
Ethernet
10
Focus Brake
Auxiliary
Rotator Brake
DACS
Chopping
Signal
P ID
Chopper
3-Focus
4-Rotator
Pow er
Position
Drive
LCU w3p6adi
Control Room
xterm
F /35 C on trol P an el
Monitoring
F/35 Tech. Maintenance Manual
3
LSO-MAN-ESO-63108-0001
CASSEGRAIN ADAPTOR
The IR Adaptor shelters 7 functions :X and Y Guide-probe motion, the TCCD guiding camera, with
its filters wheel, a pair of swapable field lenses, a pair of diverting dichroic mirrors and an electronic
Cross-hair. Each function is an independant mechanical/electronic set which can be removed for lab
tests. A local interface box provides the buffering and power needed for the long connections to the
main rack. A set of test cables permits a direct connection to the VME modules in the lab configuration.
See Chapter 8.1 for details of connections with the LCU.
3.1
Guide-Probe
In front of the TCCD a small flat mirror with two-axes rotation and a central hole can scan the field
mirror and allows for the exploration of the sky and autoguiding features. As these 2 movements go
through motor rotation, worm/nut translations, and lever arms they lead to a non-linear relationship
beetween the encoders and the mirror tilting. So a precise scale mapping of the field is necessary.
The incremental encoders (250 pulse/rev) runs for ~ 32 turns beetwen the hardware limits of the
worm/nuts which gives 8000 pulses for a total field of 9.6' , i.e an angular resolution ~ 0.07" at the
center.
The reference positions are given by the first zero pulse of the encoders after coming back from the
upper hardware limit at initialisation. See Ref. Document [1] Chapt. B 1.2.3
3.2
Filters Wheel
In front of the TCCD a wheel bearing 8 filters is driven by the motor/encoder set through a factor 8 reduction which gives 2000 pulse/rev and a resolution of ~ 0.2 ° on the filter position.
The reference position is given by a magnetic sensor which detects a hole in the metalic wheel again
synchronized with the zero pulse of the encoder. See ref. Document [1] Chapt. B 1.2.4
3.3
Dichroic Mirror
Three basic positions for this rotating set of 2 mirrors: a central one where no mirror intercepts the
light beam to permit a non-attenuated view of faint sources, and two end positions where the beam is
diverted to one of two detector. The central position (Dichroic OFF) is referenced through an absolute
8 bit encoder meanwhile the 2 end positions are fixed hardware limits. The motor drives the rotating
set through a slipping clutch and a bistable spring assembly. This configuration ensures that a permanent mechanical force maintains the mobile part on the hardware limit when the motor is OFF.
Another critical condition is the good balance of the rotating part. See the counterweight trimming.
3.4
Objectives Changer
A similar assembly is used but in a linear configuration. There is no encoder as only 2 mechanical
end-positions are used. The small field has its own manual focus trimming.
11
12
3.5
F/35 Tech. Maintenance Manual
LSO-MAN-ESO-63108-0001
X-Hair
The TCCD looks to the X-hair assembly through a small center hole in the GP mirror. The controller
amplifier regulates the current of an incandescent bulb located behind a tiny wire cross. The cross
stray light moves over the sky field and is a fixed reference on the camera/chip field.
3.6
Tecnical CCD
The xxxx X xxxx CCD camera head is housed in the Cass IR Adaptor and comes almost in contact of
the filter wheel. Power and coolant are taken from available outlets on the telescope Cassegrain rotator and the CCD head is connected to the support electronics of the Rotator own Center Field Camera.
F/35 Tech. Maintenance Manual
4
LSO-MAN-ESO-63108-0001
TOP-RING UNIT
The Focusing and Turning Unit is under control of channels 3 and 4 of the Maccon controller nbr. 2.
The chopping unit is mounted under the lower flange of the FTU and is electrically independant from
it .
The focus and rotating axis are blocked in the no-energized state by mechanicals built-in brakes. For
safety reason these 2 functions are hardware interlocked with their respective brake to protect them
against any software glitch or manual mishandling : part of the current through the brake coil is used
to power the hardware limit circuit; hence when the coil is not activated both end limits signals are in
the "limit reached" state and inhibit the output amplifiers. In local mode 2 switches permit the manual
release of the brakes and the control of the axis with the handset. These functions are implemented on
the Auxiliary board. (see Chapter 8.2 & 8.3).
4.1
Focus
An encoder of 250 puls/rev and a 5.5 revs (= 5.5 mm translation) full range give a resolution of ~ 4.0
micron/pulse. The (velocity) servo-loop is of the proportional/integral type as the output circuit is
open when the axe is braked (The former design maintened the motor under control even with the axe
blocked and would have then developped full ouput voltage with an integral correction).
See Chap 2.1.2 in "Wobbling Mirror Maintenance manual " ESO 1985 ).
4.2
Rotator
The mid-range position was selected as to permit a East-West direction chopping and with a full range
of ~ 205 º (950 encoder pulses) we can explore over 90 º on both sides.
Scale: 1 pulse => 0.22 º or 1 º => 4.63 pulses .
Due to the lack of space there was no Tacho generator installed in the original design and the control
was implemented through an open loop. Now a derivative correction is implemented in the Maccon
controller software which allows for a larger proportional gain, better accuracy and a smoother rotation.
4.3
Chopper
The control of the M2 chopping mirror still use the same servo-control board in its dedicated small
rack. The analog control loop with PID correction has 2 inputs, one of which is feeded by the Chopper
Offset function from the Auxiliary Board.That function uses 2 DACs and an analog switch. From the
parameters given by the observer (On Star Position and Chopping Amplitude), the software computes
the respective values for the 2 extreme positions of the mirror and loads them into the DACs. Then a 2
to 1 analog switch selects the signal. The selection is controlled by 2 logically ANDED signals: bit 1
P(6) from Acromag for software convenience and a TTL input for an external signal (when the detector actually needs to master the chopping).
See Chapter 8.2
13
14
F/35 Tech. Maintenance Manual
LSO-MAN-ESO-63108-0001
F/35 Tech. Maintenance Manual
5
LSO-MAN-ESO-63108-0001
15
SETUP AND OPERATION
5.1
Setup
During an instrument change-over, the different parts shall be installed in the following order:
1. The Main Electronic Rack on its dedicated stand with front door towards the center of the cage.
2. The Cassegrain Adaptor on the focal instrument flange.
3. Exchange of the Top-Ring Units (F/8 <-> F/35).
4. With the Telescope to the Platform, connections of the Top-Ring cables (4 connectors) and removal of
the Chopper mirror (M2) cover.
5. In the cage, the main cable beetween the Cass Adaptor and the Main Electronic Rack (Burndy 104 pin)
6. Connections from the Top-Ring to the Main Rack (behind and through the floor aperture)
As space is limited, these connections require to momentarily move ~ 15 cm forwards both Power
Amps and Servo racks):
• On Power Amps Rack:
• Mirrors Drives (1x Souriau, “domino” type, labelled MU)
• 2x 220v plugs from Servo rack ( 220v power is under control of a solid-state switch)
• On Servo rack:
• Position Sensor (1x Lemo 6 pins, labelled PM)
• Mirror Ends Stops (Burndy 19 pins, labelled E)
• From LCU terminals:
• Focus and Rotator encoders (Burndy 23 & 19 pins respectively, labelled F & R)
• Foc/Rot Motors/Brake/Limits (Burndy 19 pins, labelled M, DO NOT confuse with Mirror
Ends Stops)
Chapter 8.4 gives a synoptic view of the Top-ring cabling
7. Ethernet connection on the Main Rack
8. Power connections on Main Rack and Cass Adaptor.
9. Power and Signal connections of the TCCD from the available modules on the Cassegrain Rotator.
10.A Position Signal is available on a BNC connector of the Chopper Servo-loop module to be monitored
in the control room.
5.2
Operation
At power-up on both the Cass Adaptor and the LCU in the Main Rack, nothing happens as the system
is in local (Manual) mode. Meanwhile, the CPU loads the application from a Server (~ 2 min) before
to be able to respond to control from the User Interface in the corresponding workstation. Once the
User Interface takes control, no local action is possible (from the handset) unless the CPU is hardware
reset.
5.3
Testing in local mode
To test the integrity of the different functions without the need of a workstation and the net, one can
use the direct analog handset feature designed in the DC Motor Drive modules. One can select the direction and speed of the movement on one axis/function at a time and check the result with the status
16
F/35 Tech. Maintenance Manual
LSO-MAN-ESO-63108-0001
Leds (Upper and Lower Limits, Zero pulse, ...
For the 2 FTU functions, a pair of small switches on the front plate of the Auxiliary module permit to
release any of the corresponding brake before any movement on these axis.
F/35 Tech. Maintenance Manual
6
LSO-MAN-ESO-63108-0001
17
FTU Disassembly
( # xx refers to items in Drawing T 45-102 f 1/2 02)
Making some tools as (I 31.300-07 + 08 + 09 ) to remove the Transroll nuts.
6.1
Installation in Test Stand
• Set-up to materialize/measure the center of rotation relative to spider arms before dismounting.
• Install hook on top of FTU
• Ease-out or remove the 4 x M6 push-pull screws and release the 4 clamps :
a. "fastening body" ( I 31.300.02 ) to free up the FTU from the Top-Ring
b. cylinder ( see F/35 Maintenance Manual chap.A.1.1.6 page 13).
• Ease out smoothly the FTU with the crane.
• Install it in the Test Stand.
• Clamp it w/ ( I 31.300.02 ).
6.2
Removing the Rotator Encoder
• Free-up the cables/connectors from the Top Flange
• To free-up the supporting steel spiral set: (T45-102-68 & 69), unscrew the (T45-102-68) fix point axle
to loose it from the T45-102-07 support, and un-roll steel spiral and cables.
• Remove the 6 M6 screws #44, and then the top flange I 31-300-01.
• Remove the 4 spring washers, ring #10 and Tap #04
• Ease out the assembly of (#02 + ball-bearings set + #07 + Magnet Brake) along the #05 cylinder.
• Put back Tap #04 on #05 cylinder.
• Extract #07 from the assembly as it has to be machined to accept Heidenhaim encoders in replacement
of the Litton's.
6.3
Removing the Focus Encoder
• Now the 6x M6 long screws (T45-102-47) can be accessed and dismounted:
this will free the "Electro-mechanical Focussing part" from the "Mechanical Rotator and Focusing part".
Then the Electro-mechanical part can be removed holding it by the counterweight and lifting it smootly
while taking care of the cables.
CAUTION: Do not apply force on the focussing screw or any part still attached to it!
18
F/35 Tech. Maintenance Manual
LSO-MAN-ESO-63108-0001
7
linear, 2 posititions
Objective
Changer
rot. Range 205 deg.
resol:. 0.22 deg.
Sky scale: 36”/V
Pk to Pk: 2’30”
Rotator
Chopper
Offset
Chopper
Power
linear Range 5 mm
resol: 3,65 µm
linear, 3 posit.
Focus
Dichroic
Mirror
Filter Wheel
rot. infinite Range
8 pos./2000 pls
idem X-Field
Y-Field GP
X-Hair
linear, field: 9,6’
scale: 1,64 “/mm
X-Field GP
Axis Type
Brake 24V/
2A
Brake 24V/
0,3A
slipping
clutch
slipping
clutch
Clutch/
Brake
+/- 2,15 V
Upper &
Lower
Upper &
Lower
Upper &
Lower
0 - 24 V
Upper &
Lower
idem
Upper &
Lower
HW Limit
FUNCTIONS SPECIFICATIONS
Heidenhain, inc
ROD 1020, 250 pls
Heidenhain, inc.
ROD 1020, 250 pls
Litton, 8bit binary
SNB11-09P11
Heidenhain, incremental ROD 1020, 250 pls
none
none
idem
Heidenhain, inc.
ROD 1020, 250 pls
Encoder
Burr-Brown DAC7624
(4x 12 bit DAC)
Escap 28PL21-419E
No Tacho
Inland NT 2146
Inland TG 2126
Escap 28L28-410E
Escap 16C24-204
Escap 28L28-410E
Escap 16C24-204
Incandescent Bulb
Escap 28L28-410E
Escap 16C24-204
idem
Escap 28L28-416E
Escap 28C24-405
Motor/Tacho
Table 1: Functions Specifications
open loop
high gear
ratio
velocity loop
PD
2 end-stops
+ 1 enc pos.
velocity loop
PID
2 mech endstops
idem
velocity loop
PID
Remark
OFF State
Power-On Reset:
V=0.0V
Upper HW lim
+ Zero pulse
Upper HWLim
+ Zero pulse
Upper HWLim
Ref. Pulse
+ Zero Pulse
Upper HWLim
idem
Upper HWLim
+ Zero Pulse
Init.
System
P(7,7)
DAC: P(2,4)
Ctrl: P(7,0-4)
Switch:P(6,1)
Brake: P(7,5)
Status: P(6,6)
Brake: P(7,6)
Status: P(6,7)
Acromag
Mapping
n.a.
n.a.
2/4
2/3
2/2
2/1
1/4
1/3
1/2
1/1
Maccon
Nr/Ch
F/35 Tech. Maintenance Manual
LSO-MAN-ESO-63108-0001
19
20
F/35 Tech. Maintenance Manual
LSO-MAN-ESO-63108-0001
F/35 Tech. Maintenance Manual
8
8.1
SCHEMATICS
Adaptor Interface Connections
LSO-MAN-ESO-63108-0001
21
22
8.2
F/35 Tech. Maintenance Manual
Chopper Offset Control
LSO-MAN-ESO-63108-0001
F/35 Tech. Maintenance Manual
8.3
FTU Brakes Function
LSO-MAN-ESO-63108-0001
23
24
8.4
F/35 Tech. Maintenance Manual
FTU to LCU Cabling
LSO-MAN-ESO-63108-0001
F/35 Tech. Maintenance Manual
8.5
Servo Rack Internal Wiring
LSO-MAN-ESO-63108-0001
25
26
8.6
F/35 Tech. Maintenance Manual
Auxiliary Module Components Location
LSO-MAN-ESO-63108-0001
F/35 Tech. Maintenance Manual
9
LSO-MAN-ESO-63108-0001
MAPPING OF ACROMAG PORT P2
Port/Pin
Control bits
Dichroic
Chopper Bus
Function
Connector P2
Inducer bit
Default Status
Port(7) pin (7)
Chopper Power ON
A16
63
1 => Power OFF
Port(7) pin (6)
Focus Brake ON/OFF
A15
62
1 => Axe locked
Brake ON
Port(7) pin (5)
Rotator Brake ON/OFF
A14
61
idem Focus
Port(7) pin (4)
Chopper DAC A0
A13
60
Port(7) pin (3)
Chopper DAC A1
A12
59
Port(7) pin (2)
Chopper DAC CS
A11
58
Port(7) pin (1)
Chopper DAC R/W
A10
57
Port(7) pin (0)
Chopper DAC LDAC
A9
56
1 => Registers latched
Port(6) pin (7)
Focus Brake Status
A8
55
1 => Axe locked
Port(6) pin (6)
Rotator Brake Status
A7
54
idem Focus
Port(6) pin (5)
reserved
A6
53
Port(6) pin (4)
res.
A5
52
Port(6) pin (3)
res.
A4
51
Port(6) pin (2)
res.
A3
50
Port(6) pin (1)
Chopper Posit. Control
A2
49
Port(6) pin (0)
Encoder bit 8
A1
48
C24-C17
40-47
Port(5) pin 0 to 7
Encoder bit 0 to 7
Port(4) pin 4 to 7
not used
Port(4) pin 0 to 3
DAC bit 8 to 11
C32-C29
32-35
Port(3) pin 0 to 7
DAC bit 0 to 7
A24-A17
24-31
Port(2) pin 0 to 7
not used
A32-A25
16-23
Port(1) pin 0 to 7
not used
B24-B17
8-15
Port(0) pin 0 to 7
not used
B32-B25
0-7
36-39
+5V
pins C1,C9,B1,B9
<=
GND
pins C5-C8, C13-C16
<=
pins B5-B8, B13-B16
<=
1 => DAC B, Ref. Posit.
0 => DAC A Offset Posit.
27
28
F/35 Tech. Maintenance Manual
LSO-MAN-ESO-63108-0001
LCU: VME Slots Configuration
Slot
Module
Function
1/2
IF MVME 712M
Interface Connection Card
3
CPU 167-01A
CPU
5
Maccon MAC4-INC #1
Motor Controller for Guide Probe, Objective, Crosshair
6
VME4SA #1
Amplifier
9
Maccon MAC4-INC #2
Motor Controller for Filter, Dichroic, Focus, Rotator
10
VME4SA #2
Amplifier
12
DIG I/O (Acromag)
Digitial I/O
13/14
Auxiliary Board
DAC for Chopper Control, Focus/Rotator Brake Control
16/17
Power Supply +/- 15v, 5V
F/35 Tech. Maintenance Manual
LSO-MAN-ESO-63108-0001
10 CABLING OF THE MAIN RACK
10.1
Synoptics
X-Hair
4
3
VME LCU F/35 => l3p6adi
Objectives
12
6
Dichroic
11
5
L
H
Auxiliary board
Acromag
Filter
4
3
2
1
4
3
2
1
F/35 Distrib. Panel
2
GP-Y
1
GP-X
R otator
Focus
Dichroic
F ilte r
Maccon # 2
X-Hair
Objective
GP-Y
GP-X
Maccon # 1
To F/35 Adapter
F/35 Adapter
7
Input
8
Output
Synch. from
TIMMI2
Cannon 9 p
Terminals
RmCtrl
Position Sensor
Focus
PM
E
F5
10
Rotator
R5
9
F/R
Brake,
Motor
M5
Input 1
Input 2
Chopper
Servo Control
Output
Power
Control
Power Supplies
Mirror
MU5
to T op-R ing
Inputs
MU
Power Amps
29
30
F/35 Tech. Maintenance Manual
LSO-MAN-ESO-63108-0001
10.2
Name
GP-X
GP-Y
Objectives
X-Hair
FilterWheel
Dichroic
Focus Ctrl to
Terminals
Rotator Ctrl to
Terminals
Foc/Rot Ctrl to
Top-Ring
Foc/Rot Enc to
TopRing
Acromag
Auxiliary
No
1
2
3
4
5
6
7
8
9
10
11
12
Cabling of Main Rack
Auxiliary Lower
Acromag P2
Terminals
Terminals
Maccon 2, Ch 4
Maccon 2, Ch 3
Maccon 2, Ch 2
Maccon 2, Ch 1
Maccon 1, Ch 4
Maccon 1, Ch 3
Maccon 1, Ch 2
Maccon 1, Ch 1
From
DIN 41612
DIN 41612
Har-Pak
Har-Pak
Har-Pak
Har-Pak
Har-Pak
Har-Pak
Har-Pak
Har-Pak
connector
23
2
0,10 m
6
0,10 m
0,20 m
27
10+10
17
3+3+9+7
3+3+9+7
3+3+7
3+3+7+9
3+7+7
3+7+7
3+3+7+7
3+3+7+7
Nbr of
pins
0,15 m
0,80 m
0,80 m
0,15 m
0,15 m
0,80 m
0,80 m
0,80 m
0,80 m
0,80 m
0,80 m
Lenght
LCU BackPlate
Terminals
LCU BackPlate
Auxiliary board
Terminals
Terminals
Distrib Panel
Distrib Panel
Distrib Panel
Distrib Panel
Distrib Panel
Distrib Panel
Table 2: List of cables in Main Rack
To
2x isolated BNC
Canon D 9F
Upper DIN 41612
Burndy 23F
&
Burndy 19F
Burndy 19M
Canon D 15M &
Canon D 25M
Canon D 15M &
Canon D 25M
Canon D 15M
Canon D 15M
Canon D 15M &
Canon D 25M
Canon D 15M &
Canon D 25M
connector
Analog Signal for Chopper position
& Extern Swap Ctrl
Foc/Rot Brakes
Chopper Power Ctrl
Chopper Posit. DAC
Focus Encoder & Rotator Encoder
Motors/Brakes/Limits
Comments
F/35 Tech. Maintenance Manual
LSO-MAN-ESO-63108-0001
31
32
F/35 Tech. Maintenance Manual
LSO-MAN-ESO-63108-0001
F/35 Tech. Maintenance Manual - 1.0
10.3
LSO-MAN-ESO-63108-0001
Details of Cables
NAME
1, 2 : Guide-Probe X Y
DATE
27 Feb 99
Connector
PROJECT
F/35 Upgrade
asmbly of shielded
LENGHT
0.80m
FROM
VME backPlane Maccon #1
TO
F/35 Distribution Panel
PLUG
Har-Pak (Harting)
PLUG
Cannon D (15 & 25 pins) Males
SIGNAL
FROM
pin
TO pin
WIRE COLOR
or NUMBER
COMMENTS
M+
E7,E8
3
Brown
Cannon D 15 pin, Male
M-
E5,E6
4
White
id
Shield
D7
14
Shield
id
T+
E3
1
Brown
id
T-
E2
2
White
id
Shield
E4
15
Shield
id
ULim+
C3
7
Yellow
id
ULim-
C5
8
Green
id
LLim+
D3
5
Pink
id
LLim-
D5
6
Gray
id
+5 V
C2
10
Red+Blue
id
GND
C7
9
Brown+White
id
Shield
C6
A+
A8
1
Red
Cannon D 25 pin , Male
A-
A6
2
Blue
id
B+
B7
3
Brown
id
B-
B5
4
White
id
Z+
A4
5
Pink
id
Z-
A2
6
Gray
id
Shield
C6
15
Shied
id
Tags:
Tags:
PG-X Macc #1, Ch.1
GuideProbe X
PG-Y Macc #1, Ch.2
GuideProbe Y
33
34
F/35 Tech. Maintenance Manual - 1.0
NAME
3, 4: Objective, X-Hair
DATE
14 Nov 99
Connector
LSO-MAN-ESO-63108-
PROJECT
F/35 Upgrade
asmbly of shielded
LENGHT
0.80m
FROM
VME backPlane Maccon #1, Ch. 3&4
TO
F/35 Distribution Panel
PLUG
Har-Pak (Harting)
PLUG
Cannon D 15 pin Male
SIGNAL
FROM
pin
TO pin
WIRE COLOR
or NUMBER
COMMENTS
M+
E7,E8
3
Brown
Cannon D 15 pin, Male
M-
E5,E6
4
White
id
Shield
D7
14
Shield
id
T+
E3
1
Brown
id
T-
E2
2
White
id
Shield
E4
15
Shield
id
ULim+
C3
7
Yellow
id
ULim-
C5
8
Green
id
LLim+
D3
5
Pink
id
LLim-
D5
6
Gray
id
+5 V
C2
10
Red+Blue
id
GND
C7
9
Brown+White
id
Shield
Tags:
Tags:
Objectives, Macc #1, Ch.3
Objectives
X-Hair, Macc #1, Ch.4
X-Hair
F/35 Tech. Maintenance Manual - 1.0
NAME
5: Filters Wheel
DATE
25 Nov 99
Connector
LSO-MAN-ESO-63108-0001
PROJECT
F/35 Upgrade
asmbly of shielded
LENGHT
0.80m
FROM
VME backPlane Maccon #2, Ch.1
TO
F/35 Distribution Panel
PLUG
Har-Pak (Harting)
PLUG
Cannon D (15 & 25 pins) Males
SIGNAL
FROM
pin
TO pin
WIRE COLOR
or NUMBER
COMMENTS
M+
E7,E8
3
Brown
Cannon D 15 pin, Male
M-
E5,E6
4
White
id
Shield
D7
14
Shield
id
T+
E3
1
Brown
id
T-
E2
2
White
id
Shield
E4
15
Shield
id
ULim+
C3
7
Yellow
id
ULim-
C5
8
Green
id
LLim+
D3
5
Pink
id
LLim-
D5
6
Gray
id
+5 V
C2
10
Red+Blue
id
GND
C7
9
Brown+White
id
Shield
C6
A+
A8
1
Red
Cannon D 25 pin , Male
A-
A6
2
Blue
id
B+
B7
3
Brown
id
B-
B5
4
White
id
Z+
A4
5
Pink
id
Z-
A2
6
Gray
id
Ref. Position
B3
7
Yellow
id
GND
C7
24
Green
id
Shield
C6
15
Shield
id
Tags:
Tags:
FILTERS Macc #2, Ch.1
Filters
35
36
F/35 Tech. Maintenance Manual - 1.0
NAME
6: DICHR. MIRROR
DATE
18 JAN 2000
Connector
LSO-MAN-ESO-63108-
PROJECT
F/35 Upgrade
asmbly of shielded
LENGHT
0.80m
FROM
VME backPlane Maccon #2, Ch.2
TO
F/35 Distribution Panel
PLUG
Har-Pak (Harting), DIN 41612
PLUG
Cannon D (15 & 25 pins) Males
FROM
pin
TO pin
WIRE COLOR
or NUMBER
COMMENTS
M+
E7,E8
3
Brown
Cannon D 15 pin, Male
M-
E5,E6
4
White
id
Shield
D7
14
Shield
id
T+
E3
1
Brown
id
T-
E2
2
White
id
Shield
E4
15
Shield
id
ULim+
C3
7
Yellow
id
ULim-
C5
8
Green
id
LLim+
D3
5
Pink
id
LLim-
D5
6
Gray
id
+5 V
C2
10
Red+Blue
id
GND
C7
9
Brown+White
id
Shield
C6
SIGNAL
HAR-PAK
ACROMAG P2
Cannon D 25 pin , Male
Encoder D8
A1
9
through a 10 pins flat cable & connect.
D7
C17
8
id
D6
C18
7
id
D5
C19
6
id
D4
C20
5
id
D3
C21
4
id
D2
C22
3
id
D1
C23
2
id
D0
C24
1
id
GND
C15
10
id
Tags:
Dichroic, Mac #2,Ch.2
Tags:
F/35 Tech. Maintenance Manual - 1.0
LSO-MAN-ESO-63108-0001
NAME
7: Focus Ctrl - Terms.
DATE
24 NOV 99
Connector
PROJECT
F/35 Upgrade
asmbly of shielded
LENGHT
0.15 m
FROM
VME backPlane Maccon #2, Ch.3
TO
Back Terminals Strips
PLUG
Har-Pak (Harting)
PLUG
Terminals
SIGNAL
FROM
pin
M+
E7,E8
Brown
M-
E5,E6
White
Shield
D7
Green-Blue
TO pin
WIRE COLOR
or NUMBER
37
COMMENTS
Block D
T+
E3
Brown
T-
E2
White
Shield
E4
Green-Blue
(Handset Input)
B6
White
ULim+ (P +)
C3
Brown
(MP)
C4
Red
ULim- (P -)
C5
Blue
LLim+ (N +)
D3
Gray
(MN)
D4
Pink
LLim- (N -)
D5
Yellow
GND
C7
Green
Shield
C7
Green-Blue
A+
A8
Red
A-
A6
Blue
B+
B7
Brown
B-
B5
White
Z+
A4
Pink
Z-
A2
Gray
+5V
C2
Yellow
GND
C6
Green
Shield
C6
Green-Blue
Not Used
Block A B
Block G
Servo Parameters:
R1 (TG)
2.7K
R2 (P)
100K
C1 (I)
0.25UF
D
0UF
38
F/35 Tech. Maintenance Manual - 1.0
NAME
8: Rotator Ctrl - Terms.
DATE
24 NOV 99
Connector
LSO-MAN-ESO-63108-
PROJECT
F/35 Upgrade
asmbly of shielded
LENGHT
0.15 m
FROM
VME backPlane Maccon #2, Ch.4
TO
Back Terminals Strips
PLUG
Har-Pak (Harting)
PLUG
Terminals
SIGNAL
FROM
pin
M+
E7,E8
Brown
M-
E5,E6
White
Shield
D7
Green-Blue
TO pin
WIRE COLOR
or NUMBER
COMMENTS
Block F E
T+
E3
Brown
T-
E2
White
Shield
E4
Green-Blue
(Handset Input)
B6
White
ULim+ (P +)
C3
Brown
(MP)
C4
Red
ULim- (P -)
C5
Blue
LLim+ (N +)
D3
Gray
(MN)
D4
Pink
LLim- (N -)
D5
Yellow
GND
C7
Green
Shield
C7
Green-Blue
A+
A8
Red
A-
A6
Blue
B+
B7
Brown
B-
B5
White
Z+
A4
Pink
Z-
A2
Gray
+5V
C2
Yellow
GND
C6
Green
Shield
C6
Green-Blue
Not Used
Block A B
Block H
Servo Parameters:
R1 (TG)
infini
R2 (P)
20K
C1 (I)
inf (CC)
D
0UF
F/35 Tech. Maintenance Manual - 1.0
NAME
9: Foc/Rot Ctrl Topring
DATE
14 NOV 99
Connector
asmbly of shielded
LSO-MAN-ESO-63108-0001
FROM
Burndy 19 pin Male Chassis
PLUG
PROJECT
F/35 Upgrade
LENGHT
0.80 m
TO
Back Terminals Strips
PLUG
Terminals
SIGNAL
FROM
pin
FOCUS M +
V/1
Red
P/2
Blue
“
M-
TO pin
WIRE COLOR
or NUMBER
COMMENTS
Block D
“
T+
J/16
Violet
“
T-
K/17
Black
“ Brake
U/6
Red-Blue
“ ULim
N/7
Gray
“ LLim
A/8
Pink
Lim 0 V
C/10
Grey-Pink
ROTATOR M+
S/4
Yellow
R/3
Green
“
M-
Block C
Block A B
Block F
“
T+
L/18
Brown
(not used)
“
T-
M/19
White
(not used)
“ Brake
B/9
White-Yellow
Block C
“ ULim
E/12
Brown-Green
Block A B
“ LLim
D/11
White-Green
+ 24 V BRK & LIM
T/5
Yellow-Brown
Shield
F/13
Shield
Block A B
39
40
F/35 Tech. Maintenance Manual - 1.0
NAME
10: Foc/Rot Encoders Topring
DATE
20 DIC 99
Connector
asmbly of shielded
FROM
Burndy 23 & 19 pins, Female, Chassis
PLUG
SIGNAL
FROM
pin
TO pin
LSO-MAN-ESO-63108-
PROJECT
F/35 Upgrade
LENGHT
0.80 m
TO
Back Terminals Strips
PLUG
Terminals
WIRE COLOR
or NUMBER
COMMENTS
Burndy 23 pin Chassis Fem
FOCUS A +
Z
Violet
A-
R
Black
B+
S
White
B-
T
Brown
Z+
U
Gray
Z-
K
Pink
Fault
H
Yellow
+5V
X
Red
0V
V
Blue
Shield
L
White-Yellow
ROTATOR A +
Z
Violet
A-
R
Black
B+
T
White
B-
U
Brown
Z+
W
Gray
Z-
X
Pink
Fault
A
Yellow
+5V
H
Red
0V
K
Blue
Shield
L
White-Yellow
Block G
Burndy 19 pin Chassis Fem
Block H
F/35 Tech. Maintenance Manual - 1.0
NAME
11: ACROMAG
DATE
18 JAN 2000
Connector
LSO-MAN-ESO-63108-0001
PROJECT
F/35 Upgrade
asmbly of shielded
LENGHT
0.80 m
FROM
VME BackPlane Acromag P2
TO
LCU BackPlate, Auxiliary Board
PLUG
DIN 41612 welded
PLUG
DIN 41612, 2x Cannon D 25 & 9 pins
SIGNAL
FROM
pin
TO pin
WIRE COLOR
or NUMBER
COMMENTS
Auxiliary Board DIN 41612 Upper
Focus Brake Status
A8
C11
Violet
Rotator Brake Status
A7
C12
Black
Focus Brake Ctrl
A15
C13
Red
Rotator Brake Ctrl
A14
C14
Blue
DAC A0
A13
C15
Gray
DAC A1
A12
C16
Pink
DAC CS
A11
C17
Yellow
DAC R/W
A10
C18
Green
DAC LDAC
A9
C19
Brown
P(6,5)
A6
A25
White
P(6,4)
A5
A26
Pink/Brown
P(6,3)
A4
A27
Pink/White
P(6,2)
A3
A28
Gray/Brown
Chopper Position Ctrl
A2
A29
Gray/White
P(4,3) Chopper DAC D11
C29
C21
Yellow/Brown
P(4,2) D10
C30
C22
Yellow/White
P(4,1) D9
C31
C23
Green/Brown
P(4,0) D8
C32
C24
Green/White
P(3,7) D7
A17
C25
Red/Blue
P(3,6) D6
A18
C26
Gray/Pink
P(3,5) D5
A19
C27
Gray/Yellow
P(3,4) D4
A20
C28
Gray/Green
P(3,3) D3
A21
C29
Black/Brown
P(3,2) D2
A22
C30
Black/White
P(3,1) D1
A23
C31
Blue/Brown
P(3,0) D0
A24
C32
Blue/White
GND
C16
C10
Brown/Red
41
42
F/35 Tech. Maintenance Manual - 1.0
LSO-MAN-ESO-63108-
SIGNAL
FROM
pin
TO pin
WIRE COLOR
or NUMBER
COMMENTS
CHOPPER Power ON P(7,7)
A16
1
Gray
Cannon D 9 pin Female, L= 0.10m
(reserved) P(6,5)
A6
2
Yellow
(reserved) P(6,4)
A5
3
Green
(reserved) P(6,3)
B5
4
White
GND
B6
9
Brown
Shield
N.C.
5
Shield
P(6,0) DICHROIC D8
A1
9
Cannon DB25 on distrib Panel
P(5,7) D7
C17
8
Thtough a 10 pin flat cable & conect.
P(5,6) D6
C18
7
P(5,5) D5
C19
6
P(5,4) D4
C20
5
P(5,3) D3
C21
4
P(5,2) D2
C22
3
P(5,1) D1
C23
2
P(5,0) D0
C24
1
GND
C15
10
F/35 Tech. Maintenance Manual - 1.0
NAME
12: AUXILIARY
DATE
30 JAN 2000
Connector
LSO-MAN-ESO-63108-0001
PROJECT
F/35 Upgrade
asmbly of shielded
LENGHT
0.80 m
FROM
VME BackPlane Auxiliary Board
TO
Terminal & Acromag
PLUG
2x DIN 41612 to solder
PLUG
DIN 41612, & bare wires w/ tags
SIGNAL
FROM
pin
TO pin
Upper Connector
WIRE COLOR
or NUMBER
COMMENTS
Acromag Board DIN 41612 Upper
Focus Brake Status
C11
A8
P(6,7) R
Rotator Brake Status
C12
A7
P(6,6) R
Focus Brake Ctrl
C13
A15
P(7,6) W
Rotator Brake Ctrl
C14
A14
P(7,5) W
DAC A0
C15
A13
P(7,4) W
DAC A1
C16
A12
P(7,3) W
DAC CS
C17
A11
P(7,2) W
DAC R/W
C18
A10
P(7,1) W
DAC LDAC
C19
A9
P(7,0) W
P(4,3) Chopper DAC D11
C21
C29
P(4,3) W
P(4,2) D10
C22
C30
P(6,6) W
P(4,1) D9
C23
C31
P(6,7) W
P(4,0) D8
C24
C32
P(4,0) W
P(3,7) D7
C25
A17
P(3,7) W
P(3,6) D6
C26
A18
P(3,6) W
P(3,5) D5
C27
A19
P(3,5) W
P(3,4) D4
C28
A20
P(3,4) W
P(3,3) D3
C29
A21
P(3,3) W
P(3,2) D2
C30
A22
P(3,2) W
P(3,1) D1
C31
A23
P(3,1) W
P(3,0) D0
C32
A24
P(3,0) W
GND
C10
C16
P(6,5)
A25
A6
P(6,5)
P(6,4)
A26
A5
P(6,4)
P(6,3)
A27
A4
P(6,3)
P(6,2)
A28
A3
P(6,2)
Chopper Position Softw. Ctrl
A29
A2
P(6,1) W
43
44
F/35 Tech. Maintenance Manual - 1.0
LSO-MAN-ESO-63108-
SIGNAL
FROM
pin
Chopper Position Extern Ctrl
A30
Analog GND
A31
DAC Analog OUT
A32
+ 12 V
A20
Red
0V
A9/A10
(not connected)
- 12 V
A16
Yellow
TO pin
WIRE COLOR
or NUMBER
COMMENTS
Insulated BNC on LCU BackPlate
to BackPlate BNCs
Insulated BNC on LCU BackPlate
Blue
Yellow
Lower Connector
Terminals Strip
FOCUS
C26
P+
C25
MP
C22
N+
C23
MN
C20
Yellow
GND
A1/C1
White-Grey
GND
C18
Violet
*
Handset Input : Not Used
Black
Grey
*
*
Blue
Green
Block A
White
ROTATOR
C9
P+
C8
MP
C5
N+
C6
MN
C3
Shield
A2
*
Shield
FOCUS Brake Return
C21
*
Pink
ROTATOR Brake Return
C4
*
Gray-Pink
+ 24 V Brake & Limits
A10/A12
*
Brown
0V
A18/C18
*
Grey
+5V
A14
*
Blue
*
Handset Input : Not Used
Yellow-Brown
White-Green
*
Green-Brown
Red-Blue
Block C
F/35 Tech. Maintenance Manual - 1.0
LSO-MAN-ESO-63108-0001
LCU Terminals Cabling
Cable 9
Top-ring
(Motor&Lim.
Cable 12
(lower)
(Auxil. Board)
Cable 7
Maccon 2, Ch3
(Focus)
Focus P +
black C25
brown C3
MP
grey C22
red C4
Terminal Strips
P-
pink A/8
Cable 8
Maccon 2, Ch4
(Rotator)
blue C5
N+
blue C23
grey D3
MN
yellow C20
pink D4
grey N/7
N-
grey-pink
0V
white-grey
A1,C1
green C6
green C6
C/10
0V
green C18
green C7
green C7
Shield
green-blue A2
Shield
green-blue
Rotator P +
yellow-brown
C8
brown C3
MP
white-green C5
red C4
white-green D/
11
yellow D5
P-
blue C5
N+
brown-green
C6
grey D3
MN
red-blue C3
pink D4
brown-green
E/12
N-
red-blue U/6
Focus Brake
pink C21
Power
Supplies
white-yellow
B/9
Rotator Brake
pink/gray C4
orange
yellow-brown
T/5
+ 24V Brakes &
Limits
brown A10/A12
orange
black
0V
gray A8/C8
blue
+5V
blue A14
C
yellow D5
Focus M +
brownE7/E8
M-
white E5/E6
violet J/6
T+
brown E3
black K/17
T-
white E2
red V/1
blue P/2
D
45
46
F/35 Tech. Maintenance Manual - 1.0
LSO-MAN-ESO-63108-
LCU Terminals Cabling
Cable 9
Top-ring
(Motor&Lim.
yellow-green
F/13
Terminal Strips
E
Cable 12
(lower)
(Auxil. Board)
Shield
Cable 7
Maccon 2, Ch3
(Focus)
Cable 8
Maccon 2, Ch4
(Rotator)
green-blue E4
green-blue
green-blue
green-blue
ROTATOR M +
brown E7/E8
M-
white E5/E6
(brown L/18)
T+
brown E3
(white M/19)
T-
white E2
violet Z
FOC. Encod A+
A & B swapped
(B+) brown B7
black R
A-
to invert
(B-) white B5
white S
B+
counting
(A+) red A8
brown T
B-
direction
(A-) blue A6
yellow S/4
green R/3
F
gray U
G
Z+
pink A4
pink K
G
Z-
gray A2
yellow H
Fault
red X
+5V
yellow C2
blue V
0V
green C6
white-orange
L
Shield
Shield C6
white-orange
L
Shield
Shield C6
violet Z
ROT. Encod A +
red A8
black R
A-
blue A6
white T
B+
brown B7
B-
white B5
gray W
Z+
pink A4
pink X
Z-
gray A2
yellow A
Fault
red H
+5V
yellow C2
Blue K
0V
green C6
brown U
Cable 10
Top_Ring
(Encoders)
H