1
Introductory Tutorial
Information in this document is subject to change without notice. Companies, names and data used in
examples herein are fictitious unless otherwise noted. This document can be reproduced by anyone for
any purposes in its unmodified form. Modified versions or parts of this document may not be reproduced
or transmitted in any form or by any means, electronics or mechanical, for any purpose, without the
express written permission of YesSoftware, Inc.
© 2002 YesSoftware, Inc. All rights reserved.
CodeCharge Studio Tutorial
iii
Contents
Introduction ....................................................................................................... 1
Chapter 1: Creating Task Management System with Power Wizard.................... 2
Using Power Wizard.......................................................................................................3
Create New Project _________________________________________________________3
Specify Project Properties ____________________________________________________5
Select Database Connection __________________________________________________6
Configure the Wizard ________________________________________________________7
Setup Site Security and Authentication __________________________________________8
Select Database Tables ______________________________________________________9
Configure Site Pages _______________________________________________________10
Specify Site Layout and Menu ________________________________________________11
Select Site Theme _________________________________________________________12
Review Pages and Create the Site _____________________________________________13
Finalizing Task List Page..............................................................................................14
Open Task List Page________________________________________________________14
Test the Page _____________________________________________________________15
Delete Unneeded Columns___________________________________________________16
Change Texts and Captions __________________________________________________17
Launch Data Source Editor __________________________________________________18
Open Visual Query Builder ___________________________________________________19
Select Additional Tables _____________________________________________________20
Arrange Tables in Visual Query Builder _________________________________________21
Define Table Relations ______________________________________________________22
Set Fields for Inclusion in the Grid ____________________________________________24
Return to the Grid _________________________________________________________25
Update Control Sources _____________________________________________________26
Synchronize HTML with the Project ____________________________________________27
View and Test Live Page ____________________________________________________28
Add ListBox Search – Create New Table Row ____________________________________29
Add ListBox Search – Insert ListBox Control _____________________________________30
Add ListBox Search – Set ListBox Properties _____________________________________31
Add ListBox Search – Move Table Row _________________________________________32
Filter Grid Records – Select “Where” Property____________________________________33
Filter Grid Records – Add Search Parameter _____________________________________34
Filter Grid Records – Group “Where” Parameters _________________________________35
Filter Grid Records – Set AND Operator ________________________________________36
View Working Page ________________________________________________________37
Login to the System________________________________________________________38
Access Record Maintenance Page _____________________________________________39
Conclusion ...................................................................................................................40
CodeCharge Studio Tutorial
iv
Chapter 2: Creating an Employee Directory...................................................... 41
Creating New Project ...................................................................................................42
Create New Project ________________________________________________________42
Create “Blank Project”. _____________________________________________________43
Save Newly Created Project. _________________________________________________44
Specifying Project Settings ..........................................................................................45
Open Project Settings ______________________________________________________45
Specify General Project Settings ______________________________________________47
Enter Publishing Settings ____________________________________________________48
Create Database Connection(s) for the Project ___________________________________49
Setup Security Settings for the Project _________________________________________50
Configure Security Groups for the Project _______________________________________52
Creating Database Connection .....................................................................................53
Create an Initial Database Connection _________________________________________53
Build Design Connection ____________________________________________________54
Specify Data Provider (JET, ODBC, etc.) ________________________________________55
Specify Connection Parameters (Database Filename) ______________________________56
Test Database Connection ___________________________________________________57
Complete the Build Process of the Design Connection _____________________________58
Setup Server Connection ____________________________________________________59
Save Project Settings_______________________________________________________60
Creating Grid with Grid Wizard ....................................................................................61
Launch Grid Wizard ________________________________________________________61
Launch Visual Query Builder _________________________________________________62
Specify Database Fields in Visual Query Builder __________________________________63
Select Database Fields for Grid Data Source _____________________________________64
Setup Search Form to be used with the Grid_____________________________________65
Define Grid Sorting and Navigation ____________________________________________66
Select a Theme for the Grid__________________________________________________67
Preview the Grid __________________________________________________________68
Save Project______________________________________________________________69
Finalizing Search and Grid created by the Wizard ........................................................70
Rename the Page __________________________________________________________71
Change the Size of Search Fields______________________________________________73
Create ListBox Field ________________________________________________________74
Configure ListBox Field _____________________________________________________75
Change Field Captions ______________________________________________________76
Publish the Page___________________________________________________________77
Review and Test Published Page ______________________________________________78
Setup Search Parameters ___________________________________________________79
Preview and Test the Project _________________________________________________82
Protecting Web Pages from Unauthorized Access ........................................................83
Launch Login/Logout Wizard _________________________________________________83
CodeCharge Studio Tutorial
v
Run Login/Logout Wizard____________________________________________________85
Specify Login Form Options __________________________________________________86
Select a Theme for the Login Form ____________________________________________87
Specify the Login Page for the Project__________________________________________88
Restrict Page Access _______________________________________________________90
Conclusion ...................................................................................................................91
Appendix - Common Errors .............................................................................. 92
Operation must use an updateable query. (Microsoft JET Database Engine) ____________92
Microsoft JET Database Engine (0x80004005) Could not use ''; file already in use._______93
HTTP 500 Internal Server Error _______________________________________________94
Page loads forever or the IIS web server appears to “hang” ________________________95
CodeCharge Studio Tutorial
Introduction
Welcome to the Introductory Tutorial on rapidly creating web applications with CodeCharge Studio. You will
find that CodeCharge Studio is not only easy to use but it is a vital and powerful code generator for visually
creating professional web database solutions.
The tutorial consists of two chapters, each designed to take you through different approaches to creating web
applications from scratch.
It is assumed that you have some knowledge of database and web servers, and it is required that you have a
working web server such as IIS or PWS for Windows, or Apache for Linux already installed and configured. For
the purposes of this tutorial we recommend using IIS or PWS server for Windows. CodeCharge Studio also
comes with sample MS Access databases that can be used during the course of this tutorial.
If you run into technical difficulties, refer to the Appendix section for help and possible solutions.
CodeCharge Studio Tutorial
2
Using Power Wizard
Chapter 1: Creating Task Management System
with Power Wizard
Power wizard is a powerful feature of CodeCharge Studio that can automatically convert a database into a
working web application. By following a few short steps you can create administrative web pages for your SQL
database, or create a skeleton of a web application that you can then extend into a full-featured solution.
In this chapter we will take you through steps of creating ready-to-use Task Management System created in large
part by the Power Wizard, then finalized by utilizing other features of CodeCharge Studio.
CodeCharge Studio Tutorial
Using Power Wizard
3
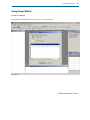
Using Power Wizard
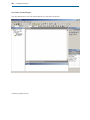
Create New Project
Start CodeCharge Studio and select “New project” on the initial screen.
CodeCharge Studio Tutorial
4
Using Power Wizard
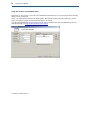
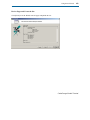
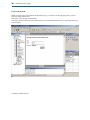
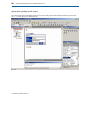
Launch Power Wizard
To start the Power Wizard, specify the name of the new project: “TaskManager”, select the location on the disk
and the programming language, then double-click on the “Power Wizard” icon.
You can also select the “Power Wizard” icon once, then click [OK] button to launch it.
CodeCharge Studio Tutorial
Using Power Wizard
5
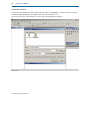
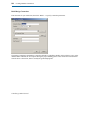
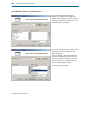
Specify Project Properties
Specify all parameters required by the wizard for generating the site.
Code Language: Programming language or technology to be generated. Currently supported technologies are:
ASP with Templates – generates .asp files with VBScript, which uses separate .html files as templates
during the run-time.
C# - generates .aspx files with C# code
CFML – generates ColdFusion code
CFML with Templates – generates ColdFusion code (.cfm) and separate .html template files
PHP with Templates – generates PHP code (.php) and separate .html template files
Servlets with Templates – generates Java code that utilizes .html templates
Site Language:
Country language to use
when generating text
messages for the site. For
example the text “No
records” that appears when
no more records are to be
displayed within a grid,
could be generated in any
support language.
Database:
The database type that you
want to work with and
convert to a web application.
If you do not find your
database in the list, select an
equivalent, or use “ANSI
SQL-92” to generate
standard SQL.
Server Path:
The full path where generated files should be published (locally). This path is usually preset by the wizard and
can be left without changes.
Server URL:
The web address corresponding to the Server Path. This URL will be used to view the page in Live Data mode.
The wizard automatically defaults to the appropriate URL that matches the server path.
CodeCharge Studio Tutorial
6
Using Power Wizard
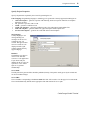
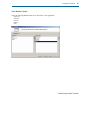
Select Database Connection
Specify the database that you want to connect to. You can create a new database connection by selecting “Use a
new database connection” and following steps described in chapter 2: Create Database section.
For the purposes of this tutorial select “Intranet Database”, which is one of the two sample databases included
with CodeCharge Studio and containing tables such as tasks, priorities and employees.
CodeCharge Studio Tutorial
Using Power Wizard
7
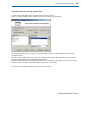
Configure the Wizard
Configure the Wizard by specifying configuration options as follows:
Enable smart naming
Select it so that the Wizard will automatically convert table names to English captions, for example
employees table will be shown as “List of Employees” grid on the page. Fields like task_name will be
converted to column headings like “Task Name”
Autoincremented Primary Keys
Select this option to specify that the database tables contain key fields that are autoincremented. The
Wizard then will hide the key fields from the record maintenance forms, since users do not need to enter
key values.
Use single keyword field for text and memo fields on search forms
Select this option to generate single search field for each of the tables/grids. If this option is deselected, the
wizard creates search section with multiple search fields – one search field for each text or memo field in
the database table.
Publish the site after Wizard completes creating pages
Specify that you want to publish the site as soon as the Wizard creates all necessary pages. This prevents
from forgetting to generate/publish some of the files needed for the application to run.
CodeCharge Studio Tutorial
8
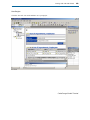
Using Power Wizard
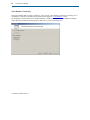
Setup Site Security and Authentication
In this step you may specify if you want to use authentication and check users’ access privileges before allowing
them to access certain pages.
Select “Use authorization” and leave all default options. The Wizard will then create the Login page, and will
allow you to specify security level for each of the pages it is creating.
You may also add additional security groups/levels or specify a different user table for authenticating users, as
described in chapter 2: Setup Security Settings for the Project.
CodeCharge Studio Tutorial
Using Power Wizard
9
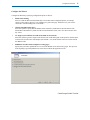
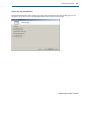
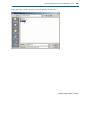
Select Database Tables
Select the following database tables to be converted to a web application:
employees
priorities
projects
statuses
tasks
CodeCharge Studio Tutorial
10
Using Power Wizard
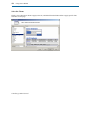
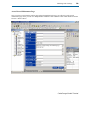
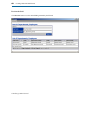
Configure Site Pages
Now configure your site by specifying options and security for each of the pages.
The Wizard creates two pages for each of the tables:
Search and Grid page
Record Maintenance page
By clicking on a name of any of the tables it is also possible to specify that the Search, Grid and Record sections
should all be on the same page for each of the tables.
For purposes of this tutorial, configure pages as shown below. The wizard will then convert tables to web pages
as follows:
employees table: searchable list of employees page and employee information page, accessible only by
authorized users
priorities table: list of priorities page and priority maintenance page, accessible only by administrators
projects table: list of projects page and project maintenance page, accessible only by administrators
statuses table: list of statuses page and status maintenance page, accessible only by administrators
tasks table: searchable list of tasks accessible by anyone, and task maintenance page accessible by
authorized users
CodeCharge Studio Tutorial
Using Power Wizard
11
Specify Site Layout and Menu
The Wizard automatically creates a header page with a menu, which is then placed on all other pages for easy
navigation. Click “Next” to leave the default horizontal position of the menu on all pages.
CodeCharge Studio Tutorial
12
Using Power Wizard
Select Site Theme
Finally, select “Knockout” theme to apply to the site, which the Wizard will then utilize to apply specific fonts
and colors to each page.
CodeCharge Studio Tutorial
Using Power Wizard
13
Review Pages and Create the Site
Click [Finish] to let the Wizard create all pages and publish the site.
CodeCharge Studio Tutorial
14
Finalizing Task List Page
Finalizing Task List Page
Although Power Wizard can create simple web applications, usually you will need to modify and extend the
functionality created by it. For example you may want to change texts and captions, remove some of the grid
columns, add additional search fields and listboxes, etc.
In this section you will learn how to do just that.
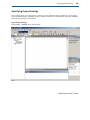
Open Task List Page
Click on the “+” sign next to page name to open it for modifications.
CodeCharge Studio Tutorial
Finalizing Task List Page
15
Test the Page
Click on “Live Page” tab to view and test working page.
You should notice that some of the grid columns contain an ID of entities such as projects, priorities and
statuses, while other columns such as “User Id Assign By” simply may not be needed.
CodeCharge Studio Tutorial
16
Finalizing Task List Page
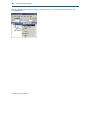
Delete Unneeded Columns
Select unneeded column by clicking and positioning the cursor somewhere within the column, then click on the
“Delete Column” icon.
Use this method to delete the following three columns:
User Id Assign By
Date Assign
Date Resolve
CodeCharge Studio Tutorial
Finalizing Task List Page
17
Change Texts and Captions
Use the design editor to modify some of the texts appearing on the page.
Change:
Project Id to Project
Priority Id to Priority
Status Id to Status
User Id Assign To to Assigned To
CodeCharge Studio Tutorial
18
Finalizing Task List Page
Launch Data Source Editor
Now use Data Source editor to specify additional tables to be used in the grid. First select the “tasks” grid in the
Project Explorer, then click on the […] next to the Data Source property to open the Data Source windows.
Here you can specify additional tables to use in the grid, such as priorities table containing priority names and
statuses table that contains status names.
CodeCharge Studio Tutorial
Finalizing Task List Page
19
Open Visual Query Builder
Now open Visual Query Builder by clicking [Select Query] button.
A new window will open up that shows tasks table, currently used in the Grid.
CodeCharge Studio Tutorial
20
Finalizing Task List Page
Select Additional Tables
Select additional tables that are related to the tasks table. Hold CTL key when clicking on table names to select
multiple tables at once, and then press [Add].
CodeCharge Studio Tutorial
Finalizing Task List Page
21
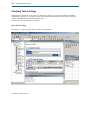
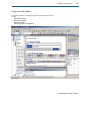
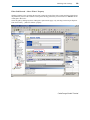
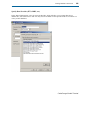
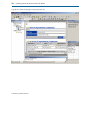
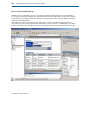
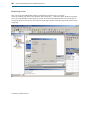
Arrange Tables in Visual Query Builder
Once multiple tables are in the Visual Query Builder, drag tables and arrange them on the screen to see all
information. You will notice that some of the tables are connected. This is because Query Builder recognizes
relations between tables that have fields with the same names. In this case both tasks and statuses tables have the
same field name: status_id, which makes it logical to assume that they are related.
CodeCharge Studio Tutorial
22
Finalizing Task List Page
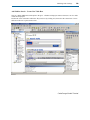
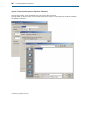
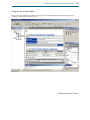
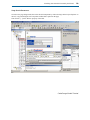
Define Table Relations
Now define relations between remaining tables, in this case employees and tasks, by dragging the foreign key
field user_id_assign_to from tasks table to employees table. You should then see all tables being connected to
the tasks table.
CodeCharge Studio Tutorial
Finalizing Task List Page
23
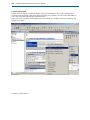
Define Field Joins
Although not necessary in our case, you may also define joins between fields by double-clicking on each of the
lines that connect the tables, then specifying that you want to display all records from tasks table and matching
records from related tables. If you do not do this, the page may not display all records, for example if you have a
task without any priority or status assigned to it.
CodeCharge Studio Tutorial
24
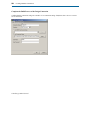
Finalizing Task List Page
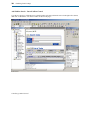
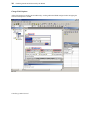
Set Fields for Inclusion in the Grid
Now mark fields to be included in the grid by clicking on corresponding checkboxes. Include the following
fields:
task_id
task_name
project_name
priority_name
status_name
emp_name
Click [OK] when done.
CodeCharge Studio Tutorial
Finalizing Task List Page
25
Return to the Grid
The Data Source window now lists several tables previously selected in the Visual Query Builder. Click OK
again in the Data Source window to return back to the page design mode.
CodeCharge Studio Tutorial
26
Finalizing Task List Page
Update Control Sources
Select project_id field by selecting it in the Project Explorer, or by clicking on it within the page design area.
Then change the value of the “Control Source” property from project_id to project_name.
Also change the value of the “Data Type” property from Integer to Text.
Now your page should display names of projects instead of their numeric ids.
Repeat above actions for the following fields:
priority_id – change to priority_name
status_id – change to status_name
user_id_assign_to – change to emp_name
CodeCharge Studio Tutorial
Finalizing Task List Page
27
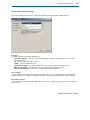
Synchronize HTML with the Project
Click “Live Page” to view and test working page.
Sometimes you will see the message window as shown, which explains that some of the components or controls
were not found in the HTML. This is because you previously removed some of the grid columns and
CodeCharge Studio wants you to confirm that this is OK since those controls are still defined in the project.
Click “Yes” to confirm the removal of the columns and continue.
CodeCharge Studio Tutorial
28
Finalizing Task List Page
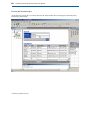
View and Test Live Page
Finally you can view the working page with a grid containing the list of tasks that can be sorted by clicking on
column headings, or searched by entering a keyword.
CodeCharge Studio Tutorial
Finalizing Task List Page
29
Add ListBox Search – Create New Table Row
Now let’s add an additional search option to the grid – a ListBox with project names so that users can view tasks
within selected project.
Position the cursor somewhere within the “Keyword” text by clicking on it, then select the “Insert Row” icon to
add a new table row top the search section.
CodeCharge Studio Tutorial
30
Finalizing Task List Page
Add ListBox Search – Insert ListBox Control
Type the text “Project” within the newly created left table cell, then position the cursor in the right cell as shown,
then click “Add ListBox” icon in the Toolbox to add it to the page.
CodeCharge Studio Tutorial
Finalizing Task List Page
31
Add ListBox Search – Set ListBox Properties
Configure ListBox properties by clicking on it and specifying required values in the property editor as follows:
Name: s_project - this name later will be used as a variable name that contains selected value
Connection: IntranetDB - database connection to use for retrieving ListBox values
List Data Source: projects - table containing ListBox values
Bound Column: project_id - table field whose value will be used as the search parameter
Text Column: project_name - table field whose value should be used to populate the ListBox
Data Type: Integer - type of the value that will be used as the search parameter (project_id is numeric)
CodeCharge Studio Tutorial
32
Finalizing Task List Page
Add ListBox Search – Move Table Row
Finally, move down the table row containing the ListBox by right-clicking near the ListBox and selecting “Move
Row Down”.
You can also do this by positioning the cursor next to the ListBox and using keyboard keys ALT + Down Arrow.
CodeCharge Studio Tutorial
Finalizing Task List Page
33
Filter Grid Records – Select “Where” Property
Working ListBox is now created on the page but it cannot be used to filter grid’s records until the grid itself uses
the parameters passed via the ListBox. To setup those filtering parameters you will need to use WHERE criteria
within grid’s data source.
Select the grid by clicking anywhere within grid’s caption on the page, or by selecting it in the Project Explorer.
Then click on the […] button in “Where” property.
CodeCharge Studio Tutorial
34
Finalizing Task List Page
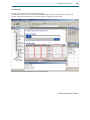
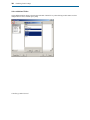
Filter Grid Records – Add Search Parameter
Add new search parameter to the grid by clicking on the [+] button and then specifying tasks.project_id field to
be matched against s_project parameter, which is the name of the previously created ListBox.
This will cause the grid to receive the parameter via the URL, then show only matching results.
Click OK when finished entering the information.
CodeCharge Studio Tutorial
Finalizing Task List Page
35
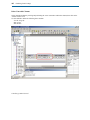
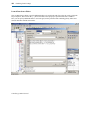
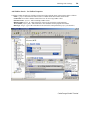
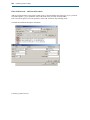
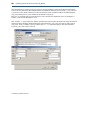
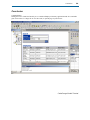
Filter Grid Records – Group “Where” Parameters
Back in the Data Source window you will see four parameters, three previously configured by Power Wizard for
the search keyword, and one you just added for the project listbox. Now the grid will return results if any of the
criteria are met, however we want results to be returned only if both the keyword and listbox parameters are
matched. For example if a user enters keyword “bug” and selects project “CodeCharge”, the grid shouldn’t
return records that are within the selected project or that contain word “bug”. Instead, in we’d want the grid to
show results that are within the project “CodeCharge” and contain the word ”bug”.
To configure the grid in such a way, first group together all parameters matched against “s_keyword”. Select
first three parameters by dragging the mouse over them or by holding Control button and clicking on each
parameter. Then click the [( )] button to add parentheses around the selected parameters, which will group them
together.
CodeCharge Studio Tutorial
36
Finalizing Task List Page
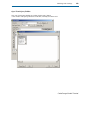
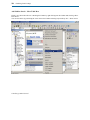
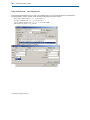
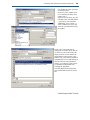
Filter Grid Records – Set AND Operator
Now that all search parameters are in place, the remaining task is to specify that the last keyword parameter
should append the “AND” operator so that the full search parameters read as follows:
(task_name contains (like ‘%…%’) ‘{s_keyword}’ or
task_desc contains (like ‘%…%’) ‘{s_keyword}’ or
task_resolution contains (like ‘%…%’) ‘{s_keyword}’) and
tasks.project_id equals (=) {s_project}
CodeCharge Studio Tutorial
Finalizing Task List Page
37
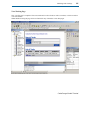
View Working Page
Now your first page is completed. You can search and view list of tasks as well as sort them, or click on a task to
view more details.
When finished viewing the page click on a Task Id for any of the tasks to test other pages.
CodeCharge Studio Tutorial
38
Finalizing Task List Page
Login to the System
When you click on any of the tasks ids on the task list page, you will arrive at the Login page where you can
enter your login and password.
Enter johns / johns to login as John Smith.
Your entry will be stored in a session variable on the server, thus making it unnecessary to login again until your
session expires.
CodeCharge Studio Tutorial
Finalizing Task List Page
39
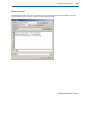
Access Record Maintenance Page
Once you select a task id on the task list page and get through the login page, you will arrive at the record
maintenance page where you can view and update the task detail. Click “Submit” button when finished or hit the
browser’s “Back” button.
CodeCharge Studio Tutorial
40
Conclusion
Conclusion
During the course of this brief tutorial you’ve used Power Wizard to create a simple Task Management
application. Although many additional features and improvements can be implemented, you should now be
familiar with CodeCharge Studio’s interface and many of its features. Refer to the User Manual for more
information.
Enjoy!
CodeCharge Studio Tutorial
Chapter 2: Creating an Employee Directory
CodeCharge Studio provides all the tools you need to get started building your Web applications, including
Wizards for creating search, grid and record maintenance sections. In this chapter we will describe how you can
utilize various wizards, components, controls and other features to create basic employee directory from scratch.
Since in this chapter we will not be using Power Wizard, you will gain more insight into setting up project
properties, creating database connection, and working with other features that extend your application.
CodeCharge Studio Tutorial
42
Creating New Project
Creating New Project
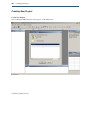
Create New Project
Start CodeCharge Studio and select “New project” on the initial screen.
CodeCharge Studio Tutorial
Creating New Project
43
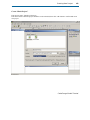
Create “Blank Project”.
Enter project name: “Employee Directory”.
Enter the Location where the project should be saved on the disk, then click “OK” button to confirm and create
new project.
CodeCharge Studio Tutorial
44
Creating New Project
Save Newly Created Project.
You may click the “Save All” icon on the toolbar to save your project at any time.
CodeCharge Studio Tutorial
Specifying Project Settings
45
Specifying Project Settings
Project settings allow you to specify how to generate your web application where to publish it. You can specify
the programming language, publishing directory, database connection, site authentication, and various additional
details describing project’s configuration.
Open Project Settings
Select Project => Settings on the main menu bar.
CodeCharge Studio Tutorial
46
Specifying Project Settings
You may also right-click on the Project Name (“Employee Directory”) in the Project Explorer window, and
select Settings there.
CodeCharge Studio Tutorial
Specifying Project Settings
47
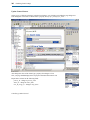
Specify General Project Settings
Specify the general project properties, such as Programming Language and Date Display Format.
Language:
Currently generated programming languages are:
ASP with Templates – generates .asp files with VBScript, which uses separate .html files as templates
during the run-time.
C# - generates .aspx files with C# code
CFML – generates ColdFusion code
CFML with Templates – generates ColdFusion code (.cfm) and separate .html template files
PHP with Templates – generates PHP code (.php) and separate .html template files
Servlets with Templates – generates Java code that utilizes .html templates
Site Language:
Country language to use when generating text messages for the site. For example the text “No records” that
appears when no more records are to be displayed within a grid, could be generated in any support language.
Date Display Format:
This is the default format for the date fields within the project, for example if you display the employee hiring
date on a page.
CodeCharge Studio Tutorial
48
Specifying Project Settings
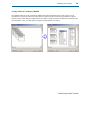
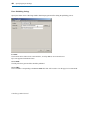
Enter Publishing Settings
Specify the folder where CodeCharge Studio should output generated files during the publishing process.
Location:
The location can be either a local or network drive, or an Ftp address on an external server.
Ftp is not supported in the Beta release.
Server Path:
The full path where generated files should be published.
Server URL:
The web address corresponding to the Server Path. This URL will be used to view the page in Live Data mode.
CodeCharge Studio Tutorial
Specifying Project Settings
49
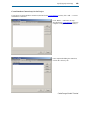
Create Database Connection(s) for the Project
If you haven’t created a database connection (described in the Create Database section), click “Add…” to create
new database connection.
Click “Build…” and follow the steps
described in the Create Database section to
complete creating database connection(s).
Once completed building the connection,
click on the “Security” tab.
CodeCharge Studio Tutorial
50
Specifying Project Settings
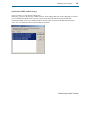
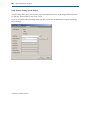
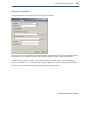
Setup Security Settings for the Project
Security settings allow you to protect specific pages from unauthorized access by directing unauthorized users to
a Login page, based on their security group or level.
If you are just starting with CodeCharge Studio, skip this step and click the OK button to complete configuring
Project Settings.
CodeCharge Studio Tutorial
Specifying Project Settings
51
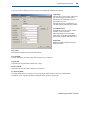
If you are ready to configure your site security, enter appropriate information as shown.
Login Page:
The page where users will be redirected if
they are not logged in or their access
permissions are insufficient to access a
page within your site.
This page must to be created before you
can start using the authentication features.
User ID Stored As:
The method of storing user IDs, which
could be a cookie or session.
URL authentication is also available,
which converts all URLs and appends a
special URL parameter that tracks users.
Connection:
Database Connection that contains user
login information.
User Table:
The table that contains user and login information.
User ID Field:
The key field in the user table, which will be used as user’s unique id.
Login Field:
The field in the user table that contains user’s login.
Password Field:
The field in the user table that contains user’s password.
Level/Group Field:
The field containing user’s security level or group, which will be used to verify access authorization.
In addition, levels or groups should be configured on the “Security Groups” tab.
CodeCharge Studio Tutorial
52
Specifying Project Settings
Configure Security Groups for the Project
Click “Add…” button to create security
levels or groups that will be used for page
authentication.
The security groups specified here usually
should match levels or groups in the table
specified on the Security tab. However,
you may also configure additional groups
that will be available in the future, or you
may configure groups that exist in other
tables or are programmatically assigned.
When later restricting page access,
CodeCharge Studio will allow you to
select any of the groups configured on this
screen.
If you use numbers as your Group IDs,
you may select the option “Higher Level
Inclusive of Lower Levels”, which will
cause the generated programs to assume
that users with higher security level can
access pages with lower security levels.
For example users with level 4 will be able
to access pages with level 3, but not 5.
CodeCharge Studio Tutorial
Creating Database Connection
53
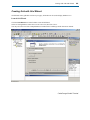
Creating Database Connection
Create an Initial Database Connection
Right-click on “Connections” in Project Explorer window and select “New Connection”.
CodeCharge Studio Tutorial
54
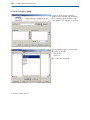
Creating Database Connection
Build Design Connection
Enter the name for your connection, then click “Build…” to specify connection parameters.
The Design Connection is the database connection utilized by CodeCharge Studio, which will allow you to select
database tables and fields in various places during the project building process. This connection can be different
from the Server Connection, which is used by the generated programs.
CodeCharge Studio Tutorial
Creating Database Connection
55
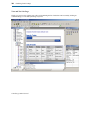
Specify Data Provider (JET, ODBC, etc.)
In the “Data Link Properties” select Jet 4.0 as the Provider, which will allow you to connect directly to a
database file, such as MS Access .mdb. You may also select ODBC or other specialized drivers to connect to a
variety of other databases.
CodeCharge Studio Tutorial
56
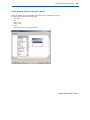
Creating Database Connection
Specify Connection Parameters (Database Filename)
If using JET provider, select the database file to be used for this connection.
If using ODBC or other provider, select the DSN (Data Source Name) or other parameters needed to establish
the database connection.
CodeCharge Studio Tutorial
Creating Database Connection
57
Test Database Connection
Click “Test Connection” to check if the connection to the database can be established.
CodeCharge Studio Tutorial
58
Creating Database Connection
Complete the Build Process of the Design Connection
Confirm that the connection string was created in “Use Connection String” field, then select “Server” to create
server connection.
CodeCharge Studio Tutorial
Creating Database Connection
59
Setup Server Connection
Specify that the Server connection is the same as the design connection.
The Server Connection is the database connection utilized by generated programs to retrieve and update the data.
This connection can be different from the Design Connection, which is used by CodeCharge Studio GUI.
Instead of selecting “Same as Design”, you may build a separate connection string if you are publishing the
project to an external server, or if you want to use a separate database for website testing on your local machine.
This screen may look differently depending on the programming language you use.
CodeCharge Studio Tutorial
60
Creating Database Connection
Save Project Settings
Click the “Save All” icon on the toolbar to save your project.
CodeCharge Studio Tutorial
Creating Grid with Grid Wizard
61
Creating Grid with Grid Wizard
Grid Wizard creates grid/table section on your page, which then can be used to display database rows.
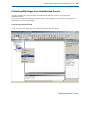
Launch Grid Wizard
Click the Grid Wizard icon in the Toolbox to start Grid Wizard.
Select an existing database connection or create a new one, then click “Next”.
You may also select one of the example databases included with CodeCharge Studio: Internet or Intranet.
CodeCharge Studio Tutorial
62
Creating Grid with Grid Wizard
Launch Visual Query Builder
To aid you in the process of selecting
database tables and fields to be used in the
grid, CodeCharge Studio includes Visual
Query Builder. Click “Build…” to access it.
Select the following tables to be used as the
data source for the grid:
departments
employees
Click “Add” when completed.
CodeCharge Studio Tutorial
Creating Grid with Grid Wizard
63
Specify Database Fields in Visual Query Builder
Set the checkboxes next to all database fields that you like to include in your grid.
For this tutorial, select the following fields:
emp_name
title
phone_home
phone_work
email
department_name (in departments table)
CodeCharge Studio Tutorial
64
Creating Grid with Grid Wizard
Select Database Fields for Grid Data Source
Once finished using the Visual Query
Builder, the Grid Wizard will display all
database fields available for inclusion in the
grid. Click on the double right arrow (>>) to
select all fields to be included.
Click on up and down arrows to move fields
and specify the order in which they will
appear in the grid.
Click on “Order by” drop-down menu and
select the field that will be used as the sort
order for the grid. For example if you select
the field “emp_name”, by default the grid
will be sorted by employee name.
Click “Next” when finished.
CodeCharge Studio Tutorial
Creating Grid with Grid Wizard
65
Setup Search Form to be used with the Grid
To make the grid searchable, in this step add a Search section to the page.
Set the “Create Search/Filter form” checkbox, then specify fields to be included in it.
For each field you may specify its type by selecting TextBox, ListBox, or other control that will be used to
represent this field.
We will use one TextBox field (emp_name) for keyword search and one ListBox field (department_name) for
specifying the department when searching/filtering the data.
ListBoxes require additional configuration therefore let’s select both emp_name and department_name fields as
TextBox for now (in Control Type field) and discuss this topic at a later time.
Click “Next” when finishing configuring the screen as shown above.
CodeCharge Studio Tutorial
66
Creating Grid with Grid Wizard
Define Grid Sorting and Navigation
Specify if users can sort the Grid by clicking on column headings, and if users can navigate the grid by clicking
on page numbers or First/Last/Previous/Next page indicators.
Specify if sorting and navigation should be represented by graphical icons or plain text.
Additionally, specify the number of grid rows to be shown on a page, as well as the message to be displayed
when no records are found.
CodeCharge Studio Tutorial
Creating Grid with Grid Wizard
67
Select a Theme for the Grid
Select one of the available themes for the grid.
Setup other grid options, such as the Style Type and Grid Layout.
Style Type:
The type of the HTML-compatible style to be used on the page. This may be either HTML itself, or CSS
(Cascading Style Sheets). If you choose to use CSS, specify if you want to generate single CSS file for all pages
(CSS File), one CSS file for each page (CSS page), or CSS embedded within the HTML (CSS Inline)
Grid Layout:
Tabular – standard grid that looks like a table or spreadsheet
Columnar – alternative grid type for newspaper/column type list of records
Justified – another alternative grid type
Alternate Records:
Whether even grid rows should have a different shade/background than odd rows.
Record Separator:
Whether grid records should be generated as separate tables, which allows for additional flexibility in how the
grid looks. For example you may use the space between records to display additional information.
CodeCharge Studio Tutorial
68
Creating Grid with Grid Wizard
Preview the Grid
Click Preview button to see the draft HTML generated by the Wizard.
CodeCharge Studio Tutorial
Creating Grid with Grid Wizard
69
Save Project
Click the “Save All” icon on the toolbar to save your project.
CodeCharge Studio Tutorial
70
Finalizing Search and Grid created by the Wizard
Finalizing Search and Grid created by the Wizard
Wizards allow you to quickly add components to your page although often you still may need to manually finish
configuring some of the controls or extending application’s functionality.
In this section we will perform additional tasks to complete the Employee Directory.
CodeCharge Studio Tutorial
Finalizing Search and Grid created by the Wizard
71
Rename the Page
First let’s change the name of the page to a more appropriate name.
Right click on the existing page in Project Explorer window, then select “Rename” option.
You may also rename a page by clicking on its name in Project Explorer and pressing F2.
CodeCharge Studio Tutorial
72
Finalizing Search and Grid created by the Wizard
Type the new name for the page to replace previous one.
CodeCharge Studio Tutorial
Finalizing Search and Grid created by the Wizard
73
Change the Size of Search Fields
Since some of the fields may be unnecessarily long, click on the field and adjust its Format Properties, for
example by changing the size from 50 to 30.
CodeCharge Studio Tutorial
74
Finalizing Search and Grid created by the Wizard
Create ListBox Field
ListBox fields are drop-down menus that display values from the databases. Since in the Grid Wizard you
specified just the department_name field without configuring it as a ListBox, you now need to add ListBox to
your Search component and configure its Data Properties.
Right-click on the department_name TextBox, then select Change to -> ListBox. This action will change your
TextBox to a ListBox.
CodeCharge Studio Tutorial
Finalizing Search and Grid created by the Wizard
75
Configure ListBox Field
Specify the Connection, Data Source, Bound Column and Text Column for the ListBox.
Connection:
The database connection that contains the data for the ListBox.
List Data Source:
The table, view, query or SQL to be used to retrieve database records for the ListBox.
Text Column:
The database field whose values will be displayed in the drop-down menu.
CodeCharge Studio Tutorial
76
Finalizing Search and Grid created by the Wizard
Change Field Captions
Adjust field captions created by the Grid Wizard, by working within the HTML Design window and typing the
new titles and captions as needed.
CodeCharge Studio Tutorial
Finalizing Search and Grid created by the Wizard
77
Publish the Page
Click on the “Live Data” tab below the main window, to test the page in the same way as it would be accessed
by users via a browser.
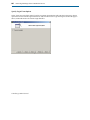
If this is the first time you are publishing this project and the publishing folder doesn’t exist, CodeCharge Studio
displays a window asking to approve the creation of a new folder.
Click “Yes” to confirm and continue.
CodeCharge Studio Tutorial
78
Finalizing Search and Grid created by the Wizard
Review and Test Published Page
When the project is published, you may view and interact with the generated page to test its functionality.
Try to enter a search keyword and select a department, then click the “Find” button. You may notice that the
search doesn’t work correctly at this time and doesn’t search employee Titles, or doesn’t display results that
match the selected department.
This happens because you specified only one field (employee_name) in the Wizard, then renamed it to
“Keyword”, but you have not specified which other fields you like to search by it. Additionally, you added a
ListBox to the Search, but you didn’t specify how it should be linked to the search results shown in the grid.
CodeCharge Studio Tutorial
Finalizing Search and Grid created by the Wizard
79
Setup Search Parameters
Go back to the page design mode, then select the Grid component by either selecting it in the Project Explorer on
the left, or by positioning the cursor anywhere within Grid’s caption on the page.
Then click on […] in the “Where” property of the Grid.
CodeCharge Studio Tutorial
80
Finalizing Search and Grid created by the Wizard
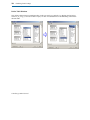
Once the Data Source window opens up you will see several parameters created by the Wizard in the Where
section. The two parameters there indicate that the Grid should be filtered by two keywords: s_emp_name and
s_department_name. Both of those keywords come from the Search component and will be matched against
emp_name and department_name fields from the database respectively.
However, we would also like to search employees’ titles, and since the department_name was changed to a
ListBox it will need an adjustment as well.
First, click the “+” sign to add a new “Where” parameter that will be used in the Grid. Then select the field title
and specify that it should be matched against the search parameter s_emp_name, the same as used to search
emp_name. As the “Condition” specify “contains (like ‘%…%’) so that all employee titles that contain the
keyword s_emp_name will be retrieved.
CodeCharge Studio Tutorial
Finalizing Search and Grid created by the Wizard
81
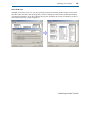
Now modify the search parameter
associated with the
department_name. Double click
on it, and in the parameter setup
window select
departments.department_id as the
field that will be searched with the
s_department_name parameter.
Additionally, select “equals (=)”
as the Condition since users will
select the exact department using
the ListBox.
Finally, once your parameters are
configured, we need to specify that the
we want to see the results if either the
Employee Name or Title matches the
specified Keyword. To do this, select
both the emp_name and title parameters
by holding the CTL key and clicking on
each one. Then click the parentheses
button [( )] to make the search of these
two parameters independent from
searching the department.
Your final Where/Search parameters
screen should look like the one shown
here.
CodeCharge Studio Tutorial
82
Finalizing Search and Grid created by the Wizard
Preview and Test the Project
As the final step, click on the “Live Data” tab below the main window, then test the page by interacting with it
and testing its functionality.
CodeCharge Studio Tutorial
Protecting Web Pages from Unauthorized Access
83
Protecting Web Pages from Unauthorized Access
You may configure your project to utilize user authentication and protect certain (or all) pages from
unauthorized access.
Once correctly setup, generated pages will redirect users to the login page in case the user is not logged in or
unauthorized to access a restricted page.
Launch Login/Logout Wizard
Create a new page, then right-click on it’s name and select the “Rename” option.
CodeCharge Studio Tutorial
84
Protecting Web Pages from Unauthorized Access
Change the name of the page to “Login”.
CodeCharge Studio Tutorial
Protecting Web Pages from Unauthorized Access
85
Run Login/Logout Wizard
Click on the “Login/Logout Wizard” icon in the Toolbox window.
Once Wizard window opens, select “Login Form” and click “Next”.
CodeCharge Studio Tutorial
86
Protecting Web Pages from Unauthorized Access
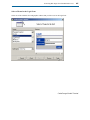
Specify Login Form Options
Select “Focus on Login field” option if you like to generate JavaScript that will cause the Login page to always
open in the browser with the Login field in focus. This will allow users to type their login as soon as the page is
shown, without the need to click on the Login field first.
CodeCharge Studio Tutorial
Protecting Web Pages from Unauthorized Access
87
Select a Theme for the Login Form
Select one of the available color and graphics schemes that you like to use for the login form.
CodeCharge Studio Tutorial
88
Protecting Web Pages from Unauthorized Access
Specify the Login Page for the Project
Once back in the main CodeCharge Studio screen, click on the project name (Employee Directory), then click
the “[…]” button in Project’s data properties.
CodeCharge Studio Tutorial
Protecting Web Pages from Unauthorized Access
89
Select the recently created Login page as the main login page for the project.
CodeCharge Studio Tutorial
90
Protecting Web Pages from Unauthorized Access
Restrict Page Access
Now you can use the authentication feature by configuring restricted access to your pages.
Select the “Default” page in the Project Explorer, then click on the […] button next to the “Restricted” property.
Once a new Page Security windows opens up, specify all user levels that should be able to access this page. If
you specify all user levels, all users will be able to see the page, but first will need to login to the system via the
Login page.
CodeCharge Studio Tutorial
Conclusion
91
Conclusion
Congratulations!
During the course of this brief tutorial you’ve created an Employee Directory application made of a searchable
grid. Click on the “Live Page” tab to view the result, or open the page in your browser.
CodeCharge Studio Tutorial
92
Appendix - Common Errors
Appendix - Common Errors
Listed below are common issues and errors with running ASP applications on Windows servers.
Operation must use an updateable query. (Microsoft JET Database Engine)
This is one of the most common ASP errors that occurs when the data is being updated in a Microsoft Access
database that doesn’t have sufficient access privileges.
Solution:
In Windows 95, 98 or ME: Right click on the MS Access file (.mdb) and uncheck the “Read-only” property.
In Windows NT, 2000 or XP: Ask your system administrator to setup full access permissions for the anonymous
user IUSR to access the database.
If you are hosting your website externally, your web hosting company most likely provides special read-write
folder for databases or will create one for you. Please check the FAQ and other information on your hosting
company’s website or contact them directly.
For more information, refer to: http://support.microsoft.com/default.aspx?scid=kb;EN-US;q175168
CodeCharge Studio Tutorial
Appendix - Common Errors
93
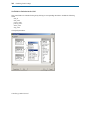
Microsoft JET Database Engine (0x80004005) Could not use ''; file already in use.
This error usually happens on Windows NT/2000/XP when your database file or database folder doesn’t have
write permissions. You can often solve it by following these steps:
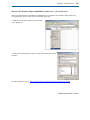
1. Right-click on the project folder on your disk and
select “Properties”.
2. In the Security tab add Internet Guest Account and set Write permissions
checkbox.
For more information, refer to: http://support.microsoft.com/default.aspx?scid=kb;EN-US;q174943
CodeCharge Studio Tutorial
94
Appendix - Common Errors
HTTP 500 Internal Server Error
This message is a “friendly” representation of a non-standard error that occurred on the web server.
To see the full error message, turn off “friendly error messages in your web browser”.
For more information, refer to: http://support.microsoft.com/default.aspx?scid=kb;EN-US;q294807
CodeCharge Studio Tutorial
Appendix - Common Errors
95
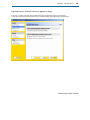
Page loads forever or the IIS web server appears to “hang”
This issue is usually caused by Norton AntiVirus being configured to block script execution.
If you have Norton AntiVirus installed on your machine, disable Script Blocking as shown below.
CodeCharge Studio Tutorial