1
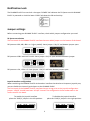
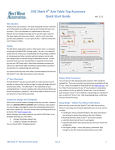
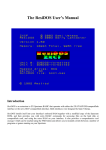
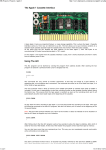
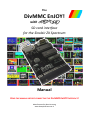
The DivMMC EnJOY! with SD card interface for the Sinclair ZX Spectrum Manual READ THIS MANUAL BEFORE CONNECTING THE DIVMMC ENJOY! INTERFACE! Manufactured by Ben Versteeg www.benophetinternet.nl Overview With the DivMMC EnJOY! you can load software from memory card into your ZX Spectrum easily! The DivMMC EnJOY! is the successor of the highly successful DivIDE interface, which nowadays is the most widely used storage interface for the ZX Spectrum. But the DivMMC EnJOY! is the affordable alternative with SD card slot, and as many pc’s have an SD card reader, it becomes easy to transfer software. The DivMMC EnJOY! has an integrated Kempston joystick interface for Atari-compatible joysticks. There is an NMI button for an easy break-in menu with lots of functions, and a reset button. The DivMMC EnJOY! has 128KB ram by default (4x the memory compared to the DivIDE), which can be upgraded to 512KB for future functions easily. The DivMMC EnJOY! comes with ESXDOS, which is a FAT and FAT32, and hence no additional pc software is needed. The most used file type on ESXDOS is .TAP, which can contain a complete ZX Spectrum game in one file. Other supported formats are SNA and Z80 snapshot files and TRD files. Check out www.worldofspectrum.org for many ZX Spectrum titles. You can also load and save separate files directly from and to the SD card! Compatibility The DivMMC EnJOY! is fully compatible with all ZX Spectrum models: 16K, 48K, 48K+, 128K, +2, +2A, +2B, +3 and some clones. In the box Your DivMMC EnJOY! interface is delivered with an SD card and this manual. The card is formatted and contains some ZX Spectrum games en demos for you to try instantly when you install your DivMMC EnJOY! for the first time, without having to download software first. 2 Notification Leds The DivMMC EnJOY! has two leds.: the upper ‘POWER’ led indicates the ZX Spectrum with DivMMC EnJOY! is powered on. And the lower ‘CARD’ led shows the SD card activity. Jumper settings Before connecting your DivMMC EnJOY! interface, check which jumper configuration you need. ZX Spectrum selection The first batch of the DivMMC EnJOY! interfaces have an added jumper on the bottom of the board. ZX Spectrum 16K, 48K, 48K+ or +2 (grey model): leave jumper ‘+2A/+3’ and bottom jumper open: ZX Spectrum 128K ‘toastrack’ model: leave jumper ‘+2A/+3’ open and close bottom jumper: ZX Spectrum +2A, +2B or +3: close jumper ‘+2A/+3’ and leave bottom jumper open: Joystick interface configuration When combining the DivMMC EnJOY! with another interface that also has a Kempston joystick port, you can disable the internal joystick port on the DivMMC EnJOY! The first batch of the DivMMC EnJOY! interfaces have a wrong print at the joystick configuration jumper: ‘JOY0/1’ should have been ‘JOY1/0’ instead. The configuration shown underneath is the correct one for this batch. To enable the joystick interface place the ‘JOY0/1’ jumper in the left position: To disable the joystick interface place the ‘JOY0/1’ jumper in the right position: 3 Programming configuration The ‘FLASH’ jumper is normally closed when using the DivMMC EnJOY! When upgrading to a newer version of the ESXDOS firmware, download the programming files and read the instructions that come with it carefully. The programming software will indicate when to remove the ‘FLASH’ jumper and when to place it again. Please note that the EEPROM on the DivMMC EnJOY! is write protected by default, to avoid unintentional programming. When an firmware update fails and shows that the ROM is protected, download and run the unprotect utility first. Connecting the DivMMC EnJOY! Disconnect the power from your ZX Spectrum before connecting any interface! Connect the DivMMC EnJOY! to your ZX Spectrum carefully. Insert the SD card. Now you can power up your ZX Spectrum. Using the DivMMC EnJOY! This DivMMC EnJOY! interface comes with ESXDOS. When you power up your ZX Spectrum , you will see the ESXDOS boot screen, like shown here on the right. After the ZX Spectrum with DivMMC EnJOY! had finished the boot sequence, you will enter 48K BASIC. Read more about ESXDOS on the next page and further. USR 0 Mode There is currently no support for 128K BASIC in case you are using a ZX Spectrum 128K model. All 128K programs will however run fine, as the 48K BASIC runs in the so-called ‘USR0’ mode. Loading a game Press the NMI button at any time and the NMI menu will appear. Use the cursor keys or CAPS SHIFT+6, CAPS SHIFT+7 to select a file and press ENTER. If you have selected a TAP file, use LOAD "" to load the file in just the very same way as from tape. More info about the NMI menu is found in the separate ‘NMI Menu’ paragraph. 4 Getting software on the memory card Disconnect the power from your ZX Spectrum. Pull the SD card from the DivMMC EnJOY! Put the SD card into a card reader on your PC or laptop and copy your files to the SD card. Visit www.worldofspectrum.org to download lots of games and other software! ESXDOS 0.8.5 Welcome to ESXDOS, the most advanced firmware for mass storage interfaces for the ZX Spectrum. ESXDOS is still continuously in development, thus being a future-safe choice for your ZX Spectrum interface. Main ESXDOS features Full FAT16/FAT32 read and write support New BASIC commands Additional commands in BIN folder: see "DOT" commands Betadisk/TR-DOS emulation using .TRD files TAPE emulation: reading and writing .TAP files NMI menu: pressing H in the NMI menu brings up onscreen help Advanced Device and file system abstraction layer; uses drivers to access file systems BASIC command integration using +3DOS headers for FAT file systems Provides RST 8 hooks for user applications POSIX-based API usable by .commands and external programs; functions available on rst $08: open, read, write, close, opendir, readdir, seek, sync, fstat, getcwd, chdir, unlink... Support for seamless IM2 loading/saving, from BASIC and machine code Possibility of getting absolute LBA sector and device on an opened file for direct I/O access Can attach and auto-LOAD .TRD files (check help screen) New/Updated Commands: .DivIDEo, .vdisk, .playwav, .dskprobe, .snapload, .gramon, .speakcz Currently unsupported features / known bugs No long file names No wildcards yet in BASIC commands No 64K clusters No extended partitions BASIC/Tape Emulator: You can overwrite ESXDOS system using LOAD CODE that crosses $2000 Commands: Proper argument/syntax checking is not done yet on most commands FAT Driver: +3DOS header is set on file creation and never updated when file size changes FAT Driver: rename() isn't even remotely posix compliant FAT Driver: Directories read-only attribute isn't always respected BIOS: version of system file isn't checked against the ROM version (beware of a mismatch) TR-DOS: FORMAT and MOVE commands don't work yet + too many to list ;) 5 Cold start To perform a cold start without powering off your ZX Spectrum, press the reset-button and hold the SPACE key while resetting. This way ESXDOS reinitializes. Drive Naming Convention Drives are named according to their type and partition number. For the first hard drive and partition, it would be named hd0 (or sd0 if using DivMMC). You can see a list of drive names when ESXDOS runs it's initial BIOS drive detection (on a cold start). BASIC commands On all BASIC commands that use a drive parameter, you can use * for the current drive. […] means it’s an optional parameters. GOTO [drive] ["path"] Example: GOTO hd0"demos" This will change the current drive and directory to hd0:/demos. You can use it to change the current drive, dir, or both. CAT [drive] Example: CAT, CAT *, CAT hd1 Without specifying a drive a fast CAT is done (no speccy header info is displayed). LOAD drive "path/filename" [CODE]|[SCREEN$] MERGE drive "path/filename" Example: LOAD *"/test/blabla", etc SAVE drive "path/filename" [LINE]|[CODE]|[SCREEN$] Example: SAVE *"filename" SCREEN$, etc ERASE [drive] "path/filename" Example: ERASE "filename", ERASE *"filename", etc 6 System commands Files located in the /BIN directory are system commands. These system commands can be executed from BASIC by typing: ".command <args>". Each .command has 7.5K of RAM available and may call any ESXDOS syscall. Commands can also exit to BASIC with a custom error message. Most commands are self-explanatory or show onscreen help when run without arguments (or with the -h parameter). An example of the onscreen help: .tapeout tapeOUT v0.1 (c) phoenix Usage: tapeout [args] [tapfile] -c: Close file -o: Overwrite file .ls Show directory listing .mkdir newdir Create a new directory .cd somedir Change directory .mv oldname newname Rename/move file/dir .tapein somefile.tap Attach .tap file for reading .cp source target Copy file .tapeout somefile.tap Attach .tap file for writing .more textfile Display the contents of a textfile .chmod +h somefile.sys Set/unset attributes on file/dir New commands in v0.8.5: .divideo (currently unsupported for the DivMMC EnJOY!) .vdisk .playwav .dskprobe .snapload .gramon .speakcz TR-DOS emulator Either use the NMI browser to attach/auto-LOAD .TRDs, or use the .vdisk command: .vdisk unit <filename> Unit 0 = Drive A, Unit 1 = Drive B, etc. If you specify just the unit, it will eject the virtual drive. You can use .dskprobe to check the contents of the vdisk. Instructions on how to use TR-DOS are out of the scope of this document. Note: TR-DOS emulation is not available in MapRAM mode (BETADISK.SYS will not be loaded) 7 NMI menu Pressing the NMI button will bring up the NMI file selector menu. From that menu the following keyboard shortcuts can be used. Up, Down Move cursor on page Left, Right Change page Enter RUN .sna, .z80, files with ZX header of type 'basic', view screen (same as 'v' except for .sna files), attach .tap file to input slot and soft reset with autoload r Reset(Warm) s Create snapshot (auto incrementing name starting with snap0000.sna on initialisation of ESXDOS). If you get ERROR 18 it’s because file already exists, try again. 1 Go to parent directory (chdir to ‘..’) v Show screen from .scr and .sna files (or files with ZX header of type ‘CODE’) i Attach tape file to input slot Space Exit from NMI mode H Onscreen help ESXDOS (c) 2005-2013 by Papaya Dezign www.esxdos.org Document version: feb 2014 Manual created by Ben Versteeg www.benophetinternet.nl 8