1
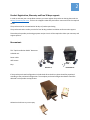
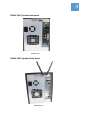
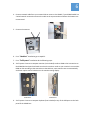
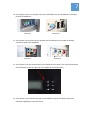
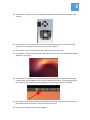
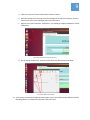
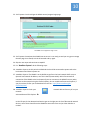
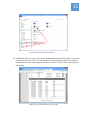
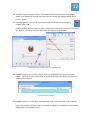
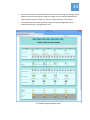
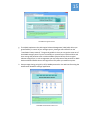
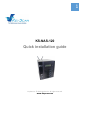
1 KS-NAS-120 Quick installation guide KeyScan Inc. © 2013 KeyScan Inc. All rights reserved. www.keyscan.com 2 Product Registration, Warranty and Free 30 days support: In order to activate your new product warranty you must register the product on the KeyScan web site at http://www.keyscan.com , click on the <Support><Warranty Activation> menu and fill in the required details. The product must be activated within 30 days of product purchasing. The product activation entitle you also for free 30 days product installation and instruction support. Please keep the product purchasing payment receipt since it will be required to claim your warranty and support options. Box content: This “Quick Installation Guide” document A KSNAS unit. Power cable. WiFi antena Keys. KSNAS120‐i7 ksnas120‐A1 If the product purchased configuration includes hard drives the drives plates should be populated according to the purchased configuration. The complete purchased configuration details should be declared on the product receipt/invoice. Otherwise the drives trays are empty. 3 Introduction: The ksnas‐120 can come in multiple configurations, this document covers two configurations, the configurations can be changed, this document is the initial installation instructions it is not an inventory list of your system configuration and the given configurations are only for the purpose of example on setting the system. KSNAS‐120 A1: an AMD C60 Dual Core processor based system with 4GB DRAM, 1 RJ45 Wired GB networks, 1 Wireless network, 1 VGA + 1 DVI connection, 3 Audio, 1 PS/2 KB/Mouse, 6 USB2/1.1 KSNAS‐120 I7: an Intel i7 Quad Core processor based system with 8GB DRAM, 2 RJ45 Wired GB networks, 1 Wireless network, 1 Bluetooth connection, 1 eSATA connection, 2HDMI + 1 DVI‐I connection, 5 Audio (Center/Subwoofer Speaker out, Rear Speaker Out,, Line in, Line out, Mic in), 1 PS/2 KB/Mouse, 2 USB 3/2 + 4 USB2/1.1, 1 Optical S/PDIF Out connection KSNAS‐120 A1 product front panel: KSNAS‐120 I7 product back panel: KSNAS120‐I7 KSNAS‐120 A1 product back panel: KSNAS120‐A1 4 5 KSNAS‐120 product installation process: For the installation process you may choose to do “full‐system” installation or “headless” installation. A “Full‐System” installation is where you connect to the KSNAS box a computer monitor (not included in the purchased package) a computer keyboard (not included) and a computer mouse (not included). The full system installation lets you work directly on the KSNAS server utilizing its user friendly windows desktop user interface (Not a Microsoft Windows). A “Headless” installation does not require monitor, keyboard and mouse connection and the KSNAS setup and control is done through a web‐browser from another system using Firefox Internet Browser, available free for download at‐ http://www.mozilla.org/en‐US/firefox/new/, you should use only the Firefox browser for setting up and connecting to the KSNAS120 web based control program. The above 2 methods : Full‐System & Headless are interchangeable you can always switch between them or do both at the same time meaning: have monitor, keyboard and mouse connected and working locally on the KSNAS desktop and at the same time connect to it from another computer over the network using Firefox Internet Browser. System setup steps: 1. A special note on power connection: a. It is strongly recommended that you connect the KSNAS to the power outlet through a surge protection or UPS unit (not included) it will reduce the chance for system failure due to power issues and extend the life of the KSNAS and the installed hard drives! You may find examples for surge protection products at‐ http://www.cyberpowersystems.com/products/surge‐protectors/office‐pro‐surge.html You may find example for UPS products at‐ http://www.cyberpowersystems.com/products/ups‐systems/soho‐ups.html A 300‐600 VA products are good for the KSNAS if it is the only device connected. b. When connecting the KSNAS power cord connect it first to the KSNAS and then to the power outlet (or the UPS or Power surge protection). 2. Remove the 4 drives plates from the system, when you start the system for the first time the drives plates should be removed. 3. Connect power cable to the KSNAS product and to a power outlet. 6 4. Connect network cable from your network hub or router to the KSNAS, if your KSNAS model has 2 wired network connection connect the cable to the top connection and leave the bottom one unconnected. 5. Connect the antenna 6. For a “Headless” installation go to step# 23. 7. For a “Full‐System” installation do the following steps: 8. <Full‐System> Connect a computer monitor (not included) to either HDMI or DVI connection on the KSNAS box back panel and make sure that the monitor mode on your monitor is set to either HDMI or DVI according to the connection to the NAS box, some monitors are set automatically and some require manual selection on the monitor setting display. KSNAS120‐I7 KSNAS120‐A1 9. <Full‐System> Connect a computer keyboard (not included) to any of the USB ports on the back panel of the KSNAS box. 7 10. <Full‐System> Connect a computer mouse (not included) to any of the USB ports on the back panel of the KSNAS box. KSNAS120‐I7 KSNAS120‐A1 11. <Full‐System> You may also connect speakers and microphone (not included) to the back connection panel of the KSNAS box. KSNAS120‐I7 KSNAS120‐A1 12. <Full‐System> Press the power button on the KSNAS box front panel. This is the top left button out of 6 buttons on the top right side of the KSNAS120 LCD display panel. 13. <Full‐System> You should see blue light on the KSNAS front panel LCD display with some indicators regarding the system functions. 8 14. <Full‐System> The box fan may start loud in full speed but should become silent within 2‐10 seconds. 15. <Full‐System> You should see on the monitor the KSNAS login page, this may take 10 to 30 seconds, it may be longer for the first time you start the system. 16. <Full‐System> For user name type “ksuser” and for password type “kspw” 17. <Full‐System> The initial first time login may take 10‐30 seconds and you should get the KSNAS desktop for user ksuser. 18. <Full‐System> The KSNAS is set by default to connect automatically to your network and get initial network dynamic address from your local network DHCP server. If everything goes well you should see the network connection indication on the top right side of the monitor. 19. <Full‐System> Activate the KSNAS browser based control panel: make one mouse left click on the Firefox icon on the icon bar on the left side of the monitor. 20. <Full System> Enable browser pop‐up windows: 9 a. Click on the top bar of the Firefox browser frame to select it b. Move the mouse over to the top bar of the desktop (at the top of the display), once the mouse hover over it you should get there the Firefox menu c. Right click on “Edit” and select “Preferences” you should get a popup window for Firefox preferences. The Firefox desktop icon and top bar menu d. On the popup window click “Content” and unselect the “Block pop‐up windows”. The Firefox preferences window 21. <Full‐System> Activate the KSNAS control program: type in the Firefox browser address field the following address‐ “localhost/ksnas/ks.html” and click return. 10 22. <Full‐System> You should get the KSNAS control program login page. The KSNAS control application login screen 23. <Full‐System> Sometimes the KSNAS internet server is not ready yet and you may get a message that the page is not found, wait 10‐20 seconds and try again. 24. Skip the next steps and continue to step# 32 25. For “Headless‐System” do the following steps: 26. <Headless‐System> At this point the KSNAS device should be connected to power and to the local network and have its power on. 27. <Headless‐System> The KSNAS is set by default to get from the local network DHCP server a dynamic local network IP address, once this is done (automatically within few seconds of connection of the KSNAS to the local network) you can connect to the KSNAS from any other machine on the network using the Firefox browser, do not use Microsoft Internet Explorer, if you do not have Firefox you can download it free from‐ http://www.mozilla.org/en‐ US/firefox/new/ 28. <Headless‐System> check your network: network devices from any PC on your activate Microsoft File Explorer on the left pan click on Network and wait to get on the right pan the list of discovered network devices, one of them should have the KSNASxxx name where xxx may be either bland or a number. 11 Microsoft File‐Browser to get network devices 29. <Headless‐System> In case you can’t see the KSNASxxx device from the file Explorer try to check it directly on your DHCP server, on small network it may be integrated as part of your network modem/router and you need to login to your router to check it. A D‐Link router DHCP page will look like this‐ Example‐ D‐Link router DHCP address allocation page 12 30. <Headless‐System> Once you find out your KSNAS network device name or its assigned IP address write it down, for the rest of this document we assume your KSNAS network device name is “ksnas1” 31. <Headless‐System> On any PC on your network open the Firefox Internet browser (if needed install it) Enable the Popup Window feature by select “setting” on the bottom bar menu of Firefox and on the “Options” window click content and unselect the “Block pop‐up windows” Firefox main window, “setting” button and “options” window 32. <Headless‐System> you are now ready to connect to the KSNAS built‐in setup and control website. Type on the Firefox address field‐ http://ksnas1/ksnas/ks.html please note that the address is case sensitive! Firefox web address input field 33. <Headless‐System> You should get the KSNAS login page, enter user= ksuser and password= kspw (case sensitive). And at this point you should be logged in to the KSNAS setup and control website (built into the KSNAS server). 13 KSNAS control application login screen 34. The following steps are common for both Full & Headless systems 35. If you are new to the KSNAS it is our recommendation that you set it up in stages, taking the time to know each feature you set before you move to the next step. This document scope is only to install the KSNAS and get it to connect to your network, please check the “Installation & setup manual” for detailed instructions for further setting options. The manual is available for download from the KeyScan website at www.keyscan.com In addition, after you register the product with KeyScan you have free 30 days support for questions regarding installation and setting of the product. 36. You may proceed the setup implementing the following steps: a. Update the default “ksuser” password with a new password since the original password is standard over all KSNAS shipped products. b. Define your own user names and their passwords as well as categorizing them as admin or user c. If required activate your additional network interface – the wireless interface and depending on the KSNAS product you purchased optionally additional wired network interface. You may set the interface(s) as static IP address but must reserve such setting also on your router/DHCP server. d. Populate the hard‐drive trays with actual drives. Please shutdown the server when you push a populated hard drive tray in or out of the server. We do not recommend hot drive swapping. 14 e. Once the drives trays are populated with hard drives you can setup your storage system. Please be aware that setting the storage is a lengthy process. Setting a RAID device or Logical‐Volume (LVM) over RAID may take the system few hours, so be patient. f. The KSNAS let you do it either manually using its “Storage Management” tool or automatically using its “Storage Wizard” tool. The KSNAS storage management tool: 15 The KSNAS storage wizard tool g. The KSNAS implements the UNIX Logical Volume Management (LVM) which allow you great flexibility in control of your storage system, please get more details from the “Installation & setup manual”. The general guideline is that you can get the most out of the KSNAS storage system if you set it manually to 4 partitions per each hard drive and then arrange the partitions with or without RAID as physical devices for the Logical‐ Volume storage layer, in such arrangement you may keep some of the partitions or RAID devices aside and attach them to the logical level only when you need more space. h. Setup storage sharing using iSCSI, NTFS, SAMBA protocols or the web interface using the web browser based file manager application. The KSNAS web based file browser tool 16 i. Setup storage syncing using the built‐in Own Cloud application. The KSNAS OwnCloud Sync tool j. Setup other servers and applications. 37. For the user‐manual with detailed setup you should register your product with KeyScan and download the product user manual at http://www.keyscan.com 38. If you need support you can call for free support as many time as you need within 30 days of the purchase of the KSNAS product. Please keep in mind that the KeyScan support team is there to help you with the KSNAS product but they are not a replacement for network maintenance, your network should be setup properly so the KSNAS can connect to it. 39. To activate the KSNAS product warranty you must register the product with KeyScan within 30 days from the date the product has been purchased, the product registration is also required in order to activate your free 30 days support option. 40. For support contact [email protected] and provide the serial number of your product, when and where it has been purchased, contact information and preferred time to call you. KeyScan support hours are 9:00am to 5:00pm eastern time.