1
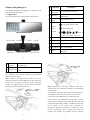
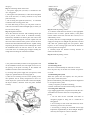
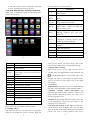
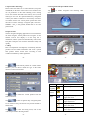
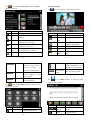
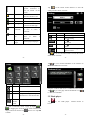
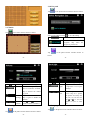
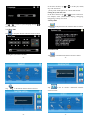
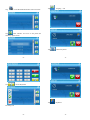
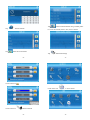
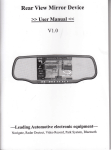
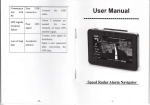
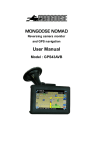
www.app-tronics.com 1(888)587-4111
SmartNav
4.3
— User’s Manual — Welcome to SmartNav GPS. Please read this user’s manual carefully to become familiar with all the operation details and to ensure you use your device as it was designed. Before getting started, please note the following: • Specifications are subject to change without notice. •
Please make a copy of the important data. •
Please read the operating instruction carefully and use only accessories provided by the original manufacturer to avoid any unexpected damage. No warranty will be executed if you are not following the instructions or are connecting with incompatible accessories. We assume no responsibility for any loss or damage caused hereby. •
The electronic navigation data may be not in conformity with the actual road markings due to traffic construction development. Please be sure to comply with actual road conditions and follow the traffic rules. •
Operating and viewing the GPS while driving may cause a severe traffic accident. App-Tronics is not responsible for any loss caused by an unexpected accident. •
Users can update and upgrade software by visiting www.app-tronics.com
•
The screens shown in this guide may be different than the ones you see on your device, depending on the firmware version.
GPS Navigation, Speed Radar Dectecting, Video Recording, Parking
Camera, Parking Sensors, Bluetooth, Entertainment
-1-
CONTENTS
WELCOME
CHAPTER I BEGINNING USE
1.1 Appearance
1.2 Installation
1.3 Basic Use
1.4 System Main Interface and Major Functions
1.5 Digital video recording*
1.6 Radar detecting
1.7 Parking radar and video
CHAPTER II GPS
2.1 Map
2.2 Navigation with Speed Radar Alarm
2.3 Reception
CHAPTER III INTERFACE AND OPERATION
-2-
Welcome
3
4
4
6
11
12
14
14
15
20
20
21
25
26
Thanks for using the device. With navigation as the major
function, it supports GPS Navigation, Speed Radar Dectecting,
Video Recording, Parking Camera, Parking Sensors, Bluetooth,
Entertainment.
You may use the GPS navigator anytime anywhere, for
example while driving, walking or cycling. Its navigation
and amusement functions will enrich your life and work!
To fully exert the functions of the device and to understand
the operation details, please read the manual carefully.
You may see the following supplemental information in the
manual.
[Note]: Explanation of relevant subjects
[Relevant Information]: Extra information of relevant
subjects
[Attention]: Precautions or warnings of relevant subjects.
Please pay attention to this information and follow the
instructions to avoid devastating influence on yourself and
others.
[*]: Optional function
-3-
Chapter I Beginning Use
SN Component
This chapter introduces the appearance, components and
basic operations of the device.
1
1.1 Appearance
The effect figure below is subject to the material object.
LCD
with
The touch pannel is capacitive
Touch panel
2 Cable Slot
3
Explanation
Mounting
bracket
Vcc, GND,Video in, Parking Power,
and Reversed
Fixed the mirror device
: Long push to power on/off .
Sensitive
4 Buttons
8 buttons.
: Switch displaying
,
,
,
,
,
:Used in
recording video, please view 1.7.2.
5 TF card for DVR
6 Speaker
7 Speaker
8 Antenna
5 TF card
Maps,video,music. Up to 32GB.
6 Speaker
Playing sounds
7 Speaker
Playing sounds
8 GPS antenna Built_in GPS antenna
9 Camera
9 DVR camera
10 Radar receive window
11 TF card for map
-4-
for
recording
-5-
Detecting
windows
Receive and detecting the signal from
the speed radar
11 Storage card
TF card, record video, support up to
32GB.
10
Megapixels camera
traffic video
Install new mount
to the base
1.2 Installation
The following steps must be opereted by professional
technicians of the vehicle.
Step 1: Remove the original rearview mirror of the car
matching from the front windshield; and then follow the
reverse steps to properly install this product. Different
models are supported by the rear-view mirror bracket,the
following picture only show Honda cars.
Remove
original
mount from the base
-6-
Step 2: Find out the ACC power connector. Most of the
vehicles fuse box is basically installed in the following
three positions:
1, The plaque , which is in the car hood on the driver's side.
2, The glove box, which is in front of Vice driver's seat.
3, The co-pilot air conditioning vent of the front foot
In this process, it is important to note that the cut don’t
fully grasp the situation, don,t make pull the fuse that
would make unnecessary trouble - mistakenly lit the light
of the failure of the vehicle (above operation by
professional automotive technician or experience of the
owners of operations, such as human errors cause this
product to any failure, are excluded from the warranty
-7-
category).
Step 3: Connecting cables on the front:
1, The power supply line (red line) is connectted to the
ACC long power.
2, The negative wire (black line) is connectted to the public
side of the fuse box, or closely connected to any metal
parts in the body.
3, The reversing the signal line (blue line) is connectted
to insurance box reversing power fuse.
To ensure that wiring is correct, you can power on the car,
if the rear-view mirror button backlight light, it means you
have the correct wiring.
Step 4: Alignment the line:
All of the electrical connector with insulating black tape
tied to prevent a short circuit or accidental loosening.
Followed by demolition of interior parts: first remove the
rubber seal, clawed through the roof and A-pillar trim, and
then wire buried. Then has been good to connect the wires
from the fuse box behind the leads into the A-pillar sealing
strips along the body and then received through the roof in
the windshield above the rearview mirror on. The same
color cable sleeve or insulating tape wrapped. Finally, the
trough will be sticking out of the harness buckle.
Red line to ACC 12v
Black line to GND
Blue line to parking light 12V
Yellow RCA to parking camera
Step 5: Install the parking camera:
1) to find the install universal camera (or the appropriate
location of the car with a special camera), if the punch
camera camera insert hole saw hole after a fixed, if it is
with butterfly screws.
2) directly from the reversing headlight lead, camera power
supply line along the car taillight line placement, and tied
with cable ties, parallel supply line (red positive, black
negative) on the reversing light. Note that the distinction
between positive and negative.
3) Carefully adjust the allowed reversing horizons to
achieve the best results.
Step 6: Install the parking sensors:
-8-
-9-
1) the probe horizontally mounted in the appropriate hole
on the installation location, the best height of 50 to 60 cm,
the spacing of the probe according to the number and
installation location of the horizontal width.
2) reversing radar power supply line (red positive, black
negative) in parallel with the reversing lights on.
3) Start the car and hang into the reverse parking sensor
into operation, the car slowly retrogression to move in a
certain object, the system will be able to detect and display
the object distance, otherwise check the probe installed
correctly.
Parking camera
Mirror Device
Parking light
power
Parking light
power
ACC power
Parking radar
- 10 -
1.3 Basic Use
1.3.1 Powering on/off
The device can automatically run when the car is start.
Press the power key for at least two seconds can power it
on or off.
1.3.2 Restarting the System
When the system does not response, also can press the
power key to restart the system.
[Relevant Information] The following situations might lead
to no response of the system.
1. Delay or stagnancy in interface switching;
2. Failure of function activation with overlong execution;
1.3.3 Using T-FLASH Card
Copy mapping applications, map data and media files in a
T-FLASH card. Insert the card in the corresponding slot.
[Note]
1. Do not take out the T-FLASH card while an
navigation program is being run or a media file is
being played.
2. To avoid drop or crash of the T-FLASH card, do not
exert heavy pressure on it or bend it.
3. Avoid using or storing the T-FLASH card in high
temperature, high humidity or direct sunlight. Keep the
card away from liquid or corrosive substance.
- 11 -
4. Mind the direction while inserting the T-FLASH
card to avoid damaging the slot or the card.
1.4 System Main Interface and Major Functions
When power on the device, it will enter the system main
interface shown below.
- 12 -
Unit
The unit conversion
Gps info
Recorded signal
Theme
Theme settings
Photo
browser
JPG,GIF,BMP and PNG files supported;
Photo rotation, zoom in/out and auto play
supported
Explorer
Go to the desktop
Gobang
Gobang games
BoxMan
BoxMan games
Snake
Snake games
Nav path
Navigation path specified
Volume
Set Volume
Backlight
Set backlight brightness
Language
Set Language
Datetime
Time and date settings
Factoty
Factoty
Sys info
Check the latest information
Bluetooth
Bluetooth setup operation
1.5 Parking sensors *
Please view in the user manual of Parking sensors.
1.6 Parking camera*
After the device runs on, it can display the reversing image
When the car hanging into reverse. Click the upper left
- 14 -
The main functions are listed as below.
Function
Explanation
Navigation
Tap to enable navigation and detecting
radar function
Radar
alarm
Support X, K, KA,KU, New K, Laser
band.
Video
recorder
Support HD 720P video recording,
built_in million pixel camera.
Parking
system
Support the reversing camera and parking
sensors input, display the image and
distance on the screen
Music
player
WMA9 and WAV files supported;
Random, sequence and cycle
supported
Movie
player
WMV, ASF and AVI files supported;
Adjustment of playing progress, pause
and full-screen play supported
E-book
TXT files
selection
Flash
SWF files supported;
Wallpaper
Set Desktop Wallpaper
FM
FM channel to adjust the power
Calculator
Units can be calculated
reading
supporting
play
page
- 13 -
corner of your display can flip the image, click on the
screen the lower right corner to the upside down image.
1.7 Digital video recording*
When the device run on, the system also auto start to
recording video. The default display screen is WINCE. Tap
to switch displaying wince and recording video. Click
the upper left corner of your display can flip the image,
click on the screen the lower right corner to the upside
down image.
1.7.1 Features
High-definition: Video Size can be set to high-definition
HD 720P (1280x720/30FPS) or VGA (640x480/30FPS,).
Continuous recording without interruption: The
proprietary file format to reach without a break, do not
reveal seconds continuous recording, and ensure not to
miss any important scenes.
Automatic cycle coverage: When the memory card is full,
it will automatically overwrite the first image to start
replication of new video clips.
Lock important moment in the video: encountered a
critical moment, press the latch button from the image
within 60 seconds after pressing the moment of the first 60
seconds and will be locked preserved and not be
- 15 -
overwritten.
Easy to use: do not need complex setting, used for the first
just want to date and time set, and then start the engine
automatically recording, stop recording after shutdown.
Playback function: the movie itself has a display, you can
preview the video screen and playback video clips.
MJPG video format: each screen in the film are
independent and complete real images, not H.264 or
MPEG4 predict calculated from the screen, you can
provide evidence of the most convincing image.
Voice: support recording and playback.
Storage media: requires the use of high-speed TF card,
support for 4 ~ 32GB, video uses a proprietary file format,
please SQPlayer or native formatted to use the memory
card before use, and can not be used if there is no
formatting.
1.7.2 Buttons define
There are two mode: Record mode and Playback mode.
Record Mode
Button Define
Recording
Playback Mode
Single
In video
Menu Show
In
Playing
Stop
REC
/
/
In Menu
Stop Playback
Playback
&Back to
&Back
Video Rec
/
to Video
Rec
MENU
Stop
Save
Record &
&
Enter
Stop Playback Menu,Back
Enter
Exit
Menu
& Enter Menu to Single
Menu
Menu
Lock
LOCK
Video
Size
Stop
&Enter OK**
PLAY
Time
Setup
Format
TV Out
1280 x 720
YYYY/MM/DD
HH:MM:SS
Yes
clip
Audio Rec
On/Off
NTSC
PAL
On
Description
Set the video size
to
play
Up
clip* previus clip
Down
Next
Go to play next
clup*
clip
Down
for menu
Frequency
Set date and time
50Hz
Set the frequency
of video
60Hz
1.7.5 System error message define
Error Message Description
Solution
No Card
Push in a card
Dectect no card
Card Protected Card is protected
Card Error
Unlock and push in
Error occur when reading or Replace a new one
writingthecard
Card size too Size is smaller than 4GB,so Please use 4GB or
small
cann’t record
larger
not Card is not formatted yet,so Formot it firstly
formatted
Card
cann’t record
size Card
size
is
changed
cann’t record
Sensor FAIL
Sensor
changed,so Please backup the
data and format it.
Initialize
an Return to repair
exception occurs,so cann’t
record
Set the fomat of
TV out
Protec slot full There is no room for more Unlock
No Video
Audio
Record
Off
Set for recording
audio
Language
English
Set the language
- 18 -
Previous Go
Up
On/Off
LCD
OK*
*: Now,if don’t release the button, it will go to previous
or next untill release the button.
**: When setting date or time, UP and DOWN can
add/sub the value. PLAY can swith to next group,the
order is Year, Month, Day, Hour, Minute,Second.
When it is Second, click PLAY can save the setting
and return tu the main menu.
Format the TF
card
No
video video playback
mode
DOWM
/
playback Pause/Continue
Playback
UP
Unlock
Start to
Record
Card
640 x 480
Unlock
- 17 -
/: No action.
1.7.3 Locked key explaination
The system has kept 1GB room for locked video. It allow
the users locked the video more than 3 times. When the
locked button has been pushed, the system will auto
storage 60 seconds previous and 60 seconds next 720P
image(or 120seconds VGA) to the room. These video data
cann’t be replaced. When the locked room is full, user can
unlocked the old one in playback mode or through Sqplay
tool.
1.7.4 Menu item define
Sub Menu
show
/
video clip
- 16 -
Main
Menu
Save &Exit
some
locked video
playback mode
No video
Just to record
- 19 -
in
1.8 Speed radar detecting*
Please ensure that there are no other obstacles (except the
windshield) on the front of the radar receiver window.User
can set parameters of the radar alarming on the setting
screen. the software has built in the memory card (or local
memory).If user use the replacementmemory card,please
contact your dealer to authorize a new memory card ID to
use. Before use the new version please operate that: Enter
the route of \menu \ Settings \ navigation path, select the \
SDMMC \ P43_2 \ P43_2.EXE, double-click to save the
path and exit.
2.2 Navigation with Speed Radar Alarm
Tap
function.
to enable navigation and detecting radar
Chapter II GPS
Various navigation mapping applications can be installed in
the GPS navigator, which position the navigator via the
satellite receiver and display it on the map. Set a
destination, and the system will automatically work out the
best path to help the user reach the destination safely and
quickly.
2.1 Map
Due to transportation development, inconformity between
products and real traffic information will occur a period
after product release. Please drive according to road
condition and abide by traffic regulations.
- 20 -
Tap
- 21 -
to add current position as a alarm camera
location, you can choose which the type of the alarm
camera is in the next windows.
Name
Traffic
Lighting
Camera
Alarm
Tap
to delete the current position from the
Spot
alarm location list.
Icon
Explanation
Traffice light Alarm on/ off
Camera Alarm on/ off
Display alarm tips on the
upper left corner
to enter navigation map. Navigation paths
Display alarm tips on the
upper rightcorner
are for reference only, and the user may decide whether to
follow them.
Display alarm tips on the
lower left corner
Tap
Display alarm tips on the
lower right corner
Tap
to enter the setting menu, and set the
value for speed radar detecting funtion.
- 22 -
- 23 -
Preview
Tap
to set the navigation paths for A, B or C.
When car speed is smallar
than the value, The alarm
does not prompt
Speed
of
Silence
Add the speed value
Sub the speed value
Navi A
Select A as current excutived
navi program, Navi A will
display on title bar.
Navi B
Select B as current excutived
navi program, Navi A will
display on title bar.
Navi C
Select B as current excutived
navi program, Navi A will
display on title bar.
Paths
Specify
the
path
navigation A, B, and C
of
Volume discrease
Volume
Volume increase
2.3 Reception
High and crowded structures (such as inside of tunnels,
space between high buildings, underground car parks and
under viaducts), weather change or satellite signals turnoff
may influence signal reception, resulting in positioning
failure, inaccurate positioning, navigation failure or system
function abnormity.
With stereoscopic maps, instant animation, voice prompt
and text prompt of the navigation system, you will
appreciate its unique charm and enjoy a great trip.
Different navigation maps may have different operation
methods. Please follow instructions of corresponding
navigation mapping applications.
- 24 -
- 25 -
[Note] Before using the GPS navigator, please purchase
and install mapping applications and appoint file paths. For
setting methods please refer to 2.2 Setting Navigation Path.
Chapter III Interface and Operation
3.1 Music Player
Tap
in the system main interface to enter the music
interface as shown below.
Icon
Name
Close
Explanation
Close the music player.
- 26 -
Minimize
Minimize the music player
and return to the Media
interface.
Play
Continue playing the paused/
stopped music.
Pause
Pause the
played.
Stop
Stop the music being played.
Set
play
sequence
Select sequence, random or
cycle play.
Previous
Play the previous music.
Next
Play the next music.
Volume
Drag it leftward to turn down
or rightward to turn up the
volume.
Progress
Drag it leftward or rightward
to play from a previous or
future moment.
Music list
Enter it to select music to
play.
Time
Display the run time.
Equalizer
Enter the equalizer.
- 27 -
music
being
Tap
in the interface Music Play to enter the Music
list shown as below.
3.2 Movie Player
Tap
Icon
Name
in the video player interface shown as below.、
Explanation
Close
Close the Music List
Scroll
bar
Drag it upward/ downward to view
all music.
Add one
Add a piece of music on the left list
to the play list on the right.
Add all
Add all the music on the left list to
the play list on the right.
Delete
one
Select one piece of music in the play
list and tap the icon to delete it.
Delete
all
Delete all the music in the play list.
Icon
Name
Close
Close the video player.
Previous
film
Play the previous film.
Play
Continue
playing
the
paused/ stopped music.
Next film
Play the next film.
Stop
Stop the film being played.
Video
folder
Enter it to select a film to
play.
- 28 -
Progress
Volume
Time
Explanation
- 29 -
Drag the sliding block
leftward to play from a
previous
moment
or
rightward coming moment.
Scroll bar
Film name&
format
Drag it leftward to turn
down or rightward to turn
up the volume.
3.4 E-book Reader
Display the play time and
the music duration.
Tap
Drag the sliding block
upward/ downward to view
all the files inside the folder.
Film name and its format
in the Media interface to enter the reader
interface shown as below.
Tap
in the Video Player interface to enter the video
folder shown as below.
Icon
Icon
Name
Close
Explanation
Close the video folder.
Name
File name& Current file name and
format
format.
Close
- 30 -
Explanation
Close the reader.
- 31 -
Scroll bar
Drag the sliding block
upward/ downward to
view all content of the
e-book.
Folder
Enter the e-book folder to
select an e-book to read.
Previous
Read the previous page.
Next
Read the next page.
Setting
Select a text theme, font,
word size and bold type.
New
bookmark
Select partial text and tap
the icon to create a
bookmark.
Bookmark
list
Enter the bookmark list to
select
or
delete
a
bookmark.
Page/ total
pages
Tap
in the e-book reader interface to enter the
setting interface shown as below.
Icon
Name
Current page/ total pages
Explanation
Close
Exit the setting interface
Save
Save the setting.
Theme
Tap
to select a theme for
the e-book.
Font
Tap
to select a font for the
e-book.
Bold
Tap to enable bold type. Tap it
again to cancel.
Tap
in the e-book reader interface to enter the e-book
folder shown as below.
- 32 -
- 33 -
Tap
to view created bookmarks in the interface of
Bookmark List shown as below.
Icon
Name
Close
Explanation
Close current folder.
Drag the scroll bar and select a bookmark on the left list.
Return
Return to the previous folder.
Scroll bar
Drag the sliding block upward/
downward to view all TXT files.
File
name&
format
Tap
to go to the page with the bookmark or tap
to delete the bookmark.
3.5 Flash player
The file name and format.
Tap
below.
To create a bookmark, locate a page by taping
in
the Flash player
or
or dragging the scroll bar in the reader interface and
drag to select text content. Tap
to finish.
- 34 -
when it is on. Tap OK
- 35 -
interface shown as
3.6 Wallpaper
Tap
in the Wallpaper interface shown as below.
Close
Exit the FM Setting.
Save
Save current setting.
Use
FM
Tick in the box to enable
FM function.
Frequ
ency
Drag
the
slide
block
rightward (or tap
) to
increase the frequency and
leftward (or tap
) to
reduce the frequency. The
frequency range is 88.00
Mhz-108.00 Mhz.
3.9 Calculator
3.8 FM
Tap
in the FM interface shown as below.
Tap
in the Calculator interface shown as below.
- 36 -
- 37 -
3.12 GPS info
Tap
in the GPS info interface shown as below.
3.10 Unit
Tap
in the Unit interface shown as below.
Tap
- 38 -
to prompt a dialog as below.
- 39 -
Tap OK to reset the GPS satellite or tap Cancel to exit.
3.13 Theme
Tap
in the Theme interface shown as below.
Icon
3.14 Photo Browser
Tap
in the photo browser interface shown as
Name
Explanation
Previous
View the preview photo in the
folder.
Next
View the next photo in the folder.
Zoom in
Scale up current photo.
Zoom out
Scale down current photo.
Rotate
Rotate current photo 90°clockwise.
Auto play
Cycle play all the photos in the
folder from current photo.
Folder
Enter the photo folder to select a
photo.
Close
Close the browser and return to the
Media interface.
below.
- 40 -
- 41 -
Tap
in the browser interface to enter the photo folder
shown as below.
Icon
Name
Explanation
Close
Close the current folder.
Return
Return to the previous folder.
Scroll bar
Drag the sliding block to view all
the photos.
3.16 Gobang
3.15 Explore
Tap
Tap
in the Gobang interface shown as below.
in the Explore interface shown as below.
- 42 -
- 43 -
3.18 Nav path
Tap
in the photo browser interface shown as below.
3.17 Snake
Tap
in the Snake interface shown as below.
Select a map address and tap
to save the setting.
Tap to select a map address.
Tick in the box to run the set
navigation map when the
navigator is powered on.
3.19 Volune
Tap
in the photo browser interface shown as
below.
- 44 -
Close
Exit the volume setting.
Volume
Ten volume grades (from
mute to maximum) available.
Tap to decrease the volume
by grade.
Sounds
for taps
Tap it to enable the function.
Tap it again to disable the
function.
Power-o
n music
Tap
or
to select
power-on music or disable it.
- 45 -
Exit the backlight setting.
Backl
ight
Drag leftward to turn down
or rightward to turn up the
backlight.
Auto
off
Auto backlight shutoff after
service stop for a period.
The options are always On,
10s, 30s, 1m, 2m and 3m.
Tap
or
to view the
options in cycle or select
one.
3.21 Language
3.20 Backlight
Tap
Tap
Close
in the photo browser interface shown as below.
in the photo browser interface shown as below.
- 46 -
- 47 -
In the above interface, tap
or
to set the year, month,
day, hour and minute.
[Note]: Time format options are 12-hour and 24-hour.
Setting the system time zone
In the above interface, tap
or
to select a time zone.
For example, select “(GMT+08:00) Beijing, Chongqing,
Hong Kong, Urumqi” for China.
3.23 Sys info
Tap
or
to select a system language and tap
save the selection.
to
Tap
in the photo browser interface shown as below.
3.22 Date time
Tap
in the photo browser interface shown as below.
3.24 Bluetooth
Setting the system date and time
Tap
in the Bluetooth interface shown as below.
- 48 -
Tap
in the Search interface shown as below.
- 49 -
Tap
in the To connect a Bluetooth interface
shown as below.
- 50 -
- 51 -
Tap
Tap
outgoing call
Tap
Phone Keyboard
in the PhoneBook interface shown as below.
Tap
Click interface for access to the phone the
following figure shown.
- 52 -
Tap
- 53 -
Phone Keyboard
Tap
Keyboard
Incoming call
- 54 -
- 55 -
Tap
Tap
Visit the website
Tap
Select the network state
Selection asked whether using a mobile phone
to access the network, Select "Yes", then as shown.
Tap
Bluetooth settings
- 56 -
- 57 -
Click on the icon
Click on the icon
Click on the icon
, to access music
, and disconnected
- 58 -
- 59 -
——The full feature version——
GPS Navigation, Speed Radar Dectecting, Video Recording, Parking
Camera, Parking Sensors, Bluetooth, Entertainment
-60-