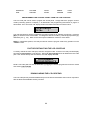
1
DAS ENGLISH LANGUAGE
LCD CODE PAD
INSTALLATION MANUAL
TABLE OF CONTENTS
General Description . . . . . . . . . . . . . . . . . . . . . . . . . . . . . . . . . . . . . P.2
Power Up Information . . . . . . . . . . . . . . . . . . . . . . . . . . . . . . . . . . . . P.3
Entering The Program Mode . . . . . . . . . . . . . . . . . . . . . . . . . . . . . . . P.4
Selecting Panel Type . . . . . . . . . . . . . . . . . . . . . . . . . . . . . . . . . . . . P.4
Programming Defaults . . . . . . . . . . . . . . . . . . . . . . . . . . . . . . . . . . . P.5
Sounder Volume Adjustment .. . . . . . . . . . . . . . . . . . . . . . . . . . . . . . P.5
Enabling The Custom Message Option . . . . . . . . . . . . . . . . . . . . . . . P.5
Failure To Communicate Message . . . . . . . . . . . . . . . . . . . . . . . . . . P.5
LED Extinguish Feature . . . . . . . . . . . . . . . . . . . . . . . . . . . . . . . . . . P.6
Suppressing Zone Status . . . . . . . . . . . . . . . . . . . . . . . . . . . . . . . . . P.6
Exiting The Program Mode . . . . . . . . . . . . . . . . . . . . . . . . . . . . . . . . P.6
Changing The "Go To Program Code" .. . . . . . . . . . . . . . . . . . . . . . . P.7
Programming A Custom Message .. . . . . . . . . . . . . . . . . . . . . . . . . . P.7
Selecting Burglary/Fire Zone Types . . . . . . . . . . . . . . . . . . . . . . . . . P.8
Programming Custom Zone Descriptions . . . . . . . . . . . . . . . . . . . . . P.8
Copying Code Pad Messages Throughout System . . . . . . . . . . . . . . P.9
Special Function Keys . . . . . . . . . . . . . . . . . . . . . . . . . . . . . . . . . . P.10
Character Conversion & Library Lists . . . . . . . . . . . . . . . . . . . . . . . P.10
Programming Control Panels With The LCD Code pad . . . . . . . . . . P.11
DIRECT ALARM SUPPLIES, VILLAWOOD NSW
SERVICE/TECHNICAL (02) 7244211 OR 008252213
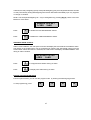
GENERAL DESCRIPTION
The DAS Liquid Crystal Display (LCD) code pad has been designed to provide step-by-step English
language information to the system user. When user action is required, the backlit, 2-line, 32 segment
LCD display gives simple, specific, easy to understand instructions. The drawing below highlights all
major elements of the code pad. When reference is made to the "SmartBuss", it applies to LCD code
pads attached to the DL-250 and DL-300 panels programmed for "SmartBuss".
1. ARMED LIGHT (RED): Stays on continuously when control is armed. Blinks to indicate an alarm
has occurred. (Alarm Memory)
2. SECURE LIGHT (GREEN): On when all zones are secured or isolated.
3. POWER LIGHT (RED): On when A.C power is present. Flashing for low battery.
4. AUXILIARY 1 KEYS [1] and [3]: If enabled, these keys, when pressed at the same time, will
activate the siren output and transmit the selected code.
5. AUXILIARY 2 KEYS [4] and [6]: If enabled, these keys, when pressed at the same time, will
activate the code pad sounder and transmit the selected code.
6 . P A N I C K E Y S [ These keys, when pressed at the same time , will activate the siren
output (if not programmed for silent operation) and transmit the selected code.
7. RESET KEY [#]: Used to power down smoke and/or auxiliary power for 10 seconds to allow for
reset. Provided other functions in the program mode. (page 11)
8 . S T A R K E Y [ Used before and after selected zones number keypress to isolate zones. Also
provides other functions in program mode. (page 11)
9. SPECIAL FUNCTION KEYS [A], [B], [C], [D]: The keys allow access to special functions in the
run mode. They also allow the installer to preform programming functions as detailed in the appropriate
sections of the booklet.
10. ADJUSTABLE SOUNDER: Provides an audible out when a key is pressed, during pre-alarm, and
when trouble or certain alarms occur.
2
POWER UP INFORMATION
Always disconnect the A.C. and battery power before connecting the LCD code pad to the DAS
security control. Connect the four wires on the code pad to the appropriate terminals on the DAS
Security Control selected for this installation. After connection is complete and upon power-up of the
Security Control, the LCD code pad will display the current status of the security system. If all zones
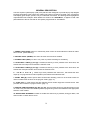
are secure, the message will look as follows:
SYSTEM READY
TYPE CODE TO ARM
If a zone is open, the following message will be displayed:
SYSTEM NOT READY
TYPE A FOR HELP
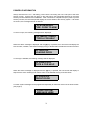
When the above message is displayed and the [A] key is pressed, the LCD screen will display the
zone number, condition, and custom message (if any) of faulted and/or isolated zone as shown below:
03 FAULTED
LOADING DOCK
If a zone(s) is isolated, the following message will be displayed:
02 ZONES ISOL
TYPE A FOR HELP
When the above message is displayed and the [A] key is pressed, the LCD screen will display in
sequence the zone number(s) and custom name of the isolated zone(s) as shown below:
01 ISOLATED
FRONT DOOR
A custom system message can be programmed separately for both lines of the LCD as shown below.
(see page 9)
YOUR CUSTOM
MESSAGE HERE
3
PROGRAMMING THE LCD CODE PAD
The DAS LCD Code Pad can be customised to individual installation requirements by utilising the LCD
code pad programming mode. In some areas the LCD screen will advance automatically, however,
where noted you must press [#] to save and move to the next programming option.
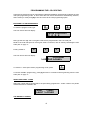
ENTERING LCD PROGRAM MODE
To enter the program mode, type:
C
0
0
The LCD screen will now display:
ENTER FOUR DIGIT
C O D E
Now type the four digit "Go To Program Code" that is programmed in the LCD code pad.
NOTE: If the LCD code pad "Go To Program Code" is unknown, refer to "Factory Defaulting the LCD
Code pad" on page 11.
Factory default is:
9
0
5
0
The LCD screen will now display:
PROGRAM
1=KEYPAD 2=PANEL
To enter the "Code pad" custom programming mode, press:
1
To choose "PANEL" programming, press [2] and refer to "Control Panel Programming from the LCD
Code pad" on page 11.
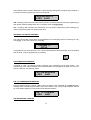
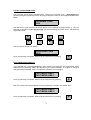
SELECTING PANEL TYPES
Select the number which corresponds to the panel being programmed. "AUST" refers to all panels
manufacturered for Australian use.
PANEL
1=8900
2=AUST 3=OTHER
THE DEFAULT SCREEN
4
The following screen is used to default ALL code pad programming back to original factory default, or
to continue custom programming of the LCD code pad:
PROG DEFAULTS
9=YES 2=NO
YES - Choosing "YES" from this screen will convert ALL previously entered code pad programming to
their default values and default the "Go To Program Code" to [9]-[0]-[5]-[0].
NO - Choosing "NO" will allow the continuation of LCD custom programming, while retaining any
custom programming that has already been done.
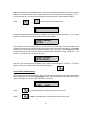
SOUNDER VOLUME ADJUSTMENT:
The code pad sounder volume level can be adjusted from the following screen by selecting an entry
from [1]-[7]. To turn the sounder off, press [9].
VOLUME 1-7
OFF=9
It is possible to scan through levels 1 thru 7 to hear all the different levels available. Once the desired
level is found, continue programming by pressing:
#
CUSTOM MESSAGE ENABLE:
If desired, a 2-line, 32-character custom message can be displayed on the LCD screen. The
programming of the custom message can be performed later in the programming table, but only if you
choose "YES from the following screen.
CUSTOM MESSAGE
1=YES 2=NO
FAIL TO COMMUNICATE MESSAGE:
From the following screen, choose "YES" or "NO" for display of the "FAILURE TO COMMUNICATE"
message when a related communication fault occurs. Refer to your control panel installation manual
for more details regarding communication fault detection features.
FAIL TO COM MSG
1=YES 2=NO
LED EXTINGUISH FEATURE:
5
If desired, all code pad lighting (except touchpad backlighting) may be extinguished after 60 seconds
of code pad inactivity. Extinguished lighting will become illuminated immediately upon any keypress
or change of condition.
NOTE: The touchpad backlighting can only be extinguished by pressing [B]-[0]. Refer to the User
Manual for more detail.
ENABLE LED EXT
1=YES 2=NO
Press
1
to enable the "LED EXTINGUISH" feature.
Press
2
to disable the "LED EXTINGUISH" feature.
SUPPRESS ZONE STATUS:
Under normal conditions, the code pad LCD screen will display the zones that have created the alarm.
The display of the faulted zones can be suppressed by entering the appropriate number from the
screen below. When this feature is selected, the LCD screen will display "SYSTEM ARMED" even
during an alarm condition.
SUP ZONE STATUS
1=YES
2=NO
Press
1
to "Suppress Zone Status" during an alarm.
Press
2
to display zone status during an alarm.
EXITING THE PROGRAM MODE
From this point forward, you can exit the program mode by entering the following keypresses:
To exit programming, press:
9
3
6
0
#
LCD GO TO PROGRAM CODE:
The LCD code pad is factory defaulted with a 4 digit "Go To Program Code", [9]-[0]-[5]-[0]which
permits entering the programming mode. This "Go To Program Code" can be changed from the screen
below:
PROGRAM CODE
9050
The desired new code must be entered one digit at a time, following each digit with the [ key. For
example, to change this code to [6]-[3]-[1]-[2], you must be viewing the screen above, and follow the
keypresses below.
6
3
1
2
The LCD screen should now display:
PROGRAM CODE
6312
Once programming is complete, advance to the next screen by pressing
#
CUSTOM MESSAGE DISPLAY:
If you selected the " CUSTOM MESSAGE" option earlier in programming, the screen below will be
displayed for programming "LINE 1"(the top line) of your custom message. To program or change a
code pad custom message, refer to "Programming Custom Text" on page 9.
CUST MESS-LINE 1
CUST MESS-LINE 1
Once programming is complete, advance to the next screen by pressing
#
Now, the screen below should appear for the programming of "LINE 2" (the bottom line).
CUST MESS-LINE 2
CUST MESS-LINE 2
Once programming is complete, advance to the next screen by pressing
7
#
ZONE TYPES (FIRE OR BURGLARY):
Two types of messages can be displayed when programming custom zone messages. When using
a 60EL, 200 and 250 Series panels in the non-SmartBuss mode, the code pad is unable to determine
the zone type (Burglary or Fire) you have selected in the panel programming for each of the zones, so
a screen will be displayed for each zone of the control panel being programmed. When these screens
are displayed, pressing the [ will toggle the zone type from "BURGLARY" to "FIRE". The zone type
selected will be displayed in the run mode when zone information is being displayed. This screen will
not appear for panels using "SmartBuss mode.
ZONE 01=BURG
T
Y
P
E
OR
ZONE 01=FIRE
TYPE
TO TOGGLE
Once programming is complete, advance to the next screen by pressing
#
CUSTOM ZONE DESCRIPTIONS
You choice of custom zone descriptions can be programmed for each zone of the system being
programmed. The screen below is an example of the screen that would be displayed for this
programming. You will notice that Zone 1 was selected as a "BURGLARY" type (see top line of
display). The bottom line is where the custom description will appear. If custom zone descriptions are
not programmed, the bottom line will simply display the zone and its number.
For programming these custom descriptions, refer to "Programming Custom Text", below.
ZONE 01=BURG
ZONE 1
OR
ZONE 01=BURG
FRONT DOOR
PROGRAMMING CUSTOM TEXT
Programming custom text refers to "Custom Messages" (if applicable) and "Custom Zone
Descriptions". When you are first presented with any message, the top line always displays the
Default, and the bottom line is where the editing takes place. To program Zone 1 with the custom word
"Entry Door", study the "Special Function Keys"and refer to the "Character Conversion List", and the
"Library List" on page 10 while following the examples below.
When beginning programming of Zone 1 description the screen below will appear:
ZONE 01=BURG
ZONE 1
Press
D
six times to delete the six character bottom line default listing (Zone 1).
ZONE 01=BURG
8
With our description to be "ENTRY DOOR", refer to the "Character Conversion List" to begin spelling
"ENTRY". You will see that the first character which is an "E" is entered by using the [5] key. The [
key will save the "E" on screen while moving the cursor ahead to the next character location.
Press
5
and you will see the screen below:
ZONE 01=BURG
E
Continue this spelling process until the word "ENTRY" is complete, and then press the [
a space. The cursor should now in position for the word "DOOR".
key to insert
ZONE 01=BURG
ENTRY
Since "DOOR" is a word in the Library List, you can choose the word in lieu of spelling it. Refer to the
"Character Conversion List" for the number that corresponds to "D" which is the [4] key. Type [4]-[A]
to take you to the "Words Beginning With D" category in the "Library List". Use the [B] key to scroll
through all the words in this category. When the word "DOOR" appears on screen, press the [ key
to save it. The screen will now appear as below:
ZONE 01=BURG
ENTRY DOOR
Now that you have completed programming the "Custom Zone Description" for Zone 1, you can to
advance to the next zone(s) to be customized by pressing:
#
COPY CODE PAD MESSAGES:
When using the LCD code pad with DL-250 or DL-300 in the SmartBuss mode, "COPY MESSAGE"
will be displayed after you press [9]-[3]-[0]-[#] to save and exit. This feature enables you to copy all
custom messages to any other LCD code pad in the system.
COPY MESSAGES
1=YES 2=NO
Press
1
to "Copy Messages" throughout the system code pads.
Press
2
to NOT "Copy Messages" throughout the system code pads.
9
SPECIAL FUNCTION KEYS
A
Library Key - To enter the library mode, pressing the [A] key will take you to "Words
That Begin With "A", or enter the desired category's numerical code (A=1 thru
Z=26) followed by [A] to take you to a specific letter category. Any subsequent
[A] keypress will advance you to the next letter category in the "Library List".
B
Scroll key - When a desired letter (A-Z) in the Library is reached with the [A]
key, you can scroll through that category by using the [B] key.
Example: To program the word "DOOR", place the cursor where the word should begin. Press [4]-[A]
or [A]-[A]-[A]-[A] to reach "Words That Begin With D" category. Scroll through the "D" words with the
[B] key until the word "DOOR" appears on the screen and press the [ key to save. To exit without
saving a word, press the [#] key, and the screen will revert to its default.
C
Shift Key - The [C] key will insert a space at the cursor position and shift the
remaining message to the right.
D
Delete Key - The [D] key deletes the character or space where the cursor is setting.
Save Key - The [ ] key will save a character selected to the screen. This key will
also move the cursor forward through the display screen.
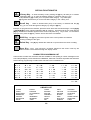
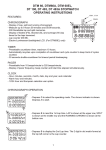
CHARACTER CONVERSION LIST
The list below contains the characters that are available for the spelling of custom messages in the
LCD code pad display. The characters are in bold text, while their numerical equivalent that would be
entered during programming to obtain these characters are in standard form.
A = 1
B = 2
C = 3
D = 4
E = 5
F = 6
G = 7
H = 8
I = 9
J = 10
K = 11
L = 12
M = 13
N = 14
O = 15
P = 16
Q = 17
R = 18
S = 19
T = 20
U = 21
V = 22
W = 23
X = 24
Y = 25
Z = 26
BKSP = 27
' = 28
! = 29
# = 30
$ = 31
& = 32
( = 33
) = 34
* = 35
+ = 36
, = 37
- = 38
. = 39
/ = 40
: = 41
? = 42
0
1
2
3
4
5
6
7
8
9
=
=
=
=
=
=
=
=
=
=
60
61
62
63
64
65
66
67
68
69
LIBRARY LIST
ALARM
AUDIO
BATHROOM
BEDROOM
CEILING
DETECTOR
DOOR
FRONT
GARAGE
GLASSBREAK
HALL
INFRARED
INTERIOR
JUNK
LIVING
MASTER
MOTION
NURSERY
OFFICE
PANIC
PIR
10
SAFE
SECTOR
SENSOR
SHOCK
SIDE
SKYLIGHT
SLIDING
TROUBLE
ULTRASONIC
UPSTAIRS
VAULT
WARE HOUSE
WINDOWS
X-RAY
EXTERIOR
FIRE
KITCHEN
LIBRARY
QUITE
ROOM
SMOKE
TAMPER
YARD
ZONE
PROGRAMMING THE CONTROL PANEL FROM THE LCD CODE PAD
The LCD code pad can be used to program the control panel. Simply select the "program control"
mode by selecting option 2 on Display 1, as described in the programming instructions on page 4 of
this booklet. The LCD screen will display location and data information as shown below:
LOCATION=000
DATA=
1
The code pad will then perform programming functions exactly as an FS4597 programmer. Press the
[#] key to advance to the next location. To change the data in a location, press the appropriate key(s)
followed by the [ key. Refer to the control panel installation manual for more detail.
NOTE: In partitioned systems, the code pad will not enter the program mode if any partition is in the
"ARMED" state.
FACTORY DEFAULTING THE LCD CODE PAD
To factory default the LCD code pad, enter the "Program Code" and the LCD code pad will display
the word "PROGRAMMER" on the top line. Then enter [9]-[1]-[0]-[#] which will default the LCD code
pad. If the default attempt was successful, the LCD display will read:
PROGRAMMER
KEYPAD DEFAULTS
NOTE: LCD code pads can also be defaulted by plugging an FS4597 programmer into the PC board
and entering [9]-[1]-[0]-[#].
DOWNLOADING THE LCD CODE PAD
The LCD code pad may be downloaded directly from the download software when used in conjunction
with the DAS Downloadable Security Controls.
11
SPECIFICATIONS
OPERATING VOLTAGE
12 VDC
MAXIMUM CURRENT DRAW
90 mA With Pre-Alarm
70 mA Without Pre-Alarm
CODE PAD DIMENSIONS
6.45" Wide
4.12" High
1.00" Deep
SHIPPING WEIGHT
8 oz.
COLOR
Off White
MATERIAL
ABS Plastic
FIVE YEAR LIMITED WARRANTY
DIRECT ALARM SUPPLIES GUARANTEES THIS PRODUCT AGAINST DEFECTIVE
PARTS AND WORKMANSHIP FOR TWENTY-FOUR (24) MONTHS FROM DATE OF
MANUFACTURING. IF ANY DEFECT APPEARS DURING THE WARRANTY PERIOD
RETURN IT TO DAS, POSTAGE PREPAID. THE UNIT WILL BE REPAIRED AND
RETURNED.
FOR THE REMAINING 36 MONTHS OF WARRANTY, THE UNIT WILL BE REPAIRED
FOR A FEE NOT TO EXCEED $20.00 PLUS SHIPPING AND HANDLING.
DAS ASSUMES NO LIABILITY FOR CONSEQUENTIAL OR INDIRECT DAMAGE AND
ACCEPTS NO RESPONSIBILITY FOR REPAIRING DAMAGE TO THE PRODUCT
CAUSED BY MISUSE, CARELESS HANDLING, OR WHERE REPAIRS HAVE BEEN
MADE BY OTHERS.
NO OTHER GUARANTEE, WRITTEN OR VERBAL, IS AUTHORIZED BY OR ON
BEHALF OF DIRECT ALARM SUPPLIES.
DIRECT ALARM SUPPLIES, VILLAWOOD NSW
SERVICE/TECHNICAL (02) 7244211 OR 008252213
BULLETIN IM-DAS LCD
HOW TO USE THE LCD Code pad IN THE STANDARD RUN MODE
The LCD code pad performs the same functions as its corresponding LED code pad, to further
understand Standard code pad operations refer to the Operator's Manual provided with your
control panel.
MASTER MODE USER OPERATIONS
If the LCD codepad is selected to work in master mode, the user operation will alter from that
of the Standard mode. Follow the directions listed below for correct operation procedures.
ARM YOUR SYSTEM IN MASTER MODE
To arm your system while the LCD codepad is in master mode:
Enter your four digit user code:
Now select the area number you wish to arm (1,2,3 or 4) followed by [A] to arm.
13
OR, simply press the [A] key to arm all displayed areas.
NOTE: If "SUPPRESS Zone STATUS" was disabled in the Code pad programming options then
faulted and or Isolated zones will be displayed during the exit time.
DISARM YOUR SYSTEM IN MASTER MODE
To Disarm your system while the LCD codepad is in master mode:
Enter your four digit user code:
Now select the area number you wish to Disarm (1,2,3 or 4) followed by [D] to Disarm.
14
OR, simply press the [D] key to arm all displayed areas.
ENTERING THE CHECK FUNCTION
If the LCD codepad is selected to work in master mode, then to enter a specific area and perform
standard mode function such as partial arm, group isolate, chime enable, isolating zones,
viewing, faulted or isolated zones, resetting a fire zone by pressing the [#] and initiating on
site downloading by pressing [*] [9] [9] [#]. All these operations can be performed via the Check
Function as follows:
Enter your four digit user code:
Now select the area (only area(s) which are assigned to your code will be displayed) you wish to
perform the desired operation (1,2,3 or 4). Note that all required operations must be performed in the
area for which the operation will affect. One exception to is initiating on site download. Once in the
Check Mode standard operational procedures apply.
EXITING THE CHECK FUNCTION
15
To exit the Check Function:
Press;
OR, wait twenty seconds for automatic exit.
USING THE NEXT FUNCTION
The Next Function is provided to allow the viewing of the Armed Status of individual area and/or the
Quick Arming or Disarming of the selected area.
Proceed to the next function by entering your four digit user code:
Now select the first area you wish to view or alter the Armed State.
If the area selected is armed then [D] will disarm that area.
If the areas selected is disarmed then [A] will arm that area.
Press [B] to move the display to the next area to which your code has access: Note: at the codepad
LED's will also follow the condition of the displayed area.
OPERATION OF SPECIAL FUNCTION KEYS
The DAS Liquid Crystal Display (LCD) Code pad can be used to operate your DAS Security Control
16
with virtually the same steps described in your Operator's Manual. With this more powerful and
versatile LCD code pad, additional features are available and are accessed with the four special
function keys on the left side of the number keys. These keys, labelled {A}, {B}, {C}, and {D} below:
[A]
KEY: The [A] key serves as a "Help" key. It only functions when the LCD display shows
the message, "TYPE A FOR HELP". Multiple messages will be displayed in sequence every 3
seconds, or will scroll with no delay each time the [A] key is pressed.
[B] KEY: The [B] key adjusts the brightness of the LCD back lighting to levels 1-6, with 6 as the
brightest. The factory setting is 6. To turn off only the LCD backing, press [B][8]. To turn off only the
code pad LEDs, press [B][9]. To turn off all lighting, press [B][0]. All lights will return to the "ON" mode
when any key is pressed, or when an alarm condition, a fire or trouble condition, or a pre-alarm occurs.
[C] KEY: The [C] key is used to quickly program auxiliary codes in the run mode. The display asks
for User number, Master Code, and new Auxiliary Code before automatically programming this
information into the Security Control. NOTE! This function can only be used when the DAS Security
Control is disarmed.
LIST OF [C] FUNCTIONS:
CHANGING USER CODES
[C][0][1] through [C][3][0] (note the DL250 only provides 15 user coders) allows you to program user
codes 01 to 30 in the run mode by using the master code or the existing user code to gain access. The
code pad will not allow you to program two users with the same four digit code.
CHANGING THE PRIMARY PHONE NUMBER
17
[C][7][2] + <MASTER CODE> is used to change the primary phone number from the run mode. Only
use this function when self monitoring is required.
CLEAR ALARM MEMORY
[C][9][5] + <MASTER CODE> is used to clear the alarm memory, refer to the special key [D][0]
function for more detail on alarm memory.
VIEWING AND CHANGING THE PANEL CLOCK
[C][9][7] + <MASTER CODE> is used to view or change the panel clock. Enter correct digits to
change the setting or press [#] to view and move.
When this function is entered, the first display is the "DAY OF WEEK" [01] is equal to Sunday through
[07] which is equal to Saturday. To change the day of the week press [01] through [07] for the correct
setting or [#] to move on to the next display.
The next display is the "MONTH/DAY/YEAR", to change to correct setting enter a two digits for the
month, [01] = January through [12] = December, then enter two digits for the day of the month, [01]
through [31], finally enter two digits for the year [95] = 1995. Enter [#] to move with out changing
18
current settings.
The final display is the "TIME", to change current time setting enter a four digit which represents the
24 hour time value. [0000] = midnight through [2359] = 11:59PM. Enter [#] to move with out changing
current settings.
VIEW THE INTERNAL LOG:
[C][9][8] + <MASTER CODE> is used to view the internal log.
The display will asks for a "MONTH/DAY" if you wish to view the records from a particular date. If you
want to start with the most recent event, press [A]. To advance through the log press the [A] key.
Press [#] exit this function.
MANUAL MASTER MODE:
[C][A] Plus any four digit user code will switch a standard mode LCD code pad to temporary master
mode. Refer to "MASTER MODE USER OPERATION" in this manual for more detail.
19
[D] KEY: The [D] key adjusts the LCD screen viewing angle for various heights by pressing [D] and
a number [1] through [3]. The lowest viewing angle is 3 and the highest is 1. The factory setting is 2.
The [D] key also causes the LCD screen to display Alarm Memory when [D][0] is pressed. Faulted
and/or isolated zones from the last alarm event, are then displayed on the LCD screen.
VIEW Zone MESSAGE:
[D][A] Allows you to view the custom zone messages from the run mode. This display will ask for a
starting zone number from [01] through [32] (note: the DL250 can only have 16 zones). Enter the
starting zone number then press [A] or press [A] to start at zone one. Press [A] to scroll through each
zone. Press [#] exit this function.
NOTE! After pressing keys [B], [C], or [D], the display will revert back to the standard message if no
additional keypresses are made within 10 seconds. To escape any of the special function modes and
return to the standard message screen, press the [#] key.
Other code pad functions, including the dual keypress alarms work exactly like the standard code pad
described in your Operator's Manual. If you have any questions about the operation of this code pad,
or any other question in regard to your security system, you should call the company that installed the
DAS Security Control in your home or business.
20
HOW TO OPERATE THE LCD CODEPAD IN A NON MASTER MODE
Refer to the normal user manual for a detailed description of Control Panel operation.
21