1
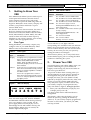
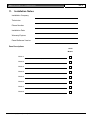
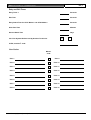
VR8
User Guide
EN
Intruder Alarm System
VR8 | User Guide | Notices
EN | 2
Copyright Notice
Notice of Liability
Unless otherwise indicated, this publication is the
copyright of Bosch Security Systems Pty Ltd
(“Bosch”). All rights are reserved.
This material is designed for use by tradespeople
with expertise in the installation of this product.
Persons without appropriate expertise should seek
assistance before attempting installation.
You may download a single copy of this publication.
By downloading the publication you agree that you
will: (i) only use the publication for your own
reference; (ii) not commercially exploit or charge any
person for the use of the publication; and (iii) not
modify the publication in any way without the prior
written permission of Bosch.
Except as specified above or where authorised by the
Copyright Act 1968 (Cth), no part of this publication
may be reproduced, transmitted, modified or stored,
in any form or by any means, without the prior
written permission of Bosch.
While care was taken in the preparation of this
material, Bosch Security Systems Pty Ltd and its
representatives are not responsible to any person or
entity for any loss or damage directly or indirectly
caused by information in, or any omission from, this
material.
Bosch Security Systems Pty Ltd reserves the right to
make changes to features and specifications of its
products at any time without prior notification.
Bosch Security Systems | 10/03 | SUBMAVR80-0001.UG.111
VR8 | User Guide | Contents
Contents
1.
1.1
1.2
1.2.1
1.2.2
Getting to Know Your VR8 ............................ 4
Zone Types........................................................ 4
VR8 Indicators.................................................. 4
AC Mains Supply Failure ................................ 4
Zone Indicators ................................................. 4
2.
Disarm Your VR8 ............................................ 4
3.
3.1
3.2
Arming Your VR8............................................ 5
Arm in AWAY Mode ...................................... 5
Arm in STAY Mode ........................................ 5
4.
4.1
4.2
4.3
Add/Delete User Code/RF Keyfob ............... 5
Add a User Code.............................................. 5
Add RF Keyfob................................................. 5
Delete a User Code/RF Keyfob ..................... 5
5.
Change Domestic Telephone Numbers......... 5
6.
Setting Date and Time ..................................... 5
7.
Silencing Alarms............................................... 5
8.
Emergency Keys ............................................... 6
9.
Keyfobs .............................................................. 6
10.
Glossary of Terms............................................. 7
11.
Installation Notes .............................................. 8
Figures
Figure 1:
Figure 2:
VR8 LCD Display..................................... 4
RF Keyfob Operations.............................. 6
Tables
Table 1:
Table 2:
Table 3:
Zone Types................................................. 4
VR8 Indicator States................................. 4
Glossary of Terms ..................................... 7
Bosch Security Systems | 10/03 | SUBMAVR80-0001.UG.111
EN | 3
VR8 | User Guide | 1. Getting to Know Your VR8
1.
Getting to Know Your
VR8
Your VR8 Intruder Alarm System is made up of a
control panel and numerous detection devices
such as magnetic/motion sensors and smoke
sensors. You can operate the VR8 using either the
keypad or RF keyfobs. Your security company will
examine your premises and divide it up into
sections called zones.
If a detection device detects intrusion, the status of
the device changes from normal to faulted. If a
detection device becomes faulted when the VR8 is
armed (AWAY Mode or STAY Mode), the VR8
sounds an alarm and sends an alarm report by
telephone to your security company. Your security
company takes the appropriate action.
1.1
During installation, your security company may
configure zones on your VR8 differently. These
different zones are described in Table 1.
Table 1:
Zone Types
Type
Burglary
Description
A burglary zone is programmed to sound an
alarm only when a fault is detected and the
VR8 is armed (AWAY Mode or STAY
Mode). When the VR8 is turned off
(disarmed), burglary zones do not sound an
alarm if faulted.
A 24-hour zone is programmed to sound an
alarm when a fault is detected (by a tamper
switch, for example) regardless of whether
the VR8 is armed.
A fire zone is programmed to sound an
alarm when a fault is detected (by a smoke
sensor, for example) regardless of whether
the VR8 is armed.
Fire
1.2
VR8 Indicators
Figure 1:
VR8 LCD Display
AWAY
STAY
POWER
SERVICE
1 2 3 4 5 6 7 8
1.2.1
Table 2:
VR8 Indicator States
Indicator
AWAY
Description
On – the VR8 is armed in AWAY Mode.
Off– the VR8 is not armed in AWAY Mode.
On – the VR8 is armed in STAY Mode.
Off– the VR8 is not armed in STAY Mode.
On – AC mains supply is normal.
Flashing (with SERVICE indicator) – AC
mains supply failure.
On– a trouble condition exists. Contact your
security company.
Flashing (with POWER indicator) – AC
mains supply failure.
On – the zone is faulted.
Off – normal condition.
Flashing – the zone is in alarm.
STAY
POWER
SERVICE
Zone
Indicators
1.2.2
Zone Types
24-Hour
EN | 4
AC Mains Supply Failure
If the AC mains supply fails, both the POWER
and SERVICE indicators flash. The keypad beeps
once every minute to warn you that the AC
power supply failed. Press the [#] key once to
acknowledge the AC fail condition and stop the
keypad beeping. When power is restored, the
indicator lights steadily again.
Bosch Security Systems | 10/03 | SUBMAVR80-0001.UG.111
Zone Indicators
A zone indicator (1 to 8) lights when the
corresponding zone is faulted. If the zone indicator
flashes, the corresponding zone is in alarm or the
zone is in alarm memory. You can clear the alarm
memory the next time you arm your system by
turning the VR8 on and off again.
Alarm memory allows you to verify which zones
became faulted (open) prior to resetting the alarm
condition or disarming the system.
2.
Disarm Your VR8
You must disarm or turn off the VR8 to enter your
premises. Disarming the system disables all
burglary zones leaving only the fire and other 24hour zone types still active.
To prevent an alarm from occurring when you
turn the VR8 off, you must enter the premises at
the designated entry point (the front door, for
example) and enter your code (default = 2580)
followed by the [#] key before the entry delay time
expires. If you f ail to disarm VR8 before the
entry delay time expires, an alarm sounds. Only
your security company can program the entry
delay time. Refer to Figure 2, RF Keyfob Operations.
1. Enter your code followed by the [#] key. For
example, press [2 5 8 0 #].
Two beeps sound and the AWAY indicator is
extinguished.
Alternatively, when using the keyfob, you can
disarm the system by pressing the unlock key
(button 2). If your security company programmed
the siren to sound when you disarm your VR8,
one beep is heard.
VR8 | User Guide | 3. Arming Your VR8
3.
Arming Your VR8
3.1
Arm in AWAY Mode
AWAY Mode is used so that all zones are in a
ready state to detect intrusion while you are away
from the premises.
After you enter your code (default = 2580)
followed by the [AWAY] key, the exit delay time
starts to count down. The exit delay time can only
be programmed by your security company. To
prevent an alarm when arming the VR8, you
should exit the premises before the exit delay time
expires.
1. Enter your code followed by the [AWAY] key.
For example, press [2 5 8 0][AWAY].
Two beeps are heard and the AWAY indicator
lights. The [AWAY] key also lights red. The
keypad beeps once every two seconds during exit
delay. During the last ten seconds, the keypad
continuously sounds to warn you that the exit
delay time has nearly expired.
Alternatively, when using the keyfob, you can turn
the system on in AWAY mode by pressing the
lock key (button 1). If your security company
programmed the siren to sound when you arm
your VR8 in AWAY Mode, two beeps sound.
Refer to Figure 2, RF Keyfob Operations.
3.2
EN | 5
4.
Add/Delete User
Code/RF Keyfob
4.1
Add a User Code
1.
2.
3.
4.2
1.
2.
3.
4.3
1.
2.
3.
5.
Arm in STAY Mode
STAY Mode is used when you only want the
perimeter zones of your premises ready to detect
intrusion. The interior zones are automatically
bypassed (disabled) so that you can move within
these zones without sounding an alarm.
After you enter your code (default = 2580)
followed by the [STAY] key, the exit delay time
starts to count down. The length of the exit delay
time can only be programmed by your security
company.
1. Enter your code followed by the [STAY] key.
For example, press [2 5 8 0][STAY].
Two beeps are heard and the [STAY] indicator
lights. The [AWAY] key also lights red. The
keypad does not beep during exit delay.
However, the keypad beeps once at the end of the
exit delay time for STAY Mode.
1.
2.
3.
6.
1.
2.
3.
7.
Enter your code, followed by [1] and the [#]
key (for example, [2 5 8 0 1 #]).
Enter the User Number (1 to 16) you want to
add/change, followed by the [#] key.
Enter the new code, followed by the [#] key.
Add RF Keyfob
Enter your code, followed by [1] and the [#]
key (for example, [2 5 8 0 1 #]).
Enter the User Number (9 to 16) you want to
add, followed by the [#] key.
Enter the 9-digit RF keyfob ID number,
followed by the [#] key.
Delete a User Code/RF Keyfob
Enter your code, followed by [1] and the [#]
key (for example, [2 5 8 0 1 #]).
Enter the User Number (1 to 16) you want to
delete, followed by the [#] key.
Press the [*] key to delete the User Code.
Change Domestic
Telephone Numbers
Enter your code, followed by [2] and the [#]
key (for example, [2 5 8 0 2 #]).
Enter the digits for the telephone number.
If there is more than one telephone number,
press the [*] key, followed by the [4] key
(inserts break between phone numbers) and
repeat Step 2, or press the [#] key to exit.
Setting Date and Time
Enter your code, followed by [6] and the [#]
key (for example, [2 5 8 0 6 #]).
Enter the day (DD), month (MM), and year
(YY) followed by the hour (HH) and minute
(MM).
Press the [#] key to exit.
Silencing Alarms
If an alarm occurs, enter your code (default =
2580) followed by the [#] key to silence the alarm.
You may need to turn the VR8 on and then off
again to clear the alarm memory.
To silence alarms using a keyfob, press button 2
(unlock key). Refer to Figure 2, RF Keyfob
Operations.
Bosch Security Systems | 10/03 | SUBMAVR80-0001.UG.111
VR8 | User Guide | 8. Emergency Keys
8.
Emergency Keys
The VR8 provides single-key emergency functions
(panic, fire, and medical). Pressing any of these
keys for two seconds sounds the siren and sends a
report to the security company. The security
company acts accordingly for each emergency
situation.
Your keyfob has the ability to activate a panic
alarm by pressing both the lock key (button 1) and
the unlock key (button 2) at the same time.
EN | 6
9.
Keyfobs
You can operate your VR8 using the two-button
keyfob instead of the keypad on the main desktop
unit.
Figure 2:
1
RF Keyfob Operations
2
3
1 – Button 1: Arm in AWAY Mode
2 – Button 2: Disarm from AWAY/STAY Mode
3 – Buttons 1 and 2: Press both buttons at same
time to activate panic alarm.
Your security company can program the VR8
speaker or siren to sound each time you turn the
VR8 on and off using the keyfob.
Bosch Security Systems | 10/03 | SUBMAVR80-0001.UG.111
VR8 | User Guide | 10. Glossary of Terms
EN | 7
10. Glossary of Terms
Table 3:
Glossary of Terms
Term
24 Hour Zone
Alarm Condition
AWAY Mode
Codepad
Detectors
Dialler
Disarmed
Entry Time or
Entry Delay
Entry Warning
Exit Time or Exit Delay
Keyfob
Master Code
Monitoring Station
Panic
Sealed
Silent Alarm
STAY Mode 1
STAY Mode 2
Unsealed or Faulted
User Code
Zones
Description
A monitored input where tamper switches and emergency switches may be
connected. If one of these switches is violated at any time, an alarm condition is
generated, whether your VR8 is armed or disarmed
Your VR8 is armed and one of the detection devices (such as a smoke detector) is
violated. A 24-hour zone can trigger an alarm when the VR8 is armed or disarmed.
Used to arm your VR8 when you leave your premises.
The codepad allows you to perform all functions such as arming, disarming, and
programming of your VR8.
Devices connected to your VR8 used to sense an alarm condition. Some common
forms of detection devices are passive infrared (PIR) and smoke detectors,
photoelectric beams, reed switches, and vibration sensors.
A device used to communicate with a monitoring station.
A state in which the VR8 does not accept alarms, except for 24-hour zones.
The time allowed to disarm your VR8 after entering your premises before an alarm
occurs.
The beeping from your codepad during entry time to remind you to disarm your VR8.
The amount of time you have to leave your premises after arming your VR8.
Hand-held transmitter that can be used to arm and disarm your VR8 or to initiate a
panic alarm.
A numeric code used to arm and disarm the VR8 and to allow access to all
functions that are programmable through the codepad.
A secure location where a digital receiver monitors numerous VR8s and deciphers
their alarm transmission reports. The operator can then advise the appropriate
authorities to take immediate action.
A type of alarm to indicate to the monitoring station that there is an emergency
situation at your premises.
Refers to a zones status. If a zone is sealed, the detection devices are not violated
and the zone indicator is extinguished (that is, a magnetic switch is closed or a
detector is on standby waiting for an intrusion).
When the zone is violated, your VR8 communicates with the monitoring station
without sounding the sirens. Only your installer can program a silent alarm.
A condition that automatically isolates zones when your VR8 is armed in STAY
Mode 1. Only your installer can program these zones.
A condition that automatically isolates zones when your VR8 is armed in STAY
Mode 2. Only the master code holder can program these zones.
Refers to zone status. A zone is unsealed when a detection device is violated. The
corresponding zone indicator lights.
A numeric personal identification number code used to arm and disarm the VR8.
A monitored input used to trigger an alarm when the zone is violated.
Bosch Security Systems | 10/03 | SUBMAVR80-0001.UG.111
VR8 | User Guide | 11. Installation Notes
11.
EN | 8
Installation Notes
Installation Company
Technician
Phone Number
Installation Date
Warranty Expires
Panel Software Version
Zone Descriptions
STAY
Mode 1
Zone 1
(Front Door, Bedroom, for example)
Zone 2
Zone 3
Zone 4
Zone 5
Zone 6
Zone 7
Zone 8
Bosch Security Systems | 10/03 | SUBMAVR80-0001.UG.111
VR8 | User Guide | 11. Installation Notes
EN | 9
Entry and Exit Times
Entry Timer 1
Seconds
Exit Time
Seconds
Entry Guard Time for STAY Mode 1 and STAY Mode 2
Seconds
Siren Run Time
Minutes
Sensor Watch Time
Days
Can Your System Be Serviced by Another Technician
YES
If YES, Installer’s Code
User Codes
Master
Code
User 1
User 9
User 2
User 10
User 3
User 11
User 4
User 12
User 5
User 13
User 6
User 14
User 7
User 15
User 8
User 16
Bosch Security Systems | 10/03 | SUBMAVR80-0001.UG.111
NO
VR8 | User Guide | Notes
EN | 10
Notes:
Bosch Security Systems | 10/03 | SUBMAVR80-0001.UG.111
VR8 | User Guide | Notes
EN | 11
Notes:
Bosch Security Systems | 10/03 | SUBMAVR80-0001.UG.111
Bosch Security Systems
25 Huntingwood Drive
Huntingwood NSW 2148
Australia
Phone: +612 9672 1777
Facsimile: +612 9672 1717
© 2003 Bosch Security Systems
SUBMAVR80-0001.UG
Issue 111