1
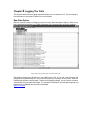
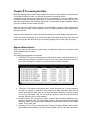
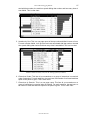
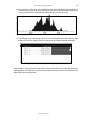
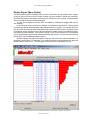
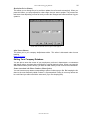
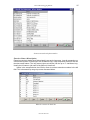
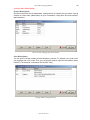
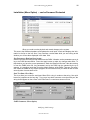
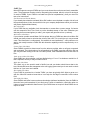
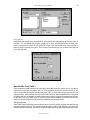
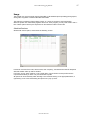
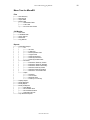
Micro-BX
Phone Traffic Analyser
Logging and Reporting of Phone Call Data
From your Telephone System
User Manual
Copyright © 1992..2003 by Microbe Engineering (Germany). All rights reserved.
(www.microbx.com)
Micro-BX Call Logging Manual
Contents
Chapter 1 Introduction
2
4
Starting the Programme ................................ .......................................................................4
Shutting Down ................................ ................................ ................................ .....................4
Chapter
2 Logging The Calls
5
Raw Data Option ................................ ................................ ................................ .....................5
Translated Data (Menu Option) ................................................................ ...............................6
Details (Button) ....................................................................................................................7
Keep display updated: ) ................................ .......................................................................7
Help (Button) .......................................................................................................................7
Alarm Option (Menu Option)....................................................................................................8
Setting Alarms and Colours .................................................................................................8
Rate Information (Menu Option)...........................................................................................8
Invoice Pricing (Check Box) .................................................................................................9
Long Names (Check Box) ....................................................................................................9
Chapter
3 Processing the Data
10
Reports (Menu Option) ................................ ................................ ................................ ..........10
Moving Between Reports ...................................................................................................14
Entering the Parameters ....................................................................................................14
Display Report (Menu Option) ............................................................................................... 17
Print (Button) .....................................................................................................................18
Adjusting Columns (More>> Button) ..................................................................................18
Print Manager (Menu Option) ................................................................................................ 18
Selecting Reports ..............................................................................................................18
Font Size ...........................................................................................................................19
(Printer) Set up (Button) ................................ .....................................................................19
(Print) Selection Only (Button) ...........................................................................................19
(Print) All Reports (Button) ................................ ................................ ................................ .19
(Print) Rates Table (Button) ............................................................................................... 19
Selecting a Report File (Menu Option) ................................ ................................ ...............19
Editing All Reports (Button) ................................................................................................ 20
Deleting Reports (Menu Option) ................................ ................................ ........................20
Scheduled Printing (Menu Option).........................................................................................22
How to Set it Up.................................................................................................................22
Chapter
4 Nuts and Bolts
23
Options: Rates and Fees (Menu Option) – can be Password Protected ................................ 23
Editing the Pricing Parameters...........................................................................................23
Conceal Last 4 Digits (Check Box) ....................................................................................23
Conceal Pin in Number (Check Box) ..................................................................................23
Conceal Account Codes (Check Box) ................................................................................23
www.microbx.com
Micro-BX Call Logging Manual
3
Sorting (Button) .................................................................................................................23
Recalculate Prices (Button) ............................................................................................... 24
Alias Names (Button) .........................................................................................................24
Editing Your Company Database ..........................................................................................24
Names Associated with Phone Numbers (Menu Option) ....................................................24
Extension Names (Menu Option) .......................................................................................25
Account Codes (Menu Option) ...........................................................................................26
Groups (Menu Option) .......................................................................................................26
Lists (Menu Option) ...........................................................................................................26
“One Off” Expense Items (Menu Option) ............................................................................27
Recurrent Expenses (Menu Option)................................ ................................ ...................27
Installation (Menu Option) – can be Password Protected ......................................................28
Port Parameters (Baud and byte format) ...........................................................................28
Send Test Data (Check Box) ................................................................ .............................28
PABX Parameters (Menu Option) ......................................................................................28
PABX Type ................................ ................................ ................................ ........................29
Watch Dog (Menu Option) ................................ ................................ ................................ .30
System (Menu Option) .......................................................................................................30
Beep (Button) ....................................................................................................................30
How Do We Cost Calls? ........................................................................................................32
The Grace Period ..............................................................................................................32
The Rates Table ................................................................................................................33
Using More Than One Telecom Provider ...........................................................................33
Network Installations .............................................................................................................33
Internet and e-mail ................................................................................................................33
More On Watchdogs .............................................................................................................33
Micro-BX For DOS ................................................................................................................34
MicroBX Hotel Version
35
Installation and Configuration ................................................................................................ 35
Usage....................................................................................................................................37
Check-in/Check-out ...........................................................................................................37
The Accounts Window .......................................................................................................38
Index
41
www.microbx.com
Micro-BX Call Logging Manual
4
Chapter 1 Introduction
Thank you for choosing Micro -BX for your call logging requirements. A programme, starting
from humble beginnings in 1991 has become one of the most powerful tools to record and an alyse your phone call data. And if you are the typical customer, expect to reduce your monthly
phone bill by 35% or more.
Call logging is typically divided into two distinct areas . The logging, which includes the ca pture and interpretation of the data supplied by the PABX comes first. Then once you have the
data, you need to process the information into reports for distribution to individuals or heads of
departments etc.. This manu al is, therefore, divided into these two logical sections. Chapter 2
deals only with the capturing of raw data and “cooking” it. This includes setting alarms for certain conditions and some more general information availabl e to the user.
Chapter 3 deals with processing the call information that you do at set intervals (daily,
weekly, monthly etc.) and how you set up your reports, display them on screen and print them.
Also discussed here is how to automate many processes. For example, setting the system to
automatically print your weekly reports every Monday morning and 04:00.
Chapter 4 titled ”Nuts and Bolts” deals more with technical details that your IT manager
may want to familiarize himself with. This in cludes the Owner options and Installation options.
Starting the Programme
You would not normally have to do this since the programme should start automatically when
you start your computer. However in some network installations, the progra mme can be used to
monitor the logging system remotely. In these cases, you may have to start the programme
manually by going to Start/Programs/Telephone Management/Logging Programme. You would
also do this if the programme is exited normally and you want to restart it.
Shutting Down
Because the programme assumes that the logging computer should not be shut down to pr event calls being logged, it issues a warning and will also prompt you for the Owner Password, if
that is set.
Are you sure you want to exit MicroBX?
If you are running the programme from a remote computer to monitor the logging computer , this
does not apply.
Please note that the data i n the examples shown in this manual are fictitious. Also, the logo of
Tiptel shown in the screens belongs to Tiptel GmbH, a strategic partner of Micro -BX. Your installation may show the generic Micro -BX logo or a strategic partner/dealer logo associated wi th
your area. Back to Contents
www.microbx.com
Chapter 2 Logging The Calls
This chapter deals with the logging aspects and what you can expect from it. The processing of
the information is discussed in detail in the next ch apter.
Raw Data Option
Below is a typical example of what you would see in the Raw Date (Menu Option). Each time a
call is made and terminated, you PABX will transmit the raw data of the call to the computer.
Typical Screen of what your raw data looks like
Raw data is what you get directly from the PABX into the PC. If you had a serial printer and
connected the PABX directly to it, this is precisely what you would get on the printer. Different
PABXs have different output formats . Thanks to call logging software, you do not have to bother
yourself with trying to interpret this data. The sof tware “understands” the raw data language and
converts into a readable format called cooked data .
Back to Contents
Micro-BX Call Logging Manual
6
Translated Data (Menu Option)
Micro-BX takes the number dialled and identifies the destination (local, town, country, mobile
network etc.). From the duration and the destination, it is able to calculate the cost of a call.
Also, it will know from which extension it was made. And if the PABX supplies transfer inform ation, the software can also determine the transfer hi story of the call.
The cooked data looks more intelligible than the raw data. Note the place and price columns.
www.microbx.com
Micro-BX Call Logging Manual
7
Details (Button)
When calls are coming through and you recognize the number, you are able to associate a
name with it. Then when that number is dialled again, the name rather than the number will be
displayed on the screen. Highlight the call and then press the Details>> button (you can also
double-click or right-click on the call). A submenu appears with the following o ptions:
Reset columns
;for the grid ‘Translated Data’
Save columns
;for the same grid
Enter aliases ->
Extension
;long and abbr. Name for Extension
Phone Number
;name to replace a phone number
Account
;customer code
Print cash slip
;cash slip for a single call
The alias submenu looks like this (extension and account code menus are similar):
Keep display updated: )
normally, you see phone calls on-line scrolling on this screen. But if you select a call with the
mouse, the display stops scrolling so you can look at this call and modify its names. When you
are done, click on this check-box, so that the calls scroll again. Of course they are recorded,
even when the display is not updated.
Help (Button)
General help can be found on the programme by pressing the Help button or pressing <F1 >.
Back to Contents
www.microbx.com
Micro-BX Call Logging Manual
8
Alarm Option (Menu Option)
Make the programme behave in certain ways based on the type of calls coming in. You can also
set the invoice pricing a displaying of long extension names in the cooked data .
The Alarms Technical Screen Options
Setting Alarms and Colours
While calls are coming in, Micro -BX can set certain calls (s uch as calls to mobile phones ) to
show up as blue and international calls as red. Also, if calls over a certain duration or cost limit
come in, the programme can beep. And if calls are made from an extension or group of exte nsions, it can also alert you by the options shown below. You can set up to 10 different alarm
conditions.
Actions that can be taken on special calls
Note that you can also run a programme (mbxalarm.pif ) that can activate anything. For exa mple, you could run a programme that would generate an email or send a SMS message to
someone’s cell phone. The file “Mbxalarm.pif” needs to exist in the c: \phone directory.
Rate Information (Menu Option)
www.microbx.com
Micro-BX Call Logging Manual
9
If you want to know what it costs you to phone a certain number, click on the Rate Inf ormation
option. The box below will be displayed. Here you can type in the starting digits of the number.
Micro-BX will automatically identify the destination and give you two prices (roughly estimated
per minute) for peak and off peak times. If you check the Selling Price box on, you’ll see your
selling price instead of the telecom price .
What are you paying for your calls?
Invoice Pricing (Check Box)
Under OptionsàRates and Fees (Menu) , you can set the telecom price as well as your own
mark up price if you are on-selling your telephone time . Checking the Invoice Price box on
means that when you view calls in the cooked data (Menu Option) , it shows the selling price
rather than the telecom price.
Long Names (Check Box)
Extensions can have both a short name, (often not used in large installations, but would typ ically be a person’s initials in small installations), and a full/long name, typ ically the full name of a
person. See OptionsàAlias ListsàExtensions (Menu Option) for details. If you check Long
Names on, the long names rather than the short names will be displayed in the translated data
(Menu Option).
That covers the logging side of the programme. What follows in the nex t chapter is how to get
the information you want from the system.
Back to Contents
www.microbx.com
Chapter 3 Processing the Data
Micro-BX, although not the most flexible programme in terms of output options, nonetheless has
a very clean interface to make it as efficient as possible in producing reports.
You define reports, which are then saved to a file on your computer. You can have different files
for different occasions (such as: regular print, or special observations), and every file may contain many reports. When you install the system first, it comes with a couple of standard reports.
You may use these or rather create your own.
When you click on the Menu Option ‘Reports’ à’Create Report’, you get a choice of what kind of
report you want to create. In this chapter we show you what the different report types do and
what they look like.
When you have created your report, the system prompts you to save, display, and also print it.
Finally, we discuss scheduling your reports and totally a utomating the process if you have the
need to look good in the office while you are a ctually sleeping late or have gone out cycling.
Reports (Menu Option)
When you create a new report, the system asks you what kind of repo rt it is to become. Here
are the different types of reports:
Report Type
The report types supported are as follows
1. Full Details: This gives a chronological record of all the phone calls made during a r eporting period, giving all the details of each call. If you are printing for a group of exte nsions, the extensions are collated in numerical order of extension number .
Full details on one extension (more options can be displayed and printed).
2. Totals Only: This reports on the total number of calls, time and cost. If you are reporting
the totals on a group of extensions , each extension is listed separately. Note that you
should check the form feed check box off if you want the extensions in a group to report
on one page. Otherwise it will use one page per extension. And since it produces two
lines per extension, this is a little waste ful.
3. Numbers Sorted: This can be a long report. It reports all the numbers dialled from your
system in numerical order. For each number dialled, it will give the total cost associated
with that number, the total time spend dialling that number and how many times it was
dialled. This is a bar chart.
4. Numbers by Time: This is a one page report of the top numbers dialled in terms of time
spent dialling these numbers. For ea ch number dialled, it will give the total cost assoc i-
Micro-BX Call Logging Manual
11
ated with that number, the total time spend dialling that number and how many times it
was dialled. This is a bar chart.
Numbers sorted by time.
5. Numbers by Cost: This i s a one page report of the top numbers dialled in terms of cost.
For each number dialled, it will give the total cost ass ociated with that number, the total
time spend dialling that number and how many times it was dialled. This is a bar chart.
Numbers dialed sorted by cost (see the sorting of the left column)
6. Extensions Sorted : This lists all your extensions or a group of extensions in numerical
order of extension. For each extension, the total cost, total number of cal ls and total time
spent on the phone is given. This is a bar chart.
7. Extensions by Duration: This is a one page r eport. This lists all your extensions or a
group of extensions in numerical order of duration. For each extension, the total cost, t otal number of calls and total time spent on the phone is given. This is a bar chart.
www.microbx.com
Micro-BX Call Logging Manual
12
Extensions sorted by duration (see the sorting in the right column).
8. Extensions by Cost: This is a one page report. This lists all your extensions or a group of
extensions in numerical order of cost. For each extension, the total cost, total number of
calls and total time spent on the phone is given. This is a bar chart.
9. Longest Calls: This is a two page report of the longest calls, listed in full details and
sorted by time.
10. Most Expensive Calls: This is a two page report of the most expensive c alls, listed in full
details and sorted by cost.
11. Duration Bar Chart: This gives you a distribution chart of the duration of your calls.
A typical Duration Bar Chart.
12. Cost Bar Chart: This gives you a distribution chart of the cost of your calls.
A typical Cost Bar Chart.
13. Operator Response: This gives you a distribution chart of the length of time it takes for
the operator to answer incoming calls. Need an e xcuse to fire your receptionist?
www.microbx.com
Micro-BX Call Logging Manual
13
14. Line Occupancy: This gives you a distribution chart of the call densities during the day. It
illustrates very clearly when you have busy and quiet times during the day and when it’s
best to get someone to assist with the tireless folk who a nswer your calls.
A typical Line Occupancy Chart. Note the 10:30 and 14:00 peaks. Busy times! Who’s working late?
15. Trunk Usage: A bar chart giving each trunk use (including the total cost of calls on each
trunk which you can compare with your telecom bill) and the percentage distribution .
How your phone calls are distributed through your telecom lines.
Daily Statistics: This gives you a break down of the phone stati stics for each day during your
reporting period. For each day, you get the total cost as well as a bar that is sized relative to the
other days in the reporting period.
www.microbx.com
Micro-BX Call Logging Manual
14
Here’s just one example of a report form (a collated detailed report per extension).
Moving Between Reports
While you are in Report Forms (Menu Option) you are able to page through the reports by clic king the Up and Down arrows next to the box that displays the number of the report (top right). If
you have made any changes to a report, you wi ll first have to confirm whether you want to keep
the changes or discard them.
Entering the Parameters
Title
This is an arbitrary title you would use to identify the report as unambiguously as possible. Try
to avoid writing long stories though.
Time
You can narrow down the calls you want to see that were made at a certain time of day such as
lunchtime or after hours. Enter the start and end time of the period you are interested in. By default, the time is set from midnight to midnight.
Duration
You can put in a minimum and maximum duration of the calls you want to report on. If you are
not interested in calls less than one minute, enter 00:01:00 in t he left time field.
Price
You can view calls that are only over a certain price. If, for example you only want to see calls
costing more than $10, enter 10.00 in the left price field.
Date/Auto date
Micro-BX comes with handy preset date ranges that are determined at the time of printing. For
example, if you select “Last Week” as your auto date, the programme will always print last week
as the date range. It first looks at the computer’s time and date to determine when last week
was.
If you select “Manual Input ” in the auto date field, then you are able to edit the from and to
dates to any dates you desire. The date format will automatically adjust itself t o your international settings (under the Windows control panel ).
www.microbx.com
Micro-BX Call Logging Manual
15
Ring Time
16. If you select incoming but not outgoing calls, the Ring Time fields can be edited. Some
PABXs report the time an incoming call was ringing for before it was answered. Nasty
one this since you can then fire your receptionist if you think his/her response time is not
up to scratch.
Number
You can report on one number (or an area code ). Double clicking in this field will bring up a list
of numbers in your daOptionase.
Exclude
You can exclude a number (or an area code) from being reported by entering the number in this
field. Double clicking in this field will bring up a list of numbers in your daOptionase.
Trunk Line
This represents the physical telecom connections to your PABX. Setting this option to ”0” (d efault) will report on all trunk lines. Enter the trunk line number to only report on one line if you
need to make a comparison with your telecom bill which is usually separated by line.
Extension
You can report on one extension or a group of extensions as defined in your company daOpti onase. To pick from a list of exte nsions, simply double click in this field to bring up the list.
Account Code
If your installation is using account code dialling for any reason, you can either report on one
account code or you can produce a collated report per account code by setting this field to
“EACH”. You can also double click in this field to bring up a list of account codes to choose
from.
Call Type (Check Boxes)
Check boxes for incoming , outgoing and unanswered call s.
More Options (Button)
Check boxes for using the billing (invoice)
price in the report, concealing the last
three digits of each number (for privacy
reasons), using long names for the extension in the call, and more check boxes for
printing a header and using a form feed
between extensions. If you are r eporting
on a group of extensions , each extension
will start on a new page if the form feed is
checked on. You would normally turn form
feeding off is you are printing totals only for
a group since each extension only requires
two lines. There is also a check box to print
the report to a text file instead of to the
printer. This text file is in a “delimited” fo rmat that you can read in with a sprea dsheet.
Finally, you can select which of the fields
of a call record should appear on display or
be printed. These options are saved and
used in the future, whenever you display or
print this report.
www.microbx.com
Micro-BX Call Logging Manual
16
More on Reporting/Excluding Numbers
If your trunk access code is “0” and your international ac cess code is “00”, then you can limit the
calls to domestic trunk calls by putting “0” in the Number field and “00” in the Exclude field. Sim ilarly, if you only want to report on local calls, y ou would leave the Number field blank and enter
“0” in the Exclude field .
Naturally, if you want to report on all out of town calls , you would put “0” in the number field
and leave the Exclude field blank. And likewise, for international calls only, you would put “00” in
the Number field. You may need to sit back and logic this out for yourself.
Back to Contents
www.microbx.com
Micro-BX Call Logging Manual
17
Display Report (Menu Option)
You will sometimes prefer to display calls on screen rather than using up paper to print a report.
So this is where you would come. Except for when you have collated r eports (per extension),
the information seen on the display is exactly as you would see it on the printer. Collated reports
are not collated on the screen when displayed.
You are able to adjust the column order and widths by clicking and dragging with the co lumn headers.
In the following screen we have an example of extensions sorted by time . Sorted reports
such as these have a special property when displayed them o n screen. If you double click on a
line, Micro-BX will create another report behind the scenes that will drill down through the data.
For example, double clicking on any of the lines below will create a report on numbers sorted by
time dialled by that extension. Then do uble clicking on any of the numbers in the subsequent
screen will generate a report for all exte nsions dialling that number. You can then later removes
the reports in the Print Manager (Menu Option) .
Another property of these sorted reports is that you can click on the column headers to r earrange the sorting order. For example, if you clicked in the price column header, the report will
the sort itself in order of cost . The same goes for the extension (Alias Name) column.
Viewing a report on the screen (Count=number of calls, Min.=number of minutes).
www.microbx.com
Micro-BX Call Logging Manual
18
Print (Button)
This is a shortcut button to print your report once you have seen the results o n the screen.
Adjusting Columns (More>> Button)
If you have made changes to the column layout, this is where you can come to make the
changes permanent. Click on the More>> button (or right-click on the bar grid) and then click on
the Save Columns button followed by Close. You can also change details of a highlighted call
with this option by entering the name associated with the number dialled as well as th e
short/long name of the extension.
Back to Contents
Print Manager (Menu Option)
When you have edited your reports and are happy with them, you seldom have to edit them
again. This is the Option you will mostly frequent to get your reports out.
Print Manager has the following submenus:
•
•
•
•
•
•
•
Selected Reports
Print all Reports
Print Rates Table
Scheduled Print
Printer Font
Printer Setup
Abort Printer
When you opt to print ‘Selected Reports’, you will get the following screen from which you
can select. In the example screen below, you will see a list of reports that are usually set up for
you at install time.
The Option you will come to most often when producing your reports.
Selecting Reports
You can highlight one or several reports you see in the list on the right hand side of the display
by using standard Windows navigation techniques. For example, if you highlight the first report
and then hold th e shift key down while clicking on any report below it, all the reports between
the two reports you clicked on are selected. You can also select discreet reports not adjacent to
each other by holding down the Control key while clicking on the reports you w ish to select.
www.microbx.com
Micro-BX Call Logging Manual
19
Font Size
This is a standard Windows printer font dialog. You may have to experiment with this to find the
optimum font size for your printer. You need to pay particular attention to this font scaling if you
print over a network to several types of printers. Always make sure that you keep the font sizing
in the picture.
(Printer) Set up (Button)
Simply what it says. It allows you to select and set up the printer you will be using during a particular printing session.
Setting up the printer uses standard Windows routines.
(Print) Selection Only (Button)
We mentioned above how to highlight or select reports. Well, when you press this button, the
programme will print only the report you have selected, one after the other.
(Print) All Reports (Button)
This button prints all the reports in the list regardless of whether you have selected them or not
as mentioned above.
(Print) Rates Table (Button)
This will print a Table of all the destinations in the rates table and the cost of calls to these de stinations. It gives costs in currency per minute . Also, it lists the duration per metered call unit to
each destination. You are able to select whether you want to print the telecom prices or your
invoice prices. You can also send the costing data to disk for importing into a sprea dsheet.
Selecting a Report File (Menu Option)
You can have several report files that contain report forms. Fo r example, you may have different
weekly and monthly reports . This allows you to select any report form file you wish to work on.
www.microbx.com
Micro-BX Call Logging Manual
20
Selecting a report forms file.
If you enter an name that does not already exi st, the programme will ask you whether you wish
to create a new file. If you do, it will create an empty file to which you can add reports.
Create a new report forms file, yes or no.
Editing All Reports (Button)
This is a powerful option to change parameters in all the report forms in the file you are currently
working on. The options are the date , price, time and duration ranges. Simply change any of the
parameters in the Options shown below and then press the OK bu tton.
Making global changes to all reports in the current file.
Deleting Reports (Menu Option)
This will prompt you to select and then delete all the reports you have highlighted.
www.microbx.com
Micro-BX Call Logging Manual
You still have a chance to back out of this one.
Back to Contents
www.microbx.com
21
Micro-BX Call Logging Manual
22
Scheduled Printing (Menu Option)
We promised to make you look good in the office even though you are sleeping late. Scheduled
printing will do this for you.
Scheduled printing (current set to print weekly reports on Mondays and monthly on 1 st of the month).
How to Set it Up
First you have to create one or all of the following report form files depending which prints you
want produce automatically. (see the discussion under Print Manager (Menu Option) above).
“MONTHLY.SEL”, “WEEKLY.SEL” ,and “DAILY.SEL”. Choose carefully which type of reports
you want to have in each file. When you are satisfied with your reports (nothing like testing them
first), you come to Scheduled Print (Menu Option). The weekly reports should all the date of
“Last Week”, the monthly reports should all have the date of “Last Month ” and the daily reports
should all have the date of “Yesterday ”.
Check the required boxes on or off. The drop down box containing the days of the week is
the day you select to print the weekly report. The hour field is the time of day it will print. The
day field determines when you are going to print monthly reports. The hour field is also the time
the monthly and daily reports will print.
Note that the Micro-BX week runs from Sunday to Saturday. Also printing a report for “Ye sterday” on a Monday will include calls from Friday to Sunday.
Back to Contents
www.microbx.com
Chapter 4 Nuts and Bolts
This chapter is more concerned with the technical aspects of the programme. The normal user
may want to stay clear of here and rather let the IT manager worry about this subject matter.
Options: Rates and Fees (Menu Option) – can be Password Protected
Here you can do some maintenance . You can change the meter call unit price (buying and sel ling), sort and recalculate the calls records and well as set some flags. It is also the only place
from which you can exit the pr ogramme.
Options available under owner options.
Editing the Pricing Parameters
Simply put in the prices (in cents). MCU (metered call unit) bu ying price is the minimum price
your telecom company charges you for local calls. Selling price is what you on -sell the telephone charges if applicable. The Grace period is the cut off time for a local call before Micro -BX
starts charging. Anything shorter than the grace period will not be charged.
The handling fee is added to every call when you a displaying or printing calls using the i nvoice pricing. This is in cents.
Conceal Last 4 Digits (Check Box)
If the phone data is sensitive (like your office is full of spies), you may not want the full numbers
to appear on the screen and on reports. Checking this box o n will mask the last for digits of the
phone number and replace them with “XXXX”. Micro -BX will, however, cost the calls correctly.
Conceal Pin in Number (Check Box)
You may have a system in which you have to ent er a pin number to get an outside line. This pin
number is usually unique to each user and different access privileges may apply between ind ividuals. Therefore, you may want mask the pin codes so that users are u nable to learn the pin
codes of other users.
Conceal Account Codes (Check Box)
You would typically use account codes to cost projects or cost calls you make on behalf of ce rtain clients (a law firm springs to mind). You are able to prevent the a ccount code numbers from
appearing on screen and on reports. The account codes will be masked by a string of “X”s.
Sorting (Button)
If calls get mixed up in the daOptionase for any reason, this optio n allows you to correct it by
sorting the calls into chronological order. It also attempts to get rid of duplicate calls if they
should creep in unannounced.
Micro-BX Call Logging Manual
24
Recalculate Prices (Button)
This allows you to change the pr ice and then update the call records retroactively. When you
press this button, you are prompted for a date range that you want to update. This process can
take some time depending on how far back you want the changes take effect and how big your
system is.
From when to when do the new prices take effect?
Alias Names (Button)
This takes you to your company daOptionase editor . This editor is discussed under its own
heading.
Back to Contents
Editing Your Company Database
You are able to enter the names of your employees, put them in departments or costcentres
and identify phone numb ers that are dialled on a regular basis by name. When you press the
Alias Names button (shown above), you start an editor where you can e nter all this information.
Names Associated with Phone Numbers (Menu Option)
You can have as many names corresponding to phone numbers as you like. But keeping the list
down to the most frequently called numbers is recommended. Putting in too many names can
be overkill and you want to avoid the extra work (if you like sleeping late).
www.microbx.com
Micro-BX Call Logging Manual
25
Names associated with phone numbers.
Extension Names (Menu Option)
Extensions can have both a short (abbreviated) name and a long name. In small companies you
could have the person’s initials (up to four characters only). Large companies usually do not use
the short name feature. The long name (right most column) can be up to 17 characters long.
Usually the full name or job name of the person is listed here.
Notice in the example below, the first four lines do not have extension numbers in the left
field. This is because they are group names discussed below.
What the extension list looks like.
www.microbx.com
Micro-BX Call Logging Manual
26
Account Codes (Menu Option)
Groups (Menu Option)
Groups of extensions can be departments, costing centres or anything else you desire. A group
consists of a short name (abbreviation) of up to 4 characters, a long name and a list of associated extensions.
The screen for editing groups of extensions.
Lists (Menu Option)
You can have a list that contains several telephone numbers. For example, you could put all
your suppliers into a list or lists. Then you can general create a report for calls made to these
numbers. (The list name is inserted in the “Number” field.)
Having numbers assigned to lists.
www.microbx.com
Micro-BX Call Logging Manual
27
“One Off” Expense Items (Menu Option)
You can allocate one off exp enses to extensions if you wish. For example, you may want to
charge for installing equipment (does not have telephone stuff, of course) and services.
Items charged only on the next report for these extensions.
Recurrent Expenses (Menu Option)
If you are charging a rental (could be office equipment or even office space), recurrent e xpenses are added to an extension report each time it is printed.
Recurrent items are added to an extension report each time it is printed.
Back to Contents
www.microbx.com
Micro-BX Call Logging Manual
28
Installation (Menu Option) – can be Password Pr otected
When you need to make physical and mental changes to the sy stem.
This scours the Windows hardwa re and updates the serial ports it finds and displays the info rmation in the list on the left. Also, if any interface r eceives data while you are looking at this
window, you will see them displayed in the ‘data ’ field.
Port Parameters (Baud and byte format)
Set the baud rate according to information from the PABX. Likewise, set the parameters accor ding to he PABX documentation . Press the Apply button to make any changes take effect. To
test whether you have the correct parameters, watch the Data field and see if the data coming
in from the PABX looks OK. Any parameters set by the PABX can be matched by the pr ogramme. It is usually a good idea to use the default settings of the PABX. That way, if a techn ician resets the PABX for any reason (happens at inconvenient times), the data will still be read
correctly when it comes back to life.
Send Test Data (Check Box)
This is to allow you to test the serial port Micro-BX is using. It sends out the string, “the quick
brown fox jumped over the lazy dog”. If you put a loop back connector onto the serial port, the
string should appear on the screen in the Raw Data in a continuous stream of lines.
PABX Parameters (Menu Option)
Modifying PABX settings.
www.microbx.com
Micro-BX Call Logging Manual
29
PABX Type
Micro-BX supports a range of PABXs and you must choose the one that most closely resembles
yours. The programme contains rules for interpreting the raw data which is unique to each type
or model of PABX. If your PABX is not listed here (the list is alphabetical ), then you must contact us for instructions.
Find Extension and Trunks (Button)
If you already have data accumulated, Micro -BX is able to scan the data a compile a list of trunk
lines and extensions. It then inse rts this list into your company daOptionase which you can then
edit (Owner Options/Alias Names).
RTC (Check Box)
If your PABX has an unreliable clock that wanders or resets after a power outage, it’s best to
use the computer’s Real Time Clock to put the time/date stamp on the calls. Otherwise your
data may become meaningless (or rather, your reports will generate a lot a qu estions).
MCU Pulses (Check Box)
If your telecom provider sends Meter Call Unit pulses that your PABX can detect, then Micro -BX
should use these pulses to calculate the prices of the calls. This would give you very accurate
costs. This information is, unfortunately, not available in most installations – not by telecom constrains, but mostly because a PABX with this detection capability would be expensive by co mparison.
Connect Time (Check Box)
Some PABXs are able to detect tones from the telecom provider when a call gets connected
and terminated. Then the duration of a call supplied by the PABX is precise and Micro -BX can
give very accurate costing of the call. Lik e MCU pulses, most installations do not have this fe ature.
Trunk Access Codes (Check Box)
Some PABX can report whether a call was dialled using a ‘9’ or a ‘0’ to obtain an outside line. If
this is reported, we may or may not want to use it.
Buffer Box (Check Box)
This refers only to one special model of buffer box and your dealer should know what to do
here. Most buffer boxes are transparent to the call logging system and you do not need to check
this box on if you have one installed.
Slave PABX (Check Box)
If your PABX is connected to a “mother” PABX, you have to typically dial 2 digits to get an ou tside line. Micro -BX needs to know this so it can strip the first digit it encounters in the number
field.
Send ACK (Check Box)
Some PABXs and buffer boxes need an acknowledge (software handshake) from the PABX at
the end of every call transmitted. If you think yours is such an installa tion, check this option on.
It does no harm to enable this feature even if your PABX does not require it. Most PABXs do not
require an ACK.
www.microbx.com
Micro-BX Call Logging Manual
30
Watch Dog (Menu Option)
Get alerts on your computer when the loggi ng computer stops responding for any reason.
Setting up the watchdog on a remote computer.
System (Menu Option)
The System screen.
Beep (Button)
What sound the computer will make when you select an alarm to sound the beeper for certain
types of calls.
Passwords (User Owner and Installation)
It only makes sense to set the User Password on a remote computer that is not logging the
calls. The Computer on which the calls are bein g logged should be allowed to start up una ttended. But the Owner and Installation Password restrict access to these Options.
If you forget the passwords, your dealer can correct t he problem (sorry, not over the phone)
and charge you a fortune.
Data file Location (Button)
You can work with several data files, (you may have more than one logging computer and more
than one PABX on your network). Thi s option allows you to select a data file to work on for r eports.
www.microbx.com
Micro-BX Call Logging Manual
31
Want to have a look at a different phone record file?
(Licensee) Details (Button)
When Micro-BX is first installed, it runs in “demo” mode for 6 week s before expiring. Each installation requires a unique code to make the installation permanent (and to stop it expiring). This
code is entered here. The lock code is generated for you and is unique to your hard disk.
The details of your installation.
If you have downloaded the programme from our website , you need to mail us the lock code as
well as your company name, phone number (including the area code) and PABX type. Pressing
the Copy button will copy these details to the cli pboard which you can then paste into an e -mail.
After we receive your payment, you will be sent the activation code (which replaces “DEMO ”)
and everyone will be happy.
Import Data (Button)
You can import data (raw data from the PABX) at any time. Typically, one would do this if you
have recorded data with another programme. For example, before installing Micro -BX, you may
have used Hyper terminal to log your data to disk. You can then use this feature to get up an
running with data you already have.
www.microbx.com
Micro-BX Call Logging Manual
32
Getting the filename of the data you want to import.
Purge (Button)
Micro-BX automatically trims the data file to t he required size that gets set during the initial i nstallation. You can adjust this file size (in MB) up or down and then purge the old data. You
need to estimate how much the file grows per month, and then decide how many months of
data you wish to access at any time. Then set the file maximum file size to about 20% larger to
be on the safe side.
Actively getting rid of old data.
How Do We Cost Calls ?
Some systems provide metered call units and if Micro-BX knows the cost of a unit, it is able to
calculate the cost very accurately. Also, on some systems, the precise connect time of a call
can be determined and again, provided the rates Table is up to date, the programme can cost
calls accurately. Unfortunately, the real world is often different. Most installations are connected
to PABXs that are not capable of dealing with meter pulses or reporting precise connect times
for the calls. Also, quite often, even if you have meter pulses enabled , your PABX may be connected to several telecom providers that have different meter pulse prices.
The Grace Period
If the PABX cannot report the precise connect time of a call, it usually supplies the total time the
line was used during a call. This would include the polling, dialling and waiting for the call to be
answered by the third party. But not all call get through and som e calls take longer than others
www.microbx.com
Micro-BX Call Logging Manual
33
to get answered. Therefore, we employ a grace period system and assume a certain amount of
time taken to get a call through depending on the destination.
For example, if we have a grace period set (see Owner Options (Menu Option)), of 25 se conds for local calls and the PABX reports a duration of 00:02:35, then the call is only calculated
on 00:02:10.
Usually, the grace period can be set by the user for local calls. Other grace period are
listed in the rates Table applicable to your area. Normally, one takes longer to connect to out of
town or international calls .
The Rates Table
Micro-BX needs a rates Table for every location where it is installed. Listed i n this Table is the
pulse rates for all the possible destinations you can dial. When your telecom company changes
it’s pricing structure, the rates Table needs to be updated. Normally, the dealer in your area will
adjust the rates Tables as needed and then post them on the web. They can be found on
www.microbx.com. When you download the correct rates Table (nrates.mbx ), you need to copy
this file into the c:\phone\data directory of the machine where the logging is taking place.
Special rates Tables can be written for you if you have special requirements. For example,
you may a run a small hotel (we have a nice add on for you!) and want to simplify the call cos ting to make it easier for guests to calc ulate how much a call will cost. You may want to cost all
destinations in minute intervals instead of the pulse intervals that your telecom supplier uses.
Your dealer can help you here.
Using More Than One Telecom Provider
It is possible for Micro-BX to cost calls that are charged from different telecom providers. For
example, in addition to the normal telecom connections , you could have cell phone lines coming
into your PABX to provide least cost rou ting (when calling cell phones on that network). This
information needs to be put into your rates Table and your company daOptionase by your
dealer. Yes, you will have to pay extra for this ser vice.
Network Installations
Micro-BX is fully network compatible. You are able to log the calls on one computer and then
view the data and print reports on another computer or computers. This needs to be set up by
your dealer and you are expected to pay a license fee based on the number of workstations u sing Micro-BX.
Internet and e-mail
Micro-BX can connect to remote sites through the internet, thus enabling you to monitor many
PABX’ from one central site. You can also send reports automatically through e -mail. For details
on these features, check our FAQ section on the internet or drop us a line at
[email protected]! Also, if your computer has Internet access, we can assist you doing the
installation under remote control from HQ.
More On Watchdogs
When you are using Micro -BX on a network, one computer can be used to monitor the logging
computer and alert you if the logging programme gets disabled for any reason . It does not make
any sense to install the watchdog feature on the logging machine since if the programme gets
disabled, it will not be able to alert you to anything. The remote computer looks for a sp ecial file
on the logging computer that should be updated at minute intervals. As soon as this file b ecomes older than 3 minutes, an alert box will pop up with the chosen message. Because it uses
this time difference, it is important to synchronise the computer clocks from time to time. (Your
IT manager can write a special log in script to synchronise your time and date to with the server
each time you log on. Ditto for the logging machine.)
www.microbx.com
Micro-BX Call Logging Manual
34
Micro-BX For DOS
Also available is a DOS version of Micro -BX that is fully compatible with the Windows version. If
you have large volume printing requirements and wish to use a line or dot matrix printer , then
using the DOS version is the way to go. You will to still need a Windows machine to log the calls
since DOS logging is no longer su pported.
Back to Contents
www.microbx.com
Micro-BX Call Logging Manual
35
MicroBX Hotel Version
Installation and Configuration
In order to use the Hotel options, you must download and install the file
MHMDEMO from our web site www.microbx.com/mhmdemo.exe
This file contains our standard telephone accounting software, with the hotel options added on.
When you start micro_bx, it will prompt you to define the guest rooms:
It has created a group of extensions with the name GAST (GUEST), and you
can enter a range of numbers and also individual o nes like this:
21-30,37,50-59,70..75
Note: when you define several numbers in a row, you don’t have to type every one of them but rather type
22-30 or 70..75. That saves you from sore fingers.
Once this is done, you click ‘Save’ and the system will star t and you see the system with the extra
menu option HOTEL. Try it, and then follow the on -line help.
If you want to change the room definition later, use the menu option
HOTEL à CONFIGURE à DEFINE GUEST ROOMS.
You can also set up room names for the extensions using the menu:
OPTIONS --> ALIAS LISTS --> EXTENSIONS, like this:
For MicroBX to cooperate with a front -office system and post phone calls automatically, so that they a ppear on the guest’s hot el bill, use the menu option
www.microbx.com
Micro-BX Call Logging Manual
36
HOTEL à CONFIGURE à SET FRONT OFFICE MAILBOX.
You should see a screen like this:
You must go to ‘My Network Places’ à ‘Entire Network’ and then find the computer that has t he ASI
front-office software installed. Unless, of course, MicroBX and ASI are running on the same computer.
ASI should already be running at this time. You will then find in ASI’s directory the file ‘mbx2foff.txt’. Click
on this file, then ‘Save’. That’s all – ASI and MicroBX are now installed and linked.
Any questions: contact us at [email protected] or at [email protected]
www.microbx.com
Micro-BX Call Logging Manual
37
Usage
This manual only covers the hotel options of MicroBX, for all standard options (including printing reports,
sorting calls, etc) please consult the MicroBX Users Guide.
The hotel menu comprises of three options: Check -in / check-out, Accounts, an d Configuration.
When the system runs automatically together with a front -office program, you may never need to use e ither of these options. But they are required to run the software in stand -alone mode.
Check-in/Check-out
We start with the first option, which shows the following screen:
It shows an overview of the hotel, with all rooms, their occupancy, the total amount owed for telephone
calls,and whether wake -up calls are booked.
From here, we can check guests in or out, transfer them, print an interrim invoice (the final invoice
is printed automatically on check -out), and book wake -up calls.
All options can be accessed by either selecting a room and then clicking on the appropriate button, or
right-clicking on the room and selecting the option from a pop -up menu.
www.microbx.com
Micro-BX Call Logging Manual
38
A wake-up call is booked like this:
Select the correct time, then ‘enable’ and tell the system whether this should be done every morning or
not. On weekends, you can disable the calls but resume them the next Monday.
When the alarm strikes, the computer starts beeping and the screen shown above right will appear.
If you want to place the calls automatically using a modem, contact us at [email protected]
The Accounts Window
Accounts are kept for 90 days and then deleted, unless you choose to delete them sooner. During this
time you can still print an invoice for an account, in case the original invoice was lost .
This screen shows you at a glance who was here at what date and how much he owed for phone calls.
And, whether he used a wake -up call.
That’s currently all there is. If you have any suggestions, we are always glad to hear them and will try to
include them into future versions of MicroBX.
Back to Contents
www.microbx.com
Micro-BX Call Logging Manual
Menu Tree for MicroBX
Files
|--------|--------|--------\---------
Data Directory
Reports File
Import Data
Rates Table
|--------- Read Rates Table
|--------- Test Table
\|--------- Set Local Area Codes
Call Monitor
|--------|--------|--------|--------\---------
Raw Data
Translated Data
Alarm Options
Rates Test
Long Names
Reports
|--------|
|
|
|
|
|
|
|
|
|
|
|
|
|
|
|
|
|
|
|
|--------|--------|--------|--------|
|
|
|
\---------
Create New Report
|--------- List
|
|--------- All Calls
|
|--------- Totals Only
|
|--------- Most Expensive Calls
|
|--------- Longest Calls
|
|--------- Sorted by Numbers
|
|--------- Sorted by Extensions
|
\--------- Sorted by Kundencodes
|--------- Bar Chart
|
|--------- Extensions Sorted by Costen
|
|--------- Extensions Sorted by Duration
|
|--------- Extensions Sorted numerically
|
|--------- Numbers Sorted by Costen
|
|--------- Numbers Sorted by Duration
|
\--------- Numbers in numerical Order
\--------- Graph
|--------- Durations
|--------- Cost of Calls
|--------- Response Time
\--------- Traffic by Time of Day
Display Report
Delete Report(s)
Modify Report
Modify All Reports
|--------- Date Range
|--------- Min and Max Price
|--------- Min and Max Duration
\--------- Start and End Time
Crop Selected Reports
www.microbx.com
39
Micro-BX Call Logging Manual
Print Manager
|--------- Print Selected Reports
|--------- Print All Reports
|--------- Print Rate Table
|
|--------- Use Selling Price
|
|--------- Print to Text File
|
\--------- Print Table
|--------- Scheduled Print
|--------- Select Printer Font
|--------- Setup Printer
\--------- Cancel Print
Info
|--------- About MicroBX
|--------- Licensing Details
\--------- Help
Options
|--------|--------|
|
|
|
|
|
|
|
|
|
\---------
Rates and Fees
Alias Lists
|--------- Phone Numbers
|--------- Suppressed Numbers
|--------- Lists of Numbers
|--------- Extensions
|--------- Cost Centres
|--------- Account Codes
|--------- Trunk Lines
|--------- Non-recurrent Add-Ons
|--------- Monthly Add-Ons
\--------- Add-On Items
Installation
|--------- PABX
|--------- Interface
|--------- System
|--------- Watch Dog
|
|--------- Enable Watchdog
|
\--------- Set Alarm Display
\--------- Set Technician Password
Hotel
|--------- Check-in/check-out
|--------- Accounts
\--------- Configure
|--------- Configure Dialer
|--------- Define Guest Rooms
|--------- Set Front Office Mailbox
|--------- Show Front Office Communication
\--------- Set Internet Rate
Back to Contents
www.microbx.com
40
Index
(Licensee) Details (Button) 31
(Print) All Reports (Button) 19
(Print) Rates Table (Button) 19
(Print) Selection Only (Button) 19
(Printer) Set up (Button) 19
account code dialling 15
account codes 23
Account Codes (Menu Option) 26
Adjusting Columns (More>>) (Button) 18
alarm 30
alarm conditions 8
Alarm Options 8
alarms 4
alerts 30
Alias Lists (Menu Option) 9
Alias Names 24
Alias Names (Button) 24
area code 15
ASI Hotel Software 36
associate 7
automate 4
bar chart 13
baud rate 28
Beep (Button) 30
Buffer Box (Check Box) 29
calculate the cost 6
call densities 13
capturing 4
cell phone lines 33
change parameters 20
Check-in/Check-out 37
clicking and dragging 17
collated per extension 10
collated report per account 15
collated reports 17
column order 17
company daOptionase 15, 29
Company Database (editing) 24
computer’s Real Time Clock 29
Conceal Account Codes (Check Box) 23
Conceal Last 4 Digits (Check Box) 23
Conceal Pin in Number (Check Box) 23
Connect Time (Check Box) 29
cooked data 5, 8
cooked data (Menu Option) 9
Copy button 31
Costing Calls 32
costing centres 26
currency per minute 19
Daily Statistics (report) 13
DAILY.SEL 22
daOptionase editor 24
Data file Location (Button) 30
date format 14
date range 20, 24
Deleting Reports (Menu Option) 20
DEMO 31
departments 24, 26
Details (Button) 7
Display Report (Menu Option) 17
distribution chart 12, 13
domestic trunk calls 16
DOS logging 34
dot matrix printer 34
drill down 17
duration 8
Duration Bar Chart (report) 12
duration per metered call unit 19
duration range 20
EACH 15
Editing All Reports (Button) 20
email 8
Entering the Parameters 14
Exclude field 16
Excluding Numbers 16
exit 23
expiring 31
extension 6
extension number 10
Extensions by Cost (report) 12
Extensions by Duration (report) 11
Extensions Sorted (report) 11
extensions sorted by time 17
Find Extension and Trunks (Button) 29
Font Size 19
for international calls 16
form feed 10
frequently called numbers 24
Front Office Software 36
Full Details report) 10
grace period 33
Grace period 23
Grace Period 32
group of extensions 8, 10, 15
groups 24
Groups (Menu Option) 26
Groups of extensions 26
Guest Rooms, Definition of 35
handling fee 23
Help (Button) 7
Hyper terminal 31
Import Data (Button) 31
incoming 15
incoming call 15
Installation (Menu Option) 28
Installation Password 30
international access code 16
international calls 8, 33
Micro-BX Call Logging Manual
international settings 14
invoice prices 19
invoice pricing 8, 23
Invoice Pricing (Check Box) 9
Keep Display updated (Checkbox) 7
large volume printing 34
Last Month print range 22
Last Week *print range) 22
Line Occupancy (report) 13
lock code 31
Logging 5
logging computer 4
logging machine 33
logging programme 33
long extension names 8
long name 26
Long Names (Check Box) 9
Longest Calls (report) 12
loop back connector 28
maintenance 23
make the changes permanent 18
Manual Input 14
mark up price 9
maximum file size 32
mbxalarm.pif 8
MCU (metered call unit) 23
MCU Pulses (Check Box) 29
meter call unit 23
Meter Call Unit pulses 29
meter pulses enabled 32
metered call units 32
Micro-BX For DOS 34
Micro-BX For Hotels 35
Micro-BX week 22
mobile phones 8
monitor the logging computer 4
monthly reports 19
MONTHLY.SEL 22
Most Expensive Calls (report) 12
Moving Between Reports 14
Names Associated with Phone Numbers
(Menu Option) 24
network 33
network compatible 33
Network Installations 33
nrates.mbx 33
Number field 16
Numbers by Cost (report) 11
Numbers by Time (report) 10
Numbers Sorted (report) 10
numerical order 10
Nuts and Bolts 23
off peak 9
on screen 17
one page report 12
Operator Response (report) 12
out of town calls 16
www.microbx.com
42
outgoing 15
output formats 5
Owner Password 30
PABX default settings 28
PABX documentation 28
PABX Type 29
Passwords 30
peak 9
percentage distribution (trunk report) 13
phone directory 8
phone statistics 13
pin number 23
Port Parameters (Baud and byte format) 28
precise connect time 32
price range 20
Print (Button) 18
Print Manager (Menu Option) 17, 18
Purge (Button) 32
Rate Information (Menu Option) 8
Rates and Fees (Menu Option) 9
rates table 19
rates Table 32
Rates Table 33
raw data 29
Raw Data 5, 28
raw data language 5
recalculate 23
Recalculate Prices (Button) 24
Recurrent Expenses (Menu Option) 27
remote computer 4
Report Account Code Number 15
Report Call Type Check Boxes) 15
Report Date Range/Auto date 14
Report Display (Button) 15
Report Duration Range 14
Report Extension Number 15
Report Number Dialled 15
Report Number Exclude 15
Report Price Range 14
Report Ring Time 15
Report Time Range 14
Report Title 14
Report Trunk Line Number 15
Report Type 10
Reports (Menu Option) 10
restrict access 30
RTC (Check Box) 29
Save Columns 18
Scheduled Printing (Menu Option) 22
Selecting a Report File (Menu Option) 19
Selecting Reports (print manager) 18
Selling Price 9
Send ACK (Check Box) 29
Send Test Data (Check Box) 28
sensitive phone data 23
serial port 28
serial ports 28
Micro-BX Call Logging Manual
serial printer 5
Setting Alarms and Colours 8
short name 9, 26
Shutting Down 4
Slave PABX (Check Box) 29
SMS message 8
sorted by time 12
Sorting (Button) 23
sorting order 17
spreadsheet 19
Starting 4
starting digits 9
synchronise 33
telecom connections 33
telecom price 9
telecom prices 19
telephone time 9
the total cost of calls 13
third party 32
time range 20
time/date stamp 29
Totals Only (report) 10
transfer history 6
transfer information 6
Translated Data (Menu Option) 6
transmit 5
trunk access code 16
Trunk Access Codes (Check Box) 29
Trunk Usage (report) 13
unanswered calls 15
unreliable clock 29
User Password 30
Wake-up Call 38
Watch Dog (Menu Option) 30
Watchdog 33
watchdog feature 33
website 31
weekly reports 19
WEEKLY.SEL 22
Windows control panel 14
Windows hardware 28
Yesterday print range 22
www.microbx.com
43