1
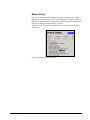
Route Manager / Advanced / Mango 7.0 Advantage Route Systems, Inc. We deliver, so you can. Version 7.0 Route Manager 7 Copyright © 1994-2015 by Advantage Route Systems, Inc. All Rights Reserved. Printed in the United States of America. Advantage Route Systems, Inc. Proprietary Advantage Route Systems, Inc. 3201 Liberty Square Parkway Turlock, CA 95380 Phone: 209.632.1122 Toll Free: 888.294.7688 Fax: 209.632.6868 Web Site: www.AdvantageRS.com Email: [email protected] Warning All information in this document and the on-line help system, as well as the software, to which it pertains, is proprietary material of Advantage Route Systems, Inc. and is subject to a Route Manager license and non-disclosure agreement. Neither the software nor the documentation may be reproduced in any manner without the prior written permission of Advantage Route Systems, Inc. Specifications are subject to change without notice. Software Version 7.0 – February 11, 2015 2/10/2015 7:53 AM Contents Chapter 1 – Product Overview 1 Introduction ............................................................................................................................... 1 System Compatibility ................................................................................................................ 1 Other Tools ................................................................................................................................ 2 Features ...................................................................................................................................... 2 How the System Works ............................................................................................................. 3 Setting up the System ................................................................................................................ 4 Daily Routines ........................................................................................................................... 5 Service and Support ................................................................................................................... 5 Chapter 2 – eStoreFront Installation and Quick Start 7 Overview ................................................................................................................................... 7 Getting Started ........................................................................................................................... 7 Installation and Services ............................................................................................................ 8 1. Set permissions to use a port on the machine with httpcfg.exe. Port 55000 is recommended since it is generally not used............................................................................... 8 httpcfg.exe set urlacl –u http://+:55000/ -a D:(A;;GA;;;WD) .................................................... 8 Note: If the command was successful, the return code will be 0. ............................................. 8 Route Manager Configuration ................................................................................................... 9 Branch Setup ............................................................................................................. 10 Customer Status Codes .............................................................................................. 11 Customer Type Codes ............................................................................................... 12 ZIP Codes .................................................................................................................. 13 Web Product Units .................................................................................................... 14 Web Product Classification Codes ............................................................................ 15 Misc. Settings ............................................................................................................ 16 Control Panel ............................................................................................................. 16 Product Charge Codes ............................................................................................... 17 Equipment Type Codes ............................................................................................. 18 Web Prospect Codes .................................................................................................. 19 Route Master Setup ................................................................................................... 20 Employee Setup ......................................................................................................... 21 Web Site Configuration ........................................................................................................... 22 Admin Login ............................................................................................................. 23 eStoreFront Configuration Options ........................................................................... 24 Chapter 3 – Daily Processing 29 Introduction ............................................................................................................................. 29 Existing Customer Process ...................................................................................................... 29 Sign Up ...................................................................................................................... 30 Viewing Account Information ................................................................................... 31 Make a Payment ........................................................................................................ 32 Invoice History .......................................................................................................... 34 Placing an Order ........................................................................................................ 37 User Manual Chapter 1 – Product Overview 3 Chat with an Employee ............................................................................................. 40 New Customer Process ............................................................................................................ 42 Creating a New Account ........................................................................................... 42 Route Manager Processing ...................................................................................................... 46 New Customer Activity ............................................................................................. 46 New Order Activity ................................................................................................... 49 Chat Messages ........................................................................................................... 51 Payment Activity ....................................................................................................... 53 Daily Report .............................................................................................................. 54 Customer Information Updates ................................................................................. 56 Chapter 4 – eStoreFront Field Definitions 58 Overview ................................................................................................................................. 58 eStoreFront Setup Menu .......................................................................................................... 58 Web Prospect Codes .................................................................................................. 59 Web Coupon Codes ................................................................................................... 67 Web Product Units .................................................................................................... 68 Web Product Classification Codes ............................................................................ 69 Map eStoreFront Locations ....................................................................................... 70 Misc. Settings ............................................................................................................ 71 Control Panel ............................................................................................................. 75 Product Charge Codes Fields (Internet Tab)............................................................................ 77 Equipment Type Codes (Internet Tab) .................................................................................... 78 Employees Fields (Internet Tab) .............................................................................................. 79 Appendix A – Frequently Asked Questions 81 Installation Questions .............................................................................................................. 87 General Questions .................................................................................................................... 87 Appendix B – How to Customize your Customer emails 89 Introduction ............................................................................................................................. 89 Here is what you can customize............................................................................................... 89 Here is how you can customize your emails ............................................................................ 89 Reference Table ....................................................................................................................... 89 Appendix C – How to upgrade to eStoreFront 91 Introduction ............................................................................................................................. 91 General overview ..................................................................................................................... 92 You may find it helpful ............................................................................................................ 93 RM changes ............................................................................................................................. 93 To be done within RM ............................................................................................... 93 To be done on your RM server ................................................................................................ 95 To be done on your web server ................................................................................................ 95 Appendix D – eStoreFront Mobile 95 Introduction ..............................................................................Error! Bookmark not defined. Mobile Sign In ..........................................................................Error! Bookmark not defined. Main Menu .............................................................................................................................. 83 Hamburger Menu ..................................................................................................................... 84 Account Information ................................................................................................................ 85 Pay My Bill .............................................................................................................................. 86 4 Chapter 1 – Product Overview User Manual Index User Manual 99 Chapter 1 – Product Overview 5 Chapter 1 – Product Overview Introduction With electronic commerce growing by leaps and bounds, creating a presence on the Internet is essential. Advantage Route Systems has created a useful tool that will allow you to provide important data to your customers on the Web. The eStoreFront program from Advantage meets those needs. This unique program integrates with your Route Manager program in a real time mode, and allows your online customers to: Create new accounts Check current balances Chat with a customer service representative Pay their account with up to three stored Credit Cards Review invoices Order products Review scheduled deliveries Access other important information eStoreFront provides you with all the tools you need to create a new Web site or enhance your existing site. System Compatibility The eStoreFront program is compatible with the following products from Advantage Route Systems: Route Manager – Series 7.0 and later If you do not have this version, please contact ARS to arrange an upgrade to our latest version. User Manual Chapter 1 – Product Overview 1 Other Tools The eStoreFront program uses a web hosting service (GoDaddy, DreamHost, etc.) and a content management system called WordPress to present your site to your customers. WordPress is extremely flexible and free to use. You will be guided through the basic steps to get your site up and running using these tools. Our qualified technicians are available if you require any assistance throughout the process. Features Just a handful of the many features available with the eStoreFront program are listed below. General: New integrated menu items within Route Manager. Direct interaction with your Route Manager data. Set up new customers from your Web site. Take orders for products or services. On Web: View and order products. View purchase history. View delivery schedules. View .PDF invoices with signatures. Make credit card payments with up to three stored cards. Customer Service: Your customers can view their own delivery and billing information. Customers can chat with customer service reps at your company. Automatically record customer service chat messages and save on each account. Administration: 2 Chapter 1 – Product Overview Integrate into your existing Web site. Customize the look and feel of eStoreFront to match your Web site. Configure numerous options to personalize eStoreFront directly within Route Manager. User Manual How the System Works By using a simple Web Server and Route Manager, the eStoreFront site is seamlessly updated with the latest product and customer information throughout the day. All activity on the site is instantly transferred to and from Route Manager and requires minimal maintenance. The data is transferred back and forth by using a Web service that constantly monitors both Route Manger and eStoreFront for activity. The eStoreFront program can be integrated into your existing site, or, a new site can be created for you to suit your company’s needs. Your customers will easily be able to sign up to use eStoreFront, and new customers can establish accounts by simply verifying that you service their area. Once a customer logs into eStoreFront, they will be able to complete activities such as product orders, make payments, and web chats that will instantly appear within the Route Manager program as they are completed. An assigned employee in your office will be able to interact with the customer, and stay up-to-date throughout the day with all activity taking place on the eStoreFront site. User Manual Chapter 1 – Product Overview 3 Setting up the System The setup process for eStoreFront is detailed in Chapter 2 of this document. It is recommended that only qualified IT personnel or an ARS technician handle the installation of the program. This manual has been separated into 4 chapters and 3 appendices that cover the following: Chapter 1: Introduction to eStoreFront Chapter 2: Installation and Quick Start Configuration Chapter 3: Daily Processing Chapter 4: eStoreFront Field Definitions Appendix A: Frequently asked Questions Appendix B: How to customize customer email Appendix C: How to upgrade to eStoreFront You should study each chapter carefully to ensure that you understand all of installation instructions and available features. Chapters 2 and 3 focus on getting your site up and running and using it daily. Chapter 4 includes a complete set of definitions for each eStoreFront field that you can use for reference. The basic steps to set up the eStoreFront program are: 1. Purchase the eStoreFront software from Advantage Route Systems. 2. Obtain a Web Address (URL) to use with eStoreFront, or use your existing site. 3. Determine if you will be hosting the Web site or if Advantage Route Systems will be doing so. 4. Acquire a SSL certificate for your site for secure data transfers (i.e., HTTPS instead of HTTP). 5. Install WordPress on your Web site. 6. Configure Port Forwarding in your firewall for the port assigned to eStoreFront. 4 Chapter 1 – Product Overview User Manual 7. Make changes in RM for eStoreFront in the following areas: Branch Setup Products Customer Types Codes Customer Status Codes ZIP Codes Web Classification Codes Route Master List Employees eStoreFront Setup (new menu item) 8. Verify seamless integration. The complete setup process can be viewed in Chapter 2. Daily Routines Each day Route Manager users will manage orders placed and scheduled from the eStoreFront site, review and accept all new accounts created, and interact with customers using the ‘Chat’ feature. All of these options and more are detailed in Chapter 3 of this document. Service and Support At ARS, it is our priority to provide you with the highest quality of service and support available. We provide 24-hour-a-day, 7-day-a-week telephone support. How to contact us: Toll free, 24-7 Telephone Support – 866-549-8837 (Outside the United States at 1-209-632-6358) Fax - 1-209-632-6868 E-mail - [email protected] Web - www.ARS247.com Support requests sent via E-mail or fax will be responded to during the hours of 7 am to 5 pm US Pacific Time. For more information on ARS support policies, please refer to our Web site. User Manual Chapter 1 – Product Overview 5 Chapter 2 – eStoreFront Installation and Quick Start Overview This chapter focuses on the installation and configuration of your eStoreFront site. It is recommended that the installation process only be performed by qualified IT personnel. If you would like assistance with your eStoreFront installation, please contact Advantage Route Systems. Getting Started In order to successfully install eStoreFront you will need to make sure you have the following items available: Web Server: eStoreFront relies on a Web Server to communicate with Route Manager. Your Web Server must support the following: php_GD2 php_soap php mail MySQl database SSL NOTE: If you are hosting the files on SunOS, ensure that the ‘LIBMCRYPT’ module is enabled. eStoreFront Installation Files: You will be instructed on downloading the eStoreFront installation file after the module has been purchased. User Manual Chapter 2 – eStoreFront Installation and Quick Start 7 Installation and Services This section will guide you through installing the eStoreFront program. NOTE: In order to complete these processes successfully, you should be familiar with directory structures, possess a basic understanding of Windows Services, and have experience executing commands and installing files. 1. Set permissions to use a port on the machine with httpcfg.exe. Port 55000 is recommended since it is generally not used. httpcfg.exe set urlacl –u http://+:55000/ -a D:(A;;GA;;;WD) Note: If the command was successful, the return code will be 0. 2. Set permissions for eStoreFront service to read/write from/to the RMA data folder a. Right click on the RMA\DATA folder, choose Properties b. Remove the Read-Only attributes on the General tab c. On the Security tab, add the user, Network Service d. Under permissions, Allow Full Access 3. Edit the eStoreFront.exe.config file in the eStoreFront service folder a. Update the <add key="RMApath" value="c:\RM7\data" />line with the correct path to the RM folder. b. Update the <add key="serverURI" value="http://66.7.246.74:55000/" /> line with the external/public IP address where the RM database is hosted. Be sure the correct port number being used is included. 4. Open the port being used (i.e. 55000) in the router for both incoming and outgoing TCP traffic and forward the data to the server’s internal IP address. 5. Create a rule for incoming and outgoing TCP traffic in any firewall software for the port being used. This step can vary depending on the firewall being used. 6. Install the service using installutil.exe: Installutil.exe /name=”eStoreFront” “enter the path to the eStoreFront.exe service” 7. Install the OLE drivers using VFPOLESetup.msi. 8. Set the eStoreFront service to run automatically. 8 Chapter 2 – eStoreFront Installation and Quick Start User Manual Route Manager Configuration This section will guide you through configuring the Route Manager program to be integrated with the eStoreFront program. NOTE: Administrative privileges in Route Manager may be required to perform the following tasks. If you do not have access to the items discussed, contact your system administrator. The configuration steps to follow are covered in the following order: 1. Branch Setup 2. Customer Status Codes 3. Customer Type Codes 4. ZIP Codes 5. Web Product Units 6. Web Product Classification Codes 7. Misc. Settings 8. Control Panel 9. Product Charge Codes 10. Equipment Type Codes 11. Web Prospect Codes 12. Route Master 13. Employee Setup These items should be followed in the order listed as some are dependent on data from other items. User Manual Chapter 2 – eStoreFront Installation and Quick Start 9 Branch Setup Customers can instantly send messages from the eStoreFront site to Route Manager for customer service needs. This includes the customer’s ability to chat with a customer service representative, and the ability for eStoreFront to make notes directly on each customer’s account. Enable the ‘Use Conversation’ option under File > Branch Setup, on the Desktop tab. Save your changes and exit the screen. 10 Chapter 2 – eStoreFront Installation and Quick Start User Manual Customer Status Codes At least two Customer Status Codes must be created or modified to use with new accounts created via eStoreFront. One code should be used for the account review process, and the other code should be used on active eStoreFront customers. Navigate to Lists > Customer Setup Codes > Customer Status Codes, and select the ‘New Customer Review’ option on the code that will be assigned to eStoreFront customers that require review (new accounts). NOTE: Do not check the ‘New Customer Review’ option for the active eStoreFront Customer Status Code. User Manual Chapter 2 – eStoreFront Installation and Quick Start 11 Customer Type Codes At least one Customer Type Code must be created or modified to use with new accounts created via eStoreFront. Navigate to Lists > Customer Setup Codes > Customer Type Codes, and select the ‘Show on Web’ option available on the Web New Cust tab. Additionally, it is necessary to configure default criteria that will be required (or optional) per customer on the eStoreFront site when they sign up for service. Check either Enable or Require for each option that you would like to include on the Web site. Check the box labeled, “Allow customers to choose invoices to pay” to configure customers to select invoices when paying online. If this box is not checked, payments will be made towards the oldest open invoices (balance only). Save your changes and repeat this process for each Customer Type Code you would like to use on the eStoreFront site. 12 Chapter 2 – eStoreFront Installation and Quick Start User Manual ZIP Codes By updating eStoreFront settings within each ZIP code in Route Manager, potential customers will have the ability to verify that your company services their area before they sign up for service. In addition, they will have the ability to view mapped directions to the nearest branch location. Navigate to Lists > ZIP Codes, and modify any existing ZIP code. Select the option ‘Include in Delivery Service Area’ to include the ZIP code on the Web site. Additionally, check the Branch option found on the bottom of the screen and assign the ZIP code to the nearest branch location. Save and repeat this process for each ZIP code that will be available on the Web site. NOTE: The name and address of the branch location provided to the customer is pulled from File > Branch Setup, on the Setup tab; ensure that this information is accurate. User Manual Chapter 2 – eStoreFront Installation and Quick Start 13 Web Product Units The Web Product Units allow you to display how many units are included with each product on your site. Navigate to Tools > eStoreFront Setup > Web Product Units to add any needed unit codes to your site. Select the ‘Enable on Web’ option to make the code available on your site. The units created will be added to your products later within this chapter. 14 Chapter 2 – eStoreFront Installation and Quick Start User Manual Web Product Classification Codes The Web Product Classification Codes allow you to group products and equipment rentals together by similar type to make it easier for your customers to navigate through the items offered on the site. Navigate to Tools > eStoreFront Setup > Web Product Classification Codes and add at least one code to your site. Create a new classification code by clicking the add key and filling in the required fields. Refer to page 69 for a complete list of field definitions. The codes created will be added to your products later within this chapter. User Manual Chapter 2 – eStoreFront Installation and Quick Start 15 Misc. Settings The Miscellaneous eStoreFront Settings include a number of fields that are used for various options on your site, such as delivery fees, delivery order cutoff times and confirmation messages. Refer to page 71 for a complete list of field definitions. Control Panel The Control Panel includes a series of additional options that allow you to customize the user experience on the site. Refer to page 75 for a complete list of field definitions. 16 Chapter 2 – eStoreFront Installation and Quick Start User Manual Product Charge Codes The products available on the eStoreFront site are determined by settings within each individual Product Code within Route Manager. NOTE: Only complete the following steps on items that you would like to appear on the eStoreFront Web site. Navigate to Lists > Product Codes > Product Charge Codes and select the Internet tab. Internet Tab Enable each Product Charge Code you would like available on the eStoreFront site by selecting the ‘Internet Product’ option. Assign each product to the items created earlier in the chapter: Product Units Web Classification Code In addition, complete the remaining fields on the screen by referring to page 77 for a complete list of field definitions. Repeat these steps for each product that will be made available on the eStoreFront site. User Manual Chapter 2 – eStoreFront Installation and Quick Start 17 Equipment Type Codes The equipment types available on the eStoreFront site are determined by settings within each individual Equipment Type Code within Route Manager. NOTE: Only complete the following steps on equipment types that you would like to appear on the eStoreFront Web site. Navigate to Lists > Equipment > Equipment Type and select the Internet tab. For each equipment type that you would like to display on your site add a new image file and description: Select the option ‘Enable on Web’ to complete the process. Repeat these steps for each equipment type that will be available on the site. Refer to page 78 for a complete list of field definitions. NOTE: If you are allowing new, prospective customers to sign up, they must choose an equipment type during the sign up process. An Equipment Type of “Not Needed” for customer owned equipment. 18 Chapter 2 – eStoreFront Installation and Quick Start User Manual Web Prospect Codes The Web Prospect Codes allow each new customer to create a new account from your site or optionally capture their contact information for follow-up within the office. Navigate to Tools > eStoreFront Setup > Web Prospect Codes and add at least one code to your site. Create a new prospect code by clicking the add key and filling in the required fields. Refer to page 59 for a complete list of field definitions. User Manual Chapter 2 – eStoreFront Installation and Quick Start 19 Route Master Setup Optional - A new Route Master entry will need to be created in Route Manager for handling route and branch settings on customers that sign up for service using a ZIP code that is not in the database. Navigate to Lists > Routes > Route Master, and add a route to the system (such as ‘ZZZ’). Additionally, assign a default Home Branch and Driver to the new record. NOTE: The description entered should be something easy to identify in the system (i.e., Temp Route, Needs Route). No further information is needed for the new entry. Save your changes and exit the screen. 20 Chapter 2 – eStoreFront Installation and Quick Start User Manual Employee Setup The Employees screen includes information that is used by eStoreFront to display their driver’s picture and Title options that control notification messages from the site. Navigate to Lists > Employee Setup > Employees and click on the Internet tab. Modify an existing driver or employee and define the desired fields. The Title options are controlled by the Notification messages selected within Misc. eStoreFront Settings covered earlier. This completes the configuration of eStoreFront within the Route Manager program. Continue to the next section to be guided through the Web site configuration process. User Manual Chapter 2 – eStoreFront Installation and Quick Start 21 Web Site Configuration After all of the previous sections within Chapter 2 have been completed, you are now ready to edit the default eStoreFront site. To access your default Web site, open a web browser and type in the IP or domain name and port configured in the Installation and Services section within Chapter 2. NOTE: Connecting to http://localhost will only work from the location where your Web Server is installed. At this point, WordPress will guide you through all of the remaining steps needed to set up and configure your default Web site. 22 Chapter 2 – eStoreFront Installation and Quick Start User Manual Admin Login When entering your Web site address in your web browser, add /wp-admin to the address to access the Admin Login screen. For example: http://mywebsite.com/wp-admin The following login screen will appear: User Manual Chapter 2 – eStoreFront Installation and Quick Start 23 After you have logged in to the site, you will automatically be directed to the Dashboard page, where you can manage the site and all of its contents: The next few sections guide you through a handful of configuration options that can be easily managed on the Web site. NOTE: Since WordPress has many configuration options available, please refer to the WordPress documentation and Help options for detailed information on the topics not covered in the remaining sections. Additionally, contact ARS with any questions related to your eStoreFront site. eStoreFront Configuration Options Prior to configuring eStoreFront within WordPress, you will need to install the eStoreFront plug-in file. A link to the latest plug-in file will be provided to you after purchasing eStoreFront. Install the plug-in within WordPress by following the steps below: 1. Select the ‘Plugins’ option on the Control Panel within the Admin screen: 24 Chapter 2 – eStoreFront Installation and Quick Start User Manual 2. Click the ‘Add New’ option on the screen: 3. Click the ‘Upload Plugin’ option on the screen: 4. Select the ‘Browse’ option: 5. Navigate to the eStoreFront plug-in .ZIP file and double-click to select it: User Manual Chapter 2 – eStoreFront Installation and Quick Start 25 6. Click the ‘Install Now’ option on the screen: 7. Complete the process by selecting the ‘Activate Plugin’ option: 8. On the bottom left portion of the Dashboard, you will find the eStoreFront panel option: 26 Chapter 2 – eStoreFront Installation and Quick Start User Manual The path to the eStoreFront service software that is installed on the Route Manager server needs to be entered into the Service Path box. Fields: Service Path: Enter the Route Manager server address that will be used by eStoreFront to access the customer’s Route Manager data. Click the ‘Update’ button when the address has been entered. Get RM Settings (only changes): When you add pictures to the configuration items in Route Manager, you must click this button to transfer the pictures to the website. This will only transfer the information that has changed in RM since the last time the button was clicked. Get RM Settings (forced): Clicking this button will get all of the settings (not just the changes) from Route Manager. User Manual Chapter 2 – eStoreFront Installation and Quick Start 27 This page intentionally left blank. 28 Chapter 2 – eStoreFront Installation and Quick Start User Manual Chapter 3 – Daily Processing Introduction This chapter details the daily process followed by existing customers, new customers, and Route Manager desktop users when using eStoreFront. Existing Customer Process Your current Route Manager customers can perform the following tasks from the eStoreFront site: Create and manage an eStoreFront account Check Balances Make Payments Review Statements and Invoices Order Products Schedule Deliveries Skip Deliveries Chat with Customer Service Each option is covered within this section. User Manual Chapter 3 – Daily Processing 29 Sign Up The existing customer will need to Sign Up to use the eStoreFront site to access their account information. 1. From the Web site, select the Sign Up (or similar) link on the screen. 2. Existing customers will enter their Account Number and ZIP code on the screen, followed by clicking the confirmation button. 3. The customer will create a Username and Password, and enter an Email Address to use for eStoreFront related activity, followed by selecting Activate Account. 30 Chapter 3 – Daily Processing User Manual 4. If the account is created successfully, a confirmation screen will appear, and a confirmation e-mail will be sent to the address entered. Select the Sign In option to continue. NOTE: If the account was not created successfully, the reason will be displayed on the screen. 5. Enter the username and password selected, followed by Sign In. 6. The customer will now be logged into the eStoreFront site. Viewing Account Information When your customers select ‘My Account Info’ on the site, they can view their account balance, invoice history, delivery schedules, and more. Delivery Options Make Payments Invoice History Account Info User Manual Chapter 3 – Daily Processing 31 Make a Payment Depending on the options enabled within your site, the customer will be able to select the Make Payment/Pay My Bill link to process a credit card transaction through Route Manager. The customer can optionally store up to three credit cards for future payments. Select invoices to Pay The customer can select the invoices to be paid on the screen by selecting/deselecting each box in the Pay field. This option is set in the Customer Type codes: Note: if the “Allow customers to choose invoice to pay” box is not checked in the Customer Type code, only the total balance due is displayed. 32 Chapter 3 – Daily Processing User Manual Enter Payment Amount (Individual Invoices) The customer can adjust the amount to pay per selected invoice: Store Credit Card(s) Info The customer can store secure credit card information on your site by selecting the My Credit Cards option: They can enter up to three credit cards to securely store within Route Manager: User Manual Chapter 3 – Daily Processing 33 Finalize the Payment Finally, the customer will click the Make Payment/Authorize option to complete the process. A confirmation screen will be displayed along with a confirmation email sent to the customer. Invoice History Select the My Account History option to view invoice history (up to one year from the month selected). 34 Chapter 3 – Daily Processing User Manual Click on any invoice number to download and view a .PDF copy of the invoice with signature (if captured): Scheduled Deliveries The customer can view their next delivery and standing order under the My Deliveries tab by clicking the desired delivery day under the Delivery Calendar option: User Manual Chapter 3 – Daily Processing 35 Add Products The customer can add products to any delivery by clicking the Add Product icon: Skip Deliveries The customer can skip any delivery selected by clicking on the Skip this Delivery option on the screen: Schedule an Extra Delivery The customer can schedule an additional delivery by clicking the Schedule an Extra Delivery icon: 36 Chapter 3 – Daily Processing User Manual Placing an Order The customer can enter a product order by selecting the Products option on the screen: 1. The customer will select the item category. 2. Next, the desired item will be selected. 3. After the item has been selected, the customer will choose the ‘Add to Cart’ option. User Manual Chapter 3 – Daily Processing 37 4. The customer will be directed to the Shopping Cart screen. From this screen the customer can update quantities, add additional items, or click Next. Add additional items Update Quantities 5. Additional items will be offered based on the item(s) added to the shopping cart. Click Next to continue. 38 Chapter 3 – Daily Processing User Manual 6. Once all of the items have been added, the customer can choose their desired delivery date on the calendar and click Next: NOTE: The customer may also add a ‘Delivery Note’ to the order. 7. A confirmation screen will be displayed. The customer will review the order and select Confirm to complete the process. User Manual Chapter 3 – Daily Processing 39 8. The order will be saved and processed to the Route Manager program. Additionally, an e-mail confirmation will be sent to the customer and associated office personnel. Chat with an Employee By selecting the ‘Chat’ option on the site, the customer can send a message to an assigned Route Manager user instantly. This will allow the customer to communicate with an employee real-time. NOTE: Messages will be directed to the Route Manager username specified within the ‘Chat User’ field on the Admin screen. After the Chat option has been selected the message entry screen will be displayed: 40 Chapter 3 – Daily Processing User Manual The customer can enter and send a message to the Route Manager user: The message will instantly appear on the user’s screen within Route Manager: The message exchange will continue until the customer exits from the message entry screen on the site; all chat exchanges will be archived in the customer’s Contacts tab within Customer Information. This completes the section on the existing customer process. Continue to the next section to learn the process for new customers. User Manual Chapter 3 – Daily Processing 41 New Customer Process Prospective customers can perform the following tasks from the eStoreFront site: Create new accounts online Order products Schedule their first delivery Each option is covered below. Creating a New Account A new customer will be required to ‘Sign Up’ for service on the eStoreFront site. 1. From the eStoreFront site, the customer will enter their ZIP code within the Start Delivery field and click Go: 2. If you deliver in their area they will be asked to select one of the Web Prospect Codes followed by clicking Next: NOTE: If the customer enters a ZIP code not within your database they will be provided with the information entered within the Out of Area ZIP Code section of the eStoreFront Setup > Misc. Settings screen within Route Manager. 42 Chapter 3 – Daily Processing User Manual 3. The customer will select their desired products based on the Web Prospect Code selected: NOTE: If the Web Prospect Code selected is set to ‘Contact Info’ only, the customer will be asked to fill out a contact sheet that will be transmitted to the office for follow-up. 4. After the customer has made a product and equipment selection they will be directed to the Delivery Info screen to schedule their first order and enter their contact information. User Manual Chapter 3 – Daily Processing 43 5. The last step requires the customer to enter billing details, create a username/password for the eStoreFront Web site, and credit card details. Additionally, there is a summary of their first order and your company terms. 6. Once the customer fills in the information and selects Confirm Order they will be asked to submit the order to the office: 7. If the account is created successfully, a confirmation screen will appear, and the customer will receive a confirmation email. NOTE: If the account was not created successfully, the reason will be displayed on the screen. 8. At this point, the customer will be directed to their new account. 44 Chapter 3 – Daily Processing User Manual Refer to the previous section on Existing Customers for detailed information on all of the options available to the customer on the eStoreFront site. This completes the section on signing up for service through the eStoreFront site. Refer to the next section to learn how to manage eStoreFront activity through the Route Manager program. User Manual Chapter 3 – Daily Processing 45 Route Manager Processing The daily process for Route Manager users depends on the activity performed by your customers from the eStoreFront site: New Customer Activity New Order Activity Chat Activity Payment Activity Daily Report Customer Information Updates Each option is detailed below. New Customer Activity When a customer creates an account from the eStoreFront site, they are entering information based on the default settings you have established in Route Manager. These requirements establish the minimum amount of data needed to create a new account within Route Manager, which means it is necessary to review each account created and add additional data or adjustments as needed. To view new accounts added from the eStoreFront site, navigate to Transactions > Enhanced Customer Review. NOTE: This area of the program will also display any new accounts created using the enhanced new customer setup option on the handheld. 46 Chapter 3 – Daily Processing User Manual Double-click on each account listed to access the Customer Information screen for editing, if needed. Or, Select each account by placing a checkmark in the white box shown to the left below. Additionally, you may select or deselect the accounts globally by clicking the box in the header line. To update the status of each account and remove the assigned ‘Review’ flag, choose a new Customer Status Code from the drop-down list and click the Save button. NOTE: The ‘Review’ flag will remain on each eStoreFront account until their ‘Account Status Code’ has been changed. User Manual Chapter 3 – Daily Processing 47 A note will be added to the Contacts tab on each account when the customer signs up on the site. This will include their assigned username. Additionally, a new customer notification message will appear on the employee’s screen that is assigned as the ‘Route Manager Chat User’ within the Admin page of the eStoreFront site. 48 Chapter 3 – Daily Processing User Manual New Order Activity When a customer places an order on the eStoreFront site, a new Delivery Order is created within Route Manager. The order will include the items selected by the customer: If the customer entered a message on the order, it will be displayed in the ‘Delivery Message’ box on the order. The Promise Date is selected by the customer when the order is placed. The last step in the process is to assign the order to the appropriate route and make any necessary adjustments. User Manual Chapter 3 – Daily Processing 49 Additionally, a new order notification message will appear on the employee’s screen that is assigned as the ‘Route Manager Chat User’ within the Admin page of the eStoreFront site . An e-mail confirmation will also be sent to the primary notification email established within eStoreFront and the customer: 50 Chapter 3 – Daily Processing User Manual Chat Messages By selecting the ‘Chat’ option on the site, the customer can send a message to Route Manager instantly. This will allow the customer to communicate with an employee real-time. NOTE: Messages will be directed to the Route Manager username specified in the ‘Route Manager Chat User’ field on the Admin page of the site. User Manual Chapter 3 – Daily Processing 51 The message will instantly appear on the user’s screen within Route Manager: The message exchange will continue until the customer exits from the message entry screen on the site. NOTE: All chat exchanges will be archived in the customer’s Contacts tab within Customer Information. 52 Chapter 3 – Daily Processing User Manual Payment Activity When a customer submits a credit card payment via eStoreFront, the credit card information is automatically billed on their Route Manager account. NOTE: The Electronic Funds Module is required to use this feature. Contact Advantage Route Systems for further information. Additionally, a payment notification message will appear on the employee’s screen that is assigned as the ‘Route Manager Chat User’ within the Admin page of the eStoreFront site. User Manual Chapter 3 – Daily Processing 53 Daily Report The Contact History Messages Report in Route Manager includes all of the eStoreFront activity performed by your customers on a daily basis. NOTE: In order to view the eStoreFront activity properly, you will need to make minor adjustments to the criteria in the report by following the steps below. The Contact History Messages Report can be found under Reports > Communication Reports in Route Manager. By default, this report includes all contact history messages available for various activities performed in Route Manager. To view eStoreFront activity only, adjust the following settings on the screen: 1. Enter the date range that you would like to include in the report within the Entered Date field. 2. Clear the dates listed in the Follow-up Date field. 3. Clear all employee initials in both the Employee and Follow Up fields. 4. Select the Include Blank Reasons option. 54 Chapter 3 – Daily Processing User Manual Once the adjustments have been made properly, the report criteria screen should resemble the following: Select the preview or print option to view a detailed report that includes all eStoreFront activity performed within the date range entered. NOTE: eStoreFront messages can be included with other types of activity on the Contact Messages Report. The important thing to note is that eStoreFront messages are not assigned Follow-Up Dates, Employees, Follow-Up Employees, or Contact Message Reasons. User Manual Chapter 3 – Daily Processing 55 Customer Information Updates The Customer Information screen contains items related to eStoreFront on both the Info and Contacts tab within each account related to managing each account or reviewing activity. Info Tab The Info tab contains options to reset the customer’s login information, or disable their account entirely. Choose the reset option if the customer forgets their username or password and would like you to assign new login information. Check the “Disable eStoreFront Login” box to prevent users from accessing their account. If a customer is terminated in Route Manager, this box will automatically be checked. NOTE: The customer can change their password on the Account Information page of the site if they do not wish to use the password you have assigned permanently. 56 Chapter 3 – Daily Processing User Manual Contacts Tab The Contacts tab contains an archive of activity to/from the customer on the site, which includes: Requested Orders Skipped Deliveries Chat Logs Payments Sign Up / Usernames You can view extended information logged with each message by highlighting it and selecting the Messages icon on the screen. This concludes the daily processing chapter for eStoreFront. If you require further assistance or have questions, please contact Advantage Route Systems. User Manual Chapter 3 – Daily Processing 57 Chapter 4 – eStoreFront Field Definitions Overview This chapter contains all of the field definitions within each eStoreFront screen in Route Manager. This chapter will assist you when setting up the new program and should be used in conjunction with Chapter 3 to ensure you are using all of the features available and offering your customers the best web experience possible. eStoreFront Setup Menu The new eStoreFront Setup menu is available in Route Manager (RM 6.1.2 and RM2K 11.2.2) that will help you configure and manage eStoreFront options. Navigate to Tools > eStoreFront Setup: NOTE: You may need to make an adjustment within Security Level Codes to view the eStoreFront Setup items. 58 Chapter 4 – eStoreFront Field Definitions User Manual Web Prospect Codes The Web Prospect Codes allow each customer to create a new account from your site or optionally capture their contact information for follow-up within the office. Info Tab The Info tab contains a description and associated customer type along with an image file that will be displayed on your site. Fields: Web Prospect Code: Enter up to six characters that will represent the prospect code. Description: Enter a description for the prospect code. Web Display Order: Enter a number that will control where the prospect code will be displayed on the page. For example, entering the number 1 will force the code to the left of 2. Send Contact Information: Select this option to use this code for collecting contact information instead of creating an order when they sign up for service (enables the Contact Info tab). Default Customer Type: Select the default Customer Type Code that will be assigned to customers that choose the current prospect code. Enable on Web: Check this option to enable the prospect code on your Web site. Change Web Image: Choose this option to associate a new image file with the item. Clear Web Image: Choose this option to remove the image file from the prospect code. User Manual Chapter 4 – eStoreFront Field Definitions 59 Products Tab The Products tab allows you to select the default items that will be displayed when a prospect signs up for service. Fields: Available Products/Products: Add the items that you would like to make available to this prospect code on the site by using the arrow keys or doubleclicking directly on each product. Page Description: Enter a brief description that you would like to include on the products page. Hide Water Calculator: Check this box if you want to prevent the water calculator from showing on the web site. 60 Chapter 4 – eStoreFront Field Definitions User Manual Equipment Tab The Equipment tab allows you to select the default equipment types that will be displayed when a prospect signs up for service. Fields: Available Equipment Types/Equipment Types: Add the equipment types that you would like to make available to this prospect code on the site by using the arrow keys or double-clicking directly on each type. Page Description: Enter a brief description that you would like to include on the equipment page. User Manual Chapter 4 – eStoreFront Field Definitions 61 Add Ons Tab The Add Ons tab allows you to select additional ‘up sale’ items that will be displayed when a prospect signs up for service. Fields: Available Products/Products: Add the products that you would like to make available to this prospect code as recommended additional purchases by using the arrow keys or double-clicking directly on each product. Page Description: Enter a brief description that you would like to include on the additional products page. 62 Chapter 4 – eStoreFront Field Definitions User Manual Delivery Tab The Delivery tab contains delivery related options displayed during the order scheduling process. Settings: Show Delivery Calendar: Select this option to display the route delivery calendar on the Web site during the sign up process. Default Route for New Orders: Choose a default route that will be assigned to each order generated from the Web site. Suggested Delivery Locations: Enter a list of business or residence delivery locations such as break room, front or back porch. Allow User Text Input: Select this option to allow the customer to enter their own preferred delivery drop-off location. Other: Contact Reason: Select a default Contact Reason Code that will be assigned to orders by default. Request (Delivery Order Reasons): Select the default Delivery Order Reason that will be assigned to orders by default. Page Description: Enter a brief description that you would like to include on the delivery screen. User Manual Chapter 4 – eStoreFront Field Definitions 63 Billing Tab The Billing tab is reserved for future enhancements to eStoreFront other than the description below. Fields: Page Description: Enter a brief description that you would like to include on the Billing screen. 64 Chapter 4 – eStoreFront Field Definitions User Manual Shopping Cart Tab The Shopping Cart includes items related to the checkout process. New Customer Activation Fee: Charge Code: Select a product code that will be used to assess a one-time account activation fee when a new customer places their first order. Other: Allow Promotions: select this option to allow discount ‘Coupons’ to be entered during the order check-out process (refer to Web Coupon Codes). Page Description: Enter a brief description that you would like to include on the shopping cart screen. User Manual Chapter 4 – eStoreFront Field Definitions 65 Contact Info Tab The Contact Info tab contains a series of fields that will be used to capture contact information on the site. Fields: Field: The displayed name of the field on the site. Required: A ‘T’ will be displayed if the field is required, or ‘F’ for optional, when filling out contact information on the Web site. Type: Displays the type of field that will be displayed. Length: Allows you to enter the number of characters that will be accepted per line. Contact E-Mail: Enter the Email address of the person that will be contacted when a prospect fills out and submits the contact information. Confirmation Message: Enter a message that will be displayed when a prospect submits their contact information. Page Description: Enter a brief description that you would like to include on the contact info screen. 66 Chapter 4 – eStoreFront Field Definitions User Manual Web Coupon Codes The Web Coupon Codes allow you to offer promotions on the site with a wide range of flexibility. Fields: Code: Enter the code that can be entered by the customer on the site. Description: Enter the description of the coupon code. Start/End Date: Enter the date range that the coupon is valid. Coupon: Enter an amount ($) or percentage (%) and select the appropriate option. Available To: Select the types of orders that the coupon can be applied towards (New Customers, Delivery Orders, and Internet Orders). Filters Tab New Customers Only: Select this option if the coupon can only be applied against a new customer’s first order. Filter by Customer Type: Select this option to filter the types of customers that can use the coupon code (use the available arrow keys). Product Coupon: Select this option if the coupon applies to a product discount. The coupon code will be assigned to the product charge code. Equipment Type Coupon: Select this option if the coupon applies to a equipment rental discount. The coupon code will be assigned to the equipment type code. User Manual Chapter 4 – eStoreFront Field Definitions 67 Web Product Units The Web Product Units allow you to display how many units are included with each product on your site. Fields: Code: Enter the code that will represent the Web Product Unit. Description: Enter the description of the unit code. Enable on Web: Select this option to enable the unit code on the web. 68 Chapter 4 – eStoreFront Field Definitions User Manual Web Product Classification Codes The Web Product Classification Codes allow you to group products together by similar type to make it easier for your customers to navigate through the items offered on the site. Fields: Classification Code: Enter a code that will represent the classification code. Description: Enter the description of the classification code. Display Level: The display level is used to control the items that appear within the code. For example, by selecting Level 2 you will be able to select any Level 2 Parent Codes from the dropdown list below. Parent Code: Displays available Parent Codes based on the Display Level selected. All items associated with the Parent Code will be listed within the box below. Products at this level: Displays the products assigned to the selected Parent Code. Equipment Types at this level: Displays equipment type assigned to the selected Parent Code. Enable on Web: Select this option to display the classification code on the web. Change Web Image: Choose this option to associate a new image file with the code. Clear Web Image: Choose this option to remove the image file from the code. User Manual Chapter 4 – eStoreFront Field Definitions 69 Map eStoreFront Locations The Map eStoreFront Locations option allows you to view your eStoreFront customers on a map by ZIP code. Fields: ZIP Code: Select the ZIP code range to include on the map. Push Pin: Select a default push pin to use when plotting locations on the map. 70 Chapter 4 – eStoreFront Field Definitions User Manual Misc. Settings The Miscellaneous eStoreFront Settings include a number of fields that are used for various options on your site, such as delivery fees and confirmation messages. Misc Tab The Misc tab contains various items used during the sign up and order process. Out of area ZIP Code: Go To (URL): Select this option and enter a default Web address that will be displayed when a prospect signs up for service but is not within your delivery area. For example, this can be directed towards an alternate company Web site. Message: Select this option and enter a message that will be displayed when a prospect signs up for service but is not within your delivery area. Delivery Charge Fee: Charge Code: Select a default product code that will be used to charge a delivery fee on each account based on the criteria below. Any Non-scheduled Delivery: Enter a fee that will be charged when a customer schedules an order not already on their calendar. Same Day Delivery: Enter a fee that will be charged when a customer schedules an order for same day delivery. Next Day Delivery: Enter a fee that will be charged when a customer schedules an order for next day delivery. 2-3 Day Delivery: Enter a fee that will be charged when a customer schedules an order within 2-3 days on the calendar. User Manual Chapter 4 – eStoreFront Field Definitions 71 Other: Allow Customer to enter Delivery Notes: Select this option to allow the customer to enter delivery notes on the schedule order screen. Delivery Order Cutoff Time: Enter the cutoff time for customers to order same day or next day delivery. One Day Before Delivery: Enter the time of day that a customer is unable to make a change to tomorrow’s order. Two Days Before Delivery: Enter the time of day that a customer is unable to make a change to the day after tomorrow’s order. Don’t Require Pre Payment For Prospect Orders: Select this option to disable credit cards to be entered for new customer sign up. Promo Sales Footer Grid [ ] Products per Row: Enter the number of promotional products to display per row on the bottom of the My Account Info screen on the site. Agree to Terms: Enter the terms that your company offers when a customer signs up for service. Confirmation Message: Enter a confirmation message that will be displayed when a customer submits an order. New Account Setup Confirmation: Enter a confirmation message that will be displayed when a prospect signs up for service. Invalid Account Setup Message: Enter instructions to customers who don’t know their account number or ZIP Code when activating their online account. 72 Chapter 4 – eStoreFront Field Definitions User Manual HTML Tab The HTML tab contains a series of messages that are transmitted to the customer via E-mail when each activity is submitted. Fields: Subject: The subject entered on the email. HTML Body: The associated HTML email template. NOTE: There are a series of default templates found within the eStoreFront folder of your Route Manager directory in recent versions. Enter a subject and associated email template for any of the following activities on the site: User Manual Change Password Forgot Password New Customer Sign Up New Customer Order Confirmation Existing Customer Sign Up Order Confirmation Updated Email Address Make Payment Cancel Service Skip Delivery Chapter 4 – eStoreFront Field Definitions 73 Notification Tab The Notification tab is used to notify internal users of various activities on the eStoreFront Web site. Fields: E-Mail Address: Enter a default E-mail address next to each type of employee that will be notified when the following activities take place on the site. CSR (Customer Service Rep): o New customer sign up o Existing customer sign up o Submit order o Update email address o Cancel service o Skips delivery Operations Manager: o New customer sign up o Submit order Accounting: o New customer sign up o Submit order o Payments Service Manager: 74 Chapter 4 – eStoreFront Field Definitions User Manual o Submit order Quality Control: o Submit order Control Panel The Control Panel includes a series of additional options that allow you to customize the user experience on the site. Options: Credit Card Processing ‘Test’ Mode: Select this option to allow credit card payments to be entered but not processed through your ‘live’ system. NOTE: Credit card processing requires additional configuration steps; contact ARS or your reseller for further information. Allow Payment by ‘eCheck’: Select this option to enable payment by Electronic Check. NOTE: You must sign up for the eCheck service with one of the supported merchant services. Enable Debug Logging: Select this option to enable event logging that can be used by ARS technicians to diagnose problems should any occur. Landing Page: Select the page that the customer ‘lands’ on when they sign into their online account. Require Payment to Submit Order: Select this option to require a payment prior to submitting a new order. User Manual Chapter 4 – eStoreFront Field Definitions 75 Account: Hide Prices for Sub-Accounts: Select this option to suppress product pricing for all ‘sub-accounts’ that login to eStoreFront. Hide Financial Data/Pages for Sub-Accounts: Select this option to suppress historical financial data for all ‘sub-accounts’ that login to eStoreFront. Months of History Available: Enter the number of months of history that will be available to each customer (up to 36). Months of History to initially Show: Enter the number of months to display upon login. Delivery: Allow Customers to Choose Delivery: Select this option to allow any delivery date to be selected by the customer on the calendar during the checkout process. Leaving this option blank will automatically assign the order to the next available delivery day. Limit Delivery Days to Existing: Select this option to restrict order requests to scheduled deliveries already established on their calendar. Let Customers Skip Stops: Select this option to allow your customers to skip any existing deliveries. 76 Chapter 4 – eStoreFront Field Definitions User Manual Products: Display Prices when not logged in: Select this option to display product prices even if the customer has not logged into the site. Show Default Products on Sign In: Select this option to display the customer’s Default Products as soon as they login to the site — for quick product ordering requests. Only allow Ordering from Default: Select this option to restrict items that can be ordered only to Default Products within Customer Information. Product Charge Codes Fields (Internet Tab) The products available on the eStoreFront site are determined by settings within each individual Product Code in Route Manager. NOTE: Only complete the following steps on items that you would like to appear on the eStoreFront Web site. Fields: Internet Product: Select this option to display the product on the Web site. Product Units: Select a Web product unit from the dropdown list. Web Display Order: Enter the display order for the item on the site. Minimum Order Qty: Enter the minimum order quantity that new customers can be select when signing up for service. User Manual Chapter 4 – eStoreFront Field Definitions 77 Special Product: Select this option to enable the Specials Banner area. Enter the Start and End date and the special pricing for the product. Web Coupon Code (optional): Select the coupon code for this product. Short Web Description: Enter a short description for the item on the site. Long Description: Enter a long description for the item on the site. Web Product Classification Code: Select the classification code that will be assigned to the item. Related Products (1-4): Select up to four items that will be considered related items for purchase on the site. Change Web Image: Choose this option to associate a new image file with the item. Images should be no larger than 900 pixels in height by 600 pixels wide. Clear Web Image: Choose this option to remove the image file from the product. Equipment Type Codes (Internet Tab) The equipment types available on the eStoreFront site are determined by settings within each individual Equipment Type Code within Route Manager. NOTE: Only complete the following steps on items that you would like to appear on the eStoreFront Web site. Fields: Web Image (Change/Clear): Choose this option to associate/remove an image file with the item. 78 Chapter 4 – eStoreFront Field Definitions User Manual Web Description: Enter a short description for the equipment type on the site. Web Long Description: Enter a long description for the equipment type on the site. Web Display Order: Enter a display order for the item on the site. Web Product Classification Code: Select the classification code that will be assigned to the item. Rental Price: Enter the price of the rental to be displayed on the web site. Web Coupon Code (optional): Select the coupon code for this product. Employees Fields (Internet Tab) The Employees screen includes information that is used by eStoreFront to display their driver’s picture and Title options that control notification messages from the site. Fields: Web Image (Change/Clear): Choose this option to associate/remove an image file with the employee. Titles: Select the employee’s title(s) for notification purposes. User Manual Chapter 4 – eStoreFront Field Definitions 79 Chapter 5 – eStoreFront Mobile Overview eStoreFront supports a responsive design site to work on mobile devices. This is separate from the eStoreFront desktop version. User Manual Chapter 5 – eStoreFront Mobile 81 Mobile Sign In When you visit a website’s eStoreFront sign in page on a mobile device, the page will “read” your screen size and if it is determined to be a mobile device, you will be automatically redirected to the eStoreFront mobile folder. Customers wishing to access their account from a mobile device will log into their account with their user name and password. Click the ‘Forgot Password’ button to have a temporary password emailed. 82 Chapter 5 – eStoreFront Mobile User Manual Main Menu The eStoreFront mobile main menu. Fields: Pay my Bill: Allows a customer to pay their bill Skip A Delivery: Customers can skip an upcoming delivery Order Products: Customers can modify orders or create a new order My Account: Customers can manage their contact information Log Out: Signs you out of the eStoreFront mobile site. User Manual Chapter 5 – eStoreFront Mobile 83 Hamburger Menu The three line button at the top will drop down a menu so you can navigate when you are not at the main menu. 84 Chapter 5 – eStoreFront Mobile User Manual Account Information Customers can change their password or contact information from the Account Information page. User Manual Chapter 5 – eStoreFront Mobile 85 Pay My Bill Customers can use their mobile device to make a payment and manage up to 3 credit cards on file. 86 Chapter 5 – eStoreFront Mobile User Manual Appendix A – Frequently Asked Questions Installation Questions Q: Do I have to log all users out of Route Manager when I install eStoreFront? A: No, you do not need to have any users log out during the install process. Q: Why can’t I view the eStoreFront site when I type ‘localhost’ into my web browser? A#1: Make sure you are on the machine that is hosting the Web Server program. If you are on another PC, you will not be able to use ‘localhost’ and will have to include the name of the Web Server and page in the address. A#2: Make sure all eStoreFront and Web Server services are running and try again. General Questions Q: What if the Route Manager user entered in the ‘Chat With’ option on the site is not logged in, how will we get our daily messages? A: All of the messages will automatically popup on the screen when the Route Manager user logs into Route Manager. Additionally, you can run the daily Contact History Messages Report (discussed in Chapter 3) in Route Manager to view all eStoreFront activity. Q: Can a customer change their eStoreFront password after it has already been created? A: Yes, the ‘Change Password’ option is available on each customers screen after they login to the eStoreFront site. User Manual Appendix A – Frequently Asked Questions 87 Appendix B – How to Customize your Customer emails Introduction With eStoreFront, you can design many of the forms that are sent to your customers. This would include such things as: 1. New Account setup 2. Payments Received 3. New orders confirmation 4. Skip Delivery Not only can you have a different message for each of these events, but you can fully customize the look, feel and text of each communication. Here is what you can customize Within each document, there are any number of t Here is how you can customize your emails Reference Table The following reference table will let you know what you can imbed in your emails User Manual Appendix B – How to Customize your Customer emails 89 Ref Variable Name What it does 1 2 3 4 5 6 7 8 9 10 11 90 Appendix B – How to Customize your Customer emails User Manual Appendix C – How to upgrade to eStoreFront 7 Introduction When you decide to upgrade to eStoreFront, there are a number of things that you will need to do. It is not a simple process and involves preparation to make it successful. Depending on what you want to do and how many products you have, it could take anywhere from a couple of hours to several days. The balance of this chapter is focused on steps you need to take to be successful at this endeavor. Bear in mind that there are three general areas that will require changes: 1. Route Manager program 2. Service side changes to your Route Manager server 3. Your actual web site (wherever it might be hosted) All of these items are required to do a successful upgrade! User Manual Appendix C – How to upgrade to eStoreFront 7 91 General overview To help you see the big picture, here is a quick overview of the upgrade process in a checklist for RMt. Please note that there are a number of activities required with RM as well as the web side. Assuming you have a functioning web site today, you will want to be careful so as to not disturb your existing site until you are ready to ‘go-live’ with the eStoreFront (or ESF5). Here are the basic steps to follow: 1. Upgrade your desktop RM program to Series 7 or later. 2. Set up the following required new items in RM: a. Prospect Codes b. Class Codes c. Misc. Settings d. Control Panel e. Classification Codes f. Locations 3. Set up the following optional new items in RM: a. Coupons b. Product Units 4. Make changes to the existing programs to add more data: a. Products b. Employees c. Equipment d. Customer Types e. Customer Status 5. On your web site, do the following: a. Create a test site b. Update your plugin 92 Appendix C – How to upgrade to eStoreFront 7 User Manual You may find it helpful Here are some other ideas that will make the transition easier. 1. Load all of your pictures to your RM server so they will be available when you need them. a. Products b. Drivers c. Web Prospect Classes 2. You may find it beneficial to set up a test area for both your web site and your RM data. It may take you a little while to put your site together and this will give you an opportunity to play with it before you commit it to your general users. As you get started you will find that it is essential that you follow the steps in order as often times one requires essential data used in the next step. RM changes The following will need to be completed in RM. Each step has details so that you can easily find what you will need to change and suggested values that will let you get maximum value from the upgrade. To be done within RM You will need to do all of these items shown below. This will be done within your live RM setup. You can do these things without disturbing your existing site that is running on the Web. 1. Create Customer Status Codes. Place a checkmark in the ‘New Customer Review’ box. Assign a Customer Type to the code. 2. Create Customer Types that will be used for new prospects. At least 1 code is required. 3. Web Product Units – set up unit types that you will be using. At a minimum set up one or two generic ones, such as ‘Each’ or ‘Bottle.’ Tools > eStoreFront Setup > Web Product Units. 4. Web Product Classification Codes - these types of codes are used to establish product are going to be used, they can be configured at Tools > eStoreFront Setup > Web Product Classification Codes. User Manual Appendix C – How to upgrade to eStoreFront 7 93 5. On the Internet tab of the Product Charge Codes screen: a. Check the ‘Internet Product’ box b. Select the ‘Product Units’ if being used c. Select the ‘Web Product Classification Code’ if being used d. Enter the ‘Web Display Order’ to put the product in the order to be displayed on the page e. Enter the ‘Short Web Description’ f. Enter the ‘Long Description’ g. Enter the ‘Related Products’ if being used h. Upload the product image. 6. If equipment is being offered in the Prospect Wizard, update the information on the Internet tab of the Equipment Type Codes screen and check the box ‘Enable on Web’. 7. Web Prospect Codes – set up codes that can be used as a starting point for a prospective customer. Examples can be ‘Home or Small Business’ and ‘Medium or Large Business’. This allows eStoreFront to tailor the site to offer residential or corporate pricing and a handful of other options. Tools > eStoreFront Setup > Web Prospect Codes. 8. If the Prospect Wizard is being used, complete the following in Web Prospect Codes (Tools > eStoreFront Setup): a. Assign the ‘Customer Type’ being used b. Add an image c. Add ‘Products’ that will be offered d. Add ‘Equipment’ that will be offered e. Add products to the ‘Add Ons’ tab f. Configure the items on the ‘Delivery’ tab g. Complete the items on the ‘Shopping Cart’ tab. 9. If the Prospect Wizard is not being used, check the box ‘Send Contact Information’ on the Info tab of Web Prospect Codes to disable the wizard and enable the ‘Contact Info’ tab. 10. On the Internet tab of Employees, check the appropriate box(s) in Titles for notifications from eStoreFront. If the employee is a driver and you wish to display their photo, upload it on this tab. 11. In Tools > eStoreFront Setup > Misc. Settings, update the messages and terms to be used on the site. Configure the email notification settings on the HTML tab. Enter the email addresses of those who will be notified of activity in eStoreFront on the Notification tab. 12. In Tools > eStoreFront Setup > Control Panel, configure the desired settings for eStoreFront. 13. Log into WordPress and go to the eStoreFront panel. Click the ‘Get RM Settings’ to import all of the configuration items (select either ‘only changes’ or the ‘forced’ option). 94 Appendix C – How to upgrade to eStoreFront 7 User Manual To be done on your RM server In addition to the RM program changes, there is another item that needs attention on your RM server. This is outside of the RM program and is often times referred to as “Services”. 1. Install the Windows service on the /RM machine. Presently, this is a manual operation. Instructions for installing the service and setting permissions are covered in Chapter 2 of this document. NOTE: ARS technicians refer to http://wiki/index.php/eStoreFront 2. Locate the eStoreFront.exe.config file in the service folder and update the RM data path and the service path to the external IP address and port number assigned to the new service. 3. Log into the router and open the new port being used for both TCP incoming and outgoing traffic. 4. If a firewall is being used, the new port needs to be opened for both TCP incoming and outgoing traffic. To be done on your web server 1. If WordPress is going to be installed in a test area at first, the area needs to be created and WordPress copied to it. 2. Locate the wp-config.php file in the root of the WordPress install. Open the file in Notepad and change the $table_prefix = '<whatever is here>'; to $table_prefix = 'wp_esf5_'; This will create new tables in the SQL database for the test data. 3. Log into WordPress in the test area and finish the installation process. 4. Install the plugin. The plugin can be installed following the normal plugin installation in WordPress or can be copied via FTP. NOTE: Do this from outside your system. 5. Verify the service can be accessed by opening a command window. At the DOS prompt, type ‘telnet <server IP address> <port>. If it is successful, the screen will go blank. If not, it will display an error message. User Manual Appendix C – How to upgrade to eStoreFront 7 95 Appendix D – Google Analytics Introduction eStoreFront supports a responsive design site to work on mobile devices. This is separate from the eStoreFront desktop version. User Manual Appendix D – Google Analytics 97 M Make a Payment 38 Index N New Customer Activit 52 New Order Activity 55 P Payment Activity 59 PHP 13 Placing an Order 43 Product Overview 1 A Admin Login 29 B Branch Setup 16, 19, 26 C Chat Messages 57 Chat with Us 46 Creating a New Account 48 Customer Password Change 87 Customer Status Codes 17 Customer Type Codes 18 S Scheduled Deliveries 41 Service Support 5 Setting up the System 4 Setup 7 Sign Up 36 Skip Deliveries 42 Support 5 System Operation 3 W Web Server 3, 7, 13, 14, 28 Website 1 D Daily Report 60 Daily Routines 5 E eStoreFront Installation Files 8 F Frequently Asked Questions 87 H How to Customize your Customer emails 89 How to upgrade to eStoreFront 91 I Internet Commerce 1 Invoice History 40 User Manual Index 99