1
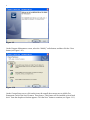
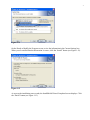
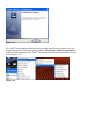
®
Aldelo For Restaurants
Tools Manual
i
PUBLISHED BY
Aldelo Systems Inc.
4641 Spyres Way, Suite 4
Modesto, CA 95356
Copyright © 1997-2008 by Aldelo Systems Inc.
All rights reserved. No part of the contents of this book may be reproduced or transmitted in any form
or by any means whatsoever without the express written permission of the publisher.
Printed and Bound in the United States of America.
This manual is available through Aldelo Systems Inc. and resellers worldwide. For further
information about other languages that the manual may be translated into, please contact Aldelo
Systems Inc. or visit our Web site at www.aldelo.com. Send comments about this manual to
[email protected].
LIMIT OF LIABILITY/DISCLAIMER OF WARRANTY: ALDELO SYSTEMS INC. HAS
USED ITS BEST EFFORTS IN PREPARING THIS MANUAL. HOWEVER, ALDELO SYSTEMS
INC. MAKES NO REPRESENTATIONS OR WARRANTIES WITH RESPECT TO THE
ACCURACY OR COMPLETENESS OF THE CONTENTS OF THIS USER MANUAL AND
SPECIFICALLY DISCLAIMS ANY IMPLIED WARRANTIES OF MERCHANTABILITY OR
FITNESS FOR A PARTICULAR PURPOSE. THERE ARE NO WARRANTIES THAT EXTEND
BEYOND THE DESCRIPTIONS CONTAINED IN THIS PARAGRAPH. NO WARRANTY MAY
BE CREATED OR EXTENDED BY SALES REPRESENTATIVES OR WRITTEN SALES
MATERIALS. THE ACCURACY AND COMPLETENESS OF THE INFORMATION PROVIDED
HEREIN AND THE OPINIONS STATED HEREIN ARE NOT GUARANTEED OR
WARRANTED TO PRODUCE ANY PARTICULAR RESULTS, AND THE ADVICE AND
STRATEGIES CONTAINED HEREIN MAY NOT BE SUITABLE FOR EVERY INDIVIDUAL’S
OR ORGANIZATION’S SITUATION. ALDELO SYSTEMS INC. SHALL NOT BE LIABLE FOR
ANY LOSS OF PROFIT OR ANY OTHER COMMERCIAL DAMAGES, INCLUDING BUT NOT
LIMITED TO SPECIAL, INCIDENTAL, CONSEQUENTIAL, OR OTHER DAMAGES. THE
ABOVE LIMIT OF LIABILITY/DISCLAIMER OF WARRANTY ALSO APPLIES TO ALDELO
SYSTEMS INC.’S SOFTWARE PRODUCTS TO BE USED IN CONJUNCTION WITH THIS
USER MANUAL, AS STATED IN THE END USER LICENSE AGREEMENT IN THE
UNDERLYING SOFTWARE DISTRIBUTION SET.
Aldelo® is the registered trademark of Aldelo Systems Inc. Other products or company names
mentioned herein may be the trademarks of their respective owners.
The example companies, organizations, products, logos, people, places, and events depicted herein
are fictitious. No association with any real company, organization, product, logo, person, place or
event is intended or should be inferred.
Manufactured in the United States of America
ii
iii
Table of Contents
INTRODUCTION ................................................................................................................................................................... V
CHAPTER 1 INSTALLATION ................................................................................................................................................. 1
Uninstalling Previous Versions ..................................................................................................................................... 1
Installation ..................................................................................................................................................................... 4
CHAPTER 2 ALDELO® DATABASE MANAGER...................................................................................................................... 9
Setting Your Password ................................................................................................................................................... 9
Logging In.................................................................................................................................................................... 10
Database Path ............................................................................................................................................................. 11
Deleting Orders ........................................................................................................................................................... 11
Selecting the Date Range ............................................................................................................................................................. 12
Displaying the Orders .................................................................................................................................................................. 12
Selecting the Orders .................................................................................................................................................................... 13
Deleting the Orders ..................................................................................................................................................................... 13
Re-Indexing the Database ............................................................................................................................................ 13
Importing Archived Files ............................................................................................................................................. 14
Moving the Files .......................................................................................................................................................................... 15
Importing the Files ...................................................................................................................................................................... 15
Instructions .................................................................................................................................................................. 16
CHAPTER 3 ALDELO® DATABASE CLEANER ..................................................................................................................... 17
Running the Utility ....................................................................................................................................................... 17
CHAPTER 4 ALDELO® CUSTOMER IMPORT UTILITY .......................................................................................................... 21
File Format .................................................................................................................................................................. 21
Importing Data ............................................................................................................................................................ 22
CHAPTER 5 ALDELO® LOCALIZATION MANAGER ............................................................................................................. 27
System Setup ................................................................................................................................................................ 27
Font Settings ................................................................................................................................................................................ 28
Resource Database Settings ......................................................................................................................................................... 30
Translating Strings ...................................................................................................................................................... 31
Exporting Strings ......................................................................................................................................................... 34
Creating the Text File .................................................................................................................................................................. 35
Finding Strings ............................................................................................................................................................ 36
Exporting the Strings as a Database............................................................................................................................ 38
Importing the New Resource Database ....................................................................................................................................... 38
Selecting the Alternative Language ............................................................................................................................................. 39
CHAPTER 6 ALDELO® SYSTEM SERVICE MANAGER .......................................................................................................... 43
Setup ............................................................................................................................................................................ 43
Running in Memory Only ............................................................................................................................................. 44
iv
v
Introduction
The purpose of the Aldelo® For Restaurants Tools Manual is to provide guidance on how to operate
the tools of the Aldelo® Data Management Suite. The suite consists of five tools; the Aldelo®
Database Manager, the Aldelo® Database Cleaner, the Aldelo® Customer Import Utility, the Aldelo®
Localization Manager, and the Aldelo® System Service Manager. These utilities are provided to
Aldelo customers free of charge and on an as-is basis, without technical support. Customers use
these utilities at their own risk.
The Aldelo® Database Manager allows the user to delete orders that were created for training
purposes in Live Mode of Aldelo® For Restaurants, and to re-index the database. It also compacts the
database automatically to allow Aldelo® For Restaurants to run more efficiently.
The Aldelo® Database Cleaner reduces the size of the active database in Aldelo® For Restaurants and
archives the old sales information for tax purposes. Sales and void information are removed from the
database while leaving other data, such as customer information, inventory information, employee
information, etc., intact. It is very simple to use.
The Aldelo® Customer Import Utility is designed to aid the user in importing customer records into
the Aldelo® For Restaurants database automatically, saving countless hours of manual data entry. It
allows the user to create a CSV (Comma Separated Values) file in Microsoft Notepad containing
customer information and then import the file into Aldelo® For Restaurants. Optionally, you may
import information from an exported text file from an infoUSA information file (infoUSA is a service
that provides sales leads and mailing lists for a fee). The imported information in the file is appended
to any previously existing customer information in the database.
The Aldelo® Localization Manager allows the user to run Aldelo® For Restaurants in one of several
default alternative languages that are included with it. The user also has the option of translating the
software into another language himself by entering the translation for each English string into a list of
strings used by Aldelo® For Restaurants. This option gives the user the freedom to run Aldelo® For
Restaurants in almost any language, with almost all of the controls displayed the alternative language.
The Aldelo® System Service Manager allows you to set a time of day at which your system will shut
down or reboot automatically, every day, without user intervention. This tool relieves your staff from
having to remember to turn off the system after closing, or, in the case of 24 hour operations, having
to reboot the system while they may be busy with other duties. The Aldelo® System Service Manager
is extremely easy to use.
Warning! Do not use these utilities while your restaurant is in operation. Some of them take an
extremely long time to complete their processes. You cannot use your Aldelo® For Restaurants
database while any of these utilities are running on your system.
vi
1
Chapter 1
Installation
The installation of the Aldelo® Data Management Suite uses the same installation program as the rest
of the products from Aldelo Systems Inc. If you are upgrading, be sure to uninstall any prior versions
of the Aldelo® Data Management Suite before proceeding with the installation so that you do not end
up with two different versions of the same program on your system. Follow the instructions below. If
you do not have a prior version installed, skip to the section entitled “Installation.”
Uninstalling Previous Versions
From your desktop, click on Start > Control Panel > Add or Remove Programs > Aldelo For
Restaurants. With Aldelo For Restaurants highlighted, click the “Change” button (See Figure 1-1).
Figure 1-1
The InstallShield Wizard displays. Click the “Next” button to continue (see Figure 1-2).
2
Figure 1-2
On the Program Maintenance screen, select the “Modify” radio button, and then click the “Next
button (see Figure 1-3).
Figure 1-3
On the Custom Setup screen, click on the icon with a small down-arrow next to Aldelo For
Restaurants Tools in the list of features. Then choose “This feature will not be available” from the
drop-down list that appears. Click the Next” button to continue (see Figure 1-4).
3
Figure 1-4
On the Ready to Modify the Program screen, review the information in the Current Settings box.
When you are satisfied that the information is correct, click the “Install” button (see Figure 1-5).
Figure 1-5
As soon as the installation process ends, the InstallShield Wizard Completed screen displays. Click
the “Finish” button (see Figure 1-6).
4
Figure 1-6
The Aldelo® Data Management Suite has been successfully uninstalled from your system. From your
desktop, this may be verified by navigating to Start > All Programs > Aldelo For Restaurants >
Tools. All of the components of the Aldelo® Data Management Suite have been removed from the
menu list (see Figure 1-7).
Figure 1-7
Installation
Place the Aldelo Installation CD in the drive on your computer. After a few seconds, the main
installation screen appears. Under Aldelo For Restaurants Suite of Products, select “Click Here To
Install” (see Figure 1-7). If the main installation screen fails to display, open Windows Explorer,
navigate to your CD drive, and double-click on the file AFR38-EN.exe to display it.
5
Figure 1-7
When the File Download Security Warning displays, click the “Run” button (see Figure 1-8).
Figure 1-8
On the InstallShield Wizard screen that follows, click the “Next” button to continue (see Figure 1-9).
6
Figure 1-9
On the Program Maintenance screen, select the “Modify” radio button, and then click the “Next
button (see Figure 1-10).
Figure 1-10
On the Custom Setup screen, click on the icon with a small down-arrow next to Aldelo For
Restaurants Tools in the list of features. Then choose “This feature will be installed on local hard
drive” from the drop-down list that appears. Click the Next” button to continue (see Figure 1-11).
7
Figure 1-11
On the Ready to Modify the Program screen, review the information in the Current Settings box.
When you are satisfied that the information is correct, click the “Install” button (see Figure 1-12).
Figure 1-12
As soon as the installation process ends, the InstallShield Wizard Completed screen displays. Click
the “Finish” button (see Figure 1-13).
8
Figure 1-13
The Aldelo® Data Management Suite has been successfully installed on your system. From your
desktop, this may be verified by navigating to Start > All Programs > Aldelo For Restaurants >
Tools. All of the components of the Aldelo® Data Management Suite have been added to the menu
list (see Figure 1-14).
Figure 1-14
9
Chapter 2
®
Aldelo Database Manager
The Aldelo® Database Manager allows the user to delete orders that were created for training
purposes in Live Mode of Aldelo® For Restaurants, and to re-index the database. It also compacts the
database automatically to allow Aldelo® For Restaurants to run more efficiently.
Warning! Depending on the size of your database, re-indexing (required after you delete
records) could take a VERY long time. Do not use the Aldelo® Database Manager unless you
are prepared to let the re-indexing run until completion. Aldelo® For Restaurants must be shut
down on your server computer and all workstations on which it is running before using the
Aldelo® Database Manager, and it must not be restarted until the re-indexing process is
finished. Furthermore, do not use the Aldelo® Database Manager to delete orders if there are
any outstanding gift certificates or if you use the in house charges feature of Aldelo® For
Restaurants. If you do, these gift certificates and in house charges can become corrupted
during the re-indexing process. Once this information has been corrupted, it cannot be
repaired. Always backup your database before using the Aldelo® Database Manager utility.
Aldelo Systems Inc. shall not be responsible for any damages whatsoever, monetary or
otherwise, resulting from the use of this software.
To start the Aldelo® Database Manager, from your desktop navigate to Start > All Programs >
Aldelo For Restaurants > Tools and click on “Database Manager.”
Setting Your Password
If you are using the Aldelo® Database Manager for the first time, the first screen that displays is the
Password Setup screen. Click the “OK” button to continue (see Figure 2-1).
Figure 2-1
10
Select a password and enter it on the following screen. Click “OK” to continue (see Figure 2-2).
Figure 2-2
Note: To reset the password, login using the number “05338942” as your password. Close and
reopen the software. The password setup screens appear, just as though you were using the
Aldelo® Database Manager for the first time. Create your new password as described above
under “Setting your Password.”
Logging In
Enter the password you just created into the password field of the Login screen. Click the “OK”
button to continue (see Figure 2-3).
Figure 2-3
The main screen of the Aldelo® Database Manager displays (see Figure 2-4).
11
Figure 2-4
Database Path
The database path that the software is currently using is listed at the top of the Aldelo® Database
Manager main screen. Compare this path with the path displayed under Data Source in the System
Information group box of the Back Office of Aldelo® For Restaurants to make sure you are using the
correct database.
Deleting Orders
Warning! The deletion of transactions in the Aldelo® Database Manager should only be used to
delete training transactions that were created in Live Mode of the restaurant software. Aldelo®
For Restaurants has a Training Mode feature that allows you to train your employees in the use
of the software without committing the transactions to the live database. Whenever possible,
avoid training your employees in Live Mode and always use Training Mode instead. Extreme
caution is necessary to make sure that you do not delete any transactions that are legitimate
customer transactions. Any transactions that are deleted using this feature cannot be
recovered. Always backup your database before using the Aldelo® Database Manager utility.
Aldelo Systems Inc. shall not be responsible for any damages whatsoever, monetary or
otherwise, resulting from the use of this software.
12
The Aldelo® Database Manager allows the user to delete orders that were created for training
purposes in Live Mode of Aldelo® For Restaurants. The user selects a range of dates and the
transactions that occurred within this date range display on the main screen. The user then selects
individual orders from this list for deletion.
Selecting the Date Range
From the main screen of the Aldelo® Database Manager, enter the beginning date of the desired date
range in the Search From field. The date must be in numerical format with a hyphen or slash
separator, such as “01-01-2008” or “1/1/08.” After entering the date, press the “Enter” button on your
keyboard. If the date was entered incorrectly, the text you entered in the date field is deleted
automatically. Re-enter the date in the correct format. If the date was entered in the correct format,
the date remains displayed in the field. Once you have entered the beginning date, repeat the
procedure to enter the ending date in the To field.
Displaying the Orders
Next, select the type of information you wish to display by choosing either the “Show Orders” radio
button or the “Show Paid Outs” radio button. Then, click the “Find” button to display the list of
transaction in the large list box of the main screen (see Figure 2-5).
Figure 2-5
13
Selecting the Orders
Find the orders you wish to delete in the list. For each order you wish to delete, select the checkbox
to its left. If you wish to delete all of the orders, click the “Select All” button in the upper right of the
screen. To unselect all of the orders, click the “Unselect All” button just below it.
Deleting the Orders
After you have selected all of the orders to delete, click the “Delete Selected” button on the right side
of the screen. A confirmation message asks you to confirm that you want to delete the selected data in
the list. If you are sure, click the “Yes” button to complete the deletion, If not, click the “No” button
(see Figure 2-6).
Figure 2-6
The Aldelo® Database Manager displays a message indicating that the selected items were deleted
successfully. Click the “OK” button to complete the process (see Figure 2-7).
Figure 2-7
Re-Indexing the Database
Note: Depending on the size of your database, re-indexing could possibly take a VERY long
time. Do not use the Aldelo® Database Manager unless you are prepared to let the re-indexing
run until completion.
After you delete orders from your database, the remaining records are no longer in sequential
numerical order. Gaps exist in the list where the deleted orders once resided. Re-indexing the
database removes these gaps and renumbers the remaining orders so that you once again have all of
your orders numbered sequentially. This enables the database to perform faster searches, thereby
improving the efficiency at which it operates. Re-indexing must always be performed after you
delete records from your database.
14
On the main screen of the Aldelo® Database Manager, click the “Re-Index Database” button to begin
the process. A message asks you to confirm that you wish to start re-indexing the database file. If you
are sure you are ready to proceed, click “Yes” (see Figure 2-8).
Figure 2-8
If the system detects that your server or any workstation connected to Aldelo® For Restaurants is still
running, the following message displays. Shut down Aldelo® For Restaurants on these systems and
then click the “OK” button to begin re-indexing the database (see Figure 2-9).
Figure 2-9
Upon completion, a message indicates that you have successfully re-indexed your database. Click the
“OK” button (see Figure 2-10).
Figure 2-10
The Aldelo® Database Manager closes and the re-indexing process is now complete.
Importing Archived Files
Whenever you delete old sales information by way of the Aldelo® Database Cleaner, the system
creates an archive file of the existing data before removing the old sales information. These files are
saved in your live database folder. The Aldelo® Database Manager allows you to import this archive
file to restore the sales information to its previous state.
15
Moving the Files
In order for the Import Archive feature to work, the archive files must first be moved to the correct
folder. The Aldelo® Database Cleaner creates the files in the C:\ Documents and Settings \ All
Users \ Application Data \ Aldelo \ Aldelo For Restaurants \ Databases \ Live folder. The files
have a .archive extension. Navigate to this folder, select all of the files of this type, and copy them to
the C:\ Program Files \ Aldelo \ Aldelo For Restaurants \ Aldelo For Restaurants Tools \
Database Manager \ Archive folder. If the folder does not exist on your system, you must first
create it.
Importing the Files
From the main screen of the Aldelo® Database Manager, click the “Import Archive” button. A
confirmation message asks you to confirm that you would like to import all archives. Click the “Yes”
button to continue (see Figure 2-11).
Figure 2-11
Next, you are asked to verify that you indeed wish to import the archived data into the current
database. Type “YES” into the field on the Verification screen and click “OK” (See Figure 2-12).
Figure 2-12
You are presented with a final warning. Read the warning carefully and in its entirety. If you are sure
you wish to proceed, click the “Yes” button (see Figure 2-13).
16
Figure 2-13
If the import is successful, the Import Completed Successfully message displays. Click the “OK”
button to complete the process (see Figure 2-14).
Figure 2-14
If you navigate to the directory where you placed the archive files earlier, note that the files
extensions have been changes to .AlreadyImported. The Import Archive feature may only be
performed once with any given set of archive files. If you want to repeat the procedure, you must
create new files with the .archive extension by using the Aldelo® Database Cleaner again. Once these
files are created, you may repeat the entire procedure.
Instructions
Click the Instructions button to display a brief explanation of each of the features of the Aldelo®
Database Manager. Click the “OK” button when you are finished reading (see Figure 2-15).
Figure 2-15
17
Chapter 3
®
Aldelo Database Cleaner
The Aldelo® Database Cleaner reduces the size of the active database in Aldelo® For Restaurants and
archives the old sales information for tax purposes. Sales and void information are removed from the
database while leaving other data, such as customer information, inventory information, employee
information, etc., intact. It is very simple to use.
Warning! Do not use the Aldelo® Database Cleaner utility if there are any outstanding gift
certificates or in house charges remaining that were issued prior to your selected date. If you
do, these gift certificates and in house charges will be removed from the database along with
your sales and void information. Once this information has been removed, it cannot be
recovered. Always backup your database before using the Aldelo® Database Cleaner utility.
Aldelo Systems Inc. shall not be responsible for any damages whatsoever, monetary or
otherwise, resulting from the use of this software.
After running your restaurant with Aldelo® For Restaurants for a period of time, the database can
become very large. This in turn can slow down the software. Reducing the size of the database by
removing and archiving old sales information can help keep the software running at its peak of
performance. The Aldelo® Database Cleaner utility allows the user to select a date prior to which all
sales information will be removed from the active database and placed in an archive file. This archive
file has a .archive file extension and is saved in the same folder as your active database.
Running the Utility
Note: Be sure to create a backup of your live database before attempting to use the Aldelo®
Database Cleaner utility. In Aldelo® For Restaurants, navigate to the Back Office and click on
“Backup Database” under Common Tasks.
First, open Aldelo® For Restaurants and navigate to the Back Office. In the System Information
group box, make note of the path to the active database file listed under Data Source. You will need
this information shortly.
Next, before you can run the Aldelo® Database Cleaner, you must shut down Aldelo® For
Restaurants on all workstations, including the server computer. Then, from your desktop, navigate to
Start > All Programs > Aldelo For Restaurants > Tools and click on “Database Cleaner” to
display the main screen of the utility (see Figure 3-1).
18
Figure 3-1
Click on the “Browse” button to display the Database File Selection window. In this window,
navigate to the location of your existing live database file. The default path is C:\ Documents and
Settings \ All Users \ Application Data \ Aldelo \ Aldelo For Restaurants \ Databases \ Live. If
your file is not found here, navigate to the file along the path that was listed in the Back Office of
Aldelo® For Restaurants under Data Source. Select your file and click “Open” (see Figure 3-2).
Figure 3-2
The main screen re-appears with the path to your database displayed in the field at the top. In the
lower field, enter the date before which you wish to delete the sales information from your database.
The date must be in numerical format with a hyphen or slash separator, such as “01-01-2008” or
“1/1/08.” After entering the date, press the “Enter” button on your keyboard. If the date was entered
incorrectly, the text you entered in the date field is deleted automatically. Re-enter the date in the
correct format. If the date was entered in the correct format, the “Start Cleaning” button is revealed
and enabled. Click the “Start Cleaning” button to complete the process (see Figure 3-3).
19
Figure 3-3
The Operation Complete message displays when the database cleaning is finished. Click the “OK”
button to have the utility attempt to compact the database (see Figure 3-4).
Figure 3-4
A message confirms that the compact procedure completed successfully (if the compaction fails, be
sure to manually compact your database in Aldelo® For Restaurants). Click the “OK” button (see
Figure 3-5).
Figure 3-5
Your database has been successfully cleaned, archived, and compacted!
20
21
Chapter 4
®
Aldelo Customer Import
Utility
The Aldelo® Customer Import Utility is designed to aid the user in importing customer records into
the Aldelo® For Restaurants database automatically, saving countless hours of manual data entry. It
allows the user to create a CSV (Comma Separated Values) file in Microsoft Notepad containing
customer information and then import the file into Aldelo® For Restaurants. Optionally, you may
import information from an exported text file from an infoUSA information file (infoUSA is a service
that provides sales leads and mailing lists for a fee). The imported information in the file is appended
to any previously existing customer information in the database. The infoUSA information must
contain telephone numbers for use with Aldelo® For Restaurants.
Warning! Before using the Aldelo® Customer Import Utility, make sure you first backup your
existing database. If you fail to create the CSV file properly, you run the risk of permanently
damaging your live database. Changes created by importing data directly into the Aldelo® For
Restaurants database cannot be reversed. Having a current backup of your existing live
database allows you to restore the database to its original condition should any problems arise
due to the use of this utility. Aldelo Systems Inc. shall not be responsible for any damages
whatsoever, monetary or otherwise, resulting from the use of this software.
File Format
The information in the CSV file must follow a specific format. It is the responsibility of the user to
make sure the information adheres to this required format. If the information cannot be manipulated
by the user to conform to the required format, then it cannot be imported. If you use infoUSA as the
source for your customer information, contact them for assistance. Aldelo Systems Inc. cannot
provide assistance with converting the information in your CSV file into the proper format.
Each field of information in a record must be surrounded by quotation marks (“ ”) and separated from
the next field by a comma (,). After the last field of a record, no comma is required. Begin the
information for the next customer record on a new line. When complete, the text file should look like
the sample below:
“John L. Sullivan”,“4820 Miramar St”,“Modesto”,“CA”,“95356”,“209-555-7230”
“William Stern”,“5319 Yarmark Ave”,“Modesto”,“CA”,“95355”,“209-234-5678”
“Joan Alexander”,“5525 Palm Ave”,“Turlock”, “CA”, “95382”,“209-777-9173”
“Bernard Zanville”,“1750 Aria Way”,“Modesto”,“CA”,“95355”,“209-551-2323”
When finished creating the file, save it with a .txt file extension and note the location of the file.
22
Importing Data
From your desktop, navigate to Start > All Programs > Aldelo For Restaurants > Tools and click
on “Customer Address Importer” to display the main screen of the import utility. Review the
information in the group box labeled “Customer Information Will Be Imported Into the Following
Database” at the bottom of the screen (see Figure 4-1).
Figure 4-1
This information should match the Current Data Source information listed in the message box when
you click on “Data Source” in the Back Office of Aldelo® For Restaurants (see Figure 4-2).
Figure 4-2
Once you have determined that the locations match, click the “Browse” button on the Aldelo®
Customer Import Utility main screen to display the file selection window. Browse to the file, select it,
and click the “Open” button (see Figure 4-3).
23
Figure 4-3
The path to the file appears in the field at the top of the Aldelo® Customer Import Utility screen.
Next, make sure the Field Customization values match the order in which the data in your file
appears and select the number of digits you wish to display in the Zip Code/Postal Code Length field.
When finished with the Field Customization values, click the “Import” button (see Figure 4-4).
Figure 4-4
24
Note: The number of digits selected in the Zip Code/Postal Code Length field does not
necessarily have to match the number of digits allocated to the zip code or postal code in the
data file. Any excess digits are truncated and the number of digits displayed matches the value
chosen. For example, if the data file contains zip codes in the format “95356-1234” and you
chose “5” in the Zip Code/Postal Code Length field, the zip code displays as “95356” in Aldelo®
For Restaurants upon completion of the import.
If the import is successful, the message “Importing Customer Information Completed Successfully”
displays at the bottom of the Aldelo® Customer Import Utility screen (see Figure 4-5).
Figure 4-5
Upon successful completion of the data import, open Aldelo® For Restaurants and navigate to Back
Office > Activities > Customer Activities > Maintain Customer Records to see that the imported
data has been added to your existing Customer Records data (see Figure 4-6).
25
Figure 4-6
26
27
Chapter 5
®
Aldelo Localization
Manager
The Aldelo® Localization Manager is designed to assist you in converting the Aldelo® For
Restaurants software into the language of your choice. You may select one of the languages included
in the software or you may convert the system into any other language you choose. Once complete,
you can then change the default language by station or by employee. Different languages may be
displayed on different stations or for each employee. Your business operations may be viewed and
printed in almost any foreign language, as well as in English. The use of this feature is ideal when
members of your wait staff and kitchen staff do not speak the same language.
System Setup
From your desktop, open the Aldelo® Localization Manager by navigating to Start > All Programs
> Aldelo For Restaurants > Tools and clicking on “Localization Manager” to display the main
screen of the utility. Select the down arrow next to the To field and choose the language to which you
wish to convert the software. If the language is not listed, select “Custom Language” (see Figure 5-1).
28
Figure 5-1
Font Settings
Click the “System Setup” button to configure the text font settings. On the System Setup screen, click
the “Yes” button to continue (see Figure 5-2).
Figure 5-2
On the Grid Font Name screen, enter the name of the font you wish to use on the grid display of the
Aldelo® Localization Manager. This font must be installed on your system. It may not be a Unicode
font. Type the name of the font in the field and click “OK” (see Figure 5-3).
29
Figure 5-3
On the Charset screen, enter the decimal charset value for the character set you wish to use and click
the “OK” button (see Figure 5-4). In most cases, this value may be left at its default value.
Figure 5-4
Note: A font character set (charset) is a group of special characters used in Windows that is
required for the proper display of text in some languages. Examples include Hebrew, Russian,
Arabic, Chinese, etc. These charsets are identified by a decimal value between 0 and 255. By
entering the proper decimal charset value, these characters may be entered and displayed in
the Aldelo® Localization Manager and Aldelo® For Restaurants. A detailed explanation of
charsets is beyond the scope of this manual. Further information about charsets and their
decimal values may be found at http://msdn.microsoft.com/en-us/library/cc194829.aspx or by
performing an Internet search.
On the Size screen that follows, enter the font size that you wish to display on the grid and click the
“OK” button (see Figure 5-5).
Figure 5-5
Next, you must set the same options for the text font. The text font is used in the text fields of the
Aldelo® Localization Manager. This font must be installed on your system. It may not be a Unicode
font. On the TEXT Font Name screen, enter the name of the font and click “OK” (see Figure 5-6).
30
Figure 5-6
On the Charset screen, enter the decimal charset value for the character set you wish to use and click
the “OK” button (see Figure 5-7). In most cases, this value may be left at its default value.
Figure 5-7
On the Size screen that follows, enter the font size that you wish to display in the text fields and click
the “OK” button (see Figure 5-8).
Figure 5-8
Once you have completed the Font Settings, you must close and re-open the Aldelo® Localization
Manager for the changes to take effect.
Resource Database Settings
Click the “System Setup” button again, but this time, on the System Setup screen, click the “No”
button to configure your Resource Database settings (see Figure 5-9).
Figure 5-9
31
The Aldelo Resource Database Selection screen displays. Click the “Open” button to accept the
default file name and location for the file. This new version of the file contains the changes you just
made to the settings (see Figure 5-10).
Figure 5-10
Translating Strings
Open the Aldelo® Localization Manager. On the main screen, select the language you wish to
translate the software into from the To drop-down list. Next, select the range of string numbers that
you wish to translate.
The strings are numbered in Aldelo® For Restaurants. To display the string numbers in Aldelo® For
Restaurants, navigate to Back Office > Station Settings > Other Options > Extra Settings and
click on the Resource Debug registry key. Click the “Edit” button at the bottom of the screen. On the
Registry Settings screen that appears, change the registry key value by typing “YES” in the text box.
Click the “OK” button to complete the change (see Figure 5-11).
32
Figure 5-11
Now close and re-open Aldelo® For Restaurants. When it reopens, each text string on the screen is
displayed with a number next to it. This number is the string number for use in translating the
software (see Figure 5-12).
33
Figure 5-12
To translate a single string, enter its string number in both the From and To numerical fields of the
Aldelo® Localization Manager. The English string appears in the large list in the center of the screen.
Enter the translation of the string in the input field below it. If you need to enter a special character
into your translated string, click the “Character Table” button to display the selectable ASCII
character table (see Figure 5-13).
Figure 5-13
Click on the desired preset character and it appears in the input field at the point of your cursor in the
string you are editing. When finished using the Character Table, click the “Cancel” button or press
the “Esc” key on your keyboard to exit. When you have finished entering the string translation, click
the “Save (F8)” button. Don’t forget to click this button or the translated string will be lost. You must
click the “Save (F8)” button after each string translation before moving on to the next one.
To translate a range of strings, enter the beginning string number of the range in the From numerical
field and the ending string number of the range in the To numerical field. All of the strings with
numbers between those chosen (inclusive) display in the large list. Select them one by one and
perform the translation. Don’t forget to click the “Save (F8)” button after each one.
34
If you wish to translate the entire list of strings in the database, enter “1001” in the From numerical
field and enter “10000” in the To numerical field. All strings in the software display in the large list
(see Figure 5-14).
Figure 5-14
Note: When translating a string, if the English string has a Line Feed (“[LF]”) or a place holder
(“|1,” “|2,” etc.) in it, the Line Feed or place holder must appear in the translated string in the
proper logical location. Depending on the language into which you are translating the string,
this is not necessarily the same physical location as in the English version. For example, string#
3978 in English reads “Total |1% Tip.” The “|1” place holder is the location where the tip
percentage is inserted by Aldelo® For Restaurants. The Spanish translation of the string is
“Propina figurada |1%.” As you can see, the place holder is in a different physical location (at
the end of the Spanish string where it was in the middle of the English string). Always place
Line Feeds and place holders in the proper location logically in your translated string to obtain
the correct results.
Exporting Strings
When you have finished translating the strings, you may export them to an ASCII text file that can be
used to review these strings all at once. The Export Strings feature allows the user to export the entire
string set in either English or the alternative language. This text file is exported to the output folder
located at C:\ Program Files \ Aldelo \ Aldelo For Restaurants \ Aldelo For Restaurants Tools \
Localization Manager \ Output (unless you selected a different folder during setup). The file has a
.txt extension and may be viewed in Microsoft Notepad.
35
Creating the Text File
After you are done translating the strings in the software, open the Aldelo® Localization Manager and
from the main screen, click the Export Strings button (see Figure 5-15).
Figure 5-15
The Output String screen displays. Click the “Yes” button to export the file in English or the “No”
button to export the file in the alternative language (see Figure 5-16).
Figure 5-16
If successful, the Operation Completed Successfully message displays. Click the “OK” button to
complete the export (see Figure 5-17).
36
Figure 5-17
To verify that the export was successful, open Windows Explorer and navigate to the Output folder
listed above. The file (or files) is listed there (see Figure 5-18).
Figure 5-18
Double-clicking on the name of the file in Windows Explorer opens it in Microsoft Notepad for
review.
Finding Strings
The Find String feature of the Aldelo® Localization Manager allows the user to locate all English
strings in the database that contain a specific text substring. It begins its search at the currently
highlighted location in the string list and finds the next instance of the substring. The list moves to
this next instance and highlights it. To find all instances of a substring in the database, highlight the
first string in the list and perform the search. Once the next substring is found, perform the search
again. When the last instance of the substring has been found, performing the search again has no
effect.
37
®
From the main screen of the Aldelo Localization Manager, choose the translated language to display
in the input box at the bottom of the screen. Click the “Find String” button to display the Search
screen. Enter the English substring you wish to find in the textbox and click the “OK” button (see
Figure 5-19).
Figure 5-19
The string list moves to the first string in the list that contains the selected substring. The translation,
if entered previously, appears in the input field at the bottom of the screen (see Figure 5-20).
Figure 5-20
You may also review translations of selected English strings into any of the languages to which the
software has been translated without changing the selected language in the To field. To do so,
highlight the English string in the large list whose translation you wish to view and then select the
dropdown list box located between the “Refresh” button and the “Save(F8)” button at the top of the
screen. Choose one of the languages and the translation of the English phrase appears in a popup
message box. Click the “OK” button on the message box to close the message (see Figure 5-21).
38
Figure 5-21
Exporting the Strings as a Database
Once you have completed the translation of all of the strings into the alternative language, you must
export the strings as a database so that they may be used in Aldelo® For Restaurants.
From the main screen of the Aldelo® Localization Manager, click the “Export Resources” button to
create and export the database. Next, open Windows Explorer and navigate to C:\ Program Files \
Aldelo \ Aldelo For Restaurants \ Aldelo For Restaurants Tools \ Localization Manager \
Export. Here you find the file named “adRes.imp” that was just created. Copy this file to removable
media or e-mail it to each of the stores where you wish to use it and place a copy of the file on each
local system.
Importing the New Resource Database
In Aldelo® For Restaurants, go to the Back Office, click on the File menu, and then select “Import
New Database Resource.” The Aldelo For Restaurants Resource Database Selection screen displays.
Navigate to the location of the file, click on it, and then click the “Open” button (see Figure 5-22).
39
Figure 5-22
A message indicates that the resource database was successfully updated. Click the “OK” button to
close the message (see Figure 5-23).
Figure 5-23
Selecting the Alternative Language
Once the new resource database has been imported into your computer, you must select the new
language in several places.
In Aldelo® For Restaurants, go to the Back Office and under the Common Tasks section, click on
“Station Settings.” Next, click on the down-arrow of the Station Language drop-down list box.
Choose the alternative language from the list. Then click on the “System Language Settings” button
and select the language again from the Default System Language drop-down list. Click the “Update”
button to complete the change. Now when you exit the back Office and return to the main screen of
Aldelo® For Restaurants, you see that the title bar and the captions of all of the buttons are displayed
in the alternative language (see Figure 5-24).
40
Figure 5-24
Finally, for each employee who wishes to use the alternative language, you must change the preferred
language in his or her employee file.
From the main screen of Aldelo® For Restaurants, navigate to Back Office > Setup > Employee
Setup > Employee Files and select the employee who wishes to use the alternative language from
the list on the left side of the screen. Open the Preferred Language drop-down list and select the
alternative language from the list. Click the “Save” and “Done” buttons (see Figure 5-25).
41
Figure 5-25
Perform these steps for each employee who wishes to use the alternative language. When you are
finished, each employee will see the entire software displayed in the alternative language whenever
he or she logs in.
Note: For many of the controls to be viewed in the alternative language, you must enter the
translation in the Secondary Language field during the initial setup of the item. For example, if
you created a menu item named “Stuffed Jalapeños” but you did not enter anything in the
Secondary Language Name field during the initial setup, the item name displays as “Stuffed
Jalapeños” on the Aldelo® For Restaurants order entry screen when viewed by your employees,
even if you have selected the alternative language as the preferred language for each of them.
However, if you entered “Jalapeños Rellenos” in the Secondary Language Name field during
the initial setup of the item, “Jalapeños Rellenos” is displayed whenever an employee is logged
in whose employee file has the alternative language selected as his or her preferred language.
42
43
Chapter 6
®
Aldelo System Service
Manager
The Aldelo® System Service Manager allows you to set a time of day at which your system will shut
down or reboot automatically, every day, without user intervention. This tool relieves your staff from
having to remember to turn off the system after closing, or, in the case of 24 hour operations, having
to reboot the system while they may be busy with other duties. The Aldelo® System Service Manager
is extremely easy to use.
Setup
To start the Aldelo® System Service Manager, from your desktop, navigate to Start > All Programs
> Aldelo For Restaurants > Tools and click on “System Service Manager” to display the main
screen of the utility (see Figure 6-1).
Figure 6-1
Click the “Settings” button to display the rest of the screen. Select the action you wish to perform
(Restart or Shut Down) from the two radio buttons in the middle of the screen. Next, enter the time of
day that you want the action performed in the Activate Time field. The time should follow a format
such as “3:00:00 AM,” 11:45 PM,” or “23:00.” When you have entered the time in the correct format,
it remains displayed in the field. If the time you entered is automatically deleted from the display,
then you did not enter it in the correct format. Re-enter the time in the correct format, following one
of the examples above. When you have entered the time and it remains displayed in the Activate
Time field, click the “Save” button (see Figure 6-2).
44
Figure 6-2
The setup is now complete. The Aldelo® System Service Manager is now running in the background.
Your system is now scheduled to shut down or restart every day at the selected time.
If you wish to deactivate the utility, click the close button
at the top of the main screen. A
confirmation message asks you to confirm that you wish to continue shutting down the System
Service Agent. Click the “Yes” button to close the utility (see Figure 6-3).
Figure 6-3
Running in Memory Only
Click the “Hide” button if you wish to run the Aldelo® System Service Manager in memory only.
When the Run This Program In Memory screen appears, select the “Yes” button (see Figure 6-4).
Figure 6-4
45
Running the program in memory prevents access by unauthorized users of the utility, as the visual
interface is hidden. When you run the program in memory, you must use the Windows Task Manager
to shut it down.
To open the Windows Task Manager, press CTRL+ALT+DEL on your keyboard to display the
Windows Security screen and click the “Task Manager” button. Click the Applications tab and select
“Aldelo System Service Manager” from the list by clicking on it. Click the “End Task” button to
close the program (see Figure 6-5).
Figure 6-5
46
47
48