1
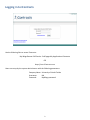
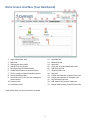
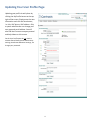
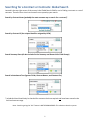
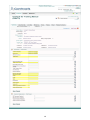
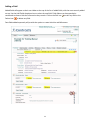
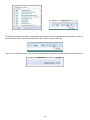
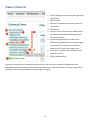
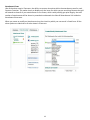
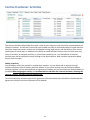
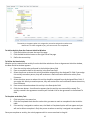
Universal Contract Manager (UCM)/ UNF Full-Access User Manual Table of Contents Logging in to iContracts .......................................................................................................................................................... 2 Home Screen Interface (Your Dashboard) .............................................................................................................................. 3 Updating Your User Profile Page............................................................................................................................................. 4 Searching for a Contract or Contracts: Global Search ............................................................................................................ 5 Notifications on the Home Screen .......................................................................................................................................... 6 Entering Contracts .................................................................................................................................................................. 7 Direct Entry ............................................................................................................................................................................. 7 Field Groups ............................................................................................................................................................................ 9 Reviewers .............................................................................................................................................................................. 12 Enterprise Ribbon ................................................................................................................................................................. 15 Contracts Tab ........................................................................................................................................................................ 15 Working with the Grid........................................................................................................................................................... 16 Views or Reports ................................................................................................................................................................... 19 Modifying a View .................................................................................................................................................................. 23 The Contract Container ......................................................................................................................................................... 24 Contract Container: Summary Tab ....................................................................................................................................... 26 Contract Container: Attachments ......................................................................................................................................... 29 Contract Container: Activities ............................................................................................................................................... 36 Contract Container: Milestones ............................................................................................................................................ 39 Contract Container: Notes .................................................................................................................................................... 42 Contract Container: History .................................................................................................................................................. 45 Contract Container: Emails ................................................................................................................................................... 46 Contract Container: Related Contracts ................................................................................................................................. 47 Appendix A: List of Standard Default Contract Fields ........................................................................................................... 48 Appendix B: UNF Naming Convention .................................................................................................................................. 50 1 Logging in to iContracts Use the following links to access iContracts: My Wings Banner Self Service: Staff page>My Applications>iContracts OR https://ucm.iContracts.com Users are set up by the system administrator with the following parameters: Company Name: University of North Florida Username: N# Password: MyWings password 2 Home Screen Interface (Your Dashboard) 1. 2. 3. 4. 5. 6. 7. 8. 9. Login information area Help text Change your user profile Log out from the system Text input area for Global Search Global Search button to execute search Click to search archived (closed) contracts Enterprise Ribbon (Bar) Home tab (in this case you are viewing the Home screen) 10. Contracts tab 11. Performance tab 12. 13. 14. 15. 16. 17. 18. 19. 20. 21. 22. 23. *only visible when you have a contract to review 3 Activities tab Milestones tab Notes tab Contracts to Review Notification tab* Add Contract icon View Activities icon Help icon Create new Contract via Direct Entry icon Create new contract via Template icon My Favorite Views icon Add View to My Favorite Views icon Delete View from My Favorite Views icon Updating Your User Profile Page Updating your profile is easily done by clicking the My Profile button at the top right of the screen. Simply enter the new information and click the Save button; i.e. title, UNF phone, UNF address. Only a system administrator can change your user type and email address. You will also find the iContracts company manual and help videos on this screen. On the User Profile pane do not check or activate Shared Views, AutoCreate Activity settings, AutoCreate Milestone settings, nor change your password. 4 Searching for a Contract or Contracts: Global Search Located in the top right corner of the screen is the Global Search field for use in finding a contract or a set of contracts. There are four criteria to choose from to speed up your search: Search by Contract Name (probably the most common way to search for a contract)* Search by Contract ID (the unique identifier assigned by UCM) Search Summary Data (all data included in the Summary and General Info Field Groups) Search in Attachment Text (ignores Fields, Contract Names, and Contract IDs) * Include Archived should only be checked for contracts that have expired and have been moved to the Archived contract stage. Note: Searching using the “ALL” feature is NOT RECOMMENDED. This selection slows the system. 5 Notifications on the Home Screen Any contract reviews assigned to a user that have not been completed will appear in the Enterprise Ribbon. Clicking on that alert will enable a pop-up window with a listing of the Contract Container names that will link to the Summary tab of those contracts. In addition, an e-mail is always sent when a user is assigned to a review. Contract reviews are covered in detail later in this documentation. Activity notifications appear on the screen when the user logs in. To make it appear “on-demand” click on the blue box in the Enterprise Ribbon. Below is the Activity Reminder box that appears when an activity: • has been assigned to you • is due or overdue • has not been marked as completed Checking the Dismiss box will permanently remove the highlighted activity from the list, yet not mark the activity as completed. Email reminders will continue if marked to do so. Checking the Dismiss All box will permanently remove all of the activities. 6 Entering Contracts There are two ways to create or enter a new contract: 1. 2. Direct Entry Defined Template (UNF does not currently use this option) Direct Entry To create a contract, simply click on the Direct Entry button and enter a Title, Contract Type, Stage, Description and Folder. Click Continue to create a new Contract Container. After the Contract Container has been created, additional documents (attachments) can be added to your Contract Container as well as adding Contract Fields and Field Groups. 7 Note: Fields notated by a red asterisk are required to be completed by the system. Contract Name: When creating or entering the name of a new contract, refer to the Appendix B of this manual and follow the procedures under “UNF Naming Convention”. The naming conventions of Contract Types and Workflows start with divisional specific prefixes. For example: Administration and Finance is “AF”. Individual users only see Contract Types and Workflows that are associated to their division. 8 Field Groups Field Groups are a way to group data fields for organized entry, quick setup and maintains a cleaner, more visible look (illustration on following page). The University of North Florida’s Purchasing Department requests that specific Field Groups be filled out as vital information pertaining to any contract entered into the system. These fields are necessary to complete the Summary tab of the Contract Container. The requested fields are as follows with those noted with an * being required fields to complete: 1. Contract Category* 2. Fiscal Year* 3. Justification* 4. Total 1st Year Cost* 5. Effective Start Date 6. Effective End Date 7. Index* 8. Fund* 9. ORG* 10. Vendor Name* 11. Vendor N# 12. Vendor Application Received 13. Vendor W9 Received When uploading a new contract, after entering the Summary Data fields, iContracts now continues on to the General Info Field Group & Insurance Requirements Field Group for data entry. Once these field groups are completed and saved, a contact ID number is generated and an automatic e-mail notification is sent to the contract owner. 9 10 Adding a Field Added fields will appear as their own ribbon at the top of the list of added fields, with the most recently added on top. Use the Add Fields drop-down box to select the new field. Field ribbons can be expanded or condensed to show or hide the information they contain. Click on the Edit icon ( ) to edit any field or the Delete icon ( ) to delete any field. Date fields added separately will provide the option to create Activities and Milestones. 11 Reviewers The Contracts to Review tab allows collaboration among multiple users not assigned in the workflow. iContracts will alert users if they have a contract or document to review by the notification on the Enterprise Ribbon to the far right when in the Home Screen. The user can see the name of the Contract Container(s) when they click on the notification and then proceed to the review process from there, as seen on the following page. Reviewers are defined when a Contract Container is created and can also be defined in the contracts Summary tab by clicking on the Review Status link. 12 Reviewers Setup Reviewers can be set up in the Contract Container within the Summary tab by clicking on the Review Status link. Select a user by clicking on the name, or multiple users by holding down the CTRL key and clicking on multiple names. Email notifications can also be designated here. Reviewers can “score” the document when either clicking on the contract name in the pop-up window generated by the Contract Review notification alert on the Enterprise ribbon or clicking on the Review Status link as described on the previous page. Choose the button and click Save to enter your choice and then enter any notes on the subsequent screen. The system records the selection and sends an email, if defined, and will do so from each reviewer. 13 14 Enterprise Ribbon Navigating and using iContracts is straightforward. Across the top of each page is the Enterprise ribbon. By clicking on any tab on the Enterprise ribbon, a user activates that specific set of capabilities. For example, by clicking on the Contracts tab, the user navigates to a listing of all active contracts. Each area in iContracts will list all of the items associated with that tab across ALL contracts based upon that user’s permissions. Contracts Tab *The column headings can be arranged and sorted as the individual sees fit - some of the columns shown may not show on your screen. 1. Enterprise Ribbon 2. Add Contract button 3. Activities notifications 4. Contracts Views area 5. Report button 6. Records Per Page selector 7. Active Contracts listing 8. Field Header row 9. Contract grid 10. Page navigator 11. Refresh icon 12. Display counter 15 The Contracts tab provides users with a simple way to access all or any filtered set of contracts, referred to as Views. In the Contracts Views panel to the left, you can add or modify an unlimited number of saved searches that contain criteria such as multilevel sorting, page layouts and the ability to filter on any combination of contract data. Users can rearrange and sort the data to their liking. By clicking on the Report button in the upper right-hand corner of the page, a user may also download the complete file in CSV (comma-delimited) readable format of the contracts listed in their Contract Views pane. Remember that all grids in the system behave similarly, so the explanation of how to arrange the grid that follows applies to all areas inside of iContracts where a grid appears. By clicking on any contract title, the user will move from the Contract Views to a Summary tab inside the selected Contract Container (to be covered later in this manual). Working with the Grid Arranging the grid The drop-down selector for displaying the number of records per page. Click and drag between column heading to resize the column width. 16 Click and drag in the middle of any heading to change the order of displayed columns. Hover your mouse over any column heading and a drop-down arrow appears that allows sorting by ascending or descending order. You can also choose which columns or fields you would like to display, in which a new pop-up window will appear for you to choose from all available fields. Listed on the left side are the default contract attributes to appear as the first category, and all of your custom-configured fields appear below sorted alphabetically by Field category. On the right side are the fields that appear as column headings on the grid, in which top-tobottom appear as left-to-right in the grid. Clicking and dragging vertically will change the order of appearance in the grid. Clicking on any column heading will sort the grid based on that column in ascending order and … …clicking a second time will sort in descending order. The grid can be sorted by any visible column using this method. The column used for sorting is indicated by a darkened shade and a small triangular arrow pointing upward showing ascending sorting or downward for descending sorting. At the bottom left of the grid is a page number indicator and navigation area. To change pages you can either use the left- or right arrows, or type in the page you would like to move to. 17 To refresh the listing of contracts in the grid (perhaps another user has updated data contained in any of the visible columns since it was last viewed) click on the circular arrows on the right. Finally, on the far bottom right, there will be a listing of how many total contracts match the entered criteria. 18 Views or Reports 1. Link to display all contracts for which you have permissions 2. Name of view 3. Number of contracts that currently meet the view criteria 4. Delete view 5. A view in red is a view in which a field used in the criteria has been deleted (hopefully you have none of these) 6. A green rectangle means that the view is defined as the default when entering the page 7. A circled red “S” indicates that the view is shared to you from another system user 8. Hover over a specific view to display the full name of the view 9. Link to Add New View Views are customizable real-time queries that can be of one-time use or named and saved to be used repeatedly to narrow and simplify the list from any of the areas inside of iContracts. To create a report from any view, click on the Report button at the top right of the grid. 19 To Create a New View 1. Choose the field to query and the associated criteria 2. Decide which columns to view in the layout and arrange them (see steps next page) 3. Choose the contract field that the created view will be sorted by 4. Choose the sort order 5. Click the Run button for one time use of the created view 6. For repeated use of a newly created view, click on ‘Save this View’. You will be asked to name your view. Then click the Run button 20 Determining Which Columns Appear in the Grid You can define and change the default columns that will appear for each view. To do so, click on any column heading and choose Columns from the drop-down list underneath the sort order icons. A window will appear for you to check which fields to appear in the headings. 21 Arranging the Grid Columns Since every grid in the system behaves similarly, please refer to section ‘Working with the Grid’ on page 16. The completed screen for creating a view is shown below with two sets of criteria to track, the desired columns and their order, sort order based on two fields, and the option for saving the view for repeated use. 22 Modifying a View In order to edit any saved view, first run the view, and then click on the Edit View icon above the column headings area. If you are looking to simply filter the results, choose Filter located above the Report button. The resulting screen will be the query as it is currently saved. Modify any of the criteria. Prior to leaving the Edit View screen: Save and Run with the same name will update the view Save and Run with a different name will create an additional new view Run will simply run the view without saving it 23 The Contract Container From the listing of contracts in the grid from the Contracts tab on the Enterprise Ribbon, a user can click to select any contract, view its contents, view key elements, and activate access to capabilities specific to the selected contract through a “secondary” navigation ribbon called the Contracts tab. The difference between the Enterprise navigation ribbon and the Contract ribbon is that of perspective. The Enterprise navigation ribbon and its associated capabilities allow the user to look across all contracts in the enterprise or, depending on their security and permission settings, only contracts to which they have access. This paradigm gives users, managers and administrators a broad view of contracts, contract performance, and exceptions that require attention across the enterprise and, of course, rapid access to relevant information. The Contract ribbon gives users in search of specific contracts the ability to quickly access information, evaluate potential actions, and effectively manage its near and long-term lifecycle and performance. After a contract has been created either manually or through an automated upload, key information regarding the Contract Container will be available by clicking on the Summary tab. Summary information (or contract attributes) includes the contract title or name, description, owner, contract type, primary document name (if any), folder, created on date and time, and updated date and time. Most of this information can be modified by clicking on the field label and saving or discarding changes as necessary (provided they have access to do so by rights defined in the user’s security settings). 24 (1) Workflow Template Selector Icon The Workflow Template Selector icon resides in every section of the Contract ribbon and appears with red and blue arrows when a workflow has been assigned, otherwise it is seen as gray. By hovering over the icon, a popup box appears with the name of the defined Workflow Template. In order to reassign a workflow, an Administrator must be contacted. (2) Assignees Indicator Clicking on this icon will bring up the Assignees notification listing for the chosen Workflow Template. (3) Current Stage/Change Stage In the upper right-hand corner of the contract Summary tab page is a drop-down box containing stages that can be assigned to a contract. Within a Workflow Template, the stages can only be advanced forward one step, but backward as many as necessary. If a selected stage requires the completion of specific activities in order to be assigned, then a selected message will notify the user of this requirement and will not change the contract stage. (4) Days in Current Stage Indicator The number of days a stage has been assigned is displayed beneath the Workflow Stage drop- down and is a reportable field as it shows up in the criteria listing. 25 Contract Container: Summary Tab 1. Contract Container Name/ID 2. Workflow Template Selector icon 3. Assignees icon 4. Workflow Stage indicator 5. Days in Current Stage 6. Contract tabs 7. Show/Hide Contract Attributes 8. Expand All Custom Fields 9. Move to Next Contract in Previous Listing 10. Expand/Collapse all Custom Fields 11. Add Custom Field/Field Group 12. Help icon 13. Contract Attributes Section 14. Contract Name 15. Contract Origin (how it was loaded) 16. Contract ID 17. Related Contract 18. Contract Description 19. Contract Owner 20. Notify On Stage Update checkbox 21. Contract Review Status (5) Days in Current Stage The number of days a stage has been assigned (6) Contract tabs The tabs on the Contract ribbon 26 22. 23. 24. 25. 26. 27. 28. 29. 30. 31. Contract Type selector Primary Document link Folder Name indicator Contract Creation Date/Time Contract Updated Date/Time Field/Field Group ribbon Field Type indicator Edit Field icon Delete Field icon Expand/Collapse Field icon (7) Show/Hide Contract Attributes Shows/hides the top section of the Summary page that includes basic contract information. Checking this on or off is a global setting for all contracts and is available for each user individually. (8) Expand All Custom Fields Opens all of the custom field ribbons to display the current data associated with the contract enabling the user to view, modify, or delete any field by clicking on the associated icons. The user can also see all history associated with any non-grouped field by clicking on its History tab. (9) Contract Navigation This set of arrows allows you to navigate through the contracts listed in the previous grid of contracts from the Enterprise ribbon, as opposed to going back to the listing and choosing the next contract from the list. (10) Expand/Collapse All Custom Fields Closes all custom field ribbons to hide or compress the data in the field. (11) Add Fields Opens a drop-down box (shown below) displaying all possible fields that can be added to the current contract. Note that only fields for which the user has permissions for a specific contract will be available for selection by that user. 27 In addition to the fields described on the previous pages, specific information related to the contract (Fields) will be listed underneath the summary information and can be viewed in either collapsed (1) or expanded (2) form. The specific fields can be modified or deleted directly on the contract Summary page and new fields can be easily added. Fields can be added singularly, or as Field Groups. The illustration here shows one of each, the single field is in collapsed form, and the field group is in expanded form. To edit a field on the Summary page, click on the Edit icon ( ), change or add the necessary information, and click Save. 28 Contract Container: Attachments If you have any attachments to your contract, you will now see the Primary Document listed prominently (provided you have defined a Primary Document) with all of its pertinent data and a grid containing all of the attachments grouped by version as the default. You will have the ability to display your attachments grouped by any of the criteria most notably, but not limited to, Attachment Category, Version Number, Attachment State, and when items were added or updated. 1. 2. 3. 4. 5. Attachment(s) Views tab Document(s) Views View All Documents link Add New View link Add Document button 6. 7. 8. 9. Primary Document information Document grid Document Field grid Attachment Group heading Any number of attachments including Word documents, Excel spreadsheets, PDFs and others can be linked to a specific contract and are accessible through the Contract Attachment tab. Any of these attachments may be designated as the Primary Document while all others including drafts, exhibits, referenced documents and other working documents can be stored as Supporting Documents. To Add a New Attachment 1. Click on the Add Document button 2. The Upload Attachment window appears 3. Enter the title of the attachment to be added in the Title field 4. Select the category for the document from the Category drop down list 5. Select the state of the document from the State drop down list 6. Attach any file for the above attachment from File field 7. Enter more information about this attachment in the Description field 8. If the attachment is the primary document check the Make this the Primary Document box in order to make the attached file a primary document 9. Click the Save button, a confirmation appears that the attachment was successfully created 29 Editing an Attachment’s Information You can change an attachment’s title, category, version, state or description or make a supporting document a primary document. To edit an attachment’s information, click on the Edit icon ( ). Arranging the Attachments Grid As with every grid in iContracts, you have the ability to choose which columns to display, but differently than the Enterprise grids, the listing of options appears in a fly-out menu that you can click in a checkbox to choose its visibility. 30 You can group any column by selecting Group By This Field from its drop-down menu. (Resulting Example) 31 In order to show an uncategorized listing of all documents, uncheck the Show in Groups box from the dropdown menu. (Resulting Example) 32 Version Control Any document can be a version of another. The system will ask if a newly added document is a version of another and the user will be able to select from a list of existing attachments. On the following screen, the system will suggest a version number, which can be overridden. 33 Users can edit existing attachments so that they are a version of another document and can specify the version number, if desired. If the system recognizes the same file name as another already loaded, it will automatically select that document and then suggest a version number. 34 Attachment Views Like all the other areas in iContracts, the ability to create a view exists within the attachments area for each Contract Container. This makes it easy to display only the items for which you are searching. Because the grid will extend to show all of your attachments on one screen, which could possibly get quite lengthy, the total number of attachments will be shown in parenthesis underneath the View All Attachments link inside the Attachment Views area. When you create or modify an Attachment view, the criteria by which you can search is listed here. All the other options are identical to all other views in iContracts. 35 Contract Container: Activities The contract Activities tab provides users with a view of past, present or future activities associated with the Contract Container. As with the Contract tab, you can add or modify an unlimited number of saved searches (Activities Views) that contain criteria such as alterable sorting, page layouts, and the ability to filter on any combination of activity data. In addition to the ability to create complex searches, with one click users may select all activities, all assigned activities, or all activities created by you. Any filtered view of contract activities may also be exported by simply clicking on the Report button. New activities may also be added directly from this page. Adding an Activity You can add an activity for yourself or another team member. You can either add an activity from the Activities window or from a contract Activities window. If you add an activity from the Enterprise Ribbon Activities window, it is not associated with an agreement; however you can associate from the drop down list provided. When assigning an activity, it is recommended to add from the Contract Container, choosing the selected contract, and then from the Activities tab. To view the activities related to a particular agreement click the Activities tab. Activities are listed under the agreement activities area near the bottom of the window. 36 The activity as it appears when it is assigned to you and as assigned to another user. Note that if it is NOT assigned to you, you cannot mark it as completed. To Add an Activity from the Contract Activities Window 1. Click the Activities tab near the top of the page 2. Click the Add Activities button on the right side of the page 3. Define the new activity To Define the New Activity Whether you’ve created a new activity from the Activities window or from an Agreement Activities window, the New Activities window appears. 4. Enter the activity to be performed in the Activities Name field 5. Enter a completion date for this activity in the Due Date field 6. Select the person to whom this activity should be assigned from the Assigned To field. If you assign this activity to another person, they will receive an e-mail notification about the activity from iContracts 7. Select the other person to whom this activity should be assigned from the Assigned Other field. If you assign this activity to another person, they will receive an e-mail notification about the activity from iContracts 8. Enter more information about this activity in the Description field 9. Click the save button. A confirmation appears that the activity was successfully created. The activity created in the agreement summary will include a link to the agreement in the Related To field To Complete an Activity Task 1. Click Activities in the menu bar 2. Click the Completed check box for each activity you want to mark as completed in the Activities table 3. If the activity is assigned to another user, the Mark as Completed option will not appear and you will not be able to complete it. Only the person to whom an activity is assigned can complete it Once you complete an activity, the activity appears with its row crossed out in the grid. 37 To Reactivate an Activity 1. If you have marked an activity as completed, and then decide that it is not complete, you can reactivate the activity in iContracts 2. Click Activities in the menu bar 3. Click the activity you want to reactivate in the Activities table 4. Click the Reactivate Activity button at the top right. The activity now appears in the Activities list as an active task To Delete an Activity 1. Click Activities in the menu bar 2. Click the activity you want to delete in the Activities table 3. Click the Delete link at the top of the Activities detail window 4. A confirmation dialog appears; click Yes to delete the activity To Edit an Activity You can change an activity’s subject, due date, or description; or you can assign an activity to a different person. If you want to complete an activity, see Completing Tasks. 1. Click Activities in the menu bar 2. Click the activity you want to edit in the Activities table 3. Click the Edit icon ( ) at the top of the Activities detail window; the Edit Activity window appears 4. You can change the subject, assignment, due date or description for the activity; then click the Save button To Export the List of Activities You can export your list of activities from iContracts. Activity information is exported in a comma-delimited (.csv) format file. 1. Click Activities in the menu bar 2. Click the export button 3. In the dialog box that appears, decide whether or not to open or save the .csv spreadsheet file To View the Activities in the Activities Window You can view tasks that you created, or that were assigned to you, from the Activities window. The Activities window shows all activities that you have created or are assigned to you. 1. 2. 3. Click Activities in the menu bar The Activities window appears You can see the activities assigned to the logged in user and have a check box (to mark complete) in the left most column Any activity that the user created has a dot in that column. Only the user to whom the activity is assigned can mark it completed. To view the activities related to a particular Contract Container, simply click the Activities tab in the Contract ribbon. Activities are listed under the Agreement Activities area near the bottom of the window. 38 Contract Container: Milestones The Milestones tab provides users with a view of past, present, and future milestones associated with all contracts housed in the system. As with the Contract tab, you can add or modify an unlimited number of saved searches (Milestone Views) that contain criteria such as alterable sorting, page layouts, and the ability to filter on any combination of activities data. Any filtered view of contract milestones may also be exported by simply clicking on the Report button. New milestones may be added directly from this page by clicking on Add Milestone. When assigning a milestone, it is recommended to add from the Contract Container, choosing the selected contract, and then from its Milestone tab. The milestones associated with a Contract Container are notifications associated with a particular contract based on a date and can be set to notify multiple users on a specified number of days before an event, such as a contract’s expiration. Milestones can be created from a few different places within the Contract Container from the Milestones tab itself or a date field located in the Summary tab. 39 Creating a Milestone from the Milestones Tab in a Contract You can add a milestone for yourself, or another team member, using iContracts. You can either add a milestone from the Enterprise Ribbon Milestone window or from an Agreement Milestone window. It is recommended to add from the Contract Container, choosing the selected contract, and then from its Milestone tab. 1. 2. 3. Click the Milestone tab near the top of the page Click the Add Milestone button on the right side of the page Define the new milestone To Define the New Milestone 1. Enter a title and description for the milestone in the Milestone Name and Description fields 2. Enter completion date in the Completion Date field 3. Select the contract from Contract drop down list 4. Select the responsible person from Responsible Person drop down list 5. Enter the notify days in the Notify Before fields 6. Check the notification method you want to notify with 7. Select the other notify person from Also Notify drop down list 8. Enter the notify days in the Notify Before fields 9. Check the notification method you want to notify with 10. Completed check box is to be checked when the milestone has been achieved 11. Click the Save button Note: Checking the Repeat Email Notification box will send a daily reminder to the responsible person. To View Milestone Details 1. Click Milestones tab in the menu bar 2. Milestones are listed in the table 3. Click the milestone you want to view in the Milestone table 4. Milestone detail window will open To Edit a Milestone You can edit a milestone to change its name, completion date, description, responsible person, notification days, etc. 1. Click Milestones tab in the menu bar 2. Milestones are listed in the table 3. Click the milestone you want to edit in the Milestone table 4. Milestone detail window will open 5. Click the Edit button at the top of the milestone detail window; the Edit milestone window appears 6. You can change name, completion date, description, responsible person, notification days, notification method etc.; then click the Update button 40 To Delete a User Created Milestone You may delete any user created milestone that has been defined for an agreement. 1. Click Milestones tab in the menu bar 2. Milestones are listed in the table 3. Click the milestone you want to delete in the Milestones table 4. Milestones detail window will open 5. Click the red Delete icon at the top right of the Milestone detail window 6. A confirmation dialogue appears; click Yes to delete the milestone Creating a Milestone from a Singular Date Field Milestones can also be created from the Summary tab from a date field not appearing in a Field Group. A popup dialog box will appear to fill out directly from that screen without having to first go to the Milestones tab. The milestone will then appear in the list with all the other milestones from this Contract Container, as well as in the Milestones tab located on the Enterprise ribbon. 41 Contract Container: Notes The Notes tab within the Contract Container includes all notes associated with only that contract. Examples of views in the Notes section are “Notes to Me” or “Notes from Me”. You can add a note for yourself or another team member. To create a note, click on the Add Note button, fill out the form and attach a document, if necessary. If a document is attached to a note, it will then also appear within the Attachments tab with a description. This is a great area to keep track of collaboration about the contract in an organized and chronological manner. 42 To Add a Note from the Notes Tab You can add a note for yourself, or another team member, using iContracts. You can either add a note from the Note window or from an agreement note window. If you add a note from the Note window, it is not associated with an agreement; however you can associate from the drop down list provided. 1. 2. Click the Notes tab on the Contract ribbon Click the Add Note link 3. 4. 5. Fill out the information fields - required fields are marked with an asterisk Attach any file in support of the above note from Attachment field Click the Save button and a confirmation appears that the note was successfully created.; the note will include a link to the contract of which it relates when saved 43 To Delete a Note 1. Click the Notes tab on the Contract Ribbon 2. Click the note title you want to delete in the Note table 3. Click the Delete icon ( ) at the top of the Note detail window 4. A confirmation dialogue appears. Click Yes to delete the note To Edit a Note You can change a note’s title, content, or you can associate a note to a different contract. 1. 2. 3. Click the Notes tab on the Contract ribbon Click the note title you want to edit in the note table You can change the title, content or you can associate a note to a different contract; then click the Save button 44 Contract Container: History The contract History tab provides users with a filtered view of changes associated with a Contract Container from the time the contract enters the system. Users can configure which columns will display, in what order they will display (from left-to-right) as well as which column the display is sorted on. History serves as an audit trail so that a user with access can see when contract fields and attachments were added, edited, and/or deleted by them. The history of a Contract Container cannot be modified . . . even by a UNF iContracts System Administrator. 45 Contract Container: Emails The contract Emails tab allows users to easily send emails and attached documents associated with a contract to anyone directly from iContracts. Email supports To:, Cc:, Bcc:, and a Subject line and also allows the user to format a message to the recipients. All, none, or select attachment documents can be sent along with the email message. All outgoing email messages are logged against the History tab. 46 Contract Container: Related Contracts A user can also look at what is pointing to a particular contract in the system. While viewing a Contract Container, the user can go to the Related Contracts tab to view a list of all of the contracts which are pointing to the currently displayed contract. In the example below, we can see both are pointing to it as their Related Contract. There is no limit to how many contracts can point to another contract. If we were to click on the contract listed below, we would see (on its Summary tab) any and all contracts listed as its Related Contract. When looking at a contract’s Summary tab, users can specify a contract that the current contract is related to (Related Contract, circled, below). Each contract in the system can specify another contract that it is related to. 47 Appendix A: List of Standard Default Contract Fields The list of fields shown on the right is the system provided contract attributes. These are available for query purposes and always appear at the top of the list of available fields for reporting. Archive Indicates if a contract is hidden from the default view, but not deleted from the system Contract ID The unique number assigned by iContracts that is associated with a Contract Container; this unique number is listed in parenthesis next to the Contract Name when inside the Contract Container, as well as in the contract attributes on the Summary tab ContractName The name given for a Contract Container ContractOrigin How the contract was entered into the system; the choices are Bulk Loader, User and Template ContractTypeName The type of contract as provided by the user CreatedOn The date the contract was entered into the system DaysInCurrStage The number of days since the contract entered its current Workflow Stage; this number is displayed inside the Contract Container under the current Workflow Stage in the Workflow Stage indicator drop-down Description Additional information detailing the nature of a Contract Container in the system EXTContractRefID A reference to a record located in another external system used for linking the two systems together (this functionality is not standard) FolderName The name of the folder in which the contract resides for security and permissions NotifyOnReviewCompletion The user specified for notification when a review has been completed by all users specified for the review 48 NotifyOnReviewStatusChange The user specified for notification after all the reviews have been completed for a contract Owner The user responsible for the contract in the system PrimaryDocument The attachment designated to be the main document, or perhaps the latest version of a document RelatedToContract Lists the contract specified that the current contract relates to RelatedToContractID Lists the contract ID specified that the current contract relates to Reviewers Lists the users specified in the Review module to review a contract ReviewsSet Denotes if a contract has been assigned for a review StageName Lists the name of the current Workflow Stage for the contract StageNotify Denotes if a user has been specified to receive notifications for a change in the workflow status of a contract StageNotifyNames The users specified to be notified when the workflow status of a contract has changed UpdatedOn The time and date stamp for a change in the contract data Workflow The name of the assigned workflow template for a contract 49 Appendix B: UNF Naming Convention Division Prefixes AA AF ATH DAA GC HR PR PRES SA Academic Affairs Administration and Finance Athletics Development and Alumni Affairs General Counsel Human Resources Public Relations President's Office Student Affairs Contract Name (Division) - (Document Title) - (Vendor Name) - (Document Category)* Example: AF - Systems Maintenance Services - SMS Inc. - Primary Document Examples of Document Category: Primary Document Change Order Amendment *Document Category not required as part of contract name Milestones (Milestone Name) - (Contract Name) Example: Contract Expiration - AF Systems Maintenance Services - SMS Inc. - Primary Document Examples of Milestone Name: Certificate of Insurance Contract Expiration Contract Renewal Activities (Activity Name) – (Contract Name) - (Vendor Name) Example: ITS Review - AF Systems Maintenance Services - SMS Inc. Workflow Stage Names Owner - Dean, Director, Department Head UNF Signature - Signature of UNF delegated authority Execution - Vendor/Independent Contractor Signature Archived - Contract is no longer in effect Workflow Standards: Divisional VP review required after Owner review The Reviewers or Activities function to be used for anyone other than approvers in the workflow 50